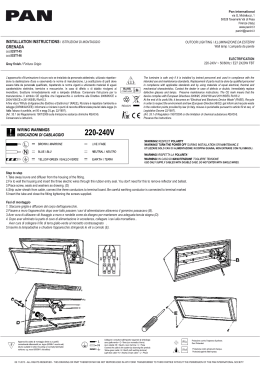
Collegare sempre l’apparecchio ad un impianto elettrico
costruito nel rispetto della vigente normativa nazionale.
Verificare che la presa di corrente sia dotata di messa a
terra e adeguata alla tensione e potenza nominale
dell’apparecchio (Vedi dati di targa).
Disconnettere
sempre
l’apparecchio
dall’impianto
elettrico prima di qualunque operazione di manutenzione
o pulizia. Attendere sempre il completo raffreddamento.
Non usare detergenti di qualsiasi tipo per la pulizia
dell’apparecchio.
Accertarsi che l’apparecchio sia completamente asciutto
prima di ricollegarlo alla presa di corrente. Mantenere
pulite e prive di ogni tipo di corpi estranei le prese d’aria
degli elementi riscaldanti. Non coprire con salviette o
asciugamani. É fatto divieto usare l’apparecchio per scopi
diversi da quello per cui è stato progettato
In caso di guasti o malfunzionamento rivolgersi sempre a
personale esperto e qualificato
programmi
start/stop
selettore
programmi
selettore tempo
selettore temperatura
selettore gruppi resistenze:
consente di parzializzare le aree di
intervento, anteriore o posteriore,
utile per trattamenti locali come
meches, schiariture o quant’altro
interessi una sola zona della testa
da trattare
Collegare l’apparecchio alla presa di corrente (vedi avvertenze).
Azionare l’interruttore principale posto nella parte inferiore della tastiera. Tutti i led si accenderanno
brevemente, l’apparecchio emetterá un breve “beep” quindi il display visualizzerá un punto luminoso acceso.
E’ possibile a questo punto scegliere il tipo di lavoro da eseguire.
PEARL ha in memoria 6 programmi automatici con parametri pre-impostati che possono essere selezionati
in modo sequenziale semplicemente premendo il tasto P.
I parametri di tempo e temperatura associati ad ogni programma saranno visualizzati dai rispettivi led e il
tempo pre-impostato sará visualizzato sul display e confermato vocalmente. Una volta scelto il programma
desiderato sará sufficiente avviare l’apparecchio premendo il tasto start/stop.
Durante il funzionamento è possibile, se necessario, modificare in qualunque momento i parametri tempo e
temperatura associati al programma scelto, in questo caso il led corrispondente al programma si spegnerá
ad indicare la modifica apportata.
Se invece si desidera impostare manualmente l’apparecchio è sufficiente scegliere attraverso i tasti +/- sia il
tempo di esecuzione che la temperatura desiderata.
La pressione del tasto start/stop avvierá l’apparecchio.
Il punto sul display lampeggerá ad indicare che l’apparecchio è in funzione.
Alla fine di ogni ciclo di lavoro le ventole rimarranno in funzione per alcuni secondi in modo da raffreddare le
resistenze.
Dopo pochi minuti di non utilizzo PEARL entrerá in posizione di stand-by, indicato da una luce lampeggiante
sul display.
Per accenderlo nuovamente premere un qualunque tasto
Togliere la vite “A” e ruotare
il cilindro di plastica nera “B”.
Quindi estrarre la lunetta
metallica “C”
Inserire
lo
spinotto
dell’apparecchio
“D”,
nel
corrispondente spinotto del
braccio “B”. Quindi riposizionare la lunetta metallica
nell’apposita
fessura.
“C”
Rimettere la vite di sicurezza
“A”, nella parte alta del
cilindro di plastica.
L’apparecchio (Pearl) è ora
fissato sul braccio a muro
Con la mano, spingere
leggermente verso la
parte del braccio a cui è
fissato l’apparecchio e
contemporaneamente
estrarre verso l’alto lo
spinotto di sicurezza “E”
permettendo
cosí
il
movimento del braccio.
Tensione di alimentazione
Frequenza
Potenza massima assorbita
Classe di isolamento
230 V
50 Hz
1450 W
1
di David Poggianti
Via Toscana 36/38 – z.i. Gello – 56025 Pontedera (PI)
tel. +39 0587 290506 – fax +39 0587 291097
[email protected]
www.sathair.com
Always connect the appliance to an electrical installation
which complies with current national legislation. Check
that the electric socket is earthed and suitable for the
voltage and power of the appliance (see data plate).
Always disconnect the appliance from the electric socket
before cleaning. Always wait for it to be completely cold.
Do not use strong detergents or any solvents to clean the
appliance. Ensure that the appliance is completely dry
before connecting it to the electric socket. Keep it clean
and remove any foreing bodies from the air inlet
Do not use the appliance near washing areas or
wherever there is water.
The applicance packaging must not be designed or
decorated in such a way as to be mistaken by a child for
a toy.
In the event of damage or malfunction, always consult a
qualified expert technician
programs
program
selector
start/stop
timer
Heat level
heater selector
In addition to the pre-set programs the location of the heat
settings can be set manually. The six heating elements of
the Pearl are positioned three of the end of each arm and
three more closer to inner part of the arms.
These six elements can be set independently (3+3)
depending on the hair style and function to be processed.
Connect the appliance to the electrical supply (see warnings).
Press the main switch under the keypad. All the leds will light up briefly. The remote control will beep and the
display will show a light.
At this point, you can choose the type of work to be carried out.
The control has a memory storing 6 automatic programmes which can be selected in turn by simply pressing
the button “P”. The times and temperatures of each programme can be seen on the respective led and the
pre-set time can be seen on the display. Once the programme has been chosen, the processor can be
started by pressing the start/stop button.
The time and temperature of the chosen programme can be changed at any time, if required. In this case the
led corresponding to the chosen programme will flash to indicate the change, if instead you wish to set up
the hair drier manually, you can choose both the time and temperature by using the +/- buttons. Press the
start/stop button to start the process. In both cases, a green led indicates that the drier is working.
Pearl processor can be stopped at anytime, even during processes, simply pressing the start/stop button. In
this case both the fans and heating will also stop. After use it, is quite normal for the fans to continue running
for a few seconds, this helps to cool the heating elements.
Pearl will go to “stand-by”(power saving mode) after a few minutes without use.
Only one light flashes on the display to indicate “stand-by”. Press any button to restart.
The arm anchor rod must be
fixed to a solid wall. Do not
mount on plasterboard or
slim partition walls.
The bracket must be
positioned vertically and
cement-blocked in order that
the distance between the
lower bolt and the floor is
between 180 and 195 cm.
Remove the two nuts and
spacer “A" only after wall
mounting is completed.
Lower fixing hole
Lower fixing hole
Floor
Remove the screws “A” and
rotate the black plastic
cylinder “B”.
Then remove the metal fixing
block “C”.
Insert the appliance connecting rod “D”, into the
corresponding arm rod “B”.
Then position the metal fixing
block “C” into the special slot.
Replace the safety screws “A”
in the top section of the plastic
cylinder.
The appliance (Pearl) is now
fixed to the wall bracket.
By hand, lightly push
downwards
the
arm
section on which the
appliance is fitted and at
the same time pull the
safety blocking plate “E”
upwards in order to allow
arm movement.
Supply voltage
Frequency
Max absorbed current
Insulation category
230 V
50 Hz
1450 W
1
di David Poggianti
Via Toscana 36/38 – z.i. Gello – 56025 Pontedera (PI) - ITALY
tel. +39 0587 290506 – fax +39 0587 291097
[email protected]
www.sathair.com
Scaricare