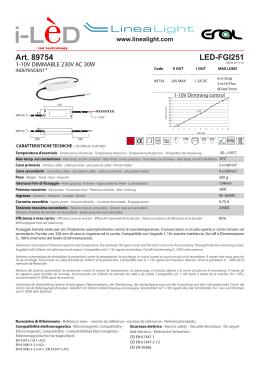
CASTORE
tavolo / terra
Apparecchio in CL II IP20
Design: Michele De Lucchi / Huub Ubbens
Avvertenze:
Prima di ogni operazione sull’apparecchio disinserire la tensione di
rete.
Usare esclusivamente le lampadine
del tipo e potenza indicate nei dati di
targa.
ARTEMIDE s.p.a. non si assume
alcuna responsabilità per prodotti
modificati senza preventiva autorizzazione.
Avis:
Note:
Vorsicht:
Advertencia:
ARTEMIDE spa décline toute
responsabilité pour les produits
modifiés sans autorisation préalable.
ARTEMIDE spa not shoulder any
responsibilities should products be
modified without prior authorisation.
ARTEMIDE s.p.a. nimmt keine
Verantwortung für ohne Vorgenehmigung geänderte Produkte an.
ARTEMIDE spa no se asume ninguna responsabilidad ante productos modificados sin autorización.
Déconnecter la tension de réseau
avant toute opération sur l’appareil.
Employer exlusivement les ampoules du type et de la puissance indiquée sur la plaque de l’appareil.
fig. 1
Prior to any work on the fixture
always switch off the mains.
Only use bulbs of the type and wattage indicated on the rating plate.
Vor jedem Eingriff an dem Gerät
die Netzspannung unterbrechen.
Ausschließlich Lampen verwenden, die dem auf dem Geräteschild
angegebenen Typ und Wert
entsprechen.
Desconectar la tensión de red
antes de cualquier operación
sobre el aparado.
Utilizar exclusivamente las bombillas del tipo y potencia indicada en
la placa del aparado.
INSTALLAZIONE
"
Ruotare il cono A nel senso indicato dalla freccia in fig. 1 fino al suo arresto. Il disco
B si troverà sollevato dal cono A come indicato. Avvitare la lampadina. Inclinare il diffusore in
vetro D ed inserire il disco B nel foro in modo tale che lo spigolo C risulti all’interno al diffusore
stesso (fig. 2). Ruotare il diffusore D con movimento a spirale verso il BASSO , fino a quando il
disco B non si trova completamente all’INTERNO del diffusore, come indicato in fig. 3.
INSTALLATION
"
Tourner le cône A dans le sens indiqué par la flèche in fig. 1 jusqu’à sa butée. Le disque B est soulevé par rapport au cône A (voir la figure). Serrer l’ampoule. Incliner le diffuseur en
verre D et insérer le disque B dans le trou de façon à ce que l’arête C se trouve à l’intérieur du
diffuseur (voir la fig. 2). Tourner le diffuseur D par un mouvement en spirale vers le BAS jusqu’à
ce que le disque B se trouve complètement à l’INTERIEUR du diffuseur (voir la fig. 3).
B
INSTALLATION
"
Turn the cone A as indicated by the arrow shown in fig. 1 till it stops. The disk B is
raised from the cone A, as shown. Tighten the bulb. Tilt the glass diffuser D, insert the disk B
so that the corner C is inside the diffuser (fig. 2) Turn the diffuser D DOWNWARDS until the disk
B is fully INSIDE the diffuser, as shown in fig. 3.
A
Installation
"
Drehen Sie den Kegel A in die durch den Pfeil
in Abb. 1 angezeigte Richtung bis zum Anschlag. Die
Scheibe B wird vom Kegel A abgelöst, wie angezeigt.
Schrauben Sie die Glühbirne ein. Neigen Sie den Glasschirm D und führen Sie die Scheibe B so in die Öffnung ein,
dass die Kante C sich in den Schirm einpasst (Abb. 2).
Schrauben Sie den Schirm D nach unten, bis die Scheibe
B sich ganz im Innern des Schirms befindet, wie in Abb. 3.
fig. 2
D
fig. 3
B
C
INSTALACIÓN
"
Girar el cono A en el sentido indicado por la flecha de la fig. 1 hasta que se detenga. El disco B se separará
del cono A como se ilustra. Enroscar la bombilla. Inclinar
la pantalla de cristal D e introducir el disco B en el orificio
de manera el canto C quede dentro de la pantalla (fig. 2).
Girar la pantalla D con un movimiento espiral hacia ABAJO,
hasta que el disco B entre completamente en la pantalla,
como muestra la fig. 3.
"
Verificare che il diffusore in vetro D sia ben centrato sul disco B , quindi ruotare il cono A nel senso indicato dalla freccia in figura 4 fino al suo arresto. Il diffusore D ed il cono A devono presentarsi come indicato in figura
5, altrimenti allentare il cono A, procedere al centraggio e serrare nuovamente il cono A.
"
Vérifier que le diffuseur en verre D est parfaitement centré sur le disque B. Ensuite, tourner le cône A
dans le sens indiqué par la flèche (voir la figure 4) jusqu’à sa butée. Le diffuseur D et le cône A doivent se présenter
comme le montre la figure 5. Dans le cas contraire, desserrer le cône A, procéder de nouveau à son centrage et
serrer de nouveau le cône A.
"
Make sure that the glass diffuser D is centred on the disk B, turn the cone A as indicated by the arrow
shown in fig. 4 till it stops. The diffuser D and the cone A must be as shown in figure 5, otherwise loosen the cone
A, centre it again and re- -tighten the cone A.
fig. 4
"
Vergewissern Sie sich, dass der Glasschirm D gut auf der Scheibe B zentriert ist, drehen Sie dann den Kegel A in die durch den Pfeil in Abb. 4 angezeigte Richtung bis zum Anschlag.
Der Schirm D und der Kegel A müssen so aussehen wie in Abb. 5 - - wenn nicht, lockern Sie den
Kegel A, zentrieren Sie ihn erneut und schrauben Sie ihn anschließend wieder fest.
fig. 5
D
"
Verificar que la pantalla de cristal D esté bien centrada en el disco B, después girar
el cono A en el sentido indicado por la flecha de la figura 4 hasta que se detenga. La pantalla
D y el cono A deben aparecer como indica la figura 5; si no, aflojar el cono A, centrarlo de nuevo
y apretarlo.
A
fig. 6
Rimozione diffusore / sostituzione lampadina.
"
Ruotare il cono A secondo la freccia indicata in figura 6 fino al suo arresto.
Enlèvement du diffuseur / remplacement de l’ampoule.
"
Tourner le cône A dans le sens indiqué par la flèche (voir la figure 6) jusqu’à sa butée.
Diffuser removal /bulb replacement
"
Turn the cone A as indicated by the arrow shown in fig. 6 till it stops.
Abnehmen des Schirms / Ersetzen der Glühbirne
"
Drehen Sie den Kegel A in die durch den Pfeil in Abb. 6 angezeigte Richtung bis zum Anschlag.
A
Retirar la pantalla / cambiar la bombilla.
"
Girar el cono A como indica la flecha de la figura 6 hasta que se detenga.
D
"
Disporsi di fronte al simbolo ”OPEN/CLOSE” , quindi spostare il diffusore
verso destra (fig. 7X), inclinarlo secondo la freccia indicata in figura 7Y in modo che
lo spigolo E risulti esterno al diffusore stesso (fig. 7Z). Ruotare il diffusore D con movimento a spirale verso L’ALTO, fino a quando il disco B non si trova completamente
all’ESTERNO del diffusore, fig. 8.
D
B
"
Se mettre face au symbole ”OPEN/CLOSE” et déplacer le diffuseur à
droite (voir fig. 7X). Incliner le diffuseur dans le sens indiqué par la flèche (voir la figure
7Y) de façon à ce que l’arête E sort du diffuseur (voir fig. 7Z). Tourner le diffuseur D
par un mouvement en spirale vers le HAUT jusqu’à ce que le disque B se trouve
complètement EN DEHORS du diffuseur (voir fig. 8).
"
Stand in front of the ”OPEN/CLOSE” symbol, move the diffuser to the
right- -hand side (Fig. 7X), tilt it as shown by the arrow in figure 7Y, so that the corner
E is out of the diffuser (fig. 7Z). Turn the diffuser D UPWARDS until the disk B is fully
OUT of the diffuser, as shown in fig. 8.
"
Stellen Sie sich vor das Symbol ”OPEN/CLOSE” und schieben Sie den
Schirm nach rechts (Abb. 7X). Neigen Sie ihn in die durch den Pfeil in Abb. 7Y angezeigte Richtung, so dass die Kante E sich außerhalb des Schirms befindet (Abb. 7Z).
Schrauben Sie den Schirm D nach oben, bis die Scheibe B sich ganz außerhalb des
Schirms befindet, wie in Abb. 8.
E
"
Colocarse frente al símbolo ”OPEN/CLOSE”, desplazar la pantalla hacia
la derecha (fig. 7X), inclinarla según la flecha de la figura 7Y para que el canto E
quede fuera de la pantalla (fig. 7Z). Girar la pantalla D con un movimiento espiral hacia ARRIBA, hasta que el disco B salga completamente de la pantalla, fig. 8
A
fig. 7
"
Procedere alla eventuale sostituzione della lampadina, quindi installare il diffusore come
descritto dalle fig. 1, 2, 3, 4, 5.
fig. 8
"
Procéder éventuellement au remplacement de l’ampoule. Installer, ensuite, le diffuseur
comme le montrent les figures 1, 2, 3, 4, 5.
"
Replace the bulb, if needed, and install the diffuser as shown in the figures 1, 2, 3, 4, 5.
"
Ersetzen Sie die Glühbirne und installieren Sie anschließend den Schirm, wie in den Abbildungen 1, 2, 3, 4 und 5 angezeigt.
"
Sustituir, si es necesario, la bombilla y montar la pantalla como se describe en las figuras
1, 2, 3, 4, 5.
CASTORE TERRA 35/42 TAVOLO 35/42
Utilizzo dell’apparecchio:
La regolazione dell’intensità luminosa avviene agendo sull’elemento sensibile Z.
Per il funzionamento del dimmer vedere foglio istruzioni allegato all’apparecchio.
Regolazione dimmerata della luce realizzata con
L.C. Relco S. p. A.
CASTORE TERRA 35/42 TAVOLO 35/42
Emploi de l’appareil:
L’intensité lumineuse est réglée en agissant sur l’élément Z.
Pour le fonctionnement du régulateur d’intensité voir la notice d’instructions livrée avec l’appareil.
Réglage de l’intensité lumineuse réalisé par
L.C. Relco S. p. A.
CASTORE TERRA 35/42 TAVOLO 35/42
Use instructions:
To adjust the light intensity, turn the element Z.
See the luminaire instruction sheet for further details on dimmer operation.
Dimmerable light adjustment by means of
L.C. Relco S. p. A. equipment
CASTORE TERRA 35/42 TAVOLO 35/42
Verwendung der Lampe:
Z
Die Lichtintensität kann über das Element Z eingestellt werden.
Zum Dimmer finden Sie weitere Informationen auf dem der Lampe beiliegenden Blatt.
Die Dimmerfunktion wurde entwickelt mit Hilfe von
L. C. Relco S. p. A.
CASTORE TERRA 35/42 TAVOLO 35/42
Empleo del aparato:
La intensidad luminosa se regula a través del elemento Z.
Consultar el funcionamiento del amortiguador de iluminación en la hoja de instrucciones
que se adjunta al aparato.
Regulación de la luz realizada con
L.C. Relco S. p. A.
Z
TAVOLO 25
Utilizzo dell’apparecchio
L’apparecchio è dotato di un dimmer con regolazione ” A GRADINI ” dell’intensità luminosa.
Sequenza luminosa: SPENTO, MASSIMO, MEDIO, MINIMO, LUCE NOTTURNA, SPENTO.
L’accensione avviene tramite un breve tocco dell’elemento Z. Per ottenere la regolazione dell’intensità luminosa agire ripetutamente sull’elemento Z sino a raggiungere
il livello desiderato. Per spegnere da qualsiasi livello mantenere il contatto con l’elemento Z per circa un secondo.
TAVOLO 25 Utilisation de l’appareil:
L’appareil est équipé d’un dispositif de réglage ”A ECHELONS” de l’intensité lumineuse.
Séquence lumineuse: ETEINT, MAXIMUM, MOYEN, MINIMUM, LUMIERE DE NUIT, ETEINT.
L’allumage se fait par une légère touche de la tige centrale Z. Pour régler l’intensité lumineuse agir plusieurs fois sur la tige Z jusqu’à obtenir le niveau souhaité. Pour
éteindre, quel que soit le niveau, maintenir le contact avec la tige Z pendant une seconde environ.
TAVOLO 25 Device usage:
The device is equipped with a ”GRADUAL” dimmer for the adjustment of the light intensity.
Light sequence: OFF, MAXIMUM, MEDIUM, MINIMUM, NIGHT LIGHT, OFF.
Lightly touch the element Z to turn the device on, until the requested intensity is achieved. To turn it off, touch the element Z for about one
second.
TAVOLO 25 Verwendung der Lampe:
Die Lampe ist mit einem Stufendimmer zur Regelung der Lichtintensität ausgestattet.
Abfolge der Stufen: ausgeschaltet, Maximum, Mittel, Minimum, Nachtlicht, ausgeschaltet.
Die Lampe kann durch ein Antippen der Berührungsfläche Z eingeschaltet werden. Zur Regulierung der Lichtintensität tippen Sie die
Berührungsfläche Z mehrmals an, bis die gewünschte Intensität erreicht ist. Zum Ausschalten lassen Sie den Finger etwa eine Sekunde lang
auf der Berührungsfläche.
Z
TAVOLO 25 Empleo del aparato:
El aparato cuenta con un amortiguador de iluminación que regula ”a grados” la intensidad luminosa.
Secuencia luminosa: APAGADO, MÁXIMO, MEDIO, MÍNIMO, ILUMINACIÓN NOCTURNA, APAGADO.
Para encender el aparato, tocar ligeramente la varilla central Z. Para regular la intensidad luminosa tocar repetidamente la varilla Z hasta
alcanzar el nivel deseado. Para apagar, desde cualquier nivel, tocar la varilla Z durante un segundo aproximadamente.
CASTORE TERRA 35/TAVOLO35 220/240V
max 150W IAG G95 E27
CASTORE TERRA 35/TAVOLO35 110V
max 150W T—10 E26
max 150W A21 E26
CASTORE TERRA 42/TAVOLO42 220/240V
max 200W IAA/F E27
max 250W HEG E27
CASTORE TERRA 42/TAVOLO42 110V
max 250W T—10 E26
max 200W A21 E26
CASTORE TAVOLO 25 220/240V
max 100W IAG G80 E27
max 100W IAA/W E27
CASTORE TAVOLO 25 110V
max 100W T—10 E26
max 100W A19 E26
F
Le symbole indique que les appareils sont indiqués pour être montés directement sur des surfaces
normalement inflammables. Les appareils ne portant pas ce symbole peuvent être montés exsclusivement sur des surfaces non combustibles.
The symbol indicates the suitabily of fixtures to be mounted directly on normaly inflammable surfaces. Fixtures without the above symbol are only suitable for installation on non- -inflammable surfaces.
Das Symbol zeigt an, ob die Geräte dazu geeignet sind, auf normal entflammbaren Oberflächen
angebracht zu werden. Geräte ohne dieses Symbol sind ausschließlich dazu geeignet, auf nicht
entflammbaren Oberflächen angebracht zu werden.
El símbolo indica que los aparatos son aptos para ser montados directamente sobre superficies normalmente inflamables. Los aparatos desprovistos de dicho símbolo pueden ser instalados exsclusivamente sobre superficies no combustibles.
Si fuera necesario sustituir el cable de alimentación, póngase en contacto con el centro de asistencia técnica
ARTEMIDE.
max 150W HEG E27
max 100W HEG E27
"
Tutti i prodotti ARTEMIDE che rientrano nell’ambito di applicazione della direttiva europea
compatibilitá elettromagnetica E.M.C. 89/336 e successive modifiche 92/31 e 93/68, e/o della direttiva europea
bassa tensione B.T. 73/23 e successiva modifica 93/68, soddisfano ai requisiti richiesti e recano la marcatura
”
”.
"
Tous les produits ARTEMIDE appartenants au champ d’application de la directive européenne
compatibilité électromagnétique E.M.C. 89/336 et modifications successives 92/31 et 93/68, et/ou de la directive européenne basse tension B.T. 73/23 et modification sucessive 93/68, remplissent les conditions prévues
et portent le marquage ”
”.
"
All ARTEMIDE products falling within the range of application of the European electromagnetic
compatibility E.M.C. directive 89/336 and subsequent amendment 92/31 and 93/68, and/or the European low
voltage directive B.T. 73/23 and subsequent amendment 93/68, meet the required specifications and bear
”
” labelling.
"
Alle Produkte von ARTEMIDE, die unter das Anwendungsgebiet der europäischen Richtlinien
der elektromagnetischen Kompatibilität E.M.C. 89/336 und nachfolgende Änderungen 92/31 und 93/68 und/
oder der europäischen Richtlinie der Niederspannung B.T. 73/23 und nachfolgende Änderung 93/68 fallen,
entsprechen den erforderlichen Eigenschaften und tragen das ”
”- -Kennzeichen.
"
Todos los productos ARTEMIDE que pertenencen al ámbito de aplicación de la directiva europea sobre compatibilidad electromagnética E.M.C. 89/336 y modificaciones sucesivas 92/31 y 93/68, y/o de
la directiva europea baja tensión B.T. 73/23 i modificación 93/68, cumplen los requisitos correspondientes y
llevan el marcado ”
”.
Il simbolo indica l’idoneitá degli apparecchi al montaggio diretto su superfici normalmente infiammabili. Gli apparecchi privi del suddetto simbolo sono idonei ad essere installati esclusivamente su
superfici non combustibili.
Nel caso si rendesse necessario la sostituzione del cavo di alimentazione contattare il centro assistenza
tecnica ARTEMIDE
Si le cordon d’alimentation doit être remplacé, contacter le service après vente ARTEMIDE.
For the replacement of the power supply cable, please contact ARTEMIDE service centre.
Falls es nötig sein sollte das Speisekabel auszuwechseln, das technische Assistenzzentrum ARTEMIDE
kontaktieren.
max100W IAA/W E27
Attenzione: La sicurezza elettrica di questo apparecchio è garantita con l’uso appropriato di queste istruzioni. Pertanto è
necessario conservarle.
Attention: La securitè de l’appareil n’est garantie que si les instructions sont convenablement suivies.Il est donc necessaire
de les conserver.
Attention: This equipment is guaranteed only when used as indicated in these instructions. Therefore they should be kept
for future reference.
Achtung: Die Sicherheit der Leuchte wird nur bei sachgerechtem Gebrauch gemäss Anweisungen gewährleistet. Bitte bewahren Sie diese sorgfältig auf.
Atencion: La seguridad del aparato está garantizada solo con el uso apropriado de las instrucciones. Por lo tanto es necesario conservarlas.
FOR U.S.A. AND CANADA ONLY
Cette lampe portative a une fiche polarisante ( une lampe est plug grande que l’autre ) comme characteristique pour reduire
This portable lamp has a polarized plug ( one blade is wider than the other ). As a safety feature, this plug will fit in
les risques de choc electrique. Cette fiche n’engage qu’une prise polarisante. Si la fiche n’engage pas completement la
a polarized outlet only one way. If the plug does not fit fully in the outlet, reverse the plug. If it still does not fit, contact
prise, alors renverserla; si elle n’engage toujours pas, mettrez vous en rapport avec un electricien qualifie. Il ne faut jamais
a qualified electrician. Never use with an extension cord unless plug can be fully inserted. Do not attempt to defeat
utiliser avec un prolongateur si la fiche n’engage pas completement. Ne changer pas la fiche.
this safety feature.
In caso di reclamo citare il numero
En cas de réclamation, veuillez citer le numéro
In case of complaint, please quote number
Bei jeder Reklamation geben Sie, bitte folgende Nummer an
En caso de reclamación indicar el número
mod. A
cod. Y503000853
via Bergamo, 18- -20010 Pregnana Milanese (Milano)- -ITALIA
tel:93.51.81- -(a ricerca automatica)
telefax 02/93.59.02.54- -93.59.04.96
sito internet http://www.ARTEMIDE.COM
codice fiscale e partita I.V.A. 00846890150
Scaricare