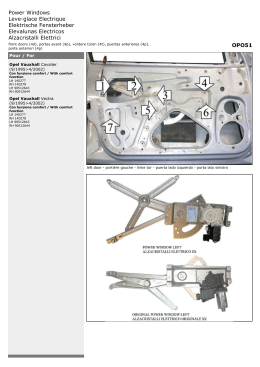
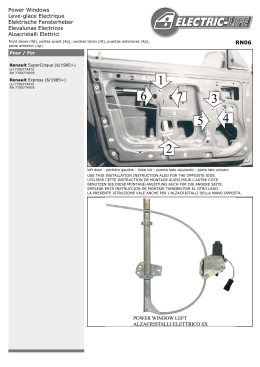
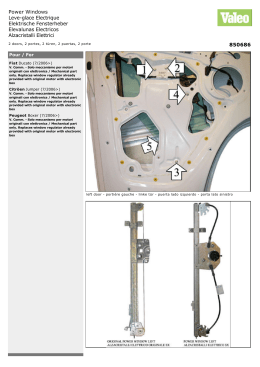
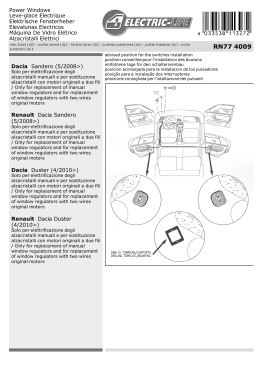
Power Windows
Leve-glace Electrique
Elektrische Fensterheber
Elevalunas Electricos
Alzacristalli Elettrici
front doors (4d), portes avant (4p), vordere türen (4t), puertas anteriores (4p),
porte anteriori (4p)
Pour / For
Opel Vauxhall
Opel Vauxhall Corsa (>2/1993)
LH 140 147
RH 140 148
Opel Vauxhall
Opel Vauxhall Nova (>2/1993)
LH 140 147
RH 140 148
left door - portière gauche - linke tür - puerta lado izquierdo - porta lato sinistro
OP23
OP23
17-11-2004
ENGLISH
ENGLISH
USE THIS INSTALLATION INSTRUCTION ALSO FOR THE OPPOSITE SIDE.
A) Remove door trim and window regulator. Bore out holes 1, 2, 3 and 4 (Ø 7 mm.).
B) Connect motor wiring. Insert the electric window regulator into the door and secure it
into holes at positions 1, 2, 3 and 4.
C) Secure the window at positions 5 and 6.
D) Wire as per wiring diagram.
E) Check correct window operation, adjust with the screws 5 and 6, if required, before
re-fitting door trim.
F) For the replacement of the spare-part, in case the motor connector is not compatible
with the original one, make the wiring connection with the cable supplied.
ENGLISH
FRANÇAIS
FRANÇAIS
UTILISER CETTE INSTRUCTION DE MONTAGE AUSSI POUR L'AUTRE COTE.
A) Demonter le leve-vitre. Elargir les trous 1, 2, 3 and 4 (Ø 7 mm.).
B) Connecter le cable du moteur. Inserer le leve-vitre electrique et le fixer sur les points
1, 2, 3 et 4.
C) Fixer la vitre sur les points 5 et 6.
D) Effectuer les liaisons electriques.
E) Verifier le bon fonctionnement de la vitre en utilisant les vis 5 et 6.
F) Pour le remplacement du piece detache, quand le connecteur du moteur n'est pas
compatible avec le connecteur d'origine, effectuer les liaisons electriques avec le cable
fourni.
FRANÇAIS
DEUTSCH
DEUTSCH
BENUTZEN SIE DIESE MONTAGE-ANLEITUNG AUCH FÜR DIE ANDERE SEITE.
A) Demontieren Sie die Türverkleidung und bauen Sie den Fensterhebermechanismus
aus. Erweitern Sie die Bohrungen 1, 2, 3 und 4 (Ø 7 mm.).
B) Verlegen Sie die Motor-Verkabelung. Bauen Sie den elektrischen Fensterheber ein und
befestigen Sie ihn an den Punkten 1, 2, 3 und 4.
C) Befestigen Sie das Fenster an den Punkten 5 und 6.
D) Verlegen Sie die elektrische Verkabelung.
E) Vor der endgültigen Fertigstellung überprüfen Sie die einwandfreie Funktion des
elektrischen Fensterhebers. Justieren Sie bei Bedarf den Fensterheber mit den Schrauben
5 und 6.
F) Um den Ersatzteil zu ersetzen, wenn der Motor-Verbinder nicht kompatibel mit den
Original-Verbinder ist, verlegen sie die elektrische Verkabelung mit dem beigefugten
Kabel.
DEUTSCH
ESPAÑOL
ESPAÑOL
EMPLEAR ESTA INSTRUCCION DE MONTAJE TAMBIEN POR EL OTRO LADO.
A) Desmontar el elevalunas. Ensachar los huecos 1, 2, 3 y 4 (Ø 7mm.).
B) Conectar el cable del motor. Introducir el elevalunas eléctrico y sujetarlo con los
tornillos 1, 2, 3 y 4.
C) Fijar el cristal en los puntos 5 y 6.
D) Efectuar las conexiones eléctricas.
E) Verificar y regular el funcionamiento del cristal mediante los tornillos 5 y 6 antes de
volver a montar el panel de la puerta.
F) Para la substitucion del repuesto, caso que el conectador del motor no es compatible
con el conectador original, hacer las conexiones electricas con el cable del kit.
ESPAÑOL
ITALIANO
ITALIANO
LA PRESENTE ISTRUZIONE VALE ANCHE PER L'ALZACRISTALLI DELLA MANO OPPOSTA.
A) Smontare l'alzacristalli. Allargare i fori n° 1, 2, 3 e 4 (Ø 7 mm.).
B) Collegare il cavo motore. Introdurre l'alzacristalli elettrico in portiera e fissarlo nei
punti n° 1, 2, 3 e 4.
C) Fissare il vetro nei punti n° 5 e 6.
D) Effettuare i collegamenti elettrici.
E) Controllare e regolare il funzionamento dei cristalli mediante le viti n° 5 e 6 prima di
rimontare il pannello portiera.
F) Per la sostituzione del ricambio, nel caso il connettore motore non fosse compatibile
con il connettore originale, effettuare il collegamento elettrico mediante il cavo in
dotazione.
Scaricare