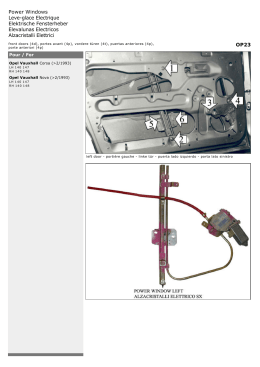
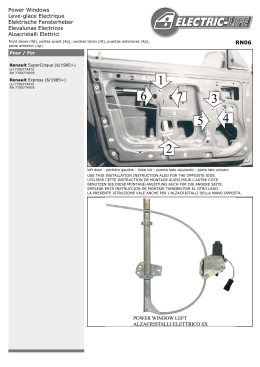
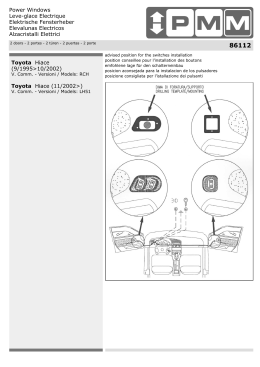
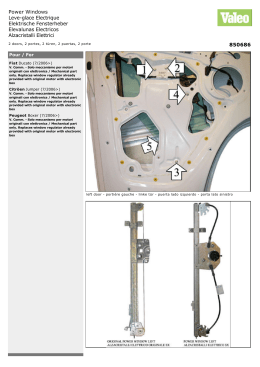
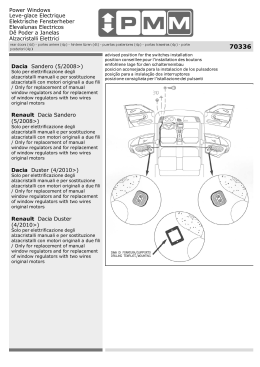
Power Windows
Leve-glace Electrique
Elektrische Fensterheber
Elevalunas Electricos
Dê Poder a Janelas
Alzacristalli Elettrici
front doors (4d), portes avant (4p), vordere türen (4t), puertas anteriores (4p), portas
dianteira (4p), porte anteriori (4p)
62164
Pour / For
Peugeot
Peugeot 207 (05/2005>)
Solo meccanismo / Mechanical part only Lato guida / Driver side - Left hand drive
/ Right hand drive] [Con funzione comfort
/ With comfort function
LH Guida sinistra / Driver side
RH Guida destra / Driver side
LH Left hand drive
RH Right hand drive
LH 9221X1
RH
LH Solo meccanismo / Mechanical part only
RH Solo meccanismo / Mechanical part only
left door - portière gauche - linke tür - puerta lado izquierdo - porta esquerda - porta lato sinistro
USE THIS INSTALLATION INSTRUCTION ALSO FOR THE OPPOSITE SIDE.
UTILISER CETTE INSTRUCTION DE MONTAGE AUSSI POUR L'AUTRE COTE.
BENUTZEN SIE DIESE MONTAGE-ANLEITUNG AUCH FÜR DIE ANDERE SEITE.
EMPLEAR ESTA INSTRUCCION DE MONTAJE TAMBIEN POR EL OTRO LADO.
LA PRESENTE ISTRUZIONE VALE ANCHE PER L'ALZACRISTALLI DELLA MANO OPPOSTA.
PG701
23-03-2010
ENGLISH
ENGLISH
USE THIS INSTALLATION INSTRUCTION ALSO FOR THE OPPOSITE SIDE.
A) Disassemble door panel. Drill out the fixing rivets and remove the regulator. Drill into
positions 1 and 2 (ø 6,5 mm.).
B) Remove the pvc gear clamp from the motor plate (photo A). Insert the motor into
positions 6, 7 and 8 and secure it with the three original screws.
C) Fix the power window rail onto the panel into the original positions 1 and 2 and the motor
plate into position 3 (position 3 using the original screw, previously removed from the
window regulator). Fix the window into positions 4 and 5.
D) Wire as per wiring diagram. Check correct window operation, adjust with the screws 4 and
5, if required, before re-fitting door trim.
E) PLEASE NOTE! To re-establish the auto function on the replacement regulator, turn the
ignition on and operate the window switch to close the window.
ENGLISH
FRANÇAIS
FRANÇAIS
UTILISER CETTE INSTRUCTION DE MONTAGE AUSSI POUR L'AUTRE COTE.
A) Demonter le panneau de la porte. Percer les rivets de fixage d'origine et demonter le levevitre. Percer les trous 1 et 2 (Ø 6,5 mm).
B) Demonter l'engranage en Pvc de la plaque du moteur (photo A). Inserer le moteur sur les
points 6, 7 et 8 et fixer avec les trois vis d’origine.
C) Fixer le guide du leve-vitre electrique sur le panneau aux points 1 et 2 et la plaque du
moteur au point 3 (point 3 en utilisant la vis d’origine precedemment demontee du levevitre). Fixer la vitre sur les points 4 et 5.
D) Effectuer les liaisons electriques. Verifier le bon fonctionnement de la vitre en utilisant les
vis 4 et 5 avant de remonter le panneau de la porte.
E) ATTENTION! Apres avoir pose la piece de rechange, la fermeture et l'ouverture
automatique ne fonctionnent pas. Pour retablir cette fonction veuillez suivre le manuel
d'usage de la voiture.
FRANÇAIS
DEUTSCH
DEUTSCH
BENUTZEN SIE DIESE MONTAGE-ANLEITUNG AUCH FÜR DIE ANDERE SEITE.
A) Demontieren Sie die Türverkleidung. Bohren Sie die Original-Befestigungs-Nieten aus.
Demontieren Sie den Fensterhebermechanismus. Erweitern Sie die Bohrungen 1 und 2 auf
6,5 mm. Ø.
B) Entfernen Sie die PVC Binder am Fensterhebergetriebe an der Motor-Platte (Abb. A).
Setzen Sie den Motor an den Punkten 6, 7 und 8 ein und befestigen Sie ihn mit den drei
Original_Schrauben.
C) Befestigen Sie die Führungsschiene an den Punkten 1 und 2 und die Motor-Platte am
Punkt 3 (Punkt 3 mit den aus dem Fensterheber ausgebauteten Original_Schrauben).
Befestigen Sie das Glas an den Punkten 4 und 5.
D) Verlegen Sie die elektrische Verkabelung. Vor der endgültigen Fertigstellung überprüfen
Sie die einwandfreie Funktion des elektrischen Fensterhebers. Justieren Sie bei Bedarf den
Fensterheber mit den Schrauben 4 und 5.
E) ACHTUNG! Sollte, nach dem Einbau des Fensterhebers, das automatische Öffnen und
Schliessen nicht funktionieren, folgen Sie das Verwendung-Handbuch des Fahrzeugs.
DEUTSCH
ESPAÑOL
ESPAÑOL
EMPLEAR ESTA INSTRUCCION DE MONTAJE TAMBIEN POR EL OTRO LADO.
A) Desmontar el panel de la puerta. Sacar el elevalunas trepanando los remaches originales
de sujeción. Agrandar los taladros 1 y 2 (ø 6,5 mm.).
B) Desmontar la banda de PVC de la placa del motor (foto A). Introducir el motor en los
puntos 6, 7 y 8 y fijarlo con los tres tornillos original.
C) Fijar la guia del elevalunas electrico en el panel en los puntos n° 1 y 2 y la placa del motor
en el punto 3 (punto n° 3 con el tornillo original antes desmontado del elevalunas). Fijar el
vidrio en los puntos 4 y 5.
D) Efectuar las conexiones eléctricas. Verificar y regular el funcionamiento del cristal
mediante los tornillos 4 y 5 antes de volver a montar el panel de la puerta.
E) ATENCION! Despues del montaje del elevalunas, las lunas habran perdido la funcion de
automatismo, “Comfort”. Para restablecer esta funcion, seguir el folleto de las instrucciones
del coche.
ESPAÑOL
ITALIANO
ITALIANO
ITALIANO
LA PRESENTE ISTRUZIONE VALE ANCHE PER L'ALZACRISTALLI DELLA MANO
OPPOSTA.
A) Smontare il pannello portiera. Togliere l'alzacristalli trapanando i rivetti originali di
fissaggio. Allargare i fori n° 1 e 2 (ø 6,5 mm.).
B) Togliere la fascetta di ritenuta rocchetto dalla piastra motore (foto A). Inserire il motore
nei punti n° 6, 7 e 8 fissandolo con le tre viti originali.
C) Fissare la guida dell’alzacristalli elettrico sul pannello, nei punti n° 1, 2 e la piastra motore
nel punto n° 3 (Punto n° 3 usando la vite originale precedentemente smontata
dall'alzacristalli). Fissare il vetro nei punti n° 4 e 5.
D) Eseguire i collegamenti elettrici. Controllare e regolare il funzionamento dei cristalli
mediante le viti n° 4 e 5 prima di rimontare il pannello portiera.
E) ATTENZIONE! Dopo che l'alzacristalli ricambio è stato installato, la chiusura ed apertura
automatica NON FUNZIONA. Per ripristinare tale funzione utilizzare le istruzioni del manuale
d’uso vettura.
Scaricare