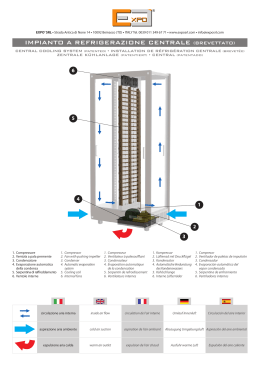
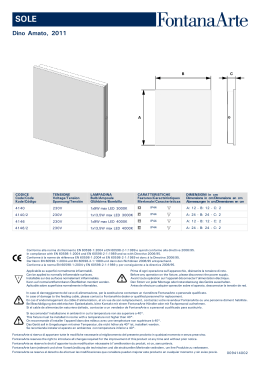
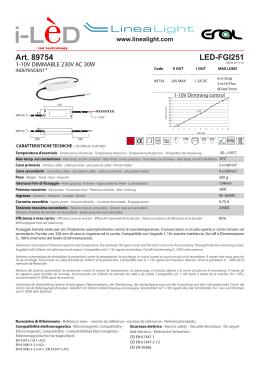
DVD RECEIVER ITALIANO ENGLISH FRANÇAIS DEUTSCH ESPAÑOL MANUALE ISTRUZIONI INSTRUCTIONS MANUAL • MODE D'EMPLOI • GEBRAUCHSANWEISUNGEN • MANUAL DE INSTRUCCIONES VM 017 ITALIANO . . . . . . . . . . . . . . . . . . . . . . . . . . . . . . . . . . . . . . . . . . . . . . . . . . . . . . . . . . . . . . . . . . . . . . . . . . . . . . . . . . . . . . . 4 ENGLISH . . . . . . . . . . . . . . . . . . . . . . . . . . . . . . . . . . . . . . . . . . . . . . . . . . . . . . . . . . . . . . . . . . . . . . . . . . . . . . . . . . . . . . . 22 FRANÇAIS . . . . . . . . . . . . . . . . . . . . . . . . . . . . . . . . . . . . . . . . . . . . . . . . . . . . . . . . . . . . . . . . . . . . . . . . . . . . . . . . . . . . . . 40 DEUTSH . . . . . . . . . . . . . . . . . . . . . . . . . . . . . . . . . . . . . . . . . . . . . . . . . . . . . . . . . . . . . . . . . . . . . . . . . . . . . . . . . . . . . . . . 58 ESPAÑOL . . . . . . . . . . . . . . . . . . . . . . . . . . . . . . . . . . . . . . . . . . . . . . . . . . . . . . . . . . . . . . . . . . . . . . . . . . . . . . . . . . . . . . 76 Indice Precauzioni sicurezza.............................................................................................................................................................................................................. 4 Schema connessioni elettriche............................................................................................................................................................................................... 5 Installazione............................................................................................................................................................................................................................. 6 Pannello di controllo................................................................................................................................................................................................................ 7 Telecomando........................................................................................................................................................................................................................... 8-9 Operazioni riproduzione.......................................................................................................................................................................................................... 10-11 Operazioni USB/SD................................................................................................................................................................................................................. 12 Setup sistema.......................................................................................................................................................................................................................... 13 Bluetooth................................................................................................................................................................................................................................. 14-15 Funzioni radio.......................................................................................................................................................................................................................... 16 RDS......................................................................................................................................................................................................................................... 17 Guida rapida alla soluzione dei problemi................................................................................................................................................................................ 18 Specifiche tecniche................................................................................................................................................................................................................. 19 Garanzia.................................................................................................................................................................................................................................. 20 4 IT Precauzioni di sicurezza PRECAUZIONI 1. Collegare l’apparecchio esclusivamente ad alimentazioni 12Volt, con negativo a Massa. 2. Non installare l’apparecchio in posizioni che possono compromettere la guida sicura. 3. Quando si è alla guida, è vietato fare uso del Display, per evitare violazio alle Regolamentazioni Stradali e per evitare incidenti stradali. L’uso del Display, è consentito esclusivamente per seguire l’immagine della retro-camera. 4. Per una guida sicura, regolare il volume ad un livello confortevole e tale da permettere di sentire l’insorgere di situazioni d’emergenza. 5. Non esporre l’apparecchio, e relativo amplificatore e altoparlanti, all’umidità o all’acqua, onde evitare scintille o incendi. 6. Non sostituire il fusibile situato sulla linea d’alimentazione, senza aver chiesto consiglio ad un professionista. Fusibili inadatti possono danneggiare l’apparecchio e causare incendi. 7. E’ importante spegnere l’apparecchio immediatamente, inviando poi l’apparecchio al Servizio Assistenza o al Rivenditore Distributore, nel caso si presentasse una delle situazioni di seguito indicate: a) Nessun Audio in Uscita b) Nessuna Immagine in Uscita c) Acqua o oggetti che si sono infiltrati nell’apparecchio d) Fumo e) Odori particolari. Avvertenza Per ridurre il rischio d’incendio o scosse elettriche, NON esporre l’apparecchio a pioggio o umidità. Attenzione L’apparecchio fa parte dei prodotti LASER CLASSE 1. I Comandi e le Procedure devono essere eseguiti esattamente come indicato nelle presenti Istruzioni. Per evitare il pericolo di fuori-uscita di radiazioni, non aprire coperchi e non riparare in proprio. Affidare le riparazioni a personale qualificato. Prodotti Laser Lunghezza d’onda: CD: 780 nm DVD: 650 nm Potenza Laser: nessuna fuori-uscita di radiazioni pericolose, se si mantengono le protezioni di sicurezza. Note sui CD • CD difettosi o sporchi possono causare una riproduzione sonora irregolare • Afferrare i CD come mostrato nella figura. • Toccare solo l’etichetta, mai la parte senza etichetta • Non attaccare sigilli, etichette o fogli di protezione da nessuna parte del CD • Non esporre i CD al sole diretto o a fonti di calore elevato • Per pulire il CD, passare un panno pulito, dal centro verso l’esterno • Non utilizzare mai solventi come esempio Trielina o alcool • Il presente apparecchio non legge CD da 3” (8cm). Non inserire quindi mai CD da 3” o CD dalla forma irregolare. L’apparecchio potrebbe non riuscire ad espellere tali CD. 5 Schema connessioni elettriche ATTENZIONE (Giallo) (Giallo) • PRIMA DELL’INSTALLAZIONE FARE RIFERIMENTO ALLO SCHEMA. • FILO FRENO A MANO: L’APPARECCHIO NON VISUALIZZERA’ LE IMMAGINI VIDEO SE NON SI COLLEGA IL CAVO. (Rosso) Video IN Video IN Retromarcia (Bianco) Audio AUX-IN (Marrone) Subwoofer FM/AM ingresso antenna (Bianco) Audio Out Front (Rosso) Uscita Video (Giallo) Grigio Fusibile (10A) Grigio Grigio Bianco Grigio Parking Altoparlante Front sx Marrone Cavo retromarcia Bianco/Nero Rosa Telecomando per amplificatore Illuminazione Arancio Grigio Altoparlante Front dx Blu Controllo connettore per antenna Grigio/Nero Blocco chiave accensione Verde +12V Sotto chiave (Rosso) Verde/Nero Viola +12V Permanente (Giallo) Fusibile Batteria Massa (GND-Nero) (Al telaio dell’auto) Viola/Nero 6 Altoparlante Rear sx Altoparlante Rear dx Installazione IT Procedure d’Installazione Per prima cosa, eseguire i collegamenti elettrici, poi controllare il tutto. Reset Premere il tasto per fare scendere il frontalino. Con l’ausilio di un oggetto appuntito, premere RESET, per ritornare alle impostazioni originali dell’apparecchio. Nota: premendo RESET, si annullano l’Orario e le Stazioni memorizzate. Foro per l’Installazione L’apparecchio può essere installato in qualsiasi cruscotto avente un’apertura come da disegno. Per poter accogliere l’apparecchio, le dimensione devono essere: 183 mm x 52 mm altezza. IMPORTANTE: Prima dell’installazione, togliere le due viti, con le quali l’apparecchio DVD non funzionerebbe. 1. Inserire la staffa di montaggio nel cruscotto. Piegare i punti di fissaggio con un cacciavite. Accertarsi che la leva di bloccaggio livello della staffa di montaggio (e che non sporga). sia allo stesso 2.Fissare il retro dell’apparecchio. Dopo aver fissato il bullone ed il connettore d’alimentazione, fissare il retro dell’apparecchio all’auto, tramite cuscinetto di gomma. 3.Inserire la piastra di rifinitura. 7 Mounting bolt rubber cushion. Pannello di controllo 1) Apertura pannello 2) Tasto Menù: Setup Sistema 3) Selettore di banda: FM1, FM2, FM3, AM1, AM2 4) Source: RADIO,DISC,SD,USB,BACK VIEW,AUX,BLUETOOTH 5) Tasti direzionali: navigare nei menù attraverso i tasti 6) TA: Attiva/Disattiva la funzione annunci sul traffico 7) Microfono 8) PTY: Seleziona il tipo di programma radio 9) Porta USB 10) APS/: Scansioni stazioni radio, Play/Pausa 11)AF: frequenza alternativa ON/OFF 12) Display TFT 3" touch screen 13) Ruotare la manopola per regolare il volume 14) Apertura per carta SD/MMC 15) Reset: ripristina le impostazioni di fabbrica 16) Tasto : espulsione disco 8 Telecomando IT TASTI E FUNZIONI 1) (PWR) Accende/Spegne l'unità (REC/Sub-T): Funzione rec non attiva; SubT; Cambia lingua in modalità DVD (MUTE): Silenzia audio (SRC): Seleziona RADIO,DISC,SD,USB,BACK VIEW,AUX,BLUETOOTH 2) (BAND/RDM): Seleziona FM1,FM2,FM3,AM1,AM2/RIPRODUZIONE CASUALE (APS/PRG): Scansione / Programmazione stazioni radio (ST/RPT): Stereo-Mono / Ripetizione 3) : Riproduzione / Pausa. : Stop. Setup: impostazioni di Setup del menù Title: Titoli (solo in moddalità DVD) ENTER: Riproduzione/ Conferma conferma selezione : Frecce Menù. 4) : Cornetta verde avvia la telefonata. OSD/Id3: visualizzazione info su display / informazioni id3 : Cornetta rossa chiude la telefonata 5) 0-9: Area digitazione numerica #/GOTO: #/Vai e Cerca RO/SN: Funzione non attiva 6) AF: Frequenza alternativa TA: Informazioni sul Traffico. PTY: Tipo di Programma RDS 7) : Sintonizzatore manuale radio; Salta/Cerca brano successivo : Sintonizzatore manuale radio; Salta/Cerca brano precedente. + : Aumento volume - : Diminuzione volume SEL: Selezione modalità Audio e Video CLK: Visualizza orologio EQ: Selezione effetto sonoro - Rock/Pop/Classic/Normal N/P-Angle: Sistema video PAL/NTSC/AUTO - Angolazione (Solo per DVD) R/L-Language: Audio Mono-L, Mono-R, Stereo; Lingua Audio (Solo per DVD) 9 Nota: l’immagine del telecomando serve solo per consultazione. Nota: Questa unità non ha la funzione RDS, AF/TA/PTY. Questa unità non ha la funzione BLUETHOOT. Telecomando Remote control Operatività del Telecomando Il Telecomando è in grado di funzionare ad una distanza di 3 ~ 5 metri. Sostituzione della batteria al Litio. Quando il numero delle funzioni eseguibili dal Telecomando risultano ridotte o impossibili, occorre rimpiazzare la batteria al litio, con una nuova. Accertarsi che la batteria venga inserita secondo le polarità indicate. 1. Estrarre il porta-batteria, premendo il fermo verso il centro. 2. Introdurre la batteria a forma di bottone, con il (+) rivolto verso l’alto. Re-inserire il porta-batteria del Telecomando. AVVERTENZE • Custodire eventuali batterie in luogo inaccessibile ai Bambini. Se la batteria venisse accidentalmente deglutita, occorre immediatamente consultare un medico. • NON ricaricare, corto-circuitare, aprire, riscaldare o gettare la batteria nel fuoco. • NON mettere la batteria a contatto con altri materiali metallici. • Tutte le procedure sopra menzionate, sono vietate, poiché possono causare il surriscaldamento o rottura della batteria e incendi. • Prima di buttare la batteria, occorre avvolgerla con nastro isolante. Il nastro isolante è necessario per evitare il surriscaldamento/la rottura della batteria e incendi. 10 Operazioni in Riproduzione IT EJECT • Premere per espellere il disco. Nota: Se il disco espulso non viene estratto, dopo 10 secondi rientrerà automaticamente nell'unità. PLAY/ PAUSE per AVVIARE/FERMARE la riproduzione. • Premere il tasto APS Nota: La riproduzione si avvia anche premendo la manopola del VOLUME. SOURCE • Premere il tasto SOURCE brevemente per accendere l’apparecchio. Nota: quando l'unità è accesa, premere brevemente SOURCE per visualizzare l'immagine seguente (figura 1) e selezionare la sorgente desiderata toccando le icone sullo schermo. VOLUME • Aumento Volume: Ruotare la manopola del VOLUME in senso orario/antiorario per incrementare/diminuire il volume. Premere la manopola per confermare le selezioni dei menù. Nota: L'icona TV (grigia) non è attiva. 11 Operazioni in Riproduzione Durante la riproduzione di un DVD/VCD/CD, toccando il centro dello schermo, il sistema TOUCHSCREEN visualizzerà il seguente menù: Nota: a causa dei diversi sistemi di masterizzazione, alcuni dischi cd-r,cdrw,dvd-rw,dvd+rw potrebbero non essere letti correttamente. Anche i dischi non FINALIZZATI potrebbero non essere riconosciuti dall’unità. Per la funzione di finalizzazione dei dischi fare riferimento ai manuali dei programmi di registrazione. • • • • In questo menù, nella parte destra si trova il sottomenù. Premendo si selezionano i file dall’elenco. Selezione Brano, Capitolo o Scene: premere / per scegliere brano,capitolo,scena precedente. premere / per scegliere brano,capitolo,scena successivi. / Avanzamento Veloce: Tenere premuto Riavvolgimento Veloce: Tenere premuto / . R/L: Premere R/L sullo schermo o sul telecomando per selezionare AUDIO MONO L, AUDIO MONO R, AUDIO STEREO. TIT: In modalità riproduzione DVD, VCD, durante la riproduzione premere TIT sullo schermo o sul telecomando per tornare al menù iniziale dove scegliere le funzioni desiderate. RPT Ripetizione: premere RPT sullo schermo o sul telecomando per scegliere tra: ESC: Premere questo tasto per uscire dalla riproduzione e passare alla schermata di selezione sorgente. Lo schermo TFT visualizzerà il seguente menù: 12 Operazioni USB/SD IT L'apparecchio passerà automaticamente in modalità SD ed inizierà a riprodurre la prima traccia presente all'interno. RIPRODUZIONE Riproduzione/Pausa: • premere sullo schermo/ pannello frontale/telecomando per avviare la riproduzione o mettere in pausa. PANNELLO INTERNO Premere il tasto lo frontale Seleziona: • premere sullo schermo/ telecomando per passare alla traccia successiva/precedente • premere sul pannello frontale/telecomando per spostarsi sulle tracce desiderate confermare la selezione premendo la manopola sul frontale o enter sul telecomando. (va girato di 90° in senso antiorario) per aprire il pannel- 1.feritoia inserimento disco 2.tasto espulsione disco 3.apertura per scheda SD/ MMC 4.reset Repeat: • Premere RPT sullo schermo o ST/RPT sul telecomando per selezionare la modalità ripetizione desiderata: CONNESSIONE DISPOSITIVO USB Inserire una periferica USB nell'apposita apertura sul pannello frontale, l'apparecchio passerà automaticamente in modalità USB ed inizierà a riprodurre la prima traccia presente all'interno. Band: • Premere BAND SUL PANNELLO FRONTALE O band/rpt sul telecomando per attivare la riproduzione casuale. CONNESSIONE SCHEDA SD/MMC • Premere il tasto (va girato di 90° in senso antiorario). • Rimuovere il pannello frontale. • Inserire la scheda nell'apposita apertura. 13 Setup del sistema MENÚ AUDIO/VIDEO/SISTEMA SETUP VIDEO • BRIGHT/LUMINOSITA’ - COLOR/COLORE - CONTRAST/CONTRASTO TINT/TINTA • VMODE/MODALITA’ IMPOSTAZIONE VIDEO Modifica impostazioni menù Toccare sullo schermo le opzioni del menù STAND/STANDARD - USER/PERSONALIZZATA - SOFT/TENUE BRIGHT/LUMINOSA Premere per regolare. Premere per confermare ed uscire. Nota: Le regolazioni si possono effettuare SETUP AUDIO anche mediante: • AUDIO SETUP:BASS-TREBLE-BALANCE-FADER tasti (frecce direzionali) RANGE DI REGOLAZIONE TRA -7 E +7 Pomello; ruotare per regolare e premere • EQ SETTING: REGOLAZIONE EQUALIZZATORE AUDIO NORM per confermare. ROCK POP CLASSIC Per entrare nel menù di setup premere il tasto MENU: Video mode: Audio mode: SETUP DI SISTEMA •LOUD ON/OFF •BEEP ON/OFF •COLOR TEMA DELLO SCREENSAVER RED/YELLOW/BLUE/GREEN/DEMO •TIME DISPLAY ON/OFF mostra l'ora sullo schermo •TIME ADJ permette la regolazione dell'orario REGOLAZIONE OROLOGIO: Premere sullo schermo la cifra delle ore e + O – per regolare Premere la cifra dei minuti e + O – per regolare Premere ESC per confermare e uscire. System mode: 14 Bluetooth IT La funzione BLUETOOTH è un metodo di trasmissione dati senza fili a raggio breve attraverso la funzione BLUETOOTH il DVD stabilisce una connessione con un dispositivo portatile abilitato. In questo modo il DVD può funzionare come apparecchio viva-voce. SELEZIONE MODALITA’ BLUETOOTH Metodo: A. Premere SOURCE, per entrare nel menù principale. B: Premere sullo schermo l'icona BLUETOOTH (Disegno N.1) (N.1) ATTIVARE LA MODALITA’ BLUETOOTH Bluetooth ha le seguenti funzioni: PARING: accoppiamento ad un nuovo dispositivo portatile CONNECTING: connessione al dispositivo accoppiato ACCOPPIAMENTO (PARING) Per l'accoppiamento con il telefono procedere come segue: Accendere il BLUETOOTH entrare in modalità BLUETOOTH premendo l'icona dal menù principale, premere setup, premere ON/OFF (Disegno N.2) Quando il telefono riconosce il lettore, inserire il codice di accoppiamento "0000" ad accoppiamento avvenuto correttamente sullo schermo appare la scritta "CONNECTED" premere "EXIT" per uscire dal setup del BLUETOOTH. (N.2) 15 Bluetooth EFFETTUARE UNA CHIAMATA RISPONDERE A UNA CHIAMATA É possibile effettuare una chiamata tramite il telecomando o TOUCHSCREEN dell'apparecchio. Quando il telefono è accoppiato all'unità e si riceve una telefonata, l'unità passa automaticamente nella modalità BLUETOOTH e visualizza il numero di telefono del chiamante (figura sotto) A. Dal TOUCHSCREEN. Premere sullo schermo/telecomando la cornetta verde per aprire la conversazione. Digitare il numero di telefono sullo schermo Per cancellare o correggere un numero premere l'icona Premere (cornetta verde) per avviare una telefonata. Premere (cornetta rossa) per chiudere o annullare la telefonata. Premendo la scritta "TRANSFER" sullo schermo, si passa l'audio della conversazione dal DVD al telefono e viceversa (vedi foto di fianco nella parte bassa a dx). Nota: Alcuni telefoni non supportano la funzione "TRANSFER" Premere sullo schermo/telecomando la cornetta rossa per chiudere la conversazione. B: Dal telecomando. Premere (cornetta verde) per entrare direttamente in modalità BLUETOOTH Digitare il numero mediante i tasti di digitazione numerica. Premere (cornetta verde) per avviare la telefonata. Premere (cornetta rossa) per chiudere o annullare la telefonata. NOTA: L’icona (FUNZIONE) rubrica non è attiva (Funzione non supportata) Cornetta verde Cornetta rossa 16 Funzioni radio IT LOC/DX Tenendo premuto per più di 2 secondi il tasto ST dal telecomando si passa dalla modalità di ricezione DX a LOC (DX: ricezione di tutte le emittenti; LOC: ricezione selettiva delle emittenti a segnale più forte) SINTONIZZAZIONE Sintonizzazione manuale: • Premendo a lungo i tasti / dal pannello frontale o / dal telecomando si scorrono le frequenze manualmente a intervalli di 0,05 MHz. Sintonizzazione Automatica: • Premendo brevemente il tasto / dal pannello frontale o / telecomando, si scorre alla stazione radio successiva/precedente. Premere i tasti ...per scorrere le stazioni memorizzate da 1 a 6 BANDA Premere il tasto BAND per selezionare tra3 bande FM e 2 AM (FM1-FM2FM3-AM-AM1). Memorizzazione stazioni: • Premendo a lungo i tasti / posizione compresa tra 1 e 6 dal si memorizza la stazione desiderata in una AS/PS Ricerca Stazioni: • Premere per più di 3 secondi il tasto per avviare la ricerca automatica delle stazioni e la loro memorizzazione in 1-6 FM1,FM2,FM3,AM,AM1. Scansione Stazioni: • Premere brevemente il tasto per ascoltare per 3 secondi le stazioni in successione. Per interrompere la scansione, premere nuovamente sulla stazione desiderata. ST Quando una stazione radio trasmette un segnale stereo una scritta "ST" blu appare sul display. Premendo il tasto ST dal telecomando è possibile passare dalla modalità stereo a mono. 17 RDS (Radio Data System) La disponibilità del servizio RDS varia da zona a zona. Se il Servizio RDS non è disponibile nella Vostra area, le seguenti Funzioni non saranno accessibili. RDS - Informazioni Basilari AF (Frequenza Alternativa) : quando il segnale radio è debole, la funzione AF provvede alla ricerca automatica di un’altra stazione avente lo stesso PI (Identificazione Programma), ma con segnale più potente. PS (nome del Servizio Programma): il Display indicherà il nome della Stazione emittente. Modalità AF: AF on: la funzione AF è attivata. AF off: la funzione AF è disattivata. Nota: l’indicatore PTY, posto sul Display, inizierà a lampeggiare fino a quando non arriveranno le informazioni RDS. Se, nella vostra zona, il servizio RDS non è disponibile, non rimane che spegnere la modalità AF. Modalità REG: premere PTO per più di 2 secondi, per attivare/disattivare la modalità REG. REG on: la funzione AF prenderà il codice regionale (del numero PI), motivo per cui risulteranno automaticamente accessibili solo le stazione locali. REG off: la funzione AF ignorerà il codice regionale (del numero PI), motivo per cui la sintonizzazione automatica sarà possibile anche su stazioni di altre Regioni. Segnalazioni sul Traffico Alcune stazioni RDS FM forniscono, ad intervalli precisi, informazioni sul traffico. TP (identificazione Programma sul Traffico) : Informazioni Radiofoniche sul Traffico. TA (identificazione Annunci sul Traffico): Segnalazioni radiofoniche sulle condizioni stradali Modalità TA: attivando la modalità TA, la relativa spia TA inizierà a lampeggiare. Non appena giunge una Segnalazione Stradale, la spia TA lo segnalerà su display e l’apparecchio salta temporaneamente, da qualsiasi modalità in cui si trova, in modalità RADIO. A questo punto, verrà trasmesso l’annuncio stradale, al volume TA previsto. Alla fine dell’annuncio, l’apparecchio riassumerà Modalità e Volume precedenti. In modalità TA, le funzioni SEEK, SCAN, AMS sono fruibili e memorizzabili soltanto in presenza del codice TP (Programma sul Traffico). EON (Enhanced Other Networks = altre Reti preferenziali). In presenza di dati EON, la spia EON si accende e le funzioni TA e AF ricevono la precedenza. TA: le informazioni sul traffico possono essere ascoltate dalla Stazione del momento o da stazioni di altre Reti Radiofoniche. AF: L’elenco delle stazioni RDS predefinite viene aggiornato da EON. La modalità EON permette alla radio di sfruttare al meglio le informazioni RDS. EON, infatti, aggiorna costantemente l’elenco AF delle stazioni prescelte ed includerà automaticamente anche l’ultima stazione su cui si è sintonizzati. Se memorizzate una stazione locale vicino a casa Vostra, potrete ricevere quella stessa stazioni ad una Frequenza alternativa, oppure una stazione diversa che però trasmette lo stesso tipo di programma. EON è in grado anche di rintracciare più velocemente le stazioni TP locali. 18 Guida rapida alla soluzione dei problemi IT Se sospettate qualche problema, spegnete immediatamente l’apparecchio. Non usare l’apparecchio in condizioni anomali, esempio: in assenza di suono, in presenza di fumo o cattivo odore, onde evitare incendi o scariche elettriche. Fermare subito l’apparecchio e chiamare il Rivenditore presso il quale è state acquistato. Non provare mai a ripararlo in proprio, poiché potrebbe essere pericoloso. PROBLEMI GENERALI Assenza di elettricità/suono L’accensione della vettura non è attivata. Girare la chiave su ACC o ON Cavo collegato male. Controllare. Il fusibile è bruciato. Sostituirlo. Montaggio instabile. Installare l’apparecchio in modo fermo, utilizzando gli accessori di fissaggio in dotazione. MESSAGGI DI ERRORE SUL DISPLAY Il display segna ERROR. Il Disco è sporco, danneggiato o girato male. Premere il tasto Eject per fare uscire il Disco. Quando il tempo di inizio film è troppo lungo. Errore di lettura del file o tipo di file non supportato. Premere SRC per uscire. Poi premere SRC ancora, per continuare a leggere il disco. DISCO Il Disco è inserito ma non c’è il suono. Il Disco è girato dalla parte sbagliata. Mettere il Disco nel verso giusto, cioè Con l’etichetta in alto. Il Disco è sporco o Danneggiato. Ripulire o sostituire il Disco. Il suono salta, la qualità sonora è bassa. Il disco è sporco o danneggiato. Ripulire il CD o inserire un CD diverso. Il suono salta a causa di vibrazioni. L’angolo di montaggio è superiore a 30°. Regolare l’angolo di montaggio a meno di 30°. PROBLEMI SULLA RADIO Disturbi di ricezione Stazione radio troppo lontana / segnale è troppo debole. Cercare un’altra stazione più potente Il cavo antenna non è collegato bene. Controllare il cavo antenna e il terminale di collegamento. 19 Se le soluzioni riportate non portano a niente; premere il bottone RESET. Specifiche tecniche DATI GENERALI Alimentazione Potenza max. in Uscita Potenza continua in Uscita T.H.D.) Impedenza ideale per Altoparlante Voltaggio uscita Pre-amp Fusibile Dimensioni (LxAxP): Peso Uscita Subwoofer Livello Aux-In Rapporto di risposta IF Rapporto Segnale/Rumore 12V CC (11V-16V) Voltaggio di prova 14,4V, negativo Massa 50Wx4canali 25Wx4 canali (4 Ohm 10% Radio AM (MW) Gamma di Frequenza 522-1620 KHz (Europa) 530-1710 KHz (USA) Sensibilità sfruttabile (S/N=20dB) 30 dBu 4 – 8 Ohm 4.0 V (modalità riproduzione CD: 1KHz, OdB, 10KOhm caricato) 10Amp 178x50x166mm 1,8 kg 4,0 V ≥300mV TFT LDC 3” Risoluzione del display (puntini)22.464 Dimensione Schermo (pollici) 3" (16:9) Contrasto 350 Luminosità 350 Nits Formato LTPS/TFT Radio FM Stereo Gamma di Frequenza 87,5 – 108,0 MHz (Europa) 87,5 – 107,9 MHz (USA) Sensibilità sfruttabile 8dBu Risposta in Frequenza 30Hz – 15KHz Separazione Stereo 30dB (1KHz) Rapporto di risposta immagine 50dB 70dB >55dB LETTORE DISCHI Sistema Risposta in Frequenza Rapporto Segnale/Rumore Distorsione armonica totale: Separazione Canali Uscita Segnale Video Livello Uscita Video Orizzontale Audio Digitale 20Hz – 20 KHz >80 dB inferiore a 0,20 % (1KHz) >60 dB PAL/NTSC/AUTO Video 1 +/- 0,2 V > 500 linee DOTAZIONE Connettore cavi Custodia per frontalino removibile Gabbia Metallica Chiave a T Libretto d’Istruzioni Telecomando 1 1 1 2 1 1 NOTA: Dati Tecnici e Design del prodotto possono cambiare senza preavviso, in virtù dei continui miglioramenti tecnologici. 20 Condizioni di garanzia IT Questo prodotto é garantito per 2 anni dalla data di acquisto Questa garanzia dà diritto alla sostituzione gratuita dei pezzi difettosi la cui causa è da imputarsi a difetti di materiale o fabbricazione. Sarà solo ed esclusivamente competenza del nostro servizio tecnico valutare se il guasto è dovuto a cattivo uso o difetto di costruzione. Le riparazioni effettuate in garanzia non danno luogo a proroghe o rinnovi della stessa ed è escluso ogni indennizzo a qualsiasi titolo. Non sono coperti da garanzia: Avarie da trasporto (graffi, ammaccature e simili). Danni dovuti ad errata installazione dell’apparecchio elettrico o alterazioni derivanti da condizioni ambientali, climatiche o altra natura. Avarie causate da trascuratezza, negligenza, manomissione, incapacità d’uso, o riparazioni effettuate da personale non autorizzato. Per le riparazioni rivolgersi al rivenditore o telefonare al Centro Assistenza Tecnica Phonocar al N° 0522 - 941621. L’apparecchio dovrà essere consegnato con il certificato di garanzia, correttamente compilato, ed il relativo documento d’acquisto. 21 Index Security Precautions............................................................................................................................................................................................................... 22 Electric Connections Scheme................................................................................................................................................................................................. 23 Installation............................................................................................................................................................................................................................... 24 Control Panel........................................................................................................................................................................................................................... 25 Remote Control Unit................................................................................................................................................................................................................ 26-27 Reproduction Operations........................................................................................................................................................................................................ 28-29 USB-Operations...................................................................................................................................................................................................................... 30 System SET-UP ...................................................................................................................................................................................................................... 31 Bluetooth-Functions................................................................................................................................................................................................................ 32-33 Radio Functions...................................................................................................................................................................................................................... 34 Radio RDS.............................................................................................................................................................................................................................. 35 Frequently Asked Questions & Solutions................................................................................................................................................................................ 36 Technical Specifications . ....................................................................................................................................................................................................... 37 Guarantee................................................................................................................................................................................................................................ 38 22 GB Security Precautions PRECAUTIONS 1. Connect Unit only to 12Volt-feed, with negative-pole to the Ground. 2. Do NOT install the Unit in positions which could compromise the driving security 3. While driving, do NOT use the Display, to avoid Traffic-Violations and/or accidents. Use display only during parking process, to observe the rear-camera. 4. To drive securely, set Volume at a reasonable level so that noises, in relation with dangerous traffic situations, can still be heard. 5. To avoid sparks or fire, never expose the Unit, and its related amplifier and speakers, to humidity or water. 6. Before replacing the current-supply-fuse, always ask a professional person for advice. Inadequate fuses can damage the Unit or cause fire. 7. Important: immediately switch-off the Unit and send it to your Phonocar-Dealer, should any of the following situations occur: a) no Audio on the Output b) no Picture on the Output c) water or objects have fallen into the Unit d) Smoke e) strange smells. Attention This Unit is a LASER CLASSE 1-product. All Commands and Procedures have to be attentively carried out as indicated in this Instructions Manual. To avoid the risk of radiation, never open the Unit and never try to repair the Unit by yourself. Repairs have to be carried out by qualified Personnel.. Laser Product Wave Length: CD: 780 nm DVD: 650 nm Laser-Force: no radiations can escape as long as all protections are observed and kept in place. Remarks to CDs • Damaged or dirty CDs can result in irregular sound-reproduction • Always handle CDs as shown in picture. • Never touch the CD directly, but only the sticker • Never stick anything onto the CD • Do not expose CDs to direct sun or strong heat sources • To clean CDs, always use a soft cloth and pass from the centre to the external edge. • Never use Solvents like Trieline or alcohol • This Unit does NOT read 3”-CDs (8cm). Never introduce 3”-CDs or deformed CDs, as the Unit might come into difficulty and not expel these CDs. 23 Electric Connections Scheme ATTENTION (Yellow) (Yellow) - OBSERVE THE RELATED SCHEME, BEFORE CARRYING OUT THE INSTALLATION. - CABLE OF HAND-BRAKE: THERE WILL BE NO VIDEO AVAILABLE FROM THE UNIT, IF THIS CABLE IS NOT CONNECTED. (Red) Video IN Video IN reverse-gear (White) Audio AUX-IN (Brown) Subwoofer FM/AM Control for Antenna-connector (White) Front Audio Output (Red) Video Output (Yellow) Grey Fuse (10A) Grey Lighting Orange Grey White Grey Parking Speaker Front left Brown Reverse-gear cable Remote-control for amplifier Pink Control for Antenna-connector Blue White/Black Grey Speaker Front right Grey/Black Ignition-key block +12V Ignition-Pluspole (Red) Battery Speaker Rear left Green/Black Violet +12V Permanent (Yellow) Fuse Green Speaker Rear right Ground (GND-Black) (to car body-work) Violet/Black 24 INSTALLATION GB Installations Procedures After having effected the electrical connections, carefully check if everything is alright. Reset Press key to slide front-plate down. By means of a pointed object, press RESET to re-establish the original settings of the Unit. NOTE: by pressing RESET, memorized Clock-Time and Stations will be lost. Installation-Opening This Unit can be installed in any Dashboard having an opening line shown in the figure and with the following dimensions: 183 mm x 52 mm height.. IMPORTANT: Before effecting the installation, take the two screws off, otherwise the Player would not run,. 1. Introduce the Bracket into the Dashboard Fold the fixation-points with a screw-driver. Make sure that the Blocking-Lever….stands at the same level as the mounting Bracket (Blocking-Lever should not overhang. 2. Fix the rear of the Unit After having fixed the screw and Current-supply connector, fix the rear of the Unit to the car, making use of the rubber-pieces. 3.Introduce the adapter frame. 25 Mounting bolt rubber cushion. Control Panel 1) Open front panel 2) Menu-key: System Setup 3) Band-Selection: FM1, FM2, FM3, AM1, AM2 4) Source: RADIO,DISC,SD,USB,BACK VIEW,AUX,BLUETOOTH 5) Direction-keys: move within Menus using keys 6) TA: Activates/De-activates Traffic-Announcements-Function 7) Microphone 8) PTY: Select type of radio-programme 9) USB-port 10) APS/: Radio-stations scanning Play/Pause 11) AF: alternative Frequency ON/OFF 12) Display TFT 3" touch screen 13) Rotate knob to set volume 14) Inlet for SD/MMC-card 15) Reset: re-establish original settings 16) Key : CD-expulsion 26 Remote Control Unit GB KEYS AND FUNCTIONS 1) (PWR) Unit ON / OFF (REC/Sub-T): Rec-function not activated; SubT; Change language in DVD-mode (MUTE): Exclude Audio (SRC): Select RADIO,DISC,SD,USB,BACK VIEW,AUX,BLUETOOTH 2) (BAND/RDM): Select FM1,FM2,FM3,AM1,AM2/RANDOM REPRODUCTION (APS/PRG): Listing / Programming radio-stations (ST/RPT): Stereo-Mono Repetition. 3) : Reproduction / Pause. : Stop. Setup: choosing the Menu-Setup Title: Titles (only in DVD-mode) ENTER: Reproduction/Confirmation : confirm selection : Menu-arrows 4) : Green receiver starts call. OSD/Id3: visualize info on display / information id3 : Red receiver stops call. 6) AF: alternative Frequency TA: Traffic Information. + : Increase Volume 5) 0-9: Area Numerical Digits #/GOTO: #/Go and Search RO/SN: Function not activated PTY: RDS Programme-Type 7) : Manual radio-tuning; Go/Search subsequent track : Manual radio-tuning; Go/Search previous track -: Reduce Volume SEL: Mode-selection Audio and Video CLK: Visualize Clock EQ: Select Sound Effect - Rock/Pop/Classic/Normal N/P-Angle: Video-System PAL/NTSC/AUTO - Angle (Only for DVD) R/L-Language: Audio Mono-L, Mono-R, Stereo; Audio-Language (only for DVD) 27 Note: Remote-control Unit is shown for consultation only. Note: This Unit does NOT have the functions RDS, AF/TA/PTY. This Unit does NOT have the BLUETOOTH-function. Remote Control Unit Remote control Remote control operating range The remote control can operate within a distance of 3~5m. Replacing the lithium battery of remote control When the range of the operation of the card remote control becomes short or no functions while operating, replace the battery with a new lithium battery. Make sure the battery Polarity replacement is correct. 1. Pull out the battery holder while pressing the stopper. 2. Insert the button-type battery with the stamped(+) mark facing upward. Insert the battery holder into the remote control. WARNING • Store the battery where children cannot reach. If a child accidentally swallows the battery, consult a doctor immediately. • Do not recharge, short, disassemble or heat the battery or dispose it in a fire. • Do not expose or bring into contact the battery with other metallic materials. • Doing this may cause the battery to give off heat, crack or start a fire. • When throwing away or saving the battery, wrap it in tape and insulate; otherwise, the battery may give off heat, crack or start a fire. 28 Reproduction Operations GB EJECT • Press to eject CD. Nota: if ejected CD is not removed, Unit will automatically take it again,after 10 minutes. dopo 10 secondi rientrerà PLAY/ PAUSE per AVVIARE/FERMARE la riproduzione. • Premere il tasto APS Nota: La riproduzione si avvia anche premendo la manopola del VOLUME. SOURCE • Premere il tasto SOURCE brevemente per accendere l’apparecchio. Nota: quando l'unità è accesa, premere brevemente SOURCE per visualizzare l'immagine seguente (figura 1) e selezionare la sorgente desiderata toccando le icone sullo schermo. VOLUME • Aumento Volume: Ruotare la manopola del VOLUME in senso orario/antiorario per incrementare/diminuire il volume. Premere la manopola per confermare le selezioni dei menù. Nota: L'icona TV (grigia) non è attiva. 29 Reproduction Operations During the reproduction of a DVD/VCD/CD, you can touch the screen-centre, so that the TOUCHSCREEN-system will show the following Menu: Note: owing to various different masterization-systems, it may happen that certain cd-r,cdrw, dvd-rw,dvd+rw cannot correctly be read by the Unit. The Unit may also have difficulties in recognising NON-FINALIZED CDs. To learn more about the CD-Finalization-process, please refer to the Manual of the related RegistrationProgramme. • • • • On the right hand-side of this Menu, you will find the Sub-Menu. Press to select files from the given List. R/L: Press R/L on Screen or Remote-Control , to select: AUDIO MONO L, AUDIO MONO R, AUDIO STEREO. Select Track, Chapter or Scene: press / to select PREVIOUS track, chapter, scene. / to select SUBSEQUENT track, chapter, scene. press Fast Forward: Keep pressed / Fast Rewind: Keep pressed / TIT: In DVD, VCD-reproduction-mode, press TIT on the Screen or on Remote-Control, to return to the first Menu where you can select the requested Functions. RPT ESC: Press to pass from the reproduction-mode to the Source-Selection menu. Repetition: press RPT on Screen or Remote-Control, to select: The TFT-screen will visualize the following Menu: 30 USB-Operations GB The Uni twill automatically switch to SD-mode and start reproducing the first track available on the card. REPRODUCTION Reproduction/Pause: • press on the screen/ front panel/remote-control, to start reproduction or make a Pause. INTERNAL PANEL Press key Select: • press on the screen/ remote-control, to switch to the subsequent / previous track • press on the front-panel/ remote-control, to move to the requested tracks. Confirm the selection, by pressing the knob on the front-plate or by pressing Enter on the remotecontrol. (turn by 90° in anti-clockwise direction) to open front panel 1.Disc-introduction opening 2.Disc-eject key 3.Opening for SD/MMCcard 4.Reset Repeat: • Press RPT on the screen or ST/RPT on the remote-control, to select the requested Repetition-mode. CONNECTION FOR USB-DEVICE Introduce a USB-stick into the related opening on the front-panel; the Unit will automatically change to the USB-mode and start reproducing the first track available on the USB-stick. Band: • Press BAND ON FRONT-PANNEL or band/rpt on the remote-control, to activate random-reproduction. CONNECTION FOR SD/MMC-CARD • Press key (turn by 90° in anti-clockwise direction). • Remove front-panel • Introduce the card into the related opening. 31 System SET-UP MENU AUDIO/VIDEO/SISTEMA To enter the Setup-Menu, press the MENU-key: Video mode: Audio mode: Change Menu-Settings Touch the requested Menu-options on the screen. to effect setting Press Press to confirm and leave mode Note: the settings can be effected also by means of: keys (direction-arrows) Knob; rotate to effect settings; then press to confirm. SETUP VIDEO • BRIGHTNESS - COLOUR - CONTRAST TINT • VMODE/Video-Setting Mode STAND/STANDARD - USER/PERSONALIZED – SOFT - BRIGHT SETUP AUDIO • AUDIO SETUP: BASS-TREBLE-BALANCE-FADER SETTING-RANGE BETWEEN -7 AND +7 • EQ SETTING: AUDIO-EQUALIZER-SETTING NORM ROCK POP CLASSIC SYSTEM-SETUP •LOUD ON/OFF •BEEP ON/OFF •COLOUR OF SCREENSAVER-THEME RED/YELLOW/BLUE/GREEN/DEMO •TIME DISPLAY ON/OFF VISUALIZES Time on the screen •TIME ADJ allows Time-setting CLOCK-SETTING: Press the digit of the related Hour on the screen and + O – to effect setting Press the digit of the minutes and + O – to effect setting Press ESC to confirm and leave mode. System-Setup System mode: 32 Bluetooth GB The BLUETOOTH-function is a short-distance, wireless data-transmission method. By means of the BLUETOOTH-function, the DVD-player creates a connection towards a pre-determined portable Device. In this way, the DVD-player con act as a hands-free unit. SELECT BLUETOOTH-MODE Method: A. Press SOURCE, to enter the Main Menu. B: Press BLUETOOTH-icon shown on the screen (Figure n°.1) (N.1) BLUETOOTH-MODE ACTIVATION Bluetooth offers following functions: PARING: paring with a new portable device CONNECTING: connection with the pared device PARING To effect telephone-paring, procede as follows: Switch-on BLUETOOTH; enter the BLUETOOTH-mode by pressing related icon from the Main menu; press Setup; press ON/OFF (Figure n°.2) As soon as the phone recognizes the Player, introduce the paring-code "0000". When paring is correctly accomplished, display will signal "CONNECTED". Press "EXIT" to leave the BLUETOOTH Setup-mode (N.2) 33 Bluetooth TO EFFECT A PHONE-CALL TO ANSWER THE PHONE It is possibile to effect a phone-call by means of the remote-control or the TOUCHSCREEN of the Unit. When the telephone is pared with the Unit and a phone-call is being received, the Unit automatically changes to the BLUETOOTH-mode and visualizes the phonenumber of the calling person (figure below). A. By means of the TOUCHSCREEN. Digit phone-number on the screen To cancel or correct a phone-number, press the icon Press (green receiver) to start a phone-call. Press (red receiver) to stop or cancel a phone-call. Pressing "TRANSFER" on the screen, the conversation-audio will pass from the DVD-player to the telephone and viceversa (see picture on right bottom) Note: some phones do NOT support the "TRANSFER"-function Press the Green Receiver on screen / remote-control, to start the phoneconversation. B: By means of the Remote-Control Press (green receiver) to directly enter the BLUETOOTH-mode Digit the phone-number by means of the number-keys. Press (green receiver) to start the phone-call. Press (red receiver) to stop or cancel the phone-call. NOTE: The calling-list-icon (FUNCTION) is NOT activated (Function not supported) Green Receiver Red Receiver 34 Radio Functions GB LOC/DX Keeping the ST-key, on the remote-control, pressed for more than 2 seconds, reception-mode will change from DX to LOC (DX: reception of all radio-stations; LOC: selected reception of those radio-stations having the strongest signals) TUNING Manual Tuning: • Keeping the keys pressed for a while / on the front panel or / on the remote-control the frequencies can be scolled manually, in intervals of 0.05 MHz. Automatic Tuning: • Pressing briefly the key / on the front-panel or / the remotecontrol, the next/previous radio-station will be tuned. Press the keys ...to scroll the memorized radio-stations from 1 to 6 Memorizing the Radio-Stations: • Keeping the keys pressed for a while / the requested radio-station gets memorized in a certain position between 1 and 6 BAND Press BAND and choose between 3 different bands: FM and 2 AM (FM1FM2FM3-AM-AM1). AS/PS Radio-Stations Research: • Press key for more than 3 seconds to start the automatic research of the radio-stations and their memorization in 1-6 FM1,FM2,FM3,AM,AM1. Scanning the Radio-Stations: • Press key briefly to listen for 3 seconds to each of the following radio-stations. To interrupt the scanning-mode, select press the requested radio-station again. ST When a radio-station is broadcasting a Stereo- signal, the display will show the blue wording "ST". Pressing the key “ST” on the remote-control, it is possible to pass from Stereo-mode to Mono. 35 RDS (Radio Data System) RDS service availability varies with areas. Please understand if RDS service is not available in you area, the following service is not available. RDS Basics AF(Alternative Frequency): When the radio signal strength is poor, enabling the AF function will allow the unit to automatically search another station with the same PI (program identification) as the current station but with stronger signal strength. PS (Program Service name): The name of station will be display instead of frequency. AF Mode: AF on: AF function is activated. AF off: AF function is disabled. Remark: PTY indicator on LCD will flash until RDS information is received. If RDS service is not available in your area, turn off the AF mode. REG Mode: Press PTY for more than 2 seconds to switch REG mode on and off. REG on: AF function will implement the regional code (of the PI) and only stations in the current region can be tuned automatically. REG off: AF function will ignore the regional code (of the PI) and stations in the other regions can also be tuned automatically. Traffic Announcements Some RDS FM stations periodically provide traffic information. TP ( Traffic Program Identification ) Broadcasting of traffic information TA ( Traffic Announcements Identification )Radio announcements on traffic conditions TA Mode: When TA mode is turned on, the TA indicator will blink. When traffic announcement is received, the TA indicator will display. The unit will temporarily switch to the tuner mode (regardless of the current mode) and begin broadcasting the announcement at TA volume level. After the traffic announcement is over, it will return to the previous mode and volume level. When TA is turned on, SEEK, SCAN, AMS function can only be received or saved when traffic program identification (TP) code is received. EON (Enhanced Other Networks) When EON data is received, the EON indicator lights and the TA and AF functions are enhanced. TA: Traffic information can be received from the current station or stations in other network. AF: The frequency list of preset RDS stations is updated by EON data. EON enables the radio to make fuller use of RDS information. It constantly updates the AF list of preset stations, including the one that currently tuned into. If you preset a station around the area at your home, you will later be able to receive the same station at an alternative 36 Frequently Asked Questions & Solutions GB If you suspect something is wrong, immediately switch power off. Do not use the unit in abnormal condition, for example without sound, or with smoke or foul smell, can cause fire or electric shock. Immediately stop using it and call the store where you purchased it. Never try to repair the unit yourself because it is dangerous to do so. General Preset station lost. Battery cable is not correctly connected. Connect the battery cable to the terminal that is always live. No power or no sound. Car’s engine switch is not on. Turn your car’s key to ACC or ON. Cable is not correctly connected. Check connection. Fuse is blown. Replace fuse. Check volume or mute on / off. If the above solutions cannot help. Press the RESET button. Check that telephone mute input cable is not been trapped and grounded during installation. Error Display Messages Display shows ERROR. Disc is dirty, damaged or upside down. Press to eject the disc. Disc Disc is inside but no sound. Disc is upside down. Place disc in the correct direction, and the label side up. Disc is dirty or damaged. Clean disc or change another disc. Disc sound skips, tone quality is low. Disc is dirty or damaged. Clean CD or change another CD. Sound skips due to vibration. Mounting angle is over 30o. Adjust mounting angle to less than 30o. Unstable mounting. Mount the unit securely with the mounting parts. When video file initializing time is too long. File read error or file type not supported. Press SRC to exit. Then press SRC to play disc again Radio Noise in broadcasts. Station is too far, or signals are too weak. Select other stations of higher signal level. Should the suggested solutions be in vain, press RESET. 37 Technical Specifications General Power supply 12V DC(11V-16V) Test voltage 14.4V, negative ground Maximum power output 50Wx4 channels Continuous power output 25Wx4 channels (4 10% T.H.D.) Suitable speaker impedance 4-8 ohm 4.0V(CD play mode: 1KHz, 0 dB, 10K load) Pre-Amp output voltage Fuse 15A Dimensions(WxHxD) 178x50x166mm Weight 2.2kg Sub-out 4.0V Aux-in level ≥ 300mV 3.5 Inch TFT LCD Display Resolution(dot) Active area(mm) Screen size(inch) Dot pitch(mm) Contrast ratio Brightness 320×(RGB)×234 76.32(H)×42.822(V) 3.5 (16:9l) 0.2385(H)×0.183 (V) 350 350 nits FM Stereo Radio Frequency range Usable sensitivity Frequency response Stereo separation Image response ratio IF response ratio Signal/noise ratio 87.5-108.0 MHz (Europe) 87.5-107.9 MHz (America) 8 dBμ 30 Hz-15KHz 30dB(1 KHz) 50dB 70dB >55dB AM(MW) Radio Frequency range 522-1620 KHz (Europe) 530-1710 KHz (America) Usable sensitivity(S/N=20dB) 30 dBμ Disc Player System Frequency response Signal/noise ratio Total harmonic distortion Channel separation Video signal format system Video Video output Horizontal nesowtiou Components Mounting collar Machine screws M5x6 mm M4x6 mm Mounting bolt (50 mm) Wire connector Removable face plate case Trim plate T-key Operating Instructions Rubber cushion Remote control Disc digital audio system 20 Hz - 20 KHz >80 dB Less than 0.20%(1 KHz) >60dB PAL/NTSC/AUTO 1 ± 0.2V ≥ 500 lines 1 4 4 1 1 1 1 2 1 1 1 Note: Specifications and the design are subject to change without notice due to improvements in technology. 38 Guarantee GB This product has a 2-years-Guarantee from the date of purchase. This Guarantee gives the right to get defect parts replaced free-of-charge, as long as the defect is due to material-flaws or production-defects. It is fully up to our Technical Department to evaluate if the problem originates from incorrect use or production-defect. Repairs effected under Guarantee do not give the right to re-new or postpone the Guarantee-validity, nor the right to obtain any kind of refund. Cases NOT covered by Guarantee: Transport-damage (scratches, dents and similar). Damage due to incorrect electric installation, weather conditions or other specific situations. Damage caused by negligence, tampering, incorrect use, repairs effected by non-authorized personnel. For Repairs, please turn to your Phonocar-Dealer and/or Phonocar-Importer/Distributor. The Unit has to be returned to your Phonocar-Dealer, along with the duly filled Guarantee-certificate and purchase-slip or invoice. 39 Index Précautions sécurité................................................................................................................................................................................................................ 40 Schéma connexions électriques............................................................................................................................................................................................. 41 Installation............................................................................................................................................................................................................................... 42 Panneau de contrôle............................................................................................................................................................................................................... 43 Télécommande........................................................................................................................................................................................................................ 44-45 Opérations reproduction......................................................................................................................................................................................................... 46-47 Opérations USB/SD................................................................................................................................................................................................................ 48 Setup système......................................................................................................................................................................................................................... 49 Bluetooth................................................................................................................................................................................................................................. 50-51 Fonctions radio........................................................................................................................................................................................................................ 52 RDS......................................................................................................................................................................................................................................... 53 Guide rapide à la solution des problèmes............................................................................................................................................................................... 54 Spécifiques techniques........................................................................................................................................................................................................... 55 Conditions de garantie............................................................................................................................................................................................................ 56 40 FR Précautions sécurité PRECAUTIONS 1. Brancher l’appareil exclusivement à alimentation 12Volt, avec négatif à Masse. 2. Ne pas installer l’appareil dans une position qui pourrait compromettre la conduite. 3. Lorsqu'on conduit, il est défendu d'utiliser l'écran pour éviter la violation les règlementations routiers et pour éviter des accidents. L’utilisation de l’écran est consenti exclusivement pour suivre l’image de la caméra arrière 4. Pour une conduite sure, régler le volume à un niveau agréable qui permet d’entendre l’arrivée de situations d’urgence. 5. Ne pas exposer l’appareil et son amplificateur et haut-parleur à l’humidité ou à l’eau afin d’éviter des étincelles ou incendies 6. Ne pas remplacer le fusible situé sur la ligne d’alimentation sans avoir consulté un professionnel. Fusibles inadéquats peuvent abîmer l’appareil et causer des incendies. 7. Il est important d'éteindre immédiatement l'appareil et l'envoyer au Service Assistance ou au revendeur Distributeur en cas d’une des situations indiquées : a) Pas d’audio en sortie b) Pas d’image en Sortie c) Eau ou objets divers se sont infiltrés dans l’appareil d) Fumée e) Odeurs particulières. Avertissement Afin de réduire le risque d’incendie ou secousses électriques NE PAS exposer l’appareil à la pluie ou à l’humidité. Attention L’appareil fait partie des produits LASER CLASSE 1. Les Commandes et les Procédures doivent être faits exactement Comme il est indiqué sur ces instructions. Afin d’éviter le ranger de sortie de radiations, ne pas ouvrir de couvercles et ne pas réparer soit même. Faire réparer à du personnel qualifié. Produits Laser Longueur d’onde: CD: 780 nm DVD: 650 nm Puissance Laser: aucune sortie de radiations dangereuses si les protections de sécurités seront maintenues. . Notes sur CD • CD défectueux et sales peuvent causer une reproduction sonore irrégulière • Saisir les CD comme indiqué sur le croquis. • Toucher seulement l’étiquette, jamais la partie sans étiquette • Ne pas attacher d’étiquettes ou bien des feuilles de protection sur aucun coté du CD. • Ne pas exposer les CD au soleil ni près une source de chaleur élevée.• Pour nettoyer le CD, passer un drap propre depuis le milieu vers l’extérieur. • Ne jamais utiliser de dissolvants comme par exemple Trichloréthylène ou alcool • Cet appareil ne lit pas de CD da 3” (8cm).Par conséquent ne pas introduire de CD de 3” ou CD à la forme irrégulière. L’appareil pourrait ne pas réussir à expulser ce genre de CD. 41 Schéma connections électriques ATTENTION (Jaune) (Jaune) • AVANT L’INSTALLATION, CONSULTER LE SCHÉMA. • FIL FREIN À MAIN: L’APPAREIL NE MONTRERA PAS LES IMAGES VIDEO S'IL N'EST PAS BRANCHÉ AU CÂBLE. (Rouge) Vidéo IN Vidéo IN-Marche arrière (Blanc) Audio AUX-IN (Marron) Subwoofer FM/AM entrée antenne (Blanc) Audio Out Front (Rouge) Uscita Video (Jaune) Gris Fusible (10A) Gris Gris Blanc Gris Parking Haut-parleur Av. gauche Marron Câble marche arrière Illumination Orange Télécommande pour ampli Rose Contrôle connecteur pour antenne Bleu Blanc/Noir Gris Haut-parleur Av. droit Gris/Noir Bloc clé allumage Vert +12V Sous clé (Rouge) Vert/Noir Violet +12V Permanent (Jaune) Fusible Batterie Masse (GND-Noir) (Au chassis de l'auto) Violet/Noir 42 Haut-parleur Ar. gauche Haut-parleur Ar. droit Installation FR Procédures d’Installation Première chose, faire les branchements électriques, ensuite contrôler le tout. Reset Appuyer sur la touche pour faire descendre frontail. Avec l’aide d’un objet pointu, appuyer sur RESET, pour retourner aux réglages originaux de l’appareil. NB: En appuyant sur la touche RESET, l’heure et les stations mémorisées. Trou pour l’installation L’appareil peut être installé sur tous les tableaux de bord qui ont une ouverture comme sur le dessin. Pour pouvoir accueillir l’appareil, les dimensions doivent être : 183mm x 52 mm de hauteur. IMPORTANT: Avant l’installation, enlever les 2 vis sinon l’appareil DVD ne fonctionnera pas. 1. Introduire l'étrier de montage dans le tableau de bord Plier les points de fixation avec un tourne vis. Bien s'assurer que le levier de blocage même niveau que l'étrier de montage (qu'il ne resorte pas) 2. Fixer le derrière de l'appareil Après avoir fixé le boulon et le connecteur d’alimentation, fixer le verso de l'appareil avec un coussinet en caoutchouc. 3.Introduire la plaque de finition 43 soit au Mounting bolt rubber cushion. Panneau de contrôle 1) Ouverture panneau 2) Touche Menu: Setup Système 3) Sélect de bande: FM1, FM2, FM3, AM1, AM2 4) Source: RADIO,DISC,SD,USB,BACK VIEW,AUX,BLUETOOTH 5) Touches de directions: naviguer dans le menu à travers les touches 6) TA: Active/Désactive la fonction annonces su traffic 7) Micro 8) PTY: Sélectionne le type de programme radio 9) Porte USB 10) APS/: Scanning stations radio, Play/Pause 11)AF: fréquence alternative ON/OFF 12) Ecran TFT 3" touch screen 13) Tourner le bouton pour régler le volume. 14) Fente pour carte SD/MMC 15) Reset: Récupère les réglages d’origine. 16) Touche : Expulsion disque 44 Télécommande FR TOUCHES ET FONCTIONS 1) (PWR) Allumer/Eteindre L’appareil (REC/Sub-T): Fonction rec non active; SubT; Change langue en mode DVD (MUTE): Enlève l’audio (SRC): Sélectionne RADIO,DISC,SD,USB,BACK VIEW,AUX,BLUETOOTH 2) (BAND/RDM): Sélectionne FM1,FM2,FM3,AM1,AM2/REPRODUCTION ALEATOIRE (APS/PRG): Scansione / Programmazione stazioni radio (ST/RPT): Stéréo-Mono / Ripetizione 3) : Riproduzione / PausE. : Stop Setup: Réglage de Setup du menù Title: Titoli (solo in moddalità DVD) ENTER: Lecture / Confirme sélection : Flèches. 4) : Récepteur vert entame le coup de fil. OSD/Id3: visualisation info sur display / informations id3 : Récepteur rouge interrompt l’appel 5) 0-9: Area digitazione numérique #/GOTO: #/Cherche RO/SN: Fonction non active 6) AF: Fréquence alternative TA: Informations sul Traffico. PTY: Type de Programme RDS 7) : Syntoniseur manuel radio; Salta/Cherche morceau suivant :Sintonizzatore manuale radio; Saute/Cherche morceau précédent. + : Aumento volume -: Diminution volume SEL: Sélection Audio et Vidéo CLK: Visualise horaire EQ: Sélectionne effet sonore - Rock/Pop/Classic/ Normal N/P-Angle: Système vidéo PAL/NTSC/AUTO - Angle (Seulement pour DVD) R/L- Langue: Audio Mono-L, Mono-R, Stéréo; Langue Audio (Seulement pour DVD) 45 Nota: l’immage de la télécommande sert seulement pour la cons Nota: Cette pièce n’a pas la fonction RDS, AF/TA/PTY. Cette pièce n’a pas de fonction BLUETHOOT. Télécommande TELECOMANDE La télécommande est en mesure de fonctionner à une distance de 3~5 mètres. Remote control Remplacement de la batterie en lithium Quand les fonctions de la télécommande diminuent d’intensité, il faut remplacer la batterie au Lithium. S’assurer que la batterie soit introduite en suivant les polarités indiquées. 1. Extraire les porte batteries en poussant le croc vers le centre 2. Introduire la batterie en forme de bouton, avec le (+) vers le haut. Introduire à nouveau le porte batterie de la Télécommande. AVVERTISSEMENTS • Garder les éventuelles batteries hors de la portée des enfants. En cas de déglutition de la batterie, consulter immédiatement un médecin. • NE PAS recharger, court circuiter , ouvrir, réchauffer ou jeter la batterie dans le feu. • NE PAS mettre la batterie en contact avec d’autres matériaux métalliques. • Toutes les procédures mentionnées ci-dessus sont défendues car elles peuvent causer un sur réchauffement ou cassure de la batterie ou un incendie.. • Avant de jeter la batterie, il faut l’envelopper dans un ruban isolant. Le ruban isolant est nécessaire pour éviter le su réchauffement /la cassure de la batterie ou un incendie. 46 Opérations reproduction FR EJECT • Appuyer dessus pour expulser le disque. Nota: Si le disque expulsé n’est pas saisi, Après 10 secondes il rentrera automatiquement dans le lecteur PLAY/ PAUSE pour DEMARRER/ARRETER la • Appuyer sur la touche APS lecture. Nota: La lecture démarre également en poussant le bouton du VOLUME. SOURCE • Appuyer la touche SOURCE brièvement pour allumer l’appareil. Nota: Quand le lecteur est allumé, appuyer brièvement sur SOURCE pour visualiser l'image suivante (image 1) et sélectionner la source désirée en touchant les icônes sur l’écran.. VOLUME • Augmente Volume: Tourner la manipule du VOLUME dans le sens horaire/ anti horaire pour augmenter/diminuer le volume. Appuyer sur le bouton pour confirmer les sélections des menus. Nota: L'icône TV (grise) non è activée. 47 Opérations reproduction Durant la lecture d’un DVD/VCD/CD, en touchant le centre de l’écran le système TOUCHSCREEN montrera la menu suivant : NB: à cause des différents systèmes de graver, certains disques cdr,cd¬rw,dvd-rw,dvd+rw pourraient ne pas être plus correctement. Même les disques TERMINES Pourraient ne pas être reconnus par le lecteur. Pour la fonction de finalisation des disques. Se référer aux manuels des programmes d’enregistrement. • Dans ce menu, sur le coté gauche il y a le sous menu En appuyant on sélectionne le file de la liste. R/L: Appuyer sur R/L sur l’écran ou sur la télécommande pour sélectionner AUDIO MONO L, AUDIO MONO R, AUDIO STEREO. • Sélectionne Morceau Chapitre ou Scène: appuyer / pour choisir le morceau,chapitre,scène précédente. appuyer / pour choisir le morceau,chapitre,scène suivants. / • Avancement Rapide: appuyer longuement • Rembobinage Rapide: Appuyer longuement / TIT: En mode lecture DVD, VCD, lors de la lecture, appuyer sur TIT sur l’écran ou sur la télécommande pour retourner au menu initial où vous pouvez choisir la fonction désirée. RPT Répétition: appuyer sur RPT sur l’écran ou sur la télécommande pour ESC: Appuyer sur cette touche pour sortir de la lecture et passer à la page écran de sèlection source. choisir entre: L’écran TFT visualisera le menu suivant: 48 Opérations USB/SD FR LECTURE Lecture /Pause: • appuyer sur l’écran Frontali / télécommande pour Entamer la lecture ou mettre sur pausa. PANNEAU INTERNE Appuyer sur la touche le panneau frontal Sélectionne: (le tourner de 90° en sens anti horaire) pour ouvrir • appuyer sur l’écran/ télécommande pour passer à la trace d’après/ d’avant • appuyer sur le frontail /télécommande pour se déplacer sur les traces désirées, confirmer la sélection en appuyant sur le bouton frontal ou enter sur la télécommande. 1.fente pour introduire le disque 2.touche expulsion disque 3.ouverture pour carte SD/ MMC 4.reset Repeat: • Appuyer sur RPT sur l’écran ou ST/RPT sur la télécommande pour sélectionner la mode répétition désiré: CONNEXION DISPOSITIF USB Introduire une périphérique USB dans l’ouverture du frontail, l'appareil passera automatiquement en mode USB et commencera à lire la première trace présente à l’intérieur. Band: • Appuyer sur BAND SUR LE FRONTAIL ou bien sur band/rpt sur la télécommande pour activer la lecture aléatoire. CONNEXION CARTEA SD/MMC • Appuyer sur la touche (la tourner de 90° en sens anti horaire). • Enlever le frontail. • Introduire la carte dans l’ouverture. L'appareil passera automatiquement en mode SD et commencera à reproduire la première trace présente à l’intérieur. 49 Setup système MENU AUDIO/VIDEO/SYTEME SETUP VIDEO Pour entrer dans le menu du setup appuyer sur la touche MENU: Vidéo mode: Audio mode: Modification réglage menu Toucher sur l’écran les options du menu pour régler. Appuyer Appuyer pour confirmer et sortir. NB: Les réglages peuvent être effectués Aussi avec : touches (flèches directionnelles) BOUTON; tourner pour régler et appuyer pour confirmer. • BRIGHT/LUMINOSITE - COLOR/COULEUR- CONTRAST/CONTRASTE TINT/TEINTE • VMODE/MODE REGLAGE VIDEO STAND/STANDARD - USER/PERSONALISE’ - SOFT/PALE BRIGHT/LUMINOSITE’ SETUP AUDIO • AUDIO SETUP: BASS-TREBLE-BALANCE-FADER RANGE DI REGLAGE ENTRE -7 E +7 • EQ SETTING: REGLAGE EGALISATEUR AUDIO NORM ROCK POP CLASSIC SETUP DI SISTEMA •LOUD ON/OFF •BEEP ON/OFF •COULEUR THEME DU SCREENSAVER RED/YELLOW/BLUE/GREEN/DEMO •TIME ECRAN ON/OFF montre l'heure sur l’écran •TIME ADJ permet le réglage de l'horaire REGLAGE HORLOGE: Appuyer sur l’écran le chiffre correspondant aux heures et + O – pour régler Appuyer le chiffre des minutes et + O – pour régler Appuyer ESC pour confirmer et sortir. System mode: 50 Bluetooth FR La fonction BLUETOOTH est une méthode de transmission données sans fil à Distance limitée. A travers la fonction BLUETOOTH le DVD établit une connexion avec un dispositif portable habilité. De cette manière, le DVD peut fonctionner en mains libres. SELECTION MODE BLUETOOTH Méthode : A. Appuyer sur SOURCE, pour entrer dans le menu principal. B: Appuyer sur l’écran, l'icône BLUETOOTH (Dessin N.1) (N.1) ACTIVER LE MODE BLUETOOTH Bluetooth a les fonctions suivantes : PARING: coupler à un nouveau dispositif portable CONNECTING: connexion au dispositif accouplé ACCOUPLEMENT(PARING) Pour l'accouplement avec le téléphone procéder comme suit: Allumer le BLUETOOTH, entrer en mode BLUETOOTH en appuyant sur l’icône depuis le menu principal, appuyer sur setup, appuyer sur ON/OFF (Dessin N.2) Quand le téléphone reconnaît le lecteur, introduire le code d’accouplement "0000" une fois effectué l’accouplement correct, sur l’écran, il apparaîtra le mot "CONNECTED" appuyer sur"EXIT" pour sortir du setup du BLUETOOTH. (N.2) 51 Bluetooth EFFECTUER UN APPEL Quand le téléphone est accouplé au lecteur et on reçoit un coup de fil , le dispositif passe automatiquement au BLUETOOTH et visualise le numéro de téléphone de la personne qui appelle Voir photo ci-dessous Il est possible d’effectuer un appel avec la télécommande ou le TOUCHSCREEN de l'appareil. Appuyer sur l’écran / télécommande sur le récepteur vert pour ouvrir la conver¬sation. A. Depuis le TOUCHSCREEN. Composer le numéro de téléphone sur l’écran Pour effacer ou corriger un numéro appuyer sur l’icone Appuyer sur le récepteur vert pour entamer un coup de fil. Appuyer sur récepteur rouge pour arrêter ou annuler le coup de fil En appuyant sur le mot TRANSFER" sur l’écran l’audio passe du DVD au téléphone et vice versa (voir photo ici à coté.) NB: Certains téléphones ne supporte pas la fonction "TRANSFER" Appuyer sur l’écran / télécommande le récepteur rouge pour arrêter la conversation. B:Avec la télécommande Appuyer sur le récepteur vert pour entrer directement en mode BLUETOOTH Composer le numéro à travers les touches de digitation numérique Appuyer sur le récepteur vert pour entamer le coup de fil Appuyer sur le récepteur rouge pour arrêter ou annuler le coup de fil. N.B. L’icône (FONCTION) répertoire n’est pas actif (Fonction non supportée) REPONDRE A UN APPEL Récepteur vert Récepteur rouge 52 Fonctions radio FR LOC/DX En laissant appuyé pour plus de 2 secondes la touche ST de la télécommande on passe De la réception DX a LOC (DX: réception de tous les émetteurs); LOC: réception sélective des émetteurs avec signal plus puissant SYNTONISATION Syntonisation manuelle: • En appuyant longuement sur les touches / depuis le frontail ou depuis la télécommande Les fréquences s’écoulent manuellement à intervalles de 0,05 MHz. / Syntonisation Automatique : • En appuyant brièvement sur la touche / depuis le frontail ou bien depuis la télécommande, on passe à la station radio suivante / précédente. Appuyer sur les touches ...pour faire écouler les stations enregistrées de 1 à 6 BAND Appuyer sur la touche BAND pour sélectionner entre 3 bandes FM et 2 AM (FM1-FM2FM3-AM-AM1). Mémorisation stations: • En appuyant longuement sur les touches rée dans une position comprise entre 1 et 6 AS/PS ST Quand une station radio transmet un signal stéréo le mot "ST" bleu apparaît sur l’écran. En appuyant sur la touche ST de la télécommande il est possible de passer de stéréo à mono. 53 / on mémorise la station dési- Recherche Stations: • Appuyer pour plus de 3 secondes sur la touche pour faire démarrer la recherche automatique des stations et leur mémorisation en 1-6 FM1,FM2,FM3,AM,AM1. Scansions Stations: • Appuyer brièvement la touche pour écouter pendant 3 secondes les stations dans l’ordre. Pour interrompre la scansion, appuyer à nouveau sur la station désirée. RDS (Radio Data System) La disponibilité du service RDS varie de zone à zone. Si le Service RDS n’est pas disponible sur votre territoire, les fonctions suivantes ne seront pas accessibles. RDS - Informations Basilaires AF (Fréquence Alternative): quand le signal radio est faible, la fonction AF fait la recherche, d’une station qui a le même PI (Identification programme) mais avec signal plus puissant. PS (nom du Service Programme): à la place de la fréquence, l’écran indiquera le nom de la Station. Modalité AF: AF on: la fonction AF est activée AF off: la fonction AF est désactivée. NB: l’indicateur PTY commencera à clignoter sur l’écran, jusqu’à quand vous recevrez les infos RDS. Cependant, si dans votre territoire, le service RDS n’est pas disponible, à ce point il vaut mieux éteindre la modalité AF. Modalité REG: Appuyer sur la touche PTO pendant plus de 2 secondes, pour activer/désactiver la modalité REG. REG on: la fonction AF prendra le code régional (du numéro PI), motif pour lequel SEUL les stations locales seront accessibles. REG off: la fonction AF ignorera le code régional (du numéro PI), motif pour le quel la syntonisation automatique sera possible même sur les stations d’autre régions. Signalisations trafic Certaines stations RDS FM fournissent des infos sur le trafic à intervalles précis. TP (identification Programme sur le Trafic) : Informations Radiophoniques sur le Trafique. TA (identification annonces sur le Trafic): Signal radiophonique sur les conditions de la route. Modalité TA: Si on active la modalité TA, Le voyant TA commencera à clignoter. Lorsque arrive une signalisation routière le voyant TA Le signalera sur l’écran et l’appareil passe temporairement en modalité RADIO depuis n’importe quelle modalité il se trouve. A ce point, l’annonce routière sera transmise au volume TA prévu, à la fin de l’annonce, l’appareil reprendra la modalité et le Volume précédents. In modalité TA, SEEK, SCAN, AMS on peut jouir des fonctions et les enregistrer seulement en présence du code TP (Programme sur le Trafic). EON (Enhanced Other Networks = autres réseaux préférentiels). En présence de données EON, le voyant EON s’allume e les fonctions TA et AF reçoivent la précédence. TA: Les informations sur le trafic peuvent être écoutées depuis la Stations du moment ou des stations d’autres Réseaux Radiophoniques. AF: La liste des stations RDS prédéfinies est à jour par EON. La modalité EON permet à la radio d’utiliser au mieux les infos RDS. EON, en effet il met à jour constamment, la liste AF des stations choisies et inclura automatiquement la dernière station sur laquelle on est syntonisé. Si vous enregistrez une stations locale près de chez vous, vous pourrez recevoir cette station alternative, ou bien une station différente qui transmet le même type de programme EON est en mesure également de trouver rapidement les stations TP locales. 54 Guide rapide à la solution des problèmes FR Si vous avez l’impression que quelque chose ne marche pas, nous vous conseillons d’éteindre immédiatement l’appareil. Il vaut mieux ne pas utiliser l’appareil dans des situations anormales, exemple: s’il n’y a pas de son, s’il y a de la fumée ou de l’odeur ceci pourrait causer des décharges électriques ou provoquer un incendie, Éteignez tout de suite l’appareil et appelez le revendeur où vous l’avez acheté, surtout n’essayez pas de le réparer tout seul car c’est dangereux. Problèmes Généraux Absence de Courant / Son La clé de contact n’est pas tournée. Tourner la clé en position ALL ou bien ON. Le câble n’est pas correctement branché. Vérifier le branchement Fixation instable. User tous les accessoires de montage fournis et bien fixer l’appareil. Messages d’erreur sur l’écran L’afficheur signale ERROR Le disque est sale, abîmé ou mis à l’envers. Appuyer sur EJECT / pour sortir le disque. Le fusible est brûlé. Mettre un nouveau fusible. Quand le film vidéo met du temps avant de démarrer Il y a une erreur de lecture du file, ou bien le l’appareil ne supporte pas ce type de file. Appuyer sur SRC pour sortir et ensuite appuyer à nouveau sur SRC pour reprendre la reproduction du disque. Disque Le disque est dedans mais il n’y a pas de son Le disque a été introduit du mauvais coté Introduisez le disque du bon coté, c.à.d. avec l’étiquette vers le haut. Le disque est sale ou abîmé. Nettoyez le disque ou mettez en un autre. Radio Problèmes avec la radio Mauvaise réception Station radio trop lointaine / signal trop faible, Chercher une autre station plus puissante. Le câble antenne n’est pas bien branché. Contrôler le câble antenne et le connecteur de branchement. Le son arrive par saccades. Basse qualité sonore. Le disque est sale ou abîmé. Nettoyer le disque ou introduire un autre disque. Le son arrive par saccades à cause de vibrations L’inclinaison du montage dépasse 30° Réduire l’inclinaison de montage à moins de 30° 55 Si les solutions ci-dessus décrites ne mènent à rien, appuyer sur la touche RESET. Spécifiques techniques Données générales Alimentation 12V CC (11V-16V) Voltage d’essai 14,4V, négatif Masse Puissance max. en Sortie 50Wx4canaux Puissance continue en Sortie 25Wx4 canaux (4 Ohm 10% T.H.D.) Impédance idéale pour Haut parleur 4 – 8 Ohm Voltage sortie Pré-amp 4.0V (modalité riproduzione CD: 1KHz, OdB, 10KOhm caricato) Fusible 15Amp Dimensions (LxAxP): 178x50x166mm Poids 2,2 kg Sortie Sub 4,0 V Niveau Aux-In >300mV Rapport Signal/Bruit Radio AM (MW) Gamme de Fréquence Sensibilité utilisable (S/N=20dB) TFT LDC 3,5” Résolution du display (points) Zone active (mm) Dimension écran (pouces) Pas des points (mm) Rapport Contraste Netteté Radio FM Stéréo Gamma di Fréquence Sensibilité utilisable Réponse en Fréquence Séparation stéréo Rapport de réponse image Rapport de réponse IF Dans l’emballage N°. 1 Étrier de montage N°. 4 Vis M5x6mm N°. 4 Vis M4x6mm N°. 1 Pivot de Montage (50mm) N°. 1 Connecteur câbles N°. 1 Étui pour façade extractible N°. 1 Plaque pour adapter N°. 1 Clé en forme de T N°. 1 Mode d’emploi N°. 1 Coussinet en caoutchouc N°. 1 Télécommande 522-1620 KHz (Europe) 530-1710 KHz (USA) 30 dBu Lecteur disques Système Audio Digitale Réponse en Fréquence 20Hz – 20 KHz Rapport Signal/Bruit >80 dB Distorsion harmonieuse totale: inférieure a 0,20 % (1KHz) Séparation Canaux >60 dB Sortie Signal Vidéo PAL/NTSC/AUTO Vidéo Niveau Sortie vidéo 1 +/- 0,2 V Horizontal > 500 lignes 320 (RGB) x 234 76,32 (Haut) x 42,822 (l) 3,5 (16:9) 0,2385 (haut.) x 0,183 (l) 350 350 Nits 87,5 – 108,0 MHz (Europe) 87,5 – 107,9 MHz (USA) 8dBu 30Hz – 15KHz 30dB (1KHz) 50dB 70dB >55dB 56 NB: Les données techniques du produit peuvent changer sans préavis en vertu des continuelles améliorations technologiques. Conditions de garantie FR Ce produit est garanti pour 2 ans à partir de la date d’achat Cette garantie donne le droit au remplacement gratuit des pièces défectueuses si la cause est due à un défaut de matériel ou de fabrication L’évaluation si le dommage est causé par un mauvais usage de l’appareil ou bien à un défaut de construction entre exclusivement dans les compétences de notre service technique. Les réparations effectuées en garantie ne donnent pas lieu à des prolongations ou renouvellements de celle-ci ou à des indemnisations de tout genre. Les avaries causées par le transport ne sont pas couvertes par la garantie (griffes, coups et autres). De même pour les dommages dus à une mauvaise installation de l’appareil électrique ou altérations dérivant de conditions ambiantes, climatiques ou d’autre nature. De même pour les avaries causées par la négligence, endommagement, incapacité d’usage ou réparations effectuées par du personnel non autorisé Pour les réparations, s’adresser au revendeur ou téléphoner au Centre Assistance technique Phonocar al N° 0039 0522 - 941621. L’appareil devra être livré avec le certificat de garantie, dûment rempli avec le document d’achat correspondant. 57 Inhaltsverzeichnis Sicherheits-Maßnahmen…………………………… . ............................................................................................................................................................... 58 Elektro-Anschlüsse.................................................................................................................................................................................................................. 59 Installation............................................................................................................................................................................................................................... 60 Bedienteil................................................................................................................................................................................................................................. 61 Fernbedienung........................................................................................................................................................................................................................ 62-63 Wiedergabe-Funktionen.......................................................................................................................................................................................................... 64-65 USB/SD-Funktionen................................................................................................................................................................................................................ 66 System-Einstellungen (Setup.................................................................................................................................................................................................. 67 Bluetooth................................................................................................................................................................................................................................. 68-69 Radio-Funktionen.................................................................................................................................................................................................................... 70 RDS......................................................................................................................................................................................................................................... 71 Fehlersuche ............................................................................................................................................................................................................................ 72 Technische Eigenschaften....................................................................................................................................................................................................... 73 Garantie................................................................................................................................................................................................................................... 74 58 D Vorsichtsmaßnahmen Bitte berücksichtigen: 1. Gerät immer nur bei 12Volt-Stromversorgung anschließen, mit Minus-Pol an die Masse. 2. Gerät nicht an Stellen installieren, die die Sicherheit am Steuer in Gefahr bringen könnten. 3. Während der Fahrt, darf der Fahrer das Display NICHT benutzen, denn es könnte zu Unfällen führen und stößt im übrigen gegen die Verkehrsregeln. Der Fahrer darf das Display nur benutzten, um den Vorgang der Rückfahr-Camera zu verfolgen. 4. Um ein sicheres Fahren zu gewährleisten, Lautstärke auf ein vernünftiges Niveau einstellen, so dass die Aufmerksamkeit gegenüber des Verkehrs und etwaiger Gefahren, nicht beeinträchtigt wird. 5. Das Gerät, mitsamt eingebautem Verstärker und Lautsprecher, fernhalten von Flüssigkeiten oder Feuchtigkeit, um Funken bzw. Feuerausbruch zu vermeiden. 6.Die Sicherung auf der Stromleitung NICHT ersetzten, ohne vorher einen Fachmann zurate gezogen zu haben. Falsche Sicherungen können das Gerät beschädigen oder Brände verursachen. 7. Gerät sofort ausschalten und bei Ihrem Phonocar-Händler einreichen, falls einer dieser Vorfälle auftaucht: a) Kein Audio am Ausgang b) Kein Bild am Ausgang c) Wasser oder Gegenstände ins Gerät eingedrungen d) Rauch e) Geruch. Vorsicht Um Brände oder Elektro-Schläge zu verhindern, Gerät vor Regen und Feuchtigkeit schützen. Wichtig: Das Gerät ist ein LASER KLASSE 1-Produkt. Die Funktionen und Anweisungen der vorliegenden Betriebsanleitungen müssen genauestens nachgelesen und befolgt werden. Um das Austreten gefährlicher Strahlungen zu verhindern , keinerlei Deckel am Gerät öffnen und auch nicht versuchen, selbt zu reparieren. Reparaturen nur unserem Fachpersonal überlassen. Laser-Produkte Wellen-Länge: CD: 780 nm DVD: 650 nm Laser-Stärke: Solange alle Schutzmaßnahmen beachtet werden, besteht keinerlei Strahlungs-Gefahr. Hinweise zu den CDs: • Defekte oder verschmutzte CDs führen zu einer unregelmäßigen Wiedergabe • CDs immer wie abgebildet in die Hand nehmen. • Immer nur das Etikett anfassen, nie die freie Fläche der CD • Keine Sigel, Aufkleber oder Schutzfolien auf CDs anbringen • CDs nicht der Sonne oder starter Hitze aussetzen • Um CDs zu reinigen, von der Mitte zum äußeren Rand hin, mit einem weichen Tuch säubern. • Keinerlei Lösungsmittel wie Terpentin oder Alhohol, verwenden • Das Gerät liest keine 3” (8cm)-CDs. Deshalb keinerlei 3”- oder verformte CDs eingeben, denn das Gerät könnte diese CDs nicht mehr auswerfen. 59 Elektro-Anschlüsse ACHTUNG (Gelb) (Gelb) • Vor der Installation, gut Einsicht nehmen in das vorgegebene Schaltbild • KABEL DER HANDBREMSE: DAS GERÄT KANN KEINE VIDEO-BILDER AUSWEISEN, WENN DAS KABEL NICHT ANGESCHLOSSEN IST. Video IN Video IN Rückwärtsgang (Rot) (Weiss) Audio AUX-IN (Braun) Subwoofer FM/AM Antennen-Eingang (Weiss) Audio Out Front (Rot) Video-Ausgang (Gelb) Grau Sicherung (10A) Grau Beleuchtung Orange Grau Weiss Parking Grigio Kabel Rückwärtsgang Braun Weiss/Schwarz Fernsteuerung für Verstärker Rosa Grau Kontrolle Antennen-Verbinder Blau Lautsprecher Front sx Lautsprecher Front dx Grau/Schwarz Zündungsblock Grün +12V Zündplus (Rot) Lautsprecher Rear sx Grün/Schwarz Violett +12V Permanent (Gelb) Sicherung Batterie Lautsprecher Rear dx Masse (GND-Schwarz) Violett/Schwarz (An die Wagen-Karosserie) 60 Installation D Installations-Prozedur Zu allererst, Elektro-Verbindungen herstellen und gut kontrollieren. Reset Taste drücken um Bedienteil herunter zu klappen. Mit Hilfe eines spitzen Gegenstandes, RESET drücken, um die Original-Einstellungen des Geräts wieder aufzugreifen. Hinweis: durch das Drücken der Taste RESET, gehen eingestellte Sender und Uhrzeit verloren. Installations-Schacht Das Gerät eignet sich für den Einbau in jedes beliebige Armaturenbrett, vorausgesetzt es verfügt über einen Schacht lt. Abbildung. Um das Gerät einbauen zu können, muss der Schacht folgende Abmessungen haben: 183 mm x 52 mm Höhe. WICHTIG: Vor der Installation, die beiden Schrauben vom DVD-Player entfernen, denn mit den eingedrehten Schrauben funktioniert das Gerät nicht. 1. Montage-Bügel in den Radio-Schacht eingeben Befestigungsstellen mit einem Schraubenzieher umknicken. Sicherstellen, dass der Blockierungs-Hebel auf derselben Ebene liegt wie der Montage-Bügel (also nicht hervorsteht). 2.Rücken des Geräts befestigen Schraube und Stromverbinder befestigen; dann den Rücken des Geräts, mittels Gummi-Pufferam Auto befestigen. Befestigungs-Schraube Gummi-Puffer 3.Anpass-Rahmen aufsetzen 61 Bedienteil 1) Öffnen des Bedienteils 2) Menü-Taste: System-Setup 3) Wahl des Frequenz-Bandes: FM1, FM2, FM3, AM1, AM2 4) Quelle: RADIO,DISC,SD,USB,BACK VIEW,AUX,BLUETOOTH 5) Richtungs-Tasten: Menü durchqueren mittels Pfeile-Tasten 6) TA: Verkehrs-Durchsagen aktivieren/de-aktivieren 7) Mikrophon 8) PTY: Wahl des Radio-Programmes 9) USB-Eingabe 10) APS/: Scrollino der Radio-Sender, Play/Pause 11) AF: alternative Frequenz ON/OFF 12) Display TFT 3" touch screen 13) Knopf drehen, um Lautstärke einzustellen 14) Eingabe für SD/MMC-Karte 15) Reset: Original-Einstellungen wiederherstellen 16) Taste : CD-Auswurf 62 Fernsteuerung D TASTEN UND FUNKTIONEN 1 (PWR) Gerät ein-/ausschalten (REC/Sub-T): Rec-Funktion nicht aktiviert ; SubT; im DVD-Modus Sprache wählen (MUTE): Stumm-Schaltung (SRC): Wahl RADIO,DISC,SD,USB,BACK VIEW,AUX,BLUETOOTH 2) (BAND/RDM): Wahl FM1,FM2,FM3,AM1,AM2/WAHLLOSE WIEDERGABE (APS/PRG): Scrolling / Programmierung der Radio-Programme (ST/RPT): Stereo-Mono / Wiederholung 3) : Wiedergabe / Pause. : Stop. Setup: Einstellungen der Menü-Regelung Title: Titel (nur in DVD-Modalität) ENTER: Wiedergabe/ Bestätigung Wahl-Bestätigung : Menü-Pfeile. 4) : Grüner Hörer, startet das Gespräch. OSD/Id3: Infos auf Display ausweisen / id3-Infos : Roter Hörer , unterbricht das Gespräch. 5) 0-9: Numerischer Wahl-Sektor #/GOTO: #/ Suche starten RO/SN: Funktion nicht aktiviert 6) AF: alternative Frequenz TA: Verkehrs-Infos. PTY: RDS-Programm-Typ 7) : Manuelle Radio-Sendersuche; Sprung/Suche darauffolgendes Stück : Manuelle Radio-Sendersuche; Sprung/Suche vorausgehendes Stück + : Lautstärke erhöhen - : Lautstärke reduzieren SEL: Wahl Audio- und Video-Modalität CLK: Uhrzeit ausweisen EQ: Wahl des Klang-Effekts - Rock/Pop/Classic/Normal N/P-Angle: Video-System PAL/NTSC/AUTO - Winkel (nur für DVD) R/L-Language: Audio Mono-L, Mono-R, Stereo; Audio-Sprache (nur für DVD) 63 Hinweis: die Fernbedienung ist nur zur besseren Erklärung abgebildet. Hinweis: über die Funktion RDS, AF/TA/PTY verfügt dieses Gerät NICHT. Über die Funktion BLUETOOTH verfügt dieses Gerät NICHT. Fernsteuerung Remote control Einsatzbereitschaft Das Fernbedienung reagiert aus einer Entfernung von 3 – 5 Metern. Einsetzen einer neuen Lithium-Batterie Sobald die Funktionen der Fernbedienung nur schwer oder gar nicht mehr möglich sind, muss die Lithium-Batterie mit einer neuen ersetzt werden. Die Batterie dabei unbedingt in der vorgegebenen Pol-Richtung einlegen 1. Batterie-Halter herausziehen. Verankerung dabei gedrückt halten. 2. Knopf-förmige Batterie, mit +Pol nach oben, einlegen. Batterie-Halter wieder in die Fernbedienung einschieben.. VORSICHT • Batterien immer an für Kinder unzugänglichen Orten aufbewahren. Bei versehentlichem Verschlucken der Batterie, sofort einen Arzt rufen. • Batterien niemals wiederaufladen, kurzschließen, öffnen, erhitzen oder ins Feuer werfen. • Batterien nicht mit anderen Metallen in Kontakt bringen. • Die genannten Verhaltensweisen sind deshalb verboten, weil die Batterie sich überhitzen und platzen könnte, mit nachfolgender Brandgefahr • Vor der Entsorgung, die Batterie mit Isolierband umhüllen, um das Überhitzen/Platzen der Batterie bzw. Brandgefahr zu verhindern. 64 Wiedergabe-Abwicklung D EJECT • Taste drücken um CD auszuwerfen. Hinweis: wird die ausgeworfene CD nicht entfernt, so nimmt das Gerät die CD nach 10 Sekunden automatisch wieder auf. PLAY/ PAUSE • APS Taste drücken, um die Wiedergabe zu STARTEN bzw. STOPPEN. Hinweis: Die Wiedergabe läßt sich auch mit Druck auf den Lautstärke-Knopf (Volume) starten. SOURCE • SOURCE-Taste kurz drücken, um das Gerät einzuschalten. Hinweis: bei eingeschaltetem Gerät, SOURCE-Taste kurz drücken, um das darauffolgende Bild (Fig. 1) zu besichtigen. Dann die gewünschte Quelle wählen, indem Sie auf die betreffende Ikone auf dem Bildschirm drücken. Lautstärke (Volume) • Lautstärke erhöhen: Lautstärke-Knopf (VOLUME) drehen: im Uhrzeigersinn, um die Lautstärke zu erhöhen. Entgegen dem Uhrzeigersinn, um die Lautstärke zu reduzieren. Knopf nochmals drücken, um die Wahl innerhalb des Menüs zu bestätigen. Hinweis: Die TV-Ikone (Grau) ist nicht aktiviert. 65 Vorgänge während der Wiedergabe Wenn Sie, während der Wiedergabe einer DVD/VCD/CD, die Mitte des Bildschirms antasten, so sorgt das TOUCHSCREEN-System dafür, dass folgendes Menü erscheint: Hinweis: aufgrund der verschiedenen Brenn-Verfahren, könnten bestimmte cd-r,cdrw, dvd-rw,dvd+rw nicht korrekt ablesbar sein. Auch UNABGESCHLOSSENE CDs könnten vom Gerät nicht erkannt werden. Wie CDs abzuschließen sind, lesen Sie bitte in der Betriebsanleitung der jeweiligen Aufnahme-Programme nach. • Innerhalb des Menüs, befindet sich rechts das Unter-Menü. Drückt man die Taste so lassen sich die Dateien aus der Liste wählen. • Wahl von Stück, Kapitel bzw. Szene: Taste / drücken, um vorhergehendes Stück, Kapitel oder Szene zu wählen. Taste / drücken, um darauf folgendes Stück, Kapitel oder Szene zu wählen. • Schnell Vorwärts: Taste / gedrückt halten. • Schnell Zurück: Taste / gedrückt halten . RPT Wiederholung: RPT auf Bildschirm oder Fernbedienung drücken, um zwischen folgenden Möglichkeiten zu wählen: Der TFT-Bildschirm wird folgendes Menü aufzeigen: R/L: R/L auf dem Bildschirm, oder auf der Fernbedienung, anwählen, um AUDIO MONO L, AUDIO MONO R, AUDIO STEREO zu wählen. TIT: Innerhalb der Modalität DVD, VCD-Wiedergabe, während der Wiedergabe selbst, TIT auf dem Bildschirm oder auf der Fernbedienung anwählen, um zum Anfangs-Menü zurückzukehren, wo sich die verschiedenen Funktionen wählen lassen. ESC: Diese Taste drücken, um die Wiedergabe zu verlassen und zur Quellen-Wahl überzugehen. 66 Vorgänge bei USB/SD IT D • Front-Blende entfernen • Karte in die betreffende Öffnung eingeben Das Gerät schaltet automatisch auf den SD-Modus und beginnt mit der Wiedergabe des ersten Stücks. WIEDERGABE Wiedergabe/Pause: • auf den Bildschirm drücken/ Front-Blende/Fernbedienung zum Starten der Wiedergabe oder zum Pause einlegen PANNELLO INTERNO INTERNES BEDIENTEIL Taste drücken (um 90°, entgegengesetzt dem Uhrzeigersinn drehen ), um die Frontblende zu öffnen. 1.CD-Einwurf 2.CD-Auswurf-Taste 3.Eingabe für SD/MMCKarte 4.Reset Wahl: • auf den Bildschirm drücken/ Fernbedienung, um das Stück danach/zuvor zu wählen • auf Front-Blende/Fernbedienung drücken, um auf die gewünschten Stücke zu gehen. Knopf auf der Blende drücken bzw. Enter-Taste auf der Fernbedienung drücken, um die Wahl zu bestätigen. Repeat: • RPT-Taste auf dem Bildschirm drücken bzw. ST/RPT-Taste auf der Fernbedienung drücken, um die Wiederholungs-Modalität einzuleiten. USB-VERBINDUNG USB-Stift in die Öffnung auf der Frontblende eingeben. Das Gerät schaltet automatisch auf den USB-Modus und beginnt mit der Wiedergabe des ersten Stücks. Band: • BAND-Taste AUF DER FRONT-BLENDE drücken bzw. BAND/RPT auf der Fernbedienung drücken, um die wahllose Wiedergabe zu aktivieren. ANSCHLUSS SD/MMC-KARTE • Taste drücken (entgegengesetzt dem Uhrzeigersinn, um 90° drehen). 67 System-Setup (System-Einstellung) MENÜ AUDIO/VIDEO/SYSTEM SETUP VIDEO • BRIGHT/HELLIGKEIT - COLOR/FARBE - CONTRAST/KONTRAST TINT/FARBTON • VMODE/MODALITÄT VIDEO-EINSTELLUNG STAND/STANDARD - USER/NACH WAHL - SOFT/ANGENEHM BRIGHT/HELL Um das Setup-Menü Einstelungs-Menü zu betreten, MENU-Taste drücken: Video mode: Audio mode: Menü-Einstellungen ändern Die gewünschten Funktionen auf dem Bildschirm anwählen. drücken und Auf die Funktion Einstellung durchführen. Nochmals auf die Funktion drücken, um zu bestätigen und um die Funktion zu verlassen. Hinweis: Die Einstellungen können auch auf anderem Wege erfolgen, d.h.: Tasten (Richtungspfeile) Knopf; drehen, einstellen und drücken. zum Bestätigen SETUP AUDIO • AUDIO SETUP: BASS-TREBLE-BALANCE-FADER EINSTELLUNG VON -7 BIS +7 • EQ SETTING: EINSTELLUNG DES AUDIO-EQUALIZERS NORM ROCK POP CLASSIC SYSTEM-SETUP (System-Einstellung) •LOUD ON/OFF •BEEP ON/OFF •COLOR BILD BEI BILDSCHIRM-WARTESTAND RED/YELLOW/BLUE/GREEN/DEMO •TIME DISPLAY ON/OFF Bildschirm weist Uhrzeit aus •TIME ADJ Einstellen der Uhrzeit UHRZEIT EINSTELLEN : Auf dem Bildschirm die Stunde anwählen bzw. einstellen (+ O –) Auf dem Bildschirm die Minuten anwählen bzw. einstellen (+ O –) ESC-Taste drücken, um zu bestätigen bzw. um Modus zu verlassen. System mode: 68 Bluetooth D Die BLUETOOTH-Funktion ist für die kabellose Kurzstrecken-DatenÜbermittlung zuständig, d.h. durch die BLUETOOTH-Funktion wird der DVD-Player mit einem tragbaren Gerät in Verbindung gebracht, das auf die Bluetooth-Funktion reagiert, so dass der DVD-Player praktisch als Freisprechgerät verwendet werden kann. WAHL DER BLUETOOTH-MODALITÄT Vorgehensweise: A. SOURCE-Taste drücken, um das Haupt-Menü zu betreten. B: Auf dem Bildschirm, die BLUETOOTH-Ikone anwählen (Abbildung 1) (N.1) BLUETOOTH-MODALITÄT AKTIVIEREN Bluetooth hat folgende Funktionen: PARING: Koppelung mit einem tragbaren Gerät CONNECTING: Anschluss des gepaarten Geräts KOPPELUNG (PARING) Um die Koppelung zum Telefon herzustellen, wie folgt vorgehen: BLUETOOTH einschalten. Die BLUETOOTH-Ikone auf dem Haupt-Menü anwählen, um die Funktion betreten. SETUP-Taste drücken. ON/OFF-Taste drücken (Abbildung 2) Sobald das Telefon den Player erkennt, die Koppelungs-Codenummer “0000” eingeben. Nach korrekt durchgeführter Koppelung erscheint die Aufschrift “CONNECTED”. Jetzt “EXIT”-Taste drücken, um die BLUETOOTH-Einstell-Funktion zu verlassen. (N.2) 69 Bluetooth TELEFON-ANRUF DURCHFÜHREN stornieren. Der Telefonanruf kann mittels Fernbedienung oder durch die TOUCHSCREEN-Funktion des Bildschirms erfolgen. TELEFONGESPRÄCH IN EMPFANG NEHMEN Wenn das Telefon mit dem Gerät gekoppelt ist und ein Telefonanruf eingeht, dann schaltet das Gerät automatisch auf die BLUETOOTH-Modalität um, und weist gleichzeitig die Telefon-Nummer des Anrufers aus (Abb. Unten) Grünen Hörer auf dem Bildschirm/der Fernbedienung anwählen, um das Telefongespräch anzunehmen. Roten Hörer auf dem Bildschirm/der Fernbedienung anwählenm, um das Telefongespräch zu beenden. A. Durch TOUCHSCREEN. Telefon-Nummer auf dem Bildschirm angeben Ikone drücken, um eine Telefonnummer zu löschen bzw. zu korrigieren (grünen Hörer) drücken, um ein Telefongespräch zu starten. (roten Hörer) drücken, um das Telefongespräch abzuschließen bzw. zu stornieren. Drückt man auf die Aufschrift “TRANSFER” auf dem Bildschirm, so schaltet das Telefonat (Audio) vom DVD-Player auf das Telefon und umgekehrt (siehe Abbildung unten rechts) Hinweis: Einige Telefon-Modelle führen keine “TRANSFER”-Funktion B: Durch die Fernbedienung (grünen Hörer) drücken, um direkt zur BLUETOOTH-Funktion zu gelangen. Telefon-Nummer mittels Nummern-Tasten anwählen. (grünen Hörer) drücken, um das Telefongespräch zu starten. (roten Hörer) drücken, um das Telefongespräch abzuschließen bzw. zu Hinweis: Die Ikone (FUNKTION) DES Telefon-Registers ist NICHT aktiviert (Funktion ist nicht gegeben) Grüner Hörer Roter Hörer 70 Radio-Funktionen IT D auf Mono umschalten. LOC/DX Hält man die ST-Taste länger als 2 Sekunden auf der Fernbedienung gedrückt, so schaltet der Empfang von DX auf LOC (DX : Empfang aller Sender; LOC: gezielter Empfang der Sender mit stärkerem Signal) SENDER-SUCHE Manuelle Sender-Suche : • Hält man die Tasten / auf der Frontblende, oder die Tasten / auf der Fernbedienung, länger gedrückt, / so lassen sich die Frequenzen manuell, in Abständen von 0,05 MHz, abspielen. Automatiche Sender-Suche: • Drückt man kurz die Taste / auf der Front-Blende, oder die Taste / auf der Fernbedienung / so erreicht man den darauffolgenden/vorhergehenden Radio-Sender. Auf die Tasten ... drücken, um die eingespeicherten Sender von 1 bis 6 abzusuchen. Sender-Einspeicherung: • Drückt man länger auf die Tasten / so speichert sich der Sender in eine Position zwischen 1 und 6 ein. BAND BAND-Taste drücken, um die Wahl zu treffen zwischen 3 FM- und 2 AMBänder (FM1-FM2FM3-AM-AM1). AS/PS Sender-Suche: •Taste länger als 3 Sekunden gedrückt halten um die autom. Sender-Suche zu starten und um die Sender einzuspeichern: 1-6 FM1, FM2, FM3, AM, AM1. Abhören der Sender: • Taste kurz drücken, um alle Sender, der Reihe nach jeweils 3 Sekunden lang abzuhören. Um das Abhören der Sender zu unterbrechen, auf die Taste des gewünschten Senders drücken. ST Wenn der Radio-Sender ein Stereo-Signal ausstrahlt, so erscheint die blaue Aufschrift “ST” auf dem Display. Drückt man die ST-Taste auf der Fernbedienung, so kann man von Stereo 71 RDS (Radio Data System) Die Verfügbarkeit des RDS-Dienstes ist gebietsmäßig geregelt. Sollte der RDS-Dienst in Ihrem Gebiet nicht zur Verfügung stehen, dann lassen sich die nachstehenden Funktionen, in Ihrem Gebiet, nicht aktivieren. RDS - Allgemeine Hinweise AF (Alternativ-Frequenz) : erweist sich ein bestimmtes Radio-Signal als zu schwach, sucht die AF-Funktion automatisch nach einem stärkeren Sender, innerhalb derselben PI-code-nummer (Programm-Identifizierung). PS (Name des Programm-Services): anstelle der Frequenz, weist das Display den Sender-Namen aus. Modalität AF: AF on: AFFunktion ist aktiviert. AF off: AF-Funktion ist deaktiviert. Hinweis: die PTY-Leuchte, die sich auf dem Display befindet, wird so lange blinken, bis die RDS-Verkehrsinformationen eingehen. Sollte, in Ihrem Gebiet, der RDS-Dienst nicht gegeben sein, dann die AF-Modalität einfach ausschalten. Modalität REG: PTO mindestens 2 Sekunden gedrückt halten, um die REG-Modalität zu aktivier/deaktivieren. REG on: die AF-Funktion greift spontan die Regional-Code-Nr. auf (Bestandteil der PI-code-nummer), so dass folglich nur die örtlichen Sender ansprechbar sind. REG off: die AF-Funktion ignoriert die Regional-Code-Nr. (Bestandteil der PI-code-nummer), so dass auch überregionale Sender automatisch erfasst werden. Verkehrs-Informationen Bestimmte RDS FM-Sender geben, in festen Zeitabständen, Verkehrsinformationen durch. TP (Traffic-Program) : Verkehrs-Informationen durchs Radio TA (Traffic-Announcements): Radio-Informationen zu den Straßenverhältnissen TA-Modalität: aktiviert man diese Modalität , so beginnt die TA-Leuchte zu blinken. Jede eintreffende Verkehrsinformation wird durch die TA-Leuchte auf dem Display signalisiert. Das Gerät schaltet dabei vorübergehend, egal in welcher Modalität es sich gerade befindet, auf die Modalität TUNE. Die Verkehrsinformation wird somit, in der für TA vorgesehenen Lautstärke, übertragen. Nach Beendigung der Durchsage, greift das Gerät auf die vorhergehende Modalität und Lautstärke zurück. Innerhalb der TA-Modalität lassen sich die Funktionen SEEK, SCAN, AMS anwählen bzw. einspeichern, jedoch nur anhand der TP-Code-Nr. (Traffic Programme). EON (Enhanced Other Networks = weitere Lieblings-Sender). Sobald EON-Daten erkennbar werden, schaltet sich die EON-Leuchte ein: die Funktionen TA und AF bekommen dadurch den Vorrang. TA: die Verkehrsinformationen sind sowohl vom momentan eingestellten Sender hörbar, als auch von anderen Radio-Sendern. AF: die Liste der bestehenden RDS-Sender wird durch EON laufend aktualisiert. Die EON-Modalität sorgt also dafür, dass das Gerät alle RDS-Informationen zum Besten nutzt. EON aktualisiert desweiteren die AF-Liste der eingespeicherten Sender und schiebt automatisch, jeweils den zuletzt einstellten Sender in diese Liste. Wenn Sie einen lokalen Sender einspeichern, dann lässt sich dieser auch auf einer Alternativ-Frequenz empfangen, oder durch einen beliebigen Sender, der gerade das gewünschte Programm ausstrahlt. EON ist also in der Lage, lokale TP-Sender schnell ausfindig zu machen. 72 Fehlersuche D Falls Sie in Schwierigkeiten geraten, schalten Sie das Gerät bitte sofort aus. Benutzen Sie das Gerät im übrigen nie unter anormalen Umständen, z.B. bei ausbleibendem Ton, bei Rauch- oder Geruch-Bildung, denn es könnten dadurch Brände oder Elektroschläge entstehen. Bei Unklarheiten, das Gerät sofort ausschalten und den Händler befragen, bei dem Sie das Gerät gekauft haben. Niemals versuchen, das Gerät selbst zu reparieren, das dies mit Gefahren verbunden sein kein. Neigung auf weniger als 30° reduzieren. Allgemeine Probleme Befestigung ist unstabil. Strom- oder Ton-Ausfall Der Zündschlüssel wurde nicht gedreht. Zündschlüssel in die Position ACC Für eine standfeste Montage des Geräts sollten alle beigelegten Beoder ON geben. standteile verwendet werden. Das Kabel ist falsch angeschlossen. Anschluss gut überprüfen. Sicherung ist durchgebrannt. Eine neue Sicherung einstzen. Radio Feststellen, ob Volume-Taste (Lautstärke) und Mute-Taste auf On/Off Störungen beim Radio-Empfang stehen. Der Sender ist zu weit entfernt und der Sender daher zu schwach. Falls o.g. Kontrollen nicht zur gewünschten Lösung des Problems führen, Einen anderen Sender suchen, der ein stärkeres Signal bietet. dann RESET drücken. Sicherstellen, dass das Eingangs-Kabel der Telefon-Stummschaltung nicht Eingespeicherter Sender geht verloren verhemmt oder geerdet ist. Das Batterie-Kabel ist nicht korrekt eingesteckt. Batterie-Kabel am immer-lebendigen Terminal anschließen. CD Die CD ist eingelegt, es kommt aber kein Ton. Fehler-Anzeige Die CD liegt seitenverkehrt. Display besagt ERROR (=Fehler). CD umdrehen, d.h. Etikett muss nach oben zeigen. CD ist verschmutzt, beschädigt oder seitenverkehrt eingelegt. CD ist verschmutzt oder beschädigt. CD säubern oder eine andere CD -Taste drücken, um die CD zu entfernen. eingeben. Wenn der Video-Wiedergabe-Start zu lange auf sich warten läßt. Beim Ablesen der Datei hat sich ein Fehler ergeben oder die Datei ist nicht kompatibel SRC drücken, um die Funktion zu verlassen. Dann nochmals SRC drücken, um die Wiedergabe auf Neue zu starten. Der Ton kommt nur zeitweise und ist von schlechter Qualität. CD ist verschmutzt oder beschädigt. CD säubern oder eine andere CD eingeben. Mögliche Vibrationen verursachen eine unregelmäßige Ton-Wiedergabe. Die Montage weist eine Neigung von mehr als 30° auf. 73 Sollten die gegebenen Tipps zu keiner Lösung führen, RESET-Taste drücken. Technische Eigenschaften Haupt-Eigenschaften Stromversorgung 12V CC (11V-16V) Test-Spannung 14,4V, Masse-Minus Max. Ausgangsleistung 50Wx 4Kanäle Ausgangs-Dauerleistung 25Wx 4 Kanäle (4 Ohm 10% T.H.D.) Ideale Lautsprecher-Impedanz 4 – 8 Ohm Vorverstärkte Ausgangsspannung 4.0 V (CD-Wiedergabe: 1KHz, OdB, 10KOhm mit Last) Sicherung 15Amp Abmessungen (LxHxT): 178x50x166mm Gewicht 2,2 kg Subwoofer-Ausgang 4,0 V Aux-In-Niveau TFT LDC 3,5” Display-Auflösung (Punkte) Aktiver Raum (mm) Bildschirm-Abmessung (in Zoll) Punkte-Abstand (mm) Kontrast-Verhältnis Schärfe Radio FM-Stereo Frequenzgang Nutzbare Sensibilität Frequenz-Antwort Stereo-Trennung Bild-Wiedergabe-Verhältnis Wiedergabe-Verhältnis IF Signal/Störungs-Verhältnis >55dB Radio AM (MW) Frequenzgang 522-1620 KHz (Europa) 530-1710 KHz (USA) Nutzbare Sensebilität (S/N=20dB) 30 dBu CD-Player System: Digitale Audio-CDs Frequenzantwort 20Hz – 20 KHz Signal/Störungs-Verhältnis >80 dB Harmonische Gesamt-Verzerrung: weniger als 0,20 % (1KHz) Kanal-Trennung >60 dB Video-Signal-Ausgang: PAL/NTSC/AUTO Video Video-Ausgangsniveau 1 +/- 0,2 V Waagerecht > 500 Zeilen Lieferumfang N°. 1 Montage-Halter N°. 4 Schrauben M5x6mm N°. 4 Schrauben M4x6mm N°. 1 Montage-Stift (50mm) N°. 1 Kabel-Stecker N°. 1Etui fürs abnehmbare Bedienteil N°. 1 Anpassung-Platte N°. 1 Montage-Anleitung N°. 1 Gummi-Puffer N°. 1 Fernsteuerungsgerät >300mV 320 (RGB) x 234 76,32 (Höhe) x 42,822 (L) 3,5 (16:9) 0,2385 (Höhe) x 0,183 (Länge) 350 350 87,5 – 108,0 MHz (Europa) 87,5 – 107,9 MHz (USA) 8dBu 30Hz – 15KHz 30dB (1KHz) 50dB 70dB 74 VORBEHALT: Im Zuge der technologischen Weiterentwicklung könnten Änderungen am Design, oder an den technischen Eigenschaften des Produktes, automatisch eingeführt werden. Garantie-Bedingungen D Dieses Produkt verfügt über eine Garantie von 2 Jahren ab Kauf-Datum. Die Garantie gibt Anspruch auf den kostenlosen Ersatz der defekten Teile, d.h. Teile, die lt. unseren Technikern, Material- oder Fabrikationsfehler aufweisen. Die Erwägung, ob das Problem zustande gekommen ist wegen falscher Verwendung oder Fabrikationsfehler, steht einzig und allein unserer Technik zu. Die unter Garantie durchgeführten Reparaturen geben keinerlei Anlass, die Garantie-Dauer zu verlängern oder zu erneuern. Desweiteren gibt die GarantieReparatur keinerlei Anspruch auf Schadensersatz jeglicher Art. Die Garantie hat in folgenden Fällen keine Gültigkeit: Bei Transportschäden (Kratzer, Dellen u.ä.). Bei Schäden, die auf falsche Installation des Geräts zurückzuführen sind, oder bei Produkt-Beeinträchtigung infolge von Umwelt- oder Klima-Verhältnissen u.ä. Bei Schäden, die auf unsachgemäße oder schlechte Behandlung, Eingriffe in das Produkt oder falsche Verwendung, oder auf Reparaturen seitens unbefugter Personen, zurückzuführen sind. Bei allen Reparatur-Fällen wenden Sie sich bitte an Ihren Phonocar-Händler. Das Gerät muss dann bei Ihrem Phonocar-Händler eingereicht werden, mitsamt korrekt ausgefüllter Garantie-Karte und Kauf-Nachweis. 75 Índice Precauciones seguridad.......................................................................................................................................................................................................... 2 Esquema................................................................................................................................................................................................................................. 3 Conexiones eléctricas............................................................................................................................................................................................................. 4 Instalación............................................................................................................................................................................................................................... 5 Panel de control...................................................................................................................................................................................................................... 6 Mando a distancia................................................................................................................................................................................................................... 7-8 Operaciones reproducción...................................................................................................................................................................................................... 9-10 Operaciones USB/SD.............................................................................................................................................................................................................. 11 Setup sistema.......................................................................................................................................................................................................................... 12 Bluetooth................................................................................................................................................................................................................................. 13-14 Funciones radio....................................................................................................................................................................................................................... 15 RDS ........................................................................................................................................................................................................................................ 16 Guía rápida a la solución de los problemas............................................................................................................................................................................ 17 Características técnicas.......................................................................................................................................................................................................... 18 Garantía................................................................................................................................................................................................................................... 19 76 E Precauciones Precauciones 1. Conectar el aparato exclusivamente a una alimentación de 12Voltios, con negativo a Masa. 2. No instalar el aparato en lugares que pueda comprometer una conducción segura. 3. Cuando se está conduciendo, esta prohibido hacer uso del Display, para evitar violar las normas de circulación, además para evitar accidentes de trafico. El uso del Display, esta consentido exclusivamente para seguir la imagen de la retro-camera. 4. Para una conducción segura, ajustar el volumen con un nivel confortable con tal de permitir escuchar eventuales situaciones de emergencias. 5. No exponer el aparato y relativo amplificador y altavoces a humedad o agua, con el fin de evitar chispas o incendios. 6. No sustituir el fusible situado en la línea de alimentación, sin haber preguntado antes a un profesional de la instalación. Fusibles no aptos pueden dañar el aparato y causar incendios. 7. Es importante apagar el aparato inmediatamente, enviando después el aparato al Servicio Técnico o al Distribuidor de la Marca, en el caso de que se verifique una de estas situaciones: a) Ningún Audio en salida b) Ninguna imagen en salida c) Agua u objetos que se hayan introducidos en el aparato d) Humo e) Olores raros. Advertencia Para reducir el riesgo de incendios o cortocircuitos., NO exponer el aparato a lluvia o humedad. Atención El aparato pertenece a los productos LASER CLASSE 1. Los Comandos y los Procedimientos tienen que ser ejecutados exactamente como indicado en las presentes instrucciones. Para evitar el peligro de salida de radiaciones, no abrir nunca las tapas ni tampoco intentar reparar uno mismo el aparato. Es preferible enviar el aparato al Servicio Técnico, para que sea reparado por personal calificado. Productos Láser Largo de onda: CD: 780 nm DVD: 650 nm Potencia Láser: ninguna salida de radiaciones peligrosas, a condición que se mantengan las protecciones de seguridad Notas en los CD •CD defectuosos o sucios pueden causar una reproducción sonora irregular • Coger los CD como se muestra en la figura. •Tocar con los dedos solo la etiqueta, nunca la parte sin etiqueta • No pegar etiquetas u hojas de protección en ningún lado del CD •No exponer los CD al sol directo o a fuentes de calor elevado • Para limpiar los CD, pasar un paño limpio, desde el centro hacia el exterior •No utilizar nunca disolventes o alcohol • El presente aparato no lee los CD de 3” (8cm). No insertar nunca CD de 3” o CD de forma irregular. El aparato podría no poder expulsar tales CD. 77 Esquema eléctrico de las conexiones ATENCIÓN (Amarillo) (Amarillo) • ANTES DE INSTALAR OBSERVAR ATENTAMENTE EL ESQUEMA. • CABLE DEL FRENO DE MANO: EL APARATO NO VISUALIZARÁ LAS IMÁGENES DE VIDEO SI NO SE CONECTA EL CABLE (Rojo) Entrada Video Entrada Video Marcha atrás (Blanco) Entrada Audio (Marrón) Subwoofer FM/AM entrada antena (Blanco) Salida Audio Frontal (Rojo) Salida Video (Amarillo) Gris Fusible (10A) Gris Blanco Gris Aparcamiento Iluminacion Naranja Gris Altavoz Delantero izq Marrón Blanco/Negro Remoto para el Amplificador Rosa Gris Control conector de antena Azul Cable marcha atrás Llave de encendido Altavoz Delantero dcho Gris/Negro Verde + 12 voltios (Rojo) + 12 voltios Permante (Amarillo) Fusible Bateria Masa (negativo – Negro) (chasis del coche) Verde/Negro Púrpura Púrpura/Negro 78 Altavoz Trasero izq. Altavoz Trasero dcho Installacion E Pauta de instalacion Ejecutar las conexiones. Volver a controlar escrupulosamente las conexiones eléctricas Reset para abrir la carátula. Con el auxilio de un objeto puntiagudo presionar RESET, para volver a los ajustes originales de fábrica. Presionar la tecla Nota: presionando RESET, se borran el horario y las emisoras memorizadas. Hueco para el montaje El aparato puede ser instalado en cualquier salpicadero que tenga estas dimensiones: 183 de ancho x 52 de alto. IMPORTANTE: Antes de fijar definitivamente el aparato, quitar los dos tornillos, de no ser así el reproductor de DVD no funciona correctamente. 1. Insertar el soporte del aparato en el salpicadero. Doblar los puntos de fijación con un destornillador. Asegurarse de que las pestañas de fijación no sobresalgan impidiendo la entrada del aparato. 2. Fijar la parte posterior del aparato Después de fijar el tornillo y el conector de alimentación, fijar la parte trasera del aparato al coche, mediante la almohadilla de goma 3.Insertar la placa. 79 Perno de montaje amortiguador de goma Panel de control 1) Abertura panel 2) Tecla Menú: Setup Sistema 3) Selector de banda: FM1, FM2, FM3, AM1, AM2 4) Source: RADIO, DISC, SD, USB, BACK VIEW, AUX, BLUETOOTH 5) Teclas direccionales: navegar en el menú mediante las teclas 6) TA: Activa/Desactiva la función Anuncios sobre el tráfico 7) Micro 8) PTY: Selecciona el tipo de programa radio 9) Puerta USB 10) APS/: Escansión emisoras de radio, Play/Pausa 11) AF: frecuencia alternativa ON/OFF 12) Display TFT 3" táctil 13) Girar el mando para ajustar el volumen 14) Ranura tarjeta de memoria SD/MMC 15) Reset: repristina los ajustes de fabrica 16) Tecla : expulsion disco 80 Mando a distancia E TECLAS Y FUNCIONES 1) (PWR) Enciende/Apaga la unidad (REC/Sub-T): Función Rec. no activa; SubT; Cambia idioma en modo DVD (MUTE): Silencia el audio (SRC): Selecciona RADIO,DISC,SD,USB,BACK VIEW,AUX,BLUETOOTH 2) (BAND/RDM): Selecciona FM1, FM2, FM3, AM1, AM2/REPRODUCION CASUAL (APS/PRG): Escansión / Programación emisoras de radio (ST/RPT): Stereo-Mono / Repetición 3) : Reproducción / Pausa. : Stop. Setup: Ajustes Setup del menú Title: Titoli (solo en modo DVD) ENTER: Reproducción/ Confirma selección :Flechas Menú. 4) : Auricular verde inicia la llamada. OSD/Id3: visualización info. en el Display informaciones id3 : Auricular rojo termina la llamada 5) 0-9: Área digitalización numérica #/GOTO: #/ Ir y Buscar RO/SN: Función no activa 6) AF: Frecuencia alternativa TA: Informaciones sobre el tráfico. PTY: Tipo de Programa RDS : Sintonizador manual de la radio; Salta/Búsqueda canción sucesiva: 7) : Sintonizador manual radio; Salta/Búsqueda canción precedente. +: Aumento volumen -: Disminución volumen SEL: Selección modo Audio y video CLK: Visualiza reloj EQ: Selecciona efecto sonoro - Rock/Pop/Classic/Normal N/P-Angle: Sistema video PAL/NTSC/AUTO - Angulo (Solo para DVD) R/L Language: Audio Mono-L, Mono-R, Stereo; Idioma Audio (Solo para DVD) 81 Nota: La imagen del mando a distancia sirve solo para consultas. Nota: Esta unidad no tiene la función RDS, AF/TA/PTY. Esta unidad no tiene la función BLUETHOOT. Mando a distancia Remote control Operatividad del Mando a distancia El Mando a distancia funciona a una distancia entre 3 ~ 5 metros. Sustitución de la batería de Litio. Cuando el número de las funciones ejecutables desde el mando a distancia resultan reducidas o imposibles, se necesita sustituir la batería de litio, con una nueva. Asegurarse que la batería sea insertada según las polaridades indicadas 1. Extraer el soporte de la batería, presionando el enganche 2. Introducir la batería, con el (+) hacia arriba. Re-insertar el soporte de la batería del mando a distancia. ATENCIÓN • Guardar la batería en un lugar fuera del alcance de los niños. En el caso de que la batería sea deglutida accidentalmente hay que consultar inmediatamente con un medico • NO recargar, corto-circuitar, abrir, calentar o tirar al fuego la batería. • NO poner la batería a contacto con otros materiales metálicos. • Todos los procedimientos arriba indicados están prohibidos ya que pueden causar el sobre-calentamiento o rotura de la batería incluso incendios. • Antes de tirar la batería, hay que envolverla con cinta adhesiva. La cinta adhesiva es necesaria para evitar el sobre-calentamiento rotura de la batería 82 Operaciones en reproduccion E EJECT • Presionar para expulsar el disco. Nota: Si el disco expulsado no se extrae de su ubicación después de 10 segundos volverá a entrar automáticamente en la unidad. PLAY/ PAUSE para INICIAR/PARAR la reproducción. • Presionar la tecla APS Nota: La reproducción se inicia también presionando el mando del VOLUMEN. SOURCE • Presionando la tecla SOURCE brevemente para acceder al aparato Nota: cuando la unidad esta encendida, presionar brevemente SOURCE para visualizar la imagen siguiente (figura 1) y selecionar la fuente deseada tocando los iconos en la pantalla VOLUMEN • Aumentar Volumen: Girar el mando del VOLUMEN en sentido Horario/anti-horario para incrementar/disminuir el volumen. Presionar el mando para confirmar las selecciones de los menùs. Nota: El icono TV (gris) no está activo. 83 Operaciones en reproduccion Durante la reproducción de un DVD/VCD/CD, tocando en centro de la pantalla táctil, el sistema TOUCHSCREEN visualizará el siguiente menú: Nota: a causa de los diferentes sistemas de grabación, algunos discos CD-r, cd-rw, dvd-rw, dvd+rw pueden no ser leído correctamente. También los discos no FINALIZADOS Pueden no ser reconocidos por la unidad. Para la función de finalización de los discos hacer referencia a los manuales de los programas de grabación. • • • • En este menú, en la parte derecha se encuentra los submenú Presionando se seleccionan los archivos y el archivo de la lista. Selecion Pista, Capitulo o Escenas: presionar / para elegir la pista,capitulo,escena precedente. presionar / para elegir pista, capitulo sucesivos. / Avance Rapido: Tener presionado Retroceso Rapido: Tener presionado / . R/L: Presionar R/L en la pantalla o en el mando a distancia para seleccionar AUDIO MONO L, AUDIO MONO R, AUDIO STEREO. TIT: en modo reproducción DVD, VCD, durante la reproducción presionar RPT TIT: en la pantalla o en el mando a distancia para volver al menú inicial donde elegir las funciones deseadas. Repetición: presionar RPT en la pantalla o en el mando a distancia para elegir entre: ESC: Presionar esta tecla para salir de la reproducción y pasar a la ventana de selección fuente La pantalla TFT visualizara el siguiente menú: 84 Operaciones USB/SD E El aparato pasará automáticamente en modo SD e iniciará a reproducir la primera pista presente en el interior. REPRODUCION PANEL INTERNO Presionar la tecla panel frontal. Reproducción/ Pausa: • Presionar en la pantalla / mando a distancia para empezar la reproducción o poner en pausa. Selecciona: • Presionar en la pantalla/ mando a distancia para pasar a la pista sucesiva/precedente • Presionar en la pantalla/ mando a distancia para desplazarse en las pistas deseadas, confirmar la selección presionando el mando en el frontal o enter en el mando a distancia. (Girar de 90° en sentido anti-horario). Remover el 1. ranura disco 2. tecla expulsión disco 3. ranura tarjeta SD/ MMC 4. reset Repeat: • Presionar RPT en la pantalla o ST/RPT en el mando a distancia para selecionar el modo repetición deseada: CONEXION DISPOSITIVO USB Insertar una PEN DRIVE USB en el correspondiente puerto en la carátula, El aparato leerá automáticamente el USB e iniciará la reproducción de la primera pista presente en el interior. Band: • Presionar BAND en la pantalla o band/rpt en el mando a distancia para activar la reproducción casual. CONEXIÓN TARJETA SD/MMC • Presionar la teclas (Girar de 90° en sentido anti-horario). • Abrir la carátula frontal • Insertar la tarjeta en la ranura. 85 Setup del sistema MENÚ AUDIO/VIDEO/SISTEMA SETUP VIDEO • BRIGHT/BRILLO’ - COLOR/COLOR - CONTRAST/CONTRASTE TINT/TINTADO • VMODE/MODO’ AJUSTE VIDEO STAND/STANDARD USER/PERSONALIZADO - SOFT/TENUE - BRIGHT/BRILLO Para entrar en el menú de Setup presionar la tecla MENU: Modo Video: Modifica ajuste menú Seleccionar en la pantalla las opciones del menú Presionar Para confirmar y salir. Nota: Los ajustes se pueden efectuar también mediante: teclado y (Flechas direccionales) Pomo; girar para ajustar y presionar para confirmar. SETUP AUDIO • AUDIO SETUP: BASS-TREBLE-BALANCE-FADER "RANGE" -7 E +7 • EQ SETTING: AJUSTE ECUALIZADOR AUDIO NORM ROCK POP CLASSIC Modeo Audio SETUP DI SISTEMA •LOUD ON/OFF •BEEP ON/OFF •COLOR TEMA DEL SALVAPANTALLA RED/YELLOW/BLUE/GREEN/DEMO •TIME DISPLAY ON/OFF Muestra el horario en la pantalla •TIME ADJ permite ajustar el horario : para ajustar. Presionar en la pantalla los digito de las horas y + O – para ajustar. Presionar los dígitos de los minutos y + O – para ajustar. Presionar ESC para confirmar y salir. System mode: 86 Bluetooth E La función BLUETOOTH es un método de transmisión de datos sin cables a breve radio, a través de la función BLUETOOTH el aparato establece una conexión con el dispositivo portátil habilitado. En este modo el aparato puede funcionar como un dispositivo de manos libres. SELECCION MODO BLUETOOTH Método: A. Presionar SOURCE, para entrar en el menú principal. B: Presionar en la pantalla el icono BLUETOOTH (Diseño N.1) (N.1) ACTIVAR EL MODO BLUETOOTH El Bluetooth tiene las siguientes funciones: PARING: acoplamiento de un nuevo dispositivo portátil CONNECTING: conexión al dispositivo acoplado ACOPLAMIENTO (PARING) Para acoplar con el teléfono proceder como sigue: Encender el BLUETOOTH entrar en el modo BLUETOOTH presionando el icono desde el menú principal, presionar Setup, presionar ON/OFF (Diseño N.2) Cuando el teléfono reconoce el lector, insertar el código de acoplamiento "0000" una vez acoplado correctamente el la pantalla aparece "CONNECTED" presionar "EXIT" para salir del Setup del BLUETOOTH. (N.2) 87 Bluetooth EFECTUAR UNA LLAMADA CONTESTAR A UNA LLAMADA Es posible efectuar una llamada a traves del mando a distancia o mediante el dispositivo Cuando el teléfono esta acoplado a la unidad y se recibe una llamada, la unidad pasa automáticamente en el modo BLUETOOTH y visualiza el numero del teléfono de quien esta llamando (figura abajo) A. Desde el TOUCHSCREEN. (PANTALLA TACTIL) Presionar en la pantalla/mando a distancia el Descolgar para iniciar una llamada. Digitare el numero de telefono en la pantalla Para borrar o corregir un numero presionar en el icono Presionar (Descolgar) para iniciar una llamada Presionar (Colgar) para terminar u cancelar una llamada. Presionando en "TRANSFER" en la pantalla el l'audio de la conversacion pasa desde el autoradio al telefono y al reves (ver foto al lado en la parte baja a la dcha). Nota: Algunos telefonos no soportan la funcion "TRANSFER" Presionar en la pantalla/mando a distancia el Colgar para terminar una conversación. B: Desde el mando a distancia. Presionar (Descolgar) para entrar directamente en modo BLUETOOTH Digitare el numero mediante las teclas de digitalizacion numerica. Presionar (Descolgar) para iniciar una llamada. Presionar (Colgar) para terminar o cancelar una llamada. NOTA: El icono (FUNCION) rubrica no es activa (Función no soportada Descolgar Colgar 88 Funciones radio E Teniendo presionado durante más de 2 segundos la tecla ST desde el mando a distancia se pasa Desde el modo de recepción DX a LOC (DX: recepción de todas las emisoras; LOC: recepción selectiva de las emisoras con la señal más fuertes) SINTONIZACION Sintonización manual: • Presionando las teclas / prolongadamente desde la pantalla o desde / el mando a distancia pasan las frecuencias manualmente con intervalos de 0,05 MHz. Sintonización Automática: • Presionando brevemente / desde la pantalla o / desde el mando, se pasa a la emisora de radio sucesiva/precedente. Presionar las teclas...para ver las emisoras memorizadas de 1 a 6 BANDA Presionar la tecla BAND para selecionar entre3 bandas FM y 2 AM (FM1FM2¬FM3-AM-AM1). Memorización emisoras: • Presionando las teclas prolongadamente / se memoriza la emisora deseada en una posición comprendida entre 1 y 6 AS/PS Búsqueda Emisoras: • Presionar durante más de 3 segundos la tecla para iniciar la búsqueda automática de las emisoras y l a respectivas memorizaciones entre 1-6 FM1,FM2,FM3,AM,AM1. ST Escansión Emisoras: • Presionar brevemente la tecla para escuchar durante 3 segundos las emisoras en sucesión. Para interrumpir la escansión, presionar nuevamente la emisora deseada. Cuando una emisora de radio trasmite una señal en stereo aparece en el Display en azul "ST”. Presionando la tecla ST en el mando a distancia es posible pasar desde el modo Stereo al modo Mono. LOC/DX 89 RDS (Radio Data System) La disponibilidad del servicio RDS varía de zona a zona. Si el Servicio RDS no es disponible en vuestra área, las siguientes Funciones no serán accesibles. RDS - Informaciones Básica AF (Frecuencias Alternativa): cuando la señal de la radio es débil, la función AF procede a la búsqueda automática de otra emisora que tiene la misma PI (Identificación Programa), pero con una señal más potente. PS (nombre del Servicio Programa): el Display indicará el nombre de la Emisora que da el servicio. Modo AF: AF on: la función AF esta activada. AF off: la función AF está desactivada. Nota: el indicador PTY, presente el Display, iniciará a parpadear hasta cuando no llegen las informaciones RDS. En el caso de que en su zona el servicio RDS no este disponible, le aconsejamos de apagar el modo AF. Modo REG: presionar PTO durante más de 2 segundos para activar/desactivar el modo REG. REG on: la función AF tomará el código regional (del numero PI), motivo por el cual resultaran automáticamente accesibles solo las emisoras locales. REG off: la función AF ignorara el código regional (del numero PI), motivo por el cual la sintonización automática será posible también en las emisoras de otras regiones Anuncio sobre el estado del Tráfico Algunas emisoras RDS FM ofrecen con intervalos determinados, informaciones sobre el estado de la circulación. TP (Identificación Programa sobre el Tráfico): Informaciones Radiofónicas sobre el Tráfico. TA (Identificación Anuncios sobre el Trafico): Señalaciones radiofónicas sobre las condiciones de las carreteras Modo TA: activando el modo TA, el relativo piloto TA iniciará a parpadear. Nada más llegar una señalación sobre el estado de la circulación, el piloto TA lo indicará en el Display y el aparato automáticamente y de forma temporánea, independientemente del modo en la cual se encuentra, empezará a transmitir la información sobre el estado de la circulación con el volumen TA previsto. Terminado el anuncio, el aparato volverá al modo y al Volumen precedentes. En modo TA, las funciones SEEK, SCAN, AMS están disponibles y memorizables solo en presencia del código TP (Programa sobre el Trafico). EON (Enhanced Other Networks = Otras Redes preferenciales). En presencia de datos EON, el piloto EON se enciende y las funciones TA y AF reciben la prioridad. TA: las informaciones sobre el tráfico pueden ser escuchadas desde la emisora del momento o desde emisoras de otras Redes Radiofónicas. AF: El elenco de las emisoras RDS predefinidas viene actualizado por EON. El modo EON permite a la radio de aprovechar al máximo las informaciones RDS. EON, de hecho se actualiza constantemente el elenco AF de las emisoras preseleccionadas, además indicará incluso la última emisora seleccionada precedentemente. En el caso de que vayas a memorizar una emisora local, cercana a su casa, puede recibir la misma emisora en una Frecuencia alternativa, o bien una emisora diferente que además transmite el mismo programa. El sistema EON resulta muy rápido en la búsqueda de las emisoras TP local. 90 Guía rápida a la solución de los problemas E Si tenéis la impresión que algo no funciona correctamente, apagar enseguida el aparato. De hecho es mejor no usar el aparato en circunstancias anormales, ejemplo si falta el sonido, en presencia de humo, malos olores, en cuanto se podrían desarrollar incendios o descargas eléctricas. En estos casos apagar enseguida el aparato y contacten con el vendedor, distribuidor de la marca. Se aconseja de no intentar reparar uno mismo el aparato en cuanto es peligroso. PROBLEMAS GENERALES Ausencia de electricidad/sonido La alimentación del vehículo no está activada. Girar la llave en ACC u ON Montaje inestable. Instalar el aparato firmemente, Utilizando los accesorios de fijación en dotación Cable conectado malamente. Controlar. Mensajes de Errores en el Display. El display indica ERROR. El Disco esta sucio o dañado o no está insertado de forma correcta. Pulsar la tecla Eject para hacer salir el Disco. El fusible esta quemado. Sustituir. Cuando el tiempo de inicio de la película es demasiado largo. Error de lectura de los archivos o tipo de archivos no soportado Presionar SRC para salir. Después presionar SRC de nuevo, para continuar a leer el disco. DISCO El Disco esta insertado pero no hay sonido. El Disco está insertado de forma equivocada. Poner el Disco con la etiqueta hacia arriba. PROBLEMA EN LA RADIO Disturbios de recepción Emisora radio demasiado lejana / señal demasiado débil. Buscar otra emisora más potente El cable antena no esta bien conectado. Controlar el cable de la antena y el terminal de conexión. El Disco esta sucio o dañado. Limpiar o sustituir el Disco. El sonido no es constante, la calidad sonora es baja. El Disco esta sucio o dañado. Limpiar el CD o insertar un CD diferente. El sonido no es constante a causa de las vibraciones. El ángulo de montaje de la unidad es superior a 30°. Ajustar el ángulo de montaje inferior a 30°. 91 En el caso que las soluciones indicadas no solventan el problema; presionar la tecla RESET. Características Técnicas DATOS GENERALES Alimentación Negativo Masa Potencia máx. En Salida Potencia continua en Salida T.H.D.) Impedancia ideal por Altavoz Voltaje salida Pre-amp Fusible Dimensiones (LxAxP): Peso Salida Subwoofer Nivel Aux-In TFT LDC 3” Resolución del Display (píxel) Dimensiones Pantalla (pulgadas) Contraste Brillo Formato Radio FM Stereo Gama de Frecuencia Sensibilidad usufruible Respuesta en Frecuencia Stereo 30dB (1KHz) Relación de respuesta de imagen Relación de respuesta IF 70dB Relación Señal/Ruido >55dB Radio AM (MW) Gama de Frecuencia 522-1620 Khz. (Europa) 530-1710 Khz. (USA) Sensibilidad usufruible (S/N=20dB) 30 dBu 12V CC (11V-16V) Voltaje de prueba 14,4V, 50Wx4canales 25Wx4 canales (4 Ohm 10% 4 – 8 Ohm 4.0 V (modo reproducción CD: 1KHz, OdB, 10KOhm bajo carga) 10Amp 178x50x166mm 1,8 kg 4,0 V ≥300mV 22.464 3" (16:9) 350 350 Nits LTPS/TFT 87,5 – 108,0 MHz (Europa) 87,5 – 107,9 MHz (USA) 8dBu 30Hz – 15KHz Separación 50dB 92 LECTOR DE DISCO Sistema Respuesta en Frecuencia Relación Señal/Ruido Distorsión armónica total: Separación Canales Salida Señal Video Video Nivel Salida Video Horizontal Audio Digital 20Hz – 20 KHz >80 dB inferior a 0,20 % (1KHz) >60 dB PAL/NTSC/AUTO 1 +/- 0,2 V > 500 líneas DOTACION 1 1 1 2 1 1 Conector cableado Funda Carátula removible Soporte Metálico Llave a T Manual de instrucciones Mando a distancia NOTA: Los Datos Técnicos y el Diseño del producto pueden variar sin preaviso, en virtud de las continuas mejorías tecnológicas. Garantía E Este producto esta garantizado por un periodo de dos años a partir de la fecha de adquisición. El producto amparado por esta garantía se halla protegido por ella para piezas y mano de obra, por defecto de Fabricación. Será exclusivamente competencia de nuestro departamento técnico, que después de una atenta evaluación confirmará si se trata de un defecto de fabricación o si es debido a mal uso. Las reparaciones cubiertas por la Garantía no prorrogan ni renuevan la garantía ni dan derecho a indemnización alguna. La garantía non cubre: daños debidos a una mala instalación del aparato eléctrico, averías de transporte (rayado, abolladuras, etc.), daños ocasionados por la instalación o alteración que deriven de condiciones ambientales, climáticas, etc., averías causadas por descuido, negligencia, manipulación, incapacidad de uso o reparaciones realizadas por personas non autorizadas. Si el aparato no funciona correctamente dirigirse al vendedor o al Centro de Asistencia Técnica más próximo. Delegado Comercial para Península Ibérica Domenico Verderese Tel. (0034) 958 302295 E-mail: [email protected]. En caso de Reparación en Garantía el aparato deberá ir acompañado de la factura de compra, así como de esta Tarjeta de Garantía correctamente rellenada. 93 Note • Notes • Vermerke S.p.A. - Via F.lli Cervi, 167/C - 42100 Reggio Emilia (Italy) - Tel. ++39 0522 941621 - Fax ++39 0522 942452 www.phonocar.com - e-mail:[email protected] FRANCE Vente et Assistance assurées par le Fabricant italien Tél/Fax N° Vert 0800.90.43.99 www.phonocar.fr • e-mail:[email protected] DEUTSCHLAND 71711 - MURR - Rudolf Diesel Strasse, 13 - Tel. 07144 82302-0 / Fax 07144 282114 www.phonocar.de - e-mail:[email protected] ESPAÑA Delegado Comercial Sr. VERDERESE DOMENICO Tel. 958 302295 - Fax 958 302470 - Movil 607592406 e-mail: [email protected]
Scaricare