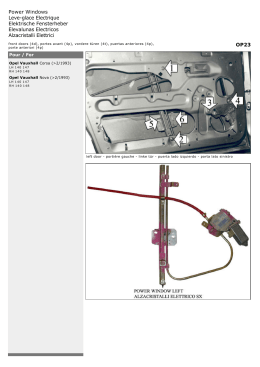
Fax +32 030 9904733
Copies of the I/B. Please reproduce them without any
changes except under special instruction from Bimar
(Italy). The pages must be reproduced and folded in
order to obtain a booklet A5 (+/- 148.5 mm width x 210
mm height). When folding, make sure you keep the good
numbering when you turn the pages of the I/B. Don’t
change the page numbering. Keep the language
integrity.
LIBRETTO ISTRUZIONI
INSTRUCTION BOOKLET
NOTICE D’INSTRUCTION
BEDIENUNGSANLEITUNG
Bistecchiera
Grill
Grillrost
Grille
1/24
Assembly page 1/24
Fax +32 030 9904733
Copies of the I/B. Please reproduce them without any
changes except under special instruction from Bimar
(Italy). The pages must be reproduced and folded in
order to obtain a booklet A5 (+/- 148.5 mm width x 210
mm height). When folding, make sure you keep the good
numbering when you turn the pages of the I/B. Don’t
change the page numbering. Keep the language
integrity.
I
1.
2.
3.
4.
5.
6.
7.
8.
9.
10.
11.
12.
GB
1.
2.
3.
4.
5.
6.
7.
8.
9.
10.
11.
12.
FR
1.
2.
3.
4.
5.
6.
D
1.
2.
3.
4.
5.
6.
7.
8.
9.
10.
11.
12.
Lid
Wire grid
Tray
Thermostat Knob
Grill body
Wing nut to fasten handle
Side handle
Extension
Wire shelf
Legs
Wing nut to fasten shelf
Plastic drawer
Couvercle
Grille de cuisson
Plateau
Bouton du thermostat
Corps du gril
Écrou papillon pour fixer la poignée
7.
8.
9.
10.
11.
12.
Coperchio
Griglia di cottura
Vassoio
Manopola termostato
Corpo bistecchiera
Dado a galletto per fissaggio maniglia
Maniglia laterale
Prolunga
Griglia ripiano
Gambe
Dado a galletto per fissaggio ripiano
Cassetto
Abdeckung
Grillrost
Schale
Thermostatschalter
Grillgehäuse
Flügelmutter zur Griffbefestigung
Seitengriff
Verlängerung
Ablagegitter
Beine
Flügelmutter zur Ablagebefestigung
Schubfach
Poignée latérale
Rallonge
Tablette inférieure
Pieds
Écrou papillon pour fixer la tablette
Tiroir
2/24
Assembly page 2/24
Fax +32 030 9904733
Copies of the I/B. Please reproduce them without any
changes except under special instruction from Bimar
(Italy). The pages must be reproduced and folded in
order to obtain a booklet A5 (+/- 148.5 mm width x 210
mm height). When folding, make sure you keep the good
numbering when you turn the pages of the I/B. Don’t
change the page numbering. Keep the language
integrity.
Vi invitiamo a leggere attentamente queste istruzioni prima dell’uso dell’apparecchio, ed
eventualmente informare terzi, se necessario. Conservare il libretto per ulteriori consultazioni.
AVVERTENZE GENERALI
• Questo apparecchio è destinato unicamente all’uso domestico, per la cottura di alimenti, secondo le
modalità riportate nel presente manuale.Ogni altro uso è da considerarsi improprio e pericoloso. Il
costruttore non potrà essere ritenuto responsabile di eventuali danni derivanti da uso improprio,
erroneo e irresponsabile e/o da riparazioni effettuate da personale non qualificato.
• Non deve essere utilizzato in ambienti esterni (all’aperto).
• Durante il funzionamento il grill si scalda, toccare quindi solo le manopole, i pulsanti e le
impugnature. Evitare il contatto con le parti calde: la resistenza elettrica, griglia di cottura,
coperchio e la sua cerniera.
• Non appoggiare sulla griglia di cottura, pentole, teglie, fogli d’alluminio, o altro che possa impedire
il dissiparsi di calore: danneggerebbero in modo irreparabile l’apparecchio.
• Non appoggiare nulla sulla resistenza.
• Non spostare il grill quando è in funzione.
• L’apparecchio non è destinato a essere usato da persone (bambini compresi) le cui capacità fisiche,
sensoriali o mentali siano ridotte, oppure con mancanza di esperienza o di conoscenza, a meno che
esse abbiano potuto beneficiare, attraverso l’intermediazione di una persona responsabile della loro
sicurezza, di una sorveglianza o di istruzioni riguardanti l’uso dell’apparecchio. I bambini devono
essere sorvegliati per sincerarsi che non giochino con l’apparecchio.
• L’apparecchio deve essere mantenuto fuori dalla portata di bambini.
• Attenzione: quando si utilizzano apparecchi elettrici, occorre sempre rispettare le precauzioni di
sicurezza di base per evitare i rischi di incendio, di scosse elettriche e di lesioni fisiche.
• Se l’apparecchio non è in funzione togliere la spina dalla presa di corrente.
• Non tirare il cavo di alimentazione o l’apparecchio stesso per disinserire la spina dalla presa di
corrente.
• Non tirare il cavo per spostare l’apparecchio.
• Se il cavo di alimentazione è danneggiato, esso deve sostituito dal costruttore o dal suo servizio
assistenza tecnica o comunque da una persona con qualifica similare, in modo da prevenire ogni
rischio.
• Non toccare l’apparecchio con mani e piedi bagnati.
• Non lasciare l’apparecchio esposto agli agenti atmosferici (sole, pioggia ecc..).
• Inserire solo acqua e nessun altro liquido o solido.
• Non utilizzate l'apparecchio come fonte di calore.
• Attenzione: per la cottura non utilizzare benzina o altri combustibili liquidi, né carbone o legna.
Attenzione: per evitare il surriscaldamento non coprire l’apparecchio.
Attenzione: le temperature delle superfici accessibili possono essere elevate quando
l'apparecchio è in funzione.
INSTALLAZIONE
• Dopo aver tolto l’imballaggio, assicurarsi dell’integrità dell’apparecchio; in caso di dubbio non
utilizzarlo e rivolgersi a personale professionalmente qualificato. Gli elementi d’imballaggio
(sacchetti in plastica, polistirolo espanso, chiodi, ecc.) non devono essere lasciati alla portata di
mano di bambini in quanto potenziali fonti di pericolo; smaltirli secondo le norme vigenti.
Attenzione: eventuali adesivi o fogli pubblicitari applicati sulla maniglia, devono essere rimossi
prima dell’uso dell’apparecchio.
3/24
Assembly page 3/24
Fax +32 030 9904733
Copies of the I/B. Please reproduce them without any
changes except under special instruction from Bimar
(Italy). The pages must be reproduced and folded in
order to obtain a booklet A5 (+/- 148.5 mm width x 210
mm height). When folding, make sure you keep the good
numbering when you turn the pages of the I/B. Don’t
change the page numbering. Keep the language
integrity.
• Prima di collegare l’apparecchio controllare che i valori di tensione riportati sulla targa dati
corrispondano a quelli della rete elettrica (230V~ 50Hz), e che la presa sia dotata d’efficace messa
a terra. In caso di incompatibilità tra la presa e la spina dell’apparecchio, far sostituire la presa con
altra di tipo adatto da personale professionalmente qualificato, il quale accerti che la sezione dei
cavi della presa sia idonea alla potenza assorbita dall’apparecchio. In generale è sconsigliato l’uso
di adattatori e/o prolunghe; se il loro uso si rendesse indispensabile, devono essere conformi alle
vigenti norme di sicurezza e la loro portata di corrente (ampères) non deve essere inferiore a quella
massima dell’apparecchio.
• Posizionare l’apparecchio su una superficie piana ben stabile, orizzontale, resistente al calore
lontano da materiali infiammabili (tende, tappezzerie, ecc.), da gas infiammabili o materiale
esplosivo (bombolette), da altri fonti di calore e da materiali che possono deformarsi con il calore.
Verificare che lo spazio libero attorno all’apparecchio sia di almeno 40 cm e superiormente di
almeno 100cm.
• Assicurarsi che il cordone elettrico sia posizionato correttamente e non sia a contatto con parti
calde o taglienti, ne avvolto intorno all’apparecchio o attorcigliato su se stesso.
• La presa di corrente deve essere facilmente accessibile in modo da poter disinserire con facilità la
spina in caso di emergenza.
• Posizionare l’apparecchio:
- lontano da altre fonti di calore (ad es. altri forni, fornello gas, ecc. ), da materiali infiammabili
(tappezzerie, ecc.), materiale esplosivo (bombolette spray) e da materiali che possono deformarsi
con il calore; verificare che lo spazio libero attorno all’apparecchio sia di almeno 40 cm.
- su un piano d’appoggio orizzontale e ben stabile, la cui superficie non sia delicata (ad esempio
mobili laccati, tovaglie, ecc), in posizione dove non possa subire urti, e a debita distanza dal
bordo del mobile, in modo che non possa cadere.
- lontano da contenitori di liquidi, ad esempio lavelli ecc. Nel caso dovesse inavvertitamente
bagnarsi o immergersi in un liquido, staccare immediatamente la spina dalla presa di corrente,
farlo raffredare, asciugarlo con cura, e verificare che le parti elettriche non si siano bagnate; in
caso di dubbio rivolgersi a personale professionalmente qualificato.
• L'utilizzatore non deve lasciare l’apparecchio senza sorveglianza quando è collegato
all'alimentazione
• L’apparecchio non deve essere posizionato immediatamente al di sotto di una presa di corrente.
• Questo apparecchio non è destinato a essere fatto funzionare per mezzo di un temporizzatore esterno o
con un sistema di comando a distanza separato, per evitare il rischio di incendio nel caso
l’apparecchio sia coperto o sia posizionato in modo non corretto.
• In caso di guasto o cattivo funzionamento spegnere l’apparecchio e farlo controllare da personale
professionalmente qualificato; le riparazioni effettuate da personale non qualificato possono essere
pericolose e fanno decadere la garanzia.
ISTRUZIONI DI IMPEGO
Il grill è dotato dei seguenti componenti:
- vassoio (3). Deve essere sempre alloggiato nell’apparecchio, e durante l’impiego deve sempre
contenere acqua. Prima di accendere la bistecchiera, togliere la resistenza, versare 1,5 litri d’acqua
(per circa 2h 30 min. di funzionamento), reinserire la resistenza e la griglia di cottura. Durante
l’impiego verificare costantemente che l’acqua sia sempre presente, nel caso di rabbocchi aggiungere
dopo aver spento la resistenza elettrica, prestando particolare attenzione a non bagnare le parti
elettriche (interruttore, termostato, resistenza, ecc.): qualora succeda, togliere la spina dalla presa di
corrente, asciugare con cura e accertarsi che i componenti elettrici (termostato, micro-interruttore,
ecc.) non si siano bagnati, poi riaccendere il grill.
- resistenza elettrica. Funziona solo se l’impugnatura è alloggiata correttamente nella propria sede. È
dotata di termostato regolabile (4), (con manopola in posizione “min” la resistenza è sempre spenta,
nella posizione “max “ la resistenza è sempre accesa, nelle posizione intermedie funziona ad
4/24
Assembly page 4/24
Fax +32 030 9904733
Copies of the I/B. Please reproduce them without any
changes except under special instruction from Bimar
(Italy). The pages must be reproduced and folded in
order to obtain a booklet A5 (+/- 148.5 mm width x 210
mm height). When folding, make sure you keep the good
numbering when you turn the pages of the I/B. Don’t
change the page numbering. Keep the language
integrity.
intervalli) e segnalatori luminosi (rosso= cavo elettrico collegato alla presa di corrente; verde=
resistenza accesa/alimentata).
- griglia cottura (2). Si inserisce nelle apposite sedi che permettono tre diverse altezze: bassa per
carni, media per pesci e alta per verdure. Le impugnature si scaldano durante l’uso e vanno
maneggiate con appositi guanti.
- griglia doppia (optional). Si appoggia sopra la griglia di cottura. Le impugnature si scaldano durante
l’uso e vanno maneggiate con appositi guanti.
- coperchio (optional), (1). E’ particolarmente idoneo per l’uso esterno del grill e trattenere il calore;
nella posizione aperto funge da paravento. Si innesta nel corpo della bistecchiera (5) e si regola a tre
diverse altezze (scegliere la più conveniente a seconda dell’alimento prima di inserire l’acqua nel
vassoio ed accendere la bistecchiera). La cerniera consente le posizioni chiuso-aperto: maneggiare
esclusivamente la maniglia poiché durante l’uso il coperchio scotta.
-cassetto (optional), (12). È posto sul fronte e permette l’appoggio di piccoli oggetti (sale, pepe,
aromi, ecc..).
- supporto da pavimento (optional). Il supporto si innesta al corpo della bistecchiera nelle quattro
asole cilindriche. È composto da 4 gambe (10) con prolunga (8), griglia ripiano (9), 2 maniglie laterali
(7). Per assembblarlo procedere nel seguente modo:
a. inserire a fondo le prolunghe all’estremità retilinea delle gambe
b. fissare le quattro gambe al ripiano in modo da risultare divaricate verso il basso (le estremità
superiori risultano invece parallele). Assicurare il fissaggio con i dadi a galletto (11).
c. Innestare all’estremità superiori le due maniglie in plastica in modo che sporgano all’esterno e
senza andare oltre le pieghe prossime ai fori. Bloccare con le viti e i dadi a galletto in dotazione
(6)-(i fori praticati nei tubi e nelle maniglie devono colimare). Il supporto è così assemblato.
d. Innestare a fondo le estremità del supporto alla bistecchiera nelle 4 sedi apposite, ricavate nella
parte sottostante del corpo in plastica. Verificare la buona stabilità sul pavimento e controllare
che la bistecchiera sia orizzontale.
Il Grill deve essere utilizzato solo col vassoio e con acqua al suo interno.
1° Accensione
Pulire con acqua saponata ed un panno morbido le griglie di cottura ed il coperchio. Asciugare con
cura e rimetterli nella propria sede.
Dopo aver versato l’acqua nel vassoio, alloggiare la resistenza elettrica nella propria sede (verificare
prima che la manopola del termostato sia in posizione “min”), poi inserire la spina nella presa di
corrente (la spia rossa si accende). Regolare la manopola del termostato (ruotare in senso orario)
nella posizione “max” e far funzionare a vuoto per 20 minuti circa.
Funzionamento
Dopo aver inserito il coperchio all’altezza opportuna, versare l’acqua nel vassoio, alloggiare la
resistenza nella propria sede: prima verificare che la manopola del termostato sia in posizione “min”,
e alloggiare l’impugnatura in modo corretto altrimenti l’interruttore di sicurezza non accende la
resistenza.
Inserire la spina nella presa di corrente (la spia rossa si accende). Regolare la manopola del termostato
(ruotare in senso orario) nella posizione idonea al tipo di alimento (max per carni, pesci, posizioni
intermedie per verdure). Disporre gli alimenti sulla griglia di cottura e alloggiarla, nella propria sede,
all’altezza più idonea (basso, medio e alto) per la cottura del cibo.
Ultimato l’utilizzo, spegnere il grill ruotando la manopola in senso antiorario, poi togliere la spina
dalla presa di corrente e far raffreddare l’apparecchio.
Per lunghi periodi di inattività, togliere la spina dalla presa di corrente.
5/24
Assembly page 5/24
Fax +32 030 9904733
Copies of the I/B. Please reproduce them without any
changes except under special instruction from Bimar
(Italy). The pages must be reproduced and folded in
order to obtain a booklet A5 (+/- 148.5 mm width x 210
mm height). When folding, make sure you keep the good
numbering when you turn the pages of the I/B. Don’t
change the page numbering. Keep the language
integrity.
CONSIGLI PRATICI
• Proporzionare l’intensità di calore secondo la natura del pezzo da cuocere e la sua dimensione (vedi
tabella cottura).
• Non modificare la posizione della griglia o l’intensità del calore durante la cottura.
• Voltare più volte i cibi evitando di usare la forchetta o altro utensile appuntito.
• Asciugare perfettamente la carne prima di deporla sulla griglia.
• Durante la cottura pennellare delicamente la carne con salsa formata da olio, succo di limone e
sostanze aromatiche a piacere.
• Il sale ed il pepe vanno aggiunti all’ultimo momento.
• Tutta la carne rossa, molto ricca di succhi, deve essere rapidamente dorata, quindi sottoposta
all’azione di un calore intenso che penetri all’interno.
• Se si tratta di carni bianche, l’intensità del calore deve essere regolata in modo che la doratura e la
cottura avvengano contemporaneamente.
• Pulire accuramente la griglia dopo l’uso.
6/24
Assembly page 6/24
Fax +32 030 9904733
Copies of the I/B. Please reproduce them without any
changes except under special instruction from Bimar
(Italy). The pages must be reproduced and folded in
order to obtain a booklet A5 (+/- 148.5 mm width x 210
mm height). When folding, make sure you keep the good
numbering when you turn the pages of the I/B. Don’t
change the page numbering. Keep the language
integrity.
COTTURA ALLA GRIGLIA (tempi indicativi)
Tipo di carne
Manzo
bistecca
costoletta
sottofiletto
spiedini
svizzere
Vitello
scaloppine
costoletta
spiedini
grandi pezzi
Maiale
bistecca
costoletta
grandi pezzi
spiedini
Agnello
costoletta
spiedini cosciotto
sella
Pollame
pollo intero aperto
pollo a pezzi
piccione
anatra
Pesci
interi
interi piccoli
filetti
trance
Spessore
posizione
griglia
al sangue
medio
ben cotto
cm.3
cm.4
cm.4
cm.3
basso
basso
basso
medio
basso
5’
9’
8’
8’
8’
8’
12’
12’
10’
10’
12’
18’
18’
12’
12’
cm.1
cm.2
-
medio
medio
medio
medio
-
5’
10’
12’
18’ ogni 300 gr.
di peso
8’
15’
15’
-
cm.2
cm.2
-
alto
alto
alto
alto
-
10’
12’
12’
18’ ogni 300
gr. di peso
13’
cm.1
-
alto
alto
alto
alto
4’
-
5’
8’
30’ ogni Kg.
30’ ogni Kg.
8’
10’
-
-
medio
medio
medio
basso
-
40’
40’
30’
50’
-
cm.4
cm.2
cm.2
medio
medio
medio
medio
-
18’
8’
6’
8’
-
PULIZIA E MANUTENZIONE
Attenzione: prima di pulire l’apparecchio spegnerlo, disinserire la spina dalla presa di corrente ed
attendere che si sia raffreddato.
• Per la pulizia delle parti in plastica e del vassoio, utilizzare una spugnetta morbida, inumidita con
acqua tiepida e un normale detersivo liquido per stoviglie. Si raccomanda particolare attenzione
nella pulizia della parte con i comandi elettrici, perché non si bagnino interruttori, resistenza, ecc.:
nel caso dovesse succedere, asciugare con cura, in caso di dubbio far controllare da personale
professionalmente qualificato. Non immergere la parte con i componenti elettrici in acqua o altri
liquidi.
• Per la pulizia della griglia di cottura, utilizzare una spazzola con setole in plastica, acqua tiepida e
un normale detersivo per stoviglie, dopo risciacquare con acqua abbondante, e asciugare con cura.
• Quando non si utilizza l’apparecchio, riporlo in un luogo asciutto.
7/24
Assembly page 7/24
Fax +32 030 9904733
Copies of the I/B. Please reproduce them without any
changes except under special instruction from Bimar
(Italy). The pages must be reproduced and folded in
order to obtain a booklet A5 (+/- 148.5 mm width x 210
mm height). When folding, make sure you keep the good
numbering when you turn the pages of the I/B. Don’t
change the page numbering. Keep the language
integrity.
• Per la sostituzione del cordone elettrico necessita un utensile speciale: rivolgersi a un centro
assistenza autorizzato anche per eventuali riparazioni.
• Se si decide di non utilizzare più l’apparecchio, si raccomanda di renderlo inoperante tagliando il
cavo di alimentazione (prima assicurarsi d’aver tolto la spina dalla presa di corrente), e di rendere
innocue quelle parti che sono pericolose qualora utilizzate per gioco dai bambini, come ad esempio
le resistenze elettriche.
• Non disperdere nell’ambiente prodotti non biodegradabili, ma smaltirli nel rispetto delle norme
vigenti. Alla fine della sua vita utile il prodotto non deve essere smaltito insieme ai rifiuti urbani.
Può essere consegnato presso gli appositi centri di raccolta differenziata predisposti dalle
amministrazioni comunali, oppure presso i rivenditori che forniranno questo servizio all’acquisto di
un nuovo apparecchio. Smaltire separatamente un elettrodomestico consente di evitare possibili
conseguenze negative per l’ambiente e per la salute derivanti da un suo smaltimento inadeguato e
permette di recuperare i materiali di cui è composto al fine di ottenere un importante risparmio di
energia e risorse. Per rimarcare l’obbligo di smaltire separatamente gli elettrodomestici, sul
prodotto è riportato il marchio del contenitore di spazzatura mobile barrato. Si tenga presente che:
il vassoio, la griglia, il coperchio, supporti, la griglia ripiano, la resistenza sono in metallo. – Le
maniglie, l’interruttore e la scatola comandi sono in plastica.- i conduttori elettrici sono in rame
rivestito in gomma.
8/24
Assembly page 8/24
Fax +32 030 9904733
Copies of the I/B. Please reproduce them without any
changes except under special instruction from Bimar
(Italy). The pages must be reproduced and folded in
order to obtain a booklet A5 (+/- 148.5 mm width x 210
mm height). When folding, make sure you keep the good
numbering when you turn the pages of the I/B. Don’t
change the page numbering. Keep the language
integrity.
Please read these instructions carefully before using the appliance, and instruct other persons using it,
too, when necessary. Keep booklet handy for further use.
WARNINGS
• This appliance is intended only for domestic use, to grill food in the manner described in these
instructions. Any other use is to be considered inappropriate and therefore dangerous. The
manufacturer cannot be held responsible for eventual damage caused by inappropriate, improper or
irresponsible use and/or for repairs made to the product by unauthorised personnel.
• The appliance must not be used in out of doors in the open.
• During operation the grill is very hot so only touch the handles, buttons and grips. Avoid touching
the heating element or the cooking surface.
• Do not rest pots, baking pans, aluminium foil or anything else that could prevent the dissipation of
heat on the cooking surface as this could damage the device.
• Do not rest anything on the heating element.
• Do not move the grill when it is operating.
• Use the appliance only with the accessories supplied to guarantee safe use. Check regularly that the
appliance and components (electric cable, tray, grids, etc.) are in good state: if in doubt, contact an
authorised assistance centre nd make sure that spare parts are original.
• This appliance is not intended for use by persons (including children) with reduced physical,
sensory or mental capabilities, or lack of experience and knowledge, unless they have been given
supervision or instruction concerning use of the appliance by a person responsible for their safety.
Children should be supervised to ensure that they do not play with the appliance.
• The appliance must be kept out of children’s reach.
• Attention: when using electric appliances, the basic safety precautions must always be observed to
avoid risks of fire, electric shocks and physical injury.
• Do not pull on the cord, or the appliance itself, to disconnect the plug from the socket.
• Unplug the appliance when not in use.
• Do not pull on the cord to move the appliance.
• Do not leave the device exposed to the weather (sun, rain, etc.).
• Put in the tray only water and not any other liquid.
• Do not use the appliance as a source of heat.
• Warning: for the cooking do not use fuel or any other liquid combustible, nor coal neither wood.
• If the electric cord is damaged, it has to be replaced by the supplier or an authorized service center
or a professionally qualified, to avoid any risks.
ATTENTION: do not cover the appliance when it is operating to avoid the risk of fires.
ATTENTION: the temperature of the outer surface may be high when the appliance is operating.
INSTALLATION
• After removing the packing materials, check the integrity of the heater; if you are unsure, do not
use it and ask for qualified professional help. The packing materials (plastic bags, polystyrene
foam, nails, etc.) must be kept out the reach of children because they are potential sources of
danger. Attention: please remove any adhesive or advertising sheet stuck to the handle before use
the device.
• Before connecting the appliance, check that the voltage shown on the data plate matches that of
your electricity (230V~ 50Hz) and that the electric plug is grounded. In the event of incompatibility
9/24
Assembly page 9/24
Fax +32 030 9904733
•
•
•
•
•
•
•
•
•
Copies of the I/B. Please reproduce them without any
changes except under special instruction from Bimar
(Italy). The pages must be reproduced and folded in
order to obtain a booklet A5 (+/- 148.5 mm width x 210
mm height). When folding, make sure you keep the good
numbering when you turn the pages of the I/B. Don’t
change the page numbering. Keep the language
integrity.
between the electric outlet and the plug of the appliance, have the outlet replaced with another
more suitable type by professionally qualified personnel, who will make sure that the section of the
wires of the outlet is appropriate for the absorbed power of the appliance. In general, the use of
adapters or extension cords is not recommended; if their use is indispensable, they must conform to
existing safety standards and their current capacity (amperes) must not be less that the maximum of
the appliance.
Locate the appliance far from sources of heat, inflammable materials (curtains, tapestries, etc.),
inflammable gas, explosive materials (gas cylinders, etc.) and from materials that could deform
with the heat. Make sure that there is at least 40 cm of free space around the appliance and more
than at least 100cm.
Each time before use, check that the device is in good condition and that the electric cord is not
damaged: if you are unsure, do not use the appliance and contact qualified service personnel.
Place the appliance:
- far from other sources of heat (for example, other ovens, gas hobs, etc.), inflammable materials
(wallpaper, etc.), explosive materials (spray cans) and materials that would become deformed
when heated. Make sure that there is at least 40 cm of free space around the appliance
- on a flat and stable work top and not on delicate surfaces (painted furniture, tablecloths, etc.), in
a position where it cannot be bumped, and at a suitable distance from the edge so that it cannot
fall.
- far from containers of liquids, such as sinks, etc. Should it unexpectedly become wet or fall in a
liquid, remove the plug immediately from the socket, leave the appliance to cool, dry carefully
and make sure the electric parts are not wet; if in doubt, call qualified professional help.
The power socket must be easy to reach so the plug can be removed quickly in case of emergency.
Use the appliance far from water or similar (like sinks and so on) or near places where can be
knocked.
The appliance must not be positioned immediately under a socket.
Do not use the appliance with a timer or a programmer or with a system that can switch on the
appliance automatically, to avoid risk of fire, since a fire risk exists if the heater is covered or
positioned incorrectly.
In the case of a breakdown or fault, switch off the appliance and have it checked by a
professionally qualified technician; repairs made by unqualified persons can be dangerous and
render void the warranty.
Make sure that the electric cord is correctly positioned, not touching hot surfaces and not wrapped
around the appliance or twisted.
ISTRUCTIONS FOR USE
The grill is provided with the following components:
- tray (3). It must always be inserted in the appliance, and must always contain water during use.
Before switching on the grill, remove the resistance, pour in 1.5 litres of water (for about 2h 30 min.
of use), reposition the resistance and the cooking grid. During use, check regularly that there is water
in the tray; if top ups are necessary, add only after switching off the electric resistance and be very
careful not to wet the electric parts (switch, thermostat, resistance, etc.). If this should happen, remove
the plug from the socket, dry carefully and make sure that the electric components (thermostat, micro
switch, etc.) are not wet, then switch on the grill again.
- electric resistance. This functions only if the handle is positioned correctly in its housing. It is
provided with an adjustable thermostat (4) - (when the knob is on “min” the resistance is always off,
when on “max “ the resistance is always on, in intermediate positions it works intermittently) and
lighted signals (red = electric cable connected to the power socket; green = resistance on/connected).
- cooking grid (2). It can be placed in slots at three different heights: low for meat, medium for fish
and high for vegetables. The handles become hot during use and protective gloves must be worn.
10/24
Assembly page 10/24
Fax +32 030 9904733
Copies of the I/B. Please reproduce them without any
changes except under special instruction from Bimar
(Italy). The pages must be reproduced and folded in
order to obtain a booklet A5 (+/- 148.5 mm width x 210
mm height). When folding, make sure you keep the good
numbering when you turn the pages of the I/B. Don’t
change the page numbering. Keep the language
integrity.
- double grill (optional). This is placed over the cooking grid. The handles become hot during use and
protective gloves must be worn.
- lid (optional), (1). It is particularly suitable when using the grill outdoors to keep in the heat; when
open it serves as a wind shield. It is inserted in the grill body (5) and can be adjusted to three different
heights (choose the most convenient according to the type of food before pouring water into the tray
and switching on the grill). The hinge allows open-closed positions: touch the handle only because the
lid is very hot during use.
- drawer (optional), (12). This is at the front and is useful for placing small objects (salt, pepper,
aromas, etc.).
- floor support (optional). The support is attached to the grill body using the four cylindrical slots. It is
composed of 4 legs (10) with extension (8), wire shelf (9), 2 side handles (7). Follow these steps for
assembly:
a. Insert the extensions as far as possible into the legs
b. Fasten the four legs to the shelf so they are wider at the bottom (tops, instead will be parallel).
Fasten them using the wing nuts (11).
c. At the top, insert the two plastic handles so they protrude but without going beyond the notches
close to the holes. Lock with the screws and wing nuts provided (6) - (the holes in the pipes and
handles must coincide). Assembly of the support is thus complete.
d. Insert as far as possible the ends of the support in the 4 appropriate housings on the grill body, in
the plastic part below. Check that the floor is stable and that the grill is horizontal.
The grill must be used only with the tray in position and water inside.
Before switching on for the first time
Use a soft cloth and soapy water to clean the cooking grids and the lid. Dry carefully and return to
their housings.
After pouring water into the tray, place the electric resistance in its housing (first check that the
thermostat is in “min” position), then insert the plug in the power socket (the red signal light comes
on). Turn the thermostat knob (clockwise) to “max” and leave the empty appliance to heat for about
20 minutes.
Functions
First check that the thermostat is on “min” and place handles correctly otherwise the safety switch
will not activate the resistance. Insert the lid at the required height, pour water into the tray, and place
the resistance in its appropriate housing.
Insert the plug in the power socket (the red signal light comes on). Turn the thermostat knob
(clockwise) to the position required for the type of food (max for meat, fish, intermediate for
vegetables). Arrange the food on the cooking grid and place it in the appropriate slot at the most
suitable height (low, medium, high) for cooking the food.
After use, switch off the grill by turning the knob anti-clockwise, then remove the plug from the
socket and leave the appliance to cool.
When not in use for long periods, the plug must always be removed from the socket.
Expert’s practical advices for a perfect grill cooking
• Proportion the intensity of the heat to the nature and size of the piece to cook (see table “Grill
cooking”).
• Do not change the position of the grate or the intensity of the power when cooking.
• Turn more once the food when cooking without using forks or other pointed utensil.
• Dry perfectly the meat before laying it on the grate.
• Brush softly the meat with a sauce made of oil, lemon juice and aromatic substances at will when
cooking.
• Add salt and pepper at the end.
11/24
Assembly page 11/24
Fax +32 030 9904733
Copies of the I/B. Please reproduce them without any
changes except under special instruction from Bimar
(Italy). The pages must be reproduced and folded in
order to obtain a booklet A5 (+/- 148.5 mm width x 210
mm height). When folding, make sure you keep the good
numbering when you turn the pages of the I/B. Don’t
change the page numbering. Keep the language
integrity.
• Juicy red meats the intensity of the heat must be such to allow the roasting and the cooking at the
same time.
• For white meats the intensity of the heat must be such to allow the roasting and the cooking at
the same time.
• Clean carefully the grate after using.
GRILL COOKING (cooking times)
Kinds of meat
beef
steak
chop
underfillet
skewers
hamburger
veal
scallops
chop
large pieces
skewers
pork
steak
chop
large pieces
skewers
lamb
chop
skewers
leg
saddle
poultry
whole open chicken
in pieces
pigeon
duck
fish
whole fish
small fish
fillets
slices
Thickness
Position
of grid
Rare
Cooked
Well done
cm.3
cm.4
cm.4
cm.3
low
low
low
medium
low
5’
9’
8’
8’
8’
8’
12’
12’
10’
10’
12’
18’
18’
12’
12’
cm.1
cm.2
-
medium
medium
medium
medium
-
5’
10’
12’
18’ per 300g.
weight
8’
15’
15’
-
cm.2
cm.2
-
high
high
high
high
-
10’
12’
12’
18’per 300g.
weight
13’
cm.1
-
high
high
high
high
4’
-
5’
8’
30’ per Kg.
30’ per Kg.
8’
10’
-
-
medium
medium
medium
low
-
40’
40’
30’
50’
-
cm.4
cm.2
cm.2
medium
medium
medium
medium
-
18’
8’
6’
8’
-
12/24
Assembly page 12/24
Fax +32 030 9904733
Copies of the I/B. Please reproduce them without any
changes except under special instruction from Bimar
(Italy). The pages must be reproduced and folded in
order to obtain a booklet A5 (+/- 148.5 mm width x 210
mm height). When folding, make sure you keep the good
numbering when you turn the pages of the I/B. Don’t
change the page numbering. Keep the language
integrity.
CLEANING AND MAINTENANCE
Attention: before cleaning the appliance, switch it off, remove the plug from the power socket and
leave it until cool.
• To clean the plastic parts and the tray, use a soft sponge moistened with warm water and, if
necessary, a normal dish detergent. We recommend maximum attention when cleaning the switch
to avoid wetting the electric controls and heating element: if this should happen, dry carefully. Do
not immerse the electric controls in water or other liquids.
• To clean the cooking grid, use a brush with plastic bristles, warm water and a normal dish
detergent, then rinse with plenty of water and dry carefully.
• When the appliance is not being used, cover it and store in a dry place.
• A special tool is required to replace the electric cable: contact an authorized service center also for
any repairs.
• If you decide not to use the appliance any longer, we recommend making it inoperative by cutting
the power cable (making sure the plug is disconnected from the socket) and ensure that children are
not allowed to play with dangerous parts.
• Do not dispose of non-biodegradable products in the environment but dispose of them in
accordance with current law. At the end of its working life, the product must not be disposed of as
urban waste. It must be taken to a special local differentiated waste collection centre or to stockists
who supply this service when purchasing a new appliance. The separate disposal of a household
appliance avoids possible negative consequences for the environment and health deriving from
inappropriate disposal and enables recovery of component materials thus obtaining significant
savings in energy and resources. Bear in mind that: - the tray, the grill and resistance are made of
metal. The handle, switch and control panel are made of plastic. The electrical wires are made of
copper and coated with rubber.
13/24
Assembly page 13/24
Fax +32 030 9904733
Copies of the I/B. Please reproduce them without any
changes except under special instruction from Bimar
(Italy). The pages must be reproduced and folded in
order to obtain a booklet A5 (+/- 148.5 mm width x 210
mm height). When folding, make sure you keep the good
numbering when you turn the pages of the I/B. Don’t
change the page numbering. Keep the language
integrity.
Bitte lesen Sie vor der Benutzung des Gerätes sorgfältig diese Anleitungen und setzen Sie
gegebenenfalls Dritte darüber in Kenntnis. Gebrauchsanleitung zum weitren Nachschlagen
aufbewahren.
ALLGEMEINE HINWEISE
• Das Gerät ist nur zum Hausgebrauch und zum Kochen von Speisen entsprechend den vorliegenden
Gebrauchsanweisungen bestimmt. Wir übernehmen keine Haftung für Schäden, welche durch
unsachgemäße Behandlung entstanden sind und/oder für Reparaturen, die nicht von Fachpersonal
gemacht sind.
• Benutzen Sie das Gerät nicht im Freien.
• Während des Betriebs wird der Grill heiß: nur die Drehschalter, die Druckknöpfe und die Griffe
anfassen. Keinesfalls das Heizelement oder die Grillfläche berühren.
• Keine Töpfe oder Pfannen auf den Grillrost stellen bzw. Alufolie oder Ähnliches darauf legen, da
dies die Wärmeverteilung beeinträchtigen und das Gerät unwiderruflich beschädigen würde.
• Keine Gegenstände auf das Heizelement legen.
• Das betriebene Grillgerät nicht versetzen.
• Verwenden Sie bitte nur das mitgelieferte Zubehör, um die Betriebssicherheit nicht zu gefährden.
Überprüfen Sie bitte regelmäßig den ordnungsgemäßen Zustand des Geräts und der Bauteile
(Stromkabel, Schale, Gitterrost usw.): Bei Unklarheiten wenden Sie sich bitte an einen autorisierten
Kundendienst und überprüfen Sie, dass Original-Ersatzteile eingesetzt werden.
• Personen (einschließlich Kinder), die aufgrund ihrer physischen, sensorischen oder geistigen
Fähigkeiten oder ihrer Unerfahrenheit oder Unkenntnis nicht in der Lage sind, das Gerät sicher zu
benutzen, sollten dieses Gerät nicht ohne Aufsicht oder Anweisung durch eine verantwortliche
Person benutzen. Kinder sollten beaufsichtigt werden, um sicherzustellen, dass sie nicht mit dem
Gerät spielen.
• Das Gerät für Kinder unzulänglich aufbewahren.
• Achtung: Beim Umgang mit Elektrogeräten immer die grundsätzlichen Sicherheitsmaßnahmen
beachten. Damit vermeiden Sie Brandgefahr sowie die Gefahr von Stromschlägen und
Körperverletzungen.
• Ziehen Sie nicht am Netzkabel oder am Gerät, um den Netzstecker aus der Steckdose zu ziehen.
• Ziehen Sie nicht am Kabel, um das Gerät zu versetzen.
• Lassen Sie Ihr Gerät niemals unbeaufsichtigt, wenn es ans Stromnetz angeschlossen ist.
• Das Gerät darf nicht als Wärmequelle eingesetzt werden.
• Setzen Sie das Gerät keinen Witterungseinflüssen (Sonne, Regen usw.) aus.
• Füllen Sie nur Wasser ein, keine anderen Flüssigkeiten oder Feststoffe.
• Eine beschädigte Anschlussleitung muss von dem Lieferanten, von einem Kundendienst oder von
einem Fachmann ausgewechselt werden.
• Achtung: verwenden Sie zum Kochen weder Benzin oder andere brennbare Flüssigkeiten noch
Kohle oder Holz.
ACHTUNG: Decken Sie das Gerät niemals ab, wenn es im Betrieb ist, um Feuer zu
vermeiden.
ACHTUNG: Die Tür und die Außenseite des Gerätes können eine hohe Temperatur erreichen
während des Gebrauches.
INSTALLATION
• Nachdem Sie das Gerät ausgepackt haben, vergewissern Sie sich, dass das Gerät in gutem Zustand
ist: Im Zweifelfall, das Gerät nicht benutzen, sondern von einem Fachmann überprüfen lassen.
Halten Sie Kinder und hilfsbedürftige Personen von allen Verpackungsmaterialien (Plastiktüte,
14/24
Assembly page 14/24
Fax +32 030 9904733
Copies of the I/B. Please reproduce them without any
changes except under special instruction from Bimar
(Italy). The pages must be reproduced and folded in
order to obtain a booklet A5 (+/- 148.5 mm width x 210
mm height). When folding, make sure you keep the good
numbering when you turn the pages of the I/B. Don’t
change the page numbering. Keep the language
integrity.
Styropor usw.) fern, da diese eine Gefahr darstellen könnten. Achtung: Bevor Sie dieses Gerät
benutzen, vergewissern Sie sich Bitte, dass Sie den am Luftan aller hängenden Kleberblätter und
Werbezettel abnehmen.
• Kontrollieren Sie, ob die Netzspannung mit der auf dem Gerät vermerkten Spannung
übereinstimmt bevor Sie den Stecker in die Steckdose stecken (230V~ 50Hz). Die Steckdose muss
geerdet sein. Im Fall einer Unvereinbarkeit zwischen dem Stecker und der Steckdose, lassen Sie die
Anschlussleitung von einem Fachmann auswechseln, der sich vergewissern wird, dass die
Netzspannung mit der der Anschlussleitung übereinstimmt. Im Allgemeinen ist es abgeraten
Verlängerungsschnur oder Adapter zu benutzen. Falls es jedoch unbedingt notwendig wäre, diese
zu benutzen, vergewissern Sie sich, dass diese den geltenden Sicherheitsvorschriften entsprechen,
und dass deren Stromstärke nicht niedriger ist, als die maximale Stromstärke des Gerätes.
• Das Gerät vor dem Gebrauch auf seinen einwandfreien Zustand hin prüfen und sicherstellen, dass
das Netzkabel nicht beschädigt ist: wenden Sie sich im Zweifelsfall an Fachpersonal.
• Das Gerät auf einem ebenen, stabilen und horizontalen Untergrund und in entsprechender
Entfernung zu anderen Hitzequellen, zu brennbaren Materialien (Vorhänge, Möbelstoffe usw.), zu
Brenngasen oder explosiven Stoffen (Sprühdosen) sowie Materialien, die sich durch die Hitze
verformen, aufstellen. Sicherstellen, dass der Freiraum um das Gerät mindestens 40 cm beträgt.
Oberhalb des Geräts mindestens 100 cm.
• Um Brandgefahr zu vermeiden, das Gerät weder an thermische Regelungssysteme noch an
Programmieruhren, Timer oder andere Vorrichtungen anschließen, die das Gerät automatisch
einschalten.
• Beim Aufstellen des Backofens ist auf Folgendes zu achten:
- Nicht in der Nähe anderer Wärmequellen (z. B. anderer Backöfen, Gasherd usw.), von
entzündlichem Material (Tapeten usw.), explosionsgefährlichem Material (Spraydosen) und
Material, das sich durch Wärme verformen kann, aufstellen. Stellen Sie sicher, dass der Freiraum
um das Gerät mindestens 40 cm beträgt.
- Auf eine ebene und sehr stabile Grundlage aufstellen, deren Oberfläche nicht empfindlich ist (z.
B. lackierte Möbel, Tischdecken usw.), und zwar so, dass er keinen Stößen und Schlägen
ausgesetzt ist und einen ausreichenden Abstand zum Möbelrand hat, um ein Herunterfallen zu
vermeiden.
- Nicht in der Nähe von Flüssigkeitsbehältern aufstellen (z.B. Spülbecken usw.). Sollte der
Backofen versehentlich nass werden oder in Flüssigkeit getaucht werden, ziehen Sie sofort den
Stecker aus der Steckdose. Das Gerät auskühlen lassen, sorgfältig abtrocknen und sicherstellen,
dass die Elektroteile nicht nass sind. Im Zweifelsfall wenden Sie sich bitte an qualifiziertes
Fachpersonal.
• Benutzen das Gerät nicht in unmittelbarer Nähe von Behältern mit Flüssigkeiten (z.B.
Waschbecken usw.) oder an Orten, wo es Stößen ausgesetzt ist.
• Stellen Sie das Gerät nicht gerade unterhalb einer Steckdose auf.
• Um Feuergefahr zu umgehen, benutzen Sie das Gerät nicht mit einer Zeitschaltuhr, einem
Programmierungssystem oder mit einem System, Zum Vermeiden von Brandgefahr, falls das Gerät
abgedeckt ist oder nicht ordnungsgemäß positioniert ist.
• Bei einer Störung oder Fehlfunktion das Gerät sofort abschalten und von einer qualifizierten
Fachkraft überprüfen lassen. Reparaturen, die nicht von qualifizierten Fachkräften durchgeführt
werden, können gefährlich sein und der Hersteller lehnt in solchen Fällen jede Garantieübernahme
ab.
BEDIENUNGSANLEITUNGEN
Das Grillgerät besteht aus folgenden Bauteilen:
- Schale (3). Sie muss ständig im Gerät untergebracht sein. Während des Betriebs muss sie ständig
Wasser enthalten. Bevor Sie das Grillgerät einschalten, Widerstand abnehmen, 1,5 Liter Wasser
einfüllen (für circa 2 Stunden und 30 Minuten Betriebsdauer), Widerstand und Grillrost wieder
einsetzen. Während des Betriebs überprüfen Sie bitte ständig, dass immer Wasser vorhanden ist.
15/24
Assembly page 15/24
Fax +32 030 9904733
Copies of the I/B. Please reproduce them without any
changes except under special instruction from Bimar
(Italy). The pages must be reproduced and folded in
order to obtain a booklet A5 (+/- 148.5 mm width x 210
mm height). When folding, make sure you keep the good
numbering when you turn the pages of the I/B. Don’t
change the page numbering. Keep the language
integrity.
Nachfüllen nur nach Ausschalten des elektrischen Widerstands. Achten Sie besonders darauf, dass
Elektroteile nicht nass werden (Schalter, Thermostat, Widerstand usw.): Sollte es trotzdem passieren,
ziehen Sie den Stecker aus der Steckdose, trocknen Sie alle Teile sorgfältig ab und stellen Sie sicher,
dass die Elektroteile (Thermostat, Mikroschalter usw.) nicht nass sind. Schalten Sie danach das
Grillgerät wieder ein.
- Elektrischer Widerstand. Er funktioniert nur, wenn der Griff richtig in der entsprechenden
Aufnahme sitzt. Er ist mit einem einstellbaren Thermostat ausgestattet (4) (Steht der Schalter auf
"min" ist der Widerstand immer ausgeschaltet, steht er auf "max" ist der Widerstand immer
eingeschalten. Mittlere Positionen = Intervallschaltung). Außerdem sind Leuchtanzeigen vorhanden
(rot
=
Elektrokabel
an
der
Steckdose
angeschlossen;
grün
=
Widerstand
eingeschaltet/spannungsversorgt).
- Grillrost (2). Er wird in die entsprechenden Führungen eingeschoben, wodurch drei verschiedene
Höhe möglich sind: unterste Schiene: für Fleisch; mittlere Schiene: für Fisch; oberste Schiene: für
Gemüse. Die Griffe werden beim Betrieb heiß und müssen mit entsprechenden Handschuhen berührt
werden.
- Doppelgrill (Option). Er wird auf den Grillrost gesetzt. Die Griffe werden beim Betrieb heiß und
müssen mit entsprechenden Handschuhen berührt werden.
- Abdeckung (Option), (1). Wenn das Gerät im Freien benutzt wird, sorgt sie dafür, dass die Wärme
an Ort und Stelle bleibt. Im geöffneten Zustand dient sie als Windfang. Sie wird in das Gerätegehäuse
eingesteckt (5) und es sind 3 verschiedenen Höheneinstellungen möglich (Wählen Sie bitte die zu
Ihrem Grillgut passende Höhe, bevor Sie die Schale mit Wasser füllen und das Gerät einschalten).
Durch das Scharnier sind folgende Positionen möglich: zu-auf. Berühren Sie ausschließlich den Griff,
da während des Betrieb die Abdeckung sehr heiß wird.
- Schubfach (Option), (12). Es ist vorne angebracht. Kleine Gegenstände (Salz, Pfeffer, Gewürze
usw.) können dort abgelegt werden.
- Ständer (Option). Der Ständer wird in das Gerätegehäuse gesteckt (in die vier Langlöcher). Er
besteht aus 4 Beinen (10), mit Verlängerung (8), Ablagegitter (9), 2 Seitengriffen (7). Beim
Zusammenbau gehen Sie bitte folgendermaßen vor:
a. Stecken Sie die Verlängerungen tief in das gerade Ende der Beine ein
b. Befestigen Sie die vier Beine an der Ablage, so dass sie nach unten gespreizt sind (die oberen
Enden sind dagegen parallel). Sichern Sie die Befestigung mit Flügelmuttern (11).
c. Stecken Sie an den oberen Enden die zwei Kunststoffgriffe ein, und zwar so, dass sie nach außen
ragen (jedoch nicht über die Falten in Lochnähe). Mit den mitgelieferten Schrauben und
Flügelmuttern festschrauben (6) – (Die Löcher in den Rohren und in den Griffen müssen
fluchten. Der Ständer ist somit zusammengebaut.
d. Stecken Sie die Enden des Ständers tief in das Gerät in die vier entsprechenden Aufnahmen
unterhalb des Kunststoffgehäuses. Stellen Sie bitte sicher, dass das Gerät stabil und horizontal
auf dem Boden steht.
Das Grillgerät darf ausschließlich dann benutzt werden, wenn die Schale eingesetzt ist und sich
Wasser in der Schale befindet.
1. Einschalten
Reinigen Sie mit Spülmittelwasser und einem weichen Tuch Grillrost und Abdeckung. Sorgfältig
abtrocken und wieder in die entsprechende Aufnahme stecken.
Nachdem die Schale mit Wasser gefüllt wurde, stecken Sie den elektrischen Widerstand in die
entsprechende Aufnahme (Vorher prüfen, dass der Thermostatschalter auf "min" steht). Danach den
Stecker in die Steckdose stecken (rote Kontrollleuchte leuchtet auf). Thermostatschalter auf "max"
stellen (Im Uhrzeigersinn drehen). Ca. 20 Minuten Leerlauf.
Betrieb
Nach dem Einsetzen der Abdeckung (Auf richtige Höhe achten) füllen Sie Wasser in die Schale ein
und setzen den Widerstand in die entsprechende Aufnahme: Prüfen Sie vorher, ob der
16/24
Assembly page 16/24
Fax +32 030 9904733
Copies of the I/B. Please reproduce them without any
changes except under special instruction from Bimar
(Italy). The pages must be reproduced and folded in
order to obtain a booklet A5 (+/- 148.5 mm width x 210
mm height). When folding, make sure you keep the good
numbering when you turn the pages of the I/B. Don’t
change the page numbering. Keep the language
integrity.
Thermostatschalter auf "min" steht. Setzen Sie den Griff richtig ein, da sonst der Sicherheitschalter
den Widerstand nicht einschaltet.
Stecken Sie den Stecker in die Steckdose (Die rote Kontrollleuchte leuchtet auf). Thermostatschalter
ensprechend dem Grillgut einstellen (Im Uhrzeigersinn drehen): max. für Fleisch, Fisch, mittlere
Stellungen für Gemüse). Legen Sie das Grillgut auf den Grillrost und stecken Sie den Rost in die
entsprechende Aufnahme (Auf zum Grillgut passende Höhe achten: oben, Mitte, unten).
Nach der Benutzung, schalten Sie den Grill aus (Schalter gegen den Uhrzeigersinn drehen). Danach
den Stecker aus der Steckdose ziehen und das Gerät abkühlen lassen.
Bei längerem Gerätestillstand den Stecker aus der Steckdose ziehen
Die praktischen Ratschläge vom Fachmann fűr ein perfektes Grillem auf dem Bratrost
• Die Intensität der Hitze auf die Art und Große der speise abstimmen (siehe tabelle „kochen auf dem
Bratrost“).
• Die Position des Bratrostes oder die Intensität der Leistung während der Garzeit nicht verändern.
• Die Speisen während des Bratens mehrere Male umdrehen, dabei Gabeln oder andere spitzige
Gegenstände vermeiden.
• Das fleisch vor dem Auflegen auf den Bratrost gut abtrocknen.
• Während der Garzeit das Fleisch mit einer Sauce aus Öl, Zitronensaft und nach Belieben mit
Gewűrzen, leicht bepinseln.
• Salz und Pfeffer werden zum Schluss hinzugefűgt.
• Rotes, saftreiches Fleisch muß schnell gebräunt werden und daher einer intensiven Hitze ausgesetzt
werden, welche in das innere eindringt.
• Bei weißen Fleisch muß die Intensität der hitze reguliert werden, damit Bräunung und Garung
gleichzeitig erfolgen.
• Den Bratrost nach Gebrauch sorgfältig reinigen.
17/24
Assembly page 17/24
Fax +32 030 9904733
Copies of the I/B. Please reproduce them without any
changes except under special instruction from Bimar
(Italy). The pages must be reproduced and folded in
order to obtain a booklet A5 (+/- 148.5 mm width x 210
mm height). When folding, make sure you keep the good
numbering when you turn the pages of the I/B. Don’t
change the page numbering. Keep the language
integrity.
KOCHEN AUF DEM BRATROST
Fleischarten
Dicke
Position des
bratrostes
Rindfleisch
Schnitzel
cm.3
unten
Kotelett
cm.4
unten
Filet
cm.4
unten
Bratspiess
Mitte
Hamburger
cm.3
unten
Kalbfleisch
Schnitzel
cm.1
Mitte
Kotelett
cm.2
Mitte
Bratspiess
Mitte
Grosse Stücke
Mitte
Schweinefleisch
Schnitzel
Kotelett
Grosse Stücke
Bratspiess
Lamm
Kotelett
Bratspiess
Keule
Rückenstück
Geflügel
Ganzes Huhn
Huhn in Stücken
Tauben
Enten
Rebhuhn
Fisch
Ganze Fische
Kleine Fische
Filet
Scheiben
Kurz durchbraten
Medium
Gut durchbraten
5’
9’
8’
8’
8’
8’
12’
12’
10’
10’
12’
18’
18’
12’
12’
-
5’
10’
12’
18’ für 300
g
8’
15’
15’
-
cm.2
cm.2
-
oben
oben
oben
oben
-
10’
12’
12’
18’ für 300 g
13’
cm.1
-
oben
oben
oben
oben
4’
-
5’
8’
30’ für Kg.
30’ für Kg.
8’
10’
-
-
Mitte
Mitte
Mitte
unten
unten
-
40’
40’
30’
50’
30’
-
cm.4
cm.2
cm.2
Mitte
Mitte
Mitte
Mitte
-
18’
8’
6’
8’
-
REINIGUNG UND PFLEGE
Achtung: vor der Reinigung ist das Gerät auszuschalten - den Stecker aus der Steckdose ziehen und
abwarten, bis es ausgekühlt ist.
• Zur Reinigung der Kunststoffteile und der Auffangschale einen weichen Schwamm mit
lauwarmem Wasser und eventuell etwas handelsüblichem Geschirrspülmittel verwenden. Bei der
Reinigung der Einheit mit den elektrischen Steuervorrichtungen besonders darauf achten, dass die
Schalter, das Heizelement usw. nicht nass werden. Sollten sie doch nass werden, sind sie sorgfältig
zu trocknen. Die Einheit mit den elektrischen Steuervorrichtungen nicht in Wasser oder andere
Flüssigkeiten tauchen.
• Den Grillrost mit einer Kunststoffbürste, lauwarmem Wasser und normalem Geschirrspülmittel
reinigen, reichlich mit Wasser nachspülen und sorgfältig trocken reiben.
• Das Gerät, wenn es nicht gebraucht wird, an einem trockenen Ort aufbewahren.
18/24
Assembly page 18/24
Fax +32 030 9904733
Copies of the I/B. Please reproduce them without any
changes except under special instruction from Bimar
(Italy). The pages must be reproduced and folded in
order to obtain a booklet A5 (+/- 148.5 mm width x 210
mm height). When folding, make sure you keep the good
numbering when you turn the pages of the I/B. Don’t
change the page numbering. Keep the language
integrity.
• Zum Austausch des Netzkabels ist ein Spezialwerkzeug nötig: wenden Sie sich auch für eventuelle
Reparaturen an eine befugte Kundendienststelle.
• Machen Sie das Gerät, wenn es außer Betrieb genommen wird, durch Abscheiden des Netzkabels
unbrauchbar (vergewissern Sie sich zuvor, dass der Netzstecker gezogen ist); beseitigen Sie
ebenfalls alle Teile, die für spielende Kinder gefährlich sein können.
• Belasten Sie die Umwelt nicht mit Produkten, die biologisch nicht abbaubar sind, sondern
entsorgen Sie dieselben im Einklang mit den gültigen Vorschriften. Am Ende seiner Nutzzeit darf
das Produkt NICHT zusammen mit dem Siedlungsabfall beseitigt werden. En kannzu den eigens
von den städtischen Behőrden eingerichteten Sammelstellen oder zu den Fachhändlern, die einen
Rűcknahmeservice anbieten, gebracht werden. Die getrennteEntsorgung eines Haushaltsgerätes
vermeidet mőgliche negative Auswirkungen auf die Umwelt und die menschliche gesundheit, die
durch eine nicht vorschriftsmäßige Entsorgung bedingt sind. Zudem ermőglicht wird die
Wiederverwertung der Material, aus denen sich das Gerät zusammensetzt, was wiederm eine
bedeutende Einsparung an Energie und Ressourcen mit sich bright. Zur Erinnerung an die
Verpflichtung,die Elektrohaushaltsgeräte getrennt zu beseitigen, ist das Produkt mit einer
Műlltonne, die durchgestrichen ist, gekennzeichnet. Berücksichtigen Sie dabei Folgendes: Auffangblech, Rost und Spurlager sind aus Metall. - Handgriffe, Schalter, Gehäuse sind aus
Plastik.- Die elektrischen Leiter sind aus Kupfer mit Gummiummantelung.
Nous vous prions de lire attentivement ces instructions avant d’utiliser l'appareil et de les divulguer à
toutes les personnes qui pourraient en avoir besoin. Gardez-les à portée de main.
RECOMMANDATIONS GENERALES
• Cet appareil est destiné uniquement à un usage domestique, pour la cuisson des aliments, en
suivant les modalités mentionnées dans ce manuel. Tout autre usage est considéré comme
inopportun et donc dangereux. Aucune responsabilité ne peut être engagée pour des détériorations
dues à une utilisation inappropriée ou non conforme au mode d’emploi et/ou pour des réparations
faites par du personnel non autorisé.
• N’utilisez pas l’appareil à l’extérieur.
• Pendant le fonctionnement, le gril se réchauffe, touchez par conséquent seulement les boutons, les
poussoirs et les poignées. Evitez le contact avec la résistance électrique et la surface de cuisson.
19/24
Assembly page 19/24
Fax +32 030 9904733
Copies of the I/B. Please reproduce them without any
changes except under special instruction from Bimar
(Italy). The pages must be reproduced and folded in
order to obtain a booklet A5 (+/- 148.5 mm width x 210
mm height). When folding, make sure you keep the good
numbering when you turn the pages of the I/B. Don’t
change the page numbering. Keep the language
integrity.
• N’appuyez pas sur la grille de cuisson des casseroles, des plats à rôti, des feuilles en aluminium ou
d’autres choses qui pourraient empêcher la chaleur de se dissiper, en endommageant l’appareil
d’une façon irréparable.
• N’appuyez rien sur la résistance.
• Ne déplacez pas le gril quand il est en train de fonctionner.
• Pour des raisons de sécurité, veuillez utiliser l’appareil uniquement avec les accessoires fournis.
Vérifiez périodiquement le bon état de l'appareil et des pièces qui le composent (cordon électrique,
plateau, grilles, etc.). En cas de doute, adressez-vous à un service après-vente agréé et assurez-vous
que les pièces de rechange fournies sont d'origine.
• Ce produit n’est pas prévu pour être utilisé par des personnes (y compris les enfants) possédant des
capacités physiques, sensorielles ou mentales réduites ou bien une expérience et connaissance
insuffisante, à moins qu’elles ne se trouvent sous la surveillance de quelqu’un ou qu’elles n’aient
reçu des instructions concernant l’utilisation de l’appareil de la part des personnes responsables de
leur sécurité. Il convient de surveiller les enfants pour s’assurer qu’ils ne jouent pas avec l’appareil.
• Tenir hors de portée des enfants.
• Attention : lorsque vous utilisez des appareils électriques, respectez toujours les consignes de
sécurité élémentaires, afin d’éviter tout risque d'incendie, de décharge électrique ou de lésion
corporelle.
• Ne pas tirer sur le câble d’alimentation ou l’appareil lui-même pour débrancher la fiche de la prise
de courant.
• Ne pas tirer sur le câble pour déplacer l’appareil.
• Ne pas laisser l’appareil exposé aux agents atmosphériques (soleil, pluie etc..).
• Insérer seulement de l’eau et aucun autre liquide ou solide.
• Si le câble est endommagé, il doit être obligatoirement remplacé par un service qualifié compétent
ou par une personne qualifiée.
• Ne laissez jamais votre appareil sans surveillance lorsque celui-ci est sous tension
• N’utilisez pas l’appareil comme source de chaleur.
• Attention: pour la cuisson, ne pas utiliser d’essence ou d’autres combustibles liquides, ni du
charbon ou du bois.
ATTENTION ne couvrez pas l’appareil lorsque celui-ci est en fonctionnement afin d’éviter les
risques d’incendie.
ATTENTION: la porte et la surface extérieure peuvent atteindre une temperature élevée
pendant le fonctionnement de l’appareil.
INSTALLATION
• Après avoir déballé l'appareil, assurez-vous qu'il soit en bon état: si l'appareil est endommagé de
quelque façon que ce soit, ne l'utilisez pas mais faites appel à un service qualifié compétent. Tous
les éléments d'emballage (sac en plastique, polystyrène expansé etc. ) représentent un danger et
doivent être gardés hors de portée des enfants ou personnes non responsables. Attention: les
éventuels adhésifs ou feuilles publicitaires avant l’emploi de l’appareil.
• Avant de brancher l'appareil, vérifiez que la tension du réseau corresponde bien à celle indiquée sur
la plaque signalétique de l'appareil et que la prise de courant soit reliée à la terre (230V~ 50Hz).
En cas d'incompatibilité entre la prise et la fiche de l'appareil, faites remplacer le cordon
d'alimentation par un service qualifié compétent qui devra s'assurer que la tension du cordon
corresponde à la tension du réseau électrique. En général il est fortement déconseillé d'utiliser des
adaptateurs; si l'utilisation d'un adaptateur s'avère indispensable, il doit être conforme aux normes
de sécurité en vigueur et son ampérage ne peut pas être inférieur à l'ampérage maximal de
l'appareil.
• Avant chaque utilisation, vérifiez si l’appareil est en bon état, si le cordon électrique n’est pas
endommagé: en cas de doute, adressez-vous à un personnel qualifié professionnellement.
20/24
Assembly page 20/24
Fax +32 030 9904733
Copies of the I/B. Please reproduce them without any
changes except under special instruction from Bimar
(Italy). The pages must be reproduced and folded in
order to obtain a booklet A5 (+/- 148.5 mm width x 210
mm height). When folding, make sure you keep the good
numbering when you turn the pages of the I/B. Don’t
change the page numbering. Keep the language
integrity.
• Placez l’appareil sur une surface plane bien stable, horizontale, loin d’autres sources de chaleur, de
matériaux inflammables (rideaux, tapisseries, etc…), de gaz inflammables ou de matériel explosif
(petites bouteilles spray) et de matériaux qui peuvent se déformer avec la chaleur. Vérifier si
l’espace libre autour de l’appareil est d’au moins 40 cm et supérieur d'au moins 100 cm.
• La prise secteur doit être facile d’accès afin de pouvoir débrancher facilement l’appareil en cas
d'urgence.
• Veillez à placer l’appareil :
- loin d'autres sources de chaleur (d'autres fours, des réchauds à gaz, etc.), de matières
inflammables (tapisseries, etc.), de matières explosives (bombes aérosol) et de toute matière
pouvant se déformer sous l'effet de la chaleur. Vérifier si l’espace libre autour de l’appareil est
d’au moins 40 cm.
- sur une surface horizontale et bien stable qui ne soit pas délicate (pas de meubles laqués, de
nappes, etc.), de manière à ce qu'il ne puisse pas subir de chocs et à une distance suffisante du
bord du meuble pour éviter tout risque de chute.
- loin de tout objet pouvant contenir du liquide, comme un évier par exemple. En cas
d’éclaboussures ou d’immersion dans un liquide, débranchez immédiatement la fiche de la prise
secteur, laissez refroidir le four et séchez-le avec soin – assurez-vous que les parties électriques
ne soient pas mouillées ; en cas de doute, adressez-vous à un profesionnel qualifié.
• La prise secteur doit être facile d’accès afin de pouvoir débrancher facilement l’appareil en cas
d'urgence.
• Ne pas utiliser l’appareil dans le voisinage immédiat de contenants de liquides (par exemple,
éviers, etc.), ni dans des endroits où on peut le heurter.
• L’appareil ne doit jamais être positionné directement sous une prise électrique.
• N'utilisez pas l'appareil avec une minuterie ou un programmateur ou avec un système qui peut
mettre l'appareil en marche automatiquement, pour éviter tout risque d'incendie si l’appareil est
couvert ou situé en position non appropriée.
• En cas de panne ou de mauvais fonctionnement, éteignez l’appareil et faites-le contrôler par un
réparateur qualifié ; les réparations confiées à des personnes non qualifiées peuvent s’avérer
dangereuses et entraînent la déchéance de la garantie.
INSTRUCTIONS POUR L’EMPLOI
Le gril est livré avec les pièces suivantes :
- plateau (3). Il doit toujours être placé dans l’appareil et il doit toujours contenir de l'eau pendant
l’utilisation. Avant d'allumer le gril, retirez la résistance, versez 1,5 litres d’eau (pour environ 2 h 30
de fonctionnement), puis replacez la résistance et la grille de cuisson. Pendant l’utilisation, vérifiez
constamment qu’il y ait toujours de l’eau. Avant d'en rajouter, coupez toujours la résistance
électrique. Faites très attention à ne pas mouiller les parties électriques (interrupteur, thermostat,
résistance, etc.). Si cela devait arriver, retirez la fiche de la prise secteur, séchez avec soin et assurezvous que les composants électriques (thermostat, micro-interrupteur, etc.) ne sont pas mouillés avant
de rallumer le gril.
- résistance électrique. Elle fonctionne uniquement si la poignée est bien dans son logement. Elle a un
thermostat réglable (4), (lorsque le bouton est sur la position « min », la résistance est toujours
éteinte ; en position « max », la résistance est toujours allumée ; sur les positions intermédiaires, elle
fonctionne par intermittence) et des témoins lumineux (rouge = câble électrique raccordé à la prise
secteur ; vert = résistance allumée/sous tension).
- grille de cuisson (2). Elle se glisse dans les logements qui permettent d’obtenir trois différentes
hauteurs : basse pour la viande, moyenne pour le poisson et haute pour les légumes. Les poignées
chauffent pendant l’utilisation. Des gants spéciaux sont donc nécessaires.
- grille double (en option). On la place au-dessus de la grille de cuisson. Les poignées chauffent
pendant l’utilisation. Des gants spéciaux sont donc nécessaires.
21/24
Assembly page 21/24
Fax +32 030 9904733
Copies of the I/B. Please reproduce them without any
changes except under special instruction from Bimar
(Italy). The pages must be reproduced and folded in
order to obtain a booklet A5 (+/- 148.5 mm width x 210
mm height). When folding, make sure you keep the good
numbering when you turn the pages of the I/B. Don’t
change the page numbering. Keep the language
integrity.
- couvercle (en option) (1). Il sert notamment en cas d’utilisation du gril à l'extérieur et pour
conserver la chaleur. En position ouverte, il sert de paravent. Il s'enclenche dans le corps du gril (5) et
se règle à trois différentes hauteurs (choisissez la plus économique en fonction de l'aliment avant de
placer l’eau dans le plateau et d’allumer le gril). La charnière permet d’obtenir les positions
fermé/ouvert : servez-vous exclusivement de la poignée, car en cours d’utilisation le couvercle est
brûlant.
-tiroir (en option), (12). Situé sur le devant, il permet de ranger de petits objets (sel, poivre, arômes,
etc.).
- support de sol (en option). Le support s'enclenche au corps du gril dans les quatre encoches
cylindriques. Il est composé de 4 pieds (10) avec rallonge (8), d’une tablette inférieure (9) et de deux
poignées latérales (7). Pour le monter, suivez les indications suivantes :
a. introduisez à fond les rallonges à l’extrémité rectiligne des pieds
b. fixez les quatre pieds à la tablette de sorte qu'ils soient écartés vers le bas (les extrémités
supérieures sont quant à elles parallèles). Fixez à l'aide des écrous papillon (11).
c. Enclenchez les deux poignées en plastique à l’extrémité supérieure afin qu'elles saillissent à
l’extérieur sans aller au-delà des plis proches des trous. Bloquez les vis et les écrous papillon
fournis (6) (les trous pratiqués dans les tubes et dans les poignées doivent correspondre). Le
support est ainsi assemblé.
d. Enclenchez à fond les extrémités du support au gril dans les 4 logements spéciaux situés dans la
partie au-dessous du corps en plastique. Vérifiez la stabilité au sol et contrôlez si le gril est bien
horizontal.
Le gril doit être utilisé uniquement avec son plateau et avec de l'eau à l'intérieur.
1° Allumage
Nettoyez à l'eau savonneuse et avec un torchon doux les grilles de cuisson et le couvercle. Séchez
avec soin et remettez-les à leur place.
Après avoir versé de l’eau dans le plateau, placez la résistance électrique dans son logement (vérifiez
auparavant si le bouton du thermostat est en position « min »), puis branchez la fiche dans la prise de
courant (le témoin rouge s'allume). Réglez le bouton du thermostat (tournez dans le sens des aiguilles
d'une montre) en position « max » et faites tourner à vide pendant 20 minutes environ.
Fonctionnement
Après avoir placé le couvercle à la bonne hauteur, versez l’eau dans le plateau et placez la résistance
dans son logement : vérifiez auparavant si le bouton du thermostat est en position « min » et placez la
poignée correctement, sinon l’interrupteur de sécurité ne permet pas d’allumer la résistance.
Introduisez la fiche dans la prise secteur (le témoin rouge s'allume). Réglez le bouton du thermostat
(tournez dans le sens des aiguilles d'une montre) sur la position qui convient au type d'aliment (max
pour la viande et le poisson, positions intermédiaires pour les légumes). Placez les aliments sur la
grille de cuisson et mettez celle-ci dans son logement, à la meilleure hauteur (basse, moyenne et
haute) pour la cuisson de l'aliment.
Après l’emploi, éteignez le gril en tournant le bouton dans le sens contraire des aiguilles d'une
montre, puis débranchez la fiche de la prise secteur et laissez refroidir l’appareil
En cas d'inutilisation prolongée, débrancher la fiche de la prise de courant.
Les conseils pratiques de l’expert pour une cuisson sur le gril parfaite
• Etablir la proportion de l’intensité de la chaleur en fonction de la nature du morceau à cuire et de sa
dimension (voir tableau « Cuisson sur le grill »).
• Ne pas modifier la position de la grille ou l’intensité de la puissance pendant la cuisson.
• Retourner plusieurs fois les aliments en train de cuire en train de cuire en évitant d’utiliser une
fourchette ou d’autres utensiles pointus.
• Faire sécher parfaitement la viande avant de la poser sur la grille.
22/24
Assembly page 22/24
Fax +32 030 9904733
Copies of the I/B. Please reproduce them without any
changes except under special instruction from Bimar
(Italy). The pages must be reproduced and folded in
order to obtain a booklet A5 (+/- 148.5 mm width x 210
mm height). When folding, make sure you keep the good
numbering when you turn the pages of the I/B. Don’t
change the page numbering. Keep the language
integrity.
• Passer délicatement le pinceau trempé dans une sauce composée d’huile, de jus de citron et
d’herbes aromatiques (selon les goûts) à la surface de la viande pendant la cuisson.
• Le sel et le poivre doivent être ajoutés au dernier moment.
• Toute la viande rouge, très riche en jus, doit être dorée rapidement, par conséquent soumise à
l’action d’une chaleur intense qui pénètre à l’intérieur.
• S’il s’agit de viandes blanches, l’intensité de la chaleur doit être réglée de façon à ce que la dorure
et la cuisson aient lieu contemporainement.
• Nettoyer soigneusement la grille après l’usage.
CUISSON SUR LE GRIL (TEMPS DE CUISSON À TITRE INDICATIF)
Sortes de viande
épaisseur Position de la saignant Cuisson à point
grille
boeuf
basse
5’
8’
bifteck
cm.3
entrecôte
cm.4
basse
9’
12’
faux-filet
cm.4
moyenne
8’
12’
brochettes
moyenne
8’
10’
basse
8’
10’
médaillons
cm.3
veau
escalopes
cm.1
moyenne
5’
côtelettes
cm.2
moyenne
10’
brochettes
moyenne
12’
moyenne
18’ tous les 300
gros morceaux
g
porc
grillade
cm.2
haute
côtelette
cm.2
haute
gros morceaux
haute
brochettes
haute
10’
agneau
côtelette
brochettes
gigot
selle
volaille
poulet entier ouvert
poulet découpé
pigeon
canard
poissons
entiers
entiers petits
filets
tranches
Bien cuit
12’
18’
18’
12’
12’
8’
15’
15’
-
12’
12’
18’ tous les
300 g.
13’
cm.1
-
haute
haute
haute
haute
4’
-
5’
8’
30’ cahque Kg.
18’ chaque Kg.
8’
10’
-
-
moyenne
moyenne
moyenne
basse
-
40’
40’
30’
50’
-
cm.4
cm.2
cm.2
moyenne
moyenne
moyenne
moyenne
-
18’
8’
6’
8’
-
23/24
Assembly page 23/24
Fax +32 030 9904733
Copies of the I/B. Please reproduce them without any
changes except under special instruction from Bimar
(Italy). The pages must be reproduced and folded in
order to obtain a booklet A5 (+/- 148.5 mm width x 210
mm height). When folding, make sure you keep the good
numbering when you turn the pages of the I/B. Don’t
change the page numbering. Keep the language
integrity.
NETTOYAGE ET MANUTENTION
Attention: avant de nettoyer l’appareil, débranchez-le, enlevez la fiche de la prise de courant et
attendez qu’il soit refroidi
• Pour le nettoyage des parties en matière plastique et du plateau, utilisez une petite éponge souple,
mouillée avec de l’eau tiède et éventuellement aussi avec un produit détergent normal pour la
vaisselle. On recommande de prêter attention particulièrement au nettoyage de la partie avec les
commandes électriques, afin de ne pas mouiller les interrupteurs, la résistance, etc…: au cas où cela
arriverait, il faut essuyer soigneusement. Ne plongez pas la partie avec les commandes électriques
dans de l’eau ou d’autres liquides.
• Pour le nettoyage de la grille de cuisson, utilisez une brosse avec des poils en plastique, de l’eau
tiède et un produit détergent normal pour la vaisselle, puis rincez abondamment avec de l’eau et
essuyez soigneusement.
• Quand on n’utilise pas l’appareil, il faut le placer dans un endroit sec.
• Pour la substitution du cordon électrique, il faut un outil spécial: adressez-vous aussi à un centre
d’assistance autorisé pour d’éventuelles réparations.
• Si vous décidez de ne plus utiliser l'appareil, il est conseillé de couper le câble d'alimentation
(s'assurer auparavant d'avoir retiré la fiche de la prise de courant) et de neutraliser les parties
dangereuses comme les résistances électriques, notamment en cas d'utilisation ludique par des
enfants.
• Ne pas déverser dans l'environnement des produits qui ne sont pas biodégradables, mais les
éliminer dans le respect des réglementations en vigueur. Au terme de son utilisation, le produit ne
doit pas ĕtre ĕliminé avec les déchets urbains. Le produit doit ĕtre remis à l’un des centres de
collecte sélective prévus par l’administration communale ou auprĕs des revendeus assurant ce
service. Éliminier séparément un appareil électroménager permet d’éviter les retombées négatives
pour l’environnement et la santé dérivant d’une élimination incorrecte, et permet de récupérer les
matériaux qui le composent dans le but d’une économie importante en termes d’énergie et de
ressources. Pour rappeler l’obligation d’éliminer séparément les appareils électroménagers, le
produit porte le symbole d’un caisson à ordures barré. Veuillez garder les éléments présents à
l'esprit.:- Plateau, grille et résistances électriques en métal. - Poignées, interrupteur et panneau
commandes sont en plastique .- les conducteurs électriques sont en cuivre recouvert de caoutchouc.
Via G.Amendola, 16/18
25019 Sirmione (BS) – ITALY
Tel. 030 9904555 r.a. Fax. 030 9904733
www.bimar-spa.it e-mail: [email protected]
24/24
Assembly page 24/24
Scarica