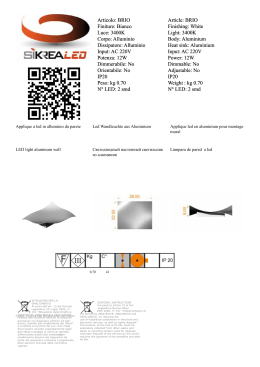
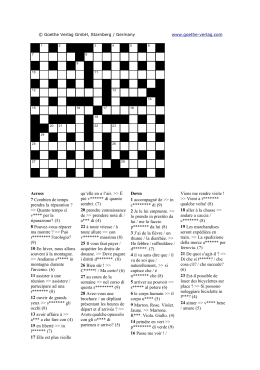
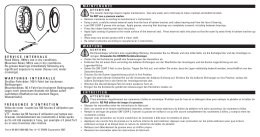
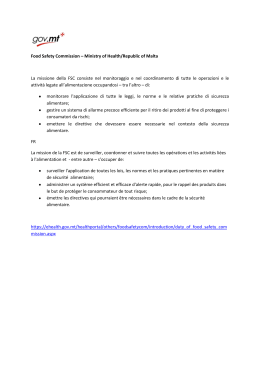
Price
BLOK
CUT
ARCHÈ
PHILO
Finishes
BLOK
pag. 27
Finishes
miscelatore monocomando lavabo
Washbasin mixer
G1/2
Mitigeur lavabo
*
115 105
Art. 5910
60
PHILO
BLOK
RTVT110
RTVT123
RTAT106
RTAE123
Price
CC
JJ
200
max 45
Einhand-Waschtischmischer
140
ARCHÈ
600
Art. 5993CC02
Lavabo sospeso
--
440
Wall mounted washbasin.
179
BLOK
363
*
105
60
miscelatore monocomando bidet
907
Ø32
595
670
Art. 5920
419
1059
50
1118
60 0
105
1230
CUT
Waschtisch
1337
Ø3
60
Lavabo sospendu
109
Bidet mixer - basin
G1/2
Mitigeur bidet
RTVT110
CC
JJ
RTVT123
190
max 45
Einhand-Bidetmischer
43°
RTAE123
140
400
Art. 5900
G1/2
Mitigeur extérieur bain/douche
AP-Badewannen-Einhandbatterie
103
*
163
168
Wall-mtd. bathtub mixer
60
miscelatore monocomando esterno vasca
RTVT110
RTVT123
RTAT106
RTAE128
JJ
210
max 45
140
600
FLEX
1,5 M PVC
Art. 5960
CC
Gruppo doccia con doccetta e soffione anticalcare
METAL
*
Wall-mtd. shower set, anti-limescale hand-shower and shower head
RTVT110
Mitigeur douche mural, douchette et tête de douche anticalcaire
CC
JJ
RTVT123
FLEX
Regenbrause-Set, Antikalk Handbrause und Kopfbrause
1,5 M PVC
METAL
METAL 200 mm
140
600
Ø40
Ø24
1080
1200
Ø200
545
pag. 28
*
G1/2
60
383
445
Cartuccia progresiva (su richiesta) - Progressive cartige (on request) - Cartouche progressive (sur demande) - Kartusche progressive (auf anfrage)
390
40
--
360
210
506
196
ARCHÈ
Ø50
Ø35
140
Ø 20
200
79
Price
Ø70
200
392
Bidet wandhängend
Ø35
80
170
270
252
Ø35
175
330
430
Bidet sospendu
145
Wall mounted bidet
100
Bidet sospeso
94
Art. 6502
Finishes
55
180
150
PHILO
BLOK
547
189
140 60
394
215
510
140
CUT
100
90
280
Ø15 Ø15
Ø100
WC wandhängend
--
240
WC sospendu
340
Ø95
140 60
430
Wall mounted WC
155
350
180
Ø55
WC sospeso
100
Art. 6503
100
550
770
900
Lavabo sospendu cm. 90
280
Cm.90 surface mounted washbasin
65
160
130
Art. rTDo160
500
270 150
720
790
850
65
160
560
145
600
980
500
Waschtisch m.
Waschtisch-Unterschrank
--
130
Meuble sospendu avec
vasque 6505
100
770
900
630
Wengé wall-mounted furniture
vanity unit with basin 6505
720
790
850
280
Möbelwaschtisch cm. 90
mobile sospeso con lavabo
6505 wengé
--
770
900
Lavabo pour meuble cm. 90
Art. 6505 + 6506
100
500
270 150
Lavabo da appoggio cm. 90
560
600
145
130
Waschtisch cm. 90
Art. 6505
BLOK
Cm. 90 wall mounted washbasin
--
65
160
Lavabo sospeso cm. 90
500
270 150
Art. 6504
Doccetta anticalcare
CC
JJ
Anti-limescale hand-shower
Douchette anticalcaire
METAL
Antikalk Handbrause
pag. 29
PHILO
BLOK
Art. rTFL501
Finishes
Flessibile m. 1,5 PVC metallizzato
FLEX
Metalized PVC 1,5 m. flexible hose
Flexible m. 1,5 en PVC métallisé
CC
JJ
1,5 m PVC
ARCHÈ
Brauseschlauch m 1,5 PVC metallisiert
Art. 7220__05
scarico completo rotondo per bidet
CC
Round waste rod and knob for bidet
JJ
CUT
Vidage à tirette ronde
Runde Betätigung für Ablauf Bidet
BLOK
Art. 7320__05
scarico completo quadrato per bidet
CC
Square waste rod and knob for bidet
JJ
Vidage à tirette carré
Eckige Betätigung für Ablauf Bidet
Art. rTVT110
Cartuccia ceramica Ø35
--
Ceramic cartridge Ø35
Cartouche céramique Ø35
Keramikkartusche Ø35
Art. rTVT123
Cartuccia progressiva Ø35
--
Ø35 progressive cartridge
Cartouche progressive Ø35
Kartusche progressive Ø35
*
Art. 5910zz01
su richiesta - On request - Sur demande - Auf Anfrage
Kit areatore ART 5910
--
Aerator kit - Kit mousseur - Kit Perlator
Art. 5900zz12
Kit areatore ART 5900
Aerator kit - Kit mousseur - Kit Perlator
pag. 30
--
Price
Finishes
Price
Il progetto Blok, nasce da un ‘idea innovativa rispetto alla tradizionale concezione della zona bagno. Utilizzando forme basilari,
il designer ha creato una soluzione molto piacevole agli occhi e nello stesso tempo estremamente funzionale.
La giuria del Design Plus 2007 ( IsH - Francoforte ) ha premiato il progetto blok con la seguente motivazione:
PHILO
BLOK
Blok comes from an innovative idea compared with the traditional bathroom concept.
Using basic shapes, the designer s created a solution that is very pleasing on the eye and extremely useful at the same time.
The Design Plus 2007 jury appreciative verdict was
CUT
blok è:
spigoli e forme rotondeggianti, contrasti che confluiscono in un nuovo prodotto estremamente pratico e dalle linee essenziali,
rubinetto e mensola senza interruzione di linea, versatilità di abbinamento con la maggior parte di stili di arredamento presenti
nel mercato.
La scelta dei materiali è stata una logica conseguenza del pensiero legato al progetto, era necessario un materiale che unisse
molteplici caratteristiche , solidità , resistenza, purezza nel colore, eleganza
Ecco perché Crystalplant,
Un materiale solido, tecnologico e soprattutto versatile .
ARCHÈ
“ComPLICATo neLLA ConCezIone, SemPLICe neLLA SoLUzIone “
blok is:
Rough edges and round shapes, contrast that flow together in a new and useful product. Tap and stand, self and water spring
with no line interruption, Blok is so versatile that can perfectly match any bathroom style
The material choice is a logical result of the project thought.
solidity, resistance, colour pureness and elegance were the requirement.
That’s why Crystal plant
Le projet Blok vient d’une idée innovative par rapport au concept traditionnel de la salle de bains.
En utilisant formes essentiels, le designer a crée une solution très agréable et fonctionnel a même temps.
La jury du Design Plus 2007 (IsH Francfort) a accordé le prix à la Blok avec la mention suivante :
“ComPLIqUé DAnS LA ConCePTIon, SImPLe DAnS LA SoLUTIon”
blok est :
Coins et formes arrondis, contrastes qui se fondent dans un nouveau produit, très pratique et avec lignes essentiels.
Robinet et tablette sans interruption des lignes.
Un éclectisme qui permet de bien assortir la Blok à presque tous les différents styles des les salles de bains d’aujourd’hui.
Le choix des matériaux est la logique conséquence de l’idée liée au projet.
solidité, résistance, pureté du couler, élégance sont les caractéristiques pour lesquelles le designer a choisi Cristalplant
Blok entstammt einer Idee, traditionelle Badezimmerkultur in besonderer Form wiederzugeben.
Der Produktentwickler schuf mit einfachen Formen ein besonderes Design mit hoher Funktionalität.
Das Design der serie Blok erhielt den Design Plus Preis 2007.
Formschöne Kanten, zusammen mit runden Formen, ergeben Kontraste die in ein nützliches Projekt fließen.
blok ist vielfältig!
Die Auswahl des material war schnell gefunden.
Aufgrund den Anforderungen des Designers entschied man sich hier für Crystal Plant®.
pag. 31
BLOK
“ComPLICATeD In ThoUghT, SImPLe In SoLUTIon”.
ARCHÈ
PHILO
BLOK
Finishes
Price
Istruzioni di montaggio
Installation Instructions
Instruction de montage
montageanleitung
grazie per aver scelto rubinetterie 3m. Perché il Suo rubinetto funzioni correttamente e possa durare nel tempo, occorre che
vengano rispettate le procedure di installazione ed manutenzione illustrate in questo opuscolo.
Thank you for selecting rubinetterie 3m. In order to allow a proper functioning of your fitting and a long-lasting reliability, you must
carefully observe our care and installation instruction described on this brochure.
CUT
nous vous remercions d’avoir chiosi rubinetterie 3m. Afin que cet appareil fonctionne d’une maniére correcte et puisse durer
longtemps, il convient de respecter les modalités d’installation et d’entretien indiquées dnas cette notice.
bitte beachten Sie die hier aufgeführte montageinstruktionen zu unserer Serie blok.
Preliminari
Prima di procedere all’installazione è necessario pulire accuratamente le tubature per eliminare eventuali detriti in esse presenti.
BLOK
Preliminary information
Before starting with the installation it is necessary to clean the pipes carefully in order to eliminate any deposit that may be found inside them.
Preliminaires
Avant de monter les mitigeur, il faut bien nettoyer les tuyuex pour éliminer toutes les impuretés à l’intérieur.
einleitende Informationen:
spülen sie unbedingt vor der montage sorgfältig die Anschlußleitungen.
5900
miscelatore monocomando esterno vasca
Wall-mtd. bathtub mixer
mitigeur extérieur bain/douche
AP-Badewannen-Einhandbatterie
5910
miscelatore monocomando lavabo
Washbasin mixer
mitigeur lavabo
Einhand-Waschtischmischer
5920
miscelatore monocomando bidet
Bidet mixer - basin
mitigeur bidet
Einhand-Bidetmischer
pag. 32
Finishes
Price
PHILO
BLOK
ImPorTAnTe: L’interasse tra i tubi non deve superare i 45 mm.
ImPorTAnT: The wheelbase has to be 45 mm.
ImPorTAnT: entraxe des 2 deux trous doit être de 45mm.
WIChTIg: Kalt-und Warmwasserrohre benötige einen mittelabstand von 45 mm.
-
Accostare la staffa alla parete nella posizione desiderata (verificare l’orizzontalità con livella) e marcare il centro delle asole esterne.
Lean the bracket against the wall using a level in order to verify exact position and mark the slot centre with a pencil.
Appuyer le châssis contre le mur et tracer le centre des fentes extérieures. Vérifier l’exact positionnement du châssis en utilisant un niveau.
Richten sie die Haltekonsole waagerecht aus und makieren sie die Bohrlöcher.
-
In corrispondenza delle tracce eseguire i fori con punta diametro 12 mm ed inserirvi il tasselli in dotazione.
Where marked, pierce the wall with a Ø12 mm drill and put supplied plugs into the wall.
Percer ou tracé avec une pointe de Ø12 mm et introduire les vis tamponnées fournies.
Bohren sie die Löcher (12 mm) für die schrauben.
BLOK
CUT
ARCHÈ
-
- Accostare la staffa alla parete (i fori più grandi devono essere rivolti verso il basso)
ed avvitare le viti nei tasselli. serrare a fondo quando la staffa è posizionata correttamente
(verificare l’orizzontalità con livella).
- Lean the bracket against the wall again (with bigger holes on the lower side).
Use the level and fix the bracket screwing till the bracket is perfectly fixed.
- En vérifiant le correct positionnement avec un niveau visser le châssis contre
le mur (les trous plus grands doivent rester au dessous).
- Befestigen sie die Haltekonsole und beachten sie, das die 6 mm
Befestigungslöcher (wie auf Abb.) nach oben zeigen.
-
Tagliare a misura i tubetti in rame.
Cut copper tubes according to the required dimension.
Couper les tuyaux à la dimension nécessaire.
schneiden sie die Anschlußrohre auf das entsprechende maß.
-
Avvitare i nipples (1) ai tubi da G1/2” dell’impianto.
screw nipples (1) to G1/2” pipes that are in the wall.
Visser les tuyaux aux arrivés d’eau G1/2”.
mitgelieferte 1/2" Fittinge (1) auf der Warm-und
Kaltwasserleitung anschrauben.
pag. 33
BLOK
Finishes
Price
- Avvitare i tubetti al rubinetto e fissarlo alla mensola con vite a testa esagonale in dotazione (2) (posizionare in ordine la guarnizione di
gomma, la rondella di acciaio e quindi la vite). Inserire le calotte esagonali (3) e le guarnizioni (4) sagomate bianche nei tubetti.
Posizionare la mensola sulla staffa facendo in modo che i tubetti di rame si inseriscano dentro i nipples.
- screw copper tubes to the mixer and fix it to the shelf with the supplied screw (2). Place rubber basket first, then iron basket, then the
screw. Put hexagonal caps (3) and white gaskets (4) into the tubes. Position the shelf on the bracket fixing copper tubes into nipples.
- Visser les tuyaux au mitigeur et visser le mitigeur à la tablette avec la vis (2) fournie. Positionner la jointe en caoutchouc d’abord, donc
celle-ci en fer et la vis. Insérez les calottes hexagonales (3) et les joints blancs (4) dans les tuyaux.
Positionner la tablette sur le châssis faisant attention de introduire les tuyaux dans les paries (1).
- montieren sie die Anschlußrohre an der Blok Armatur und befestigen die Armatur dann an der Crystal Plant Konsole.
Biegen sie die Rohre entsprechend vor und schieben danach die Überwurfmuttern (3) und die weißen Dichtungen (4) über die Rohrenden.
schieben sie die Crystal Plant Konsole auf die Halterung.
CUT
ARCHÈ
PHILO
BLOK
-
Fissare la mensola alla staffa con quattro viti m4 in dotazione.
Fix the shelf on the bracket using the four m4 supplied screws.
Visser la tablette sur le châssis avec les quatre vis m4 fournies.
Befestigen sie die Konsole von unten mit den mitgelieferten
schrauben m4 an der Tragkonsole.
-
Avvitare le calotte esagonali (3) ai nipples (1).
screw hexagonal nuts (3) to nipples (1).
Visser les calottes hexagonales (3) aux parties (1).
Befestigung der Anschlußrohre an der Kalt- und Warmwasserleitung
- Fissare il coperchio alla mensola avvitando le cinque viti di m4 con relative rondelle.
ATTEnZIOnE: evitare di stringere eccessivamente le viti generando tensioni tali da rompere il coperchio.
- Fix the cover to the shelf using the 5 m4 supplied screws.
ATTEnTIOn: do not tighten excessively screws.
- Visser le couvercle à la tablette avec les 5 vis m4 fournies.
ATTEnTIOn: éviter de les visser excessivement, on risque de casser le couvercle.
- Befestigen sie die Abdeckplatte unten an der Tragkonsole unter Verwendung der 5 stück
schrauben m4.
ACHTUnG: schrauben nur "Handfest" anziehen!
pag. 34
Finishes
Price
PHILO
BLOK
CUT
ARCHÈ
5960
Gruppo doccia con doccetta e soffione
Wall-mtd. shower set, hand-shower and shower head
mitigeur douche mural, douchette et tête de douche
Regenbrause-set m EHm, Handbrause und Kopfbrause
BLOK
- Posizionamento consigliato
- Suggested height
- hauteur conseillé
- höhenangabe
-
ImPorTAnTe: L’interasse tra i tubi non deve superare i 45 mm.
ImPorTAnT: The wheelbase has to be 45 mm.
ImPorTAnT: entraxe des 2 deux trous doit être de 45mm.
WIChTIg: Kalt-und Warmwasserrohre benötigen einen mittelabstand von 45 mm.
-
Accostare la staffa alla parete nella posizione desiderata (verificare l’orizzontalità con livella) e marcare il centro delle asole esterne.
Lean the bracket against the wall using a level in order to verify exact position and mark the slot centre with a pencil.
Appuyer le châssis contre le mur et tracer le centre des fentes extérieures. Vérifier l’exact positionnement du châssis en utilisant un niveau.
Richten sie die Haltekonsole waagerecht aus und makieren sie die Bohrlöcher.
-
In corrispondenza delle tracce eseguire i fori con punta diametro 12 mm ed inserirvi il tasselli in dotazione.
Where marked, pierce the wall with a Ø12 mm drill and put supplied plugs into the wall.
Percer ou tracé avec une pointe de Ø12 mm et introduire les vis tamponnées fournies.
Bohren sie die Löcher (12 mm) für die schrauben.
- Accostare la staffa alla parete (i fori più grandi devono essere rivolti verso il basso)
ed avvitare le viti nei tasselli. serrare a fondo quando la staffa è posizionata correttamente
(verificare l’orizzontalità con livella).
- Lean the bracket against the wall again (with bigger holes on the lower side).
Use the level and fix the bracket screwing till the bracket is perfectly fixed.
- En vérifiant le correct positionnement avec un niveau visser le châssis contre
le mur (les trous plus grands doivent rester au dessous).
- Befestigen sie die Haltekonsole und beachten sie, das die 6 mm
Befestigungs löcher (wie auf Abb.) nach oben zeigen.
pag. 35
Finishes
Price
- Utilizzare la staffa come riferimento per marcare un altro centro foro sulla parete secondo lo schema illustrato di seguito e forare con
punta di diametro 6 mm.
- Using the bracket, and following the drawing, pierce the wall with a Ø6 mm. drill.
- En utilisant le châssis et suivant la fiche, tracer et percer le mur avec une pointe de Ø6 mm.
- Zeichnen sie das Bohrloch (6 mm) mittig über der Tragkonsole an.
CUT
ARCHÈ
PHILO
BLOK
Con vite e tassello in dotazione fissare il supporto murale (5) del palo doccia alla parete. montarlo con foro per grano rivolto verso il basso.
Fix the hook (5) using supplied plug and screw. Pay attention to turn the hole on the below part.
Fixer le support mural (5) avec la vis tamponnée fournie. Faire attention à prévoir le petit trou en dessous.
Befestigen sie die obere Halterung wie auf der Abb.
-
Tagliare a misura i tubetti in rame.
Cut copper tubes according to the required dimension.
Couper les tuyaux à la dimension nécessaire.
schneiden sie die Anschlußrohre auf das entsprechende maß.
-
Avvitare i nipples (1) ai tubi da G1/2” dell’impianto.
screw nipples (1) to G1/2” pipes that are in the wall.
Visser les tuyaux aux arrivés d’eau G1/2”.
mitgelieferte 1/2" Fittinge (1) auf der Warm-und Kaltwasserleitung anschrauben.
BLOK
-
pag. 36
Price
-
Fissare la mensola alla staffa con quattro viti m4 in dotazione.
Fix the shelf on the bracket using the four m4 supplied screws.
Visser la tablette sur le châssis avec les quatre vis m4 fournies.
Befestigen sie die Konsole von unten mit den mitgelieferten schrauben m4 an der Tragkonsole.
-
Avvitare le calotte esagonali (3) ai nipples (1).
screw hexagonal nuts (3) to nipples (1).
Visser les calottes hexagonales (3) aux parties (1).
Befestigung der Anschlußrohre an der Kalt- und Warmwasserleitung.
-
Bloccare il supporto a muro serrando il grano di m5 (6)
Fix the wall hook screwing the m5 screw (6)
Fixer le support mural en utilisant la vis m5 (6) fournie
Richten sie die Regenbrause in der Vertikalen (6) aus.
BLOK
CUT
- Avvitare i tubetti al rubinetto e fissarlo alla mensola con vite a testa esagonale in dotazione (2) (posizionare in ordine la guarnizione di
gomma, la rondella di acciaio e quindi la vite). Inserire le calotte esagonali (3) e le guarnizioni (4) sagomate bianche nei tubetti.
Posizionare la mensola sulla staffa facendo in modo che i tubetti di rame si inseriscano dentro i nipples.
- screw copper tubes to the mixer and fix it to the shelf with the supplied screw (2). Place rubber basket first, then iron basket, then the
screw. Put hexagonal caps (3) and white gaskets (4) into the tubes. Position the shelf on the bracket fixing copper tubes into nipples.
- Visser les tuyaux au mitigeur et visser le mitigeur à la tablette avec la vis (2) fournie. Positionner la jointe en caoutchouc d’abord, donc
celle-ci en fer et la vis. Insérez les calottes hexagonales (3) et les joints blancs (4) dans les tuyaux. Positionner la tablette sur le châssis
faisant attention de introduire les tuyaux dans les paries (1).
- montieren sie die Anschlußrohre an der Blok Armatur und befestigen die Armatur dann an der Crystal Plant Konsole. Biegen sie die
Rohre entsprechend vor und schieben danach die Überwurfmuttern (3) und die weißen Dichtungen (4) über die Rohrenden.
schieben sie die Crystal Plant Konsole auf die Halterung.
PHILO
Finishes
ARCHÈ
BLOK
- Fissare il coperchio alla mensola avvitando le cinque viti di m4 con relative rondelle.
ATTEnZIOnE: evitare di stringere eccessivamente le viti generando tensioni tali da rompere il coperchio.
- Fix the cover to the shelf using the 5 m4 supplied screws.
ATTEnTIOn: do not tighten excessively screws.
- Visser le couvercle à la tablette avec les 5 vis m4 fournies.
ATTEnTIOn: éviter de les visser excessivement, on risque de casser le couvercle.
- Befestigen sie die Abdeckplatte unten an der Tragkonsole unter Verwendung der 5 stück schrauben m4.
ACHTUnG: schrauben nur "Handfest" anziehen!
pag. 37
BLOK
PHILO
Finishes
Price
BLOK
CUT
ARCHÈ
5910 + 5993CC02
miscelatore monocomando lavabo + lavabo
Washbasin mixer + washbasin
mitigeur lavabo + lavabo
Einhand-Waschtischmischer + Waschtisch
- Posizionamento consigliato - Suggested height - hauteur conseillé - höhenangabe
- ATTEnZIOnE! Tutte le quote verticali indicate di seguito sono valide esclusivamente per una altezza dello scarico a muro, rispetto al pavimento, di 59-60 cm.
se la misura dovesse risultare diversa, dovranno essere ricalcolate per differenza le misure.
- ATTEnTIOn! All the suggested dimensions are valid if the siphon height of 59/60 cm, otherwise it will be necessary to recalculate them accordingly.
- ATTEnTIOn! Toutes les dimensions ont été prévues en tenant compte la hauteur du siphon à 59-60 cm.
Dans le cas d’un positionnement différent, il faudra recalculer toutes les cotes.
- ACHTUnG: Alle genannten vorgeschlagenen Höhenangaben sind nur gültig bei einer Abflusshöhe von 59-60 cm.
sollte eine andere Abflusshöhe vorliegen so sind die maße dementsprechend nachzurechnen.
440
VISTA A
363
Ø 32
595
pag. 38
1118
1337
419
907
1059
1230
105
50
A
670
60
179
600
Ø3
Finishes
Price
PHILO
BLOK
Accostare la staffa alla parete nella posizione desiderata (verificare l’orizzontalità con livella) e marcare il centro delle 3 asole.
Lean the bracket against the wall using a level in order to verify exact position and mark the slot centre with a pencil.
Appuyer le châssis contre le mur et tracer le centre des fentes. Vérifier l’exact positionnement du châssis en utilisant un niveau.
markieren sie die Bohrlöcher für die Tragkonsole des Waschbeckens.
-
In corrispondenza delle tracce eseguire i fori con punta diametro 12 mm ed inserirvi il tasselli in dotazione.
Where marked, pierce the wall with a Ø12 mm drill and put supplied plugs into the wall.
Percer ou tracé avec une pointe de Ø12 mm et introduire les vis tamponnées fournie.
Bohren sie die Löcher (12 mm) an den gezeichneten stellen.
CUT
-
ARCHÈ
- montaggio del sanitario - how install the washbasin - montage du lavabo - Waschbeckenmontage
BLOK
- Accostare la staffa alla parete ed avvitare le viti nei tasselli. serrare a fondo quando la staffa è posizionata correttamente
(verificare l’orizzontalità con livella).
- Lean the bracket against the wall again. Use the level and fix the bracket screwing till the bracket is perfectly fixed.
- En vérifiant le correct positionnement avec un niveau visser le châssis contre le mur.
- Befestigen sie die Konsole und ziehen die schrauben fest an.
- svitare il controdado di plastica (5) e guarnizione (6) dallo scarico (7).
Inserire lo scarico (7) nel sanitario e stringerlo con guarnizione (6)
e controdado di plastica (5).
- Unscrew the part (5) and (6) from the part (7). Put the part (7)
into the washbasin and fix it with parts (5) and (6).
- Dévisser les parties (5) et (6) de la partie (7). Introduire la partie (7)
dans la vasque et visser les parties (5) et (6).
- Ablaufventil (7) auseinanderschrauben (5 und 6). Ablaufventil in das
Becken einsetzen und mit Dichtung (6) und Gegenmutter (5) befestigen.
-
Avvitare i due grani m8 (8) a mano.
screw two parts m8 (8) by hand.
Visser les deux parties m8 (8) à la main.
Gewindebolzen m8 einsetzen (8).
pag. 39
-
Posizionare il sanitario sulla staffa
Put the washbasin on the bracket
Positionner la vasque sur le châssis
Waschbecken auf die Konsole setzen,
Gewindebolzen durch die entsprechenden Löcher stecken.
- Fissare il sanitario inserendo le rondelle (9) e avvitando i dadi a farfalla (10) ai grani (8).
Completare il fissaggio stringendo i grani (8) con chiave a brugola di 4 mm.
- Fix the washbasin screwing parts (8) – (9) and (10). screw parts (8) with a 4 mm key
- Visser les (8) au lavabo et les parties (9) et (10) aux parties (8) Visser la partie (8) avec une clé de 4 mm.
- Waschbecken mit den beigelegten Flügelschrauben an der Tragkonsole befestigen.
BLOK
CUT
ARCHÈ
PHILO
BLOK
-
Tagliare il pescante del sifone (11) a 35 mm di lunghezza
Cut the (11) part following the instruction 35 mm
Couper la partie (11) è 35 mm. suivre le dessin
Ablaufventil entsprechend der Abflusshöhe abschneiden.
- Tagliare a misura il canotto (12) del sifone e inserirlo nel tubo di scarico a muro.
Infilare la calotta (13) e la guarnizione conica di gomma (14).
- Cut the part (12) according the required dimensions and fix it in the wall.
Put parts (13) and (14).
- Couper la partie (12) à la dimension nécessaire et l'insérer dans la sortie murale.
Insérer les parties (13) et (14).
- Anschlußrohr entsprechend kürzen und am sifon befestigen.
-
montare il sifone completo di pescante stringendo le calotte (13)
Fix the complete siphon fairly screwing parts (13).
monter le siphon complet en vissant modérément les parties (13)
sifon am Ablaufventil befestigen und alle Verschraubungen festziehen.
pag. 40
Finishes
Price
5
6
7
4
14
15
17
16
3
2
1
13
11
9
12
19
8
10
22
18
Codice
Q.ta'
1
RYIT5910CC01
1
2
RTVT110ZZ
1
3
RYIT5900CC03
1
4
RYIT5900CC25
1
5
RYIT5900CC26
1
6
RTVI116ZZ
1
7
RTTA106CC
1
8
RTGO466ZZ
1
9
RYIT5900CC04
1
10
RTAE123ZZ
1
11
RTGF114ZZ
1
12
RTVI145ZZ
1
13
RTVI144ZZ
1
14
RTTB117CC
2
15
RYIT4224ZZ02
2
16
RTGS106ZZ
2
17
RTNI103ZZ
2
18
RTSV202BI
1
19
RYIT5900BB19
1
20
RTVI146ZZ
9
21
RTVI140ZZ
9
22
RTVI150ZZ
2
PHILO
Pos.
ARCHÈ
5910
Price
CUT
Finishes
BLOK
BLOK
20
21
5920
9
10
11
4
3
15
2
12
1
6
17
13
14
5
7
16
19
23
20
8
21
22
18
Pos.
Codice
Q.ta'
1
RYIT5920CC01
1
2
RTVT110ZZ
1
3
RYIT5900CC03
1
4
RYIT5900CC25
1
5
RTAE124CC
1
6
RYIT5920CC06
1
7
RTAE115ZZ
1
8
RTAE123ZZ
1
9
RYIT5900CC26
1
10
RTVI116ZZ
1
11
RTTA106CC
1
12
RTGF114ZZ
1
13
RTVI145ZZ
1
14
RTVI144ZZ
1
15
RTTB117CC
2
16
RYIT4224ZZ02
2
17
RTGS106ZZ
2
18
RTNI103ZZ
2
19
RYIT5920CC19
1
20
RTSV204BI
1
21
RTVI146ZZ
9
22
RTVI140ZZ
9
23
RTVI150ZZ
2
pag. 41
BLOK
PHILO
Finishes
5900
10
26
24
27
ARCHÈ
25
23
3
12
2
15
16
17
18
13
14
8
CUT
7
4
19
1
5
28
22
BLOK
6
21
20
5993
19
Q.ta'
1
RYIT5900CC01
1
2
RTVT110ZZ
1
3
RYIT5900CC03
1
4
RYIT5900CC04
1
5
RTGO466ZZ
1
6
RTAE128ZZ
1
7
RTDV107CC
1
8
RYIT5900CC08
1
10
RTVI116ZZ
1
12
RTGF114ZZ
1
13
RTVI145ZZ
1
14
RTVI144ZZ
1
15
RTTB117CC
2
16
RYIT4224ZZ02
2
17
RTGS106ZZ
2
18
RTNI103ZZ
2
19
RYIT5900BB19
1
20
RTVI140ZZ
9
21
RTVI146ZZ
9
22
RTSV201BI
1
23
RTFL501CC
1
24
RTDO134CC
1
25
RYIT5900CC25
1
26
RYIT5900CC26
1
27
RTTA106CC
1
28
RTVI150ZZ
2
Pos.
Codice
Q.ta'
RZIT5910ZZ05
1
2
RTSV205BB
1
3
RTSA114CC
1
4
RTVI141ZZ
2
5
RTVI143ZZ
2
6
RTSF101CC
1
7
RTVI142ZZ
2
8
RTVI140ZZ
9
10
RYIT5900BB19
1
11
RYIT5910CC01
1
12
RTVT123ZZ
1
13
RYIT5900CC03
1
14
RYIT5900CC04
1
15
RTGO466ZZ
1
16
RTAE123ZZ
1
17
RYIT5900CC09
1
18
RTVI102ZZ
1
19
RYIT5900CC11
1
20
RTVI144ZZ
1
21
RTVI145ZZ
1
4
22
RTGF114ZZ
1
23
RTGS106ZZ
2
7
24
RYIT4224ZZ02
2
25
RTNI103ZZ
2
26
RTTB117CC
2
27
RTVI150ZZ
5
28
RTSV202BI
1
26
13
24
23
25
12
11
15
20
14
16
21
22
9
28
2
9
8
10
3
27
1
5
pag. 42
Codice
1
17
6
Pos.
RTVI146ZZ
9
Price
BLOK
Price
PHILO
Finishes
17
Pos.
Codice
Q.ta'
RTSV203BI
1
1
RYIT5960CC01
1
36
RYIT5900BB19
1
2
RYIT5900CC08
1
37
RTGF114ZZ
1
3
RYIT5960CC03
1
38
RTBR170CC
1
4
RYIT5960CC04
1
39
RTFL501CC
1
5
RYIT5960CC05
1
40
RTDO134CC
1
6
RYIT5960ZZ06
1
41
RYIT5900CC25
1
7
RYIT4224ZZ02
2
42
RTVI116ZZ
1
8
RZIT5960CC08
1
43
RTTA106CC
1
9
RZIT5960CC09
1
44
RTVI150ZZ
2
10
CXIT5960ZZ10
1
45
RTVI117ZZ
1
11
RYIT5960ZZ11
1
12
RYIT5960CC12
1
28
13
RYIT5960CC13
1
12
14
RYIT5960CC14
1
15
RYIT5960ZZ15
1
16
RTNI103ZZ
2
17
RYIT5960ZZ17
1
18
RYIT5960ZZ18
1
19
RTVI145ZZ
1
20
RTVT110ZZ
1
21
RTVI140ZZ
9
22
RTVI149ZZ
1
23
RTVI146ZZ
9
24
RYIT5900CC03
1
25
RTVI105ZZ
3
26
RYIT5900CC26
1
27
RTGS106ZZ
2
28
RTGO502ZZ
1
29
RTVI144ZZ
1
30
RTVI148ZZ
2
31
RTFL333ZZ
1
32
RTFL332ZZ
1
33
RTDV107CC
1
34
RTTB117CC
2
30
9
32
8
13
45
38
5
25
25
DETTAGLIO A
3
22
4
40
7
6
27
16
39
15
18
A
34
29
1
19
2
37
20
33
24
43
41
26
42
44
36
23
21
35
CUT
14
11
Q.ta'
35
10
31
Codice
BLOK
Pos.
ARCHÈ
5960
pag. 43
PHILO
BLOK
Finishes
Price
CUrA e mAnUTenzIone DI CrISTALPLAnT®
CrISTALPLAnT® In breVe
CRIsTALPLAnT® è un materiale composto per la maggior parte di cariche minerali legate a piccole percentuali di resine.
ARCHÈ
mAnUTenzIone qUoTIDIAnA
Prendersi cura di CRIsTALPLAnT® è semplice e veloce. É sufficiente pulire CRIsTALPLAnT® con acqua saponata o comuni detergenti per
rimuovere la maggior parte delle macchie e dello sporco che si possono depositare sulla superficie. sono in particolare consigliati detergenti
in gel, o abrasivi, avendo cura di risciacquare bene la superficie, utilizzati con una spugna abrasiva tipo “scotch Brite®” come campione
allegato (foto1); in questo modo verrà mantenuta la finitura opaca originale, caratteristica distintiva del CRIsTALPLAnT®.
Come PreVenIre I DAnneggIAmenTI
CUT
La superficie ha una buona resistenza alle macchie in genere; ciò nonostante si sconsiglia l’utilizzo di prodotti chimici aggressivi quali
acetone, trielina, acidi o basi forti. Alcune sostanze come inchiostro, cosmetici e tinte, a contatto prolungato con il materiale possono rilasciare
coloranti sulla superficie di CRIsTALPLAnT®, stessa cosa per le sigarette accese; ma il tutto può venire rimosso seguendo i consigli sotto
riportati.
rImUoVere mACChIe oSTInATe, grAFFI e brUCIATUre
BLOK
CRIsTALPLAnT® è un materiale omogeneo in tutto il suo spessore, può quindi essere riparato dalle aggressioni superficiali, quali graffi,
bruciature di sigaretta e macchie ostinate riportando la superficie alla bellezza originale (foto 2) semplicemente seguendo queste indicazioni:
Per piccoli danneggiamenti è possibile ripristinare la superficie adoperando una spugnetta abrasiva scotch Brite® (marchio registrato 3m)
e un comune pulitore abrasivo. Levigare superficialmente la parte danneggiata. se il difetto è ancora visibile ripassare levigando con carta
abrasiva molto fine.
CAre AnD mAInTenAnCe oF CrISTALPLAnT®
A brIeF DeSCrIPTIon oF CrISTALPLAnT®
CRIsTALPLAnT® is a composite material comprising mainly of minerals bonded with a small percentage of resins.
DAILy mAInTenAnCe
Caring for CRIsTALPLAnT® is both fast and easy. It is enough to clean CRIsTALPLAnT® with soapy water or household detergents in order
to remove the majority of stains and dirt which are deposited on the surface. Gel or abrasive detergents are recommended taking care to
thoroughly rinse the surface. When using an abrasive scotch-BriteTm pad, like the enclosed photo the original opaque finish which is the
distinguishing characteristic of CRIsTALPLAnT® will be maintained.
PreVenTIng DAmAge
Whilst surfaces generally resistant to marking, nevertheless the use of aggressive chemical products such as acetone, trielin, strong acids
is discouraged. some substances such as ink, makeup and dyes as well as cigarettes may leave stains and marks on the CRIsTALPLAnT®
surface but they can all be removed by following the instructions below.
remoVIng STUbborn STAInS, SCrATCheS AnD bUrnS
CRIsTALPLAnT® is a material that is homogeneous throughout its thickness and scratches, cigarette burns and stubborn stains can be
removed returning the surface to its original beauty by following these instructions: For light superficial damage, the surface can be restored
by using an abrasive scotch-BriteTm pad (trade mark of 3m) and a household abrasive cleaner. For more deeper damage one can sand the
damaged area. If the defect is still visible, repeat the sanding using very fine grain abrasive paper.
pag. 44
Finishes
Price
PHILO
BLOK
SoIn eT enTreTIen De CrISTALPLAnT®
CrISTALPLAnT® en DeUX moTS
CRIsTALPLAnT® est un matériau composite, constitué principalement de charges minérales liées à de faibles pourcentages de résines.
courants pour éliminer la plupart des taches et de la saleté pouvant se déposer sur la surface. Tout particulièrement, nous conseillons les
ARCHÈ
enTreTIen qUoTIDIen
CRIsTALPLAnT® est d’un entretien facile et rapide. Il suffit de nettoyer CRIsTALPLAnT® à l’eau savonneuse ou avec des détergents
détergents en gel, ou abrasifs, en prenant soin de bien rincer la surface, utilisés avec une éponge abrasive du type « scotch-BriteTm » comme
l’échantillon joint (photo 1) ; on conservera ainsi la finition opaque d’origine, signe distinctif du CRIsTALPLAnT®.
CommenT éVITer LeS DégÂTS
l’acétone, le trichloréthylène, les acides ou les bases fortes. Certaines substances comme l’encre, les cosmétiques et les vernis, en contact
CUT
En général, la surface a une bonne résistance aux taches ; toutefois, nous déconseillons l’utilisation de produits chimiques agressifs tels que
prolongé avec le matériau, peuvent libérer des colorants sur la surface de CRIsTALPLAnT®, de même que les cigarettes allumées; mais il
est possible de les éliminer en suivant les conseils reportés ci-dessous.
éLImIner TACheS TenACeS, érAFLUreS eT brÛLUreS
éraflures, les brûlures de cigarette et les taches tenaces en redonnant à la surface sa beauté d’origine (photo 2)
tout simplement en suivant ces indications: Pour les dégâts limités, on peut réparer la surface en utilisant une éponge abrasive scotchBriteTm (marque enregistrée 3m) et un produit abrasif courant. Polir en surface la partie endommagée.
si le défaut est encore visible, recommencer en passant du papier-émeri très fin.
SorgFALT UnD WArTUng Von CrISTALPLAnT®
eIne KUrze beSChreIbUng Von CrISTALPLAnT®
CRIsTALPLAnT® ist ein material, das hauptsächlich aus mineralstoffen besteht, die durch einen kleinen Anteil
von Harzen gebunden werden.
TägLIChe PFLege:
CRIsTALPLAnT® wird mit handelsüblichen Haushaltsreinigern gesäubert. Diese sind ausreichend um normale Verschmutzung zu entfernen.
Reinigungsmittel mit scheuerwirkung sollten vermieden werden! Verwenden sie für hartnäckige Verschmutzungen bitte den mitgelieferten
scotch-Brite Tm schwamm. somit bleibt die Oberfläche von Cristalplant erhalten.
VorbeUgenDe PFLege
Verwenden sie keine Reiniger die mit Azeton, Trielin oder mit starken säuren versetzt sind. Verunreinigungen durch Tinte oder Asche können
wie auf den nachfolgenden Abbildungen weitestgehend entfernt werden.
Christalplant ® ist ein material von dem auch hartnäckige Flecken unter Einhaltung der Gebrauchsanleitung mit Poliermittel und feinem
schleifpapier entfernt werden können.
pag. 45
BLOK
CRIsTALPLAnT® est un matériau homogène dans toute l’épaisseur, on peut donc le protéger des attaques superficielles telles que les
Finishes
FoTo 1: mACChIA DI CAFFe’
FoTo 2: brUCIATUrA DI SIgAreTTA
PhoTo 1: CoFFee STAInS
PhoTo 2: CIgAreTTe bUrnS
PhoTo 1: TAChe De CAFé
PhoTo 2: brÛLUre De CIgAreTTe
FoTo 1: KAFFeeFLeCKen
FoTo 2: zIgAreTTenASChe
BLOK
CUT
ARCHÈ
PHILO
BLOK
pag. 46
Price
Scaricare