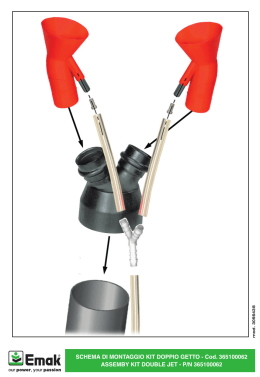
®
ITALIANO
GOLDEN SCAN “HPE ”
ISTRUZIONI PER L’USO
1
KIT TELEOBIETTIVO (C31139)
D
Il presente foglio di istruzioni deve essere letto unitamente al manuale di istruzioni fornito
con il proiettore sul quale si intende montare questo accessorio.
E
Il kit teleobiettivo per GOLDEN SCAN “HPE” è stato progettato per ottenere una riduzione
dell’angolo di proiezione e di conseguenza un aumento della luminosità del fascio
INSTALLAZIONE
Fig. 1 - Agendo sul volantino (A) smontare il vetro di protezione Clear Filter (B) e sostituirlo con
l’obiettivo opzionale (C). Togliere il coperchio cambio lampada (D) svitando il volantino (E).
Fig. 2 - Allentare i grani di bloccaggio (F) posti sul dispositivo di messa a fuoco, togliere la lente
standard (G) e sostituirla con quella fornita nel kit (H); richiudere i grani (F) controllando che
quest’ultima sia posizionata con la battuta contro il supporto (I).
Fig. 3 - Rimontare il coperchio cambio lampada (D) ed avvitare il volantino (E). Con il proiettore
in funzione e con la proiezione di un gobo posta al centro della scena posizionare il
potenziometro di comando della messa a fuoco, al 25% se si lavora con la massima ampiezza
del fascio, ed al 75% se si lavora con la minima ampiezza del fascio.
Effettuare manualmente la messa a fuoco muovendo assialmente l’obiettivo (C) e infine fissarlo
con il volantino (A).
B
C
A
ENGLISH
OPERATING INSTRUCTIONS
2
F
TELEOBJECTIVE KIT (C31139)
To be read in conjunction with the instruction manual supplied with the projector.
The teleobjective kit for GOLDEN SCAN “HPE” is designed to reduce the width of the beam
and therefore increase its intensity
G
INSTALLATION
I
Fig. 1 - Loosen the knob (A), remove the clear filter (B) and replace with the optional lens (C).
Free the lamp access cover (D) by loosening the knob (E), and remove.
Fig. 2 - Loosen the setscrews (F) on the focus collar, remove the standard lens (G) and replace
it with the lens from the kit (H). Retighten the setscrews (F), checking that the lens surround is
fully against the collar (I).
Fig. 3 - Refit the access cover (D) and retighten the knob (E). With the projector on and the
beam and a gobo effect aligned on centre stage, position the focus slider at 25% on the scale if
working with a full width beam, or at 75% if working with a narrow beam.
Adjust the focus manually by moving the lens (C) back and forth in the axial direction, and finally
secure with the knob (A).
H
3
D
C
A
CLAY PAKY SPA - Via Pastrengo,3/B - 24068 Seriate ( Bergamo) Italy
Tel. +39-035 -65 4311 - Fax +39-035 -3018 76 - Internet: www.claypaky.it
Rev. 0 02/01 Cod. 099423
studio
E
Scaricare