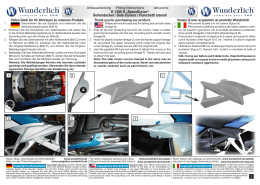
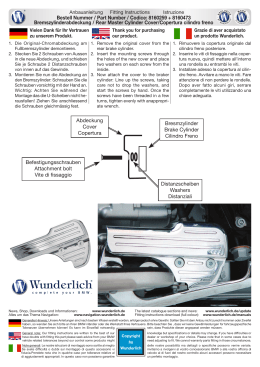
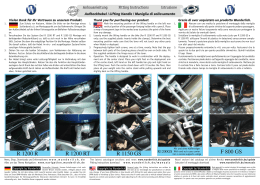
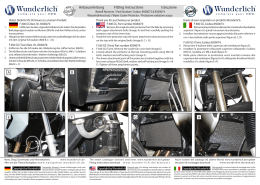
Fitting Instructions
Istruzione
Thank you for purchasing our product.
BY
Vielen Dank für Ihr Vertrauen zu unserem Produkt.
W
CH
Anbauanleitung
Bestell Nummer/ Part Number/ Codice: 8160459 + 8160468
Spritzschutz / Splash Guard/ Protezione
UNDERL
I
Grazie di aver acquistato un prodotto Wunderlich
1.
2.
Entfernen Sie beide Koffer.
Entfernen Sie die 3 Verkleidungsschrauben. Zur
besseren Montage empfehlen wir den Fußrastenhalter
an den 3 Befestigungsschrauben zu demontieren (Bild
A).
3.Drehen Sie die hintere untere Verkleidungsschraube
heraus (Bild B).
4.Die Folie vor der Montage zuerst an den Befestigungspunkten entfernen.
5.Entfernen Sie die originale Blechmutter vom Verkleidungsteil und schieben Sie sie auf den Spritzschutz (Bild
C).
6.Kleben Sie entlang der Verkleidung und des Fußrastenträgers den Moosgummi auf und schieben Sie den
Spritzschutz unter die Verkleidung (Bild D+E).
7.Befestigen Sie den Spritzschutz vorn mit der Schraube
M5X20 und der Hülse (Bild F). Hinten wird der Spritzschutz mit der original Schraube befestigt (Bild G).
8. Ziehen Sie nach der Montage die Folie vollständig ab.
9.Befestigen Sie die Fußrastenplatten und die Verkleidung
wieder am Fahrzeug und drehen Sie die Schrauben der
Fußrastenplatte mit 19 Nm an.
10.Verfahren Sie mit der anderen Seite genauso.
1.
Remove both rear side cases from the motorcycle.
2.Remove the 3 bolts of the original side cover. Remove
also the 3 attachment bolts of the footrest bracket for
easier access during the installation (Image A).
3.Remove the rear lower fairing bolt (Image B).
4.Peel back the thin protection foil on the outer surface of
the splash guard around the attachment points (keep the
foil on the other part in order to protect it during installation).
5.Remove the clip nut from the original side cover and
push it onto the splash guard (Image C).
6.Cut suitable lengths of the supplied soft foam and attach
it along the edges of the side fairing and footrest bracket
(Image D + E). Slide the splash guard in position behind
the fairing.
7.Use the supplied spacer and M5x20 bolt to secure the
front of the splash guard (Image F). Use the original bolt
to secure the splash guard at the rear (Image G).
8.Completely remove the protecting foil from the splash
guard surface.
9.Re-attach the footrest bracket and the fairing bolts.
Torque the 3 footrest bracket bolts to 19 nm (14 ft-lb).
10.Repeat the process on the other side.
1.
Rimuovere le entrambi le valige laterali dalla
moto.
2.Rimuovere i tre bulloni del fianchetto laterale della moto,
quindi rimuovere anche i tre bulloni di fissaggio del poggiapiedi in modo per facilitare il montaggio.(figura A).
3.Rimuovere il bullone posteriore inferiore della carena.
(figura B).
4.Rimuovere lo strato protettivo nella superficie esterna
della protezione nei punti di fissaggio (il folio protettivo
rimanente protegge la protezione durante l’installazione).
5.Rimuovere il clip della carena laterale e installarla alla
protezione nuova (figura C).
6.Tagliare strati della spiuma in dotazione e applicarli al
bordo della carena e al supporto poggiapiedi (figure D
+ E). Portare in posizione la protezione dietro la carena.
7.Utilizzare il distanziale ed il bullone M5x20 per fissare
la parte frontale della protezione (figura F). Alla parte
posteriore della protezione utilizzare i bulloni originali
(figura G).
8.Tirare completamente il foglio protettivo dalla superficie
della protezione
9.Ri-monatare il supporto del poggiapiedi e serrare le viti
della carena. I tre bulloni del poggiapiedi vanno serrati
con una chiave dinanometrica a 19Nm).
10.Ripetere la procedura al lato opposto.
Hinweis: Die Plastikteile können wie normale Lackteile
gereinigt und gepflegt werden. Verwenden Sie aber niemals aggressive Reinigungsmittel wie Verdünnung etc.
Note: The plastic parts can be cleaned in the same way
as the painted parts of the motorcycle. Never use any
abrasive or caustic cleaners such as paint thinner, etc.
Avviso: particolari realizzati di plastica vanno pulite nella
stessa maniera di altri pezzi verniciate della moto. Per la
pulizia dei fianchetti pregiamo di non utilizzare sostanze
solventi in quanto aggressive.
Wunderlich GmbH • Kranzweiherweg 12 • 53489 Sinzig•Gewerbepark • Germany • Tel. +49-(0)2642-97980 • Fax +49-(0)2642-9798 33 • e-mail [email protected] • web: www.wunderlich.de
Geschäftsführer/Managing Directors: Erich Wunderlich, Alexander de la Motte • Amtsgericht Andernach • HRB 12314 • USTID-Nr./VAT-No. 01 DE 149 271 221
News, Shop, Downloads und Informationen: www.wunderlich.de The latest catalogue sections and news:
www.wunderlich.de/update Nuovi sezioni del catalogo ed ultime Novità: www.wunderlich.de/update
Alles um das Thema Navigation: www.navigation.wunderlich.de Fitting instructions download (full colour): www.wunderlich.de/manuals Istruzioni di montaggio download (colore) www.wunderlich.de/manuals
Genereller Hinweis: Unsere Anleitungen
Copyright by Wunderlich® sind nach bestem Wissen erstellt worden,
erfolgen jedoch ohne Gewähr. Sollten Sie mit dem Anbau nicht zurecht kommen
oder Zweifel haben, so wenden Sie sich bitte an Ihren BMW-Händler oder die
Werkstatt Ihres Vertrauens. Bitte beachten Sie , dass wir keine Gewährleistungen für
fahrzeugspezifische Toleranzen übernehmen können! Es kann im Einzelfall notwendig
sein, dass Produkte diesen angepasst werden müssen.
General note: Our fitting instructions are
Copyright by Wunderlich® written to the best of our knowledge but
specifications or details may change. If you have difficulties or have doubts with
fitting this part please seek advice from your BMW dealer or workshop of your choice.
Please note that in some cases due to vehicle related tolerances beyond our control
some products might need adjusting to fit. We cannot warranty parts fitting in those
circumstances.
Note generali: Le nostre istruzioni di montaggio
Copyright by Wunderlich® sono scritte al meglio delle nostre possibilità
ma dettagli o specifiche possono venire variate. Se avete difficoltà o dubbi sul montaggio
di questo accessorio vi invitiamo a rivolgervi al vostro concessionario BMW o alla vostra
officina di fiducia.Prendete nota che in qualche caso per tolleranze relative al veicolo
al di fuori del nostro controllo alcuni accessori possono necessitare di aggiustamenti
appropriati. In questo caso non possiamo garantire un perfetto montaggio.
1
B
C
D
E
F
H
I
!
A
G
2
Scaricare