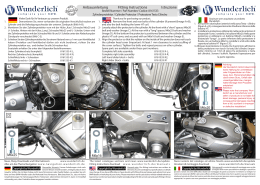
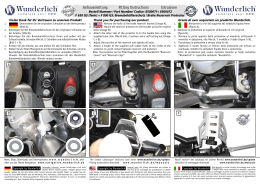
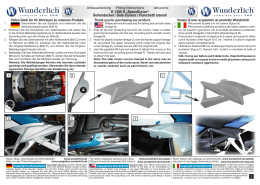
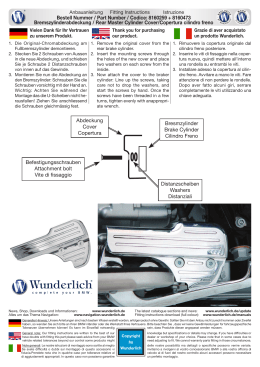
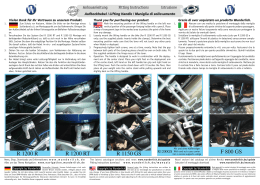
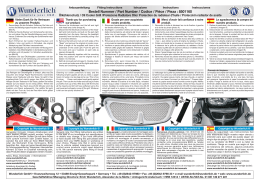
Anbauanleitung
Fitting Instructions
Istruzione
Bestell Nummer / Part Number/ Codice: 8500073 & 8500074
Wasserkühlerschutz / Water Cooler Protector / Protezione radiatore acqua
Vielen Dank für Ihr Vertrauen zu unserem Produkt.
F 800 GS Best. Nr. 8500073:
Thank you for purchasing our product.
F 800 GS, Part number 8500073:
F 650 GS (Twin) Best. Nr. 8500074:
F 650 GS (Twin) Part number 8500074:
1.
Entfernen Sie den originalen Kühlerschutz indem Sie die beiden
Befestigungsschrauben entfernen (Bild A) und den Kühlerschutz unten
herausziehen.
2. Hängen sie den neuen Kühlerschutz unten ein und befestigen Sie ihn oben
mit den original Schrauben (Bild B, C + D).
1. Entfernen Sie die Schraube der Abdeckung des Lüftermotors (Bild E).
2. Der Kühlerschutz wird oben mit den Schrauben M5x16, M6 U- Scheiben
und selbstsicherndernden Muttern befestigt (Bild D).
3. UntenwirdderKühlerschutzzusammenmitderAbdeckungdesLüftermotors
mit der Schraube M5x20, U- Scheibe und selbstsichernder Mutter befestigt
(Bild E + F)
1.
Remove the original cooler protector from the bike by removing
both upper attachment bolts (Image A) and then carefully pulling the
protector out of the lower slots.
2. Hook the new protector onto the lower attachemnt slots and secure the
on the top with the original bolts (Image B, C + D).
3. F 650 GS (Twin): Remove the cooler fan cover bolt (Image E).
4.Loosely attach the protector at the top mounting points using M5x16
bolts, washers and self locking nuts (Image F).
5. The lower attachment point of the protector is bolted together with the
fan cover using an M5x20 bolt, washer and self locking nut (Image G +H)
F). Tighten all three attachment points.
Grazie di aver acquistato un prodotto Wunderlich.
F 800 GS, Codice 8500073:
F 650 GS (Twin) Codice 8500074:
1 .
Rimuovere la protezione dal veicolo smontando i due bulloni
superiori ( figura A), quindi rimuovere la protezione.
2. Installare la protezione nuova agganciandola alla parte inferiore e
con i due bullone nella parte superiore (figura B, C, D).
3. Rimuovere il bullone della copertura del ventilatore (figura E).
4.Installare la protezione nella parte superiore utilizzando i bulloni
M5x16, rondella a U M6 e dadi (figura F).
5.Nella parte inferiore la protezione verrà montata insieme alla
copertura del ventilarore (figura G+H) utilizzando il bullone M5x20,
rondella a U e dado (figura E+F).
A
B
C
D
E
F
G
F
H
News, Shop, Downloads und Informationen: www.wunderlich.de
Alles um das Thema Navigation: w w w . n a v i g a t i o n . w u n d e r l i c h . d e
The latest catalogue sections and news www.wunderlich.de/update
Fitting instructions download w w w . w u n d e r l i c h . d e / m a n u a l s
Nuovi sezioni del catalogo ed ultime Novità www.wunderlich.de/update
Istruzioni di montaggio download www.wunderlich.de/manuals
Genereller Hinweis: Unsere Anleitungen sind nach
bestem Wissen erstellt worden, erfolgen jedoch ohne
Gewähr. Sollten Sie mit dem Anbau nicht zurecht kommen oder Zweifel haben, so wenden Sie sich
bitte an Ihren BMW-Händler oder die Werkstatt Ihres Vertrauens. Bitte beachten Sie , dass wir keine
Gewährleistungen für fahrzeugspezifische Toleranzen übernehmen können! Es kann im Einzelfall
notwendig sein, dass Produkte diesen angepasst werden müssen.
General note: Our fitting instructions are written to
the best of our knowledge but specifications or details
may change. If you have difficulties or have doubts with fitting this part please seek advice from your
BMW dealer or workshop of your choice. Please note that in some cases due to vehicle related tolerances
beyond our control some products might need adjusting to fit. We cannot warranty parts fitting in those
circumstances.
Note generali: Le nostre istruzioni di montaggio sono scritte
Copyright by Wunderlich al meglio delle nostre possibilità ma dettagli o specifiche
possono venire variate. Se avete difficoltà o dubbi sul montaggio di questo accessorio vi invitiamo a rivolgervi
al vostro concessionario BMW o alla vostra officina di fiducia.Prendete nota che in qualche caso per tolleranze
relative al veicolo al di fuori del nostro controllo alcuni accessori possono necessitare di aggiustamenti
appropriati. In questo caso non possiamo garantire un perfetto montaggio.
Copyright by Wunderlich
Copyright by Wunderlich
Vielen Dank für Ihr Vertrauen zu
unserem Produkt.
1.Schneiden und kleben Sie rechts und links an
der Innenseite des Kühlerschutzes senkrecht
jeweils einen Streifen Moosgummi (Bild A).
2.Demontieren Sie die untere Befestigungsschraube des Lüftermotors (Bild D1 oder E1).
3.F 800 S+R: Der Wasserkühlerschutz wird oben
mit den Schrauben M5x16, 6er U-Scheibe und
selbstsichernder Mutter befestigt (Bild B). Unten mit der Schraube M6x20, U-Scheibe und
selbstsichernder Mutter (Bild C).
F 800 ST: Entfernen Sie zusätzlich die oberen
Schrauben der Kühlereinfassung (Bild E). Der
Wasserkühlerschutz wird oben und unten mit
den original Schrauben verschraubt (Bild F +
G).
Thank you for purchasing our
product.
1.Cut and attach 2 straps of the supplied rubber
foam on the inside of the cooler protector (between cooler and protector) (Image A).
2.Remove the lower cooler fan mounting bolt
(Image D1 or E1).
3.F 800 S+R: Attach the cooler protector to
the bike with the M5x16 bolts, 6 mm washer
and self locking nut for the upper attachment
points. For the lower point use an M6x20 bolt,
washer and self locking nut.
F 800 ST: Remove the upper bolts of the cooler
cover (Image E). Attach the cooler protector to
the bike using the original bolts (Image E + F).
Grazie per aver acquistato il nostro
prodotto.
A
W
B
CH
BY
Anbauanleitung Fitting Instructions
Istruzione
Bestell Nummer / Part Number / Codice: 8160505 & 8601521
F 800 S/R/ST Wasserkühlerschutz / Water Cooler Protector / Protezione Radiatore Acqua
UNDERL
I
M5x16
!
!
6 mm
C
D
F 800 S + R
1
M6x20
6 mm
E
F 800 ST
1.Tagliare 2 nastri della gommino fornita ed applicarli al interno della protezione (fra ventilatore
e protezione) (figura A).
2.Rimuovere il bullone della copertura del ventilatore (figura D1 o E1).
3.F 800 S+R: Installare la protezione nella parte
superiore utilizzando i bulloni M5x16, rondella a
U M6 e dadi, nella parte inferiore vanno utilizzati
i bulloni M6x20.
F 800 ST: Rimuovere il bullone della copertura
del ventilatore (figura E). Installare la protezione
utilizzando i bulloni originali (figura E+F).
F
1
G
News, Shop, Downloads und Informationen:
www.wunderlich.de
Alles um das Thema Navigation:
www.navigation.wunderlich.de
The latest catalogue sections and news:
Fitting instructions download (full colour):
www.wunderlich.de/update
www.wunderlich.de/manuals
Genereller Hinweis: Unsere Anleitungen sind nach bestem Wissen erstellt worden, erfolgen jedoch ohne Gewähr. Sollten Sie mit dem Anbau nicht zurecht kommen oder Zweifel
haben, so wenden Sie sich bitte an Ihren BMW-Händler oder die Werkstatt Ihres Vertrauens. Bitte beachten Sie , dass wir keine Gewährleistungen für fahrzeugspezifische
Toleranzen übernehmen können! Es kann im Einzelfall notwendig
sein, dass Produkte diesen angepasst werden müssen.
General note: Our fitting instructions are written to the best of our
have doubts with fitting this part please seek advice from your BMW
vehicle related tolerances beyond our control some products might
Note generali: Le nostre istruzioni di montaggio sono scritte al meglio
Se avete difficoltà o dubbi sul montaggio di questo accessorio vi
fiducia.Prendete nota che in qualche caso per tolleranze relative al
di aggiustamenti appropriati. In questo caso non possiamo garantire
Copyright
by
Wunderlich
knowledge but specifications or details may change. If you have difficulties or
dealer or workshop of your choice. Please note that in some cases due to
need adjusting to fit. We cannot warranty parts fitting in those circumstances.
delle nostre possibilità ma dettagli o specifiche possono venire variate.
invitiamo a rivolgervi al vostro concessionario BMW o alla vostra officina di
veicolo al di fuori del nostro controllo alcuni accessori possono necessitare
un perfetto montaggio.
Scaricare