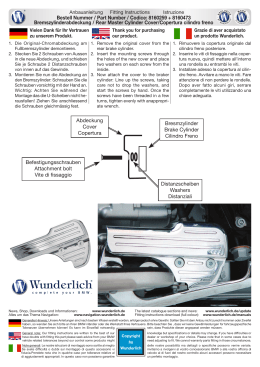
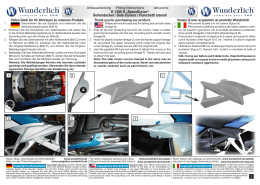
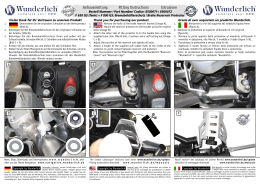
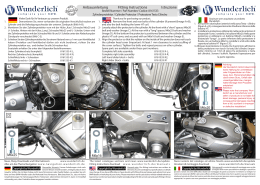
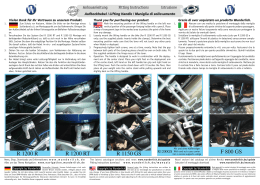
Fitting Instructions
Istruzione
Instructions
Instrucciones
Vielen Dank für Ihr Vertrauen
zu unserem Produkt.
1. Entfernen Sie die Scheibe und den originalen
Scheinwerfereinsatz (siehe auch orig. Bedienungsanleitung)(Bild A).
2. Montieren Sie die Leuchtmittel in die jeweiligen Scheinwerfer. Achtung: Lampenglas
nicht mit Fingern anfassen! (Bild B + C)
3. Verbinden Sie den Kabelsatz an die Leuchtmittel (Bild D).
4. Schützen Sie den Kotflügel mit einer Decke
o.ä. Schließen Sie den Kabelsatz an den originalen Scheinwerferstecker an (Bild E + F).
Hinweis: Die Farben der Kabel am originalen
Lampenstecker können variieren. Normalerweise ist die Verbindung wie folgt: Gelb (von
neuer Lampe) an Weiß (am Stecker), Weiß an
Gelb und Schwarz/ Weiß an Braun.
5. Wenn beide Einsätze beim Einschalten des
Ablendlichtes leuchten sollen (nicht Zulassungsgerecht), entfernen Sie die Isolation
(Bild D1) und verbinden Sie die weißen Kabel
miteinander (D1 mit D2), ansonsten lassen
Sie die weissen Kabel unverbunden (nur ein
Abblendlicht leuchtet).
6. Schneiden Sie die Rundstecker vom Kabelsatz ab (Bild G) und krimpen Sie die
mitgelieferten Flachstecker stattdessen an.
Verbinden Sie nun die Flachstecker an den
originalen Parklichtstecker.
7. Montieren Sie den Scheinwerfereinsatz mit
den Schrauben M5 und U-Scheiben an den
originalen Befestigungspunkten (Bild H).
8. Überprüfen Sie die ordnungsgemäße Funktion und Einstellung der Scheinwerfer. Das
einstellen der Scheinwerfer erfolgt wie im
Original.
9. Montieren Sie die Abdeckung mit den
Schrauben M4 und U-Scheiben (Bild I).
10.Bauen Sie die Scheibe wieder an.
Copyright by Wunderlich ®
Thank you for purchasing our
product.
1. Remove the screen and the original head light
insert (also see original hand book) (Image A).
2. Attach the supplied bulbs into the new lamp
unit. Attention: Do not touch the bulb glass
with your fingers! (Image B + C)
3. Attach the supplied wiring to both lamps
(Image D).
4. Protect the mudguard with a blanket or similar. Connect the lamp wiring to the original
head lamp plug (Image E + F). Note: The
colours of the wiring of the original lamp plug
may vary. Usually the connection should be
as follows: Yellow (from new lamp) to white
(on plug), white to yellow and black/white to
brown.
5. If both lamps are required to light up when the
low (dipped) beam is switched on, remove
the insulation tape (D1) and connect both
white wires (D1 to D2). Otherwise leave the
white wires disconnected (only one low beam
is on).
Note: Please check the law in your country
regarding the use of two low (dipped) beams
simultaneously!
6. Cut the round “bullet” connectors from the
lamp wiring (Image G) and crimp on the supplied spade connectors instead. Connect the
spade connectors to the original park light
plug.
7. Attach the new dual headlamp assembly to
the original mounting points using the supplied M5 bolts and washers (Image H).
8. Check the correct function of the lights and
adjust the aim of the lamp unit. The aim
adjustment is the same as the original.
9. Attach the front cover to the lights using the
supplied M4 bolts and washers (Image I).
10.Reattach the screen.
Copyright by Wunderlich ®
Grazie per aver acquistato il
nostro prodotto
1. R
imuovere il parabrezza e l’inserto del faro
originale (v. anche il libretto d’uso originale)
(immagine A).
2. Inserire le lampadine fornite nella nuova unità
del faro. Attenzione: non toccare il vetro della
lampadina con le dita! (immagini B e C).
3. F
issare il cablaggio ad entrambe le lampade
fornite (immagine D).
4. P
roteggere il parafango con una coperta o
simili. Collegare i cavi del faro al connettore
del faro originale (immagini E ed F). Nota: i
colori dei cavi del conettore del faro principa
le possono variare. Di norma, la connessione
dovrebbe essere: giallo (del nuovo faro) con il
bianco (sul connettore), bianco con il giallo e
nero/bianco con il marrone.
5. S
e è necessario che entrambi i fari si illuminino quando la luce anabbagliante è accesa
, rimuovere il nastro isolante (D1) e collegare
entrambi i fili bianchi (D1 con D2). Altrimenti,
lasciare i fili bianchi non collegati (solo una luce
anabbagliante).
Nota: Verificare le norme del proprio paese
in merito all’utilizzo simultaneo di due fari
anabbaglianti!
6. T
agliare i connettori „a pallottola“ rotondi dai
cavi del faro (immagine G) e aggraffare su
connettori a forcella forniti. Collegare i connettori a forcella alla atacco elettrico delle luci di
posizione originale.
7. F
issare il nuovo gruppo del doppio faro ai punti
di montaggio originali utilizzando i bulloni M5 e
le rondelle forniti (immagine H).
8. C
ontrollare il corretto funzionamento delle luci e
regolare l’obiettivo dell’unità del faro. La regolazione dell’obiettivo è uguale a quella originale.
9. F
issare la copertura frontale alle luci utilizzando
i bulloni M4 e le rondelle forniti (immagine I).
10. Rimontare il parabrezza.
Copyright by Wunderlich ®
Merci d’avoir fait confiance à
notre produit.
1. Retirez la vitre et l’insert du phare d’origine (voir
également le manuel d’origine) (photo A).
2. Montez les ampoules fournies dans la nouvelle
unité de phare. Attention : ne touchez pas le
verre d’ampoule avec vos doigts ! (photo B + C)
3. Montez le câblage sur les deux phares (photo D).
4. Protégez le garde-boue à l’aide d’un chiffon.
Connectez le câblage du phare à la fiche du
phare d’origine (photo E + F). Indication : les
couleurs du câblage d’origine peuvent éventuellement varier. La connexion se présente
généralement de la manière suivante : câble
jaune (du nouveau phare) avec câble blanc
(fiche), câble blanc avec câble jaune et câble
noir/blanc avec câble brun.
5. Si vous souhaitez que les deux phares s’allument
lorsque vous actionnez les phares à longue portée, veuillez retirer la bande adhésive d’isolation
(D1) et connectez les deux câbles blancs (D1 à
D2). Autrement, laissez les câbles blancs déconnectés (uniquement un phare de croisement).
Indication : veuillez vous renseigner sur la législation de votre pays en ce qui concerne l’utilisation simultanée de deux feux de croisement!
6. Coupez les connexions rondes du câblage
des phares (photo G) et remplacez-les par
les connexions plates fournies. Branchez les
connexions plates sur la fiche du feu de stationnement.
7. Montez l’unité de phares sur les points de
montage d’origine en utilisant les vis M5 et les
rondelles fournies (photo H).
8. Vérifiez le fonctionnement et le réglage correct
des phares. Le réglage des phares est identique
à celui des phares d’origine.
9. Montez le cache des phares en utilisant les vis
M4 et les rondelles fournies (photo I).
10. Remontez la bulle.
Copyright by Wunderlich ®
BY
Bestell Nummer / Part Number / Codice / Pieza / Pièce: 8230010
Doppelscheinwerfer / Dual Headlight Conversion / Phare double / Doppio Faro / Doble Luz
W
CH
Anbauanleitung
UNDERL
I
Le agradecemos la compra de
nuestro producto.
1. R
etirar la pantalla y la carcasa del faro delantero original (véase también el manual original)
(Imagen A).
2. Insertar las bombillas suministradas en las
nuevas unidades de faros. Atención: ¡No
tocar el cristal de las bombillas con los dedos!
(Imagen B + C)
3. C
onectar los cables suministrados a ambos
faros (Imagen D).
4. P
roteger el guardabarros con una manta
o similar. Conectar los cables del faro a la
clavija del faro original (Imagen E + F). Nota:
Los colores de los cables de la clavija del faro
original pueden ser distintos. Por lo general,
la conexión debería ser la siguiente: amarillo
(del nuevo faro) a blanco (en la clavija), blanco
a amarillo y negro/blanco a marrón.
5. S
i se necesita que ambos faros se enciendan
cuando las luces de largo alcance estén encendidas, retirar la cinta aislante (D1) y conectar los
dos cables blancos (D1 a D2). De lo contrario,
dejar desconectados los cables blancos (sólo
una luz baja).
Nota: ¡Por favor, revise las leyes de su país
respecto a la utilización de dos luces bajas
al mismo tiempo!
6. C
ortar las clavijas redondeadas de los cables
del faro (Imagen G) y doblarlas en su lugar sobre los conectores de horquilla suministrados.
Conectar los conectores de horquilla a la clavija
original de la luz de estacionamiento.
7. Instalar los nuevos faros duales con los tornillos
y arandelas M5 suministrados a los puntos
originales de fijación (Imagen H).
8. C
omprobar el correcto funcionamiento y ajuste
de los faros. El ajuste objetivo es el mismo
que el original.
9. F
ijar la tapa frontal de los faros con los tornillos
y las arandelas M4 suministrados (Imagen I).
10. Volver a colocar la pantalla.
Copyright by Wunderlich ®
Genereller Hinweis: Unsere Anleitungen sind nach bestem
Wissen erstellt worden, erfolgen jedoch ohne Gewähr.
Sollten Sie mit dem Anbau nicht zurecht kommen
oder Zweifel haben, so wenden Sie sich bitte an Ihren
BMW-Händler oder die Werkstatt Ihres Vertrauens. Bitte
beachten Sie , dass wir keine Gewährleistungen für
fahrzeugspezifische Toleranzen übernehmen können! Es
kann im Einzelfall notwendig sein, dass Produkte diesen
angepasst werden müssen.
General note: Our fitting instructions are written to the
best of our knowledge but specifications or details may
change. If you have difficulties or have doubts with fitting
this part please seek advice from your BMW dealer or
workshop of your choice. Please note that in some cases
due to vehicle related tolerances beyond our control some
products might need adjusting to fit. We cannot warranty
parts fitting in those circumstances.
Note generali: Le nostre istruzioni di montaggio sono
scritte al meglio delle nostre conoscenze, ma i dettagli o le
specifiche possono essere modificate. Se avete difficoltà o
dubbi relativi al montaggio di questo accessorio, vi invitiamo
a rivolgervi al vostro concessionario BMW o alla vostra
officina di fiducia. Vi preghiamo di tenere presente che in
qualche caso, a causa di tolleranze specifiche del veicolo
al di fuori del nostro controllo, alcuni prodotti possono
richiedere aggiustamenti appropriati. Non possiamo fornire
alcuna garanzia per le parti montate in tali circostanze.
Remarque d’ordre général: nos directives de montage sont
élaborées au mieux sur la base de nos connaissances,
mais nous ne saurions en garantir le résultat. Si vous
rencontrez des difficultés lors du montage ou si vous avez
des questions, veuillez contacter votre concessionnaire
BMW ou l’atelier de votre choix. Veuillez noter que nous
ne pouvons fournir aucune garantie quant aux tolérances
spécifiques du véhicules. Dans certains cas, il peut
être nécessaire d’ajuster les produits à ces tolérances
particulières.
Aviso de seguridad: Las instrucciones han sido elaboradas
según nuestra mejor ciencia y entender para que usted
las pueda seguir sin ningún tipo de peligro. En caso
de duda, contacte con su vendedor de BMW o con su
taller de confianza. !Tenga en cuenta que según el tipo
de tolerancia del vehículo, algunos productos podrían
necesitar de ajuste! En tal caso, no nos hacemos cargo
ni damos ninguna garantía.
News, Shop, Downloads + Informationen:
www.wunderlich.de
Kataloganforderung + Downloads:
www.wunderlich.de/katalog
Anleitung download (in Farbe):
www.wunderlich.de/manuals
Catalogue download (English):
www.wunderlich.de/update
General information, dealers and news:
www.wunderlich.de/International
Fitting instructions download (in full colour):
www.wunderlich.de/manuals
Download catalogo (italiano):
www.wunderlich.de/update
Informazioni generali, dealer e Novità:
http://www.wunderlich.it
Download istruzioni di montaggio (colore)
www.wunderlich.de/manuals
Télécharger les catalogues (francais):
www.wunderlich.de/update
Informations générales et distributeurs:
www.wunderlich.fr
Descargar los catálogos (español):
www.wunderlich.de/update
Informaciones generales, tiendas y noticias:
www.wunderlich.de/International
Descargar las instrucciones de montaje (color):
www.wunderlich.de/manuals
Télécharger les instructions de montage (en couleurs)
www.wunderlich.de/manuals
Wunderlich GmbH • Kranzweiherweg 12 • 53489 Sinzig•Gewerbepark • Germany • Tel. +49-(0)2642-97980 • Fax +49-(0)2642-9798 33 • e-mail [email protected] • web: www.wunderlich.de
Geschäftsführer/Managing Directors: Erich Wunderlich, Alexander de la Motte • Amtsgericht Andernach • HRB 12314 • USTID-Nr./VAT-No. 01 DE 149 271 221
A
B
C
3
D
F
H
2
I
G
E
1
Scaricare