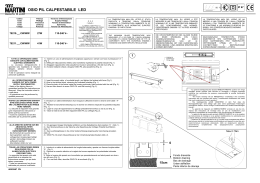
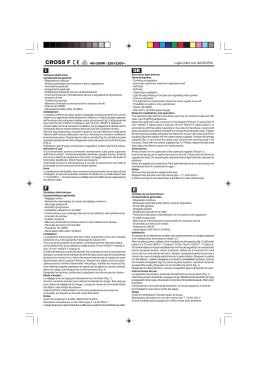
MOVIMENTO
COMPLANARE
A DUE O PIÙ ANTE
TWO
OR MULTIPLE
DOOR SLIDING
MOVEMENT
FLÄCHENBÜNDIGES
SCHIEBESYSTEM
FÜR 2 ODER MEHRERE
TÜREN
CERTIFIED
0%
64%
100%
0%
Cyan
Magenta
Yellow
Black
0%
0%
15%
82%
Cyan
Magenta
Yellow
Black
0%
0%
0%
37%
Cyan
Magenta
Yellow
Black
L’esclusività
Exclusivity
Exklusivität
Bortoluzzi Sistemi progetta e
realizza soluzioni tecnologiche
per la chiusura e lo scorrimento
delle ante di mobili ed elementi
d’arredo.
Bortoluzzi Sistemi designs
and manufactures technological solutions for closing and
sliding doors on furniture andfurnishing accessories.
Soluzioni standard e su misura sono sviluppate nel reparto
R&S da un gruppo di tecnici
altamente specializzato, per
mezzo di strutture informatiche
avanzate; i progetti sono poi
realizzati dal reparto produttivo,
secondo rigorosi criteri di organizzazione del lavoro e controllo della qualità.
Standard and custom solutions
are developed in the R&D department by a group of highly
specialized technicians using advanced computer technologies; the projects are then
created in the production department in accordance with
rigorous working organisation
and quality control criteria.
Bortoluzzi Sistemi beschäftigt sich mit Planung und Herstellung von technischen Lösungen für das Schließen und
Gleiten von Türen für Möbel
und Einrichtungsgegenstände.
Completa il processo un metodo innovativo di raccolta dell’ordine, effettuabile direttamente
dal sito internet dell’Azienda,
anche sulla base di specifiche
richieste del singolo cliente.
An innovative ordering procedure completes the process,
directly through the company
website, also based on specific
requirements of each single client.
Dal 1987 Bortoluzzi Sistemi è
affidabilità tecnica, ed esclusività progettuale.
Since 1987, Bortoluzzi Sistemi has been synonymous with
technical reliability, and exclusive design.
Standardlösungen und maßgeschneiderte Lösungen werden
in der Abteilung F&E von einer
Gruppe hoch spezialisierter
Fachleute mit Hilfe der neuesten Computertechnik entworfen. Anschließend werden
die Projekte von der Produktionsabteilung hergestellt, nach
strengen Kriterien zu Arbeitsabläufen und Qualitätskontrolle.
Ergänzt wird dieser Prozess
durch eine innovative Art der
Bestellaufnahme, die direkt auf
der Website des Unternehmens
durchgeführt werden kann,
auch bei speziellen Wünschen
des einzelnen Kunden.
Seit 1987 steht Bortoluzzi Sistemi für technische Zuverlässigkeit, und exklusive Planung.
1
2
Indice
Index
Inhaltsverzeichnis
Caratteristiche tecniche
pag. 4
Technical features
page 4
Technische Eigenschaften
S. 4
Brevetti
pag. 5
Patent
page 5
Patent
S. 5
Kit
pag. 6
Kit
page 6
Kit
S. 6
Legenda codici
pag. 8
Legend of codes
page 8
Codelegende
S. 8
Tipologie
pag. 9
Types
page 9
Typen
S. 9
Come ordinare
pag. 11
How to order
page 11
Bestellung
S. 11
Montaggio e regolazioni
pag. 17
Assembly and adjustments
page 17
Montage und Regulierung
S. 17
Slider L
Slider L
Slider L
Slider L è un meccanismo
per ante complanari di grandi
dimensioni e pesi che possono
raggiungere i 70 Kg. Applicato
sulla parte superiore di grandi
contenitori, permette la realizzazione di armadi a due, tre e
più ante.
Ogni anta rallenta la sua corsa
in apertura e chiusura grazie a
un ammortizzatore. Il meccanismo è inoltre dotato di una copertura frontale opzionale che
si presta a essere personalizzata a piacere dal cliente.
Slider L is a mechanism for
large and heavy sliding doors
up to 70 kg in weight.
Applied to the top of suitablysized cabinets, it enables the
construction of wardrobes and
storage units with two, three, or
multiple coplanar sliding doors.
A decelerating system softens
the final closing phase of each
door as well as the opening
phase. The mechanism is also
equipped with an optional front
cover, that can be customized
as preferred by the client.
Slider L ist ein Schiebesystem für Türen in großen Ausmaßen und Gewichten bis zu
70 kg. Der Beschlag wird auf
die Oberplatte montiert und
ermöglicht den Aufbau von
Schränken mit 2, 3 oder auch
mehreren Fronten.
Alle Türen haben eine gedämpfte Schließung. Der Wiedereintritt wird durch einen Rotationsdämpfer gebremst.
Diese Dämpfung ist auch bei
Türöffnung verfügbar. Der Beschlag ist auch mit einer speziellen Abdeckleiste lieferbar,
die auf Wunsch des Kunden
gestaltet werden kann.
3
4
Caratteristiche
tecniche
Technical
features
Composizione movimenti
●Profili in alluminio:
lega 6060T5 anodizzati
argento ARC10
●Ruote di scorrimento:
realizzate con cuscinetti
ad alta velocità rivestiti
in materiale plastico
●Guide per l’uscita delle ante:
in materiale plastico per una
ottimale insonorizzazione
●Carrello superiore portante:
in lega d’alluminio pressofuso
●Staffe in lamiera zincata
●Componenti di traslazione
e regolazione:
in zama primaria 15
Mechanism elements
Caratteristiche delle ante
●Peso massimo per singola
anta = 70 Kg
(uniformemente distribuito)
●Larghezza:
- minima 800 mm
- massima 2000 mm
●Altezza: massima 3000 mm
●Spessore:
- minima 18 mm
- massima 45 mm
(maniglia compresa)
●Regolazione verticale dell'anta
± 5 mm
●Regolazione orizzontale
dell'anta ± 3.5 mm
(per eventuali fuori misura, contattare la
Bortoluzzi Sistemi).
Materiale:
a) legno o derivati;
b)vetro con telaio in alluminio (per verificare la fattibilità contattare la
Bortoluzzi Sistemi).
●
ARC10 silver anodized
6060T5 alloy aluminium
profiles
●Nylon-coated rollers with highvelocity bearings
●Guide rails in thermoplastic for
excellent sound-proofing
●Top support carriage in
pressed aluminium
●Brackets in galvanised steel
●Sliders and adjustment parts
in primary zamak 15
●
Doors features
Maximum weight for each
door = 70 Kg
(Evenly distributed)
●Width:
- minimum 800 mm
- maximum 2000 mm
●Height: maximum 3000 mm
●Thickness:
- minimum 18 mm
- maximum 45 mm
(including handle)
●Door vertical adjustment
± 5 mm
●Door horizontal adjustment
± 3.5 mm
●
(For mechanisms out of the
range contact Bortoluzzi
Sistemi).
Material:
a)wood or derivatives;
b)glass with aluminium frame
(for feasibility contact Bortoluzzi Sistemi). ●
Technische
Eigenschaften
Zusammensetzung
der Beschläge
● Aluprofil: aus Aluminium
Legierung 6060T5, eloxiert
Silber ARC10
● Schieberollen: Plastikbezogene
Hochgeschwindigkeitslager
● Türgleitschienen: aus
Kunststoffmaterial zu
einer optimalen Schalldämmung
● Oberer tragender Laufwagen
aus Aluminium
● Führungsplatten aus verzinktem
Blech
● Einstell- und
Verschiebungselemente aus
15er Zamakdruckguss
Eigenschaften der Türen
●Max. Gewicht je Tür = 70 Kg
(Gleichmäßig verteilt)
● Breite:
min. 800 mm
max. 2000 mm
●Höhe:
max. 3000 mm
●Stärke:
min. 18 mm
max. 45 mm
(inklusive Griff)
●Vertikal Regulierung des Blattes
± 5 mm
●Horizontale Regulierung des
Blattes ± 3.5 mm
(Bei Systemen außerhalb dieser
Maße Bortoluzzi Sistemi
kontaktieren.)
Material:
a)Holz oder Holzprodukte;
b)Glas mit Alurahmen
(für die Machbarkeit Bortoluzzi Sistemi kontaktieren).
●
Brevetti
Patent
Patent
CERTIFICATI
Rapporto CATAS n. 132242
CERTIFICATIONS
Report CATAS n. 132242
ZERTIFIKATE
Bericht CATAS Nr. 132242
Prove eseguite
● Test di apertura e chiusura
UNI 8607: 2005.
- Peso ante: 70 Kg
- Numero cicli: 50.000
- Su specifica richiesta
della Bortoluzzi Sistemi,
la prova è stata poi prolungata fino a
100.000 cicli senza ricevere nessuna osservazione.
● Test di apertura e chiusura
con urto delle ante
UNI 8602:2005
- Peso ante: 70 Kg
Tests executed
● Opening and closing tests
UNI 8607: 2005.
- Doors weight: 70 Kg
- Number of cycles: 50,000
- Upon specific request by
Bortoluzzi Sistemi,
the test was prolonged up to 100,000 cycles
without any notable
observations.
● Opening and closing tests
with door slamming
UNI 8602:2005
- Doors weight: 70 Kg
Durchgeführte Tests
● Öffnungs- und Schliesstest
UNI 8607: 2005.
- Gewicht Tür: 70 Kg
- Anzahl Zyklen: 50.000
- Auf speziellen Wunsch
der Firma Bortoluzzi Sistemi wurde der Test auf
100.000 Zyklen verlängert,
ohne besondere Beobachtungen.
● Öffnungs- und Schliesstest
mit Anprall der Türen
UNI 8602:2005
- Gewicht Tür: 70 Kg
Brevetto depositato presso il
Ministero delle Attività Produttive
Ufficio Italiano Brevetti e Marchi
(U.I.B.M.).
Patent filed with the Ministry
of Productive Activities Italian Patent and Trademark
Office (U.I.B.M.).
Das Patent ist bei dem
Ministerium für Industrie,
Handel und Handwerk auf
dem Italienischen Patentund
Markenamt (U.I.B.M.) hinterlegt.
5
Kit
Kit
Kit
Il cliente riceverà
una scatola contenente:
The client will receive
a box containing:
1 n. 1binario superiore
di scorrimento completo di carrelli;
1 1 no. top sliding rail complete with carriages;
Dem Kunden wird eine
Packung mit folgendem
Material geliefert:
n. 1binario inferiore
di scorrimento completo di carrelli;
2
Copertura frontale
(meccanismi standard).
2 1 no. bottom sliding rail complete with carriages;
3
Front cover
(Standard mechanism).
6
FOR EACH DOOR
A 1no. upper angular plate;
2no. TCEI M5x16 screws;
2no. TPSEI M4x12 screws;
2no. black bumpers.
B 1no. upper adjustment
system vertical and horizontal;
1no. upper adjustment system vertical;
1 or 2 no. bottom adjustment systems.
G n. 1+1 Carriage plastic cover (optional).
PER OGNI MECCANISMO
C n. 1 chiave esagonale
4 mm;
n. 1 chiave esagonale
2,5 mm;
n. 1 chiave fissa 10 mm.
D n. 6 bussole in zama M4x10;
n. 8 bussole in zama M6x13.
E n. 1 carter copripiede sx;
n. 1 carter copripiede dx.
FOR EACH MECHANISM
C 1 no. 4 mm hexagonal key;
1 no. 2.5 mm hexagonal key;
1 no. 10 mm spanner.
D 6 no. M4x10 Zamak bushings;
8 no. M6x13 Zamak bushings.
E 1 no. cover for left foot;
1no. cover for right foot.
LA QUANTITÀ DEGLI
ELEMENTI SOTTO ELENCATI,
DIPENDE DAL MECCANISMO
F - Clip profilo superiore;
- Clip profilo inferiore.
THE QUANTITY OF THE
FOLLOWING COMPONENTS
WILL VARY ACCORDING
TO THE LENGTH OF THE
MECHANISM
F - Upper profile clips;
- Lower profile clips.
n. 1obere Schiene komplett
mit Laufwagen;
2 n. 1untere Schiene komplett
mit Laufwagen;
3
3
PER OGNI ANTA
A n. 1 angolare superiore;
n. 2 viti TCEI M5x16;
n. 2 viti TPSEI M4x12;
n. 2 paracolpi neri.
B n. 1 regolatore superiore verticale e orizzontale;
n. 1 regolatore superiore verticale;
n. 1 o 2 regolatori inferiori.
G n. 1+1 carter copricarrello
(optional).
1
Frontabdeckungen
(Standard Beschläge).
FÜR JEDE TÜR
A n. 1 Befestigungswinkel;
n. 2 TCEI Schrauben M5x16;
n. 2 TPSEI Schrauben M4x12;
n. 2 schwarze Pfuffer.
B n. 1oberer Waagrecht-
senkrecht
Ausrichtungsbeschlag;
n.1 oberer senkrechter Ausrichtungsbeschlag;
n.1 oder 2 untere Ausrichtungsbeschläge.
G n. 1+1 Blende für Laufwagen
(optional).
FÜR JEDEN MECHANISMUS
C n. 1 4 mm Sechskantschlüssel;
n. 1 2,5 mm Sechskantschlüssel;
n. 1 10 mm Maulschlüssel.
D n. 6Zamak Buchsen M4x10;
n. 8Zamak Buchsen M6x13.
E n. 1 Blende für linken Stellfuß;
n. 1 Blende für rechten Stellfuß.
DIE MENGE DER ELEMENTE,
DIE UNTEN BESCHRIEBEN
WERDEN, IST VOM BESCHLAG
ABHÄNGIG
F - Clips für oberes Profil;
- Clips für unteres Profil.
1
2
3
A
B
C
x1
x1
x2
x2
x1
x2
D
x1
x1
x1/2
x1
E
F
x6
7
x8
G
x1
OPTIONAL
x1
x1
x1
8
HA
SPA
SPAM
SPB
SPC
SPE
SPI
SAE
Spessore spalla esterna (mm)
Thickness of side panel (mm)
Seiten Korpusstärke (mm)
Spessore spalla centrale (mm)
Thickness of centre panel (mm)
Mittelseite Korpusstärke (mm)
Sormonto anta su spalla esterna (mm)
Superimposition of door on side panel (mm)
Tür vor Aussenseiten (mm)
HI
Spessore cielo (mm)
Thickness of top panel (mm)
Obere Korpusplattenstärke (mm)
HT
Spessore base (mm)
Thickness of bottom panel (mm)
Untere Korpusplattenstärke (mm)
LA
Spessore anta + maniglia (mm)
Thickness of door + handle (mm)
Türstärke + Griff (mm)
LT
Spessore anta (mm)
Thickness of door (mm)
Türstärke (mm)
Codelegende und nötige
Details für die Bestellung.
Altezza anta (mm)
Height of door (mm)
Türhöhe (mm)
Legend of the necessary
codes and specifications
for order.
Altezza vano interno mobile (mm)
Height of interior of cabinet (mm)
Innen Schrankkorpushöhe (mm)
Legenda codici e specifiche
necessarie per l’ordine.
Altezza totale mobile (mm)
Total height of exterior of cabinet (mm)
Gesamtes Schrankkorpushöhenmass (mm)
Codelegende
Larghezza anta (mm)
Width of door (mm)
Türbreite (mm)
Legend of codes
Larghezza totale mobile (mm)
Total width of cabinet (mm)
Gesamtes Schrankkorpusbreitenmass (mm)
Legenda codici
Piedini supplementari a metà del vano (optional).
Carter copri carrello superiore (optional).
Additional feet in the case center (optional).
Carter for the upper carriage (optional).
Zusäztliche Stellfüsse in Korpusmitte (Extra).
Blende für den oberen Laufwagen (Extra).
Nella tabella sono indicate le variabili riguardanti la progettazione
del contenitore sul quale applicare la tipologia di Slider Large
prescelta.
Sulla base di tali informazioni,
Bortoluzzi Sistemi fornirà gli
elaborati riguardanti le lavorazioni da eseguire sui pannelli.
This table includes the variables required to design the
piece of furniture to which the
selected Slider system applies.
Based on this information,
Bortoluzzi Sistemi will provide reports about the finishings to be performed on the
furniture panels.
Diese Tabelle listet die Variablen
auf, die zum Entwurf des Möbelstückes für die Einsetzung
des ausgewählten Slider-Systems notwendig sind.
Aufgrund dieser Informationen
wird Bortoluzzi Sistemi Berichte über die Bearbeitungen,
die auf den Möbelplatten auszuführen sind, liefern.
Tipologie
Types
Typen
TIPOLOGIA 17
TYPE 17
TYP 17
Ante a ridosso su cielo, base e
fianchi laterali. Distanza da terra 17 mm.
Doors covering top, bottom
and side panels. Door distance
from the ground 17 mm.
Aufschlagende Fronten am
Korpus. Von Front-Unterkante
Boden 17 mm.
COD.
364 Slider 2 ante-doors-Türig / 396 Slider 3 ante-doors-Türig
min 60
104
60
mm
LT
●
LA
●
HT
●
HI
●
HA
●
SPA
●
SPAM
●
SPB
●
SPC
●
SPE
●
SPI
●
SAE
●
60
SPC
7
HT
SPA
HA
HI
SPAM (max 45)
SPB
60
17
137
LT
SPE
LI
SPE
SPI
SAE
SAE
LA
LA
5
9
COD.
mm
LT
●
LA
●
HT
●
HI
●
HA
●
SPA
●
Tipologie
Types
Typen
TIPOLOGIA 33
TYPE 33
TYP 33
Ante a ridosso su cielo, base e
fianchi laterali. Distanza da terra 33 mm.
Doors covering top, bottom
and side panels. Door distance
from the ground 33 mm.
Aufschlagende Fronten am
Korpus. Von Front-Unterkante
Boden 33 mm.
364 Slider 2 ante-doors-Türig / 396 Slider 3 ante-doors-Türig
min 60
104
60
SPAM
60
●
SPC
SPB
●
SPC
●
SPE
●
SPI
●
SAE
●
7
HT
SPA
HI
HA
SPAM (max 45)
SPB
10
60
33
137
LT
SPE
LI
SPE
SPI
SAE
SAE
LA
LA
5
COME ORDINARE
HOW TO ORDER
BESTELLUNG
Standard
Standard
Standard
2 ante
2 doors
2-türig
I meccanismi Slider Large 2
ante STANDARD possono essere installati su armadi con dimensioni fino a 200 mm superiori (LI) al meccanismo stesso.
In questo caso bisogna però
considerare una apertura ridotta dell’anta come descritto
nella formula qui sotto riportata
(A+SAE-SPI/2+4.5)
Slider Large 2 doors STANDARD can be installed on wardrobe with dimension (LI) up to
200 mm longer SPE
than mechanism itself. In this case must be
considered a reduction in the
doors opening as described
on the formula here below
(A+SAE-SPI/2+4.5)
Die Slider Large STANDARD Beschläge können auf Schränken
LT
mit Innenlicht
(LI) bis zu 200 mm
LI
größer als
der Beschlag selbst
SPI
installiert werden. In diesem
Fall muss berücksichtigt werden, dass die Türöffnung kleiner wird.
LP Die Reduzierung kann
mit folgender Formel berechnet
werden: (A+SAESPI/2+4.5).
SAE
LT
SPE
LI
SPE
SAE
LI = LT-2*SPE
A (max 100)
LA
A = (LI-LP)/2
SPI
A (max 100)
LA
5
LP
1
1
2
SAE
SAE
A (max 100)
LA
A+SAE-SPI/2+4.5
A (max 100)
LA
5
1
Profilo superiore ed inferiore.
1
Upper and lower sliding mechanism.
1
Oberer und Unterer Gleitmechanismus.
2
Copertura frontale.
2
Front cover.
2
Frontale Abdeckung.
Piedini sempre presenti nel
binario.
Feet supplied
Track.
with
the
A+SAE-SPI/2+4.5
Piedini presenti con binario
Additional feet supplied on
LP maggiore di 2999 mm
track (LP) over 2999 mm
12
Codice
Code
Artikelnummer
Descrizione
Description
Beschreibung
Mitgelieferte Stellfüße.
Optionale
Stellfüße
ab
Schienenlänge 2999 mm
LI (mm)
LP (mm)
VE302A1600NN
SL16-18
1600 ÷ 1799
1599
VE302A1800NN
SL18-20
1800 ÷ 1999
1799
VE302A2000NN
SL20-22
2000 ÷ 2199
1999
VE302A2200NN
SL22-24
2200 ÷ 2399
2199
SL24-26
2400 ÷ 2599
2399
VE302A2400NN
VE302A2600NN
VE302A2800NN
VE302A3000NN
Slider Large 2 ante
Slider Large 2 Doors
Slider Large 2-türig
SPE
SL26-28
2600 ÷ 2799
2599
SL28-30
2800 ÷ 2999
2799
SL30-32
3000 ÷ 3199
2999
VE302A3200NN
SL32-34
3200 ÷ 3399
3199
VE302A3400NN
SL34-36
3400 ÷ 3599
3399
VE302A3600NN
SL36-38
3600 ÷ 3799
3599
VE302A3800NN
SL38-40
3800 ÷ 3999
3799
Su misura
Customised
systems
Nach Maß
2 ante
I meccanismi Slider Large possono essere richiesti “su misura”, cioé progettati (grazie alle
variabili di pag. 8) per essere
installati su contenitori con luce
interna (LI) pari alla lunghezza
dei binari (LP).
2 doors
The Slider Large can be customised, i.e., designed (on the
basis of the variables listed
on page 8) for installation on
cabinets with internal width (LI)
equal to the length of the slider
rail (LP).
2-türig
Die Slider Large Beschläge können "nach Maß“ angefordert
bzw. entworfen werden (dank
der Variablen auf S. 8), um an
Korpussen mit einem lichten Innenmaß (LI) gleich der Schienenlänge (LP) installiert zu werden.
LT
SPE
SPI
SPE
LI
LT
SPE
LI
SPE
SPI
LP
LP
1
SAE
SAE
LA
SAE
LA
SAE
5
LA
LA
5
1
SAE-SPI/2-7.5
SAE-SPI/2-7.5
1
Profilo superiore ed inferiore.
1
Upper and lower sliding mechanism.
Piedini sempre presenti nel
binario.
Feet supplied
Track.
with
the
Piedini opzionali, su richiesta.
Optional feet, on request.
1
Oberer und Unterer Gleitmechanismus.
Mitgelieferte Stellfüße.
Mitgelieferte Stellfüße.
13
Su misura
Customised
systems
Nach Maß
3 ante
I meccanismi Slider Large possono essere richiesti “su misura”, cioé progettati (grazie alle
variabili di pag. 8) per essere
installati su contenitori con luce
interna (LI) pari alla lunghezza
dei binari (LP).
3 doors
The Slider Large can be customised, i.e., designed (on the
basis of the variables listed
on page 8) for installation on
cabinets with internal width (LI)
equal to the length of the slider
rail (LP).
3-türig
Die Slider Large Beschläge können "nach Maß“ angefordert
bzw. entworfen werden (dank
der Variablen auf S. 8), um an
Korpussen mit einem lichten Innenmaß (LI) gleich der Schienenlänge (LP) installiert zu werden.
SPE
SPE
SPE
LT
LT
LT
SPI
SPI
SPI
SPI
SPI
SPI
SPE
SPE
SPE
1
SAE
SAE
SAE
LA
LA
LA
LA
LA
LA
5
5
5
LA
LA
LA
5
5
5
SAE
SAE
SAE
1
SAE-SPI/2-7.5
SAE-SPI/2-7.5
SAE-SPI/2-7.5
1
14
10
10
10
1
154-SPI+SAE
154-SPI+SAE
154-SPI+SAE
1
Profilo superiore ed inferiore.
Piedini sempre presenti nel
binario.
1
Upper and lower sliding mechanism.
Feet supplied
Track.
with
the
1
Oberer und Unterer Gleitmechanismus.
Mitgelieferte Stellfüße.
A
B
A Apertura totale
B Apertura totale
A
A Total opening
B Total opening
B
A Apertura totale
B Apertura totale
C Apertura parziale*
A
C
A Komplette Öffnung
B Komplette Öffnung
2
A Total opening
B Total opening
C Partial opening*
B
A Apertura totale
B Apertura totale
C Apertura totale
D Apertura totale
A
1
C
A Komplette Öffnung
B Komplette Öffnung
C Parzielle Öffnung*
D
A Total opening
B Total opening
C Total opening
D Total opening
B
C
3
A Komplette Öffnung
B Komplette Öffnung
C Komplette Öffnung
D Komplette Öffnung
D
E
4
A Apertura totale
B Apertura totale
C Apertura parziale*
D Apertura totale
E Apertura totale
A Total opening
B Total opening
C Partial opening*
D Total opening
E Total opening
A Komplette Öffnung
B Komplette Öffnung
C Parzielle Öffnung*
D Komplette Öffnung
E Komplette Öffnung
Nello schema precedente è indicata la corretta posizione delle
ante, il verso di apertura e il loro
susseguirsi nella composizione dell’armadio. Si può notare
come a ogni anta con senso di
apertura verso destra, devono
seguire una o al massimo due
ante con senso di apertura verso
verso sinistra. Ante della stessa
larghezza hanno l’apertura totale
con l’eccezione dell’anta C nelle
composizioni con ante dispari.
( 2 e 4 ).
The drawing above shows the
correct positioning of the doors,
their opening direction and order
in the closet composition. Please
note that every door that opens
to the right must be followed by
one or two doors opening to the
left. Same-width doors have total
opening except for the C door in
even compositions. ( 2 and 4 ).
In obiger Abbildung ist die korrekte Position der Türen, ihre Öffnungsrichtung und ihre Reihenfolge in der Zusammensetzung
dargestellt. Man beachte, dass
einer nach rechts öffnenden Tür
immer wenigstens eine oder
maximal zwei nach links öffnende Türen folgen müssen. Türen
mit gleicher Breite erreichen eine
komplette Öffnung mit Ausnahme
der Türe C in den Zusammensetzungen mit ungrader Anzahl der
Türen (Bsp. 2 und 4 ).
*V. pag. 14
*See page 14
*Sehen Seite 14
15
MONTAGGIO
E REGOLAZIONI
ASSEMBLY AND
ADJUSTMENTS
MONTAGE UND
REGULIERUNG
Fasi preparatorie
Preparatory phases
Vorbereitungsphasen
1)Prima di assemblare la struttura, fissare le clip sulla parte
superiore dei cieli (Fig. 1) e
sulla parte inferiore delle basi
(Fig. 2) con viti TPS.
1)Before assembling the structure, attach the clips on the
upper parts of the tops (Fig.
1) and on the lower parts of
the bases (Fig. 2) using TPS
screw.
1)Bevor der Korpus zusammengebaut wird, die Clips
oben an den Oberseiten (Abb.
1) und unten an den Sockeln
(Abb. 2) mit Schrauben TPS
befestigen.
Fig. 1
Abb. 1
18
Fig. 2
Abb. 2
Meccanismo
di scorrimento
superiore
Upper sliding
mechanism
Oberer
Gleitmechanismus
superiore
2) Mettere in bolla il contenitore.
2) Ensure the cabinet is plumb
and level.
2)Den Korpus ins Lot bringen.
Nel caso di meccanismo su misura passare al punto 6.
In the case of custom mechanism go on point 6.
3)Misurare la luce interna tra
i fianchi laterali X–1 (Fig. 3).
Accorciare, se necessario,
le coperture frontali (Fig. 4)
ed inserire lo spazzolino, se
previsto (Fig. 5).
3)Measure the distance between the sides X–1 (Fig.3).
If necessary, shorten the provided front cover (Fig. 4) and
insert the brush, if provided.
Bei kundenspezifischen Maßen
des Systems gehe weiter zu
Punkt 6.
3)Den inneren Abstand zwischen den Seitenwänden
X–1 messen (Abb. 3). Die
frontale Abdeckung (Abb.
4) nach Bedarf zuschneiden
und die Bürste einsetzen,
falls vorgesehen (Abb. 5)
Fig. 3
Abb. 3
Fig. 4
Abb. 4
X
X–1 mm
2
Fig. 5
Abb. 5
19
Meccanismo
di scorrimento
superiore
Upper sliding
mechanism
Oberer
Gleitmechanismus
4)Spostare un carrello nella
posizione di totale apertura
(Fig. 6 ) per poter agganciare
la copertura frontale (Fig. 7A,
7B e 7C). Ripetere l’operazione sull’altro lato.
4)Move a carriage into the totally open position (Fig. 6)
in order to fasten the front
cover (Fig. 7A, 7B and 7C).
Repeat the operation on the
other side.
4)Einen Schlitten auf die Position
der totalen Öffnung schieben
(Abb. 6), damit die Frontabdeckung eingehängt werden
kann (Abb. 7A, 7B und 7C).
An der anderen Seite auf gleiche Weise vorgehen.
20
5)Importante! Posizionare la
copertura frontale sul meccanismo in modo che fuoriesca lateralmente dello stesso valore A.
A
Fig. 7B
Abb. 7B
Fig. 7C
Abb. 7C
5)Important! Position the front
cover on the mechanism in
a way so that it comes out
of the side of the A value in
equal amounts.
_ ._ ._ ._ ._ ._ ._
Fig. 7A
Abb. 7A
_ ._ ._ ._ ._ ._ ._
Fig. 6
Abb. 6
5)Wichtig! Die Frontabdeckung so am Mechanismus
positionieren, dass sie seitlich aus dem Wert A austritt.
A
Fig. 8
Abb. 8
_ ._ ._ ._ ._ ._ ._
6) Applicare il meccanismo superiore sul cielo dell’armadio
(Fig. 8) facendo attenzione
che si agganci correttamente alle clip (Fig. 9A e 9B).
6)Apply the upper mechanism
on the top of the cabinet
(Fig. 8) making certain that it
fastens correctly to the clips
(Fig. 9A and 9B).
6)Den oberen Mechanismus
am Oberteil des Schranks
anbringen (Abb. 8), so dass
er korrekt an den Clips eingehängt wird (Abb. 9A und
Abb. 9B).
Fig. 9A
Abb. 9A
Fig. 9B
Abb. 9B
7)Fissare il meccanismo al cielo tramite le viti presenti alle
due estremità (2 o 4), iniziando dalla prima di sinistra che
garantirà la corretta posizione del sistema. Fissare poi le
altre viti presenti.
7)Fasten the mechanism to
the top using the screws located on the two ends (2 or
4), starting from the first on
the left, which ensures correct positioning of the system. Then fasten the other
screws.
7) Den Mechanismus mit den
Schrauben an den beiden
Enden (2 oder 4) am Oberteil
befestigen, dabei mit der ersten links beginnen, welche die
korrekte Position des Systems
gewährleistet. Anschließend die
übrigen Schrauben einsetzen.
21
A
B
Meccanismo
di scorrimento
inferiore
Lower sliding
mechanism
Unterer
Gleitmechanismus
Nel caso di meccanismo su
misura, passare al punto 9.
In the case of custom mechanism go on point 9.
8)Preparare il meccanismo inferiore estraendo in egual misura (A) i piedini laterali fino ad
ottenere la larghezza X–1.
8)Prepare the lower mechanism
by extracting the side support
feet in equal amounts (A) until
obtaining the width X–1.
Bei kundenspezifischen Maßen
des Systems gehe weiter zu
Punkt 9.
8)Den unteren Mechanismus
vorbereiten, indem die seitlichen Füße in gleichem Maß
(A) ausgezogen werden, so
dass die Breite X–1 erhalten
wird.
_ ._ ._ ._ ._
X–1
A
A
9)Applicare il meccanismo inferiore sotto il basamento (Fig.
10), facendo attenzione che
si agganci alle clip (Fig. 11).
9)Apply the lower mechanism
under the base (Fig. 10),
making certain that it fastens
to the previously attached
clips (Fig. 11).
9)Den unteren Mechanismus
unterhalb des Unterbaus
(Abb. 10) anbringen, so dass
er an den Clips eingehängt
wird (Abb. 11).
Fig. 10
Abb. 10
_ ._ ._ ._ ._ ._ ._
22
Fig. 11
Abb. 11
10) Bloccare il meccanismo sui
fianchi del mobile tramite le
viti presenti su entrambi i
piedini laterali.
10) Fix the mechanism onto the
sides of the furniture unit with
the screws located on each of
the side support feet.
10)Den Mechanismus mit den
Schrauben der beiden Seitenfüße an den Möbelseiten blockieren.
11)Importante! Bloccare il binario facendo scendere i
piedini laterali e centrali (Fig.
12 e 13) mettendoli in pressione. Inserire carter copripiede (Fig. 14).
11)Important! Fix the bottom
track in position by extending all the feet (Fig. 12 and
13). To insert cover foot (Fig.
14).
11)Wichtig! Das Profil arretieren indem man die seitlichen
und mittleren Füße nach unten dreht bis (Abb. 12 und
13) diese unter Druck stehen. Blende Stellfuß einfüngen (Abb. 14).
Fig. 12
Abb. 12
Fig. 13
Abb. 13
23
Fig. 14
Abb. 14
Preparazione
dell'anta
Door preparation
Vorbereitung
des Flügels
12)Fissare i regolatori superiori
(Fig. 15), verificandone la
corretta disposizione come
illustrato dalle immagini
(Fig. 16).
12)Fix the upper regulators
(Fig. 15), checking the correct arrangement as illustrated in the images (Fig.
16).
12)Die oberen Regler befestigen (Abb. 15), und die korrekte Anordnung wie im Bild
gezeigt prüfen (Abb. 16).
A = Regolatore
verticale e orizzontale.
A = Vertical and horizontal regulator.
B = Regolatore
verticale.
B = Vertical regulator.
A = Waagrecht-senkrecht Ausrichtungs
beschlag.
B = Senkrecht
Ausrichtungsbeschlag.
Fig. 15
Abb. 15
A
B
Fig. 16
Abb. 16
24
B
A
A
B
13) Fissare i regolatori inferiori, uno o due per ciascuna
anta, in funzione della sua
dimensione (Fig. 17 e 18).
13) Fix the lower regulators, one
or two for each door, depending on the size of the
door (Fig. 17 and 18).
13)Je nach Größe einen oder
zwei untere Regler pro Türflügel befestigen (Abb. 17
und 18).
Fig. 17
Abb. 17
Fig. 18
Abb. 18
25
26
Preparazione
dell'anta
Door
preparation
Vorbereitung
des Flügels
14)Applicare i paracolpi (in dotazione).
14)Apply bumpers (provided).
14)Die Pfuffer anbringen (mitgeliefert).
Montaggio
delle ante
sul meccanismo
Assembly of the
doors onto the
mechanism
Montage
der Türflügel
am Mechanismus
15) Spostare i carrelli superiore
ed inferiore dell’anta sinistra in posizione di totale
apertura.
15)Move the upper and lower
carriages of the left door in
the open position.
15)Den oberen und unteren
Schlitten des linken Flügels auf
die offene Position bringen.
16)Agganciare l’anta sinistra
alle mensole sporgenti dal
carrello superiore.
16)Fasten the left door onto
the supports on the upper
carriage.
16) Die linke Front an die Aufnahme des oberen Wagens einhängen.
27
28
Montaggio
delle ante
sul meccanismo
Assembly of the
doors onto the
mechanism
Montage
der Türflügel
am Mechanismus
17) Importante! Bloccare l’anta con le viti TCEI M5x16 (in
dotazione).
17)Important! Fix the door using the screws TCEI M5x16
(provided).
17)Wichtig! Den Flügel mit
den
Schrauben
TCEI
M5x16 blockieren (mitgeliefert).
18)Fissare l’angolare superiore con viti TPSEI M4x12 (in
dotazione).
18)Fasten the upper angle
using the screws TPSEI
M4x12 (provided).
18)Den oberen Winkel mit
Schrauben TPSEI M4x12
(mitgeliefert) befestigen.
19) Agganciare il carrello al regolatore inferiore tramite le
2 viti a testa esagonale premontate.
19)Fasten the carriage to the
lower regulator using the
2 pre-mounted hexagonal
screws.
19)Den Schlitten mit den beiden vormontierten Sechskantschrauben am unteren
Regler einhängen.
20)Bloccare il carrello.
20)Fix the carriage.
20)Den Schlitten fixieren.
29
21) Chiudere l’anta e ripetere le
operazioni dal punto 15 al
punto 20 per l’anta destra.
21) Close the door and repeat
the operations from point
15 to point 20 for the right
door.
21) Den Flügel schließen und
für den rechten Flügel die
Schritte von Punkt 15 bis
20 wiederholen.
Regolazioni
Adjustments
Regulierung
22)Aprire completamente l’anta di sinistra.
22)Completely open the left
door.
22)Den linken Flügel ganz
öffnen.
23)Livellare l’anta agendo su
entrambi i regolatori superiori A e B. Ripetere l’operazione per l’anta destra.
23)Level the door using the
upper regulators A and B.
Repeat the operation on
the right door.
23)Den Flügel durch Einwirken auf die beiden Regler
A und B nivellieren. Für den
rechten Flügel die Schritte
wiederholen.
Una corretta regolazione delle ante ne garantirà, in fase di
apertura, l’arresto simultaneo
sia nella parte superiore che inferiore del meccanismo.
Correct adjustment of the
doors will ensure simultaneous
stopping in both the upper and
lower parts of the mechanism
during the opening phase.
Die korrekte Einstellung der
Flügel sichert den gleichzeitigen Anschlag am oberen und
unteren Teil des Mechanismus
beim Öffnen.
30
24)Con ante chiuse, regolare
lo spazio centrale (minimo
5 mm) agendo sui regolatori superiori di tipo A.
24)With the doors closed, adjust the central space (at
least 5 mm) using the type
A upper regulators.
24)Bei geschlossenen Flügeln
den mittleren Abstand regulieren (mindestens 5
mm), indem auf die beiden
oberen Regler Typ A eingewirkt wird.
5 mm
25) Regolare la distanza fra le ante
e la struttura (circa 7 mm).
A Sulla parte superiore, agire sul grano M8 presente
lateralmente in ogni carrello
(Fig. 19).
25)Adjust the distance between the doors and the
structure (approximately 7
mm) of each carriage.
A On the upper part, use the
grub screws present on the
lateral one (Fig. 19).
25)Den Abstand zwischen den
Flügeln und dem Korpus
regulieren (ca.7 mm).
A Am oberen Teil über die
Einstellschraube M8 alle
Schlitten justieren (Abb.
19)
31
Fig. 19
Abb. 19
7 mm
Regolazioni
Adjustments
Regulierung
B Sulla parte inferiore, agire
sui grani M8 presenti nei regolatori.
Nel caso di anta con regolatore singolo, agire su entrambi i grani presenti (Fig. 20).
Nel caso di anta con doppio regolatore, agire sul
grano presente su quello
laterale (Fig. 21).
B On the lower part, turn the
grub screws M8 located on
the regulators.
In case of a door with a single regulator, turn both of the
grub screws (Fig. 20).
In the case of a door with
double regulator, use the
grub screws present on
each (Fig. 21).
B Am unteren Teil auf die
Stifte M8 an den Reglern
einwirken. Bei Flügeln mit
einzelnem Regler auf beide
vorhandenen Stifte einwirken (Abb. 20).
Bei Fronten mit zwei Reglern den seitlichen Regler
über die Einstellschraube
justieren. (Abb. 21)
Fig. 20
Abb. 20
7 mm
Fig. 21
Abb. 21
32
7 mm
26)Verificare la chiusura delle
ante. Se troppo lenta, aumentare la forza della molla
togliendo l’anello alla sua
estremità.
26)Check closure of the doors.
If too slow, increase the
force of the spring by removing a ring from its end.
26)Das Schließen der Flügel
kontrollieren. Erfolgt es zu
langsam, die Federkraft erhöhen, indem der Ring am
Federende entfernt wird.
27)Applicare i due carter copricarrelli (optional).
27)Apply the two plastic covers (optional).
27) Die beiden Blende für Laufwagen anbringen (optional).
33
Note
34
35
Note
36
Pulizia
La pulizia dei componenti deve
essere eseguita con acqua e sapone mediante un panno morbido. Evitare prodotti contenenti
solventi e componenti abrasivi.
Cleaning
Cleaning the components must
be executed using soap and
water with a soft cloth.
Avoid using products containing
solvents and abrasive products.
Reinigung
Die Reinigung der Teile muss mit
Wasser, Seife und einem weichen Tuch erfolgen. Keine Produkte mit Lösungsmitteln oder
Schleifmittel verwenden.
Smaltimento
Una volta dismesso, il prodotto
e i suoi componenti non vanno
dispersi nell’ambiente, ma conferiti ai sistemi pubblici di smaltimento.
Disposal
The products and its components
must not be disposed of in the
environment; for disposal, please
use public disposal systems.
Entsorgung
Die Produkte und die Produktteile, die nicht mehr eingesetzt werden, sollen nicht in die Umwelt
gelangen, sondern an den geeigneten Stellen entsorgt werden.
Nota
L’Azienda produttrice si riserva
il diritto di apportare modifiche
tecniche senza preavviso.
Note
The manufacturer reserves the
right to modify any product
without prior notice.
Hinweis
Der Hersteller behält sich das
Recht vor, Änderungen an den
Produkten ohne vorherige Ankündigung vorzunehmen.
Codice
prodotto
5030CTTEAST.4
(06-2012)
Bortoluzzi Sistemi spa
Via Caduti 14.IX.44, 45
32100 BELLUNO - Italy
Tel. + 39 0437.930866 r.a.
Fax + 39 0437.931442
[email protected]
www.bortoluzzi.com
Scaricare