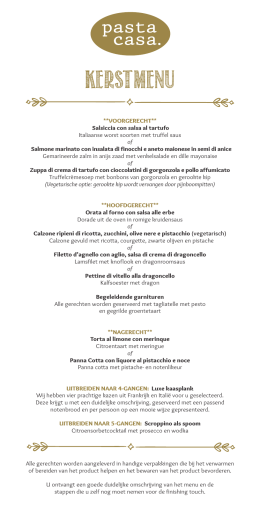
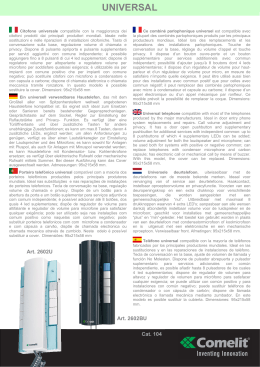
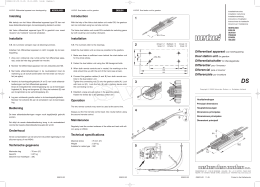
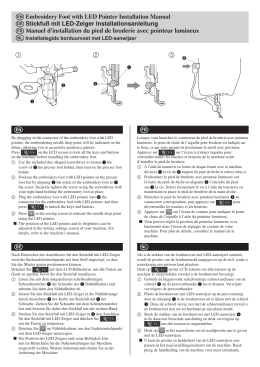
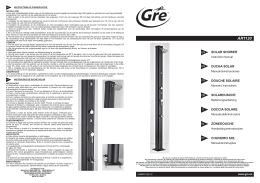
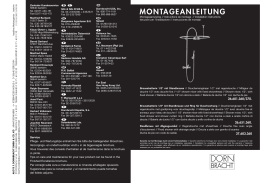
Montageanleitung
Montagehandleiding
Installation instructions
Notice de montage
Istruzioni di montaggio
Instrucciones de montaje
Duschpaneel Moonlight
26 500 000 (ohne Beleuchtung)
26 510 000 (mit Beleuchtung)
26 211 000 (Eckmontage-Set)
(without lighting)
(with lighting)
(corner installation set)
26 500 000 (senza illuminazione)
(sin iluminación)
26 510 000 (con illuminazione)
(con iluminación)
26 211 000 (set di montaggio ad angolo) (juego de montaje angular)
(sans clairage)
(avec clairage)
(kit pour montage angle)
(zonder verlichting)
(met verlichting)
(hoekmontage-set)
R
Inhaltsverzeichnis
Contents
Contenu
Deutsch
Ausstattung
Maße
Technische Daten
Technische Angaben Durchlauferhitzer, Sicherheitshinweis
Maßbild Wandmontage
Maßbild Eckmontage
Verpackungsinhalt/Varianten
Wandmontage
Eckmontage
3
4
5
6-7
8
9
10
11 - 14
15 - 18
Duschpaneel Moonlight – gemeinsames Zubehör
Einstellung Thermostat /Einstellung Trio Stop
Duschpaneel Moonlight – Version mit Beleuchtung
Pflegehinweis
19 - 20
21 - 22
23
24
English
Equipment
Dimensions
Technical Information
Technical Information for Combi-Boilers, Safety Instructions
Wall Mounting Dimensional Illustration
Corner Mounting Dimensional Illustration
Packaging Contents/Variants
Wall Mounting
Corner Mounting
Moonlight Duschpaneel® – Common Accessories
Adjusting the Thermostat/Adjusting the Trio Stop
Moonlight Duschpaneel® – Version with Lighting
Care Instructions
3
4
5
6-7
8
9
10
11 - 14
15 - 18
19 - 20
21 - 22
23
24
Français
Equipement
Mesures
Donnés techniques
Indications techniques chauffe-eau instantané, consigne de sécurité
Illustration des mesures montage mural
Illustration des mesures montage en angle
Contenu de l’emballage/variantes
Montage mural
Montage en angle
Duschpaneel® Moonlight – accessoires communs
Réglage thermostat /Réglage Trio Stop
Duschpaneel® Moonlight – Version avec éclairage
Conseil d’entretien
2
3
4
5
6-7
8
9
10
11 - 14
15 - 18
19 - 20
21 - 22
23
24
Français
Ausstattung
Equipment
Equipement
2
English
1. Mattiertes Sicherheitsglas
(Beleuchtung optional)
2. Handbrause Aktiva F'6
3. Glasablage
4. Seitenbrausen
Bodyvette Stop
5. Trio Stop
6. Beleuchtungstaste
(Beleuchtung optional)
7. Thermostat
8. Seitenbrausen Bodyvette
Deutsch
1
Deutsch
English
3
4
5
6
7
8
1. Frosted glass
(Lighting optional)
2. Hand shower Aktiva F'6
3. Glass shelf
4. Body shower Bodyvette
with shut-off function
5. Trio Stop
6. Lighting switch
(Lighting optional)
7. Thermostat
8. Body shower Bodyvette
Français
1. Verre de sécurité dépoli
(Eclairage optionnel)
2. Douche à main F'6
3. Tablette en verre
4. Douches latérales
Bodyvette Stop
5. Trio Stop
6. Touche pour l’éclairage
(Eclairage optionnel)
7. Thermostat
8. Douches latérales
3
Maße
Dimensions
Mesures
Wandversion/Wall version
Version pour montage mural
1632
Eckversion/Corner version
Version pour montage en angle
ca. 530
400
ca. 473
400
320
223
0
34
4
ca./approx.
env. 530
ca./approx.
env. 473 mm
320
Français
Technische Daten
Technical Information
Donnés techniques
1,5 bar
max. 10 bar
2-5 bar
16 bar
max. 70° C
60° C
20° – 60° C
38° C
14 l min
23 l min
29 l min
Technical Data
Minimum pressure:
1,5 bar
Working pressure:
max. 10 bar
Recommended working pressure:
2-5 bar
Test pressure:
16 bar
Hot water temperature
max. 70° C
Recommended hot water temperature
60° C
Temperature scale:
20° – 60° C
Safety Stop:
38° C
Flow rate at 3 bar unvented pressure
Hand shower
14 l min
Body shower
23 l min
Hand shower + body shower
29 l min
Français
bar
Données techniques
Pression minimum nécessaire :
1,5 bars
Pression de service autorisée :
max. 10 bars
Pression de service conseillée :
2–5 bars
Pression d’essai : 16 bars
Température eau chaude :
max. 70° C
Température eau chaude recommandée :
60° C
Plage de température :
20° – 60° C
Butée de sécurité :
38° C
Débit à une pression d’écoulement de 3 bars
Douche à main :
14 l min
Douches latérales :
23 l min
Douche à main + douche latérale :
29 l min
5
4
3
1
Handbrause / hand shower / Douche à main
2
2
Seitenbrause / body shower / Douche latérale
3
Handbrause + Seitenbrause / hand shower + body shower
Douche à main + douche latérale
1
1
2 3
0
Ql/min
l/s
0
3
6 9 12 15 18 21 24 27 30 33 36 39
0,1
0,2
0,3
0,4
0,5
5
English
Technische Daten
Mindestfließdruck:
Betriebsdruck:
Empfohlener Betriebsdruck:
Prüfdruck:
Heißwassertemperatur:
Empfohlene Heißwassertemperatur:
Temperaturskala:
Sicherheitssperre:
Durchflußleistung bei 3 bar
Handbrause:
Seitenbrausen:
Handbrause + Seitenbrause
English
Deutsch
Deutsch
Technische Angaben, Sicherheitshinweis
Technical Information, Safety Instructions
Indications techniques, consigne de sécurité
Deutsch
English
Durchlauferhitzer:
Das Duschpaneel kann nicht in Verbindung mit hydraulisch, elektronisch und thermisch gesteuerten Durchlauferhitzern eingesetzt
werden.
Combi-boilers:
The Duschpaneel can not be used on hydraulically, electronically
or thermostatically driven combi-boilers.
Druckunterschiede
Die Drücke zwischen den Kalt- und Warmwasseranschlüssen
müssen ausgeglichen werden.
Sicherheitshinweis für den Anschluß Duschpaneel
Moonlight mit Beleuchtung:
Bei der Montage des Duschpaneels mit Beleuchtung muß auf die
Steckverbindung zum Paneel und zur Stromversorgung geachtet
werden. Hinter dem Paneel sollte eine Restlänge des Kabels vorhanden sein, so daß das Paneel für etwaige Wartungsarbeiten
abgenommen werden kann.
Für den elektrischen Anschluß des Duschpaneels brauchen Sie
lediglich eine Steckdose. Die Stromversorgung der Beleuchtung
erfolgt über einen externen Trafo.
Die Installation der Steckdose sollte ausschließlich vom Fachmann, Ihrem Elektro-Installateur durchgeführt werden. Die gesamte Stromversorgung erfolgt über einen 230 V/50 Hz Wechselstromanschluß.
Bei der Elektro-Installation sind die entsprechenden VDE-, Landes- und EVU-Vorschriften in der jeweils gültigen Fassung einzuhalten. Die Installations- und Prüfungsarbeiten sind von zugelassenen Elektrofachleuten auszuführen, unter Berücksichtigung von
VDE 0100 Teil 701. Sämtliche Arbeiten am Duschpaneel dürfen
nur im spannungsfreien Zustand vorgenommen werden.
Die Trafoleistung des externen Trafos beträgt 30 VA. Für die Verlegung des Stromversorgungskabels ist ein Leerrohr mit Durchmesser von mindestens 25 mm vorzusehen (siehe Seite 3). Das
mitgelieferte Kabel ermöglicht, den Trafo im Trockenbereich
(Schutzzone 3) max. ca. 7 m entfernt vom Duschpaneel zu installieren. Der Trafo muß jederzeit zugänglich sein. Eine beschädigte Anschlußleitung kann nicht ersetzt werden. Der Trafo
darf dann nicht mehr betrieben werden.
6
Pressure fluctuations
The pressure between hot and cold water must be balanced.
Safety instructions for connecting the Moonlight
Duschpaneel with lighting
When installing the Duschpaneel with lighting, please take care
of the plug-in connection between the panel and the power
supply. A residual length of cable should be present behind the
panel, so that the panel can be removed for servicing if
necessary.
The power supply for the lighting is provided via an external
transformer and can be connected to a fused socket or spur.
The electrical socket installation must only be performed by a
qualified electrician.
The relevant VDE, national and electricity board regulations must
be observed when making the electrical installation. The
installation and inspection tasks must be performed by
authorised electricians, taking account of VDE 0100 Part 701.
All work on the Duschpaneel must be performed without power
being connected.
The capacity of the external transformer is 30 VA. For installing
the power supply cable, an empty tube with a diameter of at
least 25 mm must be provided (see page 3). The cable provided
allows the transformer to be installed in the dry area (protection
zone 3) max. approx. 7 m distant from the Duschpaneel. The
transformer must be accessible at all times. A damaged
connecting cable cannot be replaced, and the transformer must
not be operated in this instance.
Français
Technische Angaben, Sicherheitshinweis
Technical Information, Safety Instructions
Indications techniques, consigne de sécurité
Français
English
Chauffe-eau instanté:
Le Duschpaneel ne peut être pas utilisé en liaison avec un chauffe-eau instanté à commande hydraulique, électronique et thermique.
Deutsch
Différence de pression:
Les pressions entre les branchements d’eau chaude et d’eau froide doivent être équilibrées. Indications techniques chauffe-eau
instanté, consigne de sécurité.
Consigne de sécurité pour le raccordement du Duschpaneel Moonlight avec éclairage :
Lors du montage du Duschpaneel avec éclairage, il y aura lieu
de veiller à la connexion entre le Duschpanel et l’alimentation en
courant. Derrière le Paneel, une longueur résiduelle de câble devrait être à disposition, pour qu’en cas de travaux d’entretien le
Paneel puisse être enlevé.
Pour le branchement électrique du Duschpaneel, vous nécessitez
uniquement une prise de courant du secteur. L’alimentation en
électricité de l’éclairage s’effectue par un transformateur externe.
L’installation de la prise de courant devra uniquement être effectuée par un spécialiste, en l’occurrence votre électricien installateur. L’ensemble de l’alimentation électrique s’effectue par l’intermédiaire d’une connexion 230 V/50Hz, courant alternatif.
Lors de l’installation électrique, les directives VDE correspondantes, les directives nationales ainsi que les directives du fournisseur d’énergie électrique dans les dernières versions en vigueur
seront à respecter.
Les travaux d’installation et de vérification doivent être effectués
par des spécialistes en électricité autorisés tout en respectant la
directive VDE 0100 partie 701. Tous les travaux sur le Duschpaneel doivent être effectués lorsque celui-ci est hors de tension.
La capacité du transformateur externe est de 30VA. Pour la mise
en place du câble d’alimentation en électricité, il y aura lieu de
prévoir un conduit vide d‘au moins 25 mm de diamètre (voir page 3). Le câble joint à la livraison permet d’installer le transformateur en ambiance sèche (zone de protection 3) à max. env. 7
m du Duschpaneel.
Le transformateur doit être accessible à tout moment. Un câble
de connexion défectueux ne peut pas être remplacé. Le transformateur ne doit plus être mis en service.
7
Erforderliche
Mindesthöhe
vor Montagebeginn prüfen
Minimum
height,
check before
installation
23
2xØ6
max.
35
1000
Anschlüsse
connections
branchements 1/2''
Vérifier la
hauteur minimum nécessaire avant
montage
Leerrohr
empty tube
conduite vide Ø 25
50
links oder rechts
left or right
à gauche ou
à droite
1950
min. 80
max.150
1x Ø 8
1000 – 1150
15
1200
oberste Kante des Paneels / top edge of Duschpaneel / arête supérieure du Paneel 2150
Mindestraumhöhe 2200 mm / Minimum bath-room height 2200 mm / Hauteur minimale de la pièce 2200 mm
Maßbild Wandmontage
Wall Mounting Dimensional Illustration
Illustration des mesures montage mural
Standfläche/standing surface
Surface d'assise
F e r t i g b o d e n / f i n i s h e d f l o o r
S o l f i n i
Deutsch
X
English
Français
Die Bemaßung ist auf die Standfläche bezogen.
Bauseitig ist das Abstandsmaß (X) zwischen Standfläche und Rohfußboden zu ermitteln.
The measurement refers to the standing surface.
The distance (X) between standing surface and bare
floor should be determined at building site.
L’indication des mesures s’effectue au départ de la
surface d’assise. Côté maître d’oeuvre, on déterminera l’écart (X) entre la surface d’assise et le sol brut.
a) Warmwasser, DN15G 1/2
2 – 5 bar, 60° C
b) Kaltwasser, DN15G 1/2, 2 – 5 bar
a) Hot water, DN15G 1/2
2 – 5 bar, 60° C
b) Cold water, DN15G 1/2, 2 – 5 bar
a) Eau chaude, DN15G 1/2
2 – 5 bars, 60° C
b) Eau froide, DN15G 1/2, 2 – 5 bars
8
85
65
4xØ8
Vérifier la
hauteur minimum nécessaire avant
montage
1000
max.
35
Leerrohr
empty tube
conduite vide Ø 25
Deutsch
Minimum
height,
check before
installation
70
1950
120
60
Anschlüsse
connections
branchements 1/2''
links oder rechts
left or right
à gauche ou
à droite
links oder rechts
left or right
à gauche ou
à droite
2xØ8
150
15
1150
1250
150
Standfläche/standing surface
Surface d’assise
F e r t i g b o d e n / f i n i s h e d f l o o r
S o l f i n i
Deutsch
English
Erforderliche
Mindesthöhe
vor Montagebeginn prüfen
oberste Kante des Paneels / top edge of Duschpaneel / arête supérieure du Paneel 2150
Mindestraumhöhe 2200 mm / Minimum bath-room height 2200 mm / Hauteur minimale de la pièce 2200 mm
Français
Maßbild Eckmontage
Corner Mounting Dimensional Illustration
Illustration des mesures montage en angle
X
English
Français
Die Bemaßung ist auf die Standfläche bezogen.
Bauseitig ist das Abstandsmaß (X) zwischen Standfläche und Rohfußboden zu ermitteln.
The measurement refers to the standing surface.
The distance (X) between standing surface and bare
floor should be determined at building site.
L’indication des mesures s’effectue au départ de la
surface d’assise. Côté maître d’oeuvre, on déterminera l’écart (X) entre la surface d’assise et le sol brut.
a) Warmwasser, DN15G 1/2
2 – 5 bar, 60° C
b) Kaltwasser, DN15G 1/2, 2 – 5 bar
a) Hot water, DN15G 1/2
2 – 5 bar, 60° C
b) Cold water, DN15G 1/2, 2 – 5 bar
a) Eau chaude, DN15G 1/2
2 – 5 bars, 60° C
b) Eau froide, DN15G 1/2, 2 – 5 bars
9
Verpackungsinhalt/Varianten
Packaging Contents/Variants
Contenu de l’emballage/variantes
Duschpaneel® Moonlight
Wandmontage-Set
Wall Mounting Set
Kit de montage mural
2 Nylondübel S 6
2 Nylon dowels S 6
2 Chevilles nylon S 6
1 Dübel F8 Mea
1 Dowel F8 Mea
1 Cheville F8 Mea
Duschpaneel/Transportkarton
Duschpaneel/transport box
Duschpaneel/emballage pour le transport
1 Holzschraube 6 x 45
1 Wood screw 6 x 45
1 Vis à bois 6 x 45
Duschpaneel ohne Beleuchtung
Duschpaneel without lighting
Duschpaneel sans éclairage
2 Holzschrauben 4,5 x 35
2 Wood screws 4.5 x 35
2 Vis à bois 4,5 x 35
2 Scheiben 5,3
2 Washers 5.3
2 Rondelles 5,3
Duschpaneel mit Beleuchtung (optional)
Duschpaneel with lighting (optional)
Duschpaneel avec éclairage (optionnel)
Duschpaneel® Moonlight
Eckmontage-Set
Wandhalterung
Wall fixing
Fixation murale
Corner Mounting Set
Kit de montage en angle
6 Dübel F8 Mea
6 Dowel F8 Mea
6 Cheville F8 Mea
3 Linsenschrauben M 6/23
3 Oval head screws M 6/23
3 Vis à tête bombée M 6/23
6 Holzschrauben 6 x 50
6 Wood screws 6 x 50
6 Vis à bois 6 x 50
4 Senkblechschrauben 5 x 13
4 Tapping screws with
countersunk head 5 x 13
4 Vis à tôle à tête conique
5 x 13
6 Scheiben A 6
6 Washers A 6
6 Rondelles A 6
Distanzteile/Schrauben/Eckhalterung
Spacers/Screws/Corner fixing
Pièces d’écartement/vis/fixation angulaire
4 Blechmuttern F.ST3
4 Sheet metal nuts F.ST3
4 Ecrous à tôle F.ST3
10
Wandhalterung
Wall fixing
Fixation murale
Eckhalterung oben
Top corner fixing
Fixation angulaire supérieure
Eckhalterung unten
Bottom corner fixing
Fixation angulaire inférieure
1 Haupthahn Wasserleitung
zudrehen
5 Senkrecht nach unten
1000 mm abtragen
1 Close water pipe main cock
5 Measure down 1000 mm
vertically
5 Reprendre 1000 mm
verticalement vers le bas
Deutsch
1 Fermer le robinet principal de
la conduite d’eau
English
Français
Wandmontage 1
Wall Mounting 1
Montage mural 1
2 Mitte zwischen
Wasseranschlüssen markieren
2 Mark mid-point between
water connections
2 Marquer des deux côtés
les écartements trous de
forage/angle
3 Wasserwaage ausrichten,
Linie ziehen
6 Wandhalterung mittig auf
Höhenmarke 1950 mm ausrichten, Bohrlöcher anzeichnen
6 Align wall fixing centrally on
the 1950 mm height mark, mark
drill holes
6 Aligner la fixation murale
axialement sur la marque de
hauteur 1950 mm,
marquer les tous de forage
7 Markierungen ankörnen
3 Align water level, draw line
7 Mark holes with a centre
punch
3 Aligner au niveau à bulle,
tracer un trait
7 Amorcer les marquages au
pointeau
4 Höhenmarke für
Bohrungen bei 1950 mm
Höhe ab Standfläche
Duschwanne markieren
8 Markierungen anbohren
4 Make height mark for boreholes 1950 mm above shower
tray standing surface
8 Drill holes
8 Forer aux marquages
4 Marquer des deux cotés la
hauteur pour forage à 1950 mm
à partir du fond de la cuve à
douche
11
Wandmontage 2
Wall Mounting 2
Montage mural 2
9 Dübel setzen
13 Abstand prüfen
9 Insert dowels
13 Check distance
9 Positionner les chevilles
13 Vérifier les écartements
10 Wandhalterung ausrichten
14 Wasseranschlüsse
mit Hanf abdichten
10 Align wall fixing
10 Aligner fixation murale
14 Seal water connections
with hemp/PTFE Tape
14 Etancher les branchements
d’eau avec du chanvre
11 Wandhalterung festschrauben
11 Fasten wall fixing with screws
11 Visser la fixation murale
15 Wasseranschlüsse eindrehen.
Abstand Fliese/Außenkante
Winkelstück: 35 mm
15 Screw in water connections.
Distance from tile / outer edge
angular piece: 35 mm (see fig.
page 9)
15 Visser les branchements
d’eau. Ecartement entre carrelage/arête extérieure raccord
angulaire : 35 mm
12 Fixierschraube eindrehen,
bis 15 mm Abstand zwischen
Schraubenkopf und Fliese
16 Silikonabdichtung
Fliesen/Wasseranschlüsse
+ Bohrlöcher
12 Screw in fixing screw, until
there is a 15 mm gap between
screw head and tile
16 Silicon seal tiles/water
connections + boreholes
12 Visser la vis de fixation
jusqu’à atteindre un écartement
entre la tête de la vis et le
carrelage de 15 mm
12
16 Etanchéification au silicone
aux raccords carrelage/branchements de l’eau + forures
17 Overview
17 Vue d’ensemble
19 Stromversorgungkabel für Beleuchtung durch das Leerrohr ziehen (nur bei Version mit Beleuchtung) – Duschpaneel einhängen
19 Pull power supply for lighting
through empty tube (version with
lighting only) – fit Duschpaneel
19 Le câble d’alimentation de
courant pour l’éclairage est à
faire passer dans le conduit vide
(uniquement en version avec
éclairage) – accrocher le Duschpaneel
20 Flexible Schläuche
anschließen
20 Connect hoses
20 Brancher la tuyauterie
flexible
18 Vor dem Einhängen, Abdeckung abnehmen
18 Remove cover before fitting
18 Avant d’accrocher, enlever le
recrouvrement
21 Beleuchtung an Kabel im Leerrohr anschließen (nur bei Version
mit Beleuchtung)
21 Connect lighting to cable in
empty tube (version with lighting
only)
21 Brancher l’éclairage au
câble dans le conduit vide
(uniquement en version avec
éclairage)
13
Deutsch
17 Übersicht
English
Français
Wandmontage 3
Wall Mounting 3
Montage mural 3
Wandmontage 4
Wall Mounting 4
Montage mural 4
22 Duschpaneel anheben, bis
Einrastung über der Arretierschraube erfolgt:
22 Lift Duschpaneel, until it
locks onto the retention screw:
22 Soulever le Duschpaneel,
jusqu’à encliquetage par la
vis de butée :
Arretierschraube
vor Anheben
und Einrasten:
Arretierschraube
nach Anheben
und Einrasten:
Retention screw
before lifting
and locking:
Retention screw
after lifting
and locking:
Vis de butée
avant soulèvement et encliquetage :
Vis de butée
après soulèvement et encliquetage :
23 Fixierschraube festdrehen
23 Tighten fixing screw
23 Serrer vis de fixation
Gemeinsames Zubehör
für Duschpaneel Moonlight
Seiten 19 und 20
Accessories for
Duschpaneel Moonlight
see pages 19 and 20
Accessoires communs pour
Duschpaneel Moonlight
pages 19 et 20
14
1 Close water pipe main cock
1 Fermer le robinet principal de
la conduite d’eau
4 Von Bohrlöchern oben
1000 mm senkrecht nach unten
unteres Bohrloch beidseitig markieren
4 Mark 1000 mm vertically from
drill holes at the top down to the
bottom drill hole on both sides
4 Des trous de forage supérieurs, marquer des deux côtés
le trou de forage inférieur,
1000 mm verticalement vers
le bas
2 Höhenmarke für Bohrung
bei 1950 mm Höhe ab Standfläche Duschwanne beidseitig
markieren
2 Mark the height for the
borehole at 1950 mm from the
shower tray standing surface
on both sides
2 Marquer des deux cotés la
hauteur pour forage à 1950 mm
à partir du fond de la cuve à
douche
5 Abstand Bohrloch/Ecke für
untere Eckhalterung beidseitig
markieren
5 Mark distance borehole/
corner on both sides for lower
corner mounting
5 Marquer des deux côtés les
écartements trous de forage/
angle pour le support angulaire
6 Markierungen ankörnen
6 Mark markings with centre
punch
6 Amorcer les marquages
au pointeau
3 Abstände Bohrlöcher/Ecke
für obere Eckhalterung
beidseitig markieren
3 Mark distance of drill
holes/corners for top corner
fixing on both sides
7 Markierungen anbohren
7 Drill markings
7 Forer aux marquages
3 Marquer des deux côtés les
écartements trous de forage/
angle pour fixation angulaire
supérieure
15
Deutsch
1 Haupthahn Wasserleitung
zudrehen
English
Français
Eckmontage 1
Corner Mounting 1
Montage en angle 1
Eckmontage 2
Corner Mounting 2
Montage en angle 2
8 Dübel setzen
8 Insert dowels
8 Positionner les chevilles
12 Obere Eckhalterung festschrauben (4 Holzschrauben
Ø 6 x 50 mm + Unterlagscheiben)
12 Screw in top corner
mounting (4 wood screws
Ø 6 x 50 mm plus washers)
12 Visser la fixation angulaire
supérieure (4 vis à bois
Ø 6 x 50 mm plus rondelles)
9 Wasseranschlüsse
mit Hanf abdichten
9 Seal water connections
with hemp/PTFE Tape
9 Etanchéifier les branchements
d’eau avec du chanvre
13 Untere Eckhalterung festschrauben (2 Holzschrauben
Ø 6 x 50 mm + Unterlagscheiben)
13 Screw in bottom corner
mounting (2 woods screws
Ø 6 x 50 mm plus washers)
13 Visser la fixation angulaire
inférieure (2 vis à bois Ø 6 x 50
mm plus rondelles)
10 Wasseranschlüsse eindrehen,
Abstand Fliese/Außenkante
Winkelstück: 35 mm
10 Screw in water connections,
distance tile/outer edge angle
piece: 35 mm
10 Visser les branchements
d’eau, écart carrelage/ face
extérieure raccord angulaire :
35 mm
14 Adjust retention screw
(M 6 x 22 mm) 15 mm distance
between screw head and corner
fixing
14 Ajuster vis de butée
(M 6 x 22 mm) 15 mm d’écart
entre la tête de la vis et la fixation angulaire
11 Silikonabdichtung
Fliesen/Wasseranschlüsse
+ Bohrlöcher
15 Eckhalterung
Wandhalterung
Eckverkleidung
(a)
(b)
(c)
11 Silicon seal tiles/water
connections + boreholes
15 Corner fixing
Wall fixing
Corner housing
(a)
(b)
(c)
11 Etanchéification au silicone
aux raccords carrelage/branchements de l’eau + forures
16
14 Arretierschraube (M 6 x 22
mm) justieren15 mm Abstand
zwischen Schraubenkopf und
Eckhalterung
15 Fixation angulaire (a)
fixation murale
(b)
carénage angulaire (c)
Français
Eckmontage 3
Corner Mounting 3
Montage en angle 3
English
16 Obere Eckverkleidung
auf Eckhalterung stülpen,
Wandhalterung darüber,
festschrauben
16 Put top corner housing onto
corner fixing, wall fixing on top,
screw up
17 Schrauben festdrehen
17 Screw in screws
17 Serrer les vis
Deutsch
16 Glisser le carénage angulaire supérieur sur la fixation
angulaire, fixation murale
pardessus, visser
19 Blechmuttern über die vier
Bohrungen stecken
19 Put sheet metal nuts over the
four boreholes
19 Placer les écrous à tôle
sur les quatre forages
18 Übersicht
18 Overview
18 Vue d’ensemble
20 Untere Eckverkleidung paßgenau
darüberlegen, Aussparungen beachten
20 Place the bottom corner housing on
top so that it fits exactly, noting the grooves
20 Placer exactement le carénage
angulaire au-dessus, tenir compte des
encoches
21 Schrauben festdrehen
21 Tighten screws
21 Serrer les vis
17
Eckmontage 4
Corner Mounting 4
Montage en angle 4
22 Vor dem Einhängen, Abdeckung abnehmen
22 Remove cover before fitting
22 Avant d’accrocher, enlever le
recrouvrement
26 Beleuchtung an Kabel im
Leerrohr anschließen (nur bei
Version mit Beleuchtung)
26 Connect lighting to cable in
empty tube (only for version with
lighting)
26 Brancher l’éclairage au
câble dans le conduit vide
(uniquement en version avec
éclairage)
23 Einhängevorrichtung
am Duschpaneel
23 Securing device on
Duschpaneel
23 Dispositif d’accrochage
sur le Duschpaneel
27 Duschpaneel anheben, bis
Einrastung über der Arretierschraube erfolgt:
27 Lift Duschpaneel, until it
locks onto the retention screw:
27 Soulever le Duschpaneel,
jusqu’à encliquetage par la
vis de butée :
Arretierschraube
vor Anheben
und Einrasten:
Arretierschraube
nach Anheben
und Einrasten:
Retention screw
before lifting
and locking:
Retention screw
after lifting
and locking:
Vis de butée
avant soulèvement et encliquetage :
Vis de butée
après soulèvement et encliquetage :
24 Stromversorgungkabel für Beleuchtung durch das Leerrohr ziehen (nur bei Version mit Beleuchtung) – Duschpaneel einhängen
24 Pull power supply for lighting
through empty tube version with
lighting only) – fit Duschpaneel
24 Le câble d’alimentation de
courant pour l’éclairage est à
faire passer dans le conduit vide
(uniquement en version avec
éclairage) – accrocher le Duschpaneel
28 Fixierschraube festdrehen
28 Tighten fixing screw
28 Serrer vis de fixation
25 Flexible Schläuche
anschließen
25 Connect hoses
25 Raccorder la tuyauterie
flexible
Gemeinsames Zubehör für Duschpaneel Moonlight
Seiten 19 und 20
Accessories for Duschpaneel Moonlight
see pages 19 and 20
Accessoires communs pour Duschpaneel Moonlight
pages 19 et 20
18
Français
Duschpaneel® Moonlight – gemeinsames Zubehör
Duschpaneel® Moonlight – Common Accessories
Duschpaneel® Moonlight – accessoires communs
5 Thermostatgriff fixieren
1 Mount glass dish
5 Fix thermostat handle
1 Montage tablette en verre
5 Fixer la commande du
thermostat
2 Glasablage fixieren
6 Griff für Trio Stop aufstecken
2 Fix glass shelf
6 Fit handle for Trio Stop
2 Fixer la tablette en verre
6 Emboîter robinet pour Trio
Stop
Deutsch
English
1 Montage Glasablage
7 Dichtring Brauseschlauch
zu Duschpaneel
3 Abdeckung aufstecken
3 Attach cover
3 Encliqueter le
7 Sealing ring, shower hose
to Duschpaneel
7 Bague d’étanchéité entre
tuyau flexible de la douche et
Duschpaneel
8 Brauseschlauch mit Duschpaneel verbinden
8 Connect shower hose to
Duschpaneel
8 Brancher le tuyau flexible de
la douche au Duschpaneel
4 Thermostatgriff aufstecken
4 Fit thermostat handle
4 Emboîter la commande du
thermostat
19
Duschpaneel® Moonlight – gemeinsames Zubehör
Duschpaneel® Moonlight – Common Accessories
Duschpaneel® Moonlight – accessoires communs
9 Siebdichtung Brauseschlauch zu Handbrause
9 Filter seal, shower hose
to hand shower
9 Joint tamis entre tuyau
flexible de la douche et
douche à main
10 Brauseschlauch mit
Handbrause verbinden
10 Connect shower hose
with hand shower
10 Brancher le tuyau flexible
de la douche à la douche
à main
20
1 Haupthahn Wasserleitung
aufdrehen
5 Thermostatgriff
abnehmen
1 Turn on the water pipe
main cock
5 Remove the thermostat
handle. Turn spindle until 38 °C
is acheive.
5 Retirer la poignée du
thermostat
Deutsch
1 Ouvrir robinet de l’alimentation principale en eau
English
Français
Einstellung Thermostat
Adjusting the Thermostat
Réglage thermostat
2 Thermostat auf 38° C
justieren (Abbildung 3)
2 Adjust the thermostat to
38ÞC (Figure 3)
2 Régler le thermostat sur
38° C (illustration 3)
6 Thermostatgriff senkrecht
ausrichten und aufstecken
(roter Knopf zeigt nach oben)
6 Align the thermostat handle
vertically and fit (with red button
pointing upwards)
6 Aligner la poignée du
thermostat verticalement et
l’emboîter (le point rouge
est dirigé vers le haut)
3 Temperaturmessung
3 Temperature measurement
3 Mesure de la température
7 Thermostatgriff
festschrauben
7 Screw on the thermostat
handle
7 Visser la poignée du
thermostat
4 Befestigungsschraube
Thermostatgriff lösen
4 Loosen the thermostat
handle fastening screw
4 Desserrer la vis de fixation
de la poignée du thermostat
21
Einstellung Trio Stop
Adjusting the Trio Stop
Réglage Trio Stop
1 Wasserzufuhr geschlossen
1 Water supply closed
1 Alimentation en eau fermée
2 Umstellung auf Handbrause
2 Switch over to hand shower
2 Passage sur douche à main
3 Umstellung auf Seitenbrausen
3 Switch over to body shower
3 Passage sur douches latérales
Nase nach unten:
Hand-/Seitenbrausen aktiv
Nose pointing downwards:
Hand/body shower active
Pointe montre vers le bas :
Douche à main et douches
latérales actives
22
1 Connect transformer to the
mains (version with lighting only)
1 Brancher le transformateur
au secteur (uniquement sur
version avec éclairage)
2 Lichtschalter: Beleuchtung auf
Funktionstüchtigkeit überprüfen
(nur bei Version mit Beleuchtung)
2 Light switch: check illumination
and functionality (version with
lighting only)
2 Commutateur d’éclairage :
Vérifier l’éclairage en ce qui
concerne son bon fonctionnement (uniquement sur version
avec éclairage)
Abmessungen Trafo
Transformer Dimensions
Dimensions du transformateur
23
Deutsch
1 Trafo ans Netz anschließen
(nur bei Version mit Beleuchtung)
English
Français
Duschpaneel® Moonlight – Version mit Beleuchtung
Duschpaneel® Moonlight – Version with Lighting
Duschpaneel® Moonlight – Version avec éclairage
Pflegehinweis
Care Instructions
Conseil d’entretien
Deutsch
English
Oberflächenpflege:
Oberfläche mit flüssigem Haushaltsreiniger oder mit Seifenlauge reinigen
(Verdünnungsvorschrift beachten).
Surface Cleaning Instructions:
Clean surface with a liquid domestic
cleaner or with soapy water (note
dilution guidelines).
Kalkablagerungen mit Hansgrohe
Schnellentkalker Best-Nr. 90900
entfernen.
Remove any lime deposits using
Hansgrohe’s Decalcifying Agent,
order no. 90900.
Mit klarem Wasser nachspülen, mit
Tuch polieren.
Afterwards rinse with clean water
and polish with a cloth.
Bei säurehaltigen Reinigungsmitteln
nur Produkte mit Hansgrohe-Empfehlung benutzen (z. B. biff-Bad-Universalreiniger oder biff-Supra-Bad-Reinigungskonzentrat von Henkel) oder
Hansgrohe Reinigerset
Best.-Nr. 90921
If you use cleaning agents containing
acid, only use products with the
Hansgrohe recommendation (e.g.
Biff-Bad Universal Cleaner or BiffSupra Bath Cleaning Concentrate
from Henkel) or Hansgrohe Cleaning
Set order no. 90921.
Keine säurehaltigen Reinigungsmittel,
Scheuermittel oder Essigreiniger verwenden. Schäden die durch unsachgemäße Behandlung entstehen, unterliegen nicht unserer Gewährleistung.
24
Do not use any cleaning agents
containing acid, abrasive agents or
acetic cleaners. Damage caused by
improper treatment is not covered by
our guarantee.
Français
D’Entretien des surfaces :
Nettoyer la surface avec un produit
d’entretien ménager ou une lessive
de savon (tenir compte de l’instruction pour la dilution).
Eliminer les dépôts calcaires avec un
anticalcaire à action rapide. Réf. de
cde 90900.
Rincer à l’eau claire et polir avec un
chiffon doux.
Suivre les recommandations Hansgrohe pour l’utilisation de produits
d’entretien à base d’acide ou employer le kit de nettoyage Hansgrohe. Réf. de cde N° 90921.
Ne pas utiliser des produits à base
d’acide, des poudres à récurer ou
des produits à nettoyer acétiques.
Les détériorations imputables à une
utilisation inadéquate ne sont pas
couvertes par notre garantie.
Indice
Contenido
Inhoud
Pannello doccia "Moonlight" – insieme degli accessori
Regolazione termostatico /Regolazione selettore "Trio Stop"
Pannello doccia "Moonlight®": versione con illuminazione
Istruzioni per la manutenzione
42 - 43
44 - 45
46
47
Español
Equipamiento
Medidas
Datos técnicos
Datos técnicos calentador continuo, nota para la seguridad
Esquema de medidas - montaje en la pared
Esquema de medidas - montaje en un rincón
Contenido del paquete / variantes
Montaje en la pared
Montaje angular
Panel de ducha Moonlight – accesorios comunes
Ajuste termostato /Ajuste Trio Stop
Panel de ducha Moonlight® – Versión con iluminación
Nota para el mantenimiento
29 -
34
38
42
44
-
26
27
28
30
31
32
33
37
41
43
45
46
47
Nederlands
Uitvoering
Afmetingen
Technische gegevens
Technische gegevens, veiligheidsvoorschrift
Afmetingen Wandmontage
Afmetingen Hoekmontage
Inhoud verpakking / varianten
Wandmontage
Hoekmontage
Gemeenschappelijke accessoires
Instelling thermostaat / Instelling Trio stop
Duschpaneel® Moonlight – Versie met verlichting
Reinigingsinstructies
29 -
34
38
42
44
-
26
27
28
30
31
32
33
37
41
43
45
46
47
25
Español
26
27
28
29 - 30
31
32
33
34 - 37
38 - 41
Italiano
Dotazioni
Misure
Dati tecnici
Dati tecnici scaldabagni, norme di sicurezza
Schema misure per montaggio a parete
Schema misure per montaggio ad angolo
Contenuto della confezione / varianti
Montaggio a parete
Montaggio ad angolo
Nederlands
Italiano
Dotazione
Equipamiento
Uitvoering
1
2
Italiano
1. Cristallo di sicurezza smerigliato (illuminazione opzionale)
2. Doccetta Aktiva F'6
3. Mensola in cristallo
4. Docce laterali Bodyvette
con funzione di chiusura
5. Selettore "Trio Stop"
6. Interruttore illuminazione
(illuminazione opzionale)
7. Termostatico
8. Docce laterali Bodyvette
Español
7
1. Cristal de seguridad
mateado (iluminación opcional)
2. Teleducha Aktiva F'6
3. Bandeja de cristal
4. Duchas laterales Bodyvette
Stop
5. Trio Stop
6. Tecla de iluminación
(iluminación opcional)
7. Termostato
8. Duchas laterales Bodyvette
8
Nederlands
3
4
5
6
1. Mat veiligheidsglas
(verlichting optioneel)
2. Handdouche Aktiva F'6
3. Glasplanchet
4. Zijdouches met Bodyvette
stop
5. Trio stop
6. Verlichtingstoets
(verlichting optioneel)
7. Thermostaat
8. Zijdouches Bodyvette
26
Misure
Medidas
Afmetingen
Versione a parete
Versión de pared
Wandversie
Italiano
1632
Español
Nederlands
Versione ad angolo
Versión angular
Hoekversie
ca. 530
400
ca. 473
400
320
320
0
34
ca./aprox.
530
ca./aprox.
473 mm
223
27
Dati tecnici
Datos técnicos
Technische gegevens
Italiano
Dati tecnici
Pressione minima:
Pressione di servizio:
Pressione di servizio consigliata:
Pressione di prova:
Temperatura acqua calda:
Temperatura acqua calda consigliata:
Scala temperatura:
Blocco di sicurezza:
Portata a 3 bar:
Doccetta:
Docce laterali:
Doccetta + docce laterali:
Español
1,5 bar
mass. 10 bar
2–5 bar
16 bar
mass. 70° C
60° C
20°– 60° C
38° C
14 l/min.
23 l/min.
29 l/min.
Datos técnicos
Presión de flujo:
Presión de servicio:
Presión de servicio recomendada:
Presión de prueba:
Temperatura agua caliente:
Temperatura agua caliente recomendada:
Escala de temperatura:
Bloqueo de seguridad:
Caudal con 3 bar
Teleducha:
Duchas laterales:
Teleducha + duchas laterales:
Nederlands
bar
Technische gegevens
Minimale waterdruk
1,5 bar
Waterdruk
max. 10 bar
Aanbevolen waterdruk
2–5 bar
Controledruk
16 bar
Warmwatertemperatuur
max.70°C
Aanbevolen warmwatertemperatuur
60°C
en temperatuurschaal
20–60°C
Veiligheidsblokkering
38°C
Doorstroomcapaciteit bij 3 bar stroomdruk
Handdouche
14 l min
Zijdouche
23 l min
Handdouche + zijdouche
29 l min
5
4
3
1
Doccetta / Teleducha / Handdouche
2
2
Docce laterali / Duchas laterales / Zijdouche
3
Doccetta + docce laterali / Teleducha + duchas laterales
Handdouche + zijdouche
1
1
2 3
0
Ql/min
l/s
28
0
3
6 9 12 15 18 21 24 27 30 33 36 39
0,1
0,2
0,3
0,4
0,5
mín. 1,5 bar
máx. 10 bar
2–5 bar
16 bar
máx. 70° C
60° C
20° – 60° C
38° C
14 l/min
23 l/ min
29 l/min
Dati tecnici scaldabagni, norme di sicurezza
Datos técnicos calentador continuo, nota para la seguridad
Technische gegevens, veiligheidsvoorschrift
Italiano
Español
Scaldabagni istantanei:
Il pannello doccia non può essere utilizzato con scaldabagni
istantanei idraulici, elettronici e termostatici.
Calentadores continuos:
El panel de ducha no se puede utilizar en combinación con calentadores continuos con control hidráulico, electrónico y térmico.
Per l'allacciamento elettrico del pannello doccia è sufficiente
una semplice presa di corrente. Il sistema di illuminazione è alimentato tramite un trasformatore esterno.
L'installazione della presa deve essere effettuata esclusivamente
da un tecnico specializzato o dal proprio elettrotecnico. L'alimentazione elettrica complessiva avviene tramite un allacciamento a corrente alternata a 230 V/ 50 Hz.
L'installazione elettrica deve essere effettuata conformemente alle norme VDE, nazionali e EVU vigenti. I lavori di installazione
e di controllo devono essere effettuati da elettricisti qualificati ed
autorizzati, conformemente alla norma VDE 0100 Parte 701.
Qualsiasi intervento sul pannello doccia deve avvenire in assenza di corrente.
La potenza del trasformatore esterno è di 30 VA. Per il cavo di
alimentazione della corrente si deve prevedere una guaina di rivestimento con un diametro di minimo 25 mm (vedere pagina
3). Il cavo fornito permette d'installare il trasformatore in una zona asciutta (zona di protezione 3) ad una distanza massima di
circa 7 metri dal pannello doccia. Il trasformatore deve essere
accessibile in qualsiasi momento. Una conduttura d'allacciamento danneggiata non può essere sostituita. In tal caso il trasformatore non deve essere più fatto funzionare.
En el montaje del panel de ducha con iluminación, se ha de prestar atención a la conexión de enchufe hacia el panel y hacia la
alimentación eléctrica. Detrás del panel debería existir una longitud restante del cable, de modo que el panel se pueda quitar
para eventuales trabajos de montaje.
Para la conexión eléctrica del panel de ducha sólo necesita una
toma de corriente. La alimentación eléctrica de la iluminación tiene lugar a través de un transformador externo.
La instalación de la toma de corriente debería ser realizada
exclusivamente por un profesional: su instalador eléctrico. Toda
la alimentación eléctrica tiene lugar a través de una conexión
de corriente alterna 230 V/50 Hz.
Para la instalación eléctrica se deberán observar las correspondientes prescripciones VDE, nacionales y de compatibilidad electromagnética en su redacción vigente en cada momento. Los
trabajos de instalación y comprobación deberán ser ejecutados
por electricistas homologados, en cumplimiento de VDE 0100
Parte 701.
Todos los trabajos en el panel de ducha deben realizarse sólo
en estado sin tensión. La potencia de transformación del transformador externo es de 30 VA. Para el tendido del cable de alimentación eléctrica, se ha de prever un tubo vacío con un diámetro mínimo de 25 mm (ver página 3). El cable suministrado
permite instalar el transformador en el área seca (zona de protección 3) a una distancia máxima de aprox. 7 m del panel de
ducha. El transformador tiene que estar accesible en todo momento. No se puede cambiar un cable de conexión defectuoso.
En este caso, el transformador ya no debe ser utilizado.
29
Nederlands
Quando si installa il pannello doccia con illuminazione si deve
fare attenzione al collegamento a spina tra panello e alimentazione di corrente. Dietro il pannello si deve lasciare un tratto di
cavo supplementare in modo che, in caso di eventuali lavori di
manutenzione, il pannello possa essere rimosso.
Nota de seguridad para la conexión del panel de
ducha Moonlight con iluminación:
Español
Norme di sicurezza per l'allacciamento del pannello
doccia "Moonlight" con illuminazione:
Diferencias de presión
Es necesario compensar las presiones entre las conexiones de
agua fría y de agua caliente.
Italiano
Differenze di pressione
Le differenze di pressione tra acqua fredda ed acqua calda devono essere eliminate.
Dati tecnici scaldabagni, norme di sicurezza
Datos técnicos calentador continuo, nota para la seguridad
Technische gegevens, veiligheidsvoorschrift
Nederlands
Doorstroomtoestellen:
Het douchepaneel kan niet in verbinding met hydraulisch, elektronisch en thermisch gestuurde boilers worden gebruikt.
Drukverschillen:
Deze moeten tussen de koud- en warmwateraansluitingen vermeden worden.
Veiligheidsaanwijzing voor de aansluiting Duschpaneel® Moonlight met verlichting:
Bij de montage van het douchepaneel met verlichting moet op
de steekverbinding naar het paneel en de stroomtoevoer worden
gelet. Achter het paneel dient een wat extra kabellengte aanwezig te zijn, zodat het paneel voor eventuele onderhoudswerkzaamheden kan worden verwijderd.
Voor de elektrische aansluiting van het douchepaneel heeft u alleen maar een stopcontact nodig. De stroomvoorziening van de
verlichting gebeurt via een externe trafo.
De installatie van het stopcontact dient uitsluitend door een vakman, uw elektro-installateur te worden verricht. De totale stroomvoorziening gebeurt via een 230 V / 50 Hz wisselstroomaansluiting.
Bij de elektro-installatie moeten de overeenkomstige voorschriften van de beroepsvereniging van elektriciens, de provincie en
het elektriciteitsbedrijf in de van toepassing zijnde geldige versie
worden nageleefd. De installatie en controlewerkzaamheden
moeten door erkende elektriciens worden uitgevoerd, onder inachtneming van het VDE 0100 Deel 701. Alle werkzaamheden
aan het douchepaneel mogen alleen in spanningsloze toestand
worden uitgevoerd.
30
Schema misure per montaggio a parete
Esquema de medidas - montaje en la pared
Afmetingen wandmontage
2xØ6
max.
35
1000
allacciamenti
Conexiones
Aansluitingen 1/2''
vereiste minimale hoogte
vóór montage
controleren.
a destra o sinistra
izquierda o
derecha
links of rechts
Italiano
1950
min. 80
max.150
Español
guaina diametro
Tubo vacío
Lege buis Ø 25
50
1x Ø 8
1000 – 1150
1200
15
Superficie d'appoggio/Superficie de base
Standoppervlak
Pavimento finito X/Suelo terminado
Afgewerkte vloer
X
Italiano
Español
Nederlands
Le misure indicate si riferiscono alla superficie d'appoggio. La distanza (X) tra la superficie d'appoggio
ed il pavimento grezzo deve essere determinata nel
luogo d'installazione.
Las medidas se refieren a la superficie de base. En
la obra, se ha de determinar la distancia (X) entre la
superficie de base y el suelo bruto.
De afmetingen verwijzen naar het standoppervlak.
De afstand (x) moet ter plekke tussen standoppervlak
en ruwe vloer worden vastgesteld.
a) Agua caliente, DN15G 1/2
2 – 5 bar, 60° C
b) Agua fría, DN15G 1/2, 2 – 5 bar
a) Warm water, DN 15 G 1/2
2–5 bar, 60°C
b) Koud water DN 15 G 1/2, 2–5 bar
a) acqua calda, DN15G 1/2,
2–5 bar, 60° C
b) acqua fredda, DN15G 1/2, 2–5 bar.
Nederlands
Comprobar la
altura mínima
necesaria antes de iniciar
el montaje
23
Lato superiore pannello / Borde superior del panel / Bovenste zijde van het douchepaneel 2150 mm
Altezza minima della stanza 2200 mm / Altura minima del local 2200 mm / Minimale hoogte 2200 mm
Prima del
montaggio
controllare
l'altezza minima necessaria
31
Schema misure per montaggio ad angolo
Esquema de medidas - montaje en un rincón
Afmetingen hoekmontage
Comprobar la
altura mínima
necesaria antes de iniciar
el montaje
85
65
4xØ8
vereiste minimale hoogte
vóór montage
controleren.
1000
max.
35
guaina diametro
Tubo vacío
Lege buis Ø 25
70
120
60
allacciamenti
Conexiones
Aansluitingen 1/2''
a destra o sinistra
izquierda o
derecha
links of rechts
1950
a destra o sinistra
izquierda o
derecha
links of rechts
2xØ8
150
15
1150
150
1250
Lato superiore pannello / Borde superior del panel / Bovenste zijde van het douchepaneel 2150 mm
Altezza minima della stanza 2200 mm / Altura minima del local 2200 mm / Minimale hoogte 2200 mm
Prima del
montaggio
controllare
l'altezza minima necessaria
Superficie d'appoggio/Superficie de base
standoppervlak
Pavimento finito X/Suelo terminado
Afgewerkte vloer
X
Italiano
Español
Nederlands
Le misure indicate si riferiscono alla superficie d'appoggio. La distanza (X) tra la superficie d'appoggio
ed il pavimento grezzo deve essere determinata nel
luogo d'installazione.
Las medidas se refieren a la superficie de base. En
la obra, se ha de determinar la distancia (X) entre la
superficie de base y el suelo bruto.
De afmetingen verwijzen naar het standoppervlak.
De afstand (x) moet ter plekke tussen standoppervlak
en ruwe vloer worden vastgesteld.
a) Agua caliente, DN15G 1/2
2 – 5 bar, 60° C
b) Agua fría, DN15G 1/2, 2 – 5 bar
a) Warm water, DN 15 G 1/2
2–5 bar, 60°C
b) Koud water DN 15 G 1/2, 2–5 bar
a) acqua calda, DN15G 1/2,
2–5 bar, 60° C
b) acqua fredda, DN15G 1/2, 2–5 bar.
32
Contenuto della confezione / varianti
Contenido del paquete / variantes
Inhoud verpakking / varianten
Duschpaneel® Moonlight
Set per montaggio a parete Juego de montaje en la pared
Wandmontageset
2 tassello di nylon S 6
2 tacos de nylon S 6
2 nylonpluggen S 6
Pannello doccia senza illuminazione
Panel de ducha sin iluminación
Douchepaneel zonder verlichting
1 vite per legno 6 x 45
1 tornillo para madera 6 x 45
1 houten schroef 6 x 45
2 viti per legno 4,5 x 35
2 tornillos para madera
4,5 x 35
2 houten schroeven 4,5 x 35
Pannello doccia con illuminazione (opzionale)
Panel de ducha con iluminación (opcional)
Douchepaneel met verlichting (optioneel)
Duschpaneel® Moonlight
Italiano
2 rondelle 5,3
2 arandelas 5,3
2 schijven 5,3
Supporto da parete
Soporte de pared
Wandklem
Set per montaggio ad angolo Juego de montaje angular
Hoekmontageset
6 tassello F8 Mea
6 taco F8 Mea
6 plug F8 mea
3 viti a testa bombata
M 6/23
3 tornillos alomados M 6/23
3 lenskopschroeven M 6/23
6 viti per legno 6 x 50
6 tornillos para madera 6 x 50
6 houten schroeven 6 x 50
4 viti 5 x 13
4 Ttornillos avellanados
para chapa 5 x 13
4 verzonken plaatschroeven
5 x 13
6 rondelle A 6
6 arandelas A 6
6 schijven A 6
Distanziatori/viti/supporti
Elementos separadores / tornillos / soporte angular
Afstandsstukken/schroeven/hoekklem
4 dadi F.ST3
4 tuercas para chapa F.ST3
4 plaatmoeren F.ST3
Supporto da parete
Soporte de pared
Wandklem
Supporto angolare
superiore
Soporte angular superior
Hoekklem boven
Supporto angolare
Soporte angular inferior
Hoekklem onder
Español
Pannello doccia/cartone da trasporto
Panel de ducha/caja de transporte
Douchepaneel/transportkarton
Nederlands
1 tassello F8 Mea
1 taco F8 Mea
1 plug F8 mea
33
Montaggio a parete 1
Montaje en la pared 1
Wandmontage 1
1 Chiudere il rubinetto principale della conduttura dell'acqua
5 Scendere in verticale
di mm 1000.
1 Cerrar la llave principal de
la tubería de agua.
5 Retirar 1000 mm verticalmente
hacia abajo
1 Hoofdkraan waterleiding
dichtdraaien
5 Verticaal naar beneden
1000 mm markeren
2 Segnare il punto centrale
tra i due allacciamenti
dell'acqua
6 Posizionare il supporto da parete nel punto centrale del contrassegno a 1950 mm, segnare i
punti di foratura.
2 Marcar el centro entre las
conexiones de agua
2 Midden tussen wateraansluitingen markeren
6 Alinear el soporte de pared
centrado a la marca de altura
de 1950 mm y marcar los
taladros
6 Wandklem centraal op hoogtemarkering 1950 mm uitlijnen,
boorgaten aangeven
3 Posizionare la livella e
tracciare una linea.
3 Alinear el nivel de burbuja,
trazar la línea
3 Waterpas uitlijnen, lijn trekken
7 Marcar los taladros con un
granete
7 Markeringen aankruisen
4 Segnare l'altezza per i fori
a 1950 mm dalla superficie di
appoggio del piatto doccia.
8 Forare in corrispondenza
dei segni.
4 Trazar la marca de altura
para los taladros a una altura
de 1950 mm desde la superficie
de base del plato de ducha
hasta la superficie de base
8 Markeringen aanboren
4 Hoogte markering voor boorgaten bij 1950 mm hoogte
vanaf standoppervlak van de
douchebak markeren
34
7 Punzonare i segni
8 Taladrar las marcas
13 Controllare la distanza.
9 Colocar los tacos
13 Comprobar la distancia
9 Plug plaatsen
13 Afstand controleren
10 Posizionare il supporto
da parete.
14 Chiudere ermeticamente con
della canapa gli allacciamenti
dell'acqua.
10 Alinear el soporte de pared
10 Wandklem uitlijnen
14 Estanqueizar las conexiones
de agua con cáñamo
Italiano
14 Wateraansluitingen met
hennep afdichten
Español
9 Inserire i tasselli
Nederlands
Montaggio a parete 2
Montaje en la pared 2
Wandmontage 2
11 Avvitare saldamente il supporto da parete
11 Atornillar el soporte de pared
11 Wandklem vastschroeven
15 Avvitare gli allacciamenti
dell'acqua. Distanza tra le
mattonelle e il bordo esterno
dell'elemento angolare : 35 mm.
15 Enroscar las conexiones de
agua. Distancia azulejo / borde
exterior pieza angular: 35 mm
15 Wateraansluitingen
indraaien. Afstand tegel /
buitenzijde
12 Avvitare la vite di fissaggio
fino a raggiungere la distanza
di mm 15 tra la testa della vite
e la mattonella.
12 Enroscar el tornillo de fijación hasta que se alcance una
distancia de 15 mm entre la cabeza del tornillo y el azulejo
12 Fixeerschroef indraaien
tot 15 mm afstand tussen
schroefkop en tegel wordt
bereikt
16 Chiusura ermetica con silicone tra le mattonelle e gli allacciamenti dell'acqua + fori
16 Estanqueización con silicona
azulejos / conexiones de agua
+ taladros
16 Siliconenafdichting tegel /
wateraansluitingen + boorgaten
35
Montaggio a parete 3
Montaje en la pared 3
Wandmontage 3
17 Vista complessiva
17 Vista de conjunto
17 Overzicht
19 Far passare attraverso la guaina di rivestimento il cavo di
corrente per l’illuminazione (solo
nella versione con illuminazione)
– Appendere il pannello doccia
in alto al supporto da parete
19 Pasar el cable de alimentación eléctrica para la iluminación por el tubo vacio (sólo en la
versión con iluminación) –
Enganchar el panel de ducha arriba en el soporte de pared
19 Stroomtoevoerkabel voor verlichting door de lege buis trekken (alleen bij versie met verlichting) – Douchepaneel boven
in de wandklem hangen.
20 Allacciare i tubi flessibili
20 Conectar los tubos flexibles
20 Flexibele slangen aansluiten
18 Prima di appendere togliere
la copertura
18 Antes de enganchar, quitar la
cubierta
18 Voor het inhangen afdekking
verwijderen
21 Collegare l'illuminazione al
cavo nella guaina (solo nella versione con illuminazione).
21 Conectar la iluminación al
cable en el tubo vacío (sólo en
la versión con iluminación)
21 Verlichting op kabel in de
lege buis aansluiten (alleen bij
versie met verlichting).
36
Montaggio a parete 4
Montaje en la pared 4
Wandmontage 4
22 Sollevare il pannello doccia
fino al suo innesto sulla vite di
bloccaggio.
22 Levantar el panel de ducha
hasta el enclavamiento encima
del tornillo de bloqueo:
22 Douchepaneel optillen tot het
boven de klemschroef inklinkt:
Tornillo de bloqueo
antes de levantar
y enclavar:
Klemschroef voor
optillen en
Vite di bloccaggio
dopo il sollevamento e l'innesto:
Tornillo de bloqueo
después de levantar y enclavar:
Nederlands
Vite di bloccaggio
prima del
sollevamento e
dell'innesto:
Klemschroef na
optillen en
inklinken.
Español
inklinken
23 Stringere la vite di fissaggio.
Italiano
23 Apretar el tornillo de fijación
23 Fixeerschroef vastdraaien
Insieme degli accessori per
pannello doccia Moonlight:
pagine 42 e 43
Accesorios comunes para panel de ducha Moonlight
páginas 42 y 43
Gemeenschappelijke accessoires voor Duschpaneel®
Moonlight pagina 42 en 43
37
Montaggio ad angolo 1
Montaje angular 1
Hoekmontage 1
1 Chiudere il rubinetto principale della conduttura dell'acqua.
1 Cerrar la llave principal de la
tubería de agua.
1 Hoofdkraan waterleiding
dichtdraaien
4 Segnare il punto di foratura inferiore a 1000 mm di distanza
in verticale dai punti di foratura
superiori, su entrambi i lati.
4 Desde los taladros superiores,
marcar en ambos lados los taladros, midiendo 1000 mm verticalmente hacia abajo
4 Vanaf de boorgaten boven
1000 mm verticaal naar beneden onderste boorgat aan beide
zijden markeren.
2 Segnare l'altezza per il foro a
1950 mm dalla superficie di appoggio del piatto doccia, su entrambi i lati.
2 Trazar la marca de altura para los taladros a una altura de
1950 mm en ambos lados desde
la superficie de base del plato
de ducha
2 Hoogte markering voor boorgat bij 1950 mm hoogte vanaf
het standoppervlak van de douchebak aan beide zijden markeren
5 Segnare la distanza tra il punto di foratura e l'angolo per il
supporto angolare inferiore, su
entrambi i lati
5 Marcar en ambos lados las distancia taladro / ángulo para el
sporte angular inferior
5 Afstand boorgat / hoek voor
onderste hoekklem aan beide
zijden markeren
6 Punzonare i segni.
6 Marcar los taladros con un
granete
6 Markeringen aankruisen.
3 Segnare la distanza tra i punti
di foratura e l'angolo per il supporto angolare superiore, su entrambi i lati.
3 Marcar en ambos lados las
distancias entre los taladros y el
rincón para el soporte angular
superior
3 Afstanden boorgaten / hoek
voor bovenste hoekklem aan
beide zijden markeren.
38
7 Forare in corrispondenza
dei segni.
7 Taladrar las marcas
7 Markeringen aanboren
Montaggio ad angolo 2
Montaje angular 2
Hoekmontage 2
8 Inserire i tasselli.
8 Colocar los tacos
8 Pluggen plaatsen
12 Fissare con viti il supporto
superiore (4 viti per legno diametro 6 x 50 mm con rondelle).
12 Atornillar el soporte angular
superior (4 tornillos para madera
Ø 6 x 50 mm y arandelas)
9 Estanqueizar las conexiones
de agua con cáñamo
13 Atornillar el soporte angular
inferior (2 tornillos para madera
Ø 6 x 50 mm y arandelas)
13 Onderste hoekklem vastschroeven (2 houten schroeven
Ø 6 x 50 mm plus draagschijven)
Italiano
9 Wateraansluitingen met
hennep afdichten.
13 Fissare con viti il supporto inferiore (2 viti per legno diametro
6 x 50 mm con rondelle).
Español
9 Chiudere ermeticamente con
della canapa gli allacciamenti
Nederlands
12 Bovenste hoekklem vastdraaien (4 houten schroeven Ø 6 x
50 mm plus draagschijven)
10 Avvitare gli allacciamenti
dell'acqua. Distanza tra le mattonelle e il bordo esterno dell'elemento angolare: 35 mm.
14 Regolare la vite di bloccaggio (6 x 22 mm).
10 Enroscar las conexiones de
agua. Distancia azulejo / borde
exterior pieza angular: 35 mm
14 Ajustar el tornillo de bloqueo
(M 6 x 22 mm); distancia entre
la cabeza del tornillo y el soporte angular 15 mm, pieza angular: 35 mm
10 Wateraansluitingen indraaien. Afstand tegel / buitenzijde
hoekstuk: 35 mm
14 Klemschroef (M6 x 22 mm)
afstellen. 15 mm afstand tussen
schroefkop en hoekklem.
11 Chiusura ermetica con
silicone tra le mattonelle e gli
allacciamenti dell'acqua + fori
15 Supporto angolare (a)
supporto da parete
(b)
copertura angolare
(c)
11 Estanqueización con silicona
azulejos / conexiones de agua
+ taladros
15 Soporte angular
(a)
Soporte de pared
(b)
Revestimiento angular (c)
11 Siliconenafdichting tegel /
wateraansluitingen + boorgaaten
15 Hoekklem
Wandklem
Hoekbekleding
(a)
(b)
(c)
39
Montaggio ad angolo 3
Montaje angular 3
Hoekmontage 3
16 Infilare nel supporto angolare la copertura angolare superiore, su quest'ultima inserire il
supporto da parete ed avvitare.
16 Colocar el revestimiento angular superior sobre el soporte
angular, posicionar el soporte de
pared encima, atornillar.
16 Bovenste hoekbekleding op
hoekklem stulpen, wandklem
daarboven vastschroeven.
17 Stringere le viti.
17 Apretar los tornillos
17 Schroeven vastdraaien
19 Inserire i dadi sopra i
quattro fori.
19 Colocar las tuercas para
chapa sobre los cuatro taladros
19 Plaatmoeren boven de
vier boorgaten steken
18 Vista complessiva
18 Vista complessive
18 Overzicht
20 Sovrapporre la copertura angolare inferiore facendola
combaciare esattamente e rispettando gli spazi.
20 Colocar el revestimiento angular inferior
exactamente encima, observar las escotaduras
20 Onderste hoekbekleding nauwkeurig passend
erop leggen, let op de uitsparingen!
21 Stringere le viti.
21 Apretar los tornillos
21 Schroeven vastdraaien
40
Montaggio ad angolo 4
Montaje angular 4
Hoekmontage 4
23 Dispositivo per l'aggancio
del pannello doccia.
23 Dispositivo de enganche en
el panel de ducha
23 Inhanginrichting op het
douchepaneel
26 Verlichting op kabel in de
lege buis aansluiten (alleen bij
versie met verlichting)
27 Sollevare il pannello doccia
fino al suo innesto sulla vite di
bloccaggio.
27 Levantar el panel de ducha
hasta el enclavamiento encima
del tornillo de bloqueo:
27 Douchepaneel optillen tot het
boven de klemschroef inklinkt:
Vite di bloccaggio
prima del
sollevamento e
dell'innesto:
Tornillo de bloqueo
antes de levantar
y enclavar:
Vite di bloccaggio
dopo il sollevamento e l'innesto:
Tornillo de bloqueo
después de levantar y enclavar:
Klemschroef voor
optillen en
24 Far passare attraverso la guaina di rivestimento il cavo di
corrente per l’illuminazione (solo
nella versione con illuminazione)
– Appendere il pannello doccia
in alto al supporto da parete
24 Pasar el cable de alimentación eléctrica para la iluminación por el tubo vacio (sólo en la
versión con iluminación) –
Enganchar el panel de ducha arriba en el soporte de pared
24 Stroomtoevoerkabel voor verlichting door de lege buis trekken (alleen bij versie met verlichting) – Douchepaneel boven
in de wandklem hangen.
Klemschroef na
optillen en
inklinken.
inklinken
28 Stringere la vite di fissaggio.
28 Apretar el tornillo de fijación
28 Fixeerschroef vastdraaien
25 Allacciare i tubi flessibili.
25 Conectar los tubos flexibles
25 Flexibele slangen aansluiten
Insieme degli accessori per pannello doccia
Moonlight: pagine 42 e 43
Accesorios comunes para panel de ducha
Moonlight páginas 42 y 43
Gemeenschappelijke accessoires voor
Duschpaneel® Moonlight pagina 42 en 43
41
Nederlands
22 Voor het ophangen afdekking verwijderen
26 Conectar la iluminación al
cable en el tubo vacío (sólo en
la versión con iluminación)
Español
22 Antes de enganchar, quitar
la cubierta
26 Collegare l'illuminazione al
cavo nella guaina (solo nella
versione con illuminazione)
Italiano
22 Prima di appendere togliere
la copertura
Pannello doccia "Moonlight" – insieme degli accessori
Panel de ducha Moonlight – accesorios comunes
Gemeenschappelijke accessoires
1 Montaggio della mensola
in cristallo.
5 Fissare la manopola
del termostatico.
1 Montaje bandeja de cristal
5 Fijar el mando termostático
1 Montage glasplanchet
5 Thermostaatgreep bevestigen
2 Fissare la mensola in cristallo.
6 Applicare la manopola del
selettore "Trio Stop".
2 Fijar la bandeja de cristal
2 Glasplanchet bevestigen
6 Enchufar el mando para Trio
Stop
6 Greep voor Trio Stop erop
steken
7 Anello di tenuta del tubo
doccia con il pannello.
3 Applicare la copertura.
3 Enchufar la cubierta
7 Junta anular manguera de
ducha a panel de ducha
7 Afdichtring doucheslang naar
douchepaneel
3 Afdekking erop zetten
8 Collegare il tubo doccia
al pannello.
8 Conectar la manguera de
ducha con el panel de ducha
8 Doucheslang met douchepaneel verbinden
4 Applicare la manopola del
termostatico.
4 Enchufar el mando
termostático
4 Thermostaatgreep erop zetten
42
Pannello doccia "Moonlight" – insieme degli accessori
Panel de ducha Moonlight – accesorios comunes
Gemeenschappelijke accessoires
9 Guarnizione a filtro del
tubo doccia per doccetta.
9 Junta con filtro manguera de
ducha a teleducha
Nederlands
9 Zeefafdichting doucheslang
naar handdouche
10 Collegare il tubo doccia
alla doccetta.
10 Conectar la manguera de
ducha con la teleducha
Italiano
Español
10 Doucheslang met handdouche verbinden
43
Regolazione Termostatico
Ajuste termostato
Instelling thermostaat
1 Aprire il rubinetto principale
della conduttura dell'acqua.
5 Rimuovere la manopola
del termostato.
1 Abrir la llave principal de la
tubería de agua
5 Quitar el mando termostático
1 Hoofdkraan waterleiding
5 Thermostaatgreep verwijderen
2 Regolare il termostato su
38° C (figura 3).
2 Ajustar el termostato a
38° C (Fig. 3)
2 Thermostaat op 38° C
zetten (Afb.3)
6 Posizionare la manopola del
termostato in verticale ed
innestarla (bottone rosso rivolto
verso l'alto).
6 Ajustar el mando termostático
en sentido vertical y enchufarlo
(el botón rojo apunta hacia
arriba)
6 Thermostaatgreep verticaal
uitlijnen erop zetten (rode
knop wijst naar boven)
3 Misurare la temperatura.
3 Medir la temperatura
3 Temperatuurmeting
7 Avvitare la manopola
del termostato.
7 Atornillar el mando
termostático
7 Thermostaatgreep
vastschroeven.
4 Svitare la vite di fissaggio
della manopola del termostato.
4 Desenroscar el tornillo de
fijación del mando termostático
4 Bevestigingsschroef
44
Regolazione selettore "Trio Stop"
Ajuste Trio Stop
Instelling Trio stop
1 Alimentazione dell'acqua
chiusa.
1 Alimentación de agua
cerrada
1 Watertoevoer gesloten
2 Regolare su doccetta.
Nederlands
2 Conmutación a teleducha
Español
2 Omzetten op handdouche
3 Regolazione su docce laterali
3 Conmutación a duchas
laterales
Italiano
3 Omzetten op zijdouche
Selettore rivolto verso il
basso: doccetta e docce laterali
in funzione
Saliente hacia abajo:
Teleducha / duchas laterales
activas
Neus naar beneden:
Hand-/zijdouche actief.
45
Pannello doccia "Moonlight®": versione con illuminazione
Panel de ducha Moonlight® – Versión con iluminación
Duschpaneel® Moonlight – Versie met verlichting
1 Collegare il trasformatore alla
rete(solo nella versione con illuminazione).
1 Conectar el transformador a
la red (sólo en la versión con
iluminación)
1 Trafo op het net aansluiten
(alleen bij versie met verlichting)
2 Interruttore luce: verificare
il corretto funzionamento
dell'illuminazione (solo nella
versione con illuminazione).
2 Interruptor de luz: Comprobar
el funcionamiento de la iluminación (sólo en la versión con iluminación)
2 Lichtschakelaar: Verlichting op
goed functioneren controleren
(alleen bij versie met verlichting)
Dimensioni trasformatore
Dimensiones transformador
Afmetingen trafo
46
Nederlands
Manutenzione della superficie
Pulire la superficie con un detersivo
liquido o con acqua e sapone, diluendo secondo le indicazioni.
Mantenimiento de la superficie
Limpiar la superficie con un limpiahogar líquido o con lejía jabonosa
(observar las indicaciones para la
dilución).
Reiniging van het oppervlak
Oppervlak met een vloeibare huishoudreiniger of zachte zeep reinigen
(let op het verdunningsvoorschrift)
Kalkafzettingen met Hansgrohe snelontkalker bestelnr. 90900 verwijderen.
I depositi di calcare possono essere
eliminati con l'anticalcare rapido
Hansgrohe (art. nr. 90900) oppure
con il set di pulizia Hansgrohe
(art. nr. 90921).
Eliminar las incrustaciones de cal
con el producto antical Hansgrohe
Schnellentkalker, nº de pedido
90900.
Risciacquare con acqua pulita e lucidare con un panno
Aclarar con agua limpia y abrillantar con un paño.
Non utilizzare detersivi contenenti
acido, sostanze abrasive o aceto.
Para productos de limpieza que contengan ácido, utilizar únicamente
productos recomendados por Hansgrohe (p.ej. limpiador universal para
baños biff o limpiador concentrado
para baños biff-Supra de Henkel) o
el juego de limpieza Hansgrohe, nº
de pedido 90921.
La nostra garanzia non copre i danni derivanti da un trattamento non
appropriato.
Met helder water naspoelen, met
doek oppoetsen. Bij zuurhoudende
reinigingsmiddelen alleen producten
met Hansgrohe-advies gebruiken (bijv. biff-bad universele reiniger of biffsupra-bad reinigingsconcentraat van
Henkel) of Hansgrohe reinigingsset,
bestelnummer 90921.
Geen zuurhoudende reinigingsmiddelen, schuurmiddelen of azijnreiniger gebruiken. Schade die door ondeskundige behandeling ontstaat valt
niet onder onze garantie.
No utilizar productos de limpieza
que contengan ácidos, abrasivos o
limpiadores basados en vinagre.
Los daños causados por un tratamiento inadecuado quedan excluidos de nuestra garantía.
47
Español
Español
Italiano
Italiano
Nederlands
Istruzione per la manutenzione
Nota para el mantenimiento
Reinigingsinstructies
Scaricare