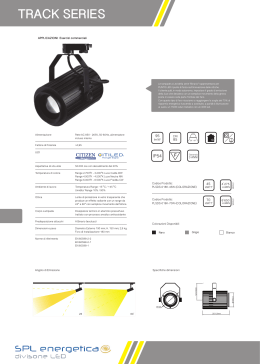
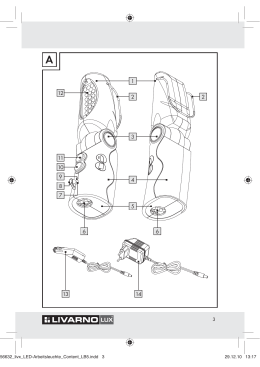
Lamptype :
Mini thub Metal LED<900lm
LED
MAP
2
DIMMABLE
110240XX-110241XX-110242XX-110243XX-110244XX-110245XX-110246XX-110247XX
NON DIMMABLE
Input voltage: 110V-240V 50-60Hz
When using more Drivers
on one Dimmer (Potmeter only)
Installatie
Dim
1 Monteer de Ledmodule in het toestel via de spiraalveer.
2 De netspanning aansluiten aan de primaire van de ballast.
3) Plooi de veren van het toestel naar boven toe, totdat ze tegen het lichaam steunen.
4) Breng het toestel in het inbouwgat. Laat de veren langzaam los, zodra ze door de opening zijn.
-
Installation
+
Dim
n
Dim
1) Mount the LED module into the Lotis appliance via the spiral spring on the lamp ring.
2) Ensure that the power cable is not connected to the power supply and then connect the power cable to your desired LED gear.
3) Bend the appliance's springs upwards to that they rest against the body.
4) Insert the unit into the recess that has been made for it. Slowly release the springs as soon as they are trough the opening.
Input voltage : 120-240V 50-60hZ
100K Log.
n
Example 4 drivers;
pot should be
100k/4=25k 22k
Dim
n Max 50 units
Installation
1-10V
dimming
1) Montez le module LED dans l'appareil du Lotis au moyen de la languette sur l'anneau de la lampe.
2) Raccordez le câble d'alimentation hors tension au ledgear de votre choix.
3) Pliez les languettes de l'appareil vers le haut de manière à ce qu'elles soient contre le corps.
4) Introduisez l'appareil dans le trou d'encastrement. Relâchez lentement les ressorts,dès que vous les avez introduits à travers l'ouverture.
Push
dimming
Montage
1) Montieren Sie das LED-Modul mit der Spiralfeder am Lampenring in die Leuchte des Lotis.
2) Schließen Sie das Stromkabel, an dem keine Spannung anliegen darf, an das gewünschte LED-Betriebsgerät an.
3) Biegen Sie die Federn der Leuchte nach oben, bis diese gegen das Gehäuse drücken.
4) Bringen Sie die Leuchte in die Einbauöffnung. Lösen Sie die Federn langsam, sobald sie durch die Öffnung gebracht wurden.
1-10V
PUSH
Instalación
1) Instale el módulo LED en el alojamiento del Lotis con ayuda del muelle espiral del anillo de montaje.
2) Conecte el cable de alimentación sin tensión al equipo LED deseado.
3) Pliegue los muelles del aparato hacia arriba hasta que hagan tope con la carcasa.
4) Coloque el aparato en el hueco. Suelte poco a poco los resortes a medida que vayan pasando por la abertura.
Dimming wires only
for dimmable versions.
+ rood / red / rouge / rot / rojo /
Installazione
rosso / красный
1) Montare il modulo del Led nell'apparecchio del Lotis tramite la molla a spirale sull'anello della lampada.
2) Collegare il cavo di alimentazione privo di tensione all'apparecchio led desiderato.
3) Piegare le molle dell'apparecchio verso l'alto finché non si appoggiano sul corpo.
4) Posizionare l'apparecchio nel foro da incastro. Rilasciare le molle lentamente appena hanno atrraversato il foro.
- zwart / black / noir / schwarz /
1
Установка
1) Установите светодиодный модуль в устройство Lotis через спиральную пружину на ламповом кольце.
2) Подсоедините отключенный от сети кабель питания к соответствующему светодиодному оборудованию.
3) Отогните пружины устройства кверху так, чтобы они прилегали к корпусу устройства.
4) Вставьте блок в специально вырезанное отверстие. Медленно отпускайте фиксаторы, пока они не встанут по месту в отверстии.
negro / nero / черный
1
1
3
Ø 114
3
Can be used with
230V / 50-60Hz
0.1 m
NO
UV / IR
11024109
11024309
11024509
11024709
185mm
1-10V
Do not
touch LED
110mm
11024009
11024209
11024409
11024609
4
V2/05-01-2011
Scaricare