Documentazione
Tecnica
S24
A 180
rev. 1.0
© CAME 07/99
119DS24
Automazione esterna per cancelli a battente
External automatic opening system for wing gates with
Automatisme extérieur pour portails à battant
Externe Automatik für Flügeltore
Automatización exterior para puertas batientes
7
1
1
7
5
6
3
4
2
2x1
TX
T RG58
2x1,5
4x1,5
RX
4x1
8
3x1
3x1,5
4x1,5
230V
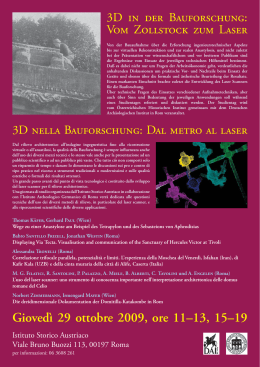
Impianto tipo
1 - Gruppo motore
2 - Quadro comando
3 - Ricevitore radio
4 - Selettore a chiave
5 - Antenna
6 - Lampeggiatore di
movimento
7 - Fotocellule di
sicurezza
8 - Trasmettitore radio
Standard
installation
1 - Motor unit
2 - Control panel
3 - Radio receiver
4 - Key-operated selector
switch
5 - Antenna
6 - Flashing light
indicating door
movement
7 - Safety photocells
8 - Radio transmitter
Installation type
1 - Groupe moteur
2 - Armoire de
commande
3 - Récepteur radio
4 - Sélecteur à clé
5 - Antenne
6 - Clignotant de
mouvement
7 - Photocellules de
sécurité
8 - Emetteur radio
Standard
montage
1 - Antriebsmotor
2 - Motorsteuerung
3 - Funkempfänger
4 - Schlüsselschalter
5 - Antenne
6 - Blinkleuchte “Tor in
Bewegung”
7 - Lichtschranken
8 - Handsender
Instalación tipo
1 - Conjunto motor
2 - Cuadro de mando
3 - Radiorreceptor
4 - Selector a llave
5 - Antena
6 - Lámpara
intermitente de
movimiento
7 - Fotocélulas de
seguridad
8 - Transmisor
Caratteristiche tecniche - Tecnichal caracteristics - Caractéristiques techniques - Technische Daten - Características técnicas
Tab. 1
MOTORIDUTTORE
PE SO
ALIMENTAZIONE
C O R R E NT E
NOMINALE
P O T E NZ A
INTERMITTENZA
LAVORO
R A P P O R T O DI
R I DU Z I O NE
G R A DO DI
P R O T E Z I O NE
SPINTA
TEMPO
C OR S A
CONDENSATORE
GEARMOTOR
WEIGHT
POWER SUPPLY
NOMINAL
C U R R E NT
POWER
DU T Y C I C L E
R E DU C T I O N
RATIO
P R OT E C T I ON
RATING
P US H
TRAVEL
TIME
CAPACITOR
P U I S S A NC E
INTERMITTENCE
DE TRAVAIL
R A P P O R T DE
R E DU C T I O N
DE G R É DE
P R OT E C T I ON
P OUS S É E
TEMPS
C OUR S E
CONDENSATEUR
R E GE L B AR E R
L AUF Z E I T
KONDENSATOR
MOTORÉDUCTEUR
P O I DS
ALIMENTATION
C O U R A NT
NOMINAL
GETRIEBEMOTOR
GEWICHT
STROM_
VERSORGUNG
NE NNS T R O M
L E I S T U NG
EINSCHALTDAUER
MOTORREDUCTOR
PE SO
ALIMENTACION
C O R R I E NT E
NOMINAL
P O T E NC I A
INTERMITENCIA
TRABAJO
R E L A C I O N DE
R E DU C C I O N
G R A DO DE
P R OT E C C I ÓN
EMPUJE
TIEMPO DE
R E C O R R I DO
C O NDE NS A DO R
A180
23 Kg
230 V a. c .
1. 2 A
140 W
30 %
1/ 36
I P 54
* 4 0 0 ÷2 0 0 0 N
19 s
9 µF
U NT E R S E T Z U NG S _
S C HUT Z GR AD
VERHÄLTNIS
Dati relativi ai valori di alimentazione nominale e a condizioni di apertura standard. * Regolabile mediante quadri comando CAME.
Data refers to nominal power supply and standard conditions of aperture. * Can be adjusted using CAME control panels.
Données relatives aux valeurs d'alimentation nominale et à des conditions d'ouverture standard. * Réglable au moyen des armoires de commande CAME.
Daten der Stromversosgungsnennwerte und standardöffnungsbedingungen. * Uber CAME-Steuergeräte regelbar.
Datos relativos a los valores de la tension nominal y a las condiciones de apertura estándar. * Ajustable mediante los cuadros de mando CAME.
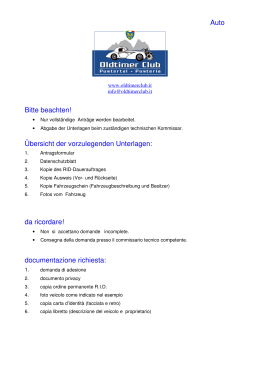
Misure d'ingombro e limiti d'impiego - Overall dimensions and use limits - Measures d'encombrent et limites d'emploi
Abmessungenunt und Einsatzbereich - Dimensiones máximas y limites de empleo
815
100
Tab. 2
300
Corsa
Travel
Course
Lauf
Recorrido
85
L ar ghez z a ant a
Door width
L ar geur de l a por t e
Breite des Torflügels
Anc hor hoj a
Peso anta max
Maxi door weight
Poids max de la porte
Höchstgewicht des Torflügels
Peso máx hoja
1, 80 m
400 Kg
680
Pilastro-Pillar-Pilier-Pfeiler-Pilar
A
Cerniera-Hinge-CharnièreScharnier- Bisagra
Anta chiusa-Leaf closed-Vantail ferméeTor geschlossen-Hoja cerrada
B
C
Tab. 3
680 mm
2
Ape r t ur a
Opening
Ouverture
Öffnung
Abe r t ur a
A
mm
B
mm
C max
mm
90°
130
130
60
120°
130
110
50
Controlli generali - General control procedure - Contrôles généraux - Allgemeine Prüfungen - Controles generales
Pilastro
Pillar
Pilier
Pfeiler
Pilar
Anta
Leaf
Vantail
Tor
Hoja
Battuta d'arresto
Gate stopper
Arrét
Toranschlag
Tope
C
Cerniera
Hinge
Charnière
Scharnier
Bisagra
Prima di procedere all’installazione dell’automatismo, controllare:
- che la struttura del cancello sia adeguatamente robusta, le cerniere siano efficienti e che non vi sia attrito tra parti fisse
e mobili;
- che la misura C non sia superiore al valore indicato nella "Tav. 2", pag. 2. In tal caso è necessario intervenire sul pilastro
in modo da raggiungere tale misura;
- il percorso dei cavi elettrici secondo le disposizioni di comando e sicurezza;
- che ci sia una battuta d'arresto meccanico in chiusura (ben fissata al suolo) per evitare l'oltrecorsa anta/motoriduttore
Before beginning installation of the automation system, check the following:
- the structure of the gate must be sufficiently strong; the hinges must function efficiently and there must be no friction
between the moving parts and fixed parts;
- measurement C must not be greater than the value shown in "Tav. 2", pag. 2. If this is the case, it is necessary to modify
the pillar so that this measurement corresponds;
- the electrical wiring path according to the position of the control and safety instruments;
- presence of a mechanical gate stop (securely anchored to the ground) in the closed position in order to prevent the gate
and the reduction gear from moving beyond the correct close position.
Avant d’installer l’automatisme, vérifier:
- que la structure du portail soit robuste et que les charnières soient efficaces. Vérifier également qu'il n'y ait pas de
frottement entre les parties fixes et celles mobiles;
- que la côte C ne soit pas supérieure à la valeur indiquée dans le "Tav. 2", pag.2. Dans ce cas, il est nécessaire d'intervenir
sur le pilier de façon à obtenir cette côte;
- le parcours des câbles électriques selon les dispositions de commande et de sécurité;
- l'existence d'un dispositif d'arrêt mécanique en fermeture (bien fixé au sol) pour éviter la course excessive vantail/
motoréducteur.
Vor Installation der Automatik kontrollieren:
- die Struktur des Tors entsprechend robust und die Scharniere effizient sind und ob zwischen fixen und mobilen Teilen
Reibung auftritt;
- das Maß C größer als der in "Tav. 2", pag. 2, angegebene Wert ist. In diesem Fall muß au den Pfeiler so lange eingewirkt
werden, bis das entsprechende Maß erreicht ist;
- die elektrischen Kabel gemaß den Antriebs- und Sicherheitsvorschriften;
- das Bestehen von einem mechanischen Toranschlag bei Torschließung (muß gut am Boden verankert sein) um den
Überlauf Torflügel/Getriebemotor zu verhindern
Antes de proceder a la instalación del automatismo, controlar:
- la estructura de la puerta sea lo suficientemente sólida, las bisagras sean eficientes y que no haya rozamiento entre las
piezas fijas y aquéllas móviles;
- la medida C no sea superior al dato indicado en la "Tav.2", pág. 2. En tal caso, es necesario actuar sobre el pilar hasta
alcanzar dicha medida;
- el recorrido de los cables eléctricos según las disposiciones de mando y seguridad;
- la existencia de un tope para el cierre (bien fijado en el suelo) para evitar que la hoja/motorreductor llegue más allá de
lo requerido.
3
Montaggio - Assembly - Montage - Montagen - Montaje
1
Piastra di fissaggio
Fixing plate
Plaque de fixation
Klemmplatte
Placa de fijación
Staffa di coda
Rear braket
Étrier arriére
Hinteren Bügel
Soporte trasero
Applicare al pilastro la piastra di fissaggio con la staffa di coda (fig. 1) rispettando le quote A e B ("Tab. 2", pag. 2) tra l'asse
della cerniera e il foro centrale della staffa. La staffa di coda è dotata di ulteriori forature per variare l'angolo di apertura del
cancello.
N.B.:
aumentando la misura B diminuisce l'angolo di apertura con conseguente diminuzione della velocità periferica e aumento
de3lla spinta motore sull'anta. Aumentando la misura A aumenta l'angolo di apertura con conseguente aumento della velocità
periferica e diminuzione della spinta motore sull'anta.
Attach the fixing plate and the rear bracket (fig. 1) to the pilar observing measurement A and B shown in "Tab. 2", pag.2,
between the hinge pin and the central hole in the bracket. The rear bracket is equipped with additional holes to change the
opening angle of the gate.
N.B.:
if measurement B is increased, the opening angle is reduced. This therefore reduces the peripheral speed and increases
the thrust exerted by the motor on the gate. If measurement A is increased, the angle of aperture is increased. This
therefore increases the peripheral speed and reduces the thrust exerted by the motor on the gate.
Fixer la plaque de fixation avec l'étrier arrière sur le pilier (fig. 1) en respectant les cotes A et B ("Tab. 2", pag. 2) entre
l'axe de la charnière et le trou central de l'étrier. L'étriere arrière comprend d'autres perforations pour modi-fier l'angle
d'ouverture du portail.
N.B.:
si on augmente la cote B, l'angle de ouverture diminue avec, par consequent, une diminution de la vitesse périphérique
et une augmentation de la poussée du moteur sur le vantail. Si on augment la cote A, l'angle d'ouverture augmente avec,
par conséquent, une augmen-tation de la vitesse périphérique et une diminution de la poussée du moteur sur le vantail.
Den hinteren Bügel mit der entsprechenden Klemmplatte (Abb. 1) unter Einhaltug der Maße A und B ("Tab. 2", Seite 2),
und zwar dem Achsenabstand zwischen zentraler Bügel-bohrung und Toran-gelzapfen, am Torpfeiler befestigen. Der
hinteren Bügel ist mit einer Reihe von Bohrungen versehen, um eine Änderung des Toröffnungs-winkels zu erlauben.
Wichtig!
Beachten Sie bitte, daß bei Erhöhen des Maßen B der Toröffnungswinkel und demzufolge auch die periphärische
Torlaufgeschwindigkeit vergrößert und der auf den Torflügel ausgeübte Motorschub reduziert.
Aplicar al pilar la placa de fijación mediante el soporte trasero (fig. 1) respetando las cotas A y B ("Tab. 2", pág. 2) entre
la bisagra y el agujero central de soporte. El soporte trasero está dotado de otros agujeros para variar el ángulo de
apertura de la puerta.
N.B.:
aumentando la medida B, se reduce el ángulo de apertura y por consiguiente la velocidad periférica mientras aumenta
el empuje del motor sobre la hoja. Aumentando la medida A, aumenta también el ángulo de apertura y por consiguiente
la velocidad periférica mientras se reduce el empuje del motor sobre la hoja.
4
2
A cancello chiuso, applicare sull'anta la piastra di fissaggio con la staffa di testa in asse orizzontale con quella di
coda rispettando la misura di 680 mm.
With the gate closed, attach the fixing plate with the front bracket to the gate wing. The anchor plate must be
horizontally aligned with the rearbracket and measurement of 680 mm must be observed.
Lorsque le portail est fermé, fixer la plaque de fixation avec l'étrier avant sur le vantail, de façon à obtenir un axe
horizontal avec l'étrier arrière, en respectant la côte de 680 mm.
Bei geschlossenem Tor den vorderen Bügel mit der entsprechenden Klemmplatte am Torflügel in horizontaler Achse
mit dem Vorderbügel und unter Einhaltung des Maßes 680 mm befestigen.
Con la puerta cerrada, incorporar a la hoja la placa de fijación mediante el soporte delantero, en línea horizontal con el
soporte trasero, respetando la medida de 680 mm.
Sportellino
Access door
Porte
Abdeckplatte
Portillo
Vite "B"
"B" screw
Vis "B"
Schraube "B"
Tornillo "B"
Coperchio
Cover
Couvercle
Haube
Tapa
Vite "A"
"A" screw
Vis "A"
Schraube "A"
Tornillo "A"
Stelo
Rod
Tige
Stange
Vástago
3
Carter
Casing
Carter
Shutzhaube
Cárter
Sollevare lo sportellino, svitare le viti "A", estrarre il coperchio, svitare la vite "B" ed estrarre lo stelo ed il carter
Raise the access door, unscrews the screws "A", remove the cover, unscrew the screw "B" and remove the rod and rod
the casing
Soulever la porte, désvisser les vis "A", enlever le couvercle, dévisser la vis "B" et enlever la tige et le carter
Den Abdeckplatte hochheben, die schrauben "A" lösen, die Haube herausziehn, die Schraube "B" lösen die stange und
die Schutzhaube herausziehen
Levantar el portillo, aflojar los tornillos "A", extraer la tapa, aflojar el tornillo "B", extraer el vástago y el cárter
5
4
Vite M8 x 35
Screw M8 x 35
Vis M8 x 35
Schraube M8 x 35
Tornillo M8 x 35
Staffa di coda
Rear braket
Étrier arrière
Hinteren Bügel
Soporte trasero
Snodo di coda
Rear joint
Articulation arriére
Endgelenk
Articulación trasera
Dado
Nut
Écrou
Mutter
Dado
Boccola
Bushing
Douille
Buchse
Casquillo
Rosetta ø 8 x 24
ø 8 x 24 Washer
Rondelle ø 8 x 24
Unterlegscheibe ø 8 x 24
Arandela ø 8 x 24
Vite M8 x
Screw M8 x
Vis M8 x
Schraube M8 x
Tornillo M8 x
Staffa di testa
Front braket
Étrier avant
Vorderbügel
Soporte delantero
35
35
35
35
35
Procedere al montaggio del motoriduttore alle due staffe.
N.B: è consigliabile lubrificare (con grasso neutro) la vite senza fine e la boccola al momento dell'installazione.
Install the gear motor on the two brackets.
N.B: use neutral grease to lubricate the worm-gear and the washer at the moment of installation.
Réaliser le montage du motoréducteur sur les deux étriers.
N.B: il est recommandé de lubrifier la vis sans fin et la rondelle au moment de l'installation (avec de la graisse neutre).
Getriebemotor auf beide Bügel montieren.
N.B: Es empfiehlt sich, das Schnecke und der Unterlegscheibe bei der Montage mit neutralem Schmierfett zu schmieren.
Montar el motorreductor en los dos soportes.
Nota: es aconsejable lubricar (con grasa neutra) el tornillo sin fin y la arandela en el momento de la instalación.
5
Pressacavo
Cable gland
Serre-câble
Kabeldurchgang
Abrazadera de cables
Applicare il pressacavo nel carter
Fit the cable gland into the casing
Appliquer le serre-câble dand le cárter
Der Kabeldurchgang auf Schutzhaube befestigen
Aplicar la abrazadera de cables en el cárter
6
Carter
Casing
Carter
Shutzhaube
Cárter
MANUTENZIONE PERIODICA / PERIODIC MAINTENANCE / ENTRETIEN PERIODIQUE
REGELMÄßIGE WARTUNG / MANTENIMIENTO PERIÓDICO
- Lubrificare la vite senza fine e i perni di rotazione;
- Controllare le viti di fissaggio;
- Verificare l'integrita' dei cavi di collegamento.
- Lubricate the worm screw and the rotating pins;
- Ceck the clamps screws;
- Ceck the connection cable's soundness.
- Graisser la vis sans fin et les axes de rotation;
- Contrôler les vis de fixation;
- Contrôler l'intégrité des câbles de branchement.
- Schmieren Sie die Schnecke und die Drehbolzen ab.
- Kontrollieren Sie die Befestigungsschrauben.
- Kontrollieren Sie, ob die Anschlußkabel unversehrt sind.
- Lubrique el tornillo sin fin y los pernos de rotación;
- Controle los tornillos de sujeción;
- Controle el estado de los cables de conexión.
7
NOTE / NOTES / NOTE/ HINWEIS / NOTA
CAME S.P.A.
ITALIA
VIA MARTIRI DELLA LIBERTÀ, 15
31030 DOSSON DI CASIER
TREVISO
CAME SUD S.R.L.
7 RUE DES HARAS
92737 NANTERRE CEDEX
ESPAÑA
internet
www.came.it
e-mail
28045 MADRID
ITALIA
VIA FERRANTE IMPARATO, 198
CM2 LOTTO A/7
80146 NAPOLI
CAME FRANCE S.A.
CAME AUTOMATISMOS S.A.
C/JUAN DE MARIANA, 17
CAME GMBH
DEUTSCHLAND
BERGSTRASSE, 17/1
70825 KORNTAL
STUTTGART
FRANCE
CAME GMBH
AKAZIENSTRASSE, 9
16356 SEEFELD
ASSISTENZA TECNICA
DEUTSCHLAND
NUMERO VERDE
800-295830
N° 12 100 8953
Scaricare