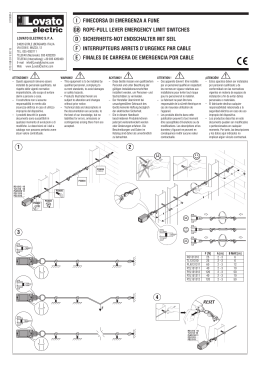
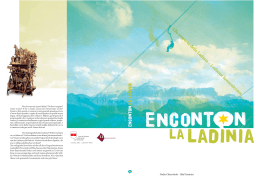
Istruzioni per luso FRIGORIFERO 2 porte Sommario I GB F Installazione, 2 Posizionamento e collegamento Reversibilità apertura porte Italiano, 1 D Deutsch, 37 English,13 NL Nerderlands, 49 Français, 25 Descrizione dellapparecchio, 3-4 Pannello di controllo Vista dinsieme Accessori, 5 Vano frigorifero Vano congelatore Avvio e utilizzo, 6-7 Avviare lapparecchio Come muoversi nel display MTP 1911 F/HA Sistema di raffreddamento Utilizzare al meglio il frigorifero Utilizzare al meglio il congelatore Manutenzione e cura, 8 Escludere la corrente elettrica Pulire lapparecchio Evitare muffe e cattivi odori Sostituire la lampadina Precauzioni e consigli, 9 Sicurezza generale Smaltimento Risparmiare e rispettare lambiente Anomalie e rimedi, 10 Assistenza, 11 Assistenza attiva 7 giorni su 7 I Installazione I ! È importante conservare questo libretto per poterlo consultare in ogni momento. In caso di vendita, di cessione o di trasloco, assicurarsi che resti insieme allapparecchio per informare il nuovo proprietario sul funzionamento e sui relativi avvertimenti. Collegamento elettrico Dopo il trasporto, posizionare lapparecchio verticalmente e attendere almeno 3 ore prima di collegarlo allimpianto elettrico. Prima di inserire la spina nella presa della corrente, accertarsi che: ! Leggere attentamente le istruzioni: ci sono importanti informazioni sullinstallazione, sulluso e sulla sicurezza. la presa abbia la messa a terra e sia a norma di legge; la presa sia in grado di sopportare il carico massimo di potenza della macchina, indicato nella targhetta caratteristiche posta nel vano frigorifero in basso a sinistra (es 150 W); la tensione di alimentazione sia compresa nei valori indicati nella targhetta caratteristiche, posta in basso a sinistra (es 220-240 V); la presa sia compatibile con la spina dellapparecchio. In caso contrario richiedere la sostituzione della spina a un tecnico autorizzato (vedi Assistenza); non usare prolunghe e multiple. Posizionamento e collegamento Posizionamento 1. Posizionare lapparecchio in un ambiente ben aerato e non umido. 2. Non ostruire le griglie posteriori di ventilazione: compressore e condensatore emettono calore e richiedono una buona aerazione per funzionare bene e contenere i consumi elettrici. 3. Lasciare una distanza di almeno 10 cm tra la parte superiore dellapparecchio ed eventuali mobili sovrastanti e di almeno 5 cm tra le fiancate e mobili/ pareti laterali. 4. Lasciare lapparecchio lontano da fonti di calore (la luce solare diretta, una cucina elettrica). 5. Per mantenere una ottimale distanza del prodotto dalla parete posteriore, montare i distanzieri presenti nel kit di installazione seguendo le istruzioni presenti sul foglio dedicato. Livellamento 1. Installare lapparecchio su un pavimento piano e rigido. 2. Se il pavimento non fosse perfettamente orizzontale, compensare svitando o avvitando i piedini anteriori. 2 ! Ad apparecchio installato, il cavo elettrico e la presa della corrente devono essere facilmente raggiungibili. ! Il cavo non deve subire piegature o compressioni. ! Il cavo deve essere controllato periodicamente e sostituito solo da tecnici autorizzati (vedi Assistenza). ! Lazienda declina ogni responsabilità qualora queste norme non vengano rispettate. Reversibilità apertura porte Nel caso sia necessario cambiare il verso di apertura delle porte, rivolgersi al servizio di Assistenza Tecnica. Descrizione dellapparecchio Pannello di controllo I Regolazione temperatura CONGELATORE ALLARMI SUPER FREEZE ICE PARTY Barra Grafica CONGELATORE Barra Grafica FRIGORIFERO SUPER COOL CHILD LOCK Regolazione temperatura FRIGORIFERO I CARE ON/OFF ON/OFF Premendo questo tasto è possibile accendere lintero prodotto (sia vano frigo che vano freezer). Il LED rosso indica che il prodotto è spento, il LED verde che è in funzione. Per spegnere il prodotto occorre premere per almeno 2 secondi il tasto ON/OFF. I CARE Gestisce lattivazione e la disattivazione della funzione I Care (la temperatura ottimale a bassi consumi). Allattivazione di questa funzione, si accendono contemporaneamente il LED AUTO ed il LED I Care. ALLARMI Consente la segnalazione e la gestione di tutti gli allarmi connessi al funzionamento del prodotto. Child Lock Consente di attivare o disattivare il blocco dei tasti del pannello di controllo onde evitare involontarie attivazioni da parte dei bambini. Regolazione Temperatura FRIGORIFERO e Consentono la modifica dellimpostazione della temperatura del frigorifero, con relativa conferma sulla barra grafica della temperatura selezionata. Attraverso questi tasti è anche possibile disattivare il solo vano frigorifero. Regolazione Temperatura CONGELATORE HOLIDAY Barra grafica FRIGORIFERO Indica la temperatura impostata nel vano frigo o la sua disattivazione (in questo caso la barra grafica è spenta). Barra grafica CONGELATORE Indica la temperatura impostata nel vano freezer. SUPER COOL Consente di attivare o disattivare la funzione SUPER COOL (raffreddamento rapido). Si accende il led SUPER COOL. SUPER FREEZE Consente di attivare o disattivare la funzione SUPER FREEZE (congelamento rapido). Si accende il led SUPER FREEZE. HOLIDAY Consente di attivare o disattivare la funzione HOLIDAY (si accende il LED AUTO e il led HOLIDAY). ICE PARTY Consente di attivare o disattivare la funzione ICE PARTY (riduce la temperatura del congelatore per il tempo necessario a raffreddare una bottiglia). Si accende il led ICE PARTY. e Consentono la modifica dellimpostazione della temperatura del congelatore, con relativa conferma sulla barra grafica della temperatura impostata. 3 Descrizione dellapparecchio I Vista dinsieme Ice Device Vano FAST FREEZE Scomparto CONSERVAZIONE Scomparto FRESH BOX* Scatola MULTIUSO* Balconcino estraibile PORTAOGGETTI Balconcino estraibile con COPERCHIO Scatola BURRO * Balconcino LATTINE Balconcino estraibile PORTAOGGETTI RIPIANO Regolatore di UMIDITÀ Cassetto FRUTTA e VERDURA PIEDINO Variabili per numero e/o per posizione. * Presente solo in alcuni modelli. 4 Balconcino BOTTIGLIE Accessori Vano frigorifero 1 2 Vano congelatore RIPIANI: sono estraibili e regolabili in altezza grazie alle apposite guide (vedi figura), per linserimento di contenitori o alimenti di notevole dimensione. Per regolare laltezza non è necessario estrarre completamente il ripiano. FRESH BOX: per carne e pesce freschi. Lo scomparto consente lunghi tempi di conservazione, fino anche a una settimana, grazie alla bassa temperatura la più fredda del frigorifero e allo sportello trasparente che protegge da fenomeni di ossidazione e annerimento. Può essere utilizzato anche per piatti freddi. Scatola MULTI-USO: per conservare a lungo vari alimenti (per esempio salumi); evita anche che si rilascino odori nel frigorifero. Va estratta per luso e può essere spostata in senso laterale per ottimizzare lo spazio (vedi figura). I ICE PARTY: per portare a giusta temperatura una bottiglia di spumante o champagne. Inserire la bottiglia nel secchiello già congelato allinterno del vano CONGELAMENTO e CONSERVAZIONE e selezionare la funzione. Estrarre la bottiglia quando segnalato. Il secchiello può essere utilizzato per servire la bottiglia mantenendola fresca. ICE DEVICE Prelevare e riempire dacqua le speciali vaschette e riposizionarle nella zona Icedevice. Dopo circa 2 ore i cubetti di ghiaccio saranno pronti. Per prelevare il ghiaccio basta ruotare verso destra le due manopole: i cubetti di ghiaccio cadranno nel contenitore sottostante, pronti per essere serviti (vedi figura). Balconcino PORTALATTINE: per riporre orizzontalmente più lattine (vedi figura). Vi si possono riporre anche yogurt, burro o contenitori in genere. Cassetto FRUTTA e VERDURA I cassetti frutta e verdura di cui è dotato il frigorifero sono appositamente progettati allo scopo di mantenere fresche e fragranti la frutta e le verdure. Aprire il regolatore dumidità (posizione B) se si desidera conservare gli alimenti in un ambiente meno umido, oppure chiuderlo (posizione A) per una conservazione in ambiente più umido. La facile apertura dei coperchi, basta tirare il cassetto verso lesterno, facilita lintroduzione e il prelievo dei cibi. 5 Avvio e utilizzo I Avviare lapparecchio ! Dopo il trasporto, posizionare lapparecchio verticalmente ed attendere circa 3 ore prima di collegarlo alla presa di corrente per favorire un buon funzionamento. Prima di mettere gli alimenti nel frigorifero pulite bene linterno con acqua tiepida e bicarbonato. Tempo protezione motore. Lapparecchio è provvisto di un controllo salvamotore che fa avviare il compressore solo dopo circa 8 minuti dallaccensione. Questo accade anche dopo ogni interruzione dellalimentazione elettrica, volontaria o involontaria (black out). Scomparto congelatore Allaccensione del prodotto il comparto congelatore si porta nellimpostazione standard di 18°C. Si consiglia di inserire la funzione SUPER FREEZE (Sulla barra grafica del CONGELATORE continua ad essere visualizzata la temperatura impostata precedentemente) per accelerare il raffreddamento del vano; quando questultimo avrà raggiunto la sua temperatura ottimale, la funzione si disattiverà e potrete introdurre nel congelatore i surgelati. Scomparto frigorifero Allaccensione del prodotto il comparto frigorifero si porta nellimpostazione standard di +5°C. Si consiglia di inserire la funzione SUPER COOL (Sulla barra grafica del FRIGORIFERO continua ad essere visualizzata la temperatura impostata precedentemente) per accelerare il raffreddamento del vano: dopo qualche ora potrete mettere i cibi nel frigorifero. Come muoversi nel display Impostazione delle temperature: Se il prodotto è acceso, le barre grafiche del vano frigorifero e congelatore visualizzeranno le temperature impostate in quel momento. Per modificarle è sufficiente e relativi al vano in cui si vuol premere i tasti cambiare la temperatura. In particolare ogni pressione dei tasti incrementa o diminuisce la temperatura di 1° ed in maniera equivalente anche il livello di freddo relativo. Le temperature del vano frigo selezionabili sono +12°, +7°, +6°, +5°, +4°, +3°, +2°, quelle del freezer sono 18°, 19°,-20°, -21°, -22°, -24°, -26°. Le temperature automaticamente impostate sono +5°C per il comparto frigorifero e 18°C per il comparto congelatore e sono quelle standard di conservazione. Quando è attiva la funzione I Care il prodotto regola automaticamente le temperature in base alle condizioni interne ed esterne al frigo, ciò viene segnalato dallaccensione della scritta AUTO. 6 Qualora fosse necessario attivare la funzione I Care con temperature differenti da quelle standard di conservazione, è necessario, allattivazione della funzione, tenere premuto il tasto I Care e impostare mediante i tasti e le nuove temperature. In queste condizioni le temperature impostabili sono 4°, 5° e 6° per il vano frigo e 18°, -19° e 20° per il vano freezer. Quando è attiva la funzione HOLIDAY non sono possibili regolazioni di temperatura, ma il prodotto si posiziona automaticamente alla regolazione ottimale per la situazione: +12°C per il comparto frigorifero e -18°C per il comparto congelatore, tale condizione è inoltre segnalata dallaccensione della scritta AUTO. Per attivare e disattivare le funzioni è sufficiente premere il relativo tasto e laccensione o lo spegnimento del relativo LED, segnalerà lo stato della funzione. Alcune funzioni (SUPER COOL, SUPER FREEZE, ICE PARTY, I CARE) sono incompatibili con altre (HOLIDAY,..), in questo caso si tiene conto di una priorità già stabilita in modo da aiutarvi nella gestione del prodotto. Al termine della funzione Ice Party occorre premere il tasto ICE PARTY per interrompere il lampeggio del led relativo e il segnale sonoro. Il lampeggio e il segnale sonoro indica il termine della funzione e la necessità di rimuovere la bottiglia dal vano freezer. Child Lock Per poter attivare la funzione Child Lock, è necessario tenere premuto il tasto Child Lock per 2 secondi, lattivazione del blocco dei tasti viene confermata da un suono breve e dallaccensione del led relativo. Per disattivare la funzione premere il tasto Child Lock per 2 secondi, la disattivazione viene confermata da un suono breve e dallo spegnimento del led relativo. ! La barra grafica del CONGELATORE serve anche per segnalare un anomalo aumento di temperatura nel vano congelatore (vedi anomalie e rimedi). Sistema di raffreddamento Utilizzare al meglio il congelatore No Frost Il No Frost gestisce un flusso continuo di aria fredda che raccoglie lumidità e impedisce la formazione di ghiaccio e brina: nel vano frigorifero mantiene il giusto livello di umidità e, grazie allassenza di brina, preserva le qualità originarie degli alimenti; nel vano congelatore evita la formazione di ghiaccio rendendo superflue le operazioni di sbrinamento ed evitando che gli alimenti si attacchino tra loro. Regolare la temperatura tramite il pannello di controllo. ! Non mettere alimenti o contenitori a diretto contatto con la parete refrigerante posteriore, per non ostruire i fori di aerazione e facilitare la formazione di condensa. ! Chiudere le bottiglie e avvolgere gli alimenti. Utilizzare al meglio il frigorifero Regolare la temperatura tramite il display. Premere il tasto SUPER COOL (raffreddamento rapido) per abbassare la temperatura in poco tempo, per esempio quando il vano viene riempito dopo una grossa spesa. La funzione si disattiva automaticamente trascorso il tempo necessario. Inserire soltanto alimenti freddi o appena tiepidi, non caldi (vedi Precauzioni e consigli). Ricordarsi che gli alimenti cotti non si mantengono più a lungo di quelli crudi. Non inserire liquidi in recipienti scoperti: provocherebbero un aumento di umidità con conseguente formazione di condensa. I Per congelare (se il congelatore è già in funzione): - per piccole quantità, inferiori alla metà di quella indicata sulla targhetta caratteristiche, premere il tasto SUPER FREEZE (congelamento rapido) (accensione della relativa spia), introdurre gli alimenti e chiudere la porta. La funzione si disattiva automaticamente trascorse 24 ore o raggiunte le temperature ottimali (spia spenta); - per grosse quantità, superiori alla metà del carico massimo indicato sulla targhetta caratteristiche, tenere premuto il tasto SUPER FREEZE (congelamento rapido) finché la relativa spia non inizia a lampeggiare. Dopo 24 ore la spia smette di lampeggiare e diventa fissa: introdurre gli alimenti e chiudere la porta. Dopo altre 24 ore la funzione si disattiva automaticamente (spia spenta). Non ricongelare alimenti che stanno per scongelare o scongelati; tali alimenti devono essere consumati entro 24 ore o ricongelati previa cottura. Gli alimenti freschi da congelare non devono essere posti a contatto con quelli già congelati. Non mettere nel congelatore bottiglie di vetro contenenti liquidi, tappate o chiuse ermeticamente, perché potrebbero rompersi. La quantità massima giornaliera di alimenti da congelare è indicata sulla targhetta caratteristiche, posta nel vano frigorifero in basso a sinistra (esempio: Kg/24h 4). ! Durante il congelamento evitare di aprire la porta. ! In caso di interruzione di corrente o di guasto, non aprire la porta del congelatore: in questo modo congelati e surgelati si conserveranno senza alterazioni per circa 9-14 ore. ! Per evitare di ostacolare la circolazione dellaria allinterno del congelatore, si raccomanda di non ostruire con cibi o contenitori i fori di areazione. 7 Manutenzione e cura I Escludere la corrente elettrica Durante i lavori di pulizia e manutenzione è necessario isolare lapparecchio dalla rete di alimentazione: 1. Tenere premuto il tasto ON/OFF per circa due secondi, finché il display si spegne tutto eccetto il led rosso del tast ON/OFF. 2. Staccare la spina dalla presa. ! Se non si segue questa procedura può scattare lallarme: esso non è sintomo di anomalia. Per ripristinare il normale funzionamento è sufficiente tenere premuto il tasto ON/ OFF per più di due secondi. Per isolare lapparecchio procedere seguendo i punti 1 e 2. Pulire lapparecchio Le parti esterne, le parti interne e le guarnizioni in gomma possono essere pulite con una spugnetta imbevuta di acqua tiepida e bicarbonato di sodio o sapone neutro. Non usare solventi, abrasivi, candeggina o ammoniaca. Gli accessori estraibili possono essere messi a bagno in acqua calda e sapone o detersivo per piatti. Sciacquarli e asciugarli con cura. Il retro dellapparecchio tende a coprirsi di polvere, che può essere eliminata utilizzando con delicatezza, dopo aver spento l'apparecchio e staccato la presa di corrente, la bocchetta lunga dellaspirapolvere, impostato su una potenza media. Evitare muffe e cattivi odori Lapparecchio è fabbricato con materiali igienici che non trasmettono odori. Per mantenere questa caratteristica è necessario che i cibi vengano sempre protetti e chiusi bene. Ciò eviterà anche la formazione di macchie. Nel caso si voglia spegnere lapparecchio per un lungo periodo, pulire linterno e lasciare le porte aperte. 8 Sostituire la lampadina Per sostituire la lampadina di illuminazione del vano frigorifero, staccare la spina dalla presa di corrente. Accedere alla lampada come indicato (vedi figura) e sostituirla con una analoga, di potenza non superiore a 10 W. Precauzioni e consigli ! Lapparecchio è stato progettato e costruito in conformità alle norme internazionali di sicurezza. Queste avvertenze sono fornite per ragioni di sicurezza e devono essere lette attentamente. Questa apparecchiatura è conforme alle seguenti Direttive Comunitarie: - 73/23/CEE del 19/02/73 (Bassa Tensione) e successive modificazioni; - 89/336/CEE del 03/05/89 (Compatibilità Elettromagnetica) e successive modificazioni; - 2002/96/CE.. Sicurezza generale Lapparecchio è stato concepito per un uso di tipo non professionale allinterno dellabitazione. Lapparecchio deve essere usato per conservare e congelare cibi, solo da persone adulte e secondo le istruzioni riportate in questo libretto. Lapparecchio non va installato allaperto, nemmeno se lo spazio è riparato, perché è molto pericoloso lasciarlo esposto a pioggia e temporali. Non toccare la macchina a piedi nudi o con le mani o i piedi bagnati o umidi. Non toccare le parti interne raffreddanti: cè pericolo di ustionarsi o ferirsi. Non staccare la spina dalla presa della corrente tirando il cavo, bensì afferrando la spina. È necessario staccare la spina dalla presa prima di effettuare operazioni di pulizia e manutenzione. Non è sufficiente premere per più di due secondi il tasto ON/OFF sul display per eliminare ogni contatto elettrico. In caso di guasto, in nessun caso accedere ai meccanismi interni per tentare una riparazione. Non utilizzare, allinterno degli scomparti conservatori di cibi congelati, utensili taglienti ed appuntiti o apparecchi elettrici se non sono del tipo raccomandato dal costruttore. Smaltimento I Smaltimento del materiale di imballaggio: attenersi alle norme locali, così gli imballaggi potranno essere riutilizzati. La direttiva Europea 2002/96/CE sui rifiuti di apparecchiature elettriche ed elettroniche (RAEE), prevede che gli elettrodomestici non debbano essere smaltiti nel normale flusso dei rifiuti solidi urbani. Gli apparecchi dismessi devono essere raccolti separatamente per ottimizzare il tasso di recupero e riciclaggio dei materiali che li compongono ed impedire potenziali danni per la salute e lambiente. Il simbolo del cestino barrato è riportato su tutti i prodotti per ricordare gli obblighi di raccolta separata. Per ulteriori informazioni, sulla corretta dismissione degli elettrodomestici, i detentori potranno rivolgersi al servizio pubblico preposto o ai rivenditori. Risparmiare e rispettare lambiente Installare lapparecchio in un ambiente fresco e ben aerato, proteggerlo dallesposizione diretta ai raggi solari, non disporlo vicino a fonti di calore. Per introdurre o estrarre gli alimenti, aprire le porte dellapparecchio il più brevemente possibile. Ogni apertura delle porte causa un notevole dispendio di energia. Non riempire con troppi alimenti lapparecchio: per una buona conservazione, il freddo deve poter circolare liberamente. Se si impedisce la circolazione, il compressore lavorerà continuamente. Non introdurre alimenti caldi: alzerebbero la temperatura interna costringendo il compressore a un grosso lavoro, con grande spreco di energia elettrica. Mantenere efficienti e pulite le guarnizioni, in modo che aderiscano bene alle porte e non lascino uscire il freddo (vedi Manutenzione). Non mettere in bocca cubetti appena estratti dal congelatore. Non permettere ai bambini di giocare con lapparecchio. In nessun caso devono sedersi sui cassetti o appendersi alla porta. Gli imballaggi non sono giocattoli per bambini. 9 Anomalie e rimedi I Può accadere che lapparecchio non funzioni. Prima di telefonare allAssistenza (vedi Assistenza), controllare che non si tratti di un problema facilmente risolvibile aiutandosi con il seguente elenco. Anomalie: Possibili cause / Soluzione: Il display è spento. La spina non è inserita nella presa della corrente o non abbastanza da fare contatto, oppure in casa non cè corrente. Il motore non parte. Lapparecchio è dotato di un controllo salvamotore (vedi Avvio e utilizzo). Il display è debolmente acceso. Staccare la spina e reinserirla nella presa dopo averla girata su se stessa. Suona lallarme, è acceso il led ALLARMI e la lampadina nel vano frigorifero lampeggia. La porta del frigorifero è rimasta aperta per più di due minuti. Il segnale acustico cessa alla chiusura della porta o premendo il tasto ALLARMI. Suona lallarme, è acceso il led ALLARMI e i led della barra grafica del congelatore si accendono in sequenza. Lapparecchio segnala un riscaldamento eccessivo del congelatore. Il congelatore si manterrà a una temperatura intorno a 0°C per non far ricongelare gli alimenti, permettendo di consumarli entro 24 ore o di ricongelarli previa cottura. Per spegnere il segnale acustico premere il tasto ALLARMI. Premere una seconda volta per visualizzare sulla barra grafica del congelatore il valore impostato, spegnere il led ALLARMI e ripristinare il normale funzionamento. Suona lallarme, lampeggia ol led ALLARMI e i led della barra grafica del congelatore lampeggiano continuamente. Lapparecchio segnala un riscaldamento pericoloso del congelatore: gli alimenti non devono essere consumati. Il congelatore si manterrà a una temperatura intorno a -18°C. Per spegnere il segnale acustico premere il tasto ALLARMI. Premere una seconda volta per visualizzare sulla barra grafica del congelatore il valore impostato, spegnere il led ALLARMI e ripristinare il normale funzionamento. Il frigorifero e il congelatore raffreddano poco. Nel frigorifero gli alimenti si gelano. Si è impostata una temperatura troppo fredda (vedi Avvio e utilizzo). Il motore funziona di continuo. Sono attive le funzioni SUPER COOL e/o SUPER FREEZE e/o ICE PARTY. La porta non è ben chiusa o viene aperta di continuo. La temperatura dellambiente esterno è molto alta. Lapparecchio emette molto rumore. Lapparecchio non è stato installato ben in piano (vedi Installazione). Lapparecchio è stato installato tra mobili o oggetti che vibrano ed emettono rumori. Il gas refrigerante interno produce un leggero rumore anche quando il compressore è fermo: non è un difetto, è normale. Termine anticipato delle funzioni. Disturbi elettrici sulla rete o brevi interruzioni della tensione di alimentazione I led della barra grafica del congelatore non segnalano la temperatura impostata, e sono accese in modo fisso. Contattare lassistenza tecnica. 10 Le porte non chiudono bene o le guarnizioni sono rovinate. Le porte vengono aperte molto spesso. Si è impostata una temperatura troppo calda (vedi Avvio e utilizzo). Il frigorifero o il congelatore sono stati riempiti eccessivamente. Assistenza Prima di contattare lAssistenza: Verificare se lanomalia può essere risolta autonomamente (vedi Anomalie e rimedi). In caso negativo, contattare il Numero Unico Nazionale 199.199.199. Comunicare: il tipo di anomalia il modello della macchina (Mod.) il numero di serie (S/N) Queste informazioni si trovano sulla targhetta caratteristiche posta nel vano frigorifero in basso a sinistra. I numero di serie modello Mod. RG 2330 220 - 240 V- TI 50 Hz Cod. 150 W 75 Total 340 Net Gross Gross Util Bruto Bruto Utile Brut Brut Compr. R 134 a Test Pressure HIGH-235 Syst. P.S-I. LOW 140 Kompr. kg 0,090 Made in Italy 13918 93139180000 W Fuse S/N 704211801 A Gross Bruto Brut Max 15 w Capac Class Poder de Cong Clase Freez. kg/24 h 4,0 N Classe Assistenza Attiva 7 giorni su 7 Se nasce il bisogno di assistenza o manutenzione basta chiamare il Numero Unico Nazionale 199.199.199* per essere messi subito in contatto con il Centro Assistenza Tecnica più vicino al luogo da cui si chiama. È attivo 7 giorni su 7, sabato e domenica compresi, e non lascia mai inascoltata una richiesta. * Al costo di 14,25 centesimi di Euro al minuto (iva inclusa) dal Lun. al Ven. dalle 08:00 alle 18:30, il Sab. dalle 08:00 alle 13:00 e di 5,58 centesimi di Euro al minuto (iva inclusa) dal Lun. al Ven. dalle 18:30 alle 08:00, il Sab. dalle 13:00 alle 08:00 e i giorni festivi, per chi chiama dal telefono fisso. Per chi chiama da radiomobile le tariffe sono legate al piano tariffario delloperatore telefonico utilizzato. Le suddette tariffe potrebbero essere soggette a variazione da parte delloperatore telefonico; per maggiori informazioni consultare il sito www.aristonchannel.com. 11 195063951.00 04/2007 I 12 Operating Instructions 2-DOOR FRIDGE Contents I Italiano, 1 D Deutsch, 37 GB English,13 NL Nerderlands, 49 F Français, 25 GB Installation, 14 Positioning and connection Reversible doors Description of the appliance, 15-16 Control panel Overall view Accessories, 17 Refrigerator compartment Freezer compartment Start-up and use, 18-19 MTP 1911 F/HA Starting the appliance Using the display Chiller system Using the refrigerator to its full potential Using the freezer to its full potential Maintenance and care, 20 Switching the appliance off Cleaning the appliance Avoiding mould and unpleasant odours Replacing the light bulb Precautions and tips, 21 General safety Disposal Respecting and conserving the environment Troubleshooting, 22 Assistance, 23 13 Installation GB ! Before operating your new appliance please read these instructions carefully. They contain important information for safe use, installation and care of the appliance. ! Please keep these operating instructions for future reference. Pass them on to possible new owners of the appliance. Positioning and connection Positioning 1. Place the appliance in a well-ventilated humidity-free room. 2. Do not obstruct the rear fan grills. The compressor and condenser give off heat and require good ventilation to operate correctly and save energy. 3. Leave a space of at least 10 cm between the top part of the appliance and any furniture above it, and at least 5 cm between the sides and any furniture/side walls. 4. Ensure the appliance is away from any sources of heat (direct sunlight, electric stove, etc.). 5. In order to maintain the correct distance between the appliance and the wall behind it, fit the spacers supplied in the installation kit, following the instructions provided. Levelling 1. Install the appliance on a level and sturdy floor. 2. If the floor is not perfectly horizontal, adjust the refrigerator by tightening or loosening the front feet. Electrical connections After transportation of the appliance, carefully place it in an upright position and wait at least 3 hours before connecting it to the electricity mains. Before inserting the plug into the electrical socket ensure the following: The appliance is earthed and the plug is compliant with the law. The socket can withstand the maximum power of the appliance (this is indicated on the data plate in the bottom left section of the refrigerator compartment), for example 150 W). The voltage is in the range of values indicated on the data plate located on the bottom left section (e.g. 220240V). The socket is compatible with the plug of the appliance. If the socket is incompatible with the plug, ask an authorised technician to replace it (see Assistance). Do not use extension cords or multiple sockets. ! Once the appliance has been installed, the power supply cable and the electrical socket must be easily accessible. ! The cable must not be bent or compressed. ! The cable must be checked regularly and replaced by authorised technicians only (see Assistance). ! The manufacturer declines any liability should these safety measures not be observed. Reversible doors If it is necessary to change the direction in which the doors open, please contact the Technical Assistance Centre. 14 Description of the appliance Control panel GB FREEZER Temperature Adjustment ALARMS SUPER FREEZE ICE PARTY FREEZER status bar REFRIGERATOR status bar SUPER COOL CHILD LOCK REFRIGERATOR Temperature Adjustment I CARE ON/OFF It is possible to switch the whole product (both the refrigerator and freezer compartments) on by pressing this button. The red LED indicates that the product is switched off, while the green LED shows that it is operating. To switch the product off, press and hold the ON/OFF button for at least two seconds. I CARE This is used to activate and deactivate the I Care function (the optimal temperature for energy saving levels). When activated, the AUTO LED and the I Care LED illuminate simultaneously. ALARMS This controls all the alarm signals connected to product operation. CHILD LOCK Activates or deactivates the control panel button lock in order to avoid the risk of the various functions being activated accidentally by children. REFRIGERATOR and Temperature Adjustment Enable the temperature setting of the refrigerator to be modified, with the relative confirmation of the temperature selected shown on the display. It is also possible to use these buttons to deactivate the refrigerator compartment only. ON/OFF HOLIDAY REFRIGERATOR status bar Indicates the set temperature relating to the refrigerator compartment or shows that it has been deactivated (in this case the status bar is disabled). FREEZER status bar Shows the set temperature relating to the freezer compartment. SUPER COOL Activates or deactivates the SUPER COOL function (rapid cooling). The SUPER COOL LED illuminates. SUPER FREEZE Activates or deactivates the SUPER FREEZE function (rapid freezing). The SUPER FREEZE LED illuminates. HOLIDAY Activates or deactivates the HOLIDAY function (the AUTO LED and HOLIDAY LED illuminates). ICE PARTY Activates or deactivates the ICE PARTY function (It reduces the temperature of the freezer for the period of time required to cool a bottle.). the ICE PARTY illuminates) FREEZER and Temperature Adjustment Enable the temperature setting of the freezer to be modified, with the relative confirmation of the temperature selected shown on the display. 15 Description of the appliance GB Overall view ICE DEVICE FAST FREEZER compartment Removable multipurpose SHELVES STORAGE compartment FRESH BOX Compartment Removable lidded shelf with EGG TRAY BUTTER dish* MULTI-USE bin* SHELVES BEVERAGE CAN shelves Removable multipurpose SHELVES BOTTLE shelf MOISTIRE adjusted FRUIT and VEGETABLE bin Levelling FEET Number and/or position may vary. * Available only on certain models. 16 Accessories Refrigerator compartment 1 2 SHELVES: the shelves are removable and their height may be adjusted thanks to special rails (see diagram), allowing easy storage of large containers and bulky food. The height may be adjusted without removing the shelf completely. FRESH BOX*: for fresh meat and fish. Due to the compartments low temperature (the coldest in the refrigerator) and to the clear door that provides protection against oxidation and blackening, food can be stored for even up to one week. It can also be used for cold meals. MULTI-USE bin: to store food (such as cold meats) for a long time and also prevent odours from lingering in the refrigerator. It can be removed for use and it may be shifted sideways to optimise space (see diagram). Freezer compartment ICE PARTY: ensures bottles of sparkling wine or champagne reach the right temperature. Place the bottle in the bucket provided inside the FREEZER and STORAGE compartment. The bucket may be used to serve the bottle and keeps it cool outside the appliance. ICE DEVICE After pouring water in the special ice cups, place them in their places in the ice device. After about 2 hours, the ice cubes will be ready. In order to get the ice cubes, it will be sufficient to turn the two buttons to the right. The ice cubes will fall in to the tray below, ready to be used. CAN RACK shelf: stores cans horizontally (see diagram). Yoghurt, butter or general containers may also be stored here. Cassetto FRUTTA e VERDURA I cassetti frutta e verdura di cui è dotato il frigorifero sono appositamente progettati allo scopo di mantenere fresche e fragranti la frutta e le verdure. Aprire il regolatore dumidità (posizione B) se si desidera conservare gli alimenti in un ambiente meno umido, oppure chiuderlo (posizione A) per una conservazione in ambiente più umido. La facile apertura dei coperchi, basta tirare il cassetto verso lesterno, facilita lintroduzione e il prelievo dei cibi. 17 GB Start-up and use GB Starting the appliance ! After transportation of the appliance, carefully place it in an upright position and wait at least 3 hours before connecting it to the electricity mains, to make sure it operates as it should. Clean the inside of the refrigerator well using warm water and bicarbonate of soda before placing food inside it. The appliance comes with a motor protection control system which makes the compressor start approximately 8 minutes after being switched on. The compressor also starts each time the power supply is cut off whether voluntarily or involuntarily (blackout). Freezer Compartment When the product is switched on the freezer compartment is set to its default value of -18°C. We recommend that the SUPER FREEZE function is set (the freezer status bar continues to display the set value) in order to accelerate the cooling process of the compartment; when the inside of the compartment has reached its optimal temperature the function will be deactivated and the food may be placed inside. Refrigerator Compartment When the appliance is switched on the refrigerator compartment is set to its default value of +5°C. We recommend that the SUPER COOL function is set (the refrigerator status bar continues to display the set value) in order to accelerate the cooling process of the compartment. After a few hours it will be cool enough for food to be placed inside. Navigating the display Setting the temperatures: If the product is switched on, the refrigerator and freezer status bars will indicate the temperatures set at that and moment. To change them, simply press the buttons corresponding to the compartment for which you wish to change the set temperature. More specifically, each time one of the buttons is pressed the temperature is increased or decreased by 1°, and the level of cold is adjusted accordingly.The temperature values that may be selected for the refrigerator compartment are +12°C, +7°C, +6°C, +5°C, +4°C, +3°C and +2°C, while the values that may be set for the freezer are -18°C, -19°C, -120°C, -21°C, -22°C, -24°C and -26°C. 18 The temperatures are automatically set to +5°C for the refrigerator compartment and -18°C for the freezer compartment (these are standard food storage values. When the I Care function is active, the appliance automatically adjusts the temperatures according to the conditions inside and outside the refrigerator; the operation of this function is signalled by the text AUTO. Whenever it is necessary to activate the I Care function at temperatures that are different to the standard storage values, the I Care button must be pressed as soon as the function is activated and held down while the new and buttons. Under temperatures are set using the these conditions, the temperatures may be set to 4°C, 5°C and 6°C for the refrigerator compartment and -18°C, -19°C and -20°C for the freezer compartment. When the HOLIDAY function is active the temperature may not be adjusted, however the appliance adjusts itself automatically so that the optimal settings for the situation are used: +12°C for the refrigerator compartment and 18°C for the freezer compartment. This function is indicated by the text. To activate and deactivate the functions simply press the relevant button and the function status will be signalled by the corresponding LED switching on or off. Several functions (SUPER COOL, SUPER FREEZE, ICE PARTY, I CARE) are incompatible with others (HOLIDAY,...); remember that there is a pre-set order of priority which will help you to use the product in the best possible way. When the Ice Party function has finished, press the ICE PARTY button to stop the corresponding LED from flashing and to silence the sound signal. This flashing and sound signal indicates that the function is complete and that the bottle should be removed from the freezer compartment. Child Lock In order to activate the Child Lock function, the Child Lock button must be pressed for 2 seconds; the activation of the button lock is confirmed by a short beep and the illumination of the corresponding LED. To deactivate the function, press the Child Lock button for 2 seconds; deactivation will be confirmed by a short beep and by the corresponding LED switching off. ! The FREEZER status bar is also used to indicate an unusual temperature increase in the freezer compartment (see Troubleshooting). Chiller system Using the freezer to its full potential No Frost The No Frost system circulates cold air continuously to collect humidity and prevent ice and frost formation. The system maintains an optimal humidity level in the compartment, preserving the original quality of the food, preventing the food from sticking together and making defrosting a thing of the past. Adjust the temperature using the display. ! Do not block the aeration cells by placing food or containers in direct contact with the refrigerating back panel. ! Close bottles and wrap food tightly. Using the refrigerator to its full potential Adjust the temperature using the display. Activate the SUPER COOL function to lower the temperature quickly, for example, when you place a large number of new food items inside a fridge and the internal temperature rises slightly. This function quickly cools the groceries by temporarily reducing the temperature until it reaches the ideal level. Place only cold or lukewarm foods in the compartment, never hot foods (see Precautions and tips). Remember that cooked foods do not last longer than raw foods. Do not store liquids in open containers: they will increase the level of humidity in the refrigerator and cause condensation to form. GB To freeze (if the freezer is already operating): - for small quantities which are less than those indicated on the data plate, press the rapid freezing SUPER FREEZE button (corresponding indicator light illuminates), insert the food and close the door. The function is disabled automatically after 24 hours or when optimal temperatures have been reached (indicator light goes out); - for large quantities which are greater than the maximum load indicated on the data plate, hold down the rapid freezing SUPER FREEZE button until the corresponding indicator light begins to flash. After 24 hours the indicator light stops flashing and remains on constantly. Place the food inside the freezer and close the door. After another 24 hours, the function will be disabled automatically (indicator light goes out). Do not re-freeze food that is defrosting or that has already been defrosted. These foods must be cooked and eaten (within 24 hours). Fresh food that needs to be frozen must not come into contact with food that has already been defrosted. Do not place glass bottles which contain liquids, and which are corked or hermetically sealed in the freezer because they could break. The maximum quantity of food that may be frozen daily is indicated on the plate containing the technical properties located on the bottom left side of the refrigerator compartment (for example: Kg/24h: 4). ! Do not open the door during freezing. ! If there is a power cut or malfunction, do not open the freezer door. This will help maintain the temperature inside the freezer, ensuring that foods are conserved for at least 9 -14 hours. ! To avoid blocking the air circulation inside the freezer, it is advisable not to obstruct the ventilation holes with food or containers. 19 Maintenance and care GB Switching the appliance off Replacing the light bulb During cleaning and maintenance it is necessary to disconnect the appliance from the electricity supply: To replace the light bulb in the refrigerator compartment, disconnect the plug from the electricity mains. 1. Hold the ON/OFF button down for more than two seconds until OFF appears on both indicator displays (refrigerator and freezer). 2. Pull the plug out of the socket. ! If this procedure is not followed, the alarm may sound. This alarm does not indicate a malfunction. To restore normal operation, hold the ON/OFF button down for more than two seconds. To disconnect the appliance, follow points 1 and 2 above. Cleaning the appliance The external and internal parts and the rubber seals may be cleaned using a sponge that has been soaked in lukewarm water and bicarbonate of soda or neutral soap. Do not use solvents, abrasive products, bleach or ammonia. The removable accessories may be soaked in warm soapy water or dishwashing liquid. Rinse and dry them carefully. The back of the appliance may collect dust. This can be removed by carefully using the hose of a vacuum cleaner set on medium power. The appliance must be switched off and the plug disconnected from the electricity mains before it is cleaned. Avoiding mould and unpleasant odours The appliance is manufactured with hygienic, odour free materials. Food should be wrapped well and containers closed properly in order to maintain this hygiene. This will also prevent the formation of stains. If you wish to switch the appliance off for an extended period of time, clean the inside and leave the doors open. 20 Access the light bulb as shown (see diagram) and replace it with a similar light bulb, the power of which should not exceed 10 W. Precautions and tips ! The appliance was designed and manufactured in compliance with international safety standards. The following warnings are provided for safety reasons and must be read carefully. This appliance complies with the following European Community Directives: - 73/23/EEC dated 19/02/73 (Low Voltage) and subsequent amendments; -89/336/EEC dated 03.05.89 (Electromagnetic Compatibility) and subsequent amendments; - 2002/96/CE. General safety The appliance was designed for domestic use inside the home and is not intended for commercial or industrial use. The appliance must be used by adults only to store and freeze food products according to the instructions in this manual. The appliance must not be installed outdoors, even in covered areas. It is extremely dangerous to leave the appliance exposed to rain and storms. Do not touch the appliance when barefoot or with wet or damp hands and feet. Do not touch the internal cooling elements: this could cause skin abrasions or frost/freezer burns. When unplugging the appliance always pull the plug from the mains socket, do not pull on the cable. Always switch the appliance off and disconnect it from the electrical supply before cleaning it or carrying out maintenance work. It is NOT sufficient to hold the ON/ OFF button down for more than two seconds to eliminate all electrical contact. In case of malfunction, under no circumstances should you attempt to repair the appliance yourself. Repairs carried out by inexperienced persons may cause injury or further malfunctioning of the appliance. Do not use any sharp or pointed utensils or electrical equipment - other than the type recommended by the manufacturer - inside the frozen food storage compartments. Disposal GB Observe local environmental standards when disposing of packaging material as some of this material may be recycled. The European Directive 2002/96/EC on Waste Electrical and Electronic Equipment (WEEE), requires that old household electrical appliances must not be disposed of in the normal unsorted municipal waste stream. Old appliances must be collected separately in order to optimise the recovery and recycling of the materials they contain and reduce the impact on human health and the environment. The crossed out wheeled bin symbol on the product reminds you of your obligation, that when you dispose of the appliance it must be separately collected. Consumers should contact their local authority or retailer for information concerning the correct disposal of their old appliance. Respecting and conserving the environment Install the appliance in a cool, well-ventilated room. Ensure that it is protected from direct sunlight and do not place it near sources of heat. Try to avoid keeping the door open for long periods. A significant amount of energy is used every time the door is opened. Do not over-fill the appliance: cold air must circulate freely for food to be preserved properly. If air circulation is impeded, the compressor will work continuously. Do not place hot food in the refrigerator. The internal temperature will increase, forcing the compressor to work harder and consume more energy. Regularly check the door seals and wipe clean to ensure they are free of debris and to prevent cold air from escaping (see Maintenance). Do not put ice cubes taken directly from the freezer into your mouth. Do not allow children to tamper with the controls or play with the appliance. Under no circumstances should they be allowed to sit on the bins or to hang from the door. Keep packaging material out of reach of children. 21 Troubleshooting GB If the appliance does not work, before calling for Assistance (see Assistance), check for a solution from the following list. Malfunctions: Possible causes / Solutions: The display is completely switched off. The plug has not been inserted into the electrical socket, or not far enough to make contact, or there is no power in the house. The motor does not start. The appliance comes with a motor protection control (see Start-up and use). The display is on but it is dim. Pull out and reverse the plug before putting it back in the socket. The alarm sounds, the ALARM LED lights up and the refrigerator compartment light flashes. The refrigerator door has been open for more than two minutes. The buzzer stops when the door is closed or when the ALARM button is pressed. The alarm sounds, the ALARM LED lights up and the freezer status bar LEDs light up in sequence. The temperature inside the freezer is too high. The freezer will maintain a temperature of around 0°C so that the food will not refreeze, allowing you to eat it within 24 hours or to refreeze it after it has been cooked. To switch off the buzzer, press the ALARM button. Press a second time to display the set value on the freezer status bar, switch off the ALARM LED and restore normal operation. The alarm sounds, the ALARM LED flashes and the freezer status bar LEDs flash simultaneously. The temperature of the freezer is dangerously high: the food inside must not be eaten. The freezer will maintain a temperature of approximately 0°C. To switch off the buzzer, press the RESET ALARM button. Press a second time to display the set value on the freezer status bar, switch off the ALARM LED and restore normal operation. The refrigerator and the freezer do not cool well. The food inside the refrigerator is beginning to freeze. The temperature that has been set is too low (see Start-up and use). The motor runs continuously. The SUPER FREEZE button has been pressed (rapid freezing): the yellow SUPER FREEZE light is on or flashing (see Description). The door is not closed properly or is continuously opened. The outside ambient temperature is very high. The thickness of the frost exceeds 2-3 mm (see Maintenance). The Aircooler fan does not rotate The refrigerator door is open. The Aircooler system is only activated automatically when it becomes necessary to restore perfect operational conditions inside the refrigerator compartment. The appliance makes a lot of noise. The appliance has not been installed on a level surface (see Installation). The appliance has been installed between cabinets that vibrate and make noise. The internal refrigerant makes a slight noise even when the compressor is off. This is not a defect, it is normal. Early ending of functions Electrical disturbance on the network or brief interruptions of the power supply. The doors do not close properly or the seals are damaged. The doors are opened too frequently. The temperature that has been set is too high (see Start-up and use). The refrigerator or the freezer have been over-filled. The freezer status bar LEDs do not Contact the Technical Assistance Centre. indicate the set temperature, and are lit in a constant manner. 22 Assistance GB Before calling for Assistance: Check if the malfunction can be solved on your own (see Troubleshooting). If after all the checks, the appliance still does not operate or the problem persists, call the nearest Service Centre serial number model Communicating: type of malfunction appliance model (Mod.) serial number (S/N) This information can be found on the data plate located on the bottom left side of the refrigerator compartment. Mod. RG 2330 220 - 240 V- TI 50 Hz Cod. 150 W 75 Total 340 Net Gross Gross Util Bruto Bruto Utile Brut Brut Compr. R 134 a Test Pressure HIGH-235 Syst. P.S-I. LOW 140 Kompr. kg 0,090 Made in Italy 13918 93139180000 W Fuse S/N 704211801 A Gross Bruto Brut Max 15 w Capac Class Poder de Cong Clase Freez. kg/24 h 4,0 N Classe Never call on unauthorized technicians and always refuse spare parts which are not originals. 23 195063951.00 04/2007 GB 24 Mode demploi REFRIGERATEUR 2 PORTES Sommaire I Italiano, 1 GB English,13 F Français, 25 Installation, 26 Mise en place et raccordement Réversibilité des portes Description de lappareil, 27-28 D Deutsch, 37 NL Nerderlands, 49 Tableau de bord Vue densemble Accessoires, 29 Compartiment réfrigérateur Compartiment congélateur Mise en marche et utilisation, 30-31 MTP 1911 F/HA Mise en service de lappareil Comment se déplacer sur lafficheur Système de refroidissement Pour profiter à plein de votre réfrigérateur Pour profiter à plein de votre congélateur Entretien et soins, 32 Mise hors tension Nettoyage de lappareil Contre la formation de moisissures et de mauvaises odeurs Remplacement de lampoule déclairage Précautions et conseils, 33 Sécurité générale Mise au rebut Economies et respect de lenvironnement Anomalies et remèdes, 34 Assistance, 35 F Installation F ! Conservez ce mode demploi pour pouvoir le consulter à tout moment. En cas de vente, de cession ou de déménagement, veillez à ce quil suive lappareil pour informer le nouveau propriétaire sur son fonctionnement et lui fournir les conseils correspondants. Raccordement électrique Après le transport, placez lappareil à la verticale et attendez au moins 3 heures avant de le raccorder à linstallation électrique. Avant de brancher la fiche dans la prise de courant, assurez-vous que : ! Lisez attentivement les instructions : elles contiennent des conseils importants sur linstallation, lutilisation et la sécurité de votre appareil. la prise est bien munie dune terre conforme à la loi; la prise est bien apte à supporter la puissance maximale de lappareil, indiquée sur la plaquette signalétique placée à lintérieur du compartiment réfrigérateur en bas à gauche (ex. 150 W); la tension dalimentation est bien comprise entre les valeurs indiquées sur la plaquette signalétique, placée en bas à gauche (ex.220-240 V); la prise est bien compatible avec la fiche de lappareil. En cas dincompatibilité, faites remplacer la fiche par un technicien agréé (voir Assistance); nutilisez ni rallonges ni prises multiples. Mise en place et raccordement Mise en place 1. Placez lappareil dans une pièce bien aérée et non humide. 2. Ne bouchez pas les grilles daération arrière : le compresseur et le condensateur produisent de la chaleur et exigent une bonne aération pour bien fonctionner et réduire la consommation délectricité. 3. Prévoir au moins 10 cm entre le haut de lappareil et les meubles installés au-dessus et au moins 5 cm entre les côtés et les meubles/parois latérales. 4. Installez lappareil loin de sources de chaleur (rayons directs du soleil, cuisinière électrique). 5. Pour maintenir une distance optimale entre le produit et la paroi arrière, montez les cales despacement comprises dans le kit dinstallation et suivez les instructions de la notice spécialement prévue. Mise à niveau 1. Installez lappareil sur un sol plat et rigide. 2. Si le sol nest pas parfaitement horizontal, vissez ou dévissez les petits pieds avant pour bien niveler lappareil. 26 ! Après installation de lappareil, le câble électrique et la prise de courant doivent être facilement accessibles. ! Le câble ne doit être ni plié ni excessivement écrasé. ! Il doit être contrôlé prériodiquement et ne peut être remplacé que par un technicien agréé (voir Assistance). ! Nous déclinons toute responsabilité en cas de non respect des normes énumérées ci-dessus. Réversibilité des portes Si une inversion du sens douverture des portes savère nécessaire, faire appel à notre service dassistance technique. Description de lappareil Tableau de bord F Réglage de la température du FREEZER ALARMES SUPER FREEZE ICE PARTY Barre graphique FREEZER Barre graphique REFRIGERATEUR SUPER COOL CHILD LOCK Réglage de la température du RÉFRIGÉRATEUR I CARE ON/OFF Cette touche sert à allumer lappareil tout entier (compartiment réfrigérateur et compartiment freezer). Le TEMOIN rouge indique que lappareil est éteint, le TEMOIN vert quil est en service. Pour éteindre lappareil, appuyez au moins 2 secondes de suite sur la touche ON/ OFF. I CARE Cest elle qui sert à activer ou à désactiver la fonction I Care (la température optimale avec une faible consommation délectricité). Dès activation de cette fonction, le TEMOIN AUTO et le TEMOIN I Care sallument simultanément. ALARMES Cette touche permet de brancher et de gérer toutes les alarmes reliées au fonctionnement de lappareil. Child Lock Ce dispositif permet de verrouiller les touches du tableau de commande pour éviter toute manipulation de la part des enfants. Réglage de la température du REFRIGERATEUR et Elles permettent de modifier le réglage de la température du réfrigérateur, avec affichage de confirmation de la température sélectionnée. Ces touches permettent aussi de désactiver le compartiment réfrigérateur. ON/OFF HOLIDAY Réglage de la température du FREEZER et Elles permettent de modifier le réglage de la température du freezer, avec affichage de confirmation de la température sélectionnée. Barre graphique REFRIGERATEUR Indication de la température sélectionnée dans le compartiment réfrigérateur ou de sa désactivation (dans ce cas la barre graphique est éteinte). Barre graphique FREEZER Affiche la température sélectionnée dans le compartiment freezer. SUPER COOL Elle permet dactiver ou de désactiver la fonction SUPER COOL (refroidissement rapide). Le temoin SUPER COOL sallume. SUPER FREEZE Elle permet dactiver ou de désactiver la fonction SUPER FREEZE. Le temoin SUPER FREEZE sallume. HOLIDAY Elle permet dactiver ou de désactiver la fonction HOLIDAY (le TEMOIN AUTO et HOLIDAY sallume). ICE PARTY Elle permet dactiver ou de désactiver la fonction ICE PARTY (il abaisse la température du congélateur le temps nécessaire au refroidissement dune bouteille). Le temoin ICE PARTY sallume 27 F Vue densemble Ces instructions dutilisation sappliquent à plusieurs modèles, il se peut donc que les composants illustrés présentent des différences par rapport à ceux de lappareil que vous avez acheté. Vous trouverez dans les pages suivantes la description des objets plus complexes. Bac à GLAÇONS Compartiment FAST FREEZER Balconnet amovible PORTE-OBJETS Compartiment CONSERVATION Compartiment FRESH BOX Bouton FONCTIONNEMENT REFRIGERATEUR Bac MULTIFONCTION* CLAYETTE Reglage DHUMIDITE Bac FRUITS et LEGUMES PIED de réglage Leur nombre et/ou leur emplacement peut varier. * Nexiste que sur certains modèles. 28 Balconnet amovible à ABATTANT Scatola BURRO * Balconnet PORTECANETTES Balconnet amovible PORTE-OBJETS Balconnet BOUTEILLES Accessoires Compartiment réfrigérateur 1 2 CLAYETTES: pleines ou grillagées. Elles sont amovibles et réglables en hauteur grâce à des glissières spéciales (voir figure), pour le rangement de récipients ou daliments de grande dimension. Pour régler la hauteur, pas besoin de sortir la clayette complètement. FRESH BOX: pour viandes et poissons frais. Ce compartiment sert à prolonger la durée de conservation jusquà une semaine, grâce à sa température très basse la plus froide du réfrigérateur et à son volet transparent qui protège contre les phénomènes doxydation et de noircissement. Il peut aussi être utilisé pour conserver des plats froids. Bac MULTIFONCTION: pour conserver plus longtemps certains aliments (la charcuterie par exemple) et éviter la diffusion dodeurs à lintérieur du réfrigérateur. A extraire pour utilisation, il peut être déplacé latéralement pour optimiser la place disponible (voir figure). Compartiment congélateur F ICE PARTY: pour amener une bouteille de mousseux ou de champagne à sa température idéale. Mettez la bouteille dans le rafraîchisseur prévu et rangez le tout dans le compartiment CONGELATION et CONSERVATION. Le rafraîchisseur de bouteille gardera votre bouteille au frais même à table. ICEDEVICE Sortez les récipients spéciaux de glace, mettez-y de leau et placezles dans leur location dans Icedevice. Approximativement 2 heures après, les cubes de glace seront prêts. Pour prends les glaçons, il suffira de tourner à droite les deux boutons; les glaçons tomberont de façon prête dans le récipient den-dessous (voir figure). Balconnet PORTE-CANETTES Le porte-canettes placé dans la contre-porte vous permet de ranger non seulement vos canettes mais aussi vos yogurts, votre beurre et vos autres récipients selon vos exigences. Bac FRUITS et LEGUMES Les tiroirs à fruits et légumes qui équipent le réfrigérateur sont spécialement conçus pour garder vos fruits et légumes frais et savoureux. Ouvrez le régulateur dhumidité (position B) si vous désirez conserver vos aliments dans un environnement moins humide ou bien fermez-le (position A) pour les conserver dans un environnement plus humide. Les couvercles, faciles à ouvrir, il suffit pour cela de tirer le tiroir vers vous, permettent dintroduire et de sortir facilement les aliments. 29 Mise en marche et utilisation F Mise en service du combiné ! Après son transport, placez lappareil à la verticale et attendez 3 heures environ avant de le brancher à une prise de courant, son fonctionnement nen sera que meilleur. Nettoyez bien lintérieur du réfrigérateur avec de leau tiède et du bicarbonate avant dy ranger vos aliments. Cet appareil est équipé dun système protège-moteur qui ne fait démarrer le compresseur que 8 minutes après son branchement. Cest ce qui se passera aussi après toute coupure de courant, volontaire ou involontaire (panne délectricité. Compartiment congélateur Lors de la mise en service de lappareil, le compartiment réfrigérateur se programme sur une température standard de 18°C. Sélectionnez la fonction SUPER FREEZE (La barre graphique du CONGELATEUR continue à visualiser la température sélectionnée précédemment) pour accélérer le refroidissement dans le compartiment. Dès que ce dernier aura atteint sa température optimale, la fonction se désactivera et vous pourrez ranger vos surgelés à lintérieur du congélateur. Compartiment réfrigérateur Lors de la mise en service de lappareil, le compartiment réfrigérateur se programme sur une température standard de +5°C. Sélectionnez la fonction SUPER COOL (La barre graphique du REFRIGERATEUR continue à isualiser la température sélectionnée précédemment) pour accélérer le refroidissement dans le compartiment: au bout de quelques heures rangez les aliments dans le réfrigérateur. Comment se déplacer sur lafficheur Sélection des températures: Si lappareil est branché, les afficheurs du compartiment réfrigérateur et du compartiment congélateur visualiseront les températures sélectionnées à ce moment-là. Pour les modifier, appuyez sur les touches et correspondant au compartiment à lintérieur duquel vous voulez changer la température. A chaque pression sur les touches la température augmente ou diminue de 1° tout comme le nombre de barres latérales allumées. Les températures du compartiment réfrigérateur sont: +12°, +7°, +6°, +5°, +4°, +3°, +2°. Celles du freezer sont : 18°, -19°,-20°, -21°, -22°, -24°, -26°. Les températures automatiquement sélectionnées sont +5°C dans le compartiment réfrigérateur et 8°C dans le compartiment congélateur qui correspondent aux températures standard de conservation. Quand la fonction I Care est activée, lappareil règle automatiquement les températures selon les conditions 30 intérieures et extérieures au réfrigérateur, le tout étant signalé par allumage du message AUTO. En cas dactivation de la fonction I Care à dautres températures que les températures standard de conservation, il faut, dès activation de la fonction, garder la touche I Care enfoncée tandis que vous sélectionnez les et . Dans nouvelles températures à laide des touches ces conditions, les températures sélectionnables sont 4°, 5° et 6° dans le compartiment réfrigérateur et 18°, -19° et 20° dans le compartiment freezer. Quand la fonction HOLIDAY est activée, aucun réglage de température nest plus possible, lappareil se place automatiquement au réglage optimal correspondant: +12°C dans le compartiment réfrigérateur et 18°C dans le compartiment congélateur, cette condition est aussi signalée par allumage du message AUTO. Pour activer ou désactiver les fonctions, il suffit dappuyer sur la touche correspondante, le TEMOIN correspondant sallume ou séteint pour signaler létat de la fonction. Certaines fonctions (SUPER COOL, SUPER FREEZE, ICE PARTY, I CARE) sont incompatibles avec dautres (HOLIDAY,..), dans ce cas il y a une priorité déjà établie pour faciliter la gestion de lappareil. Une fois de la fonction Ice Party terminée, appuyez sur la touche ICE PARTY pour interrompre le clignotement de la LED correspondante. Le clignotement indique que la fonction est terminée et que vous devez enlever la bouteille du compartiment congélateur. Child Lock Pour activer la fonction Child Lock (sécurité enfants), appuyer 2 secondes de suite sur la touche Child Lock, lactivation du verrouillage des touches est confirmée par un son bref et par lallumage de la led correspondante. Pour désactiver cette fonction, appuyer 2 secondes de suite sur la touche Child Lock, la désactivation est confirmée par un son bref et par lextinction de la led correspondante. ! La barre graphique du CONGELATEUR sert aussi à signaler toute augmentation anormale de la température à lintérieur du compartiment congélateur (voir anomalies et remèdes). Système de refroidissement Pour profiter à plein de votre congélateur No Frost Le No Frost gère un flux continu dair froid qui absorbe lhumidité et empêche la formation de glace et de givre : il maintient un niveau dhumidité adéquat à lintérieur du compartiment réfrigérateur et, grâce à labsence de givre, il préserve les qualités originaires des aliments; dans le compartiment congélateur il évite la formation de glace, il ny a par conséquent plus besoin de dégivrer et les aliments ne collent plus entre eux. Réglez la température à laide de lafficheur. ! Ne placez pas daliments ou de récipients contre la paroi refroidissante arrière pour ne pas boucher les trous daération et éviter une formation rapide deau condensée. ! Fermez bien les bouteilles et emballez les aliments. Pour profiter à plein de votre réfrigérateur Réglez la température à laide de lafficheur. Appuyez sur la touche SUPER COOL (refroidissement rapide) pour faire baisser la température rapidement, par exemple quand vous remplissez le compartiment après avoir fait de grosses provisions. Cette fonction se désactive automatiquement une fois le temps écoulé. Nintroduisez que des aliments froids ou à peine tièdes, jamais chauds (voir Précautions et conseils). Les aliments cuits contrairement à ce que lon croit ne se conservent pas plus longuement que les aliments crus. Nintroduisez pas de récipients non fermés contenant des liquides : ces derniers entraîneraient une augmentation de lhumidité et la formation deau condensée. Pour congeler (si le congélateur est déjà en service): - pour de petites quantités, inférieures à la moitié de la quantité reportée sur létiquette, appuyez sur la touche SUPER FREEZE (congélation rapide) (allumage du voyant jaune correspondant), introduisez les aliments et fermez la porte. Cette fonction se désactive automatiquement au bout de 24 heures ou dès que les températures optimales sont atteintes (voyant éteint); - pour de grosses quantités, supérieures à la moitié de la quantité totale reportée sur létiquette, gardez la touche SUPER FREEZE (congélation rapide) enfoncée jusquà ce que le voyant correspondant commence à clignoter. Au bout de 24 heures le voyant cesse de clignoter et passe au fixe : introduisez les aliments et fermez la porte. Au bout de 24 heures la fonction se désactive automatiquement (voyant éteint). Ne recongelez pas des aliments décongelés ou en cours de décongélation; il faut les faire cuire et les consommer (dans les 24 heures). Les aliments frais à congeler ne doivent pas être placés au contact daliments déjà congelés. Ne stockez pas dans votre congélateur des bouteilles en verre contenant des liquides, bouchées ou fermées hermétiquement, elles pourraient se briser. La quantité journalière maximale daliments pouvant être congelée est indiquée sur létiquette des caractéristiques, placée dans le compartiment réfrigérateur en bas à gauche (exemple: 4 Kg/24h). ! Evitez douvrir la porte pendant la phase de congélation. ! En cas de coupure de courant ou de panne, nouvrez pas la porte du congélateur : les produits surgelés et congelés se conserveront ainsi sans problème pendant 9 - 14 heures environ. ! Pour éviter dempêcher la circulation de lair à lintérieur du congelateur, nous recommandons de ne pas boucher avec des aliments ou des récipients les trous daération. 31 F Entretien et soin F Mise hors tension Remplacement de lampoule déclairage Pendant les opérations de nettoyage et dentretien, débranchez lappareil du réseau dalimentation : 1. Gardez la touche ON/OFF enfoncée pendant deux secondes environ jusquà ce que lafficheur séteigne complètement à part la LED rouge de la touche ON/ OFF. 2. débranchez la fiche de la prise de courant. Pour remplacer lampoule déclairage du compartiment réfrigérateur, débranchez la fiche de la prise de courant. Suivez les instructions fournies ci-après selon le modèle de lappareil. ! Si cette procédure nest pas respectée, lalarme peut se déclencher : ceci ne dénote pas une anomalie. Pour rétablir le fonctionnement normal, il suffit de garder la touche ON/OFF enfoncée pendant plus de deux secondes. Pour isoler lappareil, procédez comme indiqué aux points 1 et 2. Nettoyage de lappareil Nettoyez lextérieur, lintérieur et les joints en caoutchouc à laide dune éponge imbibée deau tiède additionnée de bicarbonate de soude ou de savon neutre. Nutilisez pas de solvants, de produits abrasifs, deau de Javel ou dammoniaque. mettez tremper les accessoires amovibles dans de leau chaude additionnée de savon ou de liquide vaisselle. Rincez-les et essuyez-les soigneusement. Le dos de lappareil a tendance à sempoussiérer, pour éliminer la poussière avec délicatesse, après avoir éteint lappareil et débranché la fiche, servez-vous dun aspirateur montant un accessoire adéquat et réglé sur une puissance intermédiaire. Contre la formation de moisissures et de mauvaises odeurs Cet appareil est fabriqué dans des matériaux hygiéniques qui ne transmettent pas dodeur. Pour sauvegarder cette caractéristique, veillez à bien emballer et couvrir vos aliments. Vous éviterez par la même occasion la formation de taches. Si vous devez laisser votre appareil éteint pendant une période de temps prolongée, nettoyez-le bien lintérieur et laissez les portes ouvertes. 32 Pour remplacer lampoule, procédez comme illustré (voir figure) utilisez une ampoule semblable dont la puissance ne dépasse pas 10 W. Précautions et conseils ! Lappareil a été conçu et fabriqué conformément aux normes internationales de sécurité. Ces conseils sont fournis pour des raisons de sécurité et doivent être lus attentivement. Cet appareil est conforme aux Directives Communautaires suivantes : - 73/23/CEE du 19/02/73 (Basse Tensione) et modifications suivantes; -89/336/CEE du 03/05/89 (Compatibilité Electromagnétique) et modifications suivantes; - 2002/96/CE. Sécurité générale Cet appareil a été conçu pour un usage familial, de type non professionnel. Cet appareil qui sert à conserver et à congeler des aliments ne doit être utilisé que par des adultes conformément aux instructions du mode demploi. Mise au rebut F Mise au rebut du matériel demballage : conformezvous aux réglementations locales, les emballages pourront ainsi être recyclés. La Directive Européenne 2002/96/EC sur les Déchets des Equipements Electriques et Electroniques (DEEE), exige que les appareils ménagers usagés ne soient pas jetés dans le flux normal des déchets municipaux. Les appareils usagés doivent être collectés séparément afin doptimiser le taux de récupération et le recyclage des matériaux qui les composent et réduire limpact sur la santé humaine et lenvironnement. Le symbole de la poubelle barrée est apposée sur tous les produits pour rappeler les obligations de collecte séparée. Les consommateurs devront contacter les autorités locales ou leur revendeur concernant la démarche à suivre pour lenlèvement de leur vieil appareil. Cet appareil ne doit pas être installé en extérieur, même dans un endroit à labri, il est en effet très dangereux de le laisser exposé à la pluie et aux orages. Economies et respect de lenvironnement Ne touchez pas à lappareil pieds nus ou si vos mains ou pieds sont mouillés ou humides. Installez votre appareil dans un endroit frais et bien aéré, protégez-le contre lexposition directe aux rayons du soleil et ne le placez pas près de sources de chaleur. Ne touchez pas aux parties refroidissantes: vous pourriez vous brûler ou vous blesser. Pour débrancher la fiche de la prise de courant, sortez la fiche, ne tirez surtout pas sur le câble. Avant deffectuer toute opération de nettoyage ou dentretien, débranchez la fiche de la prise de courant. Il ne suffit de garder la touche ON/OFF enfoncée pendant plus de deux secondes (appareil éteint) pour éliminer tout contact électrique. En cas de panne, nessayez en aucun cas daccéder aux mécanismes internes pour tenter de réparer lappareil. Pour introduire ou sortir les aliments, nouvrez les portes de lappareil que le temps strictement nécessaire. Chaque ouverture de porte cause une considérable dépense dénergie. Ne chargez pas trop votre appareil : pour une bonne conservation des aliments, le froid doit pouvoir circuler librement. Si la circulation est entravée, le compresseur travaillera en permanence. Ne pas utiliser, à lintérieur des compartiments de conservation pour aliments congelés, dustensiles pointus et coupants ou dappareils électriques dun type autre que celui recommandé par le fabricant. Nintroduisez pas daliments chauds : ces derniers font monter la température intérieure ce qui oblige le compresseur à travailler beaucoup plus en gaspillant un tas délectricité. Ne pas porter à la bouche des glaçons à peine sortis du congélateur. Dégivrez lappareil dès que de la glace se dépose (voir Entretien); une couche de glace trop épaisse gêne considérablement la cession de froid aux aliments et augmente la consommation délectricité. Ne permettez pas aux enfants de jouer avec lappareil. Il ne faut en aucun cas quils sasseyent sur les tiroirs ou quils saccrochent à la porte. Les emballages ne sont pas des jouets pour enfants. Gardez toujours les joints propres et en bon état pour quils adhèrent bien aux portes et ne laissent pas le froid séchapper (voir Entretien). 33 Anomalies et remèdes Assistance F Il peut arriver que lappareil ne fonctionne pas. Avant de téléphoner au service de dépannage (voir Assistance), contrôlez sil ne sagit pas dun problème facile à résoudre à laide de la liste suivante. Anomalies: Causes / Solution possibles: L'afficheur est totalement éteint. La fiche nest pas branchée dans la prise de courant ou pas assez enfoncée pour quil y ait contact ou bien il y a une coupure de courant. Le moteur ne démarre pas. Lappareil est équipé dun système protège-moteur (voir Mise en marche et utilisation). Lafficheur est faiblement éclairé. Débranchez la fiche et rebranchez-la dans la prise de courant après lavoir retournée sens dessus dessous. Lalarme retentit, la led ALARMES est allumée et la lampe du compartiment réfrigérateur clignote. La porte du réfrigérateur est restée ouverte pendant plus de deux minutes. Le signal acoustique cesse dès fermeture de la porte ou après avoir appuyé sur la touche ALARM. Lalarme sonne, la led ALARMES est allumée et les leds de la barre graphique du congélateur sallument les unes après les autres. Lappareil signale un réchauffement excessif du congélateur. Le congélateur maintient une température denviron 0°C pour ne pas faire recongeler les aliments et vous permettre de les consommer dans les 24 heures ou de les recongeler après cuisson. Pour faire cesser le signal acoustique, appuyez sur la touche ALARM. Appuyez une deuxième fois pour effacer le message sur lécran, éteindre la led ALARMES et revenir à un fonctionnement normal. Lalarme sonne, la led ALARMES clignote et les leds de la barre graphique du congélateur clignotent en continu. Lappareil signale un réchauffement dangereux du congélateur. ne pas consommer les aliments. Le congélateur maintient une température aux alentours de -18°C. Pour faire cesser le signal acoustique, appuyez sur la touche RESET ALARM. Appuyez une deuxième fois pour effacer le message sur lécran, éteindre la led ALARMES et revenir à un fonctionnement normal. Le réfrigérateur et le congélateur refroidissent peu. Les aliments gèlent à lintérieur du réfrigérateur. Sélection dune température trop froide (voir Mise en marche et utilisation). Le moteur est branché en permanence. Les fonctions SUPER COOL et/ou SUPER FREEZE et/ou ICE PARTY. La porte nest pas bien fermée ou trop souvent ouverte. La température à lextérieur est très élevée. Lappareil est très bruyant. Lappareil na pas été installé bien à plat (voir Installation). Lappareil est installé entre des meubles ou des objets qui vibrent et font du bruit. Le gaz réfrigérant interne produit un léger bruit même quand le compresseur est à larrêt : il ne sagit pas dun défaut, cest tout à fait normal. Arrêt anticipé des fonctions Perturbations du réseau électrique ou coupures brèves de la tension dalimentation. Les leds de la barre graphique du congélateur ne signalent pas la température sélectionnée et sont allumées en fixe. Contactez le service dassistance technique. 34 Les portes ne ferment pas bien ou les joints sont abîmés. Ouverture trop fréquente des portes. Sélection dune température trop chaude (voir Mise en marche et utilisation). Le réfrigérateur et le congélateur sont excessivement remplis. Assistance Avant de contacter le centre dAssistance: Vérifiez si vous pouvez résoudre lanomalie vous-même (voir Anomalies et Remèdes). Si, malgré tous ces contrôles, lappareil ne fonctionne toujours pas et linconvénient persiste, faites appel au service après-vente le plus proche de chez vous. Signalez: le type danomalie le modèle de lappareil (Mod.) le numéro de série (S/N) Vous trouverez tous ces renseignements sur létiquette signalétique placée dans le compartiment réfrigérateur en bas à gauche. modèle Mod. RG 2330 220 - 240 V- TI 50 Hz F numéro de série Cod. 150 W 75 Total 340 Net Gross Gross Util Bruto Bruto Utile Brut Brut Compr. R 134 a Test Pressure HIGH-235 Syst. P.S-I. LOW 140 Kompr. kg 0,090 Made in Italy 13918 93139180000 W Fuse S/N 704211801 A Gross Bruto Brut Max 15 w Capac Class Poder de Cong Clase Freez. kg/24 h 4,0 N Classe Ne faites jamais appel à des techniciens non agréés et refusez toujours des pièces détachées non originales. 35 195063951.00 04/2007 F 36 Gebrauchsanleitungen KÜHLSCHRANK, 2-TÜRIG Inhaltsverzeichnis I Italiano, 1 D Deutsch, 37 GB English,13 NL Nerderlands, 49 F Français, 25 Installation, 38 Aufstellort und elektrischer Anschluss SoWechsel des Türanschlags Beschreibung Ihres Gerätes, 39-40 Bedienblende Geräteansicht Zubehör, 41 Kühlzone Gefrierzone Inbetriebsetzung und Gebrauch, 42-43 Inbetriebsetzung Ihres Gerätes So bediene ich das Display Kühlsystem Optimaler Gebrauch der Kühlzone Optimaler Gebrauch der Gefrierzone MTP 1911 F/HA Wartung und Pflege, 44 Abschalten Ihres Gerätes vom Stromnetz Reinigung Ihres Gerätes Vermeidung von Schimmelpilz- und Geruchsbildung Lampenaustausch Vorsichtsmaßregeln und Hinweise, 45 Allgemeine Sicherheit Entsorgung Energie sparen und Umwelt schonen Störungen und Abhilfe, 46 Kundendienst, 47 DE Installation DE ! Es ist äußerst wichtig, diese Bedienungsanleitung sorgfältig aufzubewahren, um sie jederzeit zu Rate ziehen zu können. Sorgen Sie dafür, dass sie im Falle eines Umzugs oder Übergabe an einen anderen Benutzer das Gerät stets begleitet, damit auch der Nachbesitzer die Möglichkeit hat, diese zu Rate zu ziehen. ! Lesen Sie bitte folgende Hinweise aufmerksam durch, sie liefern wichtige Informationen hinsichtlich der Installation, dem Gebrauch und der Sicherheit. Aufstellort und elektrischer Anschluss Aufstellort 1. Stellen Sie das Gerät in einem gut belüfteten und trockenen Raum auf. 2. Die hinteren Belüftungsöffnungen dürfen nicht zugestellt bzw. abgedeckt werden: Kompressor und Kondensator geben Wärme ab und benötigen eine gute Belüftung um optimal zu arbeiten und den Stromverbrauch nicht unnötig zu erhöhen 3. Lassen Sie einen Freiraum von mindestens 10 cm oberhalb des Gerätes, und mindestens 5 cm zwischen den Geräteseiten und angrenzenden Schrankseiten bzw. Wänden. 4. Stellen Sie das Gerät fern von Wärmequellen auf (Sonnenlicht, Elektroherd). 5. Zur Einhaltung eines optimalen Abstandes des Gerätes von der Wand sind die im Installationsbausatz befindlichen Abstandsstücke zu montieren. Befolgen Sie hierzu die Hinweise des dem Bausatz beigefügten Arbeitsblattes. Nivellierung 1. Stellen Sie das Gerät auf einem ebenen und festen Boden auf. 2. Sollte der Fußboden nicht perfekt eben sein, dann gleichen Sie diese Unebenheit durch entsprechendes Drehen der vorderen Füße aus. 38 Elektrischer Anschluss Stellen Sie das Gerät nach dem Transport senkrecht auf und warten Sie etwa 3 Stunden, bevor Sie das Gerät an das Elektronetz anschließen. Vor Einfügen des Netzsteckers in die Steckdose stellen Sie bitte sicher, dass die Steckdose über eine normgerechte Erdung verfügt; die Steckdose die auf dem Typenschild (befindlich in der Kühlzone unten links) angegebene max. Leistungsaufnahme des Gerätes trägt (z.B. 150 W); die Netzspannung den auf dem Typenschild (befindlich unten links) angegebenen Werten entspricht (z.B. 220240 V); die Steckdose mit dem Netzstecker übereinstimmt. Sollte dies nicht der Fall sein, dann lassen Sie den Netzstecker durch autorisiertes Fachpersonal (siehe Kundendienst) austauschen; verwenden Sie auf keinen Fall Verlängerungen oder Vielfachsteckdosen. ! Netzkabel und Netzstecker müssen bei installiertem Gerät leicht zugänglich sein. ! Das Netzkabel darf nicht gebogen bzw. eingeklemmt werden. ! Das Kabel muss regelmäßig kontrolliert werden und darf nur durch autorisiertes Fachpersonal ausgetauscht werden (siehe Kundendienst). ! Der Hersteller lehnt jede Verantwortung ab, falls diese Vorschriften nicht eingehalten werden sollten. SoWechsel des Türanschlags llte ein Wechsel des Türanschlags erforderlich sein, dann wenden Sie sich bitte an die Kundendienststelle. Beschreibung Ihres Gerätes Bedienblende DE Einstellung der GEFRIERZONENTemperatur ALARM SUPER FREEZE ICE PARTY Graphikleiste GEFRIERZONEN Graphikleiste KÜHLZONE CHILD LOCK SUPER COOL Einstellung der KÜHLZONENTemperatur I CARE EIN/AUS-Taste Durch Drücken dieser Taste für mindestens zwei Sekunden kann das gesamte Gerät (Kühlzone und Gefrierzone) ein- bzw. ausgeschaltet werden. Die rote LED zeigt an, dass das Gerät ausgeschaltet ist; die grüne LED zeigt an, dass es sich in Betrieb befindet. I CARE Mit dieser Touchtaste wird die I Care-Funktion aktiviert und deaktiviert. Bei Aktivierung dieser Funktion schaltet sich gleichzeitig die LED AUTO und die LED I Care ein. ALARM Mit dieser Touchtaste wird die I Care-Funktion aktiviert und deaktiviert. Bei Aktivierung dieser Funktion schaltet sich gleichzeitig die LED AUTO und die LED I Care ein. Child Lock Mit Child Lock lassen sich die Tasten auf der Bedienblende sperren, um zu verhindern, dass Kinder sie unbeabsichtigterweise betätigen. Einstellung der KÜHLZONEN-Temperatur und Mittels dieser Tasten kann die Einstellung der Kühlzonentemperatur geändert werden, mit entsprechender Bestätigung der eingestellten Temperatur auf dem Display. Einstellung der GEFRIERZONEN-Temperatur und Mittels dieser Tasten kann die Einstellung der Gefrierzonentemperatur geändert werden, mit entsprechender Bestätigung der eingestellten Temperatur auf dem Display. ON/OFF HOLIDAY Graphikleiste KÜHLZONE Auf diesem wird die Kühlzonentemperatur, oder die Deaktivierung der Kühlzone (in diesem Fall ist die Graphikleiste ausgeschaltet) angezeigt. Graphikleiste GEFRIERZONEN Auf diesem wird die für die Gefrierzone eingestellte Temperatur angezeigt. SUPER COOL Über diese Taste aktivieren bzw. deaktivieren Sie die Funktion SUPER COOL (die LED SUPER COOL schaltet sich ein). SUPER FREEZE Über diese Taste aktivieren bzw. deaktivieren Sie die Funktion SUPER FREEZE (die LED SUPER FREEZE schaltet sich ein). HOLIDAY Mittels dieser Taste aktivieren bzw. deaktivieren Sie die Funktion HOLIDAY (die LED AUTO und HOLIDA schaltet sich ein). ICE PARTY Mittels dieser Taste aktivieren bzw. deaktivieren Sie die Funktion ICE PARTY(die LED ICE PARTY schaltet sich ein). Beschreibung Ihres Gerätes DE Geräteansicht Ice Device Fächer zum FAST FREEZE Fächer zum LAGERN FRESH BOXFrischhaltefach* Ablage für TUBEN UND DOSEN Abnehmbare Ablage mit Deckel, mit EIERFACH BUTTERDOSE* Ablagen für GETRÄNKEDOSEN Schubfach MEHRZWECKBEHÄLTER* Ablage für TUBEN UND DOSEN ABLAGEN FEUCHTIGKEITSREGLER Schale für OBST und GEMÜSE Höhenverstellbare Stellfüße Unterschiedliche Anzahl und Platzierung. * Nicht bei allen Modellen. 40 Ablage für FLASCHEN Zubehör Kühlzone 1 2 herauszuziehen - erleichtert das Hineingeben und das Herausnehmen der Speisen. ABLAGEN: Sie können herausgezogen und dank entsprechender Führungen (siehe Abbildung) höhenverstellt werden, um auch große Behältnisse unterbringen zu können. Zur Höhenverstellung ist es nicht erforderlich, die Ablage ganz herauszuziehen. FRESH BOX: für Frischfleisch und Fisch. Dieses Fach ermöglicht lange Aufbewahrungszeiten, bis zu einer Woche, dank der niedrigen Temperatur die kälteste im Kühlschrank und der durchsichtigen Abdeckung, die vor Oxidation und Schwarzverfärbung schützt. Die Fresh Box kann auch für Kalte Platten eingesetzt werden. Schubfach MEHRZWECKBEHÄLTER: Zur längeren Lagerung unterschiedlichster Lebensmittel (z.B. Wurstwaren), unangenehme Geruchsbildung im Kühlschrank wird so vermieden. Zum Gebrauch ist sie herauszuziehen; sie kann aus Platzgründen ggf. auch in Längsrichtung verschoben werden (siehe Abbildung). Ablage für GETRÄNKEDOSEN: zur liegenden Lagerung mehrerer Getränkedosen (siehe Abbildung). Auch Joghurtbecher, Butter oder sonstige Kleinbehältnisse können hier gelagert werden. Gemüseschalen Die Obst- und Gemüseschalen, mit denen Ihr Kühlschrank ausgestattet ist, wurden eigens dazu geschaffen, das gelagerte Obst und Gemüse frisch und ansehnlich zu erhalten. Öffnen Sie den Feuchtigkeitsregler (Position B), wenn Sie Ihre Lebensmittel in einer weniger feuchten Umgebung aufbewahren möchten, oder schließen Sie ihn (Position A) für eine Aufbewahrung in einer feuchteren Umgebung. Das einfache Öffnen der Deckel es ist nämlich nur die Schale Gefrierfach ICE PARTY: Hier kann eine Champagner- oder Sektflasche auf die korrekte Temperatur gebracht werden. Stellen Sie die Flasche im entsprechenden Kübel in die Zone zum GEFRIEREN und LAGERN. Den Kübel verwenden Sie dann direkt zum Servieren und Kalthalten der Flasche. ICEDEVICE Nehmen Sie die zur Eisbereitung bestimmten Schalen heraus, füllen Sie diese mit Wasser und stellen Sie sie in das Fach "Icedevice" (Abb. 7). Nach ca. 2 Stunden stehen Ihnen die fertigen Eiswürfel bereits zur Verfügung. Um das Eis herauszunehmen drehen Sie ganz einfach die beiden Knöpfe im Uhrzeigersinn, also nach rechts, und die Eiswürfel fallen in den untenstehenden Behälter (Abb. 8). DE Inbetriebsetzung und Gebrauch DE Inbetriebsetzung Ihres Gerätes ! Bitte warten Sie nach dem Aufstellen, bzw. nach einem Transport ca. 3 Stunden, bevor Sie das Gerät an die Netzleitung anschließen, um die optimale Betriebsweise zu fördern. Bevor Sie das Kühlgut in den Kühlschrank einsortieren, muss dieser gründlich mit lauwarmem Wasser und Bikarbonat gereinigt werden. Motorschutzzeit. Dieses Modell ist mit einem Motorschutzsystem ausgestattet. Keine Sorge demnach, wenn der Kompressor nach einem forcierten Abschalten (zum Beispiel zum Reinigen oder zum Abtauen der Gefrierzone) nicht sofort wieder anspringt. Nach 8 Minuten wird dieser automatisch wieder in Betrieb gesetzt. Gefrierzone Bei Einschalten des Gerätes, schaltet die Gefrierzone automatisch auf ihre Standardeinstellung von 18°C. Um das Abkühlen des Fachs zu beschleunigen, empfiehlt es sich, die Funktion SUPER FREEZE einzustellen (Auf der Graphikleiste der KÜHLZONE bleibt weiterhin die zuvor eingestellte Temperatur angezeigt). Nach Erreichen der optimalen Temperatur schaltet sich die Funktion automatisch ab. Das Gefriergut kann nun eingeräumt werden. Kühlzone Bei Einschalten des Gerätes wird die Kühlzone auf einen Standardwert von +5°C gebracht. Es empfiehlt sich, die Funktion SUPER COOL (Auf der Graphikleiste der GEFRIERZONE bleibt weiterhin die zuvor eingestellte Temperatur angezeigt) einzuschalten, um das Abkühlen der Zone zu beschleunigen: Nach einigen Stunden können die Speisen in den Kühlschrank eingeräumt werden. So bediene ich das Display Einstellen der Temperaturen: Ist das Gerät eingeschaltet, zeigen die Kühlzonen- und Gefrierzonen-Displays die in diesem Moment eingestellten Temperaturen an. Um diese zu ändern, drücken Sie ganz einfach die der Zone, deren Temperatur geändert werden soll, entsprechenden Tasten und . Folgende Temperaturen können eingestellt werden: +12°, +7°, +6°, +5°, +4°, +3°, +2° für die Kühlzone, 18°, 19°,-20°, -21°, -22°, -24°, -26° für die Gefrierzone. Die automatisch eingestellten Temperaturen sind Standard-Konservierungswerte, und zwar +5°C für die Kühlzone und -18°C für die Gefrierzone. Bei aktivierter I Care-Funktion reguliert das Gerät die Temperaturen automatisch auf der Grundlage der internen und externen Bedingungen des Kühlschranks. Dies wird durch Aufleuchten der Anzeige AUTO signalisiert. 42 Sollte es sich als erforderlich erweisen, die I CareFunktion mit von den Standard-Temperaturen abweichenden Temperaturen zu betreiben, halten Sie bei der Aktivierung der Funktion die I Care-Taste gedrückt und stellen dann gleichzeitig mittels der Tasten und die neuen Temperaturen ein. Die auf diese Weise einstellbaren Temperaturen belaufen sich auf 4°, 5° e 6° für die Kühlzone und auf 18°, -19° e 20° für die Gefrierzone. Bei aktivierter HOLIDAY-Funktion sind Temperatureinstellungen nicht möglich. Das Gerät schaltet automatisch auf die der jeweiligen Situation entsprechende, optimale Einstellung: +12°C für die Kühlzone und 18°C für die Gefrierzone. Dieser Zustand wird außerdem durch die Anzeige AUTO signalisiert. Zur Aktivierung bzw. Deaktivierung der Funktionen drücken Sie die entsprechende Taste. Das Aufleuchten bzw. Erlöschen der entsprechenden LED zeigt den jeweiligen Funktionsstatus an. Einige Funktionen (SUPER COOL, SUPER FREEZE, ICE PARTY, I CARE) können nicht zu anderen Funktionen hinzugeschaltet werden (HOLIDAY,..). In einem solchen Falle hilft Ihnen die bereits vorbestimmte Priorität bei der Handhabung des Gerätes Nach Ablauf der Ice Party-Funktion muss die Taste ICE PARTY gedrückt werden, um das Blinklicht der entsprechenden LED auszuschalten. Das Blinklicht signalisiert den Abschluss der Funktion und ist ein Zeichen dafür, dass die Flasche aus dem Gefrierfach entnommen werden muss. Child Lock (Kindersicherung) Zur Aktivierung der Funktion Kindersicherung muss die Taste Child Lock für 2 Sekunden gedrückt werden. Die Aktivierung der Tastensperre wird durch ein kurzes, akustisches Signal und durch Aufleuchten der entsprechenden LED bestätigt. Zur Deaktivierung der Funktion drücken Sie die Taste Child Lock für 2 Sekunden. Die Deaktivierung wird durch ein kurzes, akustisches Signal und durch Erlöschen der entsprechenden LED bestätigt. ! Die Graphikleiste der GEFRIERZONE dient ebenso dazu, Sie auf einen unnormalen Temperaturanstieg im Innern der Gefrierzone aufmerksam zu machen (siehe Störungen und Abhilfe). Kühlsystem Optimaler Gebrauch der Gefrierzone No Frost Das No Frost System steuert einen kontinuierlichen Luftstrom, der die Feuchtigkeit aufnimmt und die Bildung von Reif und Eis verhindert. In der Kühlzone wird der korrekte Feuchtigkeitsgrad erhalten. Aufgrund dessen, dass keine Reifbildung besteht, bleibt die Qualität der Lebensmittel unveränderlich erhalten, auch in der Gefrierzone wird die Bildung von Eis unterbunden, weshalb sich ein Abtauen erübrigt; die Lebensmittel haften nicht aneinander. Regulieren Sie die Temperatur über das Display. ! Lagern Sie Lebensmittel oder Behältnisse nicht in direkter Berührung mit der hinteren Kühlwand, um die Belüftungsöffnungen nicht abzudecken und somit die Bildung von Kondenswasser zu fördern. ! Schließen Sie die Flaschen und wickeln Sie Lebensmittel ein. Optimaler Gebrauch der Kühlzone Regulieren Sie die Temperatur über das Display. Aktivieren Sie die Funktion SUPER COOL (Schnellkühlen), um die Temperatur kurzfristig herabzusetzen, z.B. wenn die Kühlzone nach einem Großeinkauf besonders gefüllt wird. Die Funktion wird nach Erreichen der optimalen Betriebsbedingungen automatisch wieder ausgeschaltet. Legen Sie nur abgekühlte, höchstenfalls lauwarme, niemals heiße Speisen ein (siehe Vorsichtsmaßregeln und Hinweise). Bitte beachten Sie, dass gekochte Speisen nicht länger halten als rohe Speisen. Bewahren Sie keine Flüssigkeiten in offenen Behältern auf. Sie würden die Feuchtigkeit erhöhen und demzufolge Kondensbildung verursachen. Lebensmittel eingefrieren (Gefrierzone bereits in Betrieb): - Bei kleinen Mengen, die unter der Hälfte der auf dem Typenschild angegebenen Lademenge liegen, drücken Sie die Taste SUPER FREEZE (Schnellgefrieren) (die entsprechende gelbe Kontrollleuchte leuchtet auf); legen Sie das Frischgut ein und schließen Sie die Tür. Diese Funktion wird nach 24 Std. oder nach Erreichen der optimalen Temperatur automatisch ausgeschaltet (Kontrollleuchte erlischt). - Bei großen Mengen, die die Hälfte der auf dem Typenschild angegebenen Lademenge übersteigen, halten Sie die Taste SUPER FREEZE (Schnellgefrieren) so lange gedrückt, bis die entsprechende Kontrollleuchte auf Blinklicht schaltet. Nach 24 Stunden erlischt die Blinkanzeige und schaltet auf Dauerlicht um: Gefriergut eingeben und Gerätetür schließen. Nach weiteren 24 Stunden schaltet sich die Funktion automatisch ab. (Kontrollleuchte erlischt) An- oder aufgetautes Gefriergut darf nicht wieder eingefroren werden. Solche Lebensmittel müssen innerhalb von 24 Std. verbraucht werden. Nur nach Zubereitung zu einem Fertiggericht kann dieses neu eingefroren werden. Lagern Sie in der Gefrierzone bitte keine hermetisch verschlossenen Glasflaschen mit Flüssigkeiten, beim Gefrieren könnten sie platzen. Die Höchstmenge an Lebensmitteln, die täglich eingefroren werden kann, ist auf dem Typenschild (befindlich in der Kühlzone unten links) ersichtlich (Beispiel: Kg/24h 4). ! Während des Schnellgefrierens sollte das Öffnen der Tür vermieden werden. ! Auch während eines Stromausfalls oder einer Störung sollte die Gefrierzonentür nicht geöffnet werden. Das Gefrier- bzw. Tiefkühlgut hält sich so unverändert für ungefähr 9-14 Stunden. ! Um die Frischluftzirkulation im Innern des Gefrierschrankes nicht zu behindern, sollten die Belüftungsöffnungen nicht durch Lebensmittel oder Behältnisse zugestellt werden DE Wartung und Pflege DE Abschalten Ihres Gerätes vom Stromnetz Lampenaustausch Bei Reinigungs- und Wartungsmaßnahmen muss das Gerät vom Stromnetz getrennt werden: 1. Halten Sie die ON/OFF-Taste für etwas länger als zwei Sekunden gedrückt, bis der Schriftzug OFF in beiden Anzeigen, Kühlzone und Gefrierzone, erscheint. 2. Ziehen Sie daraufhin den Netzstecker aus der Steckdose. ! Wird dies nicht befolgt, ertönt das Warnsignal. Dieser Warnton ist kein Zeichen für eine eventuelle Störung. Um die normale Betriebsweise wiederherzustellen, drücken Sie die ON/OFF-Taste für etwas länger als zwei Sekunden. Um das Gerät vom Stromnetz zu trennen, verfahren Sie gemäß der Punke 1 und 2. Zum Austausch der Lampe der Kühlzonenbeleuchtung muss der Netzstecker aus der Steckdose gezogen werden. Öffnen Sie die Lampenabdeckung (siehe Abbildung) und ersetzen Sie die Lampe durch eine neue gleicher Leistung und Bauform (nicht höher als 10 Watt). Reinigung Ihres Gerätes Das Gehäuse des Gerätes, außen und innen, sowie die Türdichtungen können mit einem mit Wasser und Bikarbonat oder einer milden Spüllauge getränkten Schwamm gereinigt werden. Vermeiden Sie Löse-, Scheuer-, Bleichmittel oder Ammoniak. Das Zubehör kann herausgenommen und in einer warmen Spüllauge gereinigt werden. Anschließend sorgfältig klarspülen und trockenreiben. Auf der Geräterückseite könnte sich Staub ablagern. Dieser kann vorsichtig mit dem langen Rohrstutzen eines auf eine geringe Leistung eingestellten Staubsaugers entfernt werden, jedoch nicht ohne vorher das Kühlgerät vom Stromnetz getrennt zu haben. Vermeidung von Schimmelpilz- und Geruchsbi
Scarica