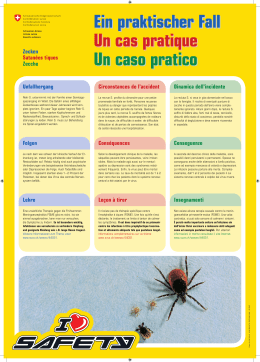
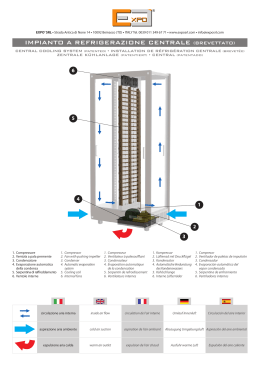
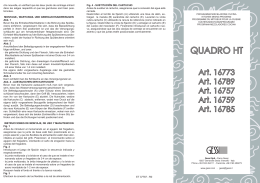
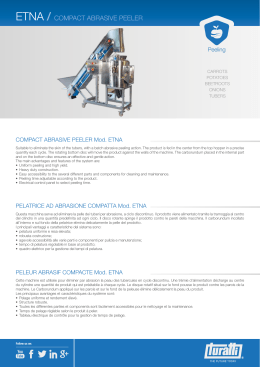
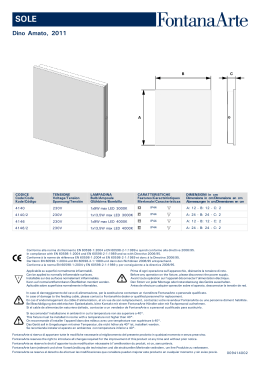
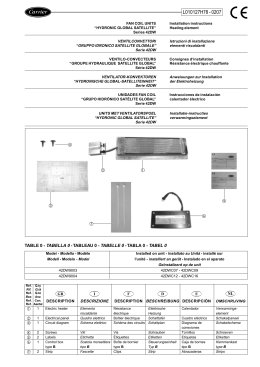
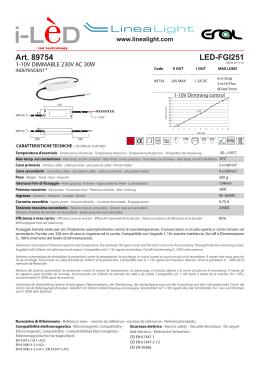
Climatizzatore
Minisplit
Climatiseur
Minisplit
Minisplit
air conditioner
Klimaanlage
Minisplit
Climatizador
Minisplit
Minisplit
airconditioner
Istruzioni
per l’installazione,
uso e manutenzione
Instructions
pour l’installation,
l’emploi et l’entretien
Instructions
for installation,
use and maintenance
Handbuch
für Installation,
Gebrauch und Wartung
Instrucciones
para la instalación,
uso y mantenimiento
Aanwijzingen
voor de installatie,
het gebruik en het onderhoud
2
INTRODUZIONE
INTRODUCTION
FOREWORD
VORWORT
INTRODUCCION
VOORWOORD
Vi ringraziamo per la fiducia
Merci de la confiance que vous
Congratulations. Of all the air
Wir danken Ihnen für das
En primer lugar queremos
Wij danken u voor het
che ci avete accordato con
avez bien voulu nous accorder en
conditioners you could have
Vertrauen, das Sie uns durch
agradecerles la confianza
vertrouwen om te kiezen voor
l’acquisto del Vostro
achetant votre climatiseur. Nous
chosen, you chose our product.
den Kauf des Klimagerätes
depositada en nosotros con la
onze airconditioner.
climatizzatore. Siamo certi che
sommes certains que vous avez
We know this is a good choice
entgegengebracht haben.
compra de su acondicionador.
Wij zijn ervan overtuigd dat u de
avete operato una scelta giusta
fait le bon choix car vous avez
because it has made you the
Wir sind sicher, daß Sie richtig
Podemos afirmar sin lugar a
juiste keuze hebt gemaakt. U
perché siete entrati in possesso
maintenant un des climatiseurs les
proud owner of one of the most
gewählt haben, denn jetzt besitzen
dudas que han efectuado una
bent nu in het bezit van een zeer
di uno dei più moderni e raffinati
plus modernes et raffinés que le
modern, newest design air
Sie eines der modernsten und
elección acertada, ya que han
moderne en praktische
climatizzatori presenti sul
marche propose. Les
conditioners available on the
praktischsten Klimageräte, die der
adquirido uno de los más
airconditioner. Leest u deze
mercato. Le istruzioni che
instructions contenues dans ce
market. The instructions in this
Markt zu bieten hat. Lesen Sie die
modernos y refinados
handleiding aandachtig door
seguiranno, Vi
manuel vous permettront
booklet will help you take full
folgenden Anleitungen durch,
acondicionadores de aire
alvorens het apparaat te
permetteranno di sfruttare
d’exploiter au mieux les qualités
advantage of everything this
bevor Sie das Gerät benutzen.
presentes en el mercado. Las
gebruiken. Volgt u nauwkeurig
appieno le qualità del Vostro
de votre appareil. Suivez-les
machine can do. Read it carefully
Beachten Sie alle Hinweise, damit
instrucciones que siguen, les
de aanwijzigingen zodat u een
apparecchio. Seguitele quindi
attentivement et respectez
and follow the instructions,
Ihnen ein angenehmer,
permitirán aprovechar al máximo
aangename koele zomer
con molta attenzione
scrupuleusement les indications
especially the “CAUTIONS”. This
komfortabler Sommer garantiert
las cualidades del aparato. Les
tegemoet gaat met uw
attenendoVi scrupolosamente
et surtout les recommandations:
way your summer will be much
ist, den Sie für Ihr Wohlbefinden
aconsejamos por lo tanto
airconditioner.
alle indicazioni e soprattutto alle
vous aurez ainsi la garantie d’un
more comfortable with the benefit
verdient haben.
respetarlas escrupulosamente
avvertenze in modo da garantir-
été riche du meilleur confort,
of cool air from your new
Vi un’estate ricca del miglior
indispensable à votre
air conditioner.
comfort, indispensabile per il
bien-être.
Vostro benessere.
como así también observar
atentamente las advertencias
dadas, garantizándose de este
modo un verano rico del máximo
confort, indispensable
para su bienestar.
3
11
4
7
6
3
1
5
2
9
8
10
Fig. 1
IDENTIFICAZIONE DELLE PARTI PRINCIPALI (Fig. 1)
1 - Unità interna.
2 - Unità esterna.
3 - Linea flessibile di collegamento.
4 - Pannello comandi.
5 - Griglia uscita aria.
6 - Sistema di regolazione flusso
aria.
7 - Filtro aria.
8 - Sportello di copertura attacchi
rapidi.
9 - Tasto di accensione generale.
10 - Tappo e raccordo per svuotamento completo dell'acqua di
condensa.
11 - Maniglia di trasporto.
IDENTIFICATION DES PRINCIPALES
PARTIES (Fig. 1)
1 - Unité intérieure.
2 - Unité extérieure.
3 - Raccord flexible de jonction.
4 - Panneau des commandes.
5 - Grille de sortie d’air.
6 - Dispositif de réglage du flux d’air.
7 - Filtre à air.
8 - Couvercle des prises rapides.
9 - Touche d’allumage géneral.
10 - Bouchon et raccord de vidange
totale de l’eau de condensation.
11 - Poignée de transport.
LIST OF MAIN COMPONENTS (Fig. 1)
1 - Inside unit.
2 - Outside unit.
3 - Connecting hose.
4 - Control panel.
5 - Air outlet grille.
6 - Air flow adjustment system.
7 - Air filter.
8 - Cover for quick connections.
9 - ON/OFF switch.
10 - Moisture emptying tube and plug.
11 - Carrying handle.
BESCHREIBUNG DER GERÄTETEILE (Abb. 1)
1 - Innengerät.
2 - Außengerät.
3 - Verbindungsschlauch.
4 - Bedienblende.
5 - Gitterabdeckung Luftauslaß.
6 - Luftstromregel-system.
7 - Luftfilter.
8 - Abdeckblende Schnellverbinder.
9 - Hauptschalter.
10 - Ablaßstöpsel für Kondenswasser.
11 - Tragegriff.
IDENTIFICACION DE LAS PARTES
(Fig. 1)
1 - Unidad interna.
2 - Unidad externa.
3 - Racor flexible de conexión.
4 - Panel de mandos.
5 - Rejilla de salida del aire.
6 - Sistema de regulación del caudal
del aire.
7 - Filtro aire.
8 - Puerta de protección de conexiones
rápidas.
9 - Interruptor de encendido general.
10 - Tapón y racor para la evacuación
completa del agua de condensación.
11 - Manilla de transporte.
ONDERDELENLIJST (Fig. 1)
1 - Binnenunit
2 - Buitenunit
3 - VerbindinWgsslang
4 - Bedieningspaneel functie
5 - Gekoelde lucht rooster
6 - instelling uitblaasrichting
7 - Luchtfilter
8 - Afdekplaat koppelingen
9 - Aan/uit schakelaar
10 - Afsluitdop condenswater
11 - Handgreep.
4
AVVERTENZE
• Assicuratevi che, tende o altri oggetti, non ostruiscano il filtro di aspirazione dell’aria posto sullo schienale del climatizzatore.
RECOMMANDATIONS
• Assurez-vous que les rideaux ou tout
autre objet ne bouchent pas le filtre
d’aspiration de l’air placé au dos du
climatiseur.
• Collegare il climatizzatore esclusivamente a prese elettriche dotate di
messa a terra.
• Branchez le climatiseur uniquement
à des prises avec raccordement à la
terre.
• Per garantire una buona efficienza
del climatizzatore eseguite almeno
una volta all’anno una pulizia interna
rivolgendoVi ad un centro di assistenza.
• Pour un fonctionnement optimal de
votre climatiseur, il est important de
faire nettoyer l’intérieur de l’appareil
au moins une fois par an, par un centre
d’assistance specialisé.
• Non ostruite il flusso dell’aria nella
unità esterna ponendola troppo vicino a muri o vetri.
• Ne gênez pas debit de l’air de l’unité
exterieure en la mettant trop pres de
murs et vitres.
• Evitare di curvare o torcere eccessivamente il tubo di collegamento tra
le due unità.
• Evitez que les raccordements entre
les deux unités soit tordu ou forme des
coudes inutiles.
• Il totale arresto del climatizzatore,
nonostante vi sia la normale alimentazione elettrica, può essere dovuto
all'intervento di una sicurezza interna che impedisce la fuoriuscita di
acqua. Prima di chiamare il centro
assistenza provate a drenare l'acqua contenuta nel CLIMATIZZATORE togliendo il tappo apposito (Fig.
1). Se l'inconveniente dovesse
riverificarsi fate controllare il Vs. climatizzatore da un tecnico specializzato.
• Si le CLIMATISEUR s’arrête
complétement, malgré une alimentation électrique normale, ceci est peut
être dû à l’activation d’une sécurité
interne qui empêche l’eau de s’évacuer.
Avant d’appeler le centre d’assistance,
essayer de drainer l’eau contenue dans
le CLIMATISEUR en enlevant le
bouchon spécial (Fig. 1). Si
l’inconvénient se reproduit, faites contrôler l’appareil par un technicien
spécialisé.
• L'apparecchio non deve essere
utilizzato in locali adibiti a lavanderie.
• Installare gli apparecchi solo in
locali asciutti (protezione IP 20).
• Gli apparecchi non possono essere messi in funzione dove vi
sono materiali, vapori o liquidi pericolosi.
ATTENZIONE: Pericolo di esplosione od incendio.
• Installare gli apparecchi su superfici piane.
• Allorchè si decida di non utilizzare più un apparecchio di questo
tipo, si raccomanda di renderlo
inoperante tagliando il cavo di
alimentazione, dopo aver stac-
• L'appareil ne doit pas être utilisé
dans les buanderies.
• Installer les appareils dans des
locaux secs uniquement (protection
IP 20).
• Les appareils ne peuvent être mis
en fonction dans des endroits où se
trouvent des matériaux, des vapeurs
ou des liquides dangereux.
ATTENTION: danger d'explosion ou
d'incendie.
• Installer les appareils sur des
surfaces planes.
• Si vous pensez ne jamais plus
utiliser cet appareil, nous vous conseillons de le rendre inopérant en
coupant le câble d’alimentation
après avoir débranché la fiche de la
prise de courant. De plus, nous vous
IMPORTANT NOTES
• Make sure that curtains or other
objects do not obstruct the air intake
filter on the back of the air conditioner.
• Only connect the air conditioner to
electrical sockets that have an earth.
• To guarantee efficient air conditioner
operation, have the unit cleaned internally once a year by your authorized
service centre.
• Do not obstruct the air flow in the
outside unit by placing it too close to
walls or windows.
• Do not bend or twist the connection
hose between the two units excessively.
• If the AIR CONDITIONER stops completely, even when the electrical supply
is functioning normally, this could be
due to the intervention of an internal
safety device which impedes the
outflow of water. Before calling the
service centre, try draining the water
from the unit by removing the air plug
(Fig. 1). If the problem persists, have
your air conditioner checked by a specialized technician.
• Do not use this equipment in
laundries.
• The equipment must only be
installed in a dry place (IP 20
protection).
• The equipment must not be
operated in areas where there are
dangerous materials, vapours or
liquids.
WARNING: Fire end explosion
hazard.
• Install the equipment on a flat
surface.
• When you decide to no longer use
an appliance of this type, you are
recommended to make it inoperative
by cutting the power cable, after
disconnecting the plug from the
power socket. You are also
recommended to make harmless the
parts of the appliance likely to
constitute a danger, especially for
children who could use the appliance
out of order for their games.
HINWEISE
• Achtung, der Luftansaugfilter auf der
Geräte-Rückseite darf nicht von
Gardinen oder anderen Gegenständen
verdeckt werden.
ADVERTENCIAS
• Controlar que cortinas u otros objetos
no obstruyan el filtro de aspiración del
aire, presente en el espaldar del
acondicionador.
BELANGRIJKE
AANWIJZIGINGEN
• Draag zorg voor een goede
luchttoevoer aan zowel voor- als
achterzijde van het apparaat.
• Das Klimagerät nur an geerdete
Steckdosen anschließen.
• Conectar el acondicionador únicamente a tomas eléctricas provistas de
conexión a tierra.
• Sluit het apparaat alleen aan op
geaarde stopcontacten.
• Voraussetzung für die einwandfreie
Funktion ist, daß Sie Ihr Gerät
mindestens einmal jährlich vom
Fachmann innen gründlich reinigen
lassen.
• Das Außengerät nicht zu nahe an
Wände oder Fenster aufstellen, damit
die Luftzirkulation nicht behindert wird.
• Den Verbindungsschlauch der beiden
Geräte nicht knicken oder verbiegen.
Sollte
das
Klimagerät
trotz
regelmäßiger Stromversorgung nicht
anlaufen, so kann eine interne
Sicherung angesprochen haben, die
den Wasserauslauf verhindert. Vor
Inanspruchnahme des Kundendienstes versuchen, das im Gerät
enthaltene Wasser durch Abnahme des
Stöpsels (Abb. 1) auslaufen zu lassen.
Sollte dieses Problem wiederholt
eintreten, so ist das Gerät von einem
Techniker zu prüfen.
• Das Gerät darf nicht in den Räumen
verwndet werden, die als Wäscherei
dienen.
• Geräte nur in trockenen Räumen
aufstellen (scoutzart IP 20).
• Das Gerät darf nicht in Bereichen
betrieben werden in denen
gefährliche Güter, Dämpfe oder
Flüßigkeiten auftreten können.
ACHTUNG:
Brandgefähr.
Explosion-
und
• Para garantizar un correcto funcionamiento del acondicionador, efectuar
por lo menos una vez al año una
limpieza de la parte interna, dirigiéndose para ello a un centro de servicio
postventa.
• No obstruir el flujo de aire en la unidad
externa colocándola demasiado cerca
de muros o vidrios.
• Evitar curvar o torcer excesivamente
el tubo de unión entre las dos unidades.
• Si el ACONDICIONADOR se para
completamente a pesar de la normal
alimentación eléctrica, puede ser que
ello se deba a la activación de una
seguridad interna que impide la evacuación del agua. Antes de llamar al
centro de asistencia, trate de vaciar el
agua contenida en el ACONDICIONADOR quitando el tapón correspondiente
(Fig. 1). Si el inconveniente se repitiera
haga controlar su acondicionador por
un técnico especializado.
• El aparato no tiene que se utilizado
en ambientes destinados a
lavanderías.
• Instalar los aparatos sólo en
ambientes secos (protección IP 20).
• Los aparatos no pueden ser
puestos en funcionamiento en zonas
en las cuales hay materiales o
liquidos peligrosos.
• Gerät nur auf ebenen Flächen
aufstellen.
ATENCIÓN: pleigro de explosión e
incendio.
• Ein Gerät dieser Art ist bei
Nichtverwendung durch Schneiden
des Stromversorgungskabels nachdem der Stekcer aus der
Steckdose gezogen wurde - außer
Betrieb zu setzen. Es empfiehlt sich
überdies, die gefährlichen Teile
abzusichern, Kinder könnten mit
dem abgestellten Gerät spielen.
• Instalar los aparatos en superficies
llanas.
• En caso de que se decida no utilizar
más un aparato de este tipo se recomienda volverlo inactivo cortando
el cable de la alimentación eléctrica
después de haber quitado el enchufe de la toma de corriente. Se
• Om de goede werking te
garanderen dient u het apparaat
jaarlijks door de erkende vakman
te laten reinigen.
• Draag zorg voor een
ongestoorde luchttoevoer van de
buitenunit.
•
Buig
of
verdraai
verbindingsslang niet.
de
• Als de airconditioner stopt
ondanks juiste stroomvoorziening
kan dit veroorzaakt worden door
een interne beveiliging die de
condenswaterafvoer controleert.
Vo o r d e s e r v i c e d i e n s t t e
raadplegen kunt u zelf de
ontluchtingsplug verwijderen
zodat het water kan weglopen (fig
1). Als dit probleem zich
herhaald, laat dan het apparaat
controleren door de erkende
vakman.
• Het apparaat mag niet
gebruikt worden in wasserijen.
• Het apparaat mag alleen
gebruikt worden in droge
ruimtes (IP 20 protectie).
• Het apparaat mag niet
gebruikt worden in ruimtes met
gevaarlijke goederen, gassen
of vloeistoffen.
WAARSCHUWING: Brand- en
explosiegevaar
• Het apparaat opstellen op een
vlakke ondergrond.
• Als u het apparaat niet meer
wilt gebruiken maak het dan
onaansluitbaar door, nadat de
stekker uit het stopcontact is
gehaald, de kabel door te
snijden. Draag zorg voor
afscherming van gevaarlijke
delen. Kinderen kunnen met
5
cato la spina dalla presa di corrente. Si raccomanda inoltre di
rendere innocue quelle parti dell’apparecchio suscettibili di
costituire un pericolo, specialmente per i bambini che
potrebbero servirsi dell’apparecchio fuori uso per i propri giochi.
Attenzione!
Questo prodotto contiene gas refrigerante R-410A con caratteristiche di ODP=0 (potenziale impoverimento ozono). Alla fine del suo
utilizzo deve essere consegnato
agli appositi centri di raccolta.
Chiedere informazioni ai servizi di
gestione della nettezza urbana del
vostro comune.
recommandons de rendre inoffensives les parties de l’appareil
susceptibles de constituer un danger, spécialement pour les enfants
qui pourrait se servir de l’appareil
pour leurs jeux.
Attention!
Cet appareil contient du gaz
réfrigérant R-410A classé ODP = 0
(appauvrissement potentiel de la
couche d’ozone). A la fin de son
utilisation, il doit être remis à un
centre de traitement spécialisé.
Renseignez-vous auprès du service
de voirie de votre mairie.
Attention!
This product contains R-410A
refrigerant with O.D.P. = 0 (Ozone
Depletion Potential). When the
refrigerant has to be disposed of it
must be handed over to the
specialised centres. Ask your local
waste collection centre for
information.
Achtung!
Dieses Produkt enthält Kältemittel
R-410A mit den Eigenschaften
ODP=0 (Ozonzehrungspotential).
Wenn es nicht mehr verwendet wird,
ist es an die zuständigen
Sammelstellen
auszuliefern.
Informationen können bei der
Straßenreinigungsverwaltung Ihrer
Gemeinde eingeholt werden.
recomienda además volver inactivas aquellas partes del aparato
susceptibles de constituir un peligro, especialmente para los niños
que podrían utilizar el aparato fuera
de uso para sus juegos.
¡Atención!
Este producto contiene gas refrigerante R-410A con características de
ODP=0
(potencial
de
empobrecimiento del ozono).
Cuando ya no se utilice el aparato,
deberá entregarse a los específicos
centros de recogida. Soliciten
informaciones a los servicios de
gestión de la limpieza urbana de su
ayuntamiento.
het apparaat gaan spelen.
Let op!
Dit produkt bevat het ecologische
koelmiddel (gas) R-410A met een
ODP-karakteristiek (potentiële
ozonafbraak) = 0. Na gebruik dient
dit bij de betreffende instanties te
worden ingeleverd. Informeer bij
de reinigingsdienst in uw
gemeente.
6
1,8 mt.
NO
10 cm
Fig. 2
POSIZIONAMENTO ED INSTALLAZIONE
- UNITÀ INTERNA
Per ottenere dal climatizzatore la
massima efficacia di funzionamento
é fondamentale posizionarlo in ambienti aventi caratteristiche adeguate
alla sua potenzialità (superficie,
irraggiamento solare, ecc...).
In ogni caso Vi raccomandiamo di
dotare l’ambiente di mezzi idonei
(tapparelle, veneziane, ecc...) ad
eliminare l’irraggiamento solare
attraverso le vetrate e di tenere
chiuse, quanto più possibile, porte
e finestre. Il posizionamento del
Vs. climatizzatore deve essere effettuato tenendo conto delle seguenti
importanti indicazioni: l' unità interna andrà posta con la parte
posteriore sempre ad una distanza di almeno 20 cm da qualsiasi
Fig. 3
Fig. 4
MISE EN PLACE ET INSTALLATION
POSITIONING AND INSTALLING
AUFSTELLUNG UND ANSCHLUSS
COLOCACIÓN E INSTALACIÓN
OPSTELLING EN INSTALLATIE
- UNITE INTERIEURE
Pour obtenir un fonctionnement optimal de votre climatiseur il est fondamental de l’installer dans des lo caux
ayant des caractéristiques adaptées à
la capacite de l’appareil (superficie,
rayonnement solaire, etc.).
Nous vous recommandons dans tous
les cas de prévoir dans le local des
solutions appropriées (stores ventilation, etc.) pour limiter le rayonnement
solaire à travers les vitres, mais aussi
de tenir les portes et les fenêtres le
plus possible fermées. Choisissez la
place de votre climatiseur en tenant
compte des indications suivantes: la
partie arrière de l’unité intérieure doit
être toujours placée à au moins 20 cm
de toute sorte d’obstacle (rideaux,
parois etc.) pouvant empêcher un bon
passage de l’air de la grille arrière avec
- INDOOR UNIT
To get the best cooling performance
from your air conditioner, it is important
to match its cooling capacity with the
characteristics of the area to be cooled
(size, exposure to sunlight and so on).
Where possible, the room should be
fitted with blinds and ventilation systems to limit heating from sun exposure
as much as possible. Windows and
doors should also be kept closed where possible.
When selecting where to place your air
conditioner, bear in mind these pointers:
the indoor unit should be positioned so
that its back is at least 20 cm from any
obstacle (curtain, wall, etc.) that could
prevent good air flow through the rear
intake grille and its filter. Nothing should
obstruct the cooled air flow from the
front grille.
- INNENEINHEIT
Das Klimagerät funktioniert nur dann
optimal, wenn die Raumverhältnisse
(Raumgröße, Sonneneinstrahlung,
usw. ...) seiner Kapazität angepaßt
sind.
Wir empfehlen auf jeden Fall
entsprechende
Vorkehrungen
(Sonnenschutz, Belüftung, usw.) zu
treffen, damit bei verglasten Wänden
die Sonneneinstrahlung in Grenzen
gehalten wird. Fenster und Türen
sollten möglichst geschlossen bleiben.
Bei der Aufstellung folgendes beachten:
Damit die Luftzirkulation am
rückwärtigen Gitter mit Filter nicht
behindert wird, muß die Rückwand der
inneren Einheit mindestens 20 cm von
anderen Gegenständen (Gardinen,
Wände, usw.) entfernt sein.
Auch die vordere Gitterabdeckung muß
- UNIDAD INTERNA
Para obtener la máxima eficacia de
funcionamiento del acondicionador,
resulta fundamental colocarlo en ambientes que posean características
adecuadas a su potencialidad (superficie, irradiación solar, etc.).
Aconsejamos dotar siempre el ambiente de los medios idóneos para limitar la
irradiación solar a través de las
superficies con vidrios y de mantener
cerradas lo más posible, puertas y
ventanas. La colocación de su acondicionador debe ser efectuada
considerando las importantes indicaciones que siguen: la unidad interna
deberá ser colocada con la parte
posterior siempre a una distancia de
por lo menos 20 cm de cualquier clase
de obstáculo (cortinas, paredes, etc.)
que pueda impedir un correcto fluir del
- BINNEN UNIT
Om een goede werking van het
apparaat te garanderen is het
belangrijk dat de koelcapaciteit
overeenkomt
met
de
warmtebelasting van het vertrek
waar het apparaat staat
opgesteld.
Aangeraden wordt directe
instraling van zonlicht in de
ruimte te voorkomen. Ramen en
deuren van vertrekken welke
uitkomen op de te conditioneren
ruimte dienen zoveel mogelijk
gesloten te blijven. Het apparaat
dient aan de achterzijde
tenminste 20 cm vrij van andere
voorwerpen te staan.
U dient zorg de dragen voor
ongehinderd in- en uitstromen
van de lucht.
7
ostacolo (tende, pareti, ecc.) che
possa impedire un buon passaggio dell’aria dalla griglia posteriore
con filtro.
Anche la griglia anteriore deve rimanere libera da qualsiasi ostacolo
che possa impedire l’uscita dell’aria.
- UNITA’ ESTERNA
L’unità esterna deve sempre essere collocata al di fuori del locale
dove si trova il climatizzatore ad
esempio, su un davanzale o su un
balcone (Fig. 2).
L’unità esterna dovrà essere collocata in modo che il dislivello
massimo con quella interna sia di
1,8 m. Per evitare grosse fuoriuscite di acqua è indispensabile che
l’unità esterna sia assolutamente
livellata. (Fig. 3).
Nei climi più caldi, per ottenere un
miglior rendimento, consigliamo di
tenere l'unità esterna con la sua
parte posteriore distanziata di 10
cm da muri, vetri o altro, in modo
da consentire un ottimale flusso
dell'aria (Fig. 4).
AVVERTENZE:
1) L’UNITÀ ESTERNA NON DOVRÀ MAI RESTARE APPESA PER
IL SOLO TUBO DI COLLEGAMENTO.
2) NEL MODELLO CLIMA 16 HP
DURANTE IL FUNZIONAMENTO
IN RISCALDAMENTO TOGLIERE
IL TAPPO DI DRENAGGIO DELL’ACQUA
DI
CONDENSA
DELL’UNITÀ ESTERNA.
filtre.
Même la grille avant doit être libre, de
façon à ce que l’air puisse sortir
librement.
- UNITE EXTERIEURE
L’unité extérieure doit toujours être
placée à l’extérieur du local où se trouve
le climatiseur, par exemple, sur un
rebord de fenêtre ou bien sur un balcon
(Fig. 2).
L’unité extérieure doit être placée de
façon à ce ce que la différence de
niveau maximum avec l’unité intérieure
soit de 1,8 m. Pour éviter les grosses
fuites d’eau, il est indispensable que
l’unité extérieure soit parfaitement
nivelée. (Fig. 3)
CONSEILS:
1) L’UNITÉ EXTÉRIEURE NE DOIT
JAMAIS RESTÉE UNIQUEMENT
SUSPENDUE PAR SON TUYAU DE
RACCORDEMENT.
2) PENDANT LE FONCTIONNEMENT
EN MODE DE CHAUFFAGE DU
MODÈLE CLIMA 16 HP, ÔTER LE
BOUCHON DE DRAINAGE DE L’EAU
DE CONDENSATION DE L’UNITÉ
EXTÉRIEURE.
- OUTDOOR UNIT
The outdoor unit must always be placed
outside the room where there is the air
conditioner, for example on a window
sill or on a balcony (Fig. 2).
The outdoor unit will have to be placed
so that the maximum difference in level
with the indoor unit is 1,8 m. To prevent
a lot of water coming out it is essential
for the outdoor unit to be absolutely
level (Fig. 3).
NOTICES:
1) THE OUTDOOR UNIT MUST
NEVER BE HUNG JUST BY ITS
CONNECTION HOSE.
2) WITH THE CLIMA 16 HP MODEL,
DURING HEATING OPERATION,
TAKE THE CONDENSATION WATER
DRAI-NAGE PLUG OUT OF THE
OUTDOOR UNIT.
frei zugänglich sein, damit die Luft
ungehindert zirkulieren kann.
- AUSSENEINHEIT
Die Ausseneinheit muß immer ausserhalb des Raumes installiert werden,
in dem sich die Klimaanlage befindet
(z.B. auf einem Balkon oder auf einem
Fensterbrett) (Abb. 2).
Die Ausseneinheit muß derart positioniert
werden,
daß
der
Höhenunterschied zur Inneneinheit
maximal 1,8 m beträgt. Es ist unbedingt
erforderlich, daß die Ausseneinheit
perfekt nivelliert ist, um das Austreten
von größeren Wassermengen zu
vermeiden (Abb. 3).
WICHTIGE HINWEISE:
1) DIE AUSSENEINHEIT DARF
NIEMALS
NUR
AM
VERBINDUNGSSCHLAUCH
AUFGEHÄNGT WERDEN.
2) BEIM MODELL CLIMA 16 HP MUSS
WÄHREND DES HEIZBETRIEBS DER
KONDENSWASSERABLASSTÖPSEL AN DER AUSSENEINHEIT
ENTFERNT WERDEN.
aire por la rejilla posterior con filtro.
También la rejilla delantera debe
encontrarse libre de todo tipo de
obstáculo que pueda impedir la salida
del aire.
- UNIDAD EXTERNA
La unidad externa tiene que estar
colocada siempre fuera del ambiente
en el cual se encuentra el climatizador,
por ejemplo, en un umbral de una
ventana o en un balcón (Fig. 2).
La unidad externa tiene que ser
colocada de manera que el desnivel
máximo con el interior sea de 1,8 m.
Para evitar grandes pérdidas de agua
es indispensable que la unidad externa
esté absolutamente nivelada (Fig. 3).
OBSERVACIONES:
1) LA UNIDAD EXTERNA NO TIENE
QUE ESTAR COLGADA NUNCA
SÓLO POR EL TUBO DE CONEXIÓN.
2) EN EL MODELO CLIMA 16 HP,
DURANTE EL FUNCIONAMIENTO EN
CALEFACCIÓN QUITAR EL TAPÓN
DE VACIADO DEL AGUA DE
CONDENSACIÓN DE LA UNIDAD
EXTERNA.
- BUITEN UNIT
De buitenunit moet buiten het
vertrek, balkon of vensterbank,
worden opgesteld (Fig. 2).
Tussen de binnen- en buitenunit
mag
maximaal
1,8
m
hoogteverschil bestaan. Om
wateroverlast te voorkomen het
buitendeel vlak opstellen (Fig. 3)
De buitenunit zoveel mogelijk vrij
van weersinvloeden plaatsen, om
beschadiging te voorkomen.
BELANGRIJK:
1) DE BUITENUNIT NOOIT
ALLEEN OPHANGEN AAN DE
FLEXIBELE LEIDING.
2) IN GEVAL VAN DE CLIMA 16
HP; TIJDENS VERWARMEN DE
CONDENSWATERSTOP UIT DE
BUITENUNIT VERWIJDEREN.
8
Fig. 5
INSTALLAZIONE CON KIT DI
SERIE
Per il climatizzatore CLIMA 16 è
previsto di serie un kit per fissare
l’unità esterna. Seguendo le istruzioni allegate al kit, procedere al
montaggio della struttura, quindi
operare come segue:
INSTALLATION AU MOYEN DU KIT
STANDARD
Un Kit standard de fixation de l’unité
extérieure est prévu pour le climatiseur
CLIMA 16. Pour effectuer le montage
de la structure, suivre les instructions
données avec le Kit puis effectuer les
opérations suivantes:
a) Ritagliare dalla scatola del kit la
dima di foratura.
a) Découper la dîme de perçage sur la
boîte contenant le Kit.
b) Usando la dima stessa, eseguire due fori nella zona di fissaggio
prescelta, tenendo presente che i
due fori devono essere perfettamente orizzontali.
b) En s’aidant de cette dîme, percer
deux trous dans la zone de fixation
choisie, en faisant bien attention à ce
que les trous soient parfaitement
horizontaux.
c) Inserire i tasselli nei fori ed agganciare la struttura. Noi Vi
consigliamo l’utilizzo di tasselli a
squadra, in quanto permettono un
facile smontaggio del supporto unità
esterna.
c) Introduire les vis à expansion à
équerre et y accrocher la structure.
Nous vous conseillons d’utiliser des
vis à expansion à équerre car elles
permettent de démonter facilement le
support de l’unité extérieure.
d) Inserire sul supporto l’unità esterna
(Fig. 5).
d) Introduire l’unité extérieure sur le
support (Fig. 5).
INSTALLATION WITH STANDARD
KIT
For the CLIMA 16 air conditioner there
is a standard kit to fix the outdoor unit.
Following the instructions enclosed with
the kit, fit the structure, then proceed
as follows:
a) Cut the drilling template from the kit
box.
b) Using the template, make two holes
in the chosen fixing area, bearing in
mind that the two holes have to be
perfectly horizontal.
c) Insert the plugs into the holes and
hook on the structure. We recommend
using square plugs as they make it
easy to dismantle the outdoor unit
support.
d) Insert the outdoor unit onto the
support (Fig. 5).
INSTALLIERUNG MIT
SERIENMÄSSIGEM KIT
Für die Klimaanlage CLIMA 16 steht
serienmäßig ein Kit für die Befestigung
der Ausseneinheit zur Verfügung. Die
Struktur unter Beachtung der dem Kit
beiliegenden Anleitungen montieren
und folgendermaßen vorgehen:
a) Aus der Kitschachtel die Bohrungsschablone ausschneiden.
b) Mit Hilfe der Schablone zwei
Bohrlöcher im gewählten Befestigungsbereich erstellen; dabei
beachten, daß die beiden Bohrlöcher
perfekt horizontal sein müssen.
c) Die Dübel in die Löcher stecken und
die Struktur einhaken. Wir empfehlen
die Verwendung von Dübeln mit Haken,
um einen leichten Abbau der
Ausseneinheithalterung
zu
gewährleisten.
d) Die Ausseneinheit in die Halterung
einsetzen (Abb. 5).
INSTALACIÓN CON JUEGO DE SERIE
Para el climatizador CLIMA 16 se ha
previsto de serie un juego para fijar la
unidad externa, siguiendo las
instrucciones adjuntas al juego, realizar
el ensamblaje de la estructura, luego
proceder de la siguiente manera:
a) Recortar de la caja del juego la
plantilla de perforación.
b) Usando la plantilla, realizar dos
agujeros en la zona de fijación
escogida, teniendo en cuenta que los
dos agujeros tienen que estar
perfectamente horizontales.
c) Colocar los tarugos en los agujeros
y enganchar la estructura. Nosotros
aconsejamos el empleo de tarugos de
escuadra ya que permiten un fácil
desmontaje del soporte de la unidad
externa.
d) Colocar en el soporte la unidad
externa (Fig. 5).
INSTALLATIE MET
STANDAARD KIT
U kunt de buitenunit van de CLIMA 16 monteren met de
standaard montage set, volg
daarvoor
onderstaande
aanwijzigingen:
a) snij het boorpatroon uit de
doos van de montage set.
b) gebruik het boorpatroon om
twee gaten te boren, de gaten
perfect horizontaal maken.
c) monteer de ondersteuning
middels haken zodat een snelle
demontage mogelijk blijft.
d) plaats de buitenunit op de
ondersteuning (Fig. 5).
9
Fig. 6
- LINEA FLESSIBILE
Il tubo di collegamento tra le due
unità dovrà essere fatto passare
tra i due battenti della finestra, i
quali, durante il funzionamento del
climatizzatore dovranno essere chiusi il più possibile (Fig. 6).
Nel caso si voglia operare una installazione “semifissa” che consenta
la chiusura completa dei battenti
della finestra occorrerà praticare
un foro rettangolare di dimensioni
40 mm di larghezza e 25 mm di
altezza nello stipite. Questo foro
può essere eseguito: nella parte
fissa, nella parte mobile, o nella
parte fissa e mobile del serramento (Fig. 7).
Per procedere ad un altro tipo di installazione (sfruttando la possibilità
di scollegare la linea di collegamento tra le due unità per poi inserirla
nel foro praticato nella parete) consultate il paragrafo “ISTRUZIONI
PER L’INSTALLAZIONE CON FORATURA DELLA PARETE”
- LIGNE FLEXIBLE
Le tuyau de raccordement entre les
deux unités devra passer entre les
deux battants de la fenêtre qui, pendant le fonctionnement du climatiseur,
devront être fermés le plus possible
(Fig. 6).
Si vous voulez realiser une installation
“demifixe” permeffant la fermeture totale des battants de la fenêtre, il faudra
percer, dans le montant, un trou
rectangulaire de 40 mm de large de
haut 25 mm. Ce trou pourra être percé:
seulement sur le bâti dormant ou seulement sur le châssis mobile, ou bien
dans la partie fixe et mobile du cadre
(Fig. 7).
Pour procéder à un autre type de pose
(en exploitant la possibilité de
déconnecter la ligne de branchement
entre les deux unités pour les monter
ensuite dans un trou percé au mur),
reportez-vous au paragraphe “POSE
PAR PERCAGE DU MUR”.
Fig. 7
- FLEXIBLE LINE
The hose connecting the two units goes
under the two partially closed wings of
the window. When the unit is running,
the wings should be kept closed as
much as possible (Fig. 6).
If you want a "semi-permanent" installation to allow you to close the window
completely, cut a 40x25 mm rectangular hole in the window sill or frame. Drill
this hole either in the fixed part or in the
moving part, or in the fixed and moving
part of the window frame (Fig. 7).
If you wish to proceed with a different
kind of installation (taking advantage
of being able to disconnect the line
between the two units and passing it
through the hole in the wall) consult the
paragraph:
“INSTALLATION
INSTRUCTIONS, DRILLING A HOLE
IN THE WALL”.
- BIGSAME LEITUNG
Der Verbindungsschlauch der beiden
Geräte wird zwischen den beiden
offenen Fensterflügeln nach außen
geführt. Das Fenster soll soweit wie
möglich geschlossen bleiben (Abb. 6).
Sollten Sie eine “halbfeste” Aufstellung
wählen, bei der das Fenster ganz zu
ist, müssen Sie eine 40 mm breite und
25 mm hohe Öffnung in den
Fensterrahmen bohren. Für die Öffnung
kann man folgende Positionen (Abb. 7)
wähien:
a) am festen Rahmen
b) am Flügel
c) am Fensterrahmen und am Fügel.
- LíNEA FLEXIBLE
El tubo de conexión entre las dos
unidades deberá pasar entre las dos
hojas de la ventana, las que, durante la
marcha del acondicionador, deberán
permanecer cerradas lo más posible
(Fig. 6).
Si se desea realizar una instalación
“semifija” que permita el cierre total de
las hojas de la ventana, será necesario
efectuar un orificio rectangular en el
marco de 40 mm de anchura por 25
mm de altura. Dicho orificio puede ser
realizado sólo en la parte fija, sólo en la
parte móvil o bien sobre ambas partes
(fija y móvil) del cerramiento (Fig. 7).
Eine weitere Installationsmöglichkeit
besteht darin, die Verbindungsleitung
der beiden Geräte abzutrennen und in
das Bohrloch einzuführen, das in der
Wand ausgeführt wurde. Diese Art von
Installation ist im Kapitel “ANLEITUNG
ZUR
MONTAGE
UNTER
DURCHBORHUNG DER WAND”
beschrieben.
Para proceder a otro tipo de instalación
(aprovechando la posibilidad de
desconectar la línea de conexión entre
las dos unidades para después
introducirlas en el orificio realizado en
la
pared)
lean
el
párrafo
“INSTRUCCIONES
PARA
LA
INSTALACIÓN CON ORIFICIO EN LA
PARED”.
- FLEXIBELE LEIDING
De verbindingsslang via het raam
naar buiten leiden. Zorg dat het
raam zover mogelijk gesloten
blijft (Fig. 6).
Vo o r e e n “ s e m i - p e r m a n e n t e ”
installatie: maak een gat van
40x25 mm in het kozijn zodat het
raam gesloten kan blijven (Fig.
7).
Om het apparaat op een andere
manier te installeren (en daarbij de
mogelijkheid te benutten om de
verbindingsleiding tussen de beide
units los te koppelen en deze
vervolgens in het in de muur
geboorde gat te doen) moet u de
paragraaf “AANWIJZINGEN VOOR
DE INSTALLATIE MET IN DE MUUR
GEBOORDE GATEN”.
10
ALLACCIAMENTO ELETTRICO
Prima di collegare il climatizzatore
assicurarsi che:
BRANCHEMENT ELECTRIQUE
Avant de brancher le climatiseur, vous
assurer que:
CONNECTION TO THE MAINS
Before connecting the air conditioner,
make sure that:
ELEKTRISCHER ANSCHLUSS
Vor Anschluß an das Stromnetz ist zu
kontrollieren:
CONEXION ELÉCTRICA
Antes de conectar el climatizador
asegurarse que:
ELEKTRISCHE AANSLUITING
Voordat u de airconditioner aansluit
moet u controleren of:
•
La linea di alimentazione sia di
220-240V/50Hz.
•
la ligne d’alimentation ait une
tension de 220-240V/50Hz.
•
Die Versorgungsleitung muß 220240V/50Hz sein.
•
La línea de alimentación sea de
220V-240V/50 Hz.
•
De voedingslijn een spanning
heeft van 220-240V/50Hz.
•
La linea di alimentazione sia
dotata di messa a terra e
dimensionata per una corrente di
spunto di 20A e protetta da un fusibile da 10AT.
•
La ligne d’alimentation soit
équipée d’une mise à la terre, qu’elle
soit dimensionnée pour un courant de
pic de 20A et protégée par un fusible
de 10AT.
•
The power supply is 220-240V/
50Hz.
The power line is grounded and rated
for a take-off current of 20A and
protected by a 10AT fuse.
•
Die Versorgungsleitung muß mit
Schutzleiter
versehen,
für
Stromspitzen von 20A ausgelegt,
sowie mit einer 10At-Sicherung
geschützt sein.
•
La línea de alimentación conste
de protección de tierra y con capacidad
para una corriente inicial de 20A y
protegida por un fusible de 10AT.
•
De voedingslijn geaard is en
berekend is op een aanloopstroom
van 20A en beveiligd is met een
zekering van minimaal 10AT.
•
La presa abbia una portata di
almeno 10A a 250V.
Qualora non fosse compatibile con
la spina del climatizzatore sostituirla con una a norme CEI.
•
La prise ait une portée d’au moins
10A à 250V.
Dans le cas où la prise ne serait pas
compatible avec la fiche du climatiseur,
la remplacer par une autre aux normes
CEI.
•
La toma tenga una capacidad de
por lo menos 10A a 250V.
En caso de que no fuera compatible
con el enchufe del climatizador
sustituirla con una según normas CEI.
•
Het stopcontact een capaciteit
heeft van minimaal 10A bij 250V.
Als de stekker niet geschikt is met
het oog op het stopcontact dan moet
de stekker vervangen worden door
een stekker die aan de CEI
voorschriften voldoet.
•
Il conduttore di un’eventuale
prolunga abbia sezione almeno di
1,5 mm2.
•
Il climatizzatore sia installato
secondo le normative nazionali.
•
L’assorbimento del climatizzatore, sommandosi a quello degli altri
elettrodomestici, non provochi l’interruzione dell’impianto elettrico.
•
Le fil conducteur d’une éventuelle
rallonge ait une section d’au moins 1,5
mm2.
•
Le climatiseur soit installé
conformément aux normes nationales.
•
L’absorption du climatiseur
ajoutée à celle des autres appareils
électroménagers ne provoque pas
l’interruption du circuit électrique.
•
The socket must have a rating of
at least 10A at 250V.
If the socket and the plug of the
conditioner are not compatible, replace
the socket with one complying with CEI
standards.
•
The lead of any extension must
have a cross-section of at least 1.5
2
mm .
•
Die
Steckdose
muß
für
mindestens 10A und 250V ausgelegt
sein.
Sollte die Steckdose mit dem Stecker
der Klimaanlage nicht übereinstimmen,
ist diese mit einer den EU-Vorschriften
entsprechenden zu ersetzen.
•
The air conditioner must be
installed in compliance with national
regulations.
•
Die Versorgungsleitung einer
eventuellen Verlängerung muß einen
Querschnitt von 1,5 mm2 aufweisen.
•
The total power requirement of the
air conditioner and other household
appliances must not cause interruption
of the electrical system.
•
Die
Klimaanlage
muß
entsprechend der ortsgegebenen
Vorschriften installiert sein.
•
Die Leistungsaufnahme der
Klimaanlage darf bei Zuschaltung der
anderen Haushaltsgeräte nicht die
Unterbrechung der Stromzufuhr
auslösen.
•
El conductor de una eventual
prolongación tenga una sección de por
lo mneos 1,5 mm2.
•
El climatizador esté instalado
según las normativas nacionales.
•
El consumo del climatizador
sumándose
al
de
otros
electrodomésticos, no cause la
interrupción de la instalación eléctrica.
•
De leiding van een eventueel
verlengsnoer een doorsnede van
minimaal 1,5 mm2 heeft.
•
Door het stroomverbruik van de
airconditioner opgeteld bij het
stroomverbruik
van
andere
elektrische apparatuur de stroom
niet uitvalt.
11
✲
12
14
15
Fig. 8
13
11
PANNELLI COMANDI
Il climatizzatore è dotato di un sistema elettronico di selezione delle
funzioni rappresentato nelle sue
parti di comando nella Fig. 8.
PANNEAU DES COMMANDES
Le climatiseur est équipé d’un dispositif
électronique de sélection des fonctions
dont les commandes sont représentées
sur la Fig. 8.
1 - Tasto di “Stand-by”.
2 - Tasto di “decremento” valore
di temperatura desiderata.
3 - Tasto di “incremento” valore
di temperatura desiderata.
4 - Tasto di “decremento” ore di
programmazione.
5 - Tasto di “incremento” ore di
programmazione.
6 - Tasto di selezione periodo di
programmazione.
(START: periodo di funzionamento del climatizzatore;
STOP: periodo di fermata del
climatizzatore).
7 - Tasto inserimento programmazione oraria.
8 - Display luminoso.
9 - Tasto selezione modo di
funzionamento “automatico”.
10 - Tasto di selezione della
velocità di ventilazione.
11 - Tasto ionizzatore.
12 - Tasto funzionamento modo
“deumidificazione”.
13 - Tasto funzionamento modo
“notturno”.
14 - Tasto funzionamento modo
“raffreddamento”.
15 - Tasto funzionamento modo
“riscaldamento” (solo per CLIMA
16 HP).
1 - Touche de “Stand by”.
2 - Touche de “diminution” de la
valeur de la température désirée.
3 - Touche d”augmentation” de la
valeur de la température désirée.
4 - Touche de “diminution” des
heures de programmation.
5 - Touche "d’augmentation" des
heures de programmation.
6 - Touche de sélection de la période
de programmation
(START: période de fonctionnement
du climatiseur;
STOP: période d’arrêt du
climatiseur).
7 - Touche d’enclenchement de la
programmation de l’horaire.
8 - Affichage lumineux.
9 - Touche de sélection du mode de
fonctionnement “automatique”.
10 - Touche de sélection de la
vitesse de ventilation.
11 - Touche ionisateur.
12 - Touche de fonctionnement en
mode “déshumidificateur”.
13 - Touche de fonctionnement en
mode “nocturne”.
14 - Touche de fonctionnement en
mode “refroidissement”.
15 - Touche de fonctionnement en
mode “chauffage” (uniquement pour
CLIMA 16 HP).
10
9
CONTROL PANEL
The air conditioner is equipped with an
electronic function selection system
shown with its control parts in Fig. 8.
1 - “Stand-by” key.
2 - Key to “decrease” the value of the
desired temperature.
3 - Key to “increase” the value of the
desired temperature.
4 - Key to “decrease” programming
hours.
5 - Key to “increase” programming
hours.
6 - Key to select the programming
period.
(START: period of operation of the
air conditioner;
STOP: period the air conditioner is
stopped).
7 - Key to insert hourly programming.
8 - Luminous display.
9 - Key to select “automatic”
operating mode.
10 - Key to select ventilation speed.
11 - Ionizer key.
12 - Key for “dehumidification”
operating mode.
13 - Key for “night” operating mode.
14 - Key for “cooling” operating
mode.
15 - Key for “heating” operating
mode (only for CLIMA 16 HP).
8
7
6
4
5
3
2
1
BEDIENUNGSFELD
Die Klimaanlage ist mit einem elektronischen Funktionswahlsystem ausgestattet, das detailliert auf Abbildung
8 abgebildet ist.
PANELES DE MANDOS
El climatizador consta de un sistema
electrónico de selección de las
funciones representado en sus partes
de mando en la Fig. 8.
BEDIENINGSPANEEL
De airconditioner is uitgevoerd
met
een
elektronisch
functiekeuze systeem, zie figuur
8.
1 - Taste "Stand-by".
2 - Taste zum Verringern der
Temperatur.
3 - Taste zum Erhöhen der
Temperatur.
4 - Taste zum Verringern der
eingestellten Stunden.
5 - Taste zum Erhöhen der
eingestellten Stunden.
6 - Taste zur Wahl des
programmierten Zeitraums
(START: Betriebsphase der
Klimaanlage;
STOP: Stillstandsphase der
Klimaanlage).
7 - Taste zum Einschalten der
Stundenprogrammierung.
8 - Leuchtanzeige.
9 - Taste zur Wahl des Automatikbetriebs.
10 - Taste zum Einstellen der
Ventila-torgeschwindigkeit.
11 - Ionisierungstaste.
12 - Taste zum Einschalten der
Betriebsweise “Entfeuchten”.
13 - Taste für den “Nachtbetrieb”.
14 - Taste zum Einschalten der
“Kühlfunktion”.
15 - Taste zum Einschalten der
“Heizfunktion” (nur bei CLIMA 16 HP).
1 - Tecla de “Stand-by”.
2 - Tecla de “decremento” valor de
temperatura deseada.
3 - Tecla de “incremento” valor de
temperatura deseada.
4 - Tecla de “decremento” horas de
programación.
5 - Tecla de “incremento” horas de
programación.
6 - Tecla de selección período de
programación.
(START: período de funcionamiento
del climatizador;
STOP: período de paro del
climatizador).
7 - Tecla de introducción
programación horas.
8 - Display luminoso.
9 - Tecla selección modo de funcionamiento “automático”.
10 - Tecla de selección de la
velocidad de ventilación.
11 - Tecla ionizador.
12 - Tecla de funcionamiento modo
“deshumidificación”.
13 - Tecla de funcionamiento modo
“nocturno”.
14 - Tecla de funcionamiento modo
“refrigeración”.
15 - Tecla de funcionamiento modo
“calefacción” (sólo para CLIMA 16 HP).
1 - Stand by toets.
2 - Verlagen temperatuur instelling.
3 - Verhogen temperatuur
instelling.
4 - Verlagen tijdsduur
timerinstelling.
5 - Verhogen tijdsduur
timerinstelling.
6 - Keuze programmeerduur.
Start: periode bedrijf;
Stop: periode stilstand.
7 -Inschakelen programmering.
8 - Verlicht display.
9 - Automatisch bedrijf.
10 - Ventilatorsnelheid.
11 - Ioniseerfunctie.
12 - Ontvochtigingsfunctie.
13 - Nachtbedrijf.
14 - Koelen aan/uit.
15 - Verwarmen aan/uit (alleen
CLIMA 16 HP).
12
SELEZIONE FUNZIONI
SELECTION DES FONCTIONS
FUNCTION SELECTION
FUNKTIONSWAHL
SELECCIÓN FUNCIONES
FUNCTIEKEUZE
- ACCENSIONE GENERALE
Premendo il tasto basculante luminoso situato nella parte posteriore
dell’apparecchio si attiva la logica
elettronica.
- MISE EN MARCHE GENERALE
La logique électronique est activée en
appuyant sur la touche basculante
lumineuse se trouvant à l’arrière de
l’appareil.
- GENERAL SWITCH-ON
Pressing the luminous flip-switch on
the back of the appliance activates the
electronic logic unit.
- EINSCHALTEN DER
KLIMAANLAGE
Durch Betätigen des leuchtenden
Kippschalters auf der Geräterückseite
wird die elektronische Logik eingeschaltet.
- ENCENDIDO GENERAL
Apretando la tecla basculante luminosa
situada en la parte trasera del aparato
se activa la lógica electrónica.
- I N S C H A K E L E N VA N H E T
APPARAAT
Druk op knop 9, figuur 1, op de
achterzijde van het apparaat.
- STAND-BY
Una volta acceso il climatizzatore
mediante il tasto di accensione
generale, comparirà sul display del
pannello comandi, l’indicazione della
temperatura impostata. Selezionando il modo “STAND-BY”, tutte le
funzioni della macchina vengono
escluse per permetterVi una facile
impostazione delle funzioni desiderate. Terminata la selezione è
sufficiente premere di nuovo il tasto (1) per riattivare il climatizzatore.
- STAND BY
Une fois le climatiseur allumé au moyen
de la touche basculante arrière,
l’indication de la température
programmée apparaît sur l’affichage
du panneau des commandes. Si le
mode “STAND BY” est sélectionné,
toutes les fonctions de la machine sont
exclues pour permettre une
programmation facile des fonctions
désirées. Une fois la sélection terminée,
il suffit d’appuyer à nouveau sur la
touche (1) pour remettre le climatiseur
en marche.
- STAND-BY
Una vez encendido el climatizador con
la tecla basculante trasera, aparece en
el display del panel de mandos, la
indicación de la temperatura
programada. Seleccionando el modo
“STAND-BY” todas las funciones de la
máquina se excluyen para permitir una
fácil programación de las funciones
deseada. Una vez terminada la
selección es suficiente apretar de
nuevo la tecla (1) para reactivar el
climatizador.
- STAND-BY
Als het apparaat middels de knop
op
de
achterzijde
wordt
ingeschakeld
zal
de
temperatuurinstelling worden
weergegeven. Door op de toets
stand-by te drukken zullen alle
acties onderbroken worden zodat
u de mogelijkheid de gewenste
functie in te stellen. Door nu
opnieuw op stand-by te drukken
zal de airconditioner de gewenste
functie uitvoeren.
- SELECCIÓN DE LA TEMPERATURA
En el display del panel de mando se
visualiza continuamente la temperatura
programada por el usuario. Para variar
este valor hay que accionar las teclas
(3) o (2), según se desee incrementar
o decrementar la temperatura deseada
en el ambiente. Las temperatturas de
confort
aconsejadas
están
comprendidas entre los 22-25 °C y
entre los 18 y 22°C. en invierno.
- TEMPERATUURINSTELLING
Na het inschakelen zal de actuele
temperatuurinstelling worden
weergegeven. Stel nu de
gewenste temperatuur in middels
toetsen (2) en (3) op het
bedieningspaneel, figuur 10.
De comforttemperatuur in de
zomer is 22-25°C. In de winter
18-22°C.
- SELEZIONE DELLA
TEMPERATURA
Sul display del pannello comandi
è visualizzata continuamente la temperatura da Voi impostata. Per
variare questo valore dovrete agire sui tasti (3) (2) a seconda che
vogliate
incrementare
o
decrementare la temperatura da
Voi desiderata nell’ambiente. Le
temperature di confort consigliate
sono comprese fra i 22-25°C in
estate e fra i 18 e 22°C in inverno.
- RAFFREDDAMENTO
Prima di selezionare questa funzione è opportuno che Voi impostiate
la temperatura desiderata. Premendo il tasto (14) il climatizzatore è
abilitato al modo raffreddamento.
Tale funzione è sempre abbinata
ad una delle 3 velocità di ventilazione.
AVVERTENZA:
NEL MODO “RAFFREDDAMENTO” IL CLIMATIZZATORE OLTRE
AD ABBASSARE LA TEMPERATURA, DEUMIDIFICA ANCHE
L’ARIA AMBIENTE. NON È QUINDI NECESSARIO SELEZIONARE
ANCHE LA FUNZIONE “DEUMIDIFICAZIONE” PER ABBASSARE
IL TASSO DI UMIDITÀ NELL’ARIA.
- RISCALDAMENTO
(VERSIONE CLIMA 16 HP)
Prima di selezionare questa funzione è opportuno che Voi impostiate
- SELECTION DE LA
TEMPERATURE
La température programmée est
continuellement affichée sur le
panneau des commandes. Pour varier
cette valeur, il faut agir sur les touches
(3) ou (2) selon que l’on veut augmenter
ou diminuer la température ambiante
désirée. Les températures de confort
conseillées sont comprises entre 22 et
25°C en été et 18 et 22 °C en hiver.
- REFROIDISSEMENT
Avant de sélectionner cette fonction, il
faut programmer la température désirée.
Le climatiseur est habilité au mode
“refroidissement” de fonctionnement en
appuyant sur la touche (14). Cette
fonction est toujours accouplée à une
des 3 vitesses de ventilation.
CONSEILS:
LORSQU’IL FONCTIONNE EN MODE
“REFROIDISSEMENT”, NON SEULEMENT LE CLIMATISEUR ABAISSE LA
TEMPÉRATURE MAIS IL DÉSHUMIDIFIE AUSSI L’AIR AMBIANT. IL N’EST
DONC PAS NÉCESSAIRE DE
SÉLECTIONNER LA FONCTION
“DÉSHUMIDIFICATION” POUR ABAISSER LE TAUX D’HUMIDITÉ DANS
L’AIR.
- CHAUFFAGE
(VERSION CLIMA 16 HP)
Avant de sélectionner cette fonction, il
faut programmer la température désirée.
Le climatiseur est habilité au mode
- STAND-BY
Once the air conditioner has been
switched on with the flip-switch on the
back, the control panel display will show
the set temperature. Selecting “STANDBY” mode will exclude all the machine
functions to enable you to set the
desired functions easily. After selection,
you need only press the key (1) again
to reactivate the air conditioner.
- TEMPERATURE SELECTION
The control panel display constantly
shows the temperature you have set.
To change this value you will have to
use the keys (3) or (2) depending on
whether you want to increase or
decrease the temperature you wish to
have in the room. The recommended
comfort temperatures are between 2225°C in the summer and between
18-22°C in the winter.
- COOLING
Before selecting this function you
should set the desired temperature.
Pressing key (14) enables the air
conditioner for the cooling mode. This
function is always combined with one
of the 3 ventilation speeds.
NOTICE:
IN “COOLING” MODE, BESIDES
LOWERING THE TEMPERATURE
THE
AIR
CONDITIONER
DEHUMIDIFIES THE AIR OF THE
ROOM AS WELL. IT IS THEREFORE
NOT NECESSARY TO SELECT THE
“DEHUMIDIFICATION” FUNCTION TO
LOWER THE LEVEL OF HUMIDITY IN
THE AIR.
- HEATING
(CLIMA 16 HP VERSION)
Before selecting this function you
should set the desired temperature.
Pressing key (15) enables the air
conditioner for the heating mode.
NOTICE: THE ELECTRONIC LOGIC
UNIT OF THE AIR CONDITIONER IS
PROGRAMMED TO PREVENT
DAMAGE TO THE REFRIGERATOR
COMPRESSOR,
THEREFORE
- STAND-BY
Nach dem Einschalten der Klimaanlage
mittels des Kippschalters wird auf dem
Bedienungsfeld die eingestellte
Temperatur angezeigt. Wenn die
Funktion “STAND-BY” eingeschaltet
wird, werden alle Funktionen des
Gerätes ausgeschaltet, um ein leichtes
Einstellen der gewünschten Funktionen
zu ermöglichen. Nach Ausführung der
Einstellungen reicht es aus erneut die
Taste (1) zu betätigen, um die
Klimaanlage wieder einzuschalten.
- TEMPERATUREINSTELLUNG
Auf dem Display des Bedienungsfelds
wird ständig die von Ihnen eingestellte
Temperatur angezeigt. Zum Ändern
dieses Wertes muß auf die Tasten (3)
oder (2) eingewirkt werden, je nachdem
ob die von Ihnen gewünschte
Raumtemperatur erhöht oder verringert
werden soll. Für ein gutes
Wohlbefinden empfehlen wir eine
Temperatur von 22 - 25°C im Sommer
und von 18-22°C im Winter.
- KÜHLEN
Vor dem Wählen dieser Funktion wird
die gewünschte Temperatur eingestellt. Durch Betätigen der Taste (14)
wird die Klimaanlage auf den
Kühlbetrieb eingestellt. Diese Funktion
ist immer mit einer der drei
Ventilationsgeschwindigkeiten
kombiniert.
WICHTIGER HINWEIS:
BEI
DER
FUNKTIONSWEISE
“KÜHLEN” SENKT DIE KLIMAANLAGE
NICHT NUR DIE RAUMTEMPERATUR,
SONDERN ENTFEUCHTET AUCH DIE
RAUMLUFT. ES IST DAHER NICHT
ERFORDERLICH
AUCH
DIE
FUNKTION
“ENTFEUCHTEN”
EINZUSCHALTEN,
UM
DIE
LUFTFEUCHTIGKEIT ZU VERRINGERN.
- HEIZEN
(AUSFÜHRUNG CLIMA 16 HP)
Vor dem Wählen dieser Funktion wird
- REFRIGERACIÓN
Antes de seleccionar esta función es
conveniente programar la temperatura
deseada. Apretando la tecla (14) se
habilita el climatizador para la
refrigeración. Esta función está siempre
combinada a una de las 3 velocidades
de ventilación.
OBSERVACIONES:
EN EL MODO “REFRIGERACIÓN” EL
CLIMATIZADOR ADEMÁS DE BAJAR
LA TEMPERATURA, DESHUMIDIFICA
INCLUSO EL AIRE DEL AMBIENTE.
POR TANTO NO ES NECESARIO
SELECCIONAR
TAMBIÉN
LA
FUNCIÓN “DESHUMIDIFICACIÓN”
PARA BAJAR EL PROCENTAJE DE
HUMEDAD DEL AIRE.
- CALEFACCIÓN
(MODELO CLIMA 16 HP)
Antes de seleccionar esta función es
conveniente programar la temperatura
deseada. Apretando la tecla (15) se
habilita el climatizador para la
calefacción.
- KOELEN
Stel de gewenste temperatuur in.
Schakel middels toets (14) de
koeling aan. Deze functie wordt
altijd gecombineerd met 1 van de
3 ventilatorsnelheden.
BELANGRIJK:
TIJDENS KOELEN ZAL DE
AIRCONDITIONER TEVENS
ONTVOCHTIGEN. HIERTOE
HOEFT
DUS
NIET
DE
ONTVOCHTIGINGSFUNCTIE TE
WORDEN AANGEZET.
- VERWARMEN
(CLIMA 16 HP)
Stel de gewenste temperatuur in.
Schakel middels toets (15) het
verwarmen aan.
BELANGRIJK:
De elektronische besturing zal
beschadiging van de compressor
voorkomen
door
na
het
uitschakelen van de compressor
deze pas na 3 minuten weer in te
schakelen.
13
la temperatura desiderata. Premendo il tasto (15), il climatizzatore è
abilitato al modo riscaldamento.
AVVERTENZA:
LA LOGICA ELETTRONICA DEL
CLIMATIZZATORE È PROGRAMMATA
PER
IMPEDIRE
DANNEGGIAMENTI AL COMPRESSORE
FRIGORIFERO,
PERTANTO OGNI PARTENZA È
RITARDATA DI 3 MINUTI DAL
MOMENTO IN CUI VIENE SELEZIONATA LA FUNZIONE.
- TASTO MOON
(AUTOMATICO NOTTURNO)
Questa funzione è particolarmente indicata durante il Vostro riposo,
in quanto la logica elettronica controlla automaticamente la temperatura dell’ambiente variandone opportunamente il valore in base al
tempo di funzionamento; questo
per garantirVi il massimo comfort
termico. Durante l’attivazione del
modo “notturno” il led corrispondente lampeggia; questa funzione
deve sempre essere abbinata nei
modi di raffreddamento, di riscaldamento o di deumidificazione. La
selezione delle velocità di ventilazione
rimane
comunque
indipendente e Vi permette di scegliere quella più corrispondente alle
Vostre esigenze. Per ottenere, il
massimo comfort acustico Vi consigliamo la selezione della minima
velocità di funzionamento.
- DEUMIDIFICAZIONE
Questa funzione permette di
deumidificare l’aria dell’ambiente,
senza abbassarne eccessivamente la temperatura. La selezione di
questa funzione esclude automaticamente il modo raffreddamento
e il modo riscaldamento; la ventilazione viene portata alla minima
velocità. Nel modo “deumidificazione” il climatizzatore funziona in
modo intermittente, alternando periodi di funzionamento a periodi di
pausa. Nel caso in cui la temperatura dell’aria sia uguale o inferiore
alla temperatura impostata, il Vostro
climatizzatore
non
deumidificherà. Questa condizione è segnalata dall’accensione
intermittente del led corrispondente.
“chauffage” de fonctionnement en
appuyant sur la touche (15).
CONSEIL:
LA LOGIQUE ÉLECTRONIQUE DU
CLIMATISEUR EST PROGRAMMÉE
POUR EMPÊCHER LES ENDOMMAGEMENTS AU COMPRESSEUR
FRIGORIFIQUE; EN CONSÉQUENCE,
TOUTE MISE EN MARCHE DE CE
DERNIER EST RETARDÉE DE 3
MINUTES PAR RAPPORT À LA
SÉLECTION DE LA FONCTION.
- MOON
(AUTOMATIQUE NOCTURNE)
Cette fonction est particulièrement
indiquée pendant votre repos car la
logique électronique contrôle automatiquement la température du milieu
ambiant et en varie opportunément la
valeur en fonction de la durée de
fonctionnement: ceci pour vous garantir
le confort thermique maximum. Lors de
l’activation du mode “nocturne” de
fonctionnement, le LED correspondant
clignote: cette fonction doit toujours être
accouplée aux modes de refroidissement, chauffage ou déshumidification.
La sélection des vitesses de ventilation
reste cependant indipendante et vous
permet de choisir celle qui correspond le
mieux à vos exigences. Pour obtenir le
confort acoustique maximum, nous vous
conseillons la vitesse minimum de
fonctionnement.
- DESHUMIDIFICATION
Cette fonction permet de séhumidifier
l’air de la pièce sans en abaisser
excessivement la température. La
sélection de cette fonction exclut
automatiquement le mode “refroidissement“ et le mode “chauffage” de
fonctionnement. La ventilation est
portée à la vitesse minimum. Dans le
mode
“déshumidification”
de
fonctionnement, le climatiseur
fonctionne d’une façon intermittente,
alternant
des
periodes
de
fonctionnement à des périodes de pause. Dans le cas où la température de
l’air ambiant serait la même ou serait
inférieure
à
la
température
programmée, le climatiseur ne
déshumidifie pas. Cette condition est
signalée par le clignotement du LED
correspondant.
- IONISATEUR (OPTIONAL)
Le climatiseur est équipé d’un dispositif
STARTING IS DELAYED BY 3
MINUTES FROM THE MOMENT
WHEN
THE
FUNCTION
IS
SELECTED.
die gewünschte Temperatur eingestellt. Durch Betätigen der Taste (15)
wird die Klimaanlage auf den
Heizbetrieb eingestellt.
- MOON
(NIGHT-TIME AUTOMATIC)
This function is especially suitable when
you are resting, since the electronic
logic unit automatically controls the
temperature of the room, appropriately
changing its value according to the
operating time; this is to ensure the
utmost thermal comfort for you. During
activation of “night” mode the
corresponding LED flashes; this
function must always be combined with
the cooling, heating or dehumidification
modes. Selecting the ventilation speeds
is anyhow independent and allows you
to choose the one that most
corresponds to your requirements. To
obtain the utmost acoustic comfort we
recommend selecting the minimum
operating speed.
WICHTIGER HINWEIS:
DIE ELEKTRONISCHE LOGIK DER
KLIMAANLAGE IST ZUR VERMEIDUNG VON SCHÄDEN AM
KÜHLKOMPREESOR PROGRAMMIERT. DAHER IST JEDER START
UM 3 MINUTEN NACH DEM
EINSCHALTEN DER FUNKTION
VERZÖGERT.
- DEHUMIDIFICATION
This function enables dehumidifying
the air in the room, without excessively
lowering its temperature. Selecting this
function automatically excludes cooling
mode and heating mode; ventilation is
taken to the minimum speed. In
“dehumidification” mode the air
conditioner operates intermittently,
alternating periods of operation with
pauses. In the event of the temperature of the air being equal to or less than
the set temperature, your air conditioner
will not dehumidify. This condition is
signalled by the corresponding LED
flashing.
- IONIZER (OPTIONAL)
The air conditioner is equipped with an
electronic device that emits negative
ions into the air making it more healthy
for your biophysical equilibrium. This
function is activated by means of the
special key (11).
- VENTILATION SPEED
By means of key (10) it is possible to
select the different ventilation speeds:
maximum, medium and minimum,
according to your needs. Maximum
speed corresponds to maximum
efficiency of the air conditioner and
great air circulation. The minimum
speed corresponds to extremely silent
operation.
- MOON
(AUTOMATISCHER NACHTBETRIEB)
Diese Funktion ist besonders für die
Nachtruhe geeignet, denn die elektronische Logik kontrolliert automatisch die Raumtemperatur und variiert
die Temperatur unter Zugrundelegung
der Betriebszeit, um Ihnen einen
maximalen Konfort zu garantieren. Bei
dem Einschalten des “Nachtbetriebs”
blinkt die entsprechende Leuchtdiode
auf: Diese Funktion muß immer mit der
Kühl, Heiz- oder Entfeuchtungsfunktion
kombiniert werden. Die Wahl der
Ventilationsgeschwindigkeit bleibt
jedoch unabhängig und kann von Ihnen
gesondert eingestellt werden. Für einen
sehr geringen Geräuschpegel
empfehlen wir Ihnen jedoch die
niedrigste Ventilationsgeschwindigkeit
einzustellen.
- ENTFEUCHTEN
Diese Funktion ermöglicht das
Entfeuchten der Raumluft, ohne die
Temperatur zu stark zu senken. Diese
Funktion schließt automatisch den
Kühl- und Heizbetrieb aus. Die
Ventilation wird automatisch auf die
geringste Geschwindigkeit eingestellt.
Beim
“Entfeuchtungsbetrieb”
funktioniert
die
Klimaanlage
intermittierend, d.h. es wechseln sich
Betrieb und Pausen ab. Falls die
Lufttemperatur gleich der eingestellten
Temperatur ist oder unter dieser liegt,
setzt der Entfeuchtungsbetrieb nicht
ein. Dieser Zustand wird durch das
Aufblinken der entsprechenden
Leuchtdiode angezeigt.
- IONISIERER (OPTIONAL)
Die Klimaanlage ist mit einer elek-trischen
Vorrichtung ausgestattet, die negative
Ionen an die Luft abgibt, was vorteilhaft
für die Gesundheit ist. Diese Funktion
OBSERVACIONES:
LA LÓGICA DEL CLIMATIZADOR
ESTÁ
PROGRAMADA
PARA
IMPEDIR DAÑOS AL COMPRESOR
DE REFRIGERACIÓN, POR TANTO
CADA PUESTA EN MARCHA ESTÁ
RETRASADA DE 3 MINUTOS DESDE
EL MOMENTO EN QUE SE SELECCIONA LA FUNCIÓN.
- MOON
(AUTOMATICO NOCTURNO)
Esta función es particularmente
indicada para el reposo ya que la lógica
electrónica controla automáticamente
la temperatura del ambiente variando
oportunamente.el valor en base al
tiempo de funcionamiento; todo ello
para garantizar el máximo bienestar
térmico. Durante la activación del modo
“nocturno” el led correspondiente emite
destellos; esta función tiene que estar
combinada siempre en los modos de
refrigeración, de calefacción o de
deshumidificación. La selección de las
velocidades de ventilación permanece
de todos modos independiente y ello
permite escoger la más adecuada a
las exigencias del usuario. Para obtener
el máximo bienestar acústico
aconsejamos la selección de la mínima
velocidad de funcionamiento.
- DESHUMIDIFICACIÓN
Esta función permite deshumidificar el
aire del ambiente, sin bajar
excesivamente la temperatura. La
selección de esta función excluye
automáticamente el modo refrigeración
y el modo calefacción; la ventilación
pasa a la mínima velocidad. En el modo
“deshumidificación” el climatizador
funciona de manera intermitente,
alternando períodos de funcionamiento
con períodos de pausa. En el caso de
que la temperatura del aire fuera igual
o inferior a la temperatura programada,
el climatizador no deshumidifica.
- IONIZADO (OPTIONAL)
El climatizador consta de un dispositivo
electrónico que emite iones negativos
en el aire haciéndola más saludable
para el equilibrio biofísico. Tal función
se activa con la tecla (11).
- VELOCIDAD DE VENTILACIÓN
Con la tecla (10) Vd. puede seleccionar
las distintas velocidades: máxima,
media y mínima en base a sus
exigencias. A la máxima velocidad
- MOON
(AUTOMATISCHE NACHTFUNKTIE)
Deze functie is bijzonder geschikt
tijdens de nachtrust, omdat het
apparaat automatisch afhankelijk
van
de
gebruikstijd
de
temperatuur
aanpast
aan
maximaal comfort. De LED voor
nachtfunctie
knippert.
De
nachtfunctie dient gecombineerd
te worden met of verwarmen, of
koelen of ontvochtigen. De
ventilatorsnelheid kan zelf
gekozen worden. Wij adviseren
i . v. m . g e l u i d e n c o m f o r t d e
minimum ventilatorsnelheid
tijdens nachtbedrijf.
- ONTVOCHTIGEN
De ontvochtigingsfunctie maakt
ontvochtiging van de lucht
mogelijk zonder grote verlaging
van de temperatuur. Gelijktijdig
kolen of verwarmen is niet
mogelijk. De ventilator zal
draaien in minimum toerental.
Het
apparaat
zal
met
tussenpozen werken. Als de
ingestelde temperatuur hoger of
gelijk is aan de actuele
ruimtetemperatuur zal de unit niet
ontvochtigen.
De corresponderende LED zal in
dit geval knipperen.
- IONISEREN (OPTIONAL)
De airconditioner is uitgerust met
een elektronisch apparaat dat
negatieve ionen in de lucht kan
brengen. Deze functie kan
middels toets (11) ingeschakeld
worden.
- VENTILATORSNELHEID
Met toets (10) kunt u de
gewenste ventilatorsnelheid
kiezen. De maximum snelheid
geeft u groot koelvermogen en
goede
luchtcirculatie.
De
minimum snelheid geeft u een
zeer stille werking.
- SMILE
(AUTOMATISCHE FUNKTIE)
Met deze functie bepaald het
apparaat volledig zelf welke actie
ingeschakeld dient te worden.
Druk toets (9) en het apparaat zal
indien de ruimte onder 18°C is
verwarmen tot een temperatuur
van 20°C. Indien de temperatuur
14
- IONIZZATORE (OPTIONAL)
Il climatizzatore è dotato di un dispositivo elettronico che emette ioni
negativi nell’aria, rendendola più salubre per il Vostro equilibrio biofisico.
Tale funzione viene attivata tramite
l’apposito tasto (11).
- VELOCITA’ DI VENTILAZIONE
Tramite il tasto (10) è possibile selezionare le diverse velocità di
ventilazione: massima, media e minima, in base alle Vostre esigenze.
Alla massima velocità corrisponde il
massimo rendimento del climatizzatore e un grande riciclo d’aria; alla
minima velocità corrisponde un funzionamento estremamente silenzioso.
- TASTO SMILE (AUTO)
Questa funzione Vi permette di far
funzionare il Vostro climatizzatore
in modo semplice ed automatico.
Premendo infatti il tasto (9) il climatizzatore sceglierà in modo autonomo
tutte le funzioni necessarie affinchè
la temperatura dell’ambiente sia sempre mantenuta entro il campo di
benessere. Per temperature dell’ambiente inferiori ai 18°C il climatizzatore
funzionerà nel modo riscaldamento
fino al raggiungimento dei 20°C; per
temperature superiori ai 26°C funzionerà in modo raffreddamento fino
al raggiungimento dei 24°C.
- PROGRAMMAZIONE
Il funzionamento temporizzato del
climatizzatore prevede un tempo di
attività ed un tempo di fermata
programmabili singolarmente. L’accesso alla visulizzazione ed alla
programmazione delle temporizzazioni
si ha premendo i tasti (4) o (5). Il
primo valore evidenziato sul display
luminoso corrisponde al numero di
ore di attività del climatizzatore. Tale
situazione è evidenziata dal puntino
rosso lampeggiante posto sotto la
scritta START. Con i tasti (4) e (5), si
può variare il valore impostato da un
minimo di 0 ore ad un massimo di 99
ore. Premendo poi il tasto START/
STOP (6) viene visualizzato sul display
il numero delle ore di fermata del
climatizzatore. Tale situazione è
evidenziata dal puntino rosso lampeggiante posto sotto la scritta STOP.
Con i tasti (4) e (5), si può variare il
valore impostato da un minimo di 1
ora ad un massimo di 99 ore. Trascor-
électronique qui émet des ions négatifs
dans l’air et le rend plus sain pour votre
équilibre biophysique. Cette fonction
est activée au moyen de la touche (11).
- VITESSE DE VENTILATION
Il est possible de sélectionner les
diverses vitesses de ventilation au
moyen de la touche (10): maximum,
moyenne et minimum, en fonction de
vos exigences. Le rendement
maximum du climatiseur et une grande
circulation de l’air correspondent à la
vitesse maximum; un fonctionnement
extrêmement silencieux correspond à
la vitesse minimum.
- SMILE (AUTO)
Cette fonction vous permet de faire
fonctionner le climatiseur d’une façon
simple et automatique. En effet, si vous
appuyez sur la touche (9), le climatiseur
choisit tout seul les fonctions
nécessaires pour que la température
de la pièce soit comprise entre les
valeurs de “confort”. Pour des
températures ambiantes inférieures à
18°, le climatiseur fonctionne en mode
“chauffage” jusqu’à ce que la
température atteigne 20°C; pour des
températures supérieures à 26°C, il
fonctionne en mode “refroidissement”
jusqu’à la température de 24°C.
- PROGRAMMATION
Le fonctionnement temporisé prévoit
une durée d’activité et une durée de
l’arrêt programmables séparément.
L’accès à l’affichage et à la
programmation des temporisations
s’obtient en appuyant sur les touches
(4) et (5). La première valeur qui
apparaît sur l’affichage lumineux
indique le nombre d’heures d’activité
du climatiseur. Cette situation est mise
en évidence par le point rouge
clignotant se trouvant sous l’inscription
START. Au moyen des touches (4) et
(5), il est possible de varier la valeur
programmée d’un minmum de 0 heure
à un maximum de 99 heures. Si l’on
appuie ensuite sur la touche START/
STOP (6), le nombre des heures d’arrêt
du climatiseur apparaît sur l’affichage.
Cette situation est mise en évidence
par le point rouge clignotant se trouvant
sous l’inscription STOP. Il est possible
de varier la valeur programmée d’un
minimum de 1 heure à un maximum de
99 heures au moyen des touches (4) et
(5). La température programmée
- SMILE (AUTO)
This function allows you to operate
your air conditioner simply and
automatically. By pressing key (9) the
air conditioner will autonomously
choose all the necessary functions for
the temperature of the room to be kept
within the field of well-being. For room
temperatures under 18°C the air
conditioner will operate in heating mode
until it reaches 20°C; for temperatures
over 26°C it will operate in cooling
mode until it reaches 24°C.
- PROGRAMMING
Timed air conditioner operation requires
an activity time and a stop time that can
be singly programmed. Access to the
display and to programming the timings
is made by pressing keys (4) and (5).
The first value shown on the luminous
display corresponds to the number of
hours’ activity of the air conditioner.
This situation is highlighted by the
flashing red spot under the writing
START. With keys (4) and (5) you can
change the set value from a minimum
of 0 hours to a maximum of 99 hours.
Pressing then the START/STOP key
(6) displays the number of hours’ stop
of the air conditioner. This situation is
highlighted by the flashing red spot
under the writing STOP. With keys (4)
and (5) you can change the set value
from a minimum of 1 hour to a maximum
of 99 hours. Ten seconds after the last
setting made, the display will show the
set temperature. At this stage, with key
(7) it is possible to activate the program
that has just been made. Its coming on
is signalled by the corresponding
flashing yellow LED. After finishing the
count of hours stopped, the air
conditioner will go back to operating
normally in the mode you selected. It is
anyhow possible to extend the stop of
the air conditioner infinitely by setting
the value of “__ __” in the “STOP” time.
To set it you have to press keys (6) and
(4) at the same time for a few seconds.
To turn programming off you need only
press key (7) again.
EXAMPLES:
1) It is 8 o’clock in the morning. The
air conditioner has to operate till 12,
and then switch itself back on again
at 2 p.m.
SETTING:
A) Press key (4) or (5) to enter programming.
wird durch die spezielle Taste (11)
eingeschaltet.
- VENTILATIONSGESCHWINDIGKEIT
Mit der Taste (10) können die
verschiedenen Ventilationsgeschwindigkeiten eingestellt werden:
Höchstgeschwindigkeit, mittlere Geschwindigkeit und Mindestgeschwindigkeit. Bei der Höchstgeschwindigkeit erreicht die Klimaanlage auch
die größte Leistung und eine große
Luftumwälzung.
Der
Mindestgeschwindigkeit entspricht ein außerordentlich niedriger Geräuschpegel.
- SMILE (AUTO)
Diese Funktion ermöglicht einen
einfachen automatischen Betrieb Ihrer
Klimaanlage. Beim Betätigen der Taste
(9) stellt Ihre Klimaanlage selbsttätig
alle erforderlichen Funktionen ein,
damit die Raumtemperatur immer ein
optimales Wohlbefinden gewährleistet.
Bei Raumtemperaturen unter 18°C
setzt automatisch der Heizbetrieb ein,
bis 20°C erreicht werden. Bei
Temperaturen über 26°C setzt der
Kühlbetrieb ein, bis eine Temperatur
von 24°C erreicht ist.
- PROGRAMMIERUNG
Der zeitgesteuerte Betrieb der
Klimaanlage sieht einzeln programmierbare Betriebs- und Pausenzeiten
vor. Durch Betätigung der Tasten (4)
und (5) wird Zugang zu der Anzeige
und der Programmierung erhalten. Der
erste auf dem Leuchtdisplay angezeigte
Wert entspricht den Betriebsstunden
der Klimaanlage. Dieser Zustand wird
durch den blinkenden roten Punkt unter
der Aufschrift START angezeigt. Mit
den Tasten (4) und (5) kann der
eingestellte Wert von mindestens 0 auf
höchstens 99 Stunden verändert
werden. Nun die Taste START/STOP
drücken und auf dem Display werden
die Pausenstunden der Klimaanlage
angezeigt. Dieser Zustand wird durch
einen aufblinkenden roten Punkt unter
der Aufschrift STOP angezeigt. Mit den
Tasten (4) und (5) kann der eingestellte
Wert von mindestens 1 auf höchstens
99 Stunden verändert werden. 10
Sekunden nach Ausführung der letzten
Einstellung erscheint auf dem Display
die Anzeige der eingestellten
Temperatur. Jetzt kann mit der Taste
(7) die soeben ausgeführte
Programmierung aktiviert werden. Die
corresponde el máximo rendimiento
del climatizador y una gran
recirculación del aire. A la mínima
velocidad
corresponde
un
funcionamiento extremadamente
silencioso.
- SMILE (AUTO)
Esta función le permite hacer funcionar
su climatizar de manera sencilla y
automática. Apretando la tecla (9) el
climatizador
selecciona
automáticamente todas las funciones
necesarias a fin de que la temperatura
ambiente se mantenga siempre dentro
del campo de bienestar. Para
temperaturas del ambiente inferiores a
18°C el climatizador funciona en el
modo calefacción hasta alcanzar los
20°C, en caso de temperaturas
superiores a los 2°C funciona en modo
refrigeración hasta alcanzar los 24°C.
- PROGRAMACIÓN
El funcionamiento temporizado del
climatizador prevé un tiempo de
actividad y un tiempo de paro
programables individualmente. El
acceso a la visualización y a la
programación de las temporizaciones
se obtiene apretando las teclas (4) y
(5). El primer valor evidenciado en el
display luminoso corresponde al
número de horas de actividad del
climatizador. Esta situación está
evidenciada por el punto rojo situado
debajo de la palabra START. Con la
teclas (4) y (5) se puede variar el valor
programado desde un mínimo de 0
horas a un máximo de 99 horas.
Apretando luego la tecla START/STOP
(6) se visualiza en el display el número
de las horas de paro del climatizador.
Esta situación está evidenciada por el
punto rojo intermitente situado debajo
de la palabra STOP. Con la teclas (4)
y (5) se puede variar el valor
programado desde un mínimo de 0
horas a un máximo de 99 horas.
Trascurridos 10 segundos después de
la última programación efectuada
aparece en el display la indicación de
la temperatura programada. En este
momento con la tecla (7) se puede
activar la programación recién
realizada. La activación está indicada
por el led amarillo correspondiente. El
climatizador, después de que ha
terminado la cuenta de las horas de
paro, se pone en funcionamiento
normalmente en el modo seleccionado.
boven de 26°C komt zal de unit
koelen tot een temperatuur van
24°C is bereikt.
- PROGRAMMEREN
Tijdsduurinstellingen dienen te
worden gedeeld in bedrijfstijd en
pauzetijd. Deze kunnen namelijk
onafhankelijk
worden
geprogrammeerd. Middels de
toetsen (4) en (5) krijgt u toegang
tot het programmeren. De eerst
getoonde tijd geeft de bedrijfstijd
weer. De kleine rode punt staat
bij START. Met toets (4) en (5)
kan de waarde worden bepaald
tussen 0 en 99 uur. Nu op toets
START/STOP drukken. Nu geeft
het display de pauzetijd aan. De
kleine rode punt staat bij STOP.
Middels toetsen (4) en (5) kan de
waarde worden ingesteld tussen
1 en 99 uur. Na 10 seconden
geeft het display de ingestelde
temperatuur aan. Met toets (7)
kan nu de programmeerfunctie
worden aangezet. De brandende
gele LED toont dit aan. Na afloop
van de pauzetijd zal de unit
starten volgens ingestelde
functiekeuze. U kunt de unit
echter voor onbepaalde tijd
stoppen door middels toets (6) en
(4), enkele seconden gelijktijdig
indrukken, de waarde “— —” bij
STOP tijd in te stellen. Om de
programmeerfunctie
te
beëindigen druk toets (7)
opnieuw.
VOORBEELDEN
1) Het is 8 uur ‘s ochtends. De
Clima 15 moet werken tot 12
uur en aansluitend weer vanaf
2 uur:
A) Druk toets (4) of (5) om te
programmeren.
B) Gebruik toets (4) en (5) om de
waarde 4 in te stellen, kleine rode
punt op START.
C) Druk toets (6).
D) Gebruik toets (4) en (5) om de
waarde 2 in te stellen, kleine rode
punt op STOP.
E ) Wa c h t t o t h e t d i s p l a y d e
temperatuur aangeeft en druk
vervolgens op toets (7).
2) Het is 10 uur ‘s avonds en
de unit moet draaien tot 4 uur‘s
nachts
15
si 10 secondi dopo aver eseguito l’ultima impostazione, ricomparirà sul display
l’indicazione della temperatura impostata. A questo punto tramite il tasto
(7) è possibile attivare la programmazione appena eseguita. L’avvenuto
inserimento è segnalato dal corrispettivo
led giallo lampeggiante. Il climatizzatore, dopo aver terminato il conteggio
delle ore di fermata, riprenderà a funzionare normalmente nel modo da Voi
selezionato. E’ possibile comunque,
protrarre all’infinito la fermata del climatizzatore andando ad impostare
nel tempo di fermata “STOP” il valore
“__ __”. Per impostarlo è necessario
premere contemporaneamente i tasti
(6) e (4) per qualche secondo. Per
disinserire la programmazione è sufficiente premere nuovamente il tasto
(7).
ESEMPI:
1) Sono le 8 del mattino. Il climatizzatore deve funzionare fino alle 12,
poi riaccendersi alle ore 14.
IMPOSTAZIONE:
A) Premere il tasto (4) o (5) per entrare
nella programmazione.
B) Impostare mediante i tasti (4) o (5)
il N° 4 sul display (puntino rosso lampeggiante sotto START).
C) Premere il tasto (6).
D) Impostare mediante i tasti (4) o (5)
il N° 2 sul display (puntino rosso lampeggiante sotto STOP).
E) Attendere che ricompaia il valore
della temperatura sul display e premere il tasto (7).
2) Sono le ore 22.00. Il climatizzatore deve funzionare fino alle ore 4.00
e poi rimanere fermo.
IMPOSTAZIONE:
A) Premere il tasto (4) o (5) per entrare
nella programmazione.
B) Impostare mediante i tasti (4) o (5)
il N° 6 sul display (puntino rosso lampeggiante sotto “START”).
C) Premere il tasto (6).
D) Impostare premendo contemporaneamente i tasti (6) e (4) il valore “__ __”
(puntino rosso lampeggiante sotto
“STOP”).
C) Attendere che ricompaia il valore
della temperatura sul display e premere il tasto (7).
3) Sono le ore 20.00 del venerdì. Il
climatizzatore deve accendersi alle
ore 16 di domenica.
réapparaît 10 secondes après la
dernière programmation effectuée. Si
l’on appuie alors sur la touche (7), il est
possible d’activer la pro-grammation à
peine faite. L’en-clenchement est
signalé par le clignotement du LED
jaune cor-respondant. Après avoir
terminé le compte des heures d’arrêt,
le climatiseur reprend à fonctionner
normalement dans le mode qui a été
sélectionné. Il est toutefois possible de
prolonger à l’infini l’arrêt du climatiseur
en inscrivant la valeur “__ __” dans la
durée d’arrêt “STOP”. Pour la
programmer, il est nécessaire
d’appuyer simultanément sur les
touches (6) et (4) pendant quelques
secondes. Pour interrompre la
programmation, il suffit d’appuyer à
nouveau sur la touche (7).
- EXEMPLES:
1) Il est 8 heures du matin. Le
climatiseur doit fonctionner jusqu’à
midi puis se remettre en marche à 14
heures.
PROGRAMMATION:
A) Appuyer sur la touche (4) et (5) pour
entrer dans la programmation.
B) Au moyen des touches (4) et (5),
programmer le N°4 sur l’affichage (point
rouge clignotant sous START).
C) Appuyer sur la touche (6).
D) Au moyen des touches (4) et (5),
programmer le N°2 sur l’affichage (point
rouge clignotant sous STOP).
E) Attendre que la valeur de la
température apparaisse sur l’affichage
et appuyer sur la touche (7).
2) Il est 22 heures. Le climatiseur
doit fonctionner jusqu’à 4 heures du
matin puis s’arrêter.
PROGRAMMATION:
A) Appuyer sur la touche (4) ou (5) pour
entrer dans la programmation.
B) Au moyen des touches (4) ou (5),
programmer le N°6 sur l’affichage (point
rouge clignotant sous “START”).
C) Appuyer sur la touche (6).
D) Programmer la valeur “ __ __” en
appuyant simultanément sur les
touches (6) et (4) (point rouge clignotant
sous “STOP”).
E) Attendre que la valeur de la
température réapparaisse sur
l’affichage et appuyer sur la touche (7).
3) Il est 20 heures de vendredi. Le
climatiseur doit se mettre en marche
à 16 heures dimanche après midi.
B) With keys (4) or (5) set No. 4 on the
display (flashing red spot under
START).
C) Press key (6).
D) With keys (4) or (5) set No. 2 on the
display (flashing red spot under STOP).
E) Wait for the value of the temperature
to come back onto the display and
press key (7).
2) It is 10 p.m.. The air conditioner
has to operate until 4 a.m. and then
stop.
SETTING:
A) Press key (4) or (5) to enter programming.
B) With keys (4) or (5) set No. 6 on the
display (flashing red spot under
START).
C) Press key (6).
D) Pressing keys (6) and (4) at the
same time, set the value “__ __” (flashing
red spot under STOP).
E) Wait for the value of the temperature
to come back onto the display and
press key (7).
3) It is 8 p.m. on Friday. The air
conditioner has to switch itself on at
4 p.m. on Sunday.
SETTING:
A) Press key (4) or (5) to enter programming.
B) With keys (4) or (5) set No. 0 on the
display (flashing red spot under
START).
C) Press key (6).
D) With keys (4) or (5) set No. 44 on the
display (flashing red spot under STOP).
E) Wait for the value of the temperature
to come back onto the display and
press key (7).
gelbe Leuchtdiode zeigt an, daß die
Programmierung aktiviert wurde. Die
Klimaanlage schaltet sich nach Ablauf
der eingestellten Stillstandsstunden in
der von Ihnen eingestellten
Betriebsweise ein. Die Klimaanlage
kann jedoch für eine unbegrenzte
Zeitspanne außer Betrieb gesetzt
werden, indem als Pausenzeit “STOP”
der Wert “__ __” eingegeben wird. Zur
Ausführung dieser Einstellung müssen
die Tasten (6) und (4) gleichzeitig
betätigt werden. Zum Ausschalten der
Programmierung reicht es aus, die
Taste (7) erneut zu betätigen.
BEISPIELE:
1) Es ist 8.00 Uhr morgens. Die
Klimaanlage soll bis 12.00 Uhr
funktionieren und sich dann wieder
um 14.00 Uhr einschalten.
EINGABE:
A) Die Taste (4) oder (5) betätigen, um
Zugang zur Programmierung zu
erhalten.
B) Mit den Tasten (4) oder (5) die Nr. 4
auf dem Display einstellen (roter Punkt
unter START blinkt auf).
C) Die Taste (6) betätigen).
D) Mit den Tasten (4) oder (5) die Nr. 2
auf dem Display einstellen (roter Punkt
unter STOP blinkt auf).
E) Abwarten, bis der Temperaturwert
auf dem Display angezeigt wird und
die Taste (7) betätigen.
2) Es ist 22.00 Uhr. Die Klimaanlage
soll bis um 4.00 funktionieren und
sich dann ausschalten.
EINGABE:
A) Die Taste (4) oder (5) betätigen, um
Zugang zur Programmierung zu
erhalten.
B) Mit den Tasten (4) oder (5) die Nr. 6
auf dem Display einstellen (roter Punkt
unter START blinkt auf).
C) Die Taste (6) betätigen.
D) Mit den gleichzeitig gedrückten
Tasten (6) und (4) den Wert “__ __”
einstellen (roter Punkt unter STOP
blinkt auf).
E) Abwarten, bis der Temperaturwert
auf dem Display angezeigt wird und
die Taste (7) betätigen.
3) Es ist Freitag, 20.00 Uhr. Die
Klimaanlage soll sich Sonntag um
16.00 Uhr einschalten.
EINGABE:
A) Die Taste (4) oder (5) betätigen, um
Zugang zur Programmierung zu
Se puede, de todos modos, llevar al infinito
el paro del climatizador programando en el
tiempo de paro “STOP” el valor “__ __”. Para
programarlo es necesario apretar
simultáneamente las teclas (6) y (4) durante
algunos segundos. Para desactivar la
programación basta apretar nuevamente
la tecla (7).
EJEMPLOS:
1) Son las 8 de la mañana, el cli-matizador
tiene que funcionar hasta las 12, luego
volver a encenderse a las 14 horas.
PROGRAMACIÓN:
A) Apretar la tecla (4) o (5) para entrar en la
programación.
B) Programar con las teclas (4) o (5) el N°
4 en el display (punto rojo destellante debajo
de START).
C) Apretar la tecla (6).
D) Programar con las teclas (4) o (5) el N°
2 en el display (punto rojo destellante debajo
de STOP).
E) Esperar a que reaparezca el valor de la
temperatura en el display y apretar la tecla
(7).
2) Son las 22 horas, el climatizador tiene
que funcionar hasta las 4.00 horas y
luego permanecer apagado.
PROGRAMACIÓN:
A) Apretar la tecla (4) o (5) para entrar en la
programación.
B) Programar con las teclas (4) o (5) el N°
6 en el display (punto rojo destellante debajo
de START).
C) Apretar la tecla (6).
D) Programar con las teclas (6) y (4) el N°
2 en el display (punto rojo destellante debajo
de STOP).
E) Esperar a que reaparezca el valor de la
temperatura en el display y apretar la tecla
(7).
3) Son las 20 horas el viernes, el
climatizador tiene que funcionar hasta
las 16.00 horas del domingo.
PROGRAMACIÓN:
A) Apretar la tecla (4) o (5) para entrar en la
programación.
B) Programar con las teclas (4) o (5) el N°
0 en el display (punto rojo destellante debajo
de START).
C) Apretar la tecla (6).
D) Programar con las teclas (4) o (5) el N°
44 en el display (punto rojo destellante
debajo de STOP).
E) Esperar a que reaparezca el valor de la
temperatura en el display y apretar la tecla
(7).
A) Druk toets (4) of (5) om te
programmeren.
B) Gebruik toets (4) en (5) om de
waarde 6 in te stellen, kleine rode
punt op START.
C) Druk toets (6)
D) Druk toets (4) en (6) gelijktijdig
en zet de waarde op “— —”,
kleine rode punt op STOP.
E ) Wa c h t t o t h e t d i s p l a y d e
temperatuur aangeeft en druk
vervolgens op toets (7).
3) Het is 8 uur ‘s avonds op
vrijdag. De unit moet starten op
zondag om 4 uur ‘s middags.
A) Druk toets (4) of (5) om te
programmeren.
B) Gebruik toets (4) en (5) om de
waarde 0 in te stellen, kleine rode
punt op START.
C) Druk toets (6).
D) Druk toets (4) en (5) om de
waarde 44 in te stellen, kleine
rode punt op STOP.
E ) Wa c h t t o t h e t d i s p l a y d e
temperatuur aangeeft en druk
vervolgens op toets (7).
16
2
5
4
7
10
✲
Fig. 9
IMPOSTAZIONE:
A) Premere il tasto (4) o (5) per entrare
nella programmazione.
B) Impostare mediante i tasti (4) o (5) il N°
0 sul display (puntino rosso lampeggiante sotto START).
C) Premere il tasto (6).
D) Impostare mediante i tasti (4) o (5) il N°
44 sul display (puntino rosso lampeggiante sullo STOP”.
E) Attendere che ricompaia il valore della
temperatura sul display e premere il
stato (7).
PROGRAMMATION:
A) Appuyer sur la touche (4) ou (5) pour
entrer dans la programmation.
B) Au moyen des touches (4) ou (5),
programmer le N°0 sur l’affichage (point
rouge clignotant sous START).
C) Appuyer sur la touche (6).
D) Au moyen des touches (4) ou (5),
programmer le N°44 sur l’affichage
(point rouge clignotant sous STOP).
E) Attendre que la valeur de la
température réapparaisse sur
l’affichage et appuyer sur la touche (7).
CONFIGURAZIONE DEL TELECOMANDO
Il telecomando in dotazione all'apparecchio (fig. 9) è molto comodo per il controllo a distanza delle principali funzioni
del Vostro climatizzatore, ed è estremamente semplice da utilizzare, in quanto
le selezioni delle varie funzioni sono identiche a quelle del pannello comandi (v.
fig. 8).
CONFIGURATION DE LA
TELECOMMANDE
La télécommande fournie en dotation
avec l’appareil (fig. 9) est très pratique
pour le contrôle à distance des
principales fonctions de votre
climatiseur. Elle est aussi très facile à
utiliser car la sélection des différentes
fonctions est identique à celle du
panneau de commandes (cfr. fig. 8).
IDENTIFICAZIONE DELLE PARTI
1 - Tasto di “decremento” valore
di temperatura desiderata.
2 - Tasto di "incremento" valore
di temperatura desiderata.
3 - Tasto di selezione della
velocità di ventilazione.
4 - Tasto inserimento programmazione oraria.
DESCRIPTION DES FONCTIONS
1 - Touche de “diminution” de la
valeur de la température désirée.
2 - Touche d”augmentation” de la
valeur de la température désirée.
3 - Touche de sélection de la vitesse
de ventilation.
4 - Touche d’enclenchement de la
programmation de l’horaire.
1
6
REMOTE-CONTROL
CONFIGURATION
The remote control supplied with the
appliance (fig. 9) is a very convenient
means of controlling the main functions
of your conditioner. It also extremely
easy to use since the selections of the
various functions are identical to those
on the control panel (see fig. 8).
PARTS ID CODE
1 - Key to “decrease” the value of the
desired temperature.
2 - Key to “increase” the value of the
desired temperature.
3 - Key to select ventilation speed.
4 - Key to insert hourly programming.
5 - Key to select “automatic”
operating mode.
6 - “Stand-by” key.
7 - Key for “dehumidification”
operating mode.
8 - Key for “night” operating mode.
9 - Key for “cooling” operating mode.
10 - Key for “heating” operating
mode (only for CLIMA 16 HP).
3
8
erhalten.
B) Mit den Tasten (4) oder (5) die Nr. 0
auf dem Display einstellen (roter Punkt
unter START blinkt auf).
C) Die Taste (6) betätigen.
D) Mit den Tasten (4) oder (5) die Nr.
44 auf dem Display einstellen (roter
Punkt unter STOP blinkt auf).
E) Abwarten, bis der Temperaturwert
auf dem Display angezeigt wird und
die Taste (7) betätigen.
AUFBAU DER FERNBEDIENUNG
Die dem Gerät (Abb. 9) beigestellte
Fernbedienung ist sehr bequem zur
Fernsteuerung der wichtigsten
Funktionen Ihres Klimageräts; die
Bedienung ist extrem einfach, da die
verschiedenen Funktionen auf die
gleiche Weise wie auf dem Schaltfeld
angewählt werden (s. Abb. 8)
IDENTIFIKATION DER ELEMENTE
1 - Taste zum Verringern der Temperatur.
2 - Taste zum Erhöhen der
Temperatur.
3 - Taste zum Einstellen der Ventilatorgeschwindigkeit.
4 - Taste zum Einschalten der Stundenprogrammierung.
5 - Taste zur Wahl des Automatikbetriebs.
6 - Taste "Stand-by".
9
CONFIGURACIÓN DEL MANDO A
DISTANCIA
El mando a distancia suministrado con
el aparato (fig. 9) es muy cómodo para
el control a distancia de las principales
funciones de su climatizador y es de
empleo extremadamente sencillo, ya
que las selecciones de las distintas
funciones son idénticas a las del
cuadro de mandos (véase fig. 8)
IDENTIFICACIÓN DE LAS PIEZAS
1 - Tecla de “decremento” valor de
temperatura deseada.
2 - Tecla de “incremento” valor de
temperatura deseada.
3 - Tecla de selección de la
velocidad de ventilación.
4 - Tecla de introducción
programación horas.
5 - Tecla selección modo de funcionamiento “automático”.
6 - Tecla de “Stand-by”.
7 - Tecla de funcionamiento modo
“deshumidificación”.
8 - Tecla de funcionamiento modo
“nocturno”.
9 - Tecla de funcionamiento modo
“refrigeración”.
10 - Tecla de funcionamiento modo
“calefacción” (sólo para CLIMA 16 HP).
VORMGEVING VAN DE
AFSTANDSBEDIENING
De afstandsbediening die bij de
levering van het apparaat
inbegrepen is (fig. 9) is erg handig
om de belangrijkste funkties van uw
airconditioner op afstand te
bedienen en is bijzonder makkelijk
in het gebruik omdat de
bedieningsorganen om de diverse
funkties te aktiveren hetzelfde zijn
als de bedieningsorganen op het
bedieningspaneel (zie fig. 8).
IDENTIFICATIE VAN DE
ONDERDELEN
1 - Verlagen temperatuur
instelling.
2 - Verhogen temperatuur
instelling.
3 - Ventilatorsnelheid.
4 -Inschakelen programmering.
5 - Automatisch bedrijf.
6 - Stand by toets.
7 - Ontvochtigingsfunctie.
8 - Nachtbedrijf.
9 - Koelen aan/uit.
10 - Verwarmen aan/uit (alleen
CLIMA 16 HP).
17
5 - Tasto selezione modo di
funzionamento "automatico".
6 - Tasto di “Stand-by”.
7 - Tasto funzionamento modo
"deumidificazione".
8 - Tasto funzionamento modo
"notturno".
9 - Tasto funzionamento modo
"raffreddamento".
10 - Tasto funzionamento modo
"riscaldamento" (solo per CLIMA
16 HP).
5 - Touche de sélection du mode de
fonctionnement “automatique”.
6 - Touche de “Stand by”.
7 - Touche de fonctionnement en
mode “déshumidificateur”.
8 - Touche de fonctionnement en
mode “nocturne”.
9 - Touche de fonctionnement en
mode “refroidissement”.
10 - Touche de fonctionnement en
mode “chauffage” (uniquement pour
CLIMA 16 HP).
GESTIONE DELL’APPARECCHIO
TRAMITE IL TELECOMANDO
Il telecomando è stato studiato in
modo da conferirgli la massima robustezza ed un’eccezionale funzionalità, ma ciononostante esso deve
essere maneggiato con alcune cautele. Per esempio è necessario evitare di:
CONTROLE DE L’APPAREIL A
TRAVERS LA TELECOMMANDE
Malgré l’exceptionnelle solidité et
l’excellente praticité de notre
télécommande, elle doit être utilisée
avec certaines précautions, à savoir:
• lasciarlo esposto alla pioggia,
spandere acqua sulla sua tastiera o farlo cadere in acqua,
• fargli subire forti urti o lasciarlo cadere su superfici dure,
• lasciarlo esposto ai raggi solari,
• frapporre ostacoli tra il telecomando e l’apparecchio mentre si usa
il telecomando stesso.
Inoltre:
• nel caso in cui nello stesso ambiente vengano usati altri apparecchi dotati di telecomando (TV,
radio, gruppi stereo, etc.), si potrebbero verificare alcune interferenze,
• le lampade elettroniche e fluorescenti possono interferire nelle
comunicazioni tra il telecomando
e l’apparecchio,
• estrarre le batterie in caso di prolungato inutilizzo del telecomando.
INSERIMENTO DELLE BATTERIE
Per il telecomando devono essere
esclusivamente usate 2 batterie a
secco LR03 da 1,5 V che, una volta
scariche, devono essere eliminate
solamente tramite gli appositi punti
di raccolta predisposti dalle Autorità
Locali per i rifiuti di questo tipo. Entrambe le batterie devono essere sostituite contemporaneamente. Per
inserire le batterie occorre aprire
l’apposito sportellino a scatto che si
trova nella parte posteriore del telecomando. Le batterie devono esse-
• ne pas l’exposer sous la pluie, faire
couler de l’eau sur son clavier ni la
faire tomber dans l’eau.
• ne pas lui faire subir de chocs ni la
laisser tomber sur des surfaces
dures.
• ne pas l’exposer au rayonnement
direct du soleil.
• ne pas interposer d’obstacles entre
la télécommande et l’appareil
même.
Il faut aussi savoir que :
• l’utilisation d’autres appareils dotés
d’une télécommande dans la même
pièce (TV, radio, chaîne HI FI, etc.)
peut créer des interférences.
• les lampes électroniques ou
fluorescentes peuvent interférer
entre la télécommande et l’appareil.
• retirer les piles avant toute
inutilisation prolongée de la
télécommande.
MONTAGE DES PILES
Utiliser seulement 2 piles à sec LR03
de 1,5 V. Une fois déchargées, elles
ne doivent pas être abandonnées dans
l’environnement mais remises à un
centre de traitement spécialisé
conformément à la législation en
vigueur. Les deux piles doivent être
changées simultanément. Ouvrir le
volet du logement qui se trouve au dos
de la télécommande et introduire les
piles en respectant les polarités
indiquées sur le fond. Refermer le
volet.
APPLIANCE REMOTE CONTROL
MANAGEMENT
The remote control has been designed
to provide maximum strength and
exceptional operating capacities, but it
must still be handled with care. For
example, do not:
• allow it to be exposed to rain, spill
water on its keyboard or allow it to
fall in water,
• allow it to be subjected to strong
impacts or allow it to fall on hard
surfaces,
• allow it to be exposed to sunlight,
• place obstacles between the remote control and the appliance while
the remote control is being used.
In addition:
• if other appliances equipped with a
remote control (TV, radio, stereo
units, etc.) are being used in the
same room, some interference may
occur,
• the electronic and fluorescent lamps
might
interfere
with
the
communications between the remote control and the appliance,
• remove the batteries if the remote
control will not be used for an
extended time period.
INSERTING THE BATTERIES
Only 2 dry, 1.5 V batteries LR03 must
be used for the remote control. Once
the batteries are depleted, they must
be eliminated only at the special
collection centres made available by
the Local Authorities for this type of
waste. Both batteries must be replaced
at the same time. To insert the batteries
open the special snap-on cover in the
back of the remote control. The
batteries must be inserted making sure
to respect the polarities indicated at the
bottom of the compartment. Close the
snap-on cover once the batteries are
inserted.
7 - Taste zum Einschalten der
Betriebsweise “Entfeuchten”.
8- Taste für den “Nachtbetrieb”.
9 - Taste zum Einschalten der
“Kühlfunktion”.
10 - Taste zum Einschalten der
“Heizfunktion” (nur bei CLIMA 16 HP).
GERÄTESTEUERUNG ÜBER DIE
FERNBEDIENUNG
Obwohl die Fernbedienung äußerst
robust und funktionstüchtig ausgelegt
ist, sind bei ihrer Handhabung die
folgenden Regeln zu beachten:
• Vor Feuchtigkeit schützen (nie
Regen aussetzen, Wasser auf die
Tastatur kommen lassen oder die
Fernbedienung ins Wasser fallen
lassen).
• Heftige Stöße vermeiden; ebenso
darf sie nie auf harte Oberflächen
fallen.
• Sie
darf
nie
direkter
Sonnenbestrahlung ausgesetzt sein.
• Bei
der
Verwendung
der
Fernbedienung dürfen sich nie
Gegenstände zwischen dieser letzten
und dem Gerät befinden, die die
Übertragung behindern könnten.
Zudem:
• Andere, im Aufstellraum des
Gerätes in Betrieb stehende Geräte
mit Fernbedienung (Fernsehen,
Radio, Stereo-Anlagen usw.)
könnten störend wirken.
• Ebenso könnten elektronische und
Fluoreszenzlampen
die
Übertragungsqualität zwischen
Fernbedienung
und
Gerät
beeinträchtigen.
• Die Batterien nach längerer
Verwendung der Fernbedienung
von dieser herausnehmen.
EINLEGEN DER BATTERIEN
Für die Fernbedienung dürfen
ausschließlich zwei Trockenbatterien
LR03 zu 1,5 V verwendet werden, die
im entladenen Zustand nach örtlich
geltender Norm zu entsorgen sind.
Stets beide Batterien gemeinsam
austauschen. Zum Auswechseln der
Batterien ist die eigene Einrastklappe
am hinteren Teil der Fernbedienung zu
öffnen. Beim Einlegen der Batterien ist
unbedingt auf die Pole (+/-), die im
Batteriefach zu sehen sind, zu achten.
Nach ordnungsgemäßem Einlegen der
Batterien die Klappe wieder gut
verschließen (sie muß einrasten).
EMPLEO DEL APARATO CON EL
MANDO A DISTANCIA
El mando a distancia ha sido estudiado
para darle la máxima duración y
resistencia y un excepcional
funcionamiento, pero a pesar de ello,
hay que tener cierto cuidado al
manejarlo. Por ejemplo es necesario
evitar:
HET APPARAAT MET DE
AFSTANDSBEDIENING BEDIENEN
De afstandsbediening is uitgekiend
om hem zo stevig en zo handig
mogelijk te maken, maar desondanks
moet er met de nodige voorzichtigheid
mee omgesprongen worden. Het is
bijvoorbeeld noodzakelijk om het
volgende te vermijden:
• dejarlo expuesto a la lluvia, verter
agua sobre el teclado o dejarlo caer
en el agua,
• dejarlo expuesto a los rayos del sol,
• interponer obstáculos entre el mando a distancia y el aparato mientras
se usa el aparato.
Además:
• si en el ambiente se usan otros
aparatos con mandos a distancia
(TV, radios, equipos de música)
podrían producirse algunas
interferencias.
• las lámparas electrónicas y
fluorescentes pueden interferir en
las comunicaciones entre el mando
a distancia y el aparato,
• extraer las baterías del mando a
distancia en caso de que no se lo
use por un período largo.
• laat de afstandsbediening niet in de
regen liggen, giet geen water op het
toetsenbord
en
laat
de
afstandsbediening niet in het water
vallen
• stoot met de afstandsbediening
nergens krachtig tegen aan en laat
hem niet op een hard oppervlak
vallen
• laat de afstandsbediening niet in de
zon liggen
• zorg ervoor dat als u de
afstandsbediening gebruikt er geen
obstakels
tussen
de
afstandsbediening en het apparaat
staan.
INTRODUCCIÓN DE LAS BATERÍAS
Para el mando a distancia hay que
usar exclusivamente 2 baterías en
seco LR03 de 1,5 V que, una vez
descargadas deben ser eliminadas
solamente a través de los expresos
puntos de recogida predispuestos por
las Autoridades locales para los
desechos de este tipo. Hay que cambiar las dos baterías al mismo tiempo.
Para colocar las baterías hay que abrir
el compartimiento de disparo que se
encuentra en la parte trasera del mando a distancia. Las baterías tienen que
ser
colocadas
respetando
escrupulosamente los signos de los
polos indicados en el fondo del
alojamiento. Cerrar el compartimiento
de disparo una vez que se han
colocado las baterías.
Bovendien moet u rekening houden
met het volgende:
• als er in hetzelfde vertrek apparaten
met afstandsbediening gebruikt
worden (TV, radio, stereoset etc.)
dan kunnen er enkele storingen
optreden
• elektronische
en
fluorescentielampen (TL-buizen)
kunnen
storingen
in
de
communicatie
van
de
afstandsbediening en het apparaat
veroorzaken
• haal de batterijen eruit als u de
afstandsbediening geruime tijd niet
gebruikt.
DE BATTERIJEN ERIN DOEN
Voor de afstandsbediening mag u
uitsluitend 2 droge batterijen LR03 van
1,5 V gebruiken die als zij leeg zijn bij
de speciale inzamelpunten die door de
plaatselijke Overheid voor dit soort
afval ingesteld zijn ingeleverd moeten
worden. Om de batterijen in de
afstandsbediening te doen moet u het
klepje met de kliksluiting aan de
achterkant open doen. Doe de
batterijen erin waarbij u de polen die
op de bodem van het vakje
aangegeven staan strikt aan moet
houden. Als u de batterijen erin heeft
gedaan doe het klepje dan weer
dicht.
18
re inserite rispettando scrupolosamente i segni di polarità indicati sul
fondo del vano. Richiudere il
portellino a scatto una volta inserite
le batterie.
TRASPORTO DEL CLIMATIZZATORE
Deve avvenire in posizione verticale.
In caso di trasporto in posizione orizzontale attendere almeno un’ora prima di riavviarlo.
Prima di effettuare il trasporto scaricare completamente l’acqua di condensa aprendo il tappo (fig. 1 - 10).
Avvertenza:
Trasporto del climatizzatore su pavimenti delicati:
- scaricare completamente l'acqua di
condensa aprendo il tappo (fig. 1 10);
- facendo leva sulle ruote posteriori
spostare il climatizzatore sollevando le ruote anteriori.
MANUTENZIONE PERIODICA
Scollegare elettricamente il climatizzatore sfilando la spina dalla presa
di corrente prima di eseguire qualsiasi operazione di manutenzione.
TRANSPORT DU CLIMATISEUR
Il doit se faire en position verticale.
Dans le cas de transport en position
horizontale, attendre au moins une
heure avant de le mettre en marche.
Avant d’effectuer le transport, vidanger
complètement la condensation en
enlevant le bouchon (Fig. 1 - 10).
HOW TO TRANSPORT THE
CONDITIONER
The conditioner must be kept upright
during transport.
If it is transported in a horizontal position,
wait at least one hour before starting it.
Prior to transport, always open the plug
(fig. 1 - 10) and drain all the
condensation.
Recommandation:
Déplacement du climatiseur sur sols
délicats:
évacuer complètement l’eau de
condensation en retirant le bouchon
prévu à cet effet (fig. 1 - 10);
en faisant levier sur les roues
postérieures, déplacer le climatiseur en
soulevant les roues antérieures.
Caution:
To move the air conditioner over fragile
flooring:
drain all the condensation water
by opening the plug (fig. 1 - 10);
by levering on the rear wheels, lift
the front wheels and move the air
conditioner.
ENTRETIEN PERIODIQUE
Déconnecter le climatiseur en débranchant la fiche de la prise de courant
avant toute intervention d’entretien.
ROUTINE MAINTENANCE
Unplug the air conditioner from the
power socket before any maintenance
work.
TRANSPORT DER KLIMAANLAGE
Die Klimaanlage muß in aufrechter
Stellung transportiert werden.
Wird sie in liegender Stellung
transportiert, muß vor dem ersten
Einschalten mindestens eine Stunde
abgewartet werden.
Vor dem Transport erst das
Kondenswasser vollständig ablassen.
Dazu den Stöpsel entfernen (Abb. 1 10).
Hinweis:
Transport des Klimagerätes auf
empfindlichen Fußböden:
den Stopfen öffnen und das
Kondenswasser völlig ablaufen lassen
(Abb. 1 - 10);
durch Aufstützen auf die
Hinterräder die Vorderräder anheben
und das Klimagerät fortbewegen.
WARTUNG
Vor Beginn aller Wartungsarbeiten
immer den Netzstecker ziehen.
TRANSPORTE DEL CLIMATIZADOR
Hay que realizar el transporte en
posición vertical.
En caso de transporte en posición
horizontal esperar al menos una hora
antes de ponerlo en marcha.
Antes de efectuar el transporte vaciar completamente el agua de la condensación
abriendo la tapa (fig. 1 - 10).
Advertencia:
Transporte del climatizador sobre
pavimentos delicados:
- Abrir el tapón para descargar completamente el agua de condensación
(fig. 1 - 10).
- Haciendo palanca en las ruedas
traseras, desplazar el climatizador
levantando las ruedas delanteras.
MANTENIMIENTO PERIODICO
Desconectar eléctricamente el acondicionador extrayendo el enchufe del
tomacorriente antes de realizar cualquier operación de mantenimiento.
TRANSPORT VAN DE
AIRCONDITIONER
De airconditioner moet rechtop
verplaatst worden.
Als de airconditioner liggend verplaatst
wordt dan moet u minimaal één uur
wachten voordat u de airconditioner
in werking kunt stellen.
Alvorens de airconditioner te gaan
verplaatsen moet u het condenswater
eerst helemaal weg laten lopen door
de dop (fig. 1 - 10) open te draaien.
Waarschuwing:
Transport van de airconditioner op
kwetsbare vloeren:
laat het condenswater er volledig
uit stromen door de dop open te
draaien (fig. 1 - 10);
duw om de airconditioner te
verplaatsen op de achterwielen en til
de voorwielen op.
ONDERHOUD
Haal altijd de stekker uit het
stopcontact alvorens onderhoud
te plegen.
19
Fig. 10
PULIZIA DEI FILTRI DELL'ARIA
Il filtro è preposto a trattenere molte
delle impurità contenute nell'aria (polvere, pollini). Per questo motivo è
necessaria una loro periodica pulizia. Questa operazione è consigliata
almento una volta alla settimana.
Per la rimozione del filtro è sufficiente afferrare il bordo superiore dello
stesso ed alzandolo sino a quando
non sarà completamente estratto
dalla propria sede (Fig. 10). La pulizia del filtro andrà fatta tramite un
getto di acqua (doccino della vasca
da bagno). Prima di riporre il filtro
scuotete l'acqua in eccesso.
NETTOYAGE DES FILTRES A AIR
Le filtre est prévu pour retenir la majeure
partie des impuretés contenues dans
l’air (poussières, pollens). C’est pour cette
raison qu’il est necessaire de le nettoyer
périodiquement. Cette opération est conseillée au moins une fois par semaine.
Pour enlever et nettoyer le filtre; il suffit
de prendre le filtre par son bord supérieur
et de le soulever jusqu’à ce qu’il soit
complétement sorti de son siège (Fig.
10). Le nettoyage du filtre doit être fait au
moyen d’un jet d’eau (douchette de la
baignoire). Avant de le replacer,
secourezle pour le débarasser de l'eau
en excès.
PULIZIA DEL CLIMATIZZATORE
Prima di pulire il climatizzatore
scollegare sempre la spina.
Per la pulizia esterna utilizzare solo
detergenti e non benzina, gasolio o
prodotti affini.
Utilizzare un panno umido per evitare che l’acqua penetri all’interno.
NETTOYAGE DU CLIMATISEUR
Débrancher toujours la fiche de la prise
de courant avant de nettoyer le
climatiseur.Utiliser uniquement des
détergents et non pas de l’essence, du
gazole ni des produits semblables pour
effectuer le nettoyage extérieur du
climatiseur.
Employer un chiffon humide pour éviter
que l’eau pénètre à l’intérieur.
RIPORRE IL CLIMATIZZATORE A
FINE STAGIONE
•
Scollegare la spina;
•
Pulire il filtro dell’aria;
•
Scaricare completamente l’acqua di condensa togliendo il tappo
(fig 1-10).
CLEANING THE AIR FILTERS
The air filter traps a large quantity of
the impurities in the air (dust, pollen),
and should thus be cleaned periodically. We recommend that you clean the
filters at least once a week. For
removing and cleaning the filters, lift
the upper edge of the filter until it comes
out of its seat (Fig. 10). Use a jet of
water to clean the filter (e.g. bathroom
shower head). Shake of excess water
before refitting the air filter.
HOW TO CLEAN THE AIR
CONDITIONER
Always pull out the plug from the
socket before cleaning the conditioner.
Use detergents to clean the outside.
Never use gasoline, fuel oil or similar
products.
Use a moist cloth to avoid water
leaking into the conditioner.
STOWING THE CONDITIONER AT
THE END OF THE SEASON
•
Pull out the plug;
•
RANGER LE CLIMATISEUR EN FIN
DE SAISON
•
Débrancher la fiche de la prise de
courant;
•
Nettoyer le filtre à air;
•
Vidanger complètement l’eau de
condensation en enlevant le bouchon
(Fig. 1-10).
REINIGUNG DER LUFTFILTER
Das Filter hält viele, der in der Luft
enthaltenen Unreinheiten (Staub,
Pollen,) zurück. Aus diesem Grunde ist
eine regelmässige Reinigung
erforderlich. Es wird empfohlen, diese
mindestens einmal wöchentlich
vorzunehmen. Zur Entfernung des
Filters ist es ausreichend, die
Oberkante anzufassen und soweit
anzuheben, bis das Gitter vollständig
herausgezogen ist (Abb. 10).
Die Filterreinigung erfolgt mit einem
Wasserstrahl (Badewannenbrause).
Vor dem Wiedereinsetzen das
überschüssige Wasser vom Filter
schütteln.
REINIGUNG DER KLIMAANLAGE
Vor der Reinigung stets den
Netzstecker ziehen. Zur äußeren
Reinigung nur seifige Lösungen
benützen. Kein Reinigungsbenzin,
Leichtöl oder ähnliche Produkte zur
Reinigung verwenden. Nur mit
feuchtem Tuch abwischen. Es darf kein
Wasser in das Gerät gelangen.
Clean the air filter;
•
Remove the specific plug and
drain all the condensation (fig. 1-10).
AUFBEWAHRUNG DER
KLIMAANLAGE FÜR LÄNGEREN
STILLSTAND
•
Netzstecker ziehen;
•
Luftfilter reinigen;
•
Stöpsel ziehen und Kondenswasser vollständig leeren (Abb.1-10).
LIMPIEZA DE LOS FILTROS DE AIRE
Este filtro tiene la función de no dejar
pasar muchas de las impurezas contenidas en el aire (polvo, polen). Por esta
razón es necesario limpiarlo periódicamente. Se aconseja realizar esta operación por lo menos una vez por
semana. Para sacar el filtro basta tomar
el borde superior del mismo y levantarlo
hasta que haya salido completamente
de su propio alojamiento (Fig. 10). La
limpieza del filtro se hace con un chorro de agua (como la ducha de la bañera
por ejemplo). Antes de volver a colocar
el filtro quitar el exceso de agua.
LIMPIEZA DEL CLIMATIZADOR
Antes de limpiar el climatizador
desenchufarlo siempre.
Para la limpieza exterior utilizar solamente detergentes y no gasolina,
gasoil o productos afines.
Utilizar un paño húmedo para evitar
que el agua penetre en el interior.
COMO GUARDAR EL
CLIMATIZADOR AL FINAL DE LA
TEMPORADA
•
Desenchufarlo;
•
Limpiar el filtro de aire;
•
Vaciar completamente el agua de
condensación quitando la tapa
(Fig. 1-10).
SCHOONMAKEN VAN HET
FILTER
De filters zijn ontworpen om de
meerderheid van stof- en pollendeeltjes
tegen te houden. U dient dus regelmatig,
elke week, het filter te reinigen. Neem
het rooster uit door aan bovenrand van
het filter deze vanuit het midden naar
boven te trekken. Spuit het filter schoon
onder stromend water, bijv. een douche.
Alvorens het filter terug te plaatsen dient
u het water uit het filter te slaan (Fig.10).
REINIGING VAN DE
AIRCONDITIONER
Voordat u de airconditioner gaat
reinigen moet u altijd eerst de stekker
uit het stopcontact halen. Om de
buitenkant schoon te maken mag u
uitsluitend reinigingsprodukten
gebruiken en geen benzine, diesel of
soortgelijke produkten. Gebruik een
vochtige doek om te voorkomen dat
er water aan de binnenkant
terechtkomt.
DE AIRCONDITIONER AAN HET
EINDE VAN HET SEIZOEN
OPBERGEN
•
Haal de stekker uit het
stopcontact;
•
Reinig het luchtfilter;
•
Laat het condenswater volledig
weglopen door de dop (Fig. 1-10)
eraf te draaien.
20
ISTRUZIONI PER L’INSTALLAZIONE CON FORATURA DELLA
PARETE
AVVERTENZA IMPORTANTE:
Le operazioni sotto elencate devono essere eseguite solo da personale specializzato ed in possesso dei requisiti professionali per
effettuare questo tipo di lavoro.
FORATURA DELLA PARETE
Come prima operazione occorre individuare nella parete il punto corretto dove eseguire il foro di diametro 60 mm, in funzione del posizionamento stabilito per le due unità
che compongono il prodotto. Prima
di procedere alla foratura, Vi consigliamo di effettuare un’accurato esame della parete per evitare di
lesionare strutture portanti o impianti
della Vostra abitazione (travi, pilastri,
tubazioni idrauliche, cavi elettrici,
ecc).
AVVERTENZE:
• Prima di procedere ad effettuare
l’operazione di sconnessione delle linee togliete l’alimentazione
elettrica dell’apparecchio mediante l’estrazione della spina del cavo
di alimentazione dalla presa di
corrente.
• Prima di far passare il connettore rapido attraverso il foro che
avete praticato nella parete è indispensabile proteggerlo con l’apposito tappo dato in dotazione,
per evitare che polvere o impurità si depositino sulla parte interna dello stesso. Lo sporco che si
verrebbe a trovare all’interno del
circuito del refrigerante (una volta ricollegate le linee) é gravemente dannoso per il nostro climatizzatore.
• Non accendere assolutamente
l’apparecchio con la linea di collegamento staccata. In caso contrario si possono determinare gravi pericoli per la sicurezza oltre a
danni importanti al climatizzatore.
POSE PAR PERCAGE DU MUR
MISE EN GARDE IMPORTANTE:
Les opérations ci-dessous doivent
être effectuées seulement par un
personnel spécialisé et spécialement
formé pour ce type de travail.
PERÇAGE DU MUR
Il convient avant tout de repérer
l’endroit correct où percer le trou de
60 mm de diamètre dans le mur en
fonction du positionnement des deux
unités qui composent le climatiseur.
Avant de percer, il est conseillé
d’effectuer un examen préalable pour
éviter d’endommager des structures
portantes ou autres installations de
votre maison (poutres, pilastres,
tuyauteries hydrauliques, câbles
électriques, etc.).
MISES EN GARDE:
• Avant de déconnecter les lignes,
coupez l’arrivée de courant
électrique en débranchant la fiche
du cordon d’alimentation de la prise
de courant.
• Avant de faire passer le connecteur
rapide à travers le trou pratiqué
dans le mur, il est indispensable de
le protéger avec le bouchon spécial
fourni en dotation. Ce bouchon
empêche la poussière ou la saleté
de se déposer à l’intérieur du
connecteur avec comme grave
conséquence la pénétration de la
saleté dans le circuit du fluide (une
fois les lignes reconnectées) ce qui
provoquerait de graves dégâts aux
composants du circuit même.
•Il est absolument interdit de mettre
en route le climatiseur avec la ligne
de jonction débranchée car cela
pourrait être très dangereux pour la
sécurité des personnes et
provoquer de graves dégâts à
l’appareil.
INSTALLATION INSTRUCTIONS,
DRILLING A HOLE IN THE WALL
ANLEITUNG ZUR MONTAGE UNTER
DURCHBORHUNG DER WAND
IMPORTANT:
The procedures described below
must only be done by qualified
personnel and who have the
professional knowledge required
for such a job.
WICHTIGER HINWEIS:
Die nachstehend beschriebenen
Arbeitsgänge sind ausschließlich
Fachpersonal vorbehalten, das die
nötigen Kenntnisse zur Ausführung
dieser Arbeit besitzt.
DRILLING THE WALL
The first thing to do is find the best
place on the wall to make a 60 mm
diameter hole, depending on the
position you have chosen for the
two units. Before drilling the hole
check carefully that nothing will be
damaged by it (beams, pillars,
water pipes, electrical wires, etc.).
DURCHBOHRUNG DER WAND
Als Erstes ist in Abhängigkeit des
Anbringungbereiches der beiden
Geräte, aus denen die Klimaanlage
besteht, genau festzulegen, an
w e l c h e r S t e l l e d e r Wa n d e i n
Bohrloch von 60 mm Durchmesser
auszuführen ist. Es empfiehlt sich,
die Wand vor der Durchbohrung
sorgfältig zu überprüfen, damit man
beim
Bohren
nicht
auf
Tragstrukturen (Balken, Pfeiler),
oder aber auf Rohrleitungen oder
elektrische Kabel u.ä. stößt und sie
dabei beschädigt.
CAUTION:
• Before disconnecting the lines,
take the appliance’s power plug
out of the mains socket.
• Before putting the quick
coupling through the hole you
have just made in the wall, put a
protective cap on it to stop dust
and other impurities from getting
inside. Any dirt that gets inside
the coolant circuit (once the lines
have been reconnected) would
be extremely harmful to the
conditioner.
• Under no circumstances must
you switch the appliance on if the
connection line is disconnected.
If you do not only is it extremely
hazardous for personal safety
but it could also seriously
damage the appliance.
HINWEISE:
• Vo r d e r A b t r e n n u n g d e r
Leitungen das Gerät durch
Abziehen des Anschlußkabels
spannungslos setzen.
• Bevor der Schnellanschluß
durch das Bohrloch geführt wird,
ist er mit dem beigestellten
Verschluß vor Eindringen von
Staub oder Schmutz zu schützen,
die sich an dessen Innenseite
ablagern und nach erneutem
Anschluß der Leitungen in den
Kühlkreis gelangen und das
Klimagerät schwer beschädigen
würden.
•
Das
Gerät
nie
bei
a b g e s c h l o s s e n e r
Verbindungsleitung einschalten,
dies wäre gefährlich und könnte
schwere Folgeschäden des
Geräts mit sich bringen.
INSTRUCCIONES PARA LA
INSTALACIÓN CON ORIFICIO EN
LA PARED
AANWIJZINGEN VOOR DE
INSTALLATIE MET IN DE MUUR
GEBOORDE GATEN
ADVERTENCIA IMPORTANTE:
Las operaciones que se describen
a continuación deben ser
efectuadas única y exclusivamente
por personal especializado y con los
requisitos profesionales para
efectuar este tipo de trabajo.
BELANGRIJKE WAARSCHUWING:
De
hieronder
vermelde
werkzaamheden
mogen
uitsluitend door gespecialiseerd
personeel uitgevoerd worden dat
in het bezit is van de nodige
vakkundige vereisten om dit soort
werkzaamheden uit te kunnen
voeren.
TALADRADO DE LA PARED
La primera operación es hallar el punto correcto donde se desea practicar
el orificio de 60 mm de diámetro, en
función
del
posicionamiento
establecido para las dos unidades que
componen el producto. Antes de iniciar
el taladrado, les aconsejamos
examinar atentamente la pared para
evitar dañar estructuras portantes o
instalaciones (travesaños, pilares,
conductos hidráulicos, cables
elécticos, etc.)
ADVERTENCIAS:
• Antes de desconectar las líneas
quiten la alimentación eléctrica del
aparato, para ello desenchufen el
cable de alimentación de la toma de
corriente.
• Antes de hacer pasar el conector
rápido a través del orificio que han
practicado en la pared, es
indispensable protegerlo con el
adecuado trapo en dotación para
evitar que el polvo o impurezas se
depositen en la parte interna del
mismo. La suciedad que se
introduciría en el interior del circuito del refrigerante (una vez
conectadas de nuevo las líneas) es
muy perjudicial para nuestro
climatizador
• Por ningún motivo enciendan el
aparato con la línea de conexión
desconectada, en caso contrario se
pueden determinar graves peligros
para la seguridad así como
importantes daños al climatizador.
GATEN IN DE MUUR BOREN
Het eerste wat gedaan moet worden
is het juiste punt bepalen waar het gat
met een diameter van 60 mm in de
muur geboord moet worden
afhankelijk van de plaats waar de
beide units waar het product uit
bestaat geïnstalleerd moeten worden.
Alvorens de gaten in de muur te boren
adviseren wij u om de muur goed te
controleren om te voorkomen dat er
draagconstructies of installaties in de
woning beschadigd worden (balken,
pilaren, waterleidingen, elektrische
kabels enz.).
WAARSCHUWINGEN:
• Alvorens over te gaan tot het
loskoppelen van de leidingen
moet de elektrische stroomtoevoer naar het apparaat
uitgeschakeld worden door de
stekker van het voedingssnoer uit
het stopcontact te halen.
• Alvorens de snelkoppeling door
het gat dat u in de muur geboord
heeft te laten lopen is het
onontbeerlijk dat hij met de speciale dop die bij het apparaat
geleverd wordt te beschermen om
te voorkomen dat er stof of vuil in
de koppeling terechtkomt. Het vuil
dat in het koelcircuit terechtkomt
(zodra
de
leiding
weer
aangesloten wordt) is erg
schadelijk
voor
onze
airconditioner.
• Zet het apparaat absoluut niet
aan als de verbindingsleiding
losgekoppeld is. Als dit namelijk
wel gedaan wordt dan kan dit
ernstige gevaren voor de
veiligheid tot gevolg hebben en de
airconditioner
bovendien
aanzienlijke schade toebrengen.
21
ISTRUZIONI PER LA
SCONNESSIONE DELLA LINEA
FLESSIBILE
Nel caso di installazione a parete (Ø
da 50 a 60 mm), la linea flessibile
può venir separata dalla unità interna. La suddetta linea è composta dai
seguenti particolari scollegabili:
• cavo di collegamento elettrico per il
motore del ventilatore dell'unità esterna;
• tubo in gomma tra la pompa ed il
condensatore dell'unità esterna;
• due linee di collegamento per refrigerante che si aprono e chiudono
automaticamente;
• cavo per sonda temperatura (solo
versione CLIMA 16 HP).
AVVERTENZA:
TOGLIERE LA SPINA DI ALIMENTAZIONE ELETTRICA PRIMA DI
INIZIARE L'OPERAZIONE DI
SCONNESSIONE DELLA LINEA
FLESSIBILE. LE OPERAZIONI DI
CONNESSIONE E SCONNESSIONE DELLA LINEA FLESSIBILE
DEVONO ESSERE ESEGUITE DA
PERSONALE SPECIALIZZATO. I
DUE RACCORDI RAPIDI DELLA LINEA FLESSIBILE DEVONO
ESSERE MANTENUTI IN STATO
DI ASSOLUTA PULIZIA. PER QUESTO
MOTIVO,
QUANDO
VENGONO FATTI PASSARE ATTRAVERSO
UN'APERTURA,
OCCORRE PROTEGGERLI CON
GLI APPOSITI TAPPI DATI IN DOTAZIONE. SE I RACCORDI RAPIDI
SONO SPORCHI POSSONO PORTARE AD UNA CATTIVA TENUTA
CON CONSEGUENTE PERDITA DI
GAS REFRIGERANTE.
IMPORTANTE:
NON ALIMENTATE MAI ELETTRICAMENTE
MEDIANTE
L'INSERIMENTO DELLA SPINA IN
UNA PRESA DI CORRENTE - IL CLIMATIZZATORE QUANDO LE LINEE
SONO SCOLLEGATE. SE LO STESSO VIENE INAVVERTITAMENTE
ACCESO CON LE LINEE STACCATE METTERESTE A SERIO RISCHIO
LA VS. SICUREZZA ED INOLTRE
DANNEGGERESTE IRREPARABILMENTE L'APPARECCHIATURA.
INSTRUCTIONS POUR LA
DECONNEXION ET LA
RE-CONNEXION DE LA LIGNE
FLEXIBLE
Dans le cas de montage au mur (allant
de 50 à 60 mm), la ligne flexible peut
etre séparée de l'unité interieure. La
ligne se compose des pièces détachables suivantes:
• câble de connexion électrique pour le
moteur du ventilateur de l'unité
exterieure;
• tuyau en caoutchouc entre la pompe
et 'unité extérieure;
• deux lignes de connexion pour le
réfrigérant qui s'ouvrent et se ferment
automatiquement;
• câble pour sonde de température
(uniquement pour version CLIMA 16 HP).
ATTENTION:
DÉBRANCHER LA FICHE D'ALIMENTATION ÉLECTRIQUE AVANT DE
COMMENCER LA DÉCONNEXION DE
LA
LIGNE
FLEXIBLE.
LES
CONNEXIONS DE LA LIGNE FLEXIBLE
DOIVENT ÊTRE EFFECTUÉES PAR
DU PERSONNEL SPECIALISÉ. LES
DEUX RACCORDS RAPIDES DE LA
LIGNE FLEXIBLE DOIVENT ÊTRE
MAINTENUS
PARFAITEMENT
PROPRES.
DANSCE
BUT,
LORSQU'ILS DOIVENT PASSER À
TRAVERS UNE OUVERTURE, IL FAUT
LES PROTÉGER AU MOYEN DES
BOUCHONS SPÉCIAUX FOURNIS EN
DOTATION. SI LES RACCORDS
RAPIDES SONT SALES, ILS PEUVENT
ENTRAINER UNE MAUVAISE
ÉTANCHEITÉ ET PAR CONSÉQUENT,
UNE PERTE DU GAZ RÉFRIGÉRANT.
IMPORTANT:
NE JAMAIS ALIMENTER LE
CLIMATISEUR ÉLECTRIQUEMENT
EN BRANCHANT UNE FICHE DANS
UNE PRISE DE COURANT LORSQUE
LES LIGNES SONT DÉCONNECTÉES. SI LE CLIMATISEUR EST
ALLMUMÉ PAR INADVERTANCE
LORSQUE LES LIGNES SONT DÉCONNECTÉES, VOUS RISQUEZ DE
METTRE VOTRE SÉCURITÉ EN
DANGER
ET,
EN
PLUS,
D'ENDOMMAGER IRREMEDIABLEMENT L'APPAREIL.
CLEANING THE AIR CONDITIONER
For wall installation (from 50 to 60 mm), the
flexible line can be separated from the
inside unit. This line is composed of the
following parts that can be disconnected:
• electrical connection cable for the outside
unit fan motor;
• rubber hose between the pump and the
condenser of the outside unit;
• two connection lines for coolant, that open
and close automatically;
• cable for temperature probe (only CLIMA
16 HP version).
CAUTION:
ALWAYS REMOVE THE ELECTRICAL
PLUG FROM THE SOCKET BEFORE
DISCONNECTING THE FLEXIBLE
LINE. CONNECTION AND DISCONNECTION OF THE FLEXIBLE LINES
MUST ONLY BE CARRIED OUT BY
SPECIALISED PERSONNEL. THE
TWO QUICK COUPLINGS OF THE
FLEXIBLE LINE MUST BE KEPT
PERFECTLY CLEAN. FOR THIS
REASON, THEY NEED TO BE
PROTECTED WHEN THEY ARE RUN
THROUGH AN OPENING USING THE
SPECIAL PLUGS PROVIDED. IF THE
QUICK COUPLINGS ARE DIRTY,
THIS CAN ALSO LEAD TO POOR
SEALING AND THUS A LOSS OF COOLANT GAS.
WARNING:
NEVER SUPPLY CURRENT TO THE
AIR CONDITIONER BY PLUGGING
THE PLUG INTO AN ELECTRICAL
SOCKET WHILE THE LINES ARE DISCONNECTED. IF THE UNIT IS
ACCIDENTALLY SUPPLIED WITH
THE LINES DISCONNECTED, IT IS
NOT ONLY A SERIOUS RISK TO
YOUR SAFETY BUT ALSO CAUSES
PERMANENT DAMAGE TO THE AIR
CONDITIONER.
TRENNUNG DES VERBINDUNGSCHLAUCHANSCHLUSSES
Für eine Wanddurchführung (Ø 50 bis
60 mm) kann der Verbindungsschlauch
am Innenteil getrennt werden. Der
Verbindungsschlauch besteht aus
folgenden trennbaren Teilen:
• Elektroverbindungsleitung für den
Ventilatormotor im Außenteil;
• Schlauch von der Pumpe zum
Verflüssiger im Außenteil;
• Zwei sich automatisch schließende
und öffnende Kältemittelverbindungs
leitungen;
• Kabel für Temperaturfühler (nur
Ausführung CLIMA 16 HP).
HINWEIS:
DIE
TRENNUNG
DER
FUNKTIONSLEITUNG DARF NUR VON
EINEM FACHMANN DURCHGERFÜHRT
WERDEN. VOR DEM TRENNEN DER
FUNKTIONSLEITUNG NETZ-STECKER
AUS DER STECKDOSE ZIEHEN. GERÄT
NICHT IM GETRENNTEN ZUSTAND
BETREIBEN.
DIE
ZWEI
SCHNELLANSCHLÜSSE
DES
VERBINDUNGSSCHLAUCHES
MÜSSEN
ABSOLUT
SAUBER
GEHALTEN WERDEN. AUS DIESEM
GRUNDE SIND SIE VOR DER
DURCHFÜHRUNG DURCH ÖFFNUNGEN IMMER MIT DEN DAZUGEHÖRIGEN KAPPEN ABZUDECKEN.
VERSCHMUTZTE SCHNELLANSCHLÜSSE KÖNNEN ZU EINER MANGELHAFTEN DICHTIGKEIT UND SOMIT
ZUM VERLUST VON KÄLTEMITTELGAS FÜHREN.
WICHTIG:
BEI NICHT ANGESCHLOSSENEN
LEITUNGEN IST DAS KLIMAGERÄT
NIEMALS DURCH EINSTECKEN DES
STECKERS IN DIE STECKDOSE AN
DAS
STROMNETZ
ANZUSCHLIESSEN. WÜRDE DAS
GERÄT VERSEHENTLICH BEI
UNANGESCHLOSSENEN
LEITUNGEN
ANGESCHALTET
WERDEN, SO WÄRE IHRE
PERSÖNLICHE SICHERHEIT STARK
GEFÄHRDET UND DAS GERÄT
UNERSETZLICH BESCHÄDIGT.
INSTRUCCIONES PARA LA
DESCONEXION Y CONEXION DE
LA LINEA FLEXIBLE
En el caso de instalación de pared (Ø
de 50 a 60 mm), la línea flexible puede
estar separada de la unidad interna.
Dicha línea está compuesta por los
siguientes elementos que pueden
desconectarse:
• cable de conexión eléctrica para el
motor del ventilador de la unidad
externa;
• tubo de goma entre la bomba y el
condensador de la unidad externa;
• 2 líneas de conexión para el refrigerador, que se abren y cierran
automáticamente;
• cable para sonda temperatura (sólo
modelo CLIMA 16 HP).
OBSERVACIONES:
QUITAR
EL
ENCHUFE
DE
ALIMENTACIÓN ELÉCTRICA ANTES
DE COMENZAR LA OPERACIÓN DE
DESCONEXIÓN DE LA LÍNEA FLEXIBLE. LA OPERACIONES DE
CONEXIÓN Y DESCONEXIÓN DE LA
LÍNEA FLEXIBLE TIENEN QUE SER
REALIZADAS POR PERSONAL ESPECIALIZADO. LOS DOS EMPALMES
RÁPIDOS DE LA LÍNEA FLEXIBLE
TIENEN QUE SER MANTENIDOS EN
ESTADO DE ABSOLUTA LIMPIEZA.
POR ESTE MOTIVO, CUANDO SE
HACEN PASAR A TRAVÉS DE UNA
ABERTURA, ES NECESSARIO
PROTEGERLOS CON LOS TAPONES
ESPECIALES QUE SE ENTREGAN
DE SERIE. SI LOS EMPALMES
RÁPIDOS ESTÁN SUCIOS PUEDEN
CAUSAR UNA MALA ESTANQUEIDAD CON LA CONSIGUIENTE
PÉRDIDA
DEL
GAS
DE
REFRIGERACIÓN.
IMPORTANTE:
CON LAS LÍNEAS DESCONECTADAS, EL ACONDICIONAR NO TIENE
QUE ESTAR ALIMENTADO ELÉCTRICAMENTE NUNCA, ES DECIR NO
TIENE QUE ESTAR ENCHUFADO. SI,
POR DESCUIDO, LO ENCENDIERA
CON LAS LÍNEAS DESCONECTADAS, PONDRÍA EN PELIGRO
SU PROPIA SEGURIDAD Y ADEMÁS
DAÑARÍA IRREPARABLEMENTE EL
APARATO.
WETTELIJKE BEPALINGEN
In Nederland is sinds enkele jaren
wetgeving van kracht aangaande
stoffen die de ozonlaag aantasten.
De wettelijke regels bekend onder
de
naam
“Regeling
Lekdichtheidsvoorschriften
Koelinstallaties”, RLK, staat het
werken aan koeltechnische
installaties uitsluitend toe aan
gediplomeerde vakmensen. De
handelingen die nodig zijn om de
binnen- en buitenunit te koppelen
danwel te ontkoppelen vallen
onder deze wetgeving. Laat deze
werkzaamheden
daarom
uitvoeren
door
STEK
gecertificeerde bedrijven en
vakmensen.
22
3
5
6
1
C
4
1
2
A
D
B
Fig. 11/B
Fig. 11/A
Fig. 12
2
OPERAZIONI PER LA SCONNESSIONE (v. Fig. 11 e 12)
OPERATIONS A EXECUTER POUR
LA DECONNEXION (v. Fig. 11 et 12)
DISCONNECTING THE FLEXIBLE
LINE (s. Fig. 11 and 12)
TRENNUNGSVORGANG
(s. Abb. 11 u. 12)
OPERACIONES PARA LA DESCONEXION (V. Fig. 11 y 12)
☞ Togliere la vite che blocca la
protezione (Fig. 11/A) allo schienale
del climatizzatore.
☞ Oter la vis qui bloque la protection
(Fig. 11/A) au dos du climatiseur.
☞ Remove the screw that secures
the guard (Fig. 11/A) to the back of the
air conditioner.
☞ Abdeckplatte auf der Rückseite
entfernen (Abb. 11/A Schraube).
☞ Quitar el tornillo que fija la
protección (Fig. 11/A) a la parte trasera
del climatizador.
☞ Muovere la protezione (Fig. 11/
B) verso sinistra mediante un piccolo spostamento, quindi estrarla dalla
sua sede.
☞ Staccare dall'apposito portagomma (Fig. 12 Part. 2) il tubo di
trasferimento acqua di condensa.
☞ Sconnettere - facendo pressione sulle due linguette esterne - il
connettore elettrico (Fig. 12 Part. 3).
☞ Sconnettere il cavo della sonda
termostato esercitando una leggera
trazione sul connettore (solo versione CLIMA 16 HP).
☞
Allentare la fascetta metallica
☞ Déplacer légèrement la protection
(Fig. 11/B) vers la gauche puis la sortir
de son siege.
☞ Débrancher le tuyau d' évacuation
de l'eau de condensation du portetuyau (Fig. 12 Détail 2).
☞ Débrancher le connecteur électrique (Fig. 12 Détail 3) en exercant une
pression sur les deux languettes
extérieures.
☞ Débrancher le câble de la sonde
thermostat en tirant légèrement sur le
connecteur (uniquement pour version
CLIMA 16 HP).
☞ Desserrer le collier métallique (6)
de fixation du tuyau flexible.
☞ Move the guard (Fig. 11/B) slightly
toward the left, then take it out of its
seat.
☞ Take the moisture transfer hose
out of the hose-holder (Fig. 12 Part 2).
☞ Pressing on the two outside tabs,
remove the electrical connector (Fig.
12 Part 3).
☞ Die Abdeckplatte (Abb. 11/B) leicht
nach links drehen und herausnehmen.
☞ Den Kondenswasserschlauch von
seinem Schlauchhalter (Abb. 12 Teil 2)
abnehmen.
☞ Den Elektroanschluß (Abb. 12 Teil
3) durch drücken der beiden äußeren
Federn trennen.
☞ Mover la protección (Fig. 11/B)
hacia la izquierda con un pequeño
desplazamiento, luego sacarla de su
alojamiento.
☞ Separar del porta manguera (Fig.
12 Elemento 2), el tubo de conducción
del agua de condensación.
☞ Desconectar - ejerciendo presión
sobre las leugüetas externas - el conector eléctrico (Fig. 12 Elemento 3).
☞ Disconnect the cable of the
thermostat probe pulling lightly on the
connector (only CLIMA 16 HP version).
☞ Das Kabel des Thermostatfühlers
abstecken; hierzu leicht am
Steckverbinder ziehen (nur Ausführung
CLIMA 16 HP).
☞ Loosen the metal clamp (6) which
secures the hose.
☞ Die den Schlauch befestigende
Metallschelle (6) lockern.
☞ Desconectar el cable de la sonda
del termóstato ejerciendo una leve
tracción en el conector (sólo en el
modelo CLIMA 16 HP).
☞
☞
☞
Loosen the two quick couplings
Die beiden Schnellanschlüsse (4)
Aflojar la abrazadera metálica (6)
23
(6) che fissa la linea flessibile.
☞ Svitare i due raccordi rapidi (4)
e (5) agendo come descritto di seguito. Durante la separazione dei
raccordi rapidi fare attenzione a che
gli stessi, mentre vengono allentati,
non si inclinino, causando fuoriuscita del gas refrigerante. Osservare le
norme di sicurezza per le "operazioni con refrigeranti".
- RACCORDO SINISTRO (4)
• Con una chiave da 19 mm
tenete bloccata la parte fissa
del raccordo femmina (Fig.
12 Part. A).
• Con una chiave da 24 mm
svitate, ruotando in senso antiorario l'elemento mobile del
raccordo femmina (Fig. 12
Part. B) sino al completo distacco.
- RACCORDO DESTRO (5)
• Con una chiave da 21 mm
tenete bloccata la parte maschio del raccordo (Fig. 12
Part C) collegata alla linea
flessibile.
• Con una chiave da 24 mm svitate girandola in senso orario,
l'elemento mobile del raccordo
femmina fissato alla macchina
(Fig. 12 Part D) sino al completo distacco delle due parti.
☞ Togliere la fascetta metallica (6)
che fissa la linea flessiblie svitando
le 2 viti relative.
RICONNESSIONE DELLA LINEA
FLESSIBILE
AVVERTENZA:
• I due collegamenti a vite non sono
intercambiabili.
• I tubi per il refrigerante vanno sempre avvitati in posizione verticale e
non inclinati.
• Al momento dell'avvitamento non
esercitare pressione sui collegamenti
a vite poichè potrebbero aprirsi.
☞ Avvitare i due raccordi rapidi (4)
e (5) agendo come descritto di seguito:
☞ Dévisser les deux raccords rapides
(4) et (5) en agissant de la manière
décrite cidessous. Lors de la séparation des raccords rapides, faire bien
attention à ce que ces derniers ne
s'inclinent pas pendant leur déssérage
pour ne pas provoquer de fuite du gaz
réfrigérant. Respecter les normes de
sécurité pour les "opérations avec
réfrigérants".
- RACCORD DE GAUCHE (4)
• Bloquer la partie fixe du raccord
femelle (Fig. 12, Détail A) au
moyen d'une clé de 19 mm.
• Dévisser l'élément mobile du
raccord femelle (Fig. 12, Détail
B) en tournant avec une clé de
24 mm dans le sens contraire
des aiguilles d'une montre jusqu'
à ce qu'il se sépare
complètement.
- RACCORD DE DROITE (5)
• Bloquer la partie mâle du raccord (Fig. 12, Dé tail C) reliée à
la ligne flexible au moyen d'une
clé de 21 mm.
• Dévisser l'élément mobile du
raccord femelle fixé à la machine
(Fig. 12, Détail D) en tournant
avec une clé de 24 mm dans le
sens des aiguilles d'une montre
jusqu' à ce que les deux parties
se séparent complétement.
☞ Oter le collier métallique (6) qui
fixe la ligne flexible aprés avoir dévissé
ses 2 vis.
(4) and (5) as described below. When
separating the quick couplings, make
sure that they do not tilt, allowing the
coolant gas to leak out. Observe all
safety rules for carrying out operations
with coolants.
- LEFT COUPLING (4)
• Using a 19 mm spanner, hold
the fixed female part of the
coupling still (Fig. 12 Part A).
• Using a 24 mm spanner, loosen
the moving female part of the
coupling by turning anticlockwise (Fig. 12 Part B) until
it comes off.
- LINKER ANSCHLUSS (4)
• Das Teil "A" mit einem 19 mm
Gabelschlüssel festhalten (Abb.
12 Teil A).
• Teil "B" mit einem 24 mm Gabelschlüssel entgegen dem
Uhrzeigersinn zügig losschrauben, bis sich die Leitung
trennen läßt (Abb. 12 Teil B).
- RECHTER SCHLUSS (5)
• Den Gewindebolzen des mit
dem Verbindungsschlauch
verbundenen Anschlusses
(Abb. 12 Teil C) mit einem 21
mm Gabelschlüssel festhalten.
• Using a 24 mm spanner, turn
the moving female element of
the coupling that is fixed to the
unit clockwise to loosen (Fig. 12
Part D) until the two parts separate.
• Mit
einem
24
mm
Gabelschlüssel die auf dem
Gerät befestigte, bewegliche
Überwurfmutter (Abb. 12 Teil D)
im Uhrzeigersinn komplett
abschrauben.
☞ Remove the metal clamp (6) that
attaches the flexible line by loosening
the two screws.
☞ Die Metallschelle (6), welche die
Schlauchverbindung festhält, durch
Abschrauben der beiden Schrauben
abnehmen.
RECONNECTING THE FLEXIBLE
LINE
• The two screw connections are not
interchangeable.
RECONNEXION DE LA LIGNE
FLEXIBLE
CONSEILS:
• Les deux connexions à vis ne sont
pas interchangeable.
• At the moment of startup, never put
pressure on the screw attachments as
they could open.
• Les câbles pour le refrigérant doivent
toujours être vissés en position verticale et non pas inclinés.
☞ Screw the two quick couplings (4)
and (5) as described below:
☞ Visser les deux raccords rapides
(4) et (5) en procédant comme indiqué
ci-après:
ACHTUNG: Vorhte Halteschelle (6)
lösen oder entfernen.
- RIGHT COUPLING (5)
• Using a 21 mm spanner, hold
the male part of the coupling
connected to the flexible line
still (Fig. 12 Part C).
• The coolant hoses should always be
attached in the vertical position and
never tilted.
• Lors du vissage, ne pas exercer de
pression sur les connexions à vis car
elles pourraient s'ouvrir.
und (5) gemäß nachstehender
Anleitungen abschrauben.
- LEFT COUPLING (4)
• Fit the female part of the coupling
on the male part fixed to the unit,
manually screwing in the moving
element of the female part
clockwise (Fig. 12 Part B). Complete the operation, keeping the
fixed female part of the coupling
still (Fig. 12 Part A) using a 19
HINWEISE: Die Trennstellen der
Verbindungsleitungen müssen absolut
sauber gehalten werden. Daher beim
Durchstecken durch eine Öffnung die
mitgelieferten Schutzkapper benutzen
oder mit einer Folientüte schützen.
Verschmutzte Trennstellen führen zu
Kältemittelverlusten (Undichtigkeit).
Zusammenschrauben der Kältemittelverbindungsleitung. Die beiden
Verschraubungen sind unverwechselbar. Kältemittelleitungen stets
senkrecht aufschrauben, nicht verkanten. Beim Zusammenschrauben
nicht auf die Verschraubungen drücken,
da diese sich dadurch eventuell öffnen
könnten. Die ersten Gewindegänge mit
der Hand festschrauben.
• Auf Leichtgängigkeit achten.
WIEDERANSCHLUSS DES
VERBINDUNGSSCHLAUCHES
• Die beiden Schraubverbindungen sind
unverwechselbar.
que fija el tubo flexible.
☞ Desatornillar los dos empalmes
rápidos (4) y (5), actuando de la siguiente manera: durante la separación
de los empalmes rápidos tener cuidado de que los mismos, mientras se
aflojan, no se inclinen, causando la
salida del gas de refrigeración. Respetar las normas de seguridad para las
"operaciones con este tipo de gases".
- EMPALME IZQUIERDO (4)
• Con una llave de 19 mm
mantener bloqueada la parte fija
del empalme hembra (Fig. 12
Elemento A).
• Con una llave de 24 mm
desatornillar, girando en
dirección antihoraria el elemento móvil del empalme hembra
(Fig. 12, Elemento B) hasta que
se separe completamente.
- EMPALME DERECHO (5)
• Con una llave de 21 mm
mantener bloqueada la parte
macho del empalme (Fig. 12
Elemento C) conectada con la
línea flexible.
• Con una llave de 24 mm
desatornillar, girando en dirección horaria, el elemento móvil
del empalme hembra fijado en
la maquina (Fig. 12 Elemento
D), hasta que se separen
completamente da los partes.
☞ Quitar la abrazadera metálica (6)
que fija la línea flexible desatornillando
los 2 tornillos correspondientes.
CONEXION DE LA LINEA FLEXIBLE
OBSERVACIONES:
• Las dos conexiones de rosca no son
intercambiables.
• Los cables para el refrigerador se
enroscan siempre en posición vertical
y no inclinados.
• En el momento de atornillar no ejercer presión sobre las conexiones de
rosca porque podrí an abrirse.
☞ Atornillar los dos empalmes
rápidos (4) y (5) según se indica a
continuación:
24
- RACCORDO SINISTRO (4)
• Imboccate la parte femmina
del raccordo sulla parte maschio fissata alla macchina
avvitando manualmente l'elemento mobile della parte
femmina (Fig. 12 Part. B) in
senso orario. Completate
l'operazione tenendo bloccata la parte fissa del raccordo
femmina (Fig. 12 Part. A) con
una chiave da 19 mm e avvitando l'elemento mobile in
senso orario sino al completo
serraggio.
- RACCORD DE GAUCHE (4)
• Enfiler la partie femelle du raccord sur la partie mâle fixée à la
machine en vissant à la main
l'élément mobile de la partie
femelle (Fig. 12 Détail B) dans
le sens des aiguilles d'une montre. Compléter l'opération en bloquant la partie fixe du raccord
femelle (Fig. 12 Détail A) au
moyen d'une clé de 19 mm et en
vissant l'élément mobile dans le
sens des aiguilles d'une montre
jusqu'à ce qu'il soit complètement sérré.
- RACCORDO DESTRO (5)
• Imboccate la parte maschio
del raccordo (Fig. 12 Part. C)
nella parte femmina (Fig. 12
Part. D) avvitando la stessa in
senso antiorario. Completate
l'operazione di avvitamento
tenendo bloccata la parte maschio con una chiave da 21
mm e avvitando in senso antiorario l'elemento mobile della
parte femmina con una chiave da 24 mm sino al completo
serraggio.
- RACCORD DE DROITE (5)
• Enfiler la partie male du raccord
(Fig. 12 Détail C) dans la partie
femelle (Fig. 12 Détail D) et la
visser dans le sens contraire
des aiguilles d'une montre.
Compléter le vissage en bloquant la partie mâle au moyen
d'une clé de 21 mm et en vissant
dans le sens contraire des
aiguilles d'une montre l'élément
mobile de la partie femelle au
moyen d'une clé de 24 mm
jusqu'au serrage complet.
☞ Fissare la linea flessibile alla
macchina tramite la fascetta metallica (Fig. 12 Part. 6).
☞ Fixer la ligne flexible à la machine
au moyen du collier metallique (Fig. 12
Détail 6).
ATTENZIONE:
DOPO AVERE EFFETTUATO IL
COLLEGAMENTO DEI RACCORDI
RAPIDI CONTROLLARE CHE NON
VI SIANO PERDITE DI GAS REFRIGERANTE.
ATTENTION:
APRÈS AVOIR EFFECTUÉ LA
CONNEXION DES RACCORDS RAPIDES, VERIFIER QU'IL N'Y AIT PAS
DE PERTES DE GAZ REFRIGÉRANT.
☞ Inserite il connettore elettrico
controllando che le linguette laterali
si inseriscano nelle apposite tacche
della parte fissata alla macchina (Fig.
12 Part. 3).
☞ Introduire le connecteur électrique
en contrôlant que les languettes latérales pénètrent bien dans les encoches de la partie fixée sur la machine
(Fig. 12 Détail 3).
☞ Inserire con cura il tubo di drenaggio condensa (Fig. 12 Part. 2).
☞ Introduire le tuyau de drainage de
la condensation avec soin (Fig. 12
Détail 2).
☞ Ricollegare il cavo della sonda
termostato (solo versione CLIMA 16
HP).
☞ Rebrancher le câble de la sonde
thermostat (uniquement pour version
CLIMA 16 HP).
☞ Chiudere il vano attacchi mediante l’apposita protezione. Per
eseguire comodamente questa operazione procedete come segue:
☞ Fermez le logement des attaches
avec la protection correspondante.
Pour effectuer commodément cette
opération, procédez de la façon
suivante:
• Appoggiate la protezione
contro lo schienale tenendo il
mm spanner and turning the moving element clockwise until it is
completely tightened.
• Die Kältemittelleitung muß stets, ohne
sie zu neigen in senkrechter Stellung
angeschraubt werden.
- RIGHT COUPLING (5)
• Fit the male part of the coupling
(Fig. 12 Part C) into the female
part (Fig. 12 Part D) by turning
the female part anti-clockwise.
Complete the tightening operation, keeping the male part still
using a 21 mm spanner and
turning the moving element of
the female part anti-clockwise
using a 24 mm spanner until it is
completely tightened.
• Beim Anschrauben keinen Druck auf
die Schraubanschlüsse ausüben, da
diese sich öffnen könnten.
☞ Attach the flexible line to the air
conditioning unit using the metal clamp
(Fig. 12 Part 6).
IMPORTANT NOTE:
AFTER CONNECTING THE QUICK
COUPLINGS, CHECK TO MAKE
SURE THAT THERE ARE NO LEAKS
OF COOLANT.
☞ Insert the electrical connector,
making sure that the side tabs fit into
the notches on the fixed part of the air
conditioning unit (Fig. 12 Part 3).
☞ Carefully insert the moisture drainage hose (Fig. 12 Part 2).
☞ Reconnect the thermostat probe
cable (only CLIMA 16 HP version).
☞ Close
the
couplings’
compartment with the guard. To do
this easily proceed as follows:
• Position the guard against
the back of the air
conditioner, keeping the left
side edge about 2 cm further
out compared to the back so
the guides slot into each
other.
• Slide the guard to the right
until the side edge coincides
with that of the back.
• Screw down the screws
securing the guard.
☞ Die zwei Schnellanschlüsse (4)
und (5) wie nachstehend beschrieben
festschrauben:
- LINKER ANSCHLUSS (4)
• Die Überwurfmutter auf das
Gerätegewinde stecken und
zuerst im Uhrzeigersinn mit der
Hand festziehen (Abb. 12 Teil
B). Die vollständige Verbindung
so herstellen, indem mit einem
19 mm Gabelschlüssel der
obere Teil festgehalten und mit
einem 24 mm Schlüssel die
Überwurfmutter festgezogen
wird.
- RECHTER ANSCHLUSS (5)
• Das Gewinde (Abb. 12 Teil C)
in die Überwerfmutter (Abb. 12
Teil D) stecken und diese
entgegen dem Uhrzeigersinn
anschrauben. Den Anschluß
vervollständigen, indem das
Gewindestück mit einem 21 mm
Gabelschlüssel gehalten und
der bewegliche Teil der
Überwurfmutter mit einem 24
mm Gabelschlüssel entgegen
dem Uhrzeigersinn komplett
festgeschraubt wird.
☞ Den Verbindungsschlauch mit der
Metallschelle an das Gerät befestigen
(Abb. 12 Teil 6).
ACHTUNG:
NACH
VERBINDUNG
DER
SCHNELLANSCHLÜSSE IST ZU
KONTROLLIEREN, OB KEINE
LECKAGEN VON KÄLTEMITTELGAS
BESTEHEN.
☞ Den Elektroanschluß einstecken
und darauf achten, daß die seitlichen
Federn in die auf dem Gerät befestigten
Klammern einrasten (Abb. 12 Teil 3).
☞ Den Kondenswasserschlauch zusammenstecken (Abb. 12 Teil 2).
☞ Thermostatfühlerkabel wieder anschliessen (nur Ausführung CLIMA 16 HP).
- EMPALME IZQUIERDO (4)
• Colocar la parte hembra del
empalme sobre la parte macho
y fijar a la máquina enroscando
manualmente el elemento móvil
de la parte hembra (Fig. 12,
Elemento B) en dirección de las
agujas del reloj. Completar la
operación manteniendo bloqueada la parte fija del empalme
hembra ( Fig. 12, Elemento A)
con una llave de 19 mm y atornillando el elemento móvil en
dirección horaria hasta ajustarlo
completamente.
- EMPALME DERECHO (5)
• Colocar la parte macho del
empalme (Fig. 12, Elemento C)
en la parte hembra (Fig. 12
Elemento C) enroscando la
misma en dirección contraria a
las agujas del reloj. Completar
la operación manteniendo bloqueada la parte macho con una
llave de 21 mm y atornillando el
elemento móvil de la parte
hembra, en dirección antihoraria, con una llave de 24 mm
hasta ajustarlo completamente.
☞ Fijar la Iínea flexible a la máquina
con una abrazadera metálica (Fig. 12
Elemento 6).
ATENCION:
DESPUÉS DE HABER EFECTUADO
LA CONEXIÓN DE LOS EMPALMES
RÁPIDOS CONTROLAR QUE NO
HAYA PÉRDIDAS DEL GAS DE
REFRIGERACIÓN.
☞ Insertar el conector eléctrico, controlando que las lengüetas laterales
entren en las muescas correspondientes de la parte fijada a la máquina (Fig.
12 Elemento 3).
☞ Colocar con cuidado el tubo de
vaciado del agua de condensación (Fig.
12 Elemento 2).
☞ Conectar el cable de la sonda del
termóstato (sólo en el modelo CLIMA
16 HP).
☞ Cierren el vano empalmes mediante la específica protección. Para
efectuar cómodamente esta operación
procedan del siguiente modo:
25
bordo sinistro più all’esterno
di circa 2 cm rispetto a quello
dello schienale stesso in
modo che le guide si inseriscano le une nelle altre.
• Fate scorrere verso destra la
protezione sino a far combaciare il bordo laterale con
quello dello schienale.
• Avvitate la vite che blocca la
protezione.
• Posez la protection contre le
dos de l’appareil en faisant
dépasser le bord gauche du
panneau de 2 cm par rapport au
bord gauche du dos de façon à
ce
que
les
glissières
s’emboîtent l’une dans l’autre.
• Faites glisser la protection sur
la droite jusqu’à ce que les deux
bords latéraux coïncident avec
les bords du dos.
• Vissez la vis qui fixe la
protection.
☞ Den Anschlußraum anhand des
eigenen Schutzes verschließen.
Hierzu
ist
folgendermaßen
vorzugehen:
• Den Schutz an der Rückseite
ansetzen und dabei den
linken Rand ca. 2 cm nach
außen halten; dies, damit die
Führungen
ineinandergleiten.
• Apoyen la protección contra la
parte posterior del climatizador,
teniendo el borde izquierdo de
la portezuela del climatizador
unos 2 cm más hacia el exterior
respecto al borde izquierdo de
la
parte
posterior
del
climatizador, de modo que las
guías puedan introducirse una
dentro de las otras.
• Den Schutz nach rechts
schieben, bis der Seitenrand
genau mit jenem der
Rückseite ausgerichtet ist.
• Desplacen hacia la derecha la
protección hasta que el borde
lateral coincida con el borde de
la
parte
posterior
del
climatizador.
• Den Schutz mit der eigenen
Schraube festspannen.
• Atornillen el tornillo que bloquea
la protección.
26
INDIVIDUAZIONE DI ANOMALIE DI FUNZIONAMENTO
MANIFESTAZIONI
CAUSE
ANOMALIES POSSIBLES
RIMEDI
SYMPTOMES
CAUSES
REMEDES
Il climatizzatore non funziona.
-
manca la corrente.
è disinserita la spina.
il timer è inserito.
l'interruttore generale non è premuto.
- attendere.
- inserire la spina.
- disinserire il timer utilizzando il tasto
apposito.
- premere l'interruttore generale.
Le climatiseur ne fonctionne pas.
- il n’y a pas de courant.
- la fiche est débranchée.
- l’interrupteur général n’est pas
appuyé.
- attendre.
- introduire la fiche.
- débrancher la minuterie au moyen
de la touche spéciale.
- appuyer sur l’interrupteur génétal.
Il climatizzatore funziona solo per
poco tempo.
- la temperatura impostata è troppo
vicina alla temperatura ambiente.
- ci sono degli ostacoli sull'aspirazione dell'unità esterna.
- il ventilatore dell'unità esterna è bloccato.
- abbassare la temperatura impostata.
- togliere gli eventuali ostacoli.
- chiamare il Centro Assistenza.
Le climatiseur fonctionne uniquement
pendant quelques temps.
- la température programmée est trop
proche de la température ambiante.
- il y a des obstacles sur l’aspiration
de l’unité extérieure.
- le ventilateur de l’iunité extérieure
est bloqué.
- abaisser la température programmée.
- ôter les éventuels obstacles.
- appeler le Service Après Vente.
- spegnerlo ed interpellare il Centro
Assistenza.
Le climatiseur fait intervenir souvent
l’interrupteur général du compteur
domestique.
Le climatiseur fonctionne mais ne
rafraîchit pas la pièce.
- fenêtre ouverte.
- une source de chaleur quelconque
fonctionne dans la pièce (brûleur,
lampe, etc.) ou bien il y a beaucoup
de personnes.
- la température programmée est trop
haute.
- le filtre à air est obstrué.
- nettoyer le filtre.
- la puissance du climatiseur n’est
pas appropriée aux conditions ou
aux dimensions de la pièce.
- fenêtre ouverte.
- éliminer la source de chaleur.
- abaisser
la
température
programmée.
- nettoyer le filtre.
Le ventilateur extérieur se bloque ou
devient trop bruyant lorsque le
climatiseur.
- de la glace s’est formée dans le bac
de l’unité extérieure car le bouchon
n’a pas été enlevé (Fig. 1-2).
- de la glace s’est formée dans le
bac de l’unité extérieure car le
bouchon n’a pas été enlevé.
Il climatizzatore fa intervenire
spesso l'interruttore generale del
contatore di casa.
- éteindre le climatiseur et appeler
le Service Après Vente.
Il climatizzatore funziona ma non
rinfresca la stanza.
- finestra aperta.
- nella stanza sta funzionando qualche fonte di calore (bruciatore, lampada, ecc.) oppure vi sono molte
persone.
- la temperatura impostata è troppo
alta.
- filtro dell'aria intasato.
- il climatizzatore ha una potenzialità
non adeguata alle condizioni o alle
dimensioni dell'ambiente.
- chiudere la finestra.
- eliminare la fonte di calore.
- abbassare la temperatura impostata.
- pulire il filtro.
In pompa di calore con bassa temperatura esterna la ventola si blocca o diventa troppo rumorosa.
- si è formato ghiaccio nella bacinella
dell'unità esterna perchè non è stato tolto il tappo (Fig. 1-2).
- aspettare che il ghiaccio si sciolga e
togliere il tappo di drenaggio.
L'unità esterna perde acqua anche senza muoverla.
- la posizione della bacinella non è su
un piano orizzontale.
- posizionare in modo corretto l'unità
esterna come descritto nel paragrafo "Unità esterna".
L’unité extérieure perd de l’eau même
sans qu’on la déplace.
- le bac de l’unité extérieure ne se
trouve pas sur un plan horizontal.
- placer correctement l’unité
extérieure de la façon décrite au
paragraphe “Unité extérieure”.
Durante lo spostamento del
climatizzatore esce acqua.
- il climatizzatore viene inclinato o coricato.
- prima degli spostamenti svuotare
l'acqua contenuta tramite l'apposito
raccordo (Fig. 1-10).
Le climatiseur perd de l’eau lorsqu’on
le déplace.
- le climatiseur est incliné ou couché.
- avant de dèplacer le climatiseur,
vider l’eau qu’il contient au moyen
du raccord spécial (Fig. 1-10).
L’unité extérieure perd de l’eau pendant
les déplacements.
- le bac extérieur est plein d’eau de
condensation.
- vider l’unité extérieure de l’eau
avant de la déplacer; pour
effectuer cette opération, enlever
le bouchon se trouvant sur le bac
(Fig. 1-2).
Le panneau de commandes est éteint,
la machine ne marche pas mais la
touche d'allumage général est allumée.
- accumulation excessive d'eau à
l'intérieur du climatiseur.
- vidanger l'eau par le raccord prévu
dans la partie arrière du climatiseur (Fig. 1-10)
L'unità esterna perde acqua durante gli spostamenti
Il pannello comandi è spento, la
macchina non funziona, ma il tasto di accensione generale è acceso.
- la bacinella esterna è colma di acqua di condensa.
- accumulo eccessivo di acqua all'interno del climatizzatore.
- svuotare l'unità esterna dall'acqua
prima di spostarla: per questa operazione si può agire anche tramite il
tappo posto sulla bacinella stessa
(Fig. 1-2).
- scaricare l'acqua mediante l'apposito raccordo posto nella parte posteriore del climatizzatore
(Fig. 1-10).
27
TROUBLE-SHOOTING
PROBLEM
LIKELY CAUSE
The air conditioner will not work.
-
The air conditioner will only work for
a short time.
- the temperature set is too close to
room temperature.
- there are obstructions to the suction
of the outdoor unit.
- the outdoor unit fan is blocked.
no current.
plug disconnected.
timer on.
master switch not pressed.
The air conditioner often triggers the
master switch of the house meter.
The air conditioner works but does
not cool the room.
KLEINE STÖRUNGEN SELBST BEHEBEN
SUGGESTED SOLUTION
- stromversorgung unterbrochen.
- netzstecker gezogen.
- hauptschalter nicht einge-schaltet.
- den Stecker in die Steckdose
stecken.
- den Timer mit der speziellen Taste
ausschalten.
- den Hauptschalter betätigen.
- lower the set temperature.
- remove any obstructions.
- call the Service Centre.
Die Klimaanlage funktioniert nur über
einen kurzen Zeitraum.
- die eingestellte Temperatur liegt zu
nahe an der Raumtemperatur.
- hindernisse
an
der
Ansaugvorrichtung
der
Ausseneinheit.
- blockierter
Ventilator
der
Ausseneinheit.
- die eingestellte Temperatur
verringern.
- eventuelle Hindernisse entfernen.
- den Kundendienst rufen.
-
close the window.
eliminate the source of heat.
lower the set temperature.
clean the filter.
- ice has formed in the basin of the outdoor
unit because the plug has not been
removed (Fig. 1-2).
- wait for the ice to melt and take out
the drainage plug.
The outdoor unit leaks water even
without moving it.
- the position of the basin is not on a
horizontal level.
- position the outdoor unit correctly as
described in the “Outdoor Unit”
paragraph.
Water comes out of the air conditioner
when it is moved.
- the air conditioner is tilted or laid
down.
- before moving it, empty the water
contained by means of the special
fitting (Fig. 1-10).
Control panel is off, unit does not
work, but main ON/OFF switch is
ON.
- the outdoor basin is full of
condensation water.
- drip pan full.
BESEITIGUNG
Die Klimaanlage funktioniert nicht.
- switch it off and call the Service
Centre.
- window open.
- there is a source of heat in the room
(burner, light, etc.) or there are a lot
of people.
- the temperature set is too high.
- air filter clogged.
- the capacity of the air conditioner is
not appropriate for the conditions or
size of the room.
URSACHEN
- wait.
- plug in.
- turn off the timer using the special
key.
- press the master switch.
In the heat pump with a low outside
temperature the fan jams or becomes
too noisy.
The outdoor unit leaks water when it
is moved.
STÖRUNGEN
- die Klimaanlage ausschalten und
den Kundendienst rufen.
Die Klimaanlage ruft häufig ein
Ansprechen der Sicherung am
Stromzähler hervor.
Die Klimaanlage funktioniert, kühlt
jedoch den Raum nicht.
- offenes Fenster.
- im Zimmer sind Wärmequellen
eingeschaltet (Brenner, Lampen,
usw) oder es sind viele Personen
anwesend.
- die eingestellte Temperatur ist zu
hoch.
- verstopfter Luftfilter.
- die
Leistungsfähigkeit
der
Klimaanlage ist nicht der Größe des
Raumes angemessen.
- das Fenster schließen.
- die Wärmequelle eliminieren.
- die eingestellte Temperatur
verringern.
- den Filter reinigen.
Bei Wärmepumpe mit niedriger
Aussentemperatur blockiert sich das
Laufrad oder ruft starke Geräusche
hervor.
- vereistes Becken der Ausseneinheit,
weil der Stöpsel nicht entfernt wurde
(Abb. 1-2).
- abwarten, bis das Eis auftaut und
den Ablasstöpsel entfernen.
Die Ausseneinheit verliert Wasser, ohne
daß sie bewegt wird.
- das Becken ist nicht waagerecht.
- die Ausseneinheit korrekt
aufstellen
(s.
Paragraph
“Ausseneinheit”).
- empty the outdoor unit of water
before moving it; to do this you can
also use the plug on the basin itself
(Fig. 1-2).
Während des Bewegens
Klimaanlage tritt Wasser aus.
- empty drip pan by means of special
plug fitted on the back of the air
conditioner (Fig. 1-10).
Die Ausseneinheit verliert während des
Bewegens Wasser.
- das Aussenbecken
Kondenswasser gefüllt.
mit
- das in der Ausseneinheit
enthaltene Wasser vor dem
Verschieben ablassen. Dazu kann
auch der Stöpsel auf dem Becken
entfernt werden (Abb. 1-2).
Die Bedienblende ist ausgestellt, das
Gerät funktioniert nicht, der Hauptschalter leuchtet.
- zuviel Wasser im Klimagerät (wird
nicht abgepumpt).
- das Wasser mit Hilfe des Stöpsel
auf der Geräterückseite ablassen
(Abb. 1-10).
der
die Klimaanlage wird geneigt oder
umgedreht.
ist
- das Wasser vor dem Bewegen
durch den speziellen Anschluss
ablassen (Abb. 1-10).
28
DETECCION DE ANOMALIAS DE FUNCIONAMIENTO
MANIFESTACIONES
CAUSAS
El climatizador no funciona.
-
falta corriente.
está desenchufado.
el timer está activado.
el interruptor general no está
apretado.
El climatizador funciona solo durante
poco tiempo.
- la temperatura programada está muy
próxima a la temperatura ambiente.
- hay obstáculos en la aspiración de
la unidad externa.
- el ventilador de la unidad externa
está bloqueado.
El climatizador hace intervenir a
menudo el interruptor general del
contacto de casa.
ZELF KLEINE STORINGEN VERHELPEN
RIMEDIOS
- esperar.
- enchufar.
- desactivar el timer utilizando la tecla
correspondiente.
- apretar el interruptor general.
OORZAAK
OPLOSSING
De unit functioneert niet
- stroomvoorziening onderbroken
stekker
niet
in
contact
hoofdschakelaar niet aan
- stekker in stopcontact
- timer uitzetten
- hoofdschakelaar op achterzijde
aan
De unit werkt voor korte tijd
- de ingestelde temp te laag
luchtobstructie bij buitenunit
geblokkeerde ventilator
- temperatuurinstelling verlagen
- lucht ongehinderd laten stromen
- servicedienst inschakelen
- bajar la temperatura programada.
- quitar los obstáculos.
- llamar al Centro de Asistencia.
De zekering springt regelmatig
-
En la bomba de calor con baja
temperatura exterior el ventilador se
bloquea o se vuelve muy ruidoso.
- se ha formado hielo en el recipiente
de la unidad exterior porque no se
ha quitado el tapón (Fig. 1-2).
- esperar a que el hielo se disuelva y
quitar el tapón de vaciado.
La unidad externa pierde agua aun
sin moverla.
- la posición del recipiente no está en
un plano horizontal.
- colocar la unidad externa de manera
correcta como se describe en el
párrafo “Unidad Externa”.
Durante el desplazamiento sale agua
del climatizador.
- el climatizador está inclinado o
acostado.
- antes de moverlo vaciar el agua
contenida
por
el
racor
correspondiente (Fig. 1-10).
La unidad externa pierde al moverla.
- el recipiente externo está lleno de
agua de condensación.
- vaciar el agua de la unidad exterior
antes de moverla: esta operación
se puede hacer incluso por el tapón
situado sobre el recipiente mismo
(Fig. 1-2).
El panel de mandos se halla apagado,
máquina no funciona, perro la tecla
de encendido general se encuentra
encendida.
- acumulación excesiva de agua dentro del acondicionador.
- evacuar el agua mediante el correspondiente racor situado en la parte
psterior del acondicionador
(Fig. 1-10).
cerrar la ventana.
eliminar la fuente de calor.
bajar la temperatura programada.
limpiar el filtro.
- servicedienst inschakelen
De unit koelt onvoldoende
-
Bij HP versie: buitenunit geblokkeerd
of maakt veel lawaai
- ijsafzetting
- laten ontdooien en
- stop in buitenunit verwijderen.
De buitenunit lekt water
- iet horizontaal gemonteerd
- horizontaal opstellen
Tijdens transport lekt unit water de unit
staat scheef
- de unit staat scheef
- middels stop water laten weglopen
Tijdens transport lekt buitenunit water
lekbak vol
- lekbak vol
- middels stop water laten weglopen
Bedieningspaneel is uit, de unit werkt
niet, de hoofdschakelaar aan
- teveel water in de unit, water wordt
niet weggepompt
- het water laten weglopen door op
de achterzijde de stop te
verwijderen
- apagarlo y llamar al Centro de
Asistencia.
- ventana abierta.
- en la habitación está funcionando
alguna fuente de calor (hornillo,
lámpara, etc.) o hay muchas
personas.
- la temperatura programada es
demasiado alta.
- filtro del aire obstruido.
- el climatizador tiene una potencia
no adecuada para las condiciones y
dimensiones del ambiente.
El climatizador funciona pero no
refresca la habitación.
STORING
geopend raam
veel warmtebronnen
ingestelde temperatuur te hoog
verstopt luchtfilter
de ruimte is te groot
- ramen en deuren sluiten
- warmtebronnen zo mogelijk
vermijden
- temperatuurinstelling verlagen
- filter reinigen de ruimte is te
groot
29
DATI
TECNICI
DONNEES
TECHNIQUES
SPECIFICATIONS
TECHNISCHE
DATEN
DATOS
TECNICOS
TECHNISCHE
GEGEVENS
CLIMA 16
CLIMA 16 CENTRAL
CLIMA 16 HP
Potenza refrigerante
Puissance de refrigeration
Cooling capacity
Kühlleistung
Potencia de refrigeración
Koelcapaciteit
4,26 kW
4,26 kW
Classe efficienza energetica in raffreddamento
Classe d’efficacité
énergétique en
refroidissement
Energy efficiency class in
cooling mode
Energieeffizienzklasse
beim Abkühlen
Clase de eficiencia
energética en enfriamiento
Energie-efficiëntieklasse
tijdens koelen
C
C
EER
EER
EER
EER
EER
EER
2,82
2,82
Assorbimento
in raffreddamento
Consommation
en refroidissement
Power draw / cooling
Leistung-und
Stromaufnahme im
Kühlbetrieb
Consumo en refrigeración
Opgenomen
vermogen koeling
1.510 W
1.510 W
Capacità di
deumidificazioine
Capacite
de deshumidification
Dehumidifying capacity
Entfeuchtungsleistung
Capacidad
de deshumidificación
Ontvochtigingscapaciteit
1,8 l/h
1,8 l/h
Potenza riscaldamento
Piussance de chauffage
Heating capacity
Heizleistung
Potencia calefacción
Verwarmingscapaciteit
-
4,22 kW
Classe efficienza energetica in riscaldamento
Classe d'efficacité
énergétique en mode
chauffage
Energy efficiency class in
heating mode
Energieffizienklasse der
Heizfunktion
Clase de eficiencia
energética modo
calefacción
Verwarmingsstad
energiefficiëntieklasse
-
D
COP
COP
COP
COP
COP
COP
-
2,81
Assorbimento
in riscaldamento
Consommation
en chauffage
Power draw / heating
Leistung- und
Stromaufnahme beim
Heizbetrieb
Consumo en calefacción
Opgenomen vermogen
verwarmen
-
1.500 W
Aria trattata
Air traite
Air throughput
Luftvolumenstrom
Aire tratado
Luchthoeveelheid
700 m3/h
700 m3/h
Velocità di ventilazione
Vitesse de ventilation
Fan speeds
Ventilatorstufen
Velocidad de ventilación
Aantal toerentallen
ventilator
3
3
Tensione di alimentazione
Tension d'alimentation
Supply voltage
Netzanschluss
Tensión de alimentación
Aansluitspanning
220 - 240 V / 50 Hz
220 - 240 V / 50 Hz
Dimensione unità interna
(lxhxp)
Dimensions unité
interieure (lxhxp)
Indoor unit (wxhxd)
Abmessungen
Aussengerät (bxhxt)
Medidas unidad interna
(l.xh.xp)
Afmetingen binnenunit
(hxbxd)
900x475x410 mm
900x475x410 mm
Dimensione unità esterna (lxhxp)
Dimensions unité
exterieure (lxhxp)
Outdoor unit (wxhxd)
Abmessungen
Innengerät (bxhxt)
Medidas unidad externa
(l.xh.xp)
Afmetingen buitenunit
(hxbxd)
500x570x210 mm
500x570x210 mm
Fusibile
Fusible
Fuse
Schmelzsicherung
Fusible
Zekering
10 AT
10 AT
Limiti di funzionamento
in raffreddamento:
Limites de fonctionnement
en refroidissement:
Operational limits for
cooling:
Betriebsbedingungen Bei
Kühlung:
Límites de funcionamiento
en refrigeración:
Werkgebied (limieten)
Koelen:
- temperatura esterna
- température externe
- external temperature
- Außentemperatur
- temperatura externa
- Buitentemperatuur
18°C b.s.min./43°C b.s.max.
18°C b.s.min./43°C b.s.max.
- temperatura ambiente
- température ambiante
- room temperature
- Raumtemperatur
- temperatura ambiente
- Ruimtetemperatuur
18°C b.s.min./35°C b.s.max.
18°C b.s.min./35°C b.s.max.
Limiti di funzionamento
in riscaldamento:
Limites de fonctionnement
en réchauffement:
Operational limits for
heating:
Betriebsbedingungen Bei
Heizung:
Límites de funcionamiento
en calefacción:
Werkgebied (limieten)
Verwarmen :
- temperatura esterna
- température externe
- external temperature
- Außentemperatur
- temperatura externa
- Buitentemperatuur
-
-6°C b.s.min./20°C b.s.max.
- temperatura ambiente
- température ambiante
- room temperature
- Raumtemperatur
- temperatura ambiente
- Ruimtetemperatuur
-
12°C b.s.min./25°C b.s.max.
30
SCHEMA ELETTRICO
SCHÉMA ÉLECTRIQUE
WIRING DIAGRAM
STROMLAUFPLAN
ESQUEMA ELÉCTRICO
WIRING DIAGRAM
A1 - Scheda elettronica
(potenza);
A2 - Scheda elettronica
(comando);
B1 - Sonda termostato;
B2 - Sonda scambiatore U.I.;
B3 - Sonda scambiatore U.E.
(solo per CLIMA 16 HP);
F1 - Protettore termico
compressore;
F2 - Protettore termico pompa;
H1 - Spia luminosa interruttore
generale;
I1 - Ionizzatore (optional);
I2 - Bobina per ventilatore U.E.;
I3 - Bobina per valvola
inversione ciclo (solo per
CLIMA 16 HP);
K1 - Comando per pompa;
K2 - Comando per valvola
inversione ciclo;
K3 - Comando per ventilatore
U.I.;
K4 - Comando per ventilatore
U.E.;
K5 - Relay per compressore;
K6 - Relay per ionizzatore;
M1 - Motocompressore;
M2 - Ventilatore unità esterna;
M3 - Ventilatore unità interna;
M4 - Pompa smaltimento
condensa;
S1 - Interruttore generale;
S2 - Microinterruttore di
sicurezza;
S3 - Microinterruttore pompa;
T1 - Trasformatore;
X1 - Morsettiera alimentazione
generale;
X2 - Connettore 4 poli;
X3 - Connettore 4 poli;
X4 - Connettore 5 poli;
X5 - Connettore 4 poli;
X6 - Connettore 4 poli;
X7 - Connettore 2 poli;
X8 - Connettore 2 poli;
X9 - Connettore 2 poli;
Z1 - Condensatore compressore;
Z2 - Condensatore ventilatore
U.E.;
Z3 - Condensatore ventilatore U.I.
A1 - Carte électronique
(puissance);
A2 - Carte électronique (commande);
B1 - Sonde thermostat;
B2 - Sonde échangeur U.I.;
B3 - Sonde échangeur U.E.
(uniquement pour CLIMA 16
HP);
F1 - Protecteur thermique
compres-seur;
F2 - Protecteur thermique pompe;
H1 - Voyant lumineux interrupteur
général;
I1 - Ioniseur (optional);
I2 - Bobine pour ventilateur U.E.;
I3 - Bobine pour soupape
inversion cycle (uniquement
pour CLIMA 16 HP);
K1 - Commande pour pompe;
K2 - Commande pour soupape
inversion cycle;
K3 - Commande pour ventilateur
U.I.;
K4 - Commande pour ventilateur
U.E.;
K5 - Relais pour compresseur;
K6 - Relais pour ioniseur;
M1 - Motocompresseur;
M2 - Ventilateur unité externe;
M3 - Ventilateur unité interne;
M4 - Pompe élimination condensation;
S1 - Interrupteur général;
S2 - Microinterrupteur de sécurité;
S3 - Microinterrupteur pompe;
T1 - Transformateur;
X1 - Bornier alimentation générale;
X2 - Connecteur 4 pôles;
X2 - Connecteur 4 pôles;
X3 - Connecteur 4 pôles;
X4 - Connecteur 5 pôles;
X5 - Connecteur 4 pôles;
X6 - Connecteur 4 pôles;
X7 - Connecteur 2 pôles;
X8 - Connecteur 2 pôles;
X9 - Connecteur 2 pôles;
Z1 - Condensateur compresseur;
Z2 - Condensateur ventilateur U.E.;
Z3 - Condensateur ventilateur U.I.
A1
A2
B1
B2
B3
A1
A2
B1
B2
A1
A2
B1
B2
B3
A1
A2
B1
B2
B3
-
F1 F2
H1
I1
I2
I3
-
K1
K2
K3
K4
K5
K6
M1
M2
M3
M4
S1
S2
S3
T1
X1
-
X2
X3
X4
X5
X6
X7
X8
X9
Z1
Z2
Z3
-
Electronic board (power);
Electronic board (control);
Thermostat probe;
I.U. exhanger probe;
O.U. exchanger probe (only
for CLIMA 16 HP);
Compressor overload protector;
Pump overload protector;
Master switch light;
Ionizer (optional);
Coil for O.U. fan;
Coil for cycle inversion valve
(only for CLIMA 16 HP);
Control for pump;
Control for cycle inversion valve;
Control for I.U. fan;
Control for O.U. fan;
Relay for compressor;
Relay for ionizer;
Motor-driven compressor;
Outside unit fan;
Inside unit fan;
Moisture removal pump;
Master switch;
Safety microswitch;
Pump microswitch;
Transformer;
Main power supply terminal
board;
4-pin connector;
4-pin connector;
5-pin connector;
4-pin connector;
4-pin connector;
2-pin connector;
2-pin connector;
2-pin connector;
Compressor condenser;
O.U. fan condenser;
I.U. fan condenser.
-
B3 -
F1 F2 H1 l1
l2
-
l3
-
K1 K2 K3 K4 K5
K6
M1
M2
M3
M4
-
S1
S2
S3
T1
X1
X2
X3
X4
X5
X6
X7
X8
X9
Z1
Z2
-
Z3 -
Elektronikkarte (Leistung);
Elektronikkarte (Steuerung);
Thermostatsonde;
Sonde Wärmetauscher
interne Einheit;
Sonde Wärmetauscher
externe Einheit (nur bei
CLIMA 16 HP);
Thermoschutz Verdichter;
Thermoschutz Pumpe;
Leuchtkontrolle
Hauptschalter;
Ionisierer (optional);
Spule für Ventilator externe
Einheit;
Spule für Zyklus-Umkehrventil
(nur bei CLIMA 16 HP);
Pumpensteuerung;
Steuerung ZyklusUmkehrventil;
Ventilatorsteuerung interne
Einheit;
Ventilatorsteuerung externe
Einheit;
Verdichterrelais;
Ionisiererrelais;
Motorverdichter;
Ventilator externe Einheit;
Ventilator interne Einheit;
Pumpe Kondenswasserableitung;
Hauptschalter;
Sicherheits-Mikroschalter;
Mikroschalter Pumpe;
Transformator;
Netzteil-Klemmenbrett;
4-poliger Verbinder;
4-poliger Verbinder;
5-poliger Verbinder;
4-poliger Verbinder;
4-poliger Verbinder;
2-poliger Verbinder;
2-poliger Verbinder;
2-poliger Verbinder;
Kondensator Verdichter;
Kondensator Ventilator
externe Einheit;
Kondensator Ventilator
interne Einheit.
-
F1 F2 H1 I1
I2
I3
-
K1 K2 K3
K4
K5
K6
M1
M2
-
M3 M4 S1
S2
S3
T1
X1
-
X2
X3
X4
X5
X6
X7
X8
X9
Z1
Z2
-
Z3 -
Ficha electrónica (potencia);
Ficha electrónica (mando);
Sonda del termóstato;
Sonda del intercambiador U.I.;
Sonda del intercambiador U.E.
(sólo para CLIMA 16 HP);
Protector térmico del
compresor;
Protector térmico de la
bomba;
Luz testigo del interruptor general;
Ionizador (optional);
Bobina para ventilador U.E.;
Bobina para válvula de
inversión del ciclo (sólo para
CLIMA 16 HP);
Mando para bomba;
Mando para válvula de
inversión del ciclo;
Mando para ventilador U.I.;
Mando para ventilador U.E.;
Relé para compresor;
Relé para ionizador;
Motocompresor;
Ventilador de la unidad
externa;
Ventilador de la unidad
interna;
Bomba de eliminación de la
condensación;
Interruptor general;
Microinterruptot de seguridad;
Microinterruptor de la bomba;
Transformador;
Caja de bornes de
alimentación general;
Conector de 4 polos;
Conector de 4 polos;
Conector de 5 polos;
Conector de 4 polos;
Conector de 4 polos;
Conector de 2 polos;
Conector de 2 polos;
Conector de 2 polos;
Condensador del compresor;
Condensador del ventilador
U.E.;
Condensador del ventilador U.I.
-
F1 F2
H1
I1
I2
I3
-
K1 K2 K3
K4
K5
K6
M1
M2
M3
M4
S1
S2
S3
T1
X1
-
X2
X3
X4
X5
X6
X7
X8
X9
Z1
Z2
Z3
-
Electronic board (power);
Electronic board (control);
Thermostat probe;
I.U. exhanger probe;
O.U. exchanger probe (only
for CLIMA 16 HP);
Compressor overload
protector;
Pump overload protector;
Master switch light;
Ionizer (optional);
Coil for O.U. fan;
Coil for cycle inversion valve
(only for CLIMA 16 HP);
Control for pump;
Control for cycle inversion
valve;
Control for I.U. fan;
Control for O.U. fan;
Relay for compressor;
Relay for ionizer;
Motor-driven compressor;
Outside unit fan;
Inside unit fan;
Moisture removal pump;
Master switch;
Safety microswitch;
Pump microswitch;
Transformer;
Main power supply terminal
board;
4-pin connector;
4-pin connector;
5-pin connector;
4-pin connector;
4-pin connector;
2-pin connector;
2-pin connector;
2-pin connector;
Compressor condenser;
O.U. fan condenser;
I.U. fan condenser.
31
CLIMA 16 HP
(CLIMA 16 HP)
OPTIONAL
CLIMA 16 HP
COD. 273050A - Edizione 3D
Scaricare