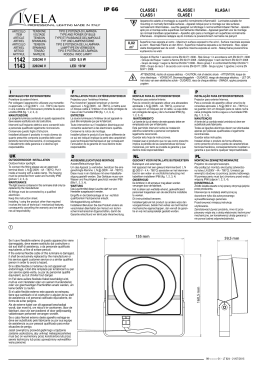
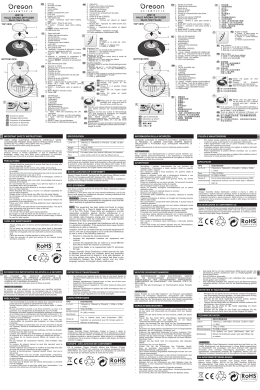
C’est moi qui l’ai fait !
Mode d’emploi
Gebruiksaanwijzing
Betriebsanleitung
Istruzioni per l’uso
Modo de empleo
Instruction book
12
5
3
4
2
7
9
10
11
1
1
1.
2.
3.
4.
5.
6.
7.
8.
9.
10.
11.
12.
13.
14.
6
8
13
14
2
Base en polypropylène
Capot en bakélite
Poignée en bakélite
Verrou de fermeture
Plaque supérieure pour les maxi gaufres et les croque monsieur
Plaque supérieure pour les mini gaufres
Plaque inférieure maxi gaufres
Plaque inférieure mini gaufres
Plaque inférieure croque monsieur
Zones de préhension pour enlever et positionner les plaques
Crochets de fixation des plaques
Voyant de contrôle
Tartineur
Louche
FRA
- DESCRIPTION DE L’APPAREIL -
CONSIGNES DE SÉCURITÉ
■■ Ne pas toucher les parties métalliques de l’appareil lorsqu’il
Lire attentivement ce mode d’emploi et le conserver afin
de pouvoir le consulter ultérieurement.
■■ Vérifier que la tension du réseau corresponde bien à celle notée
sur la plaque signalétique de l’appareil.
■■ Toujours dérouler complètement le cordon.
■■ En cas d’utilisation d’une rallonge, impérativement utiliser un
modèle équipé d’une prise de terre et de fils de section égale
ou supérieure à 0,75 mm2.
■■ Placer votre appareil loin d’objets facilement inflammables
(rideaux…).
■■ Ne jamais placer votre appareil sur une surface chaude ni à
proximité d’une flamme.
■■ Ne jamais laisser votre appareil sans surveillance lorsque
celui-ci est en marche.
■■ Uniquement utiliser l’appareil pour des usages domestiques et
de la manière indiquée dans le mode d’emploi.
■■ Ne jamais plonger votre appareil dans l’eau ou dans tout
autre liquide ni pour son nettoyage ni pour toute autre raison.
Ne jamais le mettre au lave-vaisselle.
■■ Veiller à ne pas utiliser ou ranger l’appareil à l’extérieur, sous
la pluie, l’entreposer dans un endroit sec.
■■ Ne jamais déplacer l’appareil en tirant sur son câble. Veiller à
ce que le cordon d’alimentation ne puisse être accidentellement
accroché, et ce afin d’éviter toute chute de l’appareil. Ne pas
enrouler le cordon autour de l’appareil, ne pas le tordre et veiller
à ce qu’il n’entre pas en contact avec les parties chaudes de
l’appareil.
■■ Cet appareil n’est pas destiné à être utilisé par des personnes,
fonctionne car elles sont chaudes.
y compris par des enfants âgés d’au moins 8 ans, dont les
capacités physiques, sensorielles ou mentales sont diminuées,
ou qui ne disposent pas des connaissances ou de l’expérience
nécessaires, à moins d’avoir été formées et encadrées pour
l’utilisation en toute sécurité de cet appareil et de connaître
les risques encourus. Ne laissez pas les enfants jouer avec
l’appareil. Seuls les enfants âgés de plus de 8 ans peuvent,
sous la surveillance d’un adulte, procéder au nettoyage et à
l’entretien de l’appareil.
■■ Ces appareils ne sont pas destinés à être mis en fonctionnement
au moyen d’une minuterie extérieure ou par un système de
commande à distance séparé.
■■ Il convient de surveiller les enfants pour s’assurer qu’ils ne
jouent pas avec l’appareil.
■■ Les surfaces présentant un repère de température élevée sont
susceptibles de devenir très chaudes en cours d’utilisation.
■■ Tenez l’appareil et le cordon d’alimentation hors de la portée
des enfants de moins de 8 ans.
NE JAMAIS METTRE EN MARCHE L’APPAREIL SANS AVOIR
MIS LES PLAQUES EN PLACE.
3
FRA
Caractéristiques
■■ Thermostat de sécurité et voyant de contrôle.
■■ Multifonction avec des plaques interchangeables vendues
séparément chez
.
■■ Système de fixation des plaques par clips.
■■ Plaques en fonte d’aluminium revêtues d’antiadhésif.
■■ Capot et poignées en bakélite.
■■ Base en polypropylène.
■■ Tartineur en polypropylène.
■■ Louche en mélamine.
■■ Puissance : 1070W - 230V - 50Hz.
CARACTERISTIQUES TECHNIQUES SPECIFIQUES :
+
Modèle Tarti’Gaufres® Ref 029112
Livré avec un jeu de plaques de 2 maxi
gaufres de 150 x 100 mm.
+
Modèle Tarti’Gaufres® + plaques mini
gaufres Ref 029122
Livré avec un jeu de plaques de 2 maxi gaufres
de 150 x 100 mm et un jeu de plaques de
6 mini gaufres de 100 x 49 mm.
4
+
Modèle Tarti’Gaufres® + plaques mini
gaufres et croque-monsieur Ref 029422
Livré avec un jeu de plaques de 2 maxi gaufres
de 150 x 100 mm, un jeu de plaques de 6 mini
gaufres de 100 x 49 mm et une plaque de
2 croque monsieur de 150 x 100 mm.
Jeux de plaques vendus séparément :
CORDON
■■ Plaques de 2 maxi Tarti’Gaufres® 150 x 100 mm (Ref 020 122).
Il faut examiner attentivement le câble d’alimentation avant toute
utilisation. Si celui-ci est endommagé, il ne faut pas utiliser l’appareil.
Le cordon ne doit être remplacé que par
, son service
après-vente ou une personne qualifiée et agréée par
et ce afin d’éviter un danger pour l’usager. Le cordon utilisé est
un H05RRF 3G 0,75 mm².
Ces appareils sont conformes aux directives 2006/95/CE, 2004/108/
CE, DEEE 2002/96/CE, RoHs 2002/95/CE et au règlement CE
contact alimentaire 1935/2004.
■■ Plaques de 6 mini Tarti’Gaufres® 100 x 49 mm (Ref 020 322).
ENVIRONNEMENT
Protection de l’environnement – DIRECTIVE 2002/96/CE DEEE
Afin de préserver notre environnement et notre santé,
l’élimination en fin de vie des appareils électriques doit
se faire selon des règles bien précises et nécessite
l’implication de chacun, qu’il soit fournisseur ou
utilisateur.
C’est pour cette raison que votre appareil, tel que le signale le
symbole apposé sur sa plaque signalétique, ne doit en aucun
cas être jeté dans une poubelle publique ou privée destinée aux
ordures ménagères.
Lors de son élimination, il est de votre responsabilité de déposer
votre appareil dans un centre de collecte publique désigné pour
le recyclage des équipements électriques ou électroniques.
Pour obtenir des informations sur les centres de collecte et de
■■ Plaques de 2 croque-monsieur de 150 x 100 mm (Ref 020 422).
5
■■ Pour une gaufre parfaitement dessinée, croustillante à l’extérieur
et moelleuse à l’intérieur, nous vous conseillons de suivre la
recette des gaufres Lyonnaises fournie dans ce livret.
■■ Utilisez la louche doseuse fournie avec votre appareil. Une
louche de pâte correspond à une maxi gaufre ou 3 mini gaufres.
Attention, si vous utilisez une louche du commerce, le résultat
ne sera pas optimal.
Mise en service et utilisation
1ère utilisation
Un appareil neuf peut fumer et/ou dégager des odeurs lors de la
première utilisation.
Pour limiter ce dégagement de fumée et d’odeur, après avoir mis
les plaques de cuisson en place, il est recommandé de laisser
chauffer l’appareil ouvert pendant 10 minutes puis le laisser
refroidir pendant environ 30 minutes.
1
Versez la pâte en
remplissant tous les
carreaux des gaufres.
MISE EN ROUTE ET UTILISATION
GAUFRES
■■ Déroulez complètement le cordon.
■■ Positionnez vos plaques dans l’appareil (plaque plane sur le
dessus).
■■ Branchez votre appareil et laissez préchauffer jusqu’à ce que
le voyant s’éteigne.
■■ Une fois l’appareil préchauffé, graissez légèrement vos plaques sur
toute leur surface, à l’aide d’un pinceau ou d’un papier absorbant.
Attention : ne jamais graisser pendant le préchauffage.
2
Attendez une ou deux
secondes que la pâte
commence à lever dans
la plaque puis tapissez-la
avec le dos de la louche.
3
Fermez l’appareil
jusqu’au verrouillage.
6
Attention, tapissez et
refermez le gaufrier
avant que le dessus de
la pâte ne soit déjà cuit
afin que le quadrillage
du côté lisse de la gaufre
soit bien imprimé.
FRA
recyclage des appareils mis au rebut, veuillez prendre contact
avec les autorités locales de votre région, les services de collecte
des ordures ménagères ou le magasin dans lequel vous avez
acheté votre appareil.
■■ Si vous remplissez trop la louche (surtout pour la réalisation
des mini gaufres) ou si votre pâte comporte beaucoup de bière
ou de levure, celle-ci peut déborder sur les côtés de l’appareil.
Ceci est normal et ne constitue pas un défaut de fonctionnement.
Dans ce cas, épongez et remplissez moins la louche pour la
fournée suivante.
■■ Dès que le voyant s’éteint, vos gaufres sont prêtes. Vous pouvez
refermer l’appareil et prolonger la cuisson si elles ne sont pas
suffisamment dorées à votre goût.
■■ Pour savoir si vos gaufres sont prêtes, ouvrez délicatement
l’appareil pendant la cuisson, refermez si ce n’est pas assez cuit.
■■ Retirez les gaufres avec un couteau (ou une fourchette), en le
plantant horizontalement dans l’épaisseur des gaufres.
■■ Il est normal que votre 1ère fournée de gaufres ne soit pas
parfaitement réussie. Votre gaufrier a besoin de s’équilibrer au
niveau des températures avant d’arriver à une gaufre optimum.
■■ Graissez à nouveau plus légèrement pour la 2ème et 3ème fournée
(en principe, ne plus graisser après).
■■ Cet appareil n’est pas un gaufrier classique, donnez vous le
temps d’améliorer votre coup de main.
ou remplissez les trous généreux de la face alvéolée avec du
sucre glace, des fruits...
Laissez libre cours à votre imagination.
N.B. Votre tartineur
comporte une
petite butée qui
vous sera utile
pour caler celui-ci
sur votre pot.
Utilisez le tartineur fourni pour étaler de la confiture ou une
pâte à tartiner sur la face lisse de la gaufre...
7
Positionnement de la plaque supérieure
ARRET DE L’APPAREIL
■■ Pour arrêter l’appareil, débranchez le cordon.
Positionnement de la plaque inférieure
CHANGEMENT DES PLAQUES
■■ Débranchez l’appareil.
■■ Laissez refroidir complètement.
■■ Saisissez vos plaques grâce à leurs zones de préhension.
■■ Désenclenchez-les en tirant vers vous et remplacez-les par
les nouvelles.
■■ Pour positionner les nouvelles plaques, insérez-les sous les
crochets de fixation puis appuyez sur les zones de préhension
jusqu’à enclenchement.
8
FRA
CROQUE-MONSIEUR
■■ La cuisson des croque-monsieur est très rapide. Il est préférable
de préparer tous les ingrédients avant de mettre en chauffe.
■■ Positionnez vos plaques à croque monsieur dans l’appareil.
■■ Branchez votre appareil et laissez préchauffer jusqu’à ce que
le voyant s’éteigne.
■■ Les deux faces externes du croque-monsieur, en contact avec
les moules, doivent être soigneusement beurrées.
■■ Disposez deux croque-monsieur dans l’appareil.
■■ Fermez l’appareil en serrant légèrement et progressivement
jusqu’au verrouillage.
■■ Dès que le voyant s’éteint, vous pouvez retirer vos croquemonsieur.
■■ Vous pouvez refermer l’appareil et prolonger la cuisson s’ils
ne sont pas suffisamment dorés à votre goût.
ENTRETIEN
Conditions de garantie
■■ Attention : assurez-vous que votre appareil soit bien
Votre appareil est garanti 2 ans.
Pour bénéficier gratuitement d’une année supplémentaire de
garantie, inscrivez-vous sur le site Internet
(www.lagrange.fr).
débranché et complètement refroidi avant de le nettoyer.
■■ Ne plongez jamais votre appareil dans l’eau et ne le mettez
pas au lave-vaisselle.
■■ Attention, après avoir retiré les plaques, veillez à ce qu’il n’y ait
pas de résidus autour de la résistance chauffante.
■■ Lavez le corps de l’appareil avec une éponge humide.
■■ Plaques de cuisson antiadhésives : après un trempage
de quelques minutes, nettoyez à l’aide d’une éponge
douce imbibée de détergent doux puis rincez à l’eau tiède.
Attention : ne pas utiliser d’éponge métallique ni de
poudre à récurer.
■■ Vous pouvez aussi mettre vos plaques au lave-vaisselle.
■■ Séchez bien avant de remettre les plaques dans l’appareil.
La garantie s’entend pièces et main-d’œuvre et couvre les défauts
de fabrication. Sont exclues de la garantie : les détériorations
provenant d’une mauvaise utilisation ou du non respect du mode
d’emploi, et les bris par chute.
CETTE GARANTIE S’APPLIQUE AUX UTILISATIONS DOMESTIQUES,
EN AUCUN CAS AUX UTILISATIONS PROFESSIONNELLES.
La garantie légale due par le vendeur n’exclut en rien la garantie
légale due par le Constructeur pour défauts ou vices de fabrication
selon les articles 1641 et suivants du code Civil.
En cas de panne ou dysfonctionnement, adressez-vous à votre
revendeur. En cas de défectuosité technique dans les 8 jours
suivant l’achat, les appareils sont échangés. Après ce délai ils sont
réparés par le service après-vente
.
9
FRA
RECETTE DE BASE LAGRANGE DES GAUFRES LYONNAISES
La recette de base des gaufres
Lyonnaises salées
La recette de base des gaufres
Lyonnaises sucrées
500 g de farine – 1 sachet de levure chimique – ¾ L de liquide
(eau, bière et lait) – sel (selon goût) - 125 g de beurre – 4 œufs.
500 g de farine – 1 sachet de levure chimique – ¾ L de liquide
(eau, bière et lait) - 1 pincée de sel - 125 g de beurre – 30 g de
sucre – 2 sachets de sucre vanillé – parfum vanille, kirsch ou
rhum – 4 œufs.
Faites fondre le beurre et laissez tiédir.
Versez la farine dans un saladier.
Ajoutez le sel, les œufs.
Battez à l’aide d’un fouet.
Faites fondre le beurre et laissez tiédir.
Versez la farine dans un saladier.
Ajoutez le sel, le sucre, les œufs.
Battez à l’aide d’un fouet.
Dans un bol, faites dissoudre la levure dans le liquide.
Ajoutez ce mélange dans le saladier ainsi que le beurre fondu.
Continuez de battre jusqu’à ce que la pâte soit bien homogène.
Laissez reposer 30 minutes.
Dans un bol, faites dissoudre la levure dans le liquide.
Ajoutez ce mélange dans le saladier ainsi que le beurre fondu.
Parfumez selon votre goût.
Continuez de battre jusqu’à ce que la pâte soit bien homogène.
Laissez reposer 30 minutes.
10
12
5
3
4
2
7
9
10
11
1
11
1.
2.
3.
4.
5.
6.
7.
8.
9.
10.
11.
12.
13.
14.
6
8
13
14
12
Onderkant van polypropyleen
Deksel van bakeliet
Handvatten van bakeliet
Vergrendelde sluiting
Bovenplaat voor maxi-wafels en tosti’s
Bovenplaat voor mini-wafels
Onderplaat voor maxi-wafels
Onderplaat voor mini-wafels
Onderplaat voor tosti’s
Aangrijpzones voor afnemen en plaatsen van platen
Bevestigingsclips van de platen
Controlelampje
Spatel
Lepel
NED
- BESCHRIJVING VAN HET APPARAAT -
VEILIGHEIDSVOORSCHRIFTENÉ
■■ Raak de metalen onderdelen van het apparaat niet aan terwijl
Lees deze handleiding aandachtig door en bewaar hem
zodat u hem later nog kunt raadplegen.
■■ Controleer of de netspanning overeenkomt met de spanning
aangegeven op het identificatieplaatje van het apparaat.
■■ Rol het snoer altijd volledig uit.
■■ Gebruik bij gebruik van een verlengsnoer altijd een model
uitgerust met een geaard contact en een draadsectie met een
diameter van 0,75 mm2 of groter.
■■ Plaats het apparaat ver verwijderd van ontvlambare objecten
(gordijnen...).
■■ Plaats het apparaat nooit op een warme ondergrond of in de
buurt van open vuur.
■■ Laat het apparaat nooit zonder toezicht wanneer het aan staat.
■■ Het apparaat is uitsluitend bestemd voor huishoudelijk gebruik
op de manier zoals beschreven in de handleiding.
■■ Dompel het apparaat nooit onder in water of welke andere
vloeistof dan ook, ook niet bij het schoonmaken of om andere
redenen. Niet geschikt voor de vaatwasmachine.
■■ Gebruik en bewaar het apparaat niet buiten of in de regen, zet
het op een droge plaats.
■■ Verplaats het apparaat nooit door aan het snoer te trekken. Zorg
er voor dat het snoer niet per ongeluk ergens achter kan blijven
haken, om te voorkomen dat het apparaat valt. Rol het snoer
niet om het apparaat, verdraai het niet en zorg dat het niet in
contact kan komen met de warme onderdelen van het apparaat.
■■ Dit apparaat kan gebruikt worden door kinderen van 8 jaar en
het aan staat, deze zijn heet.
ouder en personen met verminderde fysieke, sensorische of
mentale capaciteiten of gebrek aan ervaring of kennis, wanneer
er toezicht wordt gehouden of wanneer zij instructies hebben
gekregen betreffende het veilige gebruik van het apparaat en
de bijkomende gevaren begrijpen. Kinderen mogen niet met
het apparaat spelen. Schoonmaak van en onderhoud aan het
apparaat zal niet worden uitgevoerd door kinderen, tenzij deze
ouder zijn dan 8 jaar en er toezicht wordt gehouden.
■■ Deze apparaten zijn niet bedoeld om gebruikt te worden met
een externe tijdschakelaar of een afstandsbediening.
■■ Zie erop toe dat kinderen niet met het apparaat spelen.
■■ Oppervlakken gemarkeerd met de markering voor hoge
temperaturen kunnen heet worden tijden gebruik.
■■ Houdt het apparaat en het snoer ervan buiten bereik van
kinderen jonger dan 8 jaar.
ZET HET APPARAAT NOOIT AAN VOORDAT U DE PLATEN ERIN
GEPLAATST HEBT.
13
TECHNISCHE KENMERKEN
NED
■■ Veiligheidsthermostaat en controlelampje.
■■ Multifunctioneel, met verwisselbare platen die afzonderlijk door
verkocht worden.
■■ Plaatbevestigingssysteem met clips.
■■ Platen van gegoten aluminium bekleed met anti-aanbaklaag.
■■ Deksels en handvatten van bakeliet.
■■ Onderkant van polypropyleen.
■■ Spatel van polypropyleen.
■■ Melamine lepel.
■■ Vermogen: 1070W - 230V - 50Hz.
SPECIFIEKE TECHNISCHE KENMERKEN
+
Modèle Tarti’Gaufres® Ref 029112
Wordt geleverd met een set platen voor
2 maxi-wafels van 150 x 100 mm.
+
Model Tarti’Gaufres® + mini-wafel platen
Ref 029122
Wordt geleverd met een set platen voor
2 maxi-wafels van 150 x 100 mm en
een set platen voor 6 mini-wafels van
100 x 49 mm.
14
+
Model Tarti’Gaufres® + mini-wafel en
tostiplaten Ref 029422
Wordt geleverd met een set platen voor 2 maxiwafels van 150 x 100 mm, een set platen voor
6 mini-wafels van 100 x 49 mm en een plaat
voor 2 tosti’s van 150 x 100 mm.
Apart verkochte platensets:
STROOMKABEL
■■ Platen voor 2 maxi-wafels van 150 x 100 mm (Ref 020 122).
Controleer de stroomkabel zorgvuldig voor elk gebruik. Gebruik het
apparaat niet met een beschadigde stroomkabel.
Om elk risico voor de gebruiker te vermijden mag de kabel uitsluitend
vervangen worden door de fabrikant, zijn klantenservice of een door
de fabrikant gekwalificeerd en goedgekeurd persoon.
De gebruikte kabel is een H05RRF 3G 0,75 mm2.
Dit apparaat voldoet aan de Richtlijnen 2006/95/EU, 2004/108/
CE, DEEE 2002/96/EU, RoHs 2002/95/EU en aan de EU richtlijn
inzake aanraking met levensmiddelen 1935/2004.
■■ Platen voor 6 mini-wafels van 100 x 49 mm (Ref 020 322).
MILIEU
Milieubescherming – RICHTLIJN 2002/96/EU DEEE
Om ons milieu en onze gezondheid te beschermen
moeten elektrische apparaten aan het einde van hun
levensduur verwijderd worden volgens nauwkeurig
vastgestelde regels en is medewerking en betrokkenheid
van zowel leverancier als gebruiker noodzakelijk.
Daarom mag uw apparaat, zoals aangegeven met het symbool op
het etiket, in geen geval in een afvalbak voor huishoudelijk afval
weggegooid worden.
Het is uw verantwoordelijkheid om dit apparaat aan het einde van
zijn levensduur in te leveren bij een afvalinzamelingspunt bestemd
voor elektrische en elektronische huishoudelijke apparaten. Neem
voor informatie met betrekking tot de inzameling en de recycling
■■ Platen voor 2 tosti’s van 150 x 100 mm (Ref 020 422).
15
■■ Voor een goed gevormde wafel die knapperig van buiten en
zacht van binnen is, adviseren wij u het recept voor Wafels uit
Lyon in dit boekje te volgen.
■■ Gebruik de doseerlepel die bij het apparaat is meegeleverd.
Een beslaglepel komt overeen met de hoeveelheid voor een
maxi-wafel of 3 mini-wafels. Let op, bij gebruik van een andere
lepel is het resultaat niet optimaal.
INGEBRUIKNAME EN GEBRUIK
EERSTE GEBRUIK
Een nieuw apparaat kan roken en/of geur afgeven bij het eerste
gebruik.
Om rook en geuren na het plaatsen van de bakplaten te beperken,
wordt geadviseerd het apparaat gedurende 10 minuten open te
laten opwarmen en het daarna 30 minuten te laten afkoelen.
1
2
INGEBRUIKNAME EN GEBRUIK
WAFELS
■■ Rol het snoer volledig uit.
■■ Plaats de platen in het apparaat (vlakke plaat boven).
■■ Sluit het apparaat aan en laat het opwarmen totdat het
controlelampje uitgaat.
■■ Vet, als het apparaat is voorverwarmd, de platen over het
gehele oppervlak licht in met een kwastje of keukenpapier
Let op: nooit invetten tijdens het voorverwarmen.
Giet het beslag op de
platen tot alle vierkante
holtes gevuld zijn.
3
Sluit het apparaat tot het
vergrendeld is.
16
Wacht een of twee
seconden tot het deeg
begint te rijzen en strijk
het uit met de achterkant
van de lepel.
Let op, strijk het
beslag uit en sluit het
wafelijzer voordat
de gladde bovenkant
gegaard is, zodat zich
ook aan de gladde kant
een wafelpatroon kan
vormen.
NED
van afgedankte apparaten contact op met uw lokale autoriteiten,
de vuilophaaldienst of de winkel waar u het apparaat hebt gekocht.
■■ Als u de lepel te vol doet (vooral bij het maken van mini-
wafels) of als het beslag veel bier of gist bevat, kan het
beslag over de randen van het apparaat heen lopen. Dit is
normaal en betekent niet dat het apparaat niet functioneert.
Neem het apparaat af en gebruik voor de volgende lepel
minder beslag.
■■ Uw wafels zijn klaar zodra het controlelampje uitgaat. U kunt
het apparaat weer dicht doen en de wafels langer laten bakken
als ze naar uw smaak niet gekleurd genoeg zijn.
■■ Om te weten of de wafels al gaar zijn kunt u het apparaat
tijdens het bakken voorzichtig openen en dicht doen als ze
nog niet gaar zijn.
■■ Haal de wafels er uit met een met (of een vork), door dit
horizontaal in de wafel te steken.
■■ Het is normaal als de 1e lading wafels niet perfect geslaagd is.
Het wafelapparaat moet het juiste temperatuurniveau vinden
voor een optimaal resultaat.
■■ Vet de platen opnieuw licht in voor de 2e en 3e lading (in principe
hoeft u daarna niet meer in te vetten).
■■ Dit apparaat is geen klassiek wafelijzer, gun uzelf de tijd om
eraan te wennen.
of bestrooi de wafel met veel poedersuiker, fruit...
Laat uw fantasie de vrije loop.
N.B. De spatel heeft
een klein uitsteeksel
waarmee u hem op
de pot kunt laten
rusten.
Gebruik de spatel om de wafel met jam of een ander beleg te
bestrijken...
17
TOSTI
■■ Het bakken van tosti’s gebeurt in een handomdraai. U kunt
alle ingrediënten het beste klaar zetten voordat u het apparaat
opwarmt.
■■ Plaats de tostiplaten in het apparaat.
■■ Sluit het apparaat aan en laat het opwarmen totdat het
controlelampje uitgaat.
■■ De buitenkanten van de tosti’s, die met de platen in contact
komen, moeten rijkelijk besmeerd zijn met boter.
■■ Plaats de twee tosti’s in het apparaat.
■■ Sluit het apparaat, druk het licht, en steeds meer, aan totdat
het apparaat vergrendeld is.
■■ Zodra het controlelampje uitgaat kunt u uw tosti’s uit het
apparaat halen.
■■ U kunt het apparaat weer sluiten en de tosti’s langer laten
bakken als ze naar uw smaak nog niet gekleurd genoeg zijn.
NED
Plaatsen van de bovenste plaat
Plaatsen van de onderste plaat
HET APPARAAT UITZETTEN
■■ Haal de stekker uit het stopcontact om het apparaat uit te zetten.
DE PLATEN VERWISSELEN
■■ Haal de stekker uit het stopcontact.
■■ Laat het apparaat volledig afkoelen.
■■ Pak de platen vast bij de aangrijpzones.
■■ Haal ze eruit door ze naar u toe te trekken en vervang ze door
andere.
■■ Om de nieuwe platen te plaatsen, duwt u ze onder de
bevestigingsclips en duwt u op de aangrijpzones totdat de
platen vastklikken.
18
ONDERHOUD
ALGEMENE GARANTIEVOORWAARDEN
■■ Let op: zorg ervoor dat de stekker uit het stopcontact
De garantie van dit apparaat is 2 jaar.
Wilt u de garantie gratis met één jaar verlengen, schrijf u dan in
op de website van
(www.lagrange.fr).
is en het apparaat volledig is afgekoeld voordat u het
schoonmaakt.
■■ Dompel het apparaat nooit onder in water en doe het niet in
de vaatwasser.
■■ Let er op dat er, nadat u de platen verwijderd hebt, geen resten
rondom het verwarmende deel achterblijven.
■■ Maak het apparaat zelf schoon met een vochtig doekje/spons.
■■ De anti-aanbakplaten: laat deze enige minuten weken, maak ze
dan schoon met een vochtige doek met vaatwasmiddel en spoel
ze met lauwwarm water na. Let op: gebruik geen(metalen)
schuurspons of schuurmiddel.
■■ U kunt de platen ook in de vaatwasser zetten.
■■ Maak de platen goed droog voordat u ze in het apparaat
terugplaatst.
De garantie geldt voor onderdelen en manuren en dekt fabrieksfouten.
Buiten de garantie vallen: beschadiging die voortkomen uit verkeerd
gebruik of het niet naleven van de handleiding en schade door vallen.
DEZE GARANTIE BEPERKT ZICH TOT HUISHOUDELIJK GEBRUIK EN
IN GELDT IN GEEN GEVAL BIJ BEROEPSMATIG GEBRUIK.
De wettelijk verplichte garantie van de verkoper sluit in niets
de wettelijke garantie van de producent uit voor wat betreft
fabricagefouten, volgens artikel 1641 en verder van het Franse
Burgerlijk Wetboek.
Neem bij storingen of slecht functioneren contact op met uw
verkoper.
In geval van een technisch defect binnen 8 dagen volgend op de
aankoopdatum wordt het apparaat vervangen. Na verstrijken van
deze periode wordt het apparaat gerepareerd door de klantenservice
van
.
19
Het basisrecept voor hartige wafels uit Lyon
Het basisrecept voor zoete wafels uit Lyon
500 g bloem – 1 zakje bakpoeder – ¾ L vloeistof (water, bier en
melk) – zout (naar smaak) - 125 g boter – 4 eieren.
500 g bloem – 1 zakje bakpoeder – ¾ L vloeistof (water, bier
en melk) – snufje zout - 125 g boter – 30 g suiker - 2 zakjes
vanillesuiker - vanillearoma, kirsch of rum - 4 eieren.
Laat de boter smelten en tot lauwwarm afkoelen.
Doe de bloem in een beslagkom.
Voeg het zout en de eieren toe.
Klop met een garde.
Laat de boter smelten en tot lauwwarm afkoelen.
Doe de bloem in een beslagkom.
Voeg het zout, de suiker en de eieren toe.
Klop met een garde.
Laat in een kommetje de gist in de vloeistof oplossen.
Voeg dit mengsel en de gesmolten boter toe aan het beslag.
Blijf kloppen tot het beslag glad is.
Laat 30 minuten rusten.
Laat in een kommetje de gist in de vloeistof oplossen.
Voeg dit mengsel en de gesmolten boter toe aan het beslag.
Voeg smaakstoffen naar wens toe.
Blijf kloppen tot het beslag glad is.
Laat 30 minuten rusten.
20
NED
LAGRANGE BASISRECEPT VOOR WAFELS UIT LYON
12
5
3
4
2
7
9
10
11
1
21
1.
2.
3.
4.
5.
6.
7.
8.
9.
10.
11.
12.
13.
14.
6
8
13
14
22
Sockel aus Polypropylen
Haube aus Bakelit
Griffe aus Bakelit
Verschlussriegel
Oberer Einsatz für Maxiwaffeln und Croque Monsieur
Oberer Einsatz für Miniwaffeln
Unterer Einsatz für Maxiwaffeln
Unterer Einsatz für Miniwaffeln
Unterer Einsatz für Croque Monsieur
Greifflächen zum Erfassen und Anbringen der Einsätze
Befestigungsklammern für die Einsätze
Kontrolllampe
Streichmesser
Kelle
DEU
- BESCHREIBUNG DES GERÄTES -
SICHERHEITSHINWEISE
■■ Wenn das Gerät eingeschaltet ist, die Metallteile nicht berühren,
Diese Gebrauchsanweisung aufmerksam lesen und zum
späteren Nachlesen aufbewahren.
■■ Darauf achten, dass die Netzspannung mit den Angaben auf
dem Geräteschild übereinstimmt.
■■ Die Geräteschnur stets vollkommen abwickeln.
■■ Eine Verlängerungsschnur darf nur benutzt werden, wenn
sie einen Masseanschluss und einen Drahtquerschnitt von
mindestens 0,75 mm2 besitzt.
■■ Beim Aufstellen des Gerätes darauf dachten, dass sich keine
leicht entflammbaren Gegenstände in der Nähe befinden
(Gardinen…).
■■ Das Gerät darf nicht auf eine heiße Fläche oder in die Nähe
einer Flamme gestellt werden.
■■ Das Gerät nicht unbeaufsichtigt eingeschaltet lassen.
■■ Das Gerät nur für Haushaltszwecke und entsprechend den
Anweisungen der Bedienungsanleitung benutzen.
■■ Das Gerät weder zum Reinigen noch aus einem anderen Grund
in Wasser oder eine sonstige Flüssigkeit eintauchen. Nicht in
der Spülmaschine reinigen.
■■ Das Gerät nicht im Freien benutzen oder lagern, es muss
trocken stehen.
■■ Das Gerät nicht an seiner Schnur ziehen. Darauf achten, dass
niemand an der Geräteschnur hängen bleiben und das Gerät
zu Fall bringen kann. Die Schnur nicht um das Gerät wickeln,
nicht verdrehen und nicht mit den heißen Teilen des Gerätes
in Berührung bringen.
■■ Dieses Gerät kann von Kindern ab 8 Jahren und älter sowie von
denn sie sind heiß.
Personen mit eingeschränkten körperlichen, sensorischen oder
geistigen Fähigkeiten oder ohne Erfahrung und Wissen benutzt
werden, sofern sie beaufsichtigt werden oder Anweisungen
bezüglich der sicheren Benutzung des Geräts erhalten haben
und die Gefahren verstehen. Kindern ist das Spielen mit dem
Gerät verboten. Reinigung und Instandhaltung durch den
Benutzer sollten nicht durch Kinder durchgeführt werden, es
sei denn, sie sind älter als 8 Jahre und werden beaufsichtigt.
■■ Diese Geräte sind nicht dafür geeignet, durch eine separate
Schaltuhr oder ein separates Fernsteuerungssystem in Betrieb
gesetzt zu werden.
■■ Kinder müssen beaufsichtigt werden, um sicherzugehen, dass
sie nicht mit dem Gerät spielen.
■■ Die mit der Warmtemperatur-Markierung gekennzeichneten
Flächen können sich während der Benutzung erhitzen.
■■ Das Gerät und sein Kabel für Kinder unter 8 Jahren unzugänglich
aufbewahren.
DAS GERÄT NICHT EINSCHALTEN, WENN DIE EINSÄTZE NICHT
AN IHREM PLATZ SIND.
23
TECHNISCHE DATEN
■■ Sicherheitsthermostat und Kontrolllampe.
■■ Mehrfunktionsgerät mit einzeln bei
DEU
verkocht
worden.
■■ Befestigungssystem der Einsätze mit Klammern.
■■ Einsätze aus Aluminiumguss mit Antihaftbeschichtung.
■■ Haube und Griff aus Bakelit.
■■ Sockel aus Polypropylen.
■■ Streichmesser aus Polyproylen.
■■ Kelle aus Melamin.
■■ Leistung: 1070W - 230V - 50Hz.
GERÄTESPEZIFISCHE TECHNISCHE DATEN:
+
Modell Tarti’Gaufres®
Best.-Nr. 029112
Enthält einen Satz Waffelformen für
2 Maxiwaffeln von 150 x 100 mm.
+
Modell Tarti’Gaufres® + Einsätze
für Miniwaffeln Best.-Nr. 029122
Enthält einen Satz Waffelformen für
2 Maxiwaffeln von 150 x 100 mm und einen
Satz Waffelformen für 6 Miniwaffeln von 100 x
49 mm.
24
+
Modell Tarti’Gaufres® + Einsätze
für Miniwaffeln und Croque Monsieur
Best.-Nr. 029422
Enthält einen Satz Waffelformen für
2 Maxiwaffeln von 150 x 100 mm, einen
Satz Waffelformen für 6 Miniwaffeln von 100 x
49 mm und einen Einsatz für 2 Croque Monsieur
von 150 x 100 mm.
Getrennt erhältliche Einsätze:
GERÄTESCHNUR
■■ Einsätze für 2 Maxi-Tarti’-Gaufres® 150 x 100 mm (Best.-Nr. 020 122).
Vor jedem Gebrauch die Geräteschnur aufmerksam kontrollieren.
Wenn sie beschädigt ist, darf das Gerät nicht benutzt werden.
Um Gefahren für den Benutzer zu vermeiden, darf die Geräteschnur
nur vom Hersteller, von dessen Kundendienst oder von einem vom
Hersteller zugelassenen Fachmann ersetzt werden.
Die Geräteschnur ist ein Kabel H05RRF 3G 0,75 mm2.
Das Gerät erfüllt die Richtlinien 2006/95/EG, 2004/108/EG, DEEE
2002/96/EG, RoHs 2002/95/EG und die EG-Lebensmittelvorschrift
1935/2004.
■■ Einsätze für 6 Mini-Tarti -Gaufres® 100 x 49 mm (Best.-Nr. 020 322).
UMWELT
Umweltschutz – RICHTLINIE 2002/96/EG DEEE
Zum Schutz der Umwelt und unserer Gesundheit müssen für die
Entsorgung ausgedienter Elektrogeräte präzise Regeln beachtet
werden, die jeden betreffen, sowohl Händler als auch Benutzer.
Deshalb darf Ihr Gerät, wie das Symbol auf dem Geräteschild
anzeigt, auf keinen Fall in eine öffentliche oder private Abfalltonne
für Hausmüll entsorgt werden.
Für die Entsorgung sind Sie dafür verantwortlich, dass Ihr Gerät an
einer öffentlichen Sammelstelle zum Recyceln von elektrischen oder
elektronischen Geräten abgegeben wird. Hinweise in
Bezug auf Sammel- und Recyclingstellen für ausgediente
Geräte erhalten Sie bei den örtlichen Ämtern Ihrer Region,
bei den Müllabfuhrdiensten oder in dem Geschäft, in
dem Sie Ihr Gerät gekauft haben.
■■ Einsätze für 2 Croque Monsieur von 150 x 100 mm
(Best.-Nr. 020 422).
25
INBETRIEBNAHME UND BENUTZUNG
■■ Für eine exakt geformte, außen knusprige und innen zarte Waffel
ERSTMALIGE BENUTZUNG
Das Gerät kann bei seiner ersten Benutzung rauchen und/oder
Geruch verbreiten.
Um die Rauch- bzw. Geruchentwicklung einzuschränken, empfiehlt
es sich, das Gerät nach dem Einsetzen der Waffelformen 10 Minuten
lang geöffnet heizen und anschließend rund 30 Minuten abkühlen
zu lassen.
1
2
INBETRIEBNAHME UND BENUTZUNG
WAFFELN
■■ Wickeln Sie die Geräteschnur vollkommen ab.
■■ Setzen Sie ihre Waffelformen in das Gerät ein (der ebene Einsatz
kommt nach oben).
■■ Schalten Sie das Gerät ein und lassen Sie es vorheizen, bis die
Kontrolllampe erlischt.
■■ Wenn das Gerät vorgeheizt ist, die gesamte Oberfläche der
Waffelformen mit einem Pinsel oder Stück Küchenpapier
leicht einfetten.
Achtung: nicht einfetten, solange das Gerät vorheizt.
Gießen Sie den Teig in
die Form, indem Sie alle
Waffelquadrate füllen.
3
Schließen Sie das
Waffeleisen, bis es
einrastet.
26
Warten Sie eine oder
zwei Sekunden, bis der
Teig anfängt, in der Form
aufzugehen, und glätten
Sie ihn dann mit dem
Rücken der Kelle.
Achtung, den Teig
glätten und das
Waffeleisen schließen,
bevor die Teigoberfläche
gebacken ist, damit
sich das Muster gut auf
der glatten Waffelseite
einprägt.
DEU
empfehlen wir Ihnen das in diesem Heft beigefügte Rezept für
Lyonnaiser Waffeln.
■■ Benutzen Sie die mit dem Gerät gelieferte Dosierkelle. Ein Kelle
Teig reicht für eine Maxiwaffel oder 3 Miniwaffeln. Achtung,
wenn Sie eine handelsübliche Kelle benutzen, erhalten Sie kein
optimales Ergebnis.
■■ Wenn Sie die Kelle zu voll füllen (vor allem bei Miniwaffeln)
oder wenn der Teig viel Bier oder Backpulver enthält, ist es
möglich, dass er an den Seiten des Gerätes herausquellt.
Das ist normal und bedeutet keine Störung. Wischen Sie den
ausgelaufenen Teig ab und geben Sie bei der nächsten Füllung
weniger Teig in die Kelle.
■■ Wenn die Lampe erlischt, sind die Waffeln fertig. Sie können
das Gerät aber zum Nachbacken nochmals schließen, wenn
die Waffeln nach Ihrem Geschmack nicht braun genug sind.
■■ Um nachzuschauen, ob die Waffeln fertig sind, das Gerät
während des Backens vorsichtig öffnen und wieder schließen,
wenn sie noch nicht braun genug sind.
■■ Entnehmen Sie die Waffeln mit einem Messer (oder einer
Gabel), indem Sie waagrecht in das Innere der Waffel stechen.
■■ Es ist normal, wenn die Waffeln im ersten Durchgang noch nicht
hundertprozentig gelingen. Die Hitze in Ihrem Waffeleisen muss
sich erst gleichmäßig verteilen, bevor die Waffeln optimal backen.
■■ Fetten Sie die Form für den 2. und 3. Backdurchgang noch
einmal etwas weniger (danach ist es generell nicht mehr nötig).
■■ Dieses Gerät ist kein klassisches Waffeleisen, geben Sie sich
Zeit, damit umgehen zu lernen.
oder füllen Sie die Mulden der gewellten Waffelseite großzügig
mit Puderzucker, Obst …
Lassen sie Ihrer Fantasie freien Lauf.
.B. Unser Streichmesser
N
besitzt einen kleinen
Stopper, damit es nicht
ins Glas rutscht.
Benutzen Sie das mitgelieferten Streichmesser, um Konfitüre oder
einen anderen Aufstrich auf die glatte Waffelseite zu streichen...
27
CROQUE-MONSIEURS
■■ Die Croque-Monsieurs backen sehr schnell. Deshalb ist es
ratsam, alle Zutaten schon vor dem Aufheizen zuzubereiten.
■■ Setzen Sie die Croque-Monsieur-Formen in das Gerät ein.
■■ Schließen Sie Ihr Gerät an und lassen Sie sie es heizen, bis
die Lampe erlischt.
■■ Die beiden Außenseiten der Croque-Monsieurs, die mit den
Einsätzen in Berührung kommen, müssen sorgfältig mit Butter
bestrichen werden.
■■ Legen Sie zwei Croque-Monsieurs in das Gerät.
■■ Schließen Sie das Gerät langsam mit leichtem Druck, bis der
Verschluss einrastet.
■■ Wenn die Lampe erlischt, können Sie die Croque-Monsieurs
entnehmen.
■■ Wenn Sie Ihnen nicht braun genug erscheinen, können Sie das
Gerät wieder schließen und sie etwas nachbräunen lassen.
DEU
Einsetzen der oberen Form
Einsetzen der unteren Form
AUSSCHALTEN DES GERÄTES
■■ Zum Ausschalten den Stecker ziehen.
WECHSELN DER EINSÄTZE
■■ Den Stecker ziehen.
■■ Warten, bis das Gerät völlig abgekühlt ist.
■■ Die Einsätze an den Greifflächen erfassen.
■■ Zum Lösen nach vorne zu Ihnen hin herausziehen und durch
andere Einsätze ersetzen.
■■ Die neuen Formen zum Einsetzen unter die Befestigungshaken
schieben und bis zum Einrasten auf die Griffflächen drücken.
28
WARTUNG
ALLGEMEINE GARANTIEBEDINGUNGEN
■■ Achtung: Bevor Sie das Gerät reinigen, unbedingt
Ihr Gerät besitzt 2 Jahre Garantie.
Wenn Sie sich auf der Websit
(www.lagrange.fr)
einschreiben, erhalten Sie kostenlos ein weiteres Jahr Garantie.
darauf achten, dass der Stecker gezogen und das Gerät
vollkommen abgekühlt ist.
■■ Das Gerät auf keinen Fall in Wasser eintauchen und nicht in
der Spülmaschine reinigen.
■■ Achtung, wenn Sie die Einsätze herausgenommen haben, darauf
achten, das sich keine Teigrückstände an den Heizwiderständen
angesammelt haben.
■■ Reinigen Sie das Gerät von außen mit einem feuchten Schwamm.
■■ Antihaftbeschichtete Einsätze: nach wenigen Minuten Einweichen
mit einem weichen Schwamm und mildem Reinigungsmittel
säubern, dann mit klarem Wasser spülen. Achtung: keinen
Topfkratzer und kein Scheuerpulver benutzen.
■■ Die Einsätze können Sie auch in der Spülmaschine reinigen.
■■ Die Einsätze gut abtrocknen, bevor sie wieder in das Gerät
eingesetzt werden.
Die Garantie umfasst Ersatzteile und Arbeitslohn und deckt
Fertigungsmängel ab.
Ausgeschlossen von der Garantie sind: Schäden aufgrund
einer unsachgemäßen Benutzung oder Nichteinhaltung der
Gebrauchsanweisung und Sturzschäden.
DIESE GARANTIE GILT NUR FÜR DEN HAUSGEBRAUCH, AUF KEINEN
FALL FÜR EINEN GEWERBLICHEN EINSATZ
Die gesetzliche Händlergarantie schließt in keiner Weise die vom
Hersteller zu leistende gesetzliche Garantie für Fertigungsmängel
oder –schäden gem. Artikel 1641 ff. des Bürgerlichen Gesetzbuchs
aus.
Bei Ausfall oder Störung des Gerätes wenden Sie sich bitte an
Ihren Händler.
Bei einem technischen Schaden innerhalb von 8 Tagen nach dem
Kauf werden die Geräte ersetzt. Nach Ablauf dieser Frist werden
sie vom Kundendienst
ausgebessert.
29
Grundrezept für salzige Lyonnaiser Waffeln
Grundrezept für süSSe Lyonnaiser Waffeln
500 g Mehl – 1 Beutel Backpulver – ¾ L Flüssigkeit (Wasser,
Bier oder Milch) – Salz (nach Geschmack) - 125 g Butter – 4 Eier.
500 g Mehl – 1 Beutel Backpulver – ¾ L Flüssigkeit (Wasser, Bier
oder Milch) - 1 Prise Salz - 125 g Butter – 30 g Zucker – 2 Beutel
Vanillezucker – Vanille-, Kirsch- oder Rumaroma – 4 Eier.
Butter schmelzen und wieder abkühlen lassen.
Mehl in eine Schüssel geben.
Salz und Eier hinzufügen.
Mit dem Schneebesen schlagen.
Butter schmelzen und wieder abkühlen lassen.
Mehl in eine Schüssel geben.
Salz, Zucker und Eier hinzufügen.
Mit dem Schneebesen schlagen.
In einem Schälchen das Backpulver in der Flüssigkeit auflösen.
Diese Mischung mit der geschmolzenen Butter in die Schüssel geben
Den Teig weiter schlagen, bis er gut durchgemischt ist.
30 Minuten ruhen lassen.
In einem Schälchen das Backpulver in der Flüssigkeit auflösen.
Diese Mischung mit der geschmolzenen Butter in die Schüssel geben.
Nach Belieben würzen.
Den Teig weiter schlagen, bis er gut durchgemischt ist.
30 Minuten ruhen lassen.
30
DEU
GRUNDREZEPT LAGRANGE FÜR LYONNAISER WAFFELN
12
5
3
4
2
7
9
10
11
1
31
1.
2.
3.
4.
5.
6.
7.
8.
9.
10.
11.
12.
13.
14.
6
8
13
14
32
Base in polipropilene
Cofano in bachelite
Impugnature in bachelite
Serratura
Piastra superiore per le maxi cialde e i croque monsieur
Piastra superiore per le mini cialde
Piastra inferiore per le maxi cialde
Piastra inferiore per le mini cialde
Piastra inferiore per i croque monsieur
Zone di prensione per togliere e posizionare le piastre
Ganci di fissaggio delle piastre
Spia di controllo
Coltello da spalmare
Mestolo
ITA
- DESCRIZIONE DELL’APPARECCHIO -
ISTRUZIONI DI SICUREZZA
■■ Non toccate le parti metalliche dell’apparecchio quando è in
Leggere attentamente questo manuale d’uso e tenerlo sempre
a portata di mano per poterlo consultare ulteriormente.
■■ Verificate che la tensione della rete corrisponda bene a quella
indicata sulla piastrina dell’apparecchio.
■■ Srotolate sempre completamente il cavo.
■■ Se dovete servirvi di una prolunga, utilizzate imperativamente
un modello munito di presa di terra e di fili con una sezione
uguale o superiore a 0.75mm2.
■■ Porre il vostro apparecchio a distanza d’oggetti facilmente
infiammabili (tende…).
■■ Non porre mai il vostro apparecchio su una superficie calda né
a prossimità di una fiamma.
■■ Non lasciate funzionare l’apparecchio senza sorveglianza.
■■ Utilizzate l’apparecchio unicamente per usi domestici e nella
maniera indicata nel manuale d’uso.
■■ Non immergete mai l’apparecchio nell’acqua o in un liquido
qualsiasi per la sua pulizia o per tutt’altra ragione. Non metterlo
mai nella lavastoviglie.
■■ Non utilizzate nè custodite l’apparecchio all’esterno, sotto la
pioggia, custodire in un luogo secco.
■■ Non spostart mai l’apparecchio tirando sul cavo. Fate attenzione
che il cavo d’alimentazione non rimanga accidentalmente
agganciato, e questo per evitare la caduta dell’apparecchio.
Non arrotolate il cavo attorno all’apparecchio, aver cura di non
torcere il cavo e fate attenzione che non entri a contatto con le
parti calde dell’apparecchio.
■■ L’utilizzo del presente dispositivo è consentito a bambini di età
funzione in quanto sono calde.
pari o superiore agli 8 anni e a persone con capacità fisiche,
sensoriali o mentali ridotte oppure prive dell’esperienza e delle
conoscenze necessarie previa supervisione o dietro ricezione di
istruzioni relative all’utilizzo in sicurezza del dispositivo stesso
e comprensione dei rischi ad esso collegati. Non consentire ai
bambini di giocare con il dispositivo. La pulizia e la manutenzione
possono essere effettuate da bambini di età superiore agli
8 anni previa supervisione.
■■ Questi apparecchi non sono destinati ad essere messi in
funzione tramite un timer esterno o un dispositivo di comando
remoto separato.
■■ Si consiglia di sorvegliare i bambini per accertarsi che non
giochino con l’apparecchio.
■■ Le superfici contrassegnate dal simbolo «alta temperatura»
possono diventare estremamente calde durante l’utilizzo.
■■ Mantenere il dispositivo e il relativo cavo fuori dalla portata dei
bambini di età inferiore agli 8 anni.
NON METTETE MAI IN MARCIA L’APPARECCHIO SENZA PRIMA
AVER INSTALLATO LE PIASTRE.
33
CARATTERISTICHE TECNICHE
■■ Termostato di sicurezza e spia di controllo.
■■ Multifunzione con piastre intercambiabili vendute separatamente
da
.
ITA
■■ Sistema di fissaggio delle piastre tramite clip.
■■ Piastre in ghisa di alluminio rivestite con antiadesivo.
■■ Cofano ed impugnature in bachelite.
■■ Base in polipropilene.
■■ Coltello da spalmare in polipropilene.
■■ Mestolo in melammina.
■■ Potenza: 1070W - 230V - 50Hz.
CARATTERISTICHE TECNICHE SPECIFICHE:
+
Modello Tarti’Gaufres® RIF 029112
Consegnato con un set di piastre per
2 maxi cialde di 150 x 100 mm.
+
Modello Tarti’Gaufres® + piastre mini
cialde RIF 029122
Consegnato con un set di piastre per 2 maxi
cialde di 150 x 100 mm e un set di piastre
per 6 mini cialde di 100 x 49 mm.
34
+
Modello Tarti’Gaufres® + piastre mini
cialde e croque-monsieur RIF 029422
Consegnato con un set di piastre per 2 maxi
cialde di 150 x 100 mm, set di piastre per
6 mini cialde di 100 x 49 mm e una piastra
per 2 croque monsieur di 150 x 100 mm.
Set di piastre vendute separatamente:
CAVO
■■ Piastre per 2 maxi Tarti’Gaufres® 150 x 100 mm (RIF 020 122).
Occorre verificare attentamente il cavo di alimentazione prima di
ogni utilizzo. In caso di guasto, non bisogna usare l’apparecchio.
Il cavo deve essere sostituito soltanto da parte del fabbricante, dal
suo servizio di assistenza o da una persona qualificata ed autorizzata
da parte del fabbricante e questo per evitare un pericolo per l’utente.
Il cavo utilizzato è un H05RRF 3G 0,75 mm2.
Quest’apparecchio è conforme alle Direttive 2006/95/CE, 2004/108/
CE, DEEE 2002/96/CE, RoHs 2002/95/CE e al regolamento CE
contatto alimentare 1935/2004.
■■ Piastre per 6 mini Tarti’Gaufres® 100 x 49 mm (RIF 020 322).
AMBIENTE
Protezione dell’ambiente – DIRETTIVA 2002/96/CE
Per preservare il nostro ambiente e la nostra salute, la distruzione
in fin di vita degli apparecchi elettrici deve farsi secondo regole ben
precise e richiede la partecipazione attiva di tutti, fornitori od utenti.
Questo è il motivo per il quale il vostro apparecchio, come lo
indica il simbolo apposto sulla piastrina, non deve in alcun caso
essere gettato in una pattumiera pubblica o privata destinata ai
rifiuti domestici.
Al momento della sua distruzione, vi appartiene di
depositare l’apparecchio in un centro di raccolta
differenziata pubblica designato per il riciclaggio degli
apparecchi elettrici od elettronici. Per ottenere maggiori
informazioni sui centri di raccolta e di riciclaggio degli apparecchi
destinati al macero, si prega contattare le autorità locali della vostra
■■ Piastre per 2 croque-monsieur di 150 x 100 mm (RIF 020 422).
35
regione, i servizi di raccolta dei rifiuti domestici oppure il negozio
nel quale avete comperato il vostro apparecchio.
■■ Per ottenere una cialda perfettamente disegnata, croccante
all’esterno e morbida all’interno, vi consigliamo di seguire la
ricetta delle cialde Lionesi fornite in questo libretto.
■■ Utilizzate un mestolo dosatore in dotazione con il vostro
apparecchio. Un mestolo di pasta corrisponde ad una maxi
cialda o 3 mini cialde. Attenzione, se utilizzate un mestolo
comperato nel commercio, il risultato non sarà ottimale.
MESSA IN SERVIZIO ED UTILIZZAZIONE
PRIMA UTILIZZAZIONE
Un apparecchio appena comperato può rilasciare fumo e/o rilasciare
odori durante la prima utilizzazione.
Per limitare questo fenomeno di fumi e di odori, si consiglia,
dopo aver installato le piastre di cottura, di lasciare riscaldare
l’apparecchio aperto per 10 minuti, poi di lasciarlo raffreddare
per circa 30 minuti.
2
ITA
1
MESSA IN FUNZIONE ED UTILIZZAZIONE
CIALDE
■■ Srotolate completamente il cavo
■■ Posizionate le vostre piastre nell’apparecchio (piastra piatta
al di sopra).
■■ Collegate l’apparecchio alla rete e lasciar preriscaldare finché
la spia si spenga.
■■ Dopo che l’apparecchio si sia riscaldato, ungere leggermente
le piastre su tutta la superficie servendosi di un pennello o di
carta assorbente.
Attenzione: non ungete mai durante il preriscaldamento.
Versate la pasta riempendo
tutti i carrelli delle cialde.
3
Chiudete l’apparecchio fino
alla chiusura.
36
Aspettate uno o due secondi
affinché la pasta cominci ad
lievitare quindi ricoprite con
il dorso del mestolo.
Attenzione, ricoprite e
richiudete il ferro per
cialde prima che la parte
superiore della pasta
sia già cotta affinché la
quadrettatura del lato
liscio della cialda sia ben
impressa.
■■ Se riempite troppo il mestolo (soprattutto per la realizzazione
delle mini cialde) o se la vostra pasta comporta troppa birra o
lievito, quest’ultima potrebbe sconfinare sui lati dell’apparecchio.
Questo è normale e non costituisce un difetto di funzionamento.
In questo caso, asciugate con una spugna e riempite meno il
mestolo la prossima infornata.
■■ Le vostre cialde sono pronte non appena la spia si spegne. Potete
richiudere l’apparecchio e prolungare la cottura se queste non
sono abbastanza dorate per il vostro gusto.
■■ Per sapere se le vostre cialde sono pronte, aprite delicatamente
l’apparecchio durante la cottura, richiudete se non sono
abbastanza cotte.
■■ Ritirate le cialde con un coltello (o una forchetta), inserendolo
orizzontalmente nello spessore delle cialde.
■■ È normale che la 1a infornata non sia riuscita perfettamente.
Il vostro ferro per cialde ha bisogno di equilibrarsi per quanto
riguarda le temperature prima di ottenere una cialda ottimale.
■■ Ungete di nuovo più leggermente per la 2a e 3a infornata (in
teoria, non ungete più).
■■ Quest’apparecchio non è un classico ferro per cialde, datevi il
tempo per migliorare e per prendere la mano.
o riempite i fori in modo generoso della faccia alveolata con
zucchero a velo, frutta...
Lasciate libero corso alla vostra fantasia
.B. Il vostro coltello da
N
spalmare comporta un
piccolo arresto che vi
sarà utile per sistemare
quest’ultimo nel vasetto.
Utilizzate il coltello da spalmare in dotazione per stendere marmellata
o pasta da spalmare sulla faccia liscia della cialda...
37
CROQUE-MONSIEUR
■■ La cottura dei croque-monsieur è molto rapida. Si raccomanda
di preparare tutti gli ingredienti prima di mettere in cottura.
■■ Posizionate le vostre piastre per croque monsieur nell’apparecchio.
■■ Collegate l’apparecchio alla rete e lasciar preriscaldare finché
la spia si spenga.
■■ Le due facce esterne del croque-monsieur, a contatto con gli
stampi, devono essere accuratamente imburrate.
■■ Mettete due croque-monsieur nell’apparecchio.
■■ Richiudete l’apparechio stringendo leggermente e
progressivamente fino alla chiusura.
■■ Potete ritirare i vostri croque-monsieur non appena la spia si
spegne.
■■ Potete richiudere l’apparecchio e prolungare la cottura se non
sono abbastanza dorati.
ITA
Disposizione della piastra superiore
ARRESTO DELL’APPARECCHIO
■■ Per spegnere, scollegate il cavo.
Disposizione della piastra inferiore
CAMBIO DELLE PIASTRE
■■ Scollegate l’apparecchio.
■■ Lasciatelo raffreddare completamente.
■■ Afferrate le piastre grazie alle zone di prensione.
■■ Sganciatele tirando verso di voi e cambiatele con delle nuove.
■■ Per posizionare le nuove piastre, inseritele sotto i ganci di
fissaggio poi premete sulle zone di impugnatura fino al bloccaggio.
38
MANUTENZIONE
CONDIZIONI GENERALI DI GARANZIA
■■ Attenzione : accertatevi che il vostro apparecchio sia ben
Il vostro apparecchio è garantito 2 anni.
Per beneficiare gratuitamente di un anno supplementare di garanzia,
iscrivetevi sul sito Internet
(www.lagrange.fr).
scollegato e completamente raffreddato prima di pulirlo.
■■ Non immergete mai il vostro apparecchio nell’aqua e non
mettetelo mai nella lavastoviglie.
■■ Attenzione, dopo aver ritirato le piastre, accertatevi che non vi
sia più alcun residuo attorno alla resistenza scaldante.
■■ Lavate il corpo dell’apparecchio con una spugna umida.
■■ Piastre di cottura antiadesive: dopo un’immersione di alcuni
minuti, pulitele con una spugna morbida imbevuta di detergente
dolce quindi risciacquate con acqua tiepida. Attenzione: non
utilizzate spugne metalliche nè detersivo abrasivo in
polvere.
■■ Potete mettere le piastre nella lavastoviglie.
■■ Asciugate bene prima di rimettere le piastre nell’apparecchio.
La garanzia copre parti e manodopera e copre i difetti di fabbricazione.
Sono escluse dalla garanzia: le deteriorazioni dovute ad uno cattivo
uso o al non rispetto delle istruzioni per l’uso e le rotture per caduta.
QUESTA GARANZIA SI APPLICA AGLI USI DOMESTICI, IN NESSUN
CASO AGLI USI PROFESSIONALI
La garanzia legale dovuta dal venditore non esclude per niente
la garanzia legale dovuta dal Costruttore per difetto o vizi di
fabbricazione conformemente agli articoli 1641 e successivi del
codice Civile.
In caso di guasto o di malfunzionamento, rivolgetevi al vostro
rivenditore.
In caso di difettosità tecnica negli 8 giorni successivi all’acquisto,
gli apparecchi saranno sostituiti. Passato questo termine, saranno
riparati dal servizio Assistenza
.
39
La ricetta di base delle cialde Lionesi salate
La ricetta di base delle cialde Lionesi zuccherate
500 g di farina – 1 sacchettino di lievito chimico – ¾ L di liquido
(acqua, birra e latte) – sale (secondo i gusti) - 125 g di burro –
4 uova.
500 g di farina – 1 sacchettino di lievito chimico – ¾ L di liquido
(acqua, birra e latte) - 1 pizzico di sale - 125 g di burro – 30 g di
zucchero – 2 sacchetti di zucchero vaniglia – profumo vaniglia,
kirsch o rum – 4 uova.
Fate sciogliere il burro e lasciate intiepidire.
Versate la farina in un’insalatiera.
Aggiungete il sale, le uova.
Sbattete con una frusta.
Fate sciogliere il burro e lasciate intiepidire.
Versate la farina in un’insalatiera.
Aggiungete il sale, lo zucchero, le uova.
Sbattete con una frusta.
Fate sciogliere il lievito nel liquido in una scodella.
Aggiungete questa miscela nell’insalatiera così come il burro fuso.
Continuate a sbattere finchè la pasta sia ben omogenea.
Lasciate riposare per 30 minuti.
Fate sciogliere il lievito nel liquido, in una scodella.
Aggiungete questa miscela nell’insalatiera così come il burro fuso.
Profumate secondo i vostri gusti.
Continuate a sbattere finchè la pasta sia ben omogenea.
Lasciate riposare per 30 minuti.
40
ITA
RICETTA DI BASE LAGRANGE DELLE CIALDE LIONESI
12
5
3
4
2
7
9
10
11
1
41
1.
2.
3.
4.
5.
6.
7.
8.
9.
10.
11.
12.
13.
14.
6
8
13
14
42
Base de polipropileno
Cubierta de baquelita
Asas de baquelita
Cerrojo de cierre
Placa superior para maxigofres y sándwiches
Placa superior para minigofres
Placa inferior maxigofres
Placa inferior minigofres
Placa inferior sándwiches
Zonas de sujeción para retirar y colocar las placas
Ganchos de fijación de las placas
Piloto de control
Untador
Cazo
ESP
- DESCRIPCIÓN DEL APARATO -
INSTRUCCIONES DE SEGURIDAD
■■ No tocar las partes metálicas del aparato mientras está
Leer atentamente este modo de empleo y conservarlo para
poder consultarlo posteriormente.
■■ Comprobar que el voltaje de la red corresponde con el que
figura en la placa de características del aparato.
■■ Desenrollar siempre completamente el cordón.
■■ En caso de utilizar una alargadera, utilizar obligatoriamente
un modelo provisto de toma de tierra e hilos de sección igual
o superior a 0,75 mm2.
■■ Mantener el aparato alejado de los objetos fácilmente inflamables
(cortinas, etc.)
■■ No colocar nunca el aparato sobre una superficie caliente ni
cerca de una llama.
■■ No dejar nunca el aparato sin vigilancia mientras está funcionando.
■■ Utilizar únicamente el aparato para usos domésticos, tal y como
se indica en el modo de empleo.
■■ No sumergir nunca el aparato en el agua o cualquier otro
líquido ni para limpiarlo ni por ningún otro motivo. No meterlo
nunca en el lavavajillas.
■■ Cerciorarse de no utilizar ni guardar el aparato en el exterior,
bajo la lluvia, y almacenarlo en un lugar seco.
■■ No desplazar nunca el aparato tirando del cable. Cerciorarse
de que el cordón de alimentación no pueda engancharse
accidentalmente, para evitar cualquier caída del aparato.
No enrollar el cordón alrededor del aparato, no retorcerlo y
prestar atención para que no entre en contacto con las partes
calientes del aparato.
■■ Este aparato puede ser utilizado por niños a partir de 8 años y
funcionando puesto que están calientes.
por personas con capacidades físicas, sensoriales o mentales
reducidas o con falta de experiencia y conocimientos siempre y
cuando estén bajo supervisión o se les haya instruido acerca de
cómo utilizarlo adecuadamente y sobre los riesgos inherentes.
No permitir que los niños jueguen con el dispositivo. La limpieza
y el mantenimiento no deberán ser realizados por niños salvo
que sean mayores de 8 años y estén bajo supervisión.
■■ Estos aparatos no están destinados a ponerlos en funcionamiento
con un minutero exterior o con un sistema de control a distancia
separado.
■■ Conviene vigilar a los niños para cerciorarse de que no jueguen
con el aparato.
■■ Las superficies con el símbolo de alta temperatura tienden a
calentarse durante el uso.
■■ Mantener el dispositivo y su cable fuera del alcance de niños
menores de 8 años.
NO PONER NUNCA EN MARCHA EL APARATO SIN HABER
COLOCADO LAS PLACAS.
43
CARACTERÍSTICAS TÉCNICAS
■■ Termostato de seguridad y piloto de control.
■■ Multifunción con placas intercambiables vendidas por separado
en
.
■■ Sistema de fijación de las placas con grupillas.
■■ Placas de fundición de aluminio con revestimiento antiadherente.
■■ Tapas y asas de baquelita.
■■ Base de polipropileno.
■■ Untador de polipropileno.
■■ Cazo de melamina.
■■ Potencia: 1070W - 230V - 50Hz.
ESP
CARACTERÍSTICAS TÉCNICAS ESPECÍFICAS:
+
Modelo Tarti’Gaufres® REF 029112
Se suministra con un juego de placas de
2 maxigofres de 150 x 100 mm.
+
Modelo Tarti’Gaufres® + placas minigofres
REF 029122
Suministrado con un juego de placas de
2 maxigofres de 150 x 100 mm y un juego de
placas de 6 minigofres de 100 x 49 mm.
44
+
Modelo Tarti’Gaufres® + placas minigofres
y sándwiches REF 029422
Suministrado con un juego de placas
para 2 maxigofres de 150 x 100 mm,
un juego de placas para 6 minigofres de
100 x 49 mm y una placa para 2 sándwiches
de 150 x 100 mm.
Juegos de placas vendidos por separado:
CORDÓN
■■ Placas de 2 maxi Tarti’Gaufres® 150 x 100 mm (REF 020 122).
Es necesario examinar atentamente el cable de alimentación antes
de cualquier utilización. Si éste está dañado, no hay que utilizar
el aparato.
El cordón sólo debe cambiarlo el fabricante, su servicio posventa o
una persona cualificada y homologada por el fabricante para evitar
cualquier peligro para el usuario.
El cordón utilizado es un H05RRF 3G 0,75 mm2.
Este aparato está en conformidad con las Directivas 2006/95/
CE, 2004/108/CE, DEEE 2002/96/CE, RoHs 2002/95/CE y con la
normativa CE contacto alimentario 1935/2004.
■■ Placas de 6 mini Tarti’Gaufres® 100 x 49 mm (REF 020 122).
MEDIO AMBIENTE
Protección del medio ambiente- DIRECTIVA 2002/96/CE DEEE
Para preservar nuestro medio ambiente y nuestra salud,
la eliminación al final de su vida útil de los aparatos
eléctricos debe realizarse según reglas bien precisas y
requiere la implicación de cada uno de nosotros, tanto
si se es proveedor como usuario.
Por esta razón su aparato, tal y como lo indica el símbolo que aparece
en su placa descriptiva, no debe arrojarse en ningún caso a un
cubo de basura pública o privada destinado à basura doméstica.
Durante su eliminación, es responsabilidad suya depositar el aparato
en un centro de recogida pública designado para el reciclaje de
equipos eléctricos o electrónicos. Para obtener más información
sobre los centros de recogida y reciclaje de los aparatos desechados,
■■ Placas de 2 maxi Tarti’Gaufres® 150 x 100 mm (REF 020 122).
45
póngase en contacto con las autoridades locales de su región, con
los servicios de recogida de basuras domésticas o con la tienda
en la que compró su aparato.
■■ Para conseguir un gofre perfectamente dibujado, crujiente
exteriormente y esponjoso en el interior, le aconsejamos seguir
la receta de los gofres Lioneses proporcionada en este manual.
■■ Utilice el cazo dosificador suministrado con su aparato. Un cazo
de pasta corresponde a un maxigofre o a 3 minigofres. Cuidado,
si utiliza un cazo del comercio, el resultado no será óptimo.
PUESTA EN SERVICIO Y UTILIZACIÓN
PRIMERA UTILIZACIÓN
Un aparato nuevo puede desprender humo y/o olores cuando se
utiliza por primera vez.
Para limitar este desprendimiento de humo después de haber
colocado las placas, se recomienda dejar que el aparato se
caliente abierto durante 10 minutos y dejar que se enfríe durante
unos 30 minutos.
2
ESP
1
ARRANQUE Y UTILIZACIÓN
Vierta la pasta llenando
todos los cuadrados de
los gofres.
GOFRES
■■ Desenrollar totalmente el cordón.
■■ Coloque sus placas en el aparato (placa plana por encima).
■■ Enchufar el aparato y dejar que se precaliente hasta que se
apague el piloto.
■■ Una vez precalentado el aparato, aplicar un poco de aceite o
mantequilla a las placas por toda su superficie con un pincel
o con papel absorbente.
Cuidado: no hacerlo nunca durante el precalentamiento.
3
Cierre el aparato hasta que
quede bloqueado.
46
Espere uno o dos segundos
a que la pasta empiece a
subir en la placa y después
iguálela con la base del
cazo.
Cuidado, iguale y vuelva
a cerrar el aparato para
hacer gofres antes de
que la parte superior de
la pasta esté hecha para
que el cuadriculado del
lado liso del gofre quede
perfectamente impreso.
■■ Si llena demasiado el cazo (sobre todo para la realización
de minigofres) o si su pasta lleva mucha cerveza o levadura,
ésta puede desbordar por los costados del aparato.
Esto es normal y no supone un fallo en el funcionamiento.
En tal caso, limpiar y llenar menos el cazo para el lote siguiente.
■■ En cuanto se apaga el indicador, sus gofres están listos. Puede
volver a cerrar el aparato y prolongar la operación si no están
suficientemente dorados y a su gusto.
■■ Para saber si los gofres están listos, abrir suavemente el aparato
y cerrar si no están suficientemente hechos.
■■ Retirar los gofres con un cuchillo (o un tenedor), pinchando
horizontalmente en el grosor de los gofres.
■■ Es normal que su primer lote de gofres no salga perfectamente.
Su aparato para hacer gofres tiene que equilibrarse en las
temperaturas antes de conseguir un gofre óptimo.
■■ Volver a aplicar un poco de aceite o mantequilla para la 2ª y 3ª
hornada (en principio, ya no será necesario hacerlo nuevamente).
■■ Este aparato no es un aparato para hacer gofres clásico, dese
tiempo para mejorar su habilidad.
o rellene los amplios huecos de la cara alveolada con azúcar
glas, fruta,…
Dé rienda suelta a su imaginación.
Nota. Su untador posee
un pequeño tope que le
será útil para introducirlo
en el bote.
Utilice el untador suministrado para extender mermelada o cualquier
pasta para untar en la cara lisa del gofre...
47
SÁNDWICHES
■■ La preparación de sándwiches es muy rápida. Es preferible
preparar todos los ingredientes antes de empezar a calentar.
■■ Coloque las placas para sándwiches en el aparato.
■■ Enchufar el aparato y dejar que se precaliente hasta que se
apague el piloto.
■■ Las dos caras externas del sándwich, en contacto con los
moldes, deben untarse cuidadosamente.
■■ Coloque dos sándwiches en el aparato.
■■ Cierre el aparato apretando ligera y progresivamente hasta
que quede bloqueado.
■■ En cuanto se apague el indicador, puede retirar los sándwiches.
■■ Puede volver a cerrar el aparato y prolongar la operación si no
están suficientemente dorados y a su gusto.
ESP
Colocación de la placa superior
PARADA DEL APARATO
■■ Para parar, desenchufar el cordón.
Colocación de la placa inferior
CAMBIO DE LAS PLACAS
■■ Desenchufe el aparato.
■■ Deje que se enfríe totalmente.
■■ Tome las placas por sus zonas de prensión.
■■ Desencájelas tirando hacia usted y sustitúyalas por las nuevas.
■■ Para colocar las placas nuevas introdúzcalas debajo de los
ganchos de fijación y apriete en las zonas de sujeción hasta
que queden enganchadas.
48
MANTENIMIENTO
CONDICIONES GENERALES DE GARANTÍA
■■ Cuidado: cerciorarse de que el aparato está bien
Su aparato está garantizado 2 años.
Para disponer gratuitamente de un año suplementario de garantía,
inscríbase en el sitio Interne
(www.lagrange.fr).
desenchufado y completamente enfriado antes de
limpiarlo.
■■ No introduzca nunca el aparato en el agua ni lo meta en el
lavavajillas.
■■ Cuidado, después de haber retirado las placas, preste atención
para que no queden residuos alrededor de la resistencia
calentadora.
■■ Lavar el bloque del aparato con una esponja ligeramente húmeda.
■■ Placas eléctricas antiadherentes: tras estar a remojo durante
varios minutos, limpiar con una esponja suave empapada en
detergente suave y aclarar después con agua tibia. Cuidado:
no utilizar esponja metálica ni detergente en polvo.
■■ También puede meter las placas en el lavavajillas.
■■ Secar bien antes de volver a colocar las placas en el aparato.
La garantía incluye piezas y mano de obra y cubre los defectos
de fabricación.
Quedan excluidos de la garantía: los deterioros debidos a una
mala utilización o al incumplimiento del modo de empleo y las
roturas por caída.
ESTA GARANTÍA SE APLICA A LAS UTILIZACIONES DOMÉSTICAS,
EN NINGÚN CASO A LAS UTILIZACIONES PROFESIONALES
La garantía legal correspondiente al vendedor no excluye en ningún
modo la garantía legal correspondiente al fabricante para fallos
o defectos de fabricación según los artículos 1641 y siguientes
del código civil francés.
En caso de avería o funcionamiento defectuoso, diríjase a su
vendedor.
En caso de fallo técnico dentro de los 8 días siguientes a la compra,
los aparatos se cambiarán. Transcurrido este plazo los reparará el
servicio posventa
.
49
RECETA BÁSICA LAGRANGE DE LOS GOFRES LIONESES
Receta básica de los gofres Lioneses salados
Receta básica de los gofres Lioneses dulces
500 g de harina - 1 bolsita de levadura química - ¾ L de líquido
(agua, cerveza y leche) - sal (según gusto) - 125 g de mantequilla
- 4 huevos.
500 g de harina - 1 bolsita de levadura química - ¾ L de líquido
(agua, cerveza y leche) - 1 pizca de sal - 125 g de mantequilla - 30 g
de azúcar - 2 bolsitas de azúcar aromatizado de vainilla – sabor
de vainilla, aguardiente de cerezas o ron - 4 huevos.
Derretir la mantequilla y dejar templar.
Verter la harina en una ensaladera.
Añadir la sal y los huevos.
Batir con una batidora.
En un cuenco, disolver la levadura en el líquido.
Añadir esta mezcla en la ensaladera así como la mantequilla
derretida.
Seguir batiendo hasta que la masa sea homogénea.
Dejar reposar 30 minutos.
En un cuenco, disolver la levadura en el líquido.
Añadir esta mezcla en la ensaladera así como la mantequilla
derretida.
Aromatizar según su gusto.
Seguir batiendo hasta que la masa sea homogénea.
Dejar reposar 30 minutos.
50
ESP
Derretir la mantequilla y dejar templar.
Verter la harina en una ensaladera.
Añadir la sal, el azúcar y los huevos.
Batir con una batidora.
12
5
3
4
2
7
9
10
11
1
51
1.
2.
3.
4.
5.
6
6.
7.
8.
9.
10.
11.
12.
13.
14.
8
13
14
52
Polypropylene base
Bakelite cover
Bakelite handles
Closing latch
Upper plate - for maxi waffles and croque monsieur
(toasted ham and cheese sandwich)
Upper plate - for mini waffles
Lower plate - maxi waffles
Lower plate - mini waffles
Lower plate - croque monsieur
Holding areas for removing and positioning the plates
Fastening hooks for the plates
Control light
Spreader
Ladle
ENG
- DESCRIPTION OF THE UNIT -
SAFETY INSTRUCTIONS
■■ Never touch the metallic parts of the unit when it is in operation
Read these instructions carefully and keep them for future
consultation.
■■ Check that the voltage of the electrical system corresponds to
the one indicated on the data plate of the unit.
■■ Always unwind the cord completely.
■■ If you use an extension cord, you must use a model with a
ground connection and wires of section greater than or equal
to 0.75 mm2.
■■ Place the unit far from any easily inflammable objects (curtains,
etc.).
■■ Never put the unit on a hot surface or near a flame.
■■ Never leave the unit unsupervised when it is in operation.
■■ The unit should only be used for household uses and as indicated
in the instructions.
■■ Never put the unit into water or any other liquid, neither for
cleaning nor for any other reason. Never put it in a dishwasher.
■■ Do not use or store the unit outside or in the rain. Store it in
a dry place.
■■ Never move the unit by pulling its cord. Make sure that the
power cord cannot be accidentally caught and make sure that
the unit doesn’t fall. Don’t wind the cord around the unit, do
not twist it and make sure that it does not come into contact
with the hot parts of the unit.
■■ This appliance can be used by children aged from 8 years and
because they are hot.
above and persons with reduced physical, sensory or mental
capabilities or lack of experience and knowledge if they have
been given supervision or instruction concerning use of the
appliance in a safe way and understand the hazards involved.
Children shall not play with the appliance. Cleaning and user
maintenance shall not be made by children unless they are
older than 8 and supervised.
■■ These units are not intended for operation by means of an
exterior timer or a separated remote control system.
■■ Make sure that children do not play with the unit.
■■ The surfaces marked with the hot temperature mark are liable
to get hot during use.
■■ Keep the appliance and its cord out of reach of children less
than 8 years.
NEVER TURN ON THE UNIT WITHOUT HAVING PUT THE
PLATES IN PLACE.
53
TECHNICAL CHARACTERISTICS
■■ Safety thermostat and control light.
■■ Multi-function with interchangeable plates sold separately
by
.
■■ System for fastening the plates with clips.
■■ Cast aluminum plates with anti-stick coating.
■■ Bakelite cover and handles.
■■ Polypropylene base.
■■ Polypropylene spreader.
■■ Melamine ladle.
■■ Power: 1070W - 230V - 50Hz.
+
Model Tarti’Gaufres® REF 029112
Delivered with a set of plates for two 150 x
100 mm maxi waffles.
+
Model Tarti’Gaufres® + mini waffle plates
REF 029122
Delivered with a set of plates for two 150 x
100 mm maxi waffles and a set of plates for six
100 x 49 mm mini waffles.
54
+
Model Tarti’Gaufres® + mini waffle and
croque-monsieur plates REF 029422
Delivered with a set of plates for two
150 x 100 mm maxi waffles, a set of plates
for six 100 x 49 mm mini waffles and a
150 x 100 mm plate for two croque monsieurs.
ENG
SPECIFIC TECHNICAL CHARACTERISTICS:
Sets of plates sold separately:
CORD
■■ Plate for 2 maxi Tarti’Gaufres® 150 x 100 mm (REF 020 122)
Carefully examine the power cord before using it. If it is damaged,
don’t use the unit.
The cord should only be replaced by the manufacturer, his aftersale service or a person who is qualified and authorized by the
manufacturer in order to avoid danger for the user.
The cord used is a H05RRF 3G 0.75 mm2.
This unit is in compliance with Directives 2006/95/EC, 2004/108/
EC, DEEE 2002/96/EC, RoHs 2002/95/EC and EC food contact
regulation 1935/2004.
■■ Plates for 6 mini Tarti’Gaufres® 100 x 49 mm (REF 020 322)
ENVIRONMENT
Protection of the environment – DIRECTIVE 2002/96/EC DEEE
In order to protect our environment and our health,
electrical appliances at the end of their working life
must be eliminated according to very precise rules,
requiring everyone’s involvement, including the supplier
and the user.
It is for this reason that your unit, as indicated by the symbol which
appears on the data plate, must absolutely not be thrown into a
public or private garbage intended for household wastes.
For its elimination, it is your responsibility to bring your unit to a
public collection center intended for the recycling of electrical and
electronic equipment. To obtain information about collection and
recycling centers for discarded appliances, please contact the local
■■ Plates for 2 croque-monsieur, 150 x 100 mm (REF 020 422)
55
authorities of your region, the household waste collection services
or the store where you purchased your unit.
■■ For a perfectly-made waffle, crisp on the outside and soft on
the inside, we suggest that you follow the Lyons-style waffle
recipe provided in this booklet.
■■ Use the measuring ladle provided with your unit. One ladle
of dough corresponds to one maxi waffle or 3 mini waffles.
NB: if you use a standard ladle, the result will not optimal.
STARTING-UP AND USE
FIRST USE
A new unit can smoke and/or release odors at the time of its first use.
To limit this release of smoke and odors, once you have put the
cooking plates in place, we recommend letting the unit heat up
open for 10 minutes then letting it cool for about 30 minutes.
1
2
WAFFLES
■■ Completely unwind the cord
■■ Position your plates in the unit (flat plate above).
■■ Plug in your unit and let it pre-heat until the light goes off.
■■ Once your unit is preheated, lightly grease your plates over
their whole surface using a brush or paper towels.
Warning: never grease during the preheating.
Pour in the dough, filling
all of the squares of the
waffle plates.
3
Close the unit until it locks.
56
Wait one or two seconds
until the dough starts to rise
in the plate then spread it
with the back of the ladle.
Be careful to cover and
close the waffle iron
before the top side of the
dough is cooked so that
the grid of the smooth
side of the waffle is
properly made.
ENG
STARTING-UP AND USE
■■ If you overfill the ladle (especially for making mini waffles) or
if your dough has a lot of beer or baking powder, it may flow
over the sides of the unit.
This is normal and does not constitute a malfunction.
In this case, sponge it up and fill the ladle a bit less for the next
batch.
■■ As soon as the light goes off, your waffles are ready. You can
close the unit and continue the cooking if they are not perfectly
cooked to your taste.
■■ To see if the waffles are ready, gently open the unit during the
cooking, and close it again if it is not cooked enough.
■■ Remove the waffles with a knife (or a fork), inserting it horizontally
into the thickness of the waffles.
■■ It is normal that your first set of waffles may not be perfect.
Your waffle iron needs to adjust in terms of temperature before
making optimal waffles.
■■ Use a little less grease for the 2nd and 3rd batches (no fat should
be needed thereafter).
■■ This unit is not a standard waffle iron; give yourself a chance
to get good at using it.
or to fill in the generous holes of the honeycombed side with icing
sugar, fruit, etc.
Use your imagination.
N.B.: Your spreader has
a small stop which you
can use to wedge it on
your jar.
Use the spreader provided to spread jam or spreads on the smooth
side of the waffle...
57
CROQUE-MONSIEUR
■■ Croque-monsieurs can be cooked very quickly. It is best to
prepare all of the ingredients before you start heating the unit.
■■ Position your croque monsieur plates in the unit.
■■ Plug in your unit and let it pre-heat until the light goes off.
■■ The two external sides of the croque-monsieur, which are in
contact with the molds, must be thoroughly buttered.
■■ Put two croque-monsieurs into the unit.
■■ Close the unit, tightening it gently and progressively until it locks.
■■ As soon as the light goes on, you can remove your croquemonsieur.
■■ You can close the unit again and cook them longer if they are
not toasted sufficiently to your taste.
Positioning of the upper plate
STOPPING THE UNIT
■■ To stop it, unplug the cord.
Positioning of the lower plate
ENG
CHANGE OF PLATES
■■ Unplug the unit.
■■ Let it cool down completely.
■■ Hold the plates by their handling areas.
■■ Remove them by pulling them towards you and replace them
with the new ones.
■■ To position the new plates, insert them under the fastening hooks
and then press on the holding areas until they lock into place.
58
UPKEEP
GENERAL GUARANTEE TERMS
■■ Warning: make sure that your unit is unplugged and
Your unit is guaranteed for two years.
To benefit from an additional one-year guarantee period free
of charge, register your unit on the
web site
(www.lagrange.fr).
completely cooled before cleaning it.
■■ Never put your unit into water and do not put it in the dishwasher.
■■ Warning: after removing the plates, make sure that there are
no residues around the heating resistor.
■■ Wash the body of the unit with a moist sponge.
■■ Non-stick cooking plates: after soaking them for a few minutes,
clean them with a soft sponge and mild detergent and then
rinse then with warm water. Warning: do not use a metallic
scouring pad or scouring powder.
■■ You can also put the plates in a dishwasher.
■■ Dry the plates thoroughly before putting them back in the unit.
The guarantee is for parts and labor and covers manufacturing
defects.
The guarantee does not cover: deterioration due to poor use or
non-observance of the instructions and breakage due to falling.
THIS GUARANTEE IS APPLICABLE FOR HOUSEHOLD USES, BUT
NOT FOR PROFESSIONAL USES.
The legal guarantee due by the seller does not in any way exclude
the legal guarantee due from the Manufacturer for manufacturing
defects or flaws according to articles 1641 and following of the
Civil Code.
In the event of a breakdown or malfunction, contact your retailer.
In the event of a technical defect within one week of purchase,
the units will be exchanged. Beyond this time period, they will be
repaired by the
after-sale service.
59
BASIC RECIPE FOR LAGRANGE LYONS-STYLE WAFFLES
The basic recipe for Lyons-style savory waffles
The basic recipe for Lyons-style sugar waffles
500 g flour – 1 packet of baking powder – ¾ L liquid (water, beer
and milk) – salt (to taste) - 125 g butter – 4 eggs.
500 g flour – 1 packet of baking powder – ¾ L of liquid (water,
beer and milk) - 1 pinch of salt - 125 g of butter – 30 g sugar –
2 packets of vanilla sugar –vanilla, kirsch or rum flavoring – 4 eggs.
Melt the butter and keep it warm.
Put the flour into a mixing bowl.
Add the salt and eggs.
Beat using a whisk.
Melt the butter and keep it warm.
Put the flour into a mixing bowl.
Add the salt, sugar, and eggs.
Beat with a whisk.
In a bowl, dissolve the baking powder in the liquid.
Put this mixture in the mixing bowl along with the melted butter.
Continue beating until the batter is homogeneous.
Let sit for 30 minutes.
ENG
Dissolve the baking powder in the liquid in a bowl.
Put this mixture in the mixing bowl along with the melted butter.
Flavor to your taste.
Continue beating until the batter is homogeneous.
Let sit for 30 minutes.
60
17 Chemin de la Plaine
ZA les Plattes
BP 75
69390 VOURLES
France
www.lagrange.fr
[email protected]
Scaricare