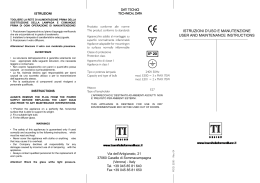
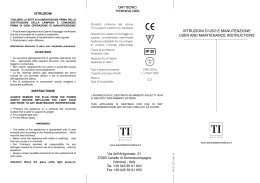
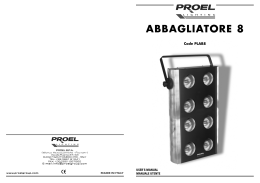
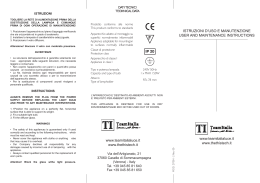
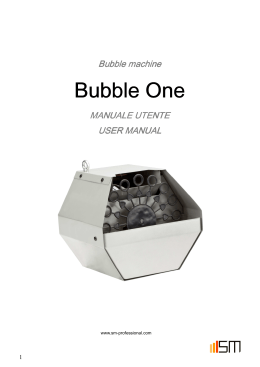
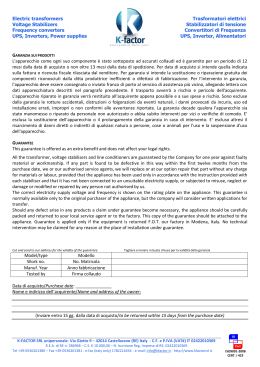
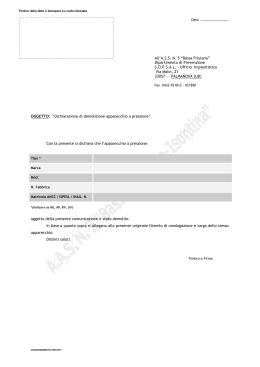
ITALIANO
IT
Istruzioni per l’istallazione, l’uso, la manutenzione
ENGLISH
Installation, use and maintenance instructions
GB
IT
ITALIANO
3
Istruzioni per l’istallazione, l’uso, la manutenzione
GB
ENGLISH
Installation, use and maintenance instructions
13
Italiano
IT
Si ringrazia per la scelta della macchina.
La preghiamo di leggere attentamente queste brevi note scritte per lei e per poter utilizzare al massimo tutte le
prestazioni che può ottenere
La qualità dell’apparecchio è garantita poiché ogni nostro prodotto è controllato al 100% a fine produzione, con
lunghe prove e con diversi tipi di TEST. La usi e vedrà quante soddisfazioni otterrà.
Indice
NORMATIVE-AVVERTENZE E CONSIGLI IMPORTANTI
4
DESCRIZIONE MACCHINA
5
POSIZIONAMENTO E MESSA IN OPERA
6
Rimozione delle protezioni per il trasporto
6
Nell’installare occorre osservare i seguenti punti:
6
USO DEL REPARTO FRIGORIFERO
7
Pannello di comando
Descrizione dell’apparecchio
7
7
Prima della messa in funzione
7
Collegamento dell’apparecchiatura
7
Messa in funzione e regolazione dello scomparto frigorifero
7
USO DELLO SCOMPARTO CONGELATORE
Uso dello scomparto congelatore
8-9
8
Funzione super
8
Allarme temperatura
8
Sbrinamento freezer
8
Produzione cubetti di ghiaccio
9
Confezionamento dei prodotti freschi per la congelazione
9
Conservazione cibi surgelati
9
Sbrinamento
9
PULIZIA
Pulizia dell’apparecchio
10
10
Per la pulizia interna di tutte le parti in plastica e della guarnizione porta
10
Pulizia del condensatore
10
Per assenze prolungate
10
Pulizia scarico acqua
10
Pulizia filtro antibatterico
10
Cavo di alimentazione
10
RICERCA GUASTI
11
Ricerca guasti
11
Collegamento elettrico
11
Prima di contattare il servizio assistenza
11
967
3
Normative-avvertenze e consigli importanti
Questo prodotto è conforme alle vigenti normative europee
di sicurezza relative alle apparecchiature elettriche.
E’ stato sottoposto a lunghe prove e meticolosi test per
valutarne la sicurezza e l’affidabilità.
Prima di utilizzare l’apparecchio, leggere attentamente
questo manuale, in modo da sapere esattamente cosa fare
e cosa non fare.
Un uso inappropriato dell’apparecchio può essere pericoloso, soprattutto per i bambini.
Prima di collegare l’apparecchio accertarsi che i dati in targa
siano corrispondenti a quelli del vostro impianto.
Non disperdere i materiali riciclabili dell’imballaggio nell’ambiente ma portarli ad un impianto di smaltimento affinché
possano essere riciclati.
La sicurezza elettrica di questo apparecchio è assicurata
soltanto quando è collegato ad un impianto elettrico munito
di un’efficace presa di terra, a norma di legge.
E’ obbligatorio verificare questo fondamentale requisito
di sicurezza.
In caso di dubbio, richiedere un controllo accurato dell’impianto da parte di un tecnico qualificato (legge 46/9O).
L’uso di questa macchina, così come di un qualsiasi apparecchio elettrico, comporta l’osservanza di alcune regole
fondamentali:
• non toccare l’apparecchio con mani o piedi bagnati o
umidi;
• non tirare il cavo di alimentazione per staccare la spina
dalla presa;
967
IT
• non lasciare esposto l’apparecchio agli agenti atmosferici;
• non permettere che l’apparecchio sia usato dai bambini senza sorveglianza; non staccare o inserire la spina
nella presa con le mani bagnate; - prima di effettuare
qualsiasi operazione di pulizia o di manutenzione,
disinserire l’apparecchio dalla rete di alimentazione
elettrica o staccando la spina o spegnendo l’interruttore generale dell’impianto:
• in caso di guasto o di cattivo funzionamento, spegnere
l’apparecchio, e non manometterlo.
Questo apparecchio è contrassegnato in conformità alla
Direttiva Europea 2002/96/EC, Waste Electrical and Electronic Equipment (WEEE).
Assicurandosi che questo prodotto sia smaltito in modo
corretto, l’utente contribuisce a prevenire le potenziali
conseguenze negative per l’ambiente e la salute.
Il simbolo
sul prodotto o sulla documentazione di
accompagnamento indica che questo prodotto non deve
essere trattato come rifiuto domestico ma deve essere consegnato presso l’idoneo punto di raccolta per il riciclaggio
di apparecchiature elettriche ed elettroniche.
Disfarsene seguendo le normative locali per lo smaltimento
dei rifiuti.
Per ulteriori informazioni sul trattamento, recupero e
riciclaggio di questo prodotto, contattare l’idoneo ufficio
locale, il servizio di raccolta dei rifiuti domestici o il negozio
presso il quale il prodotto è stato acquistato.
4
Normative-avvertenze e descrizione macchina IT
1
9
8
6
2
3
10
7
4
11
5
ATTENZIONE! Al termine della vita funzionale
dell’apparecchio che utilizza gas refrigerante
R 600a (isobutano) e gas infiammabile nella
schiuma Isolante, lo stesso dovrà essere messo
in sicurezza prima dell’invio in discarica. Per
questa operazione rivolgersi al Vs. negoziante e
all’ente Locale preposto.
ATTENZIONE! Quando installate il vostro apparecchio frigorifero è importante tener conto della
classe climatica del prodotto. Per conoscere la
classe climatica del vostro apparecchio controllate la targa dati qui riportata. L’apparecchio
funziona correttamente nel campo di temperatura
ambiente indicato in tabella, secondo la classe
climatica.
ATTENZIONE! Mantenere libere da ostruzioni le
aperture di ventilazione nell’involucro dell’apparecchio o nella struttura da incasso.
ATTENZIONE! In caso di lunga assenza (vacanze),
l’apparecchio deve essere disinserito, vuotato
completamente, pulito ed asciugato avendo cura
di lasciare le porte aperte per evitare la formazione
di cattivi odori.
ATTENZIONE: Non danneggiare il circuito di
refrigerazione.
ATTENZIONE: Non conservare sostanze esplosive
in questo apparecchio, come bombolette per
aerosol con propellente infiammabile.
967
Il presente apparecchio è concepito per essere utilizzato
in applicazioni domestiche e simili quali:
• la zona cucina destinata al personale di negozi, uffici ed
altri ambienti lavorativi;
• le fattorie e dai clienti negli alberghi, nei motel e in altri
ambienti di tipo residenziale;
• i bed e breakfast;
• i servizi di catering e applicazioni simili non per la vendita
al dettaglio.
Gli apparecchi Frigocongelatori verticali, sono elettrodomestici di grande capienza che permettono di congelare,
conservare e refrigerare qualsiasi cibo. La STRUTTURA
portante è stata realizzata in pannelli di lamiera trattati e
verniciati elettrostaticamente per resistere ai maltrattamenti
e rimanere bella e lucente nel tempo. Gli ISOLAMENTI sono
stati scelti per mantenere costante la temperatura INTERNA
e avere grossi spazi interni. Lo SPAZlO INTERNO è stato
studiato per poter conservare qualsiasi tipo di cibo grazie
alla facilità di spostamento dei ripiani.
1
2
3
4
5
6
7
8
9
10
11
QUADRO COMANDI
RIPIANI REGOLABILI
CASSETTI FRUTTA E VERDURA
CASSETTO CONGELAMENTO
CASSETTI FREEZER
BALCONCINO PORTASCATOLE
BALCONCINO BOTTIGLIE
LUCE INTERNA
LIBRETTO D’ISTRUZIONE
BACINELLA GHIACCIO
DISTANZIALI
5
Posizionamento e messa in opera
IT
A
2
B
1
D
E
RIMOZIONE DELLE PROTEZIONI
PER IL TRASPORTO
Controllate che l’apparecchio non sia danneggiato. I danni
subiti durante il trasporto devono essere segnalati al Vostro
Rivenditore entro 24 ore dal ricevimento.
1 Rimuovere la protezione dalla guarnizione della porta.
La protezione evita i possibili danni della guarnizione
dovuti al trasporto. La protezione deve essere rimossa
per poter chiudere ermeticamente la porta.
Per togliere la protezione, tirare leggermente un’estremità, ruotandola verso l’esterno.
2 Rimuovere i dispositivi di blocco dei ripiani in vetro.
Tali elementi in plastica evitano lo spostamento dei
ripiani durante il trasporto. Per rimuovere i dispositivi
di blocco, procedere come segue:
a) Afferrare gli elementi in plastica, ruotandoli fino a
disimpegnarli totalmente dal ripiano.
b) Estrarre gli elementi tirandoli verso l’esterno.
3 Livellare il frigorifero agendo sugli appositi piani
regolabili.
NELL’INSTALLARE OCCORRE OSSERVARE
I SEGUENTI PUNTI:
A Non installatelo vicino a sorgenti di calore come stufe,
termosifoni, cucine etc. ed evitare la sua esposizione
967
3
I
alla luce diretta del sole.
B Sistemate l’apparecchio in un posto asciutto e ben
aerato.
C Non installatelo in spazi non areati come nicchie o
rientranze del muro.
D Se l’apparecchio è dotato di distanziali applicateli sulla
parte superiore del condensatore posto sulla parete
posteriore.
E Dopo aver installato l’apparecchio nel luogo prescelto,
lasciatelo fermo per circa un’ora prima di collegarlo
alla presa di corrente.
F Prima di immagazzinare i cibi, assicuratevi del perfetto
funzionamento dell’apparecchio .
G Lasciare una distanza di almeno 5 cm fra la parte
superiore dell’apparecchio ed eventuali pensili.
H Alcuni apparecchi sono dotati di ruote posteriori per
consentire un facile spostamento.
I L’apparecchio è dotato di un filtro antibatterico; la
sua funzione è quella di migliorare la qualità dell’aria
all’interno del frigorifero, garantendo un ambiente più
sano e privo di batteri per una migliore e più lunga
conservazione degli alimenti.
ATTENZIONE: OGNI 3 MESI CIRCA, IL FILTRO antibatterico VA PULITO (VEDI CAPITOLO PULIZIA).
ATTENZIONE: NON COLLOCARE L’APPARECCHIO
VICINO A SORGENTI DI CALORE E LASCIARE ALMENO 5 CM DI ARIA SULLA PARTE SUPERIORE
6
Uso del reparto frigorifero
IT
6 543 2 1
A
B
1
T1
S6
PANNELLO DI COMANDO
1 TASTO DI:
- ON e OFF
- Regolazione temperatura
- Inserimento funzione SUPER
2 LED VERDE POSIZIONE MINIMA
3 LED VERDE POSIZIONE MEDIA
4 LED VERDE POSIZIONE MASSIMA
5 LED GIALLO FUNZIONE SUPER
6 LED ROSSO FUNZIONE ALLARME (CONGELATORE)
DESCRIZIONE DELL’APPARECCHIO
L’apparecchio è costituito da due celle:
- Un frigorifero (parte superiore) per la conservazione
di cibi freschi e delle bevande
- Un congelatore (parte inferiore) per la conservazione
a lunga durata dei prodotti surgelati (scomparto inferiore) e la congelazione di prodotti freschi (scomparto
superiore).
PRIMA DELLA MESSA IN FUNZIONE
Per la pulizia dei vani interni e degli accessori attenersi alle
specifiche riportate nel capitolo “ Pulizia ”.
COLLEGAMENTO DELL’APPARECCHIATURA
Verificare che la tensione dell’impianto elettrico corrisponda
alla tensione indicata sulla targhetta dell’apparecchiatura,
e che la presa di corrente sia provvista di collegamento a
terra. Non utilizzare adattatori che potrebbero generare
surriscaldamenti.
967
S2
2
S5
S6
S3
S4
T1
S2
ATTENZIONE! Se si spegne e si riaccende subito
l’apparecchiatura, il compressore si mette in funzione dopo circa 10 minuti. Questo rientra nel normale
funzionamento dell’apparecchiatura.
MESSA IN FUNZIONE E REGOLAZIONE DELLO SCOMPARTO
FRIGORIFERO
Se all’inserimento della spina nella presa di corrente la spia
verde (S2) (posizione minima) non si accende significa che
il prodotto è spento.
Per mettere in funzione l’apparecchio premere per almeno
0,5 secondi il tasto T1. Per interrompere il funzionamento
premere il tasto T1 per almeno 4 secondi.
All’accenzione il funzionamento viene segnalato dalla spia
verde (S2) (posizione minima) accesa. Se il comparto congelatore è caldo si accenderà in modo lampeggiante anche la
spia rossa (S6) (allarme) che si spegnera automaticamente
al raggiungimento di -12°C nel comparto congelatore.
- Programmazione e regolazione della temperatura:
è possibile selezionare 3 temperature ben distinte
segnalate dalle 3 spie verdi (S2-S3-S4). Per cambiare
impostazione occorre premere il tasto (T1), ad ogni
click si spegne la spia accesa e si accende la successiva i in modo lampeggiante per 4 secondi in base
alla sequenza S2-S3-S4 - S5.
La nuova impostazione sarà memorizzata al termine
della fase di lampeggiamento. L’inserimento della
funzione SUPER (S5) avviene quando tramite il tasto
(T1) si accende la spia gialla (S5) in modo fisso.
Le funzioni programmate restano memorizzate anche
in mancanza di corrente o quando l’apparecchiatura
è scollegata.
7
Uso dello scomparto congelatore
IT
A
S5
B
S6
NOTE:
• La distanza fra i ripiani e la parete posteriore interna
del frigorifero assicura la libera circolazione dell’aria.
• Non disponete gli alimenti a diretto contatto con la
parete posteriore del comparto frigorifero.
• Non ponete gli alimenti ancora caldi nei comparti.
• Conservate i liquidi in contenitori chiusi
Il sistema NO-FROST garantisce una temperatura costante e una capacità di raffreddamento
più rapida. La circolazione forzata di aria esente
da umidità tende ad asciugare rapidamente i
cibi, per questo raccomandiamo di proteggerli
in contenitori sigillati.
USO DELLO SCOMPARTO CONGELATORE
Il comparto congelatore viene avviato automaticamente
Dopo la messa in funzione sono necessarie circa tre ore
prima che venga raggiunta la temperatura adeguata di
conservazione degli alimenti surgelati.
Funzione SUPER
La funzione super si inserisce premendo il tasto (T1)
ripetutamente fino a che non si accende la spia gialla S5.
La funzione SUPER si arresta automaticamente dopo circa
27 ore, ma è possibile interromperla in qualsiasi momento
premendo il tasto T1 fino alla nuova impostazione desiderata. Durante la funzione SUPER il compressore funziona
per 65 minuti acceso e 25 minuti spento.
967
S3
S4
T1
S2
ALLARME TEMPERATURA
L’allarme si attiva quando la temperatura interna dello
scomparto freezer è superiore a -12 (esempio -11). Viene
segnalata in modo lampeggiante dalla spia rossa lampeggiante (S6).
POSSIBILI CAUSE:
- E’ stata introdotta nel congelatore una quantità eccessiva di alimenti (vedere modalità di congelazione).
- La porta è rimasta aperta.
- Si è interrotta la corrente elettrica.
- Vi è un guasto nell’apparecchiatura.
NOTA
Per ottimizzare il volume dello scomparto congelatore, senza alterare il funzionamento dell’apparecchiatura, si possono
togliere i 3 cassetti superiori, e conservare unicamente il
cassetto inferiore.
IMPORTANTE
- Gli alimenti che cominciano a scongelarsi non devono
in nessun caso essere ricongelati.
- Non conservare gli alimenti surgelati per periodi
superiori a quelli consigliati.
SBRINAMENTO FREEZER
Avviene in modo automatico e non richiede alcun intervento.
PRODUZIONE CUBETTI DI GHIACCIO
Riempite la bacinella del ghiaccio per 3/4 di acqua; riponetela nel vano congelatore e nell’apposito cassetto scorrevole
(se in dotazione).
8
Uso dello scomparto congelatore
IT
S5
S6
S3
S4
T1
S2
A
B
CONFEZIONAMENTO DEI PRODOTTI
FRESCHI PER LA CONGELAZIONE
Questa apparecchiatura comprende scomparti ben separati.
- Il cassetto “A” superiore si utilizza per la congelazione
di alimenti freschi.
- I 2 cassetti inferiori servono esclusivamente per la
conservazione di alimenti surgelati o congelati.
Per ottenere una congelazione ottimale, è indispensabile
attivare la congelazione rapida (SUPER) almeno 3 ore prima
di introdurre gli alimenti.
Congelare solo prodotti di prima qualità e confezionati ermeticamente per evitare che perdano sapore o si asciughino.
Su ogni confezione, applicare un’etichetta che indichi il
contenuto e la data di congelazione. La quantità di alimenti
freschi congelabili in 24 ore è indicata sulla targhetta di
identificazione dell’apparecchiatura (8kg/24h).
Evitare di mettere gli alimenti da congelare a contatto con
alimenti già congelati, per non provocare un innalzamento
di temperatura degli alimenti. E’ importante quindi estrarre
i prodotti congelati dallo scomparto “A” e collocarli nei
cassetti inferiori.
RACCOMANDAZIONI:
NON mettere in bocca i cubetti di ghiaccio e non consumare
i bastoncini gelati (ghiaccioli), subito dopo averli tolti dal
congelatore, perché possono provocare bruciature da freddo.
NON introdurre nel congelatore contenitori sigillati con
liquidi quali bibite o altro tipo. I cibi e le bevande calde devono
essere raffreddate prima di porle nel congelatore.
CONSERVAZIONE CIBI SURGELATI
Per i cibi surgelati l’effettivo periodo di conservazione non può
967
essere stabilito con precisione perché varia notevolmente per
la diversa natura degli alimenti. Rispettando rigorosamente
le istruzioni riportate sull’involucro dei cibi surgelati sarete
sempre sicuri di agire nel migliore dei modi.
ALCUNI CONSIGLI:
Assicurarsi che l’involucro sia intatto e non presenti delle
macchie di umido o rigonfiamento perché in questi casi
il prodotto surgelato può già essersi deteriorato. I cibi
che hanno iniziato lo scongelamento non devono essere
assolutamente ricongelati. Non conservare i cibi surgelati
più a lungo di quanto raccomandato.
SBRINAMENTO
In mancanza di corrente, accertarsi sulla durata della sospensione. Se la previsione non supera le 12 ore, lasciate
gli alimenti nel congelatore e tenete chiusa la porta.
Se la mancanza di corrente dovesse superare tale periodo
di 12 ore e una parte degli alimenti si dovesse scongelare,
è opportuno consumare quest’ultimi al più presto.
- Togliere gli alimenti e avvolgerli in più strati di carta a
giornale e conservarli in frigorifero o in un luogo fresco.
- Tenere presente che un aumento di temperatura degli
alimenti riduce sensibilmente la durata di conservazione degli stessi.
AVVERTENZA! non usare dispositivi meccanici o
altri metodi artificiali per accellerare il processo
di sbrinamento, diversi da quelli raccomandati
dal costruttore.
ATTENZIONE: Non usare apparecchi elettrici
all’interno dello scomparto conservatore di cibi,
se questi non sono di tipo raccomandato dal
costruttore.
9
Pulizia
IT
1
2
3
PULIZIA DELL’APPARECCHIO
Disinserite sempre l’apparecchio dalla presa di
corrente, prima d’effettuare qualsiasi operazione di pulizia.
Nessuna protezione (griglia a filo, carter) deve
essere rimossa da parte di personale non qualificato, evitate assolutamente di far funzionare
l’apparecchio senza queste protezioni.
PER LA PULIZIA INTERNA DI TUTTE LE PARTI IN PLASTICA
E DELLA GUARNIZIONE PORTA
Non usate abrasivi e detersivi di alcun genere.
-
Usate esclusivamente una soluzione di bicarbonato di
sodio in acqua tiepida 2 cucchiai in 2 litri di acqua.
PULIZIA DEL CONDENSATORE
- Da compiere almeno due volte l’anno.
- Utilizzate un aspirapolvere per uso domestico o una
spazzola. Un condensatore sporco influisce negativamente sull’apparecchio riducendone le prestazioni.
PULIZIA SCARICO ACQUA
Contemporaneamente alla pulizia del condensatore, verificate che il tubo R di scarico, sia libero da ostruzioni.
- Estraete il tubo R di scarico dalla vaschetta V e se
necessario provvedete alla sua pulizia.
PULIZIA FILTRO ANTIBATTERICO
- Da compiere ogni 4 mesi.
1 Rimuovere il coperchietto del portafiltro fig. 1.
2 Estrarre il filtrino fig. 2.
3 Lavarlo in acqua calda (è possibile lavarlo anche in
lavastoviglie); asciugarlo ad una temperatura inferiore
a 100°C; per mantenere un corretto potere filtrante
provvedere alla sostituzione del filtro ogni 2 anni. Rimontarlo nell’apposita sede rimettendo il coperchietto
fig. 1.
CAVO DI ALIMENTAZIONE
- Ispezionate periodicamente il cavo di alimentazione al
fine di controllare la sua integrità.
- Nel caso di cavo danneggiato, non utilizzate l’apparecchio e non tentate la riparazione ma rivolgetevi a
personale qualificato per la sua sostituzione.
PER ASSENZE PROLUNGATE
PER ASSENZE PROLUNGATE
- Vuotate i comparti.
- Disinserite l’apparecchio dalla rete elettrica.
- Pulite entrambi i comparti e asciugateli.
- Lasciate aperte le porte per impedire la formazione di
cattivi odori o muffe.
967
10
Ricerca guasti
IT
Green and
Yellow to Earth
Blue to
Neutral
13 amp Fuse
Brown
to Live
Cord Clamp
RICERCA GUASTI
1) L’APPARECCHIO NON FUNZIONA
- C’è un’interruzione di corrente?
- La spina è ben inserita nella presa di corrente?
- Il cavo di alimentazione è danneggiato?
- L’impostazione della temperatura è corretta?
2) LA TEMPERATURA ALL’INTERNO DEI COMPARTI NON È
SUFFICIENTEMENTE BASSA
- Le porte chiudono correttamente?
- L’apparecchio è installato vicino ad una sorgente di calore?
- L’impostazione della temperatura è corretta?
- Il condensatore è pulito?
3) LA TEMPERATURA ALL’INTERNO DEL COMPARTO FRIGORIFERO È TROPPO BASSA
- Il termostato è sulla posizione corretta?
4) L’APPARECCHIO È ECCESSIVAMENTE RUMOROSO
- L’apparecchio è in contatto con altri mobili, o oggetti?
- I tubi nella parte posteriore si toccano o vibrano?
- L’apparecchio è ben livellato?
5) LA LUCE INTERNA NON FUNZIONA
- Chiamare ilSERVIZIO ASSISTENZA.
6) C’È ACQUA SUL PAVIMENTO
- La vaschetta V è ben inserita a contatto della superficie del
compressore?
- Il tubo di scarico R, a sua volta, è ben inserito nella vaschetta?
7) ANOMALIE
In caso di errore di funzionamento delle sonde, le tre spie verdi
lampeggiano contemporaneamente o in modo sequenziale
“S2-S3-S4” (fig. 7).
L’apparecchio continuerà comunque a funzionamento con cicli
fissi preimpostati ma sarà necessario far sostituire quanto
967
prima la sonda difettosa da parte di un centro assistenza
autorizzato.
COLLEGAMENTO ELETTRICO
Controllare che la tensione dell’impianto elettrico corrisponda a
quella indicata sulla targhetta caratteristiche posta sul lato sinistro in basso nella parte interna dello scomparto congelatore.
Se la presa a muro è priva di contatto a terra, o se la spina non
è adatta al vostro impianto vi consigliamo di rivolgervi ad un
elettricista specializzato.
Non impiegare adattatori o derivatori che potrebbero causare
riscaldamenti e bruciature.
PRIMA DI CONTATTARE IL SERVIZIO ASSISTENZA:
- Verificate se è possibile eliminare da soli i guasti (vedere
“Guida Ricerca Guasti”).
- Riavviate l’apparecchio per accertarvi che l’inconveniente sia
stato eliminato. Se il risultato è negativo, disinserite nuovamente l’apparecchio e ripetete l’operazione dopo un’ora.
Se l’apparecchio non funziona bene o addirittura non funziona affatto prima di chiedere l’intervento di un tecnico, nel
vostro interesse, controllate che:
- la spina sia bene inserita nella presa di corrente;
- ci sia tensione nella linea elettrica;
- la temperatura sia impostato correttamente;
- le chiusure delle porte siano perfette;
- la tensione di alimentazione corrisponda a quella dell’apparecchio (± 6%).
- Se il risultato è ancora negativo, contattate il Servizio Assistenza.
COMUNICARE:
- il tipo di guasto
- il modello
- Il numero di matricola
11
Note
IT
.......................................................................................................................................................................................................
.......................................................................................................................................................................................................
.......................................................................................................................................................................................................
.......................................................................................................................................................................................................
.......................................................................................................................................................................................................
.......................................................................................................................................................................................................
.......................................................................................................................................................................................................
.......................................................................................................................................................................................................
.......................................................................................................................................................................................................
.......................................................................................................................................................................................................
.......................................................................................................................................................................................................
.......................................................................................................................................................................................................
.......................................................................................................................................................................................................
.......................................................................................................................................................................................................
.......................................................................................................................................................................................................
.......................................................................................................................................................................................................
.......................................................................................................................................................................................................
.......................................................................................................................................................................................................
.......................................................................................................................................................................................................
.......................................................................................................................................................................................................
.......................................................................................................................................................................................................
.......................................................................................................................................................................................................
.......................................................................................................................................................................................................
.......................................................................................................................................................................................................
.......................................................................................................................................................................................................
.......................................................................................................................................................................................................
.......................................................................................................................................................................................................
.......................................................................................................................................................................................................
.......................................................................................................................................................................................................
.......................................................................................................................................................................................................
967
12
English
GB
Thank you for purchasing one of our appliances.
Please read these notes thoroughly as they have been written to help you obtain the maximum performance from
the appliance.
The quality of the appliance is guaranteed as each one of our products is fully tested as it comes off the production line.
Use the appliance and you will see just how much satisfaction you will get.
Contents
STANDARDS-WARNINGS AND IMPORTANT RECOMMENDATIONS
14
DESCRIPTION OF THE MACHINE
15
POSITIONING AND COMMISSIONING
16
Removing the protection devices for transport
16
When installing, comply with the following points
16
USING THE COOLING COMPARTMENT
17
Control panel
Description of the appliance
17
17
Before commissioning
17
Connecting the appliance
17
Commissioning and adjustment of the cooling compartment
17
USING THE FREEZER
18-19
Using the freezer
18
Super Function
18
Temperature Alarm
18
Defrosting the freezer
18
Producing ice cubes
19
Packing fresh products for freezing
19
Storing frozen food
19
Defrosting
19
CLEANING
Cleaning the appliance
20
20
Cleaning all the inner plastic parts and door gasket
20
Cleaning the condenser
20
For prolonged absences
20
Cleaning the water drain
20
Cleaning the antibacterial filter
20
Power cable
20
TROUBLE SHOOTING
20-21
Troubleshooting
20-21
Electrical connection
21
Before contacting the assistance service
21
967
13
Tandards-warnings and recommendations
This product complies with current European safety standards governing electrical appliances.
It has been subjected to thorough and meticulous testing
to assess its safety and reliability.
Before using the appliance, read this manual carefully as it
will tell you what to do and what not to do.
Improper use of the appliance can be dangerous, above
all for children.
Before connecting the appliance, make sure that the data on
the rating plate complies with that of the domestic supply.
Do not dispose of the recyclable packing materials in an
unauthorised manner.
Take them to an appropriate plant for recycling.
The electrical safety of this appliance is only guaranteed
when it has been connected to a mains supply with an
efficient earthing system as provided for by law.
This is an important safety requirement and must be
complied with.
In case of doubt, have the mains supply checked by a
qualified electrician.
As with any other electrical appliance, a few fundamental
rules must be observed during use:
• do not touch the appliance with wet or damp hands
or feet.
• do not pull the power cable to remove the plug from
its socket.
967
GB
• do not expose the appliance to atmospheric agents.
• do not allow the appliance to be used by unsupervised
children.
• do not plug-in or unplug the appliance using wet
hands. - before carrying out any cleaning or maintenance operation, disconnect the appliance from the
mains supply by either unplugging it or switching the
mains power supply off at the main switch:
• in the case of a fault or malfunction, switch off the
appliance and do not attempt any repairs.
This appliance is marked as complying with European
Directive 2002/96/EC, Waste Electrical and Electronic
Equipment (WEEE).
Make sure that the product is disposed of in a correct manner. The user is obliged to contribute towards preventing
any negative consequences for health and the environment.
The symbol
affixed to the product or accompanying
documents signifies that the product must not be treated
as normal domestic refuse, but must be delivered to an
authorised collection centre to enable the electric and
electronic equipment to be recycled.
When disposing of the appliance, comply with local waste
disposal regulations. For further information on the treatment, recovery and recycling of this product, refer to the
appropriate offices, local domestic waste collection service
or the retailer from where the appliance was purchased.
14
Tandards-warnings and recommendations
GB
1
9
8
6
2
3
10
7
4
11
5
WARNING! AT THE END OF THE USEFUL LIFE OF AN
APPLIANCE THAT MAKES USE OF R 600A REFRIGERATION GAS (ISOBUTANE) AND FLAMMABLE GAS
IN THE INSULATION FOAM, IT MUST BE MADE SAFE
PRIOR TO BEING TRANSPORTED TO THE PLACE OF
DISPOSAL. TO DO THIS, REFER TO THE RETAILER
OR THE APPROPRIATE LOCAL AUTHORITY.
WARNING! WHEN INSTALLING THE APPLIANCE,
CONSIDERATION MUST BE GIVEN TO THE CLIMATIC CATEGORY OF THE PRODUCT ITSELF.
THE CLIMATIC CATEGORY OF THE APPLIANCE IS
WRITTEN ON THE RATING PLATE. THE APPLIANCE
WILL FUNCTION CORRECTLY WITHIN THE AMBIENT TEMPERATURE RANGE IN THE TABLE FOR THE
PARTICULAR CLIMATIC CATEGORY.
WARNING! MAKE SURE THAT THE VENTILATION
OPENINGS IN THE APPLIANCE BODY OR BUILT-IN
UNITS ARE NOT OBSTRUCTED.
WARNING! IF THE APPLIANCE IS TO BE LEFT
UNUSED FOR A LONG PERIOD OF TIME, E.G.
HOLIDAYS, IT MUST BE UNPLUGGED, EMPTIED,
CLEANED AND DRIED. THE DOOR MUST BE LEFT
OPEN TO PREVENT THE FORMATION OF BAD
SMELLS.
WARNING: DO NOT DAMAGE THE COOLING CIRCUIT.
WARNING: DO NOT STORE EXPLOSIVE SUBSTANCES SUCH US AEREOSOL CANS WITH A
FLAMMABLE PROPELLANT IN THIS APPLIANCE.
967
This appliance is intended to be used in household
and similar applications such as
• staff kitchen areas in shops, offices and other working
environments;
• farm house and by clients in hotel, motels and other
residential type environment;
• bed and breakfast type environment;
• catering and similar non-retail applications.
Fridge-freezers are large capacity domestic appliances
for freezing, storing and refrigerating any types of food.
The load-bearing STRUCTURE has been fabricated in
steel panels which have been treated and electrostatically painted to resist mistreatment and to ensure that
its “new” look remains unaltered over time. The INSULATION MATERIALS have been specially selected to ensure
that the INTERNAL temperature remains constant and
to provide maximum storage space. The internal STORAGE SPACE has been designed to store any type of food
thanks to the easily removable shelves.
1 CONTROL PANEL
2 ADJUSTABLE SHELVES
3 FRUIT & VEG DRAWER
4 DRAWER FOR FREEZING FOOD
5 FREEZER DRAWERS
6 CONTAINER SHELF
7 BOTTLE SHELF
8 INTERNAL LIGHT
9 INSTRUCTION BOOK
10 ICE TRAY
11 SPACERS
15
Positioning and installing the appliance
GB
A
2
B
1
D
E
REMOVING THE TRANSPORT PROTECTION DEVICES
Check that the appliance is undamaged.
The retailer must be informed of any damage to the appliance within 24 hours of delivery.
1 Remove the protection from the door gasket.
The protection is used to protect the gasket during
transport.
The protection must be removed in order to ensure
that the door seal functions correctly.
To remove the protection, lightly pull one end while
rotating it outwards.
2 Remove the glass shelf locking devices.
These plastic elements prevent the shelves from
moving during transport.
To remove the shelf locking devices, proceed as follows:
a) Grasp the plastic locking device and rotate it until
it comes away from the shelf.
b) Remove the locking device by pulling it outwards.
3 Level the fridge by adjusting the feet.
WHEN INSTALLING THE APPLIANCE,
REMEMBER THE FOLLOWING:
3
I
ers, radiators, cookers, etc. or in direct sunlight.
B Position the appliance in a dry well-ventilated location.
C Do not install the appliance in non-ventilated spaces
such as wall niches.
D If the appliance is supplied with spacers, fit them to
the upper part of the condenser on the back.
E After the appliance has been placed in its final position,
leave it for about an hour before connecting it to the
power supply.
F Make sure that the appliance is working properly
before placing any food in it.
G Leave a space of at least 5 cm between the top of the
appliance and any wall cupboards.
H Some appliances are fitted with rear wheels to enable
them to be moved easily.
I The appliance is equipped with an antibacterial filter;
its function is to improve the air quality inside the
refrigerator, ensuring a healthier and bacteria-free
environment and, as a result, extending food preservation.
ATTENTION: CLEAN THE ANTIBACTERIAL FILTER
APPROXIMATELY EVERY 3 MONTHS (SEE CLEANING CHAPTER).
WARNING: DO NOT INSTALL THE APPLIANCE
NEAR TO ANY HEAT SOURCES AND LEAVE A GAP
OF AT LEAST 5 CM ABOVE IT
A Do not install it near to sources of heat such as heat967
16
Using the fridge compartment
GB
6 543 2 1
A
B
1
T1
S6
CONTROL CONTROL PANEL
1 BUTTONS:
- ON / OFF
- Temperature control
- SUPER mode activation
2 GREEN LED MINIMUM POSITION
3 GREEN LED MEDIUM POSITION
4 GREEN LED MAXIMUM POSITION
5 YELLOW LED super MODE
6 RED LED ALARM FUNCTION (FREEZER)
DESCRIPTION OF THE APPLIANCE
The appliance consists of two cells:
- A fridge (upper part) for storing fresh food and drinks
- A freezer (lower part) for long-term storing of frozen
products (bottom compartment) and for freezing fresh
products (top compartment).
BEFORE STARTING THE FRIDGE
When cleaning the internal compartments and accessories,
follow the instructions reported in chapter “ Cleaning ”.
CONNECTING THE APPLIANCE TO THE MAINS SUPPLY
Check that the mains voltage corresponds to that indicated
on the appliance’s rating plate and that the mains socket is
equipped with an earth connection.
967
S2
2
S5
S6
S3
S4
T1
S2
AWARNING! If the appliance is switched off then
immediately back on again, the compressor will
start to operate after approximately 10 minutes.
This is normal.
START-UP AND CONTROL OF REFRIGERATOR COMPARTMENT
On insertion of the plug in the mains socket, if the green led
(S2) (minimum position) does not light, this means that the
appliance is switched off. To start up the appliance, press
button T1 for at least 0.5 seconds. To interrupt operation,
press T1 for at least 4 seconds. On power-up, operation is
indicated by illumination of the green led (S2) (minimum
position) . If the freezer compartment is warm, the red led
(S6) (alarm) starts to flash, and turns off automatically when
the freezer compartment reaches the temperature of -12°C .
- Temperature programming and control: 3 different
temperatures can be selected, as indicated by the 3
green leds (S2-S3-S4). To change settings, press button (T1); on each click the illuminated led turns off and
the next one flashes for 4 seconds according to the
sequence S2-S3-S4 - S5. The new setting is saved
at the end of the flashing phase. Activation of SUPER
mode (S5) is by means of button (T1) after which the
yellow led (S5) is permanently lit.
The programmed functions are memorised also in
the event of a power failure or when the appliance is
disconnected.
17
Using the freezer compartment
GB
A
S5
B
S6
NOTE:
• The distance between the shelves and the rear internal
wall of the refrigerator ensures that air circulates freely.
• Do not place food in direct contact with the rear wall
of the refrigerator compartment.
• Do not place food that is still warm into the compartments.
• Keep all liquids in closed containers.
The NO-FROST system guarantees a constant
temperature and a more rapid freezing capacity.
The humidity-free, forced air circulation tends to
dry food up quickly and for this reason we advise
keeping all food in closed containers.
USING THE FREEZER COMPARTMENT
Freezer compartment is started up automatically
After start-up the freezer compartment takes approximately
three hours to reach the required temperature for storing
frozen food.
SUPER MODE
Super mode is activated by pressing button (T1) repeatedly
until the yellow led S5 illuminates.
SUPER mode stops automatically after approx. 27 hours,
but it can be interrupted at any time by pressing T1 as many
times as required for the new setting. During SUPER mode,
the compressor runs for 65 minutes ON and 25 minutes OFF.
TEMPERATURE ALARM
The alarm is activated when the internal temperature of
967
S3
S4
T1
S2
the freezer compartment exceeds -12 (for example -11).
On activation, the red led (S6) flashes.
POSSIBLE CAUSES:
- An excessive amount of food has been placed in the
freezer (see freezing methods).
- The door has been left open.
- There has been a power cut.
- There is a fault in the appliance.
NOTA
Per ottimizzare il volume dello scomparto congelatore,
senza alterare il funzionamento dell’apparecchiatura, si possono togliere i 3 cassetti superiori, e conservare unicamente
il cassetto inferiore.
IMPORTANTE
- Gli alimenti che cominciano a scongelarsi non devono
in nessun caso essere ricongelati.
- Non conservare gli alimenti surgelati per periodi
superiori a quelli consigliati.
SBRINAMENTO FREEZER
Avviene in modo automatico e non richiede alcun intervento.
ICE-CUBE PRODUCTION
Fill the ice-tray 3/4 full with water. Place it in the sliding
drawer (where fitted) in the freezer compartment.
18
Using the freezer compartment
GB
S5
S6
S3
S4
T1
S2
A
B
PACKING FRESH PRODUCTS FOR FREEZING
This freezer has two separate compartments.
- Upper drawer “A” is used for freezing fresh food.
- The two lower drawers are reserved exclusively for
storing frozen products.
For optimum freezing, activate the quick-freeze function
(SUPER) at least 3 hours beforehand.
Only freeze prime quality hermetically sealed products to
avoid loss of taste or drying out. Apply a label to each pack,
indicating the content and date of freezing. The quantity of
fresh food that can be frozen in 24 hours is indicated on
the appliance’s rating plate (8kg/24h).
Do not place food in the freezer in contact with already
frozen products. This will prevent the food from increasing
in temperature. In this respect, it is important to transfer
frozen food from compartment “A” to the lower drawers.
RECOMMENDATIONS:
NEVER place ice cubes in the mouth or eat ice-lollies that
have just been taken out of the freezer, as these can cause
ice burns.
DO NOT place sealed containers containing liquids such as
soft-drinks or similar in the freezer.
Hot foods and drinks must be allowed to cool before being
placed in the freezer.
STORING FROZEN FOOD
It is impossible to accurately predict the effective storage
period for frozen food in that this varies considerably according to the nature of the food itself.
967
To be safe, always follow the instructions reported on the
packaging of frozen food products.
GENERAL ADVICE:
Make sure that the packaging is intact and that there are
no damp marks or swelling, in that these indicate that the
frozen product may already have deteriorated.
Any food that has started to thaw out must not under any
circumstances be re-frozen.
Do not store frozen foods for longer than the recommended
time period.
If a power cut should occur, try to establish its duration.
If the forecast is less than 12 hours, leave the food in the
freezer and keep the door closed.
If the power cut lasts for longer than 12 hours and part of
the food starts to thaw out, this should be consumed as
soon as possible.
- Remove the food, wrap it in several layers of newspaper and place it in the fridge or in a cool location.
- Remember that an increase in the temperature of the
food will greatly reduce its storage life.
WARNING! Do not use any mechanical devices or
other artificial methods other that those recommended by the manufacturer for accelerating the
defrosting process.
WARNING: Unless otherwise approved by the
manufacturer, do not use electrical appliances
inside the food storage compartment.
19
Cleaning - Troubleshooting
GB
1
2
3
CLEANING
Before starting any cleaning, disconnect the
appliance from the mains electricity supply.
The protections (wire grill, covers) must not
be removed by unqualified personnel: do not
use the appliance if the protections have been
removed.
WHEN CLEANING THE INTERNAL PLASTIC PARTS AND
THE DOOR GASKEt:
do not use abrasives or detergents of any kind.
- Use a warm solution of bicarbonate of soda (two
spoonfuls in two litres of water).
CLEANING THE CONDENSER
- This should be carried out at least twice a year.
- Clean using a domestic vacuum cleaner or a brush.
A dirty condenser will have a negative effect on the
appliance and reduce its performance.
FOR PROLONGED ABSENCES
- Empty the compartments.
- Disconnect the appliance from the mains electricity
supply.
- Clean both the compartments and dry them.
- Leave the doors open to prevent bad smells or mould
from forming.
967
CLEANING THE ANTIBACTERIAL FILTER
- Every 4 months.
1 Remove the filter-holder cover fig. 1.
2 Remove the filter fig. 2.
3 Wash it with hot water (it can be washed also in the
dishwasher); dry it at a temperature lower than 100°C;
to maintain a proper filtering capacity, replace the filter
every 2 years. Remount it in the specific seat and place
back the cover fig1.
CLEANING THE WATER DRAIN
When cleaning the condenser, check that the rear drain
pipe R is not blocked.
- Remove drain pipe R from the container V and if
necessary clean it.
POWER SUPPLY CABLE
- Periodically inspect the power cable to check its
condition.
- If the cable is damaged, do not use the appliance and
do not attempt any repairs. Call a qualified technician
to replace the faulty cable.
TROUBLESHOOTING
1) THE APPLIANCE DOES NOT WORK.
- Is there a power cut?
- Is the plug inserted properly in the mains socket?
- Is the power supply cable damaged?
- Is the temperature setting correct?.
2) THE TEMPERATURE INSIDE THE COMPARTMENTS IS NOT
LOW ENOUGH.
- Do the doors close properly?
20
Troubleshooting
GB
Green and
Yellow to Earth
Blue to
Neutral
13 amp Fuse
Brown
to Live
Cord Clamp
TROUBLESHOOTING
- Is the appliance installed near to a heat source?
- Is the temperature setting correct?.
- Is the condenser clean?
3) THE TEMPERATURE INSIDE THE FRIDGE COMPARTMENT
IS TOO LOW.
- Is the thermostat in the right position?
4) THE APPLIANCE IS VERY NOISY.
- Is the appliance in contact with other furniture or objects?
- Are the pipes on the back touching or vibrating?
- Is the appliance level?
5)5) THE INTERNAL LIGHT DOES NOT WORK
- Contact the ASSISTANCE SERVICE
6) WATER IS FOUND ON THE FLOOR.
- Is tray V placed correctly and contacting the compressor
surface?
- Is discharge pipe R placed correctly inside the tray?
7) ANOMALIES
In the event of probe malfunction, the three green indicators
start flashing simultaneously and sequentially “S2-S3-S4” (fig.
7). The appliance will keep working with pre-set fixed cycles;
however, the failed probe must be replaced by an authorised
assistance service as soon as possible.
ELECTRICAL CONNECTION
Check that the mains voltage complies with that indicated on the
rating plate located on the bottom left of the freezer compartment. If the mains socket does not have an earth connection or
if the plug is not suitable for the mains supply system, refer to
a qualified electrician. Do not use adapters or extension leads,
as these may overheat and burn.
WARNING: THIS APPLIANCE MUST BE EARTHED
967
If the appliance has been fitted with a non-rewirable plug of
the incorrect type for the mains socket, cut off the plug and fit
a new one. The removed plug must be thrown away. Inserting
an unsuitable plug into a 13 Amp socket is likely to cause an
electrical hazard. When a non rewirable plug or rewirable 13
Amp (BS1363) plug is used, it must be fitted with a 15 Amp
ASTA approved (BS1362) fuse. If any other type of plug is used
it must be wired as follows. Connect the GREEN & YELLOW
wire to the earth terminal marked with the letter “E” or earth
symbol,
or coloured green or green & yellow. Connect the
BLUE wire to the neutral terminal marked with the letter “N” or
coloured black. Connect the BROWN coloured wire to the live
terminal marked with the letter “L” or coloured red.
TECHNICAL ASSISTANCE SERVICE
Before contacting the Assistance Service:
- Check whether it is possible to rectify the problem by referring to the “Troubleshooting” guide.
- Restart the appliance to check whether the problem has been
resolved. If the problem still exists, disconnect the appliance from
the mains electricity supply and repeat the operation after one hour.
If the appliance is not working properly or not working at all,
before calling the Technical Assistance Service check that:
- The plug is inserted properly in the mains socket.
- The mains supply is working.
- The temperature is set correctly.
- The doors close properly.
- The power supply voltage corresponds to that of the appliance (± 6%).
- If the problem still exists, call the Assistance Service.
INFORM THE ASSISTANCE SERVICE OF:
- The type of malfunction
- The appliance model
- The serial number
21
Notes
GB
.......................................................................................................................................................................................................
.......................................................................................................................................................................................................
.......................................................................................................................................................................................................
.......................................................................................................................................................................................................
.......................................................................................................................................................................................................
.......................................................................................................................................................................................................
.......................................................................................................................................................................................................
.......................................................................................................................................................................................................
.......................................................................................................................................................................................................
.......................................................................................................................................................................................................
.......................................................................................................................................................................................................
.......................................................................................................................................................................................................
.......................................................................................................................................................................................................
.......................................................................................................................................................................................................
.......................................................................................................................................................................................................
.......................................................................................................................................................................................................
.......................................................................................................................................................................................................
.......................................................................................................................................................................................................
.......................................................................................................................................................................................................
.......................................................................................................................................................................................................
.......................................................................................................................................................................................................
.......................................................................................................................................................................................................
.......................................................................................................................................................................................................
.......................................................................................................................................................................................................
.......................................................................................................................................................................................................
.......................................................................................................................................................................................................
.......................................................................................................................................................................................................
.......................................................................................................................................................................................................
.......................................................................................................................................................................................................
.......................................................................................................................................................................................................
967
22
461308198
IT
GB
967
TLF 11/03/2013
Scaricare