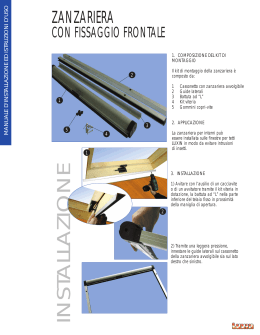
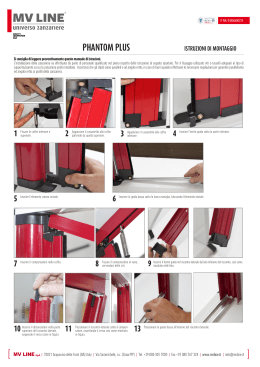
USER MANUAL
MANUALE UTENTE
La zanzariera senza barriere.
Flyscreen without barriers.
MV LINE congratulates you for buying PHANTOM–Z® flyscreen.
THANKS!
This guidebook will allow you to appreciate the benefits of this flyscreen and it will help you during the installation steps,
usage and maintenance. The company reserves the right to introduce total or partial changes to the product without notice,
declining all responsibility for any possible uncorrected specifications. This guidebook is copyright of MV LINE. Any kind of
reproduction, either partial, is strictly prohibited without written authorization by MV LINE.
INSTALLATION
For a correct flyscreen installation and usage, we suggest to assemble it in the recess directly, paying attention to the squaring
jambs and follow carefully the instruction as described in this installation guide.
USE
For a correct flyscreen opening, please use the handle mounted on the handle bar; in case of very strong wind, please keep
the flyscreen completely opened by rolling it back into cassette, in order to avoid damages to the mesh.
MV LINE si congratula con lei per l’acquisto della zanzariera PHANTOM-Z®.
Questa guida le consentirà di apprezzare i vantaggi di questa zanzariera e l’aiuterà ad orientarsi nelle fasi di installazione, uso
e manutenzione. L’azienda si riserva il diritto di apportare modifiche parziali o totali al prodotto senza preavviso, declinando
ogni responsabilità su eventuali dati inesatti. Questa guida è di proprietà della MV LINE. E’ severamente vietata la riproduzione, in ogni sua forma, anche parziale di questo documento senza autorizzazione scritta della MV LINE.
GRAZIE!
MONTAGGIO
Per un corretto montaggio ed utilizzo della zanzariera è consigliabile montare la zanzariera nel vano, facendo attenzione allo
squadro degli stipiti ed eseguendo esattamente le istruzioni di montaggio, così come indicate in questo opuscolo.
USO
Per un’apertura corretta utilizzare l’apposita maniglietta applicata sulla barra maniglia e riavvolgere la zanzariera in presenza
di vento forte.
FASE 1
STEP 1
Fix the upper and lower head-covers on the recess.
Fissare la copritestata superiore ed inferiore al vano.
Hook the box over the head-covers by a light inward pressure.
STEP 2
FASE 2
Agganciare il cassonetto alle copritestate con
una leggera pressione verso l’interno.
FASE 3
STEP 3
Hook the upper coupler device over the corresponding head cover.
Agganciare l’invito guida superiore alla corrispettiva copritestata.
Hang up the lower coupler device over the head-cover. It’s better to open the flyscreen, pulling it out
from the cassette about 15 centimetres (6 inches), to make the operation easier.
STEP 4
FASE 4
Agganciare l’invito guida inferiore alla copritestata.
Per facilitare l’operazione, è consigliabile aprire la zanzariera di circa 15 cm.
Insert zama lock in the side
hanging point (Phantom-Z hook only)
Inserire nell’aggancio laterale il
distanziatore ed il fermo-guida.
Insert bottom guide lock
in the side hanging point.
Infilare il fermo guida inferiore
nel riscontro laterale.
FASE 5
Insert the lateral coupler,
the spacer and the stopping device.
STEP 5
Infilare il fermo in zama nel riscontro laterale
(solo per la Phantom-Z con gancio).
Place the lateral coupler in the window opening on the opposite side of the box.
Be sure that the box and the window opening are parallel, then fix the lateral coupler.
Run the upper guide bar through the coupler device, following to the joints.
STEP 6
FASE 6
Posizionare l’aggancio laterale nel vano sul lato opposto al cassonetto; assicurarsi del parallelismo tra
i due (cassonetto-aggancio) e fissare l’aggancio laterale.
Infilare la guida superiore nell’invito-guida, rispettando gli incastri.
FASE 7
STEP 7
Place the opposite extremity of the upper guide bar in the corresponding coupler of the pilot bar.
Fix the guide lock with the screw.
Posizionare l’estremità opposta della guida nel corrispettivo aggancio.
Fissare quindi il fermo-guida con la vite in dotazione.
Open the flyscreen about 20 centimetres (8 inches).
Unthread the chain of the handle bar then hang up the first link of the chain over the head-cover in
the place arranged beforehand, as shown by the red arrow on the picture.
STEP 8
FASE 8
Aprire di circa 20 cm. la zanzariera. Sfilare la catena dalla maniglia ed agganciare la prima maglia
della catena alla copritestata nella sede predefinita, come evidenziato dalla freccia nella finestra.
STEP 9
Lower the bottom guide lock and block the bottom guide.
Abbassare il fermo guida inferiore e
bloccare la guida inferiore.
Inserire la guida
sotto le rotelline.
Set the zama lock, aligning it to the
hook and check the right working
(Phantom-Z hook only)
Posizionare il fermo in zama, allineandolo
al gancio, verificandone il corretto
funzionamento (solo Phantom-Z con
gancio).
FASE 9
Insert the bottom rail under the
wheel on the side.
INSTALLATION STEP FOR PHANTOM-Z DOUBLE CASSETTE ONLY
Once you make sure about the correct flowing of the handle bar, remove the protection of the twosticky tape from the mini-botton rail and stick it on the window opening.
STEP 10
FASE 10
NB: FASE DA ESEGUIRE SOLO PER LA PHANTOM-Z DOPPIO
CASSONETTO
Fissare l’incastro centrale. Una volta assicuratisi del
corretto scorrimento della barra maniglia, rimuovere
la pellicola protettiva del bi-adesivo dalla mini-guida e
fissarla al vano.
FASE 11
SETP 11
INSTALLATION STEP FOR PHANTOM-Z DOUBLE CASSETTE ONLY
Fix upper and lower wooden strip.
NB: FASE DA ESEGUIRE SOLO PER LA PHANTOM-Z DOPPIO CASSONETTO
Fissare il blocca paletto inferiore (foto sx) ed il blocca paletto
superiore (foto dx).
Avoid excessive dust over the flyscreen. Periodically clean chain tracks witha brush and oil them using silicone spray. Do not
use grasey oils.
MAINTENANCE
When the chain elements come off, it is possible to hang them up again through their interconnection clips.
It’s possible to replace any element to the Phantom-Z by turning to your retailer or directly contactingMVLINE.
Due to wear and tear, it may happen that flyscreen won’t close completely, it can be sent to a technical assistance center or
directly to MV LINE, to carry out the repair and servicing.
For all warranty conditions may have effect, do not proceed autonomously and without notice to dismantle any piece or
accessory which may seem it doesn’t work.
Please, contact your retailer who will provide you for assistance and replacement of pieces.
Evitare l’accumulo di polvere sul binario ed effettuare periodicamente lo spazzolamento dei cingoli e la loro lubrificazione con
spray siliconico. Evitare l’uso di olii o grassi.
Quando i cingoli si staccano è possibile riagganciarli, in quanto sono elementi interconnessi tra di loro.
MANUTENZIONE
E’ possibile sostituire qualsiasi elemento della zanzariera Phantom-Z rivolgendosi al proprio installatore di fiducia oppure
direttamente alla MV LINE.
Se in seguito all’usura la zanzariera non dovesse chiudersi completamente, potrà essere inviata in un centro assistenza o
direttamente alla MV LINE per la revisione o la riparazione.
Affinché abbiano effetto tutte le condizioni di garanzia, non intervenire autonomamente e senza preavviso allo smontaggio
di pezzi o accessori che potrebbero sembrare non funzionanti ma contattare il rivenditore che provvederà all’assistenza ed al
ricambio di parti.
OPENING AND CLOSING
Premere sulla maniglia
per aprire dall’interno
PULL the handle to open from the outside
Tirare la maniglia verso di sè
per aprire dall’esterno
APERTURA E CHIUSURA
Push on the handle to open
from the inside
Scaricare