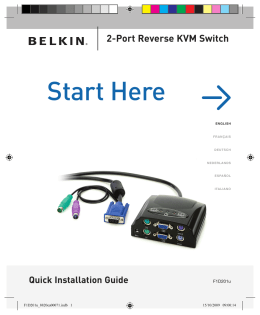
P74243ea_F1DK102P_QIG.qxd
01-04-2003
16:15
Page 1
En
Fr
OMNICUBE 2-Port Switch with Built-In Cabling
Switch OMNICUBE 2 Ports avec Câbles Intégrés
OMNICUBE 2-fach Switch mit integrierter Kabelgarnitur
OMNICUBE 2-poorts switch met geïntegreerde kabels
OMNICUBE Conmutador de 2 puertos
con cableado incorporado
Switch a 2 porte OMNICUBE con cablaggio incorporato
Control two computers using
one video monitor, and a PS/2
keyboard and mouse
Contrôler deux ordinateurs avec un
écran, un clavier et une souris PS/2
Kontrollieren Sie zwei Computer mit einem
Monitor und einer PS/2-Tastatur und -Maus
Beheer twee computers met slechts
één monitor, PS/2-toetsenbord en muis
Controla dos ordenadores utilizando
un monitor de vídeo, un teclado PS/2 y un ratón
Per permettere di utilizzare due computer
mediante un singolo monitor, tastiera PS/2 e mouse
Quick Installation Guide
Guide d’installation rapide
Anleitung für Schnellinstallation
Installatiehandleiding
Guía de Instalación Rápida
Guida rapida d’installazione
F1DK102P
De
Nl
Es
It
P74243ea_F1DK102P_QIG.qxd
01-04-2003
16:15
Page 2
OMNICUBE 2-Port Switch
with Built-In Cabling
Control two computers using one video monitor,
and a PS/2 keyboard and mouse
Quick Installation Guide
F1DK102P
P74243ea_F1DK102P_QIG.qxd
01-04-2003
16:15
Page 2
Introduction
This sheet will guide you through the basic steps needed to
install the 2-Port KVM Switch with Built-In Cabling (the Switch). If you
have any problems during installation, please refer to the User Manual.
1
Connecting the Keyboard, Video, and
Mouse to the Console Ports on the Switch
1. Power down all computers.
2. Connect your PS/2-type keyboard and mouse to the KEYBOARD and
MOUSE ports located on the front panel of your Switch.
3. Take the video cable that is attached to your monitor and connect it to
the VGA port on the front panel of the Switch.
You will need the following items to install the Switch:
• 2-Port KVM Switch with Built-In Cabling
• One (each) keyboard, monitor, and mouse
P74243ea_F1DK102P_QIG.qxd
2
01-04-2003
16:15
Page 4
Connecting Computers to the Switch
1. Using the attached cables, take the VGA cable and connect it to
the VGA port on the first computer.
2. Connect the PS/2 keyboard KVM cable to the keyboard port on
the computer.
3. Connect the PS/2 mouse KVM cable to the mouse port on
the computer.
Repeat Steps 1 through 3 for
the additional computer to be
connected to the Switch.
3
Power on your Computers
Power up your computers.
You are now ready to use your Switch.
Please refer to your User Manual for additional information.
P74243ea_F1DK102P_QIG.qxd
01-04-2003
16:15
Page 6
Belkin Corporation
501 West Walnut Street
Compton • CA • 90220 • USA
Tel: +1 310.898.1100
Fax: +1 310.898.1111
Belkin Components, Ltd.
Express Business Park • Shipton Way • Rushden
NN10 6GL • United Kingdom
Tel: +44 (0) 1933 35 2000
Fax: +44 (0) 1933 31 2000
Belkin Components B.V.
Starparc Building • Boeing Avenue 333
1119 PH Schiphol-Rijk • The Netherlands
Tel: +31 (0) 20 654 7300
Fax: +31 (0) 20 654 7349
Switch OMNICUBE 2 Ports
avec Câbles Intégrés
Contrôler deux ordinateurs en utilisant
seulement un écran et un clavier et souris PS/2
Belkin GmbH
Hanebergstrasse 2
80637 München • Germany
Tel.: +49 (0) 89 1434050
Fax: +49 (0) 89 143405100
Belkin Tech Support
US:
Europe:
Australia:
+1 310.898.1100 ext. 2263
+1 800.223.5546 ext. 2263
00 800 223 55 460
1800 666 040
P74243
© 2003 Belkin Corporation. All rights reserved. All trade names are
registered trademarks of respective manufacturers listed.
Guide d’Installation Rapide
F1DK102P
P74243ea_F1DK102P_QIG.qxd
01-04-2003
16:15
Page 2
Introduction
Ce document vous guidera à travers les étapes de base nécessaire à
l’installation du Switch KVM 2 Ports avec Câbles Intégrés (le Switch).
Si vous rencontrez des problèmes lors de l’installation, référez-vous
au Guide de l’Utilisateur.
Vous aurez besoin des éléments suivant
pour l’installation du Switch :
• Switch KVM 2 Ports avec Câbles Intégrés
• Un clavier, un écran et une souris
1
Connecter le Clavier, l’Écran et la Souris
sur les ports Console du Switch
1. Éteignez tous les ordinateurs.
2. Connectez le clavier et la souris de type PS/2 sur les ports CLAVIER et
SOURIS situés sur le devant de votre Switch.
3. Prenez le câble vidéo qui est relié à votre écran et connectez le au port
VGA sur le devant du Switch.
P74243ea_F1DK102P_QIG.qxd
2
01-04-2003
16:15
Page 4
Connecter les Ordinateurs au Switch
1. En utilisant les câbles reliés, prenez le câble VGA et connectez le au
port VGA du premier ordinateur.
2. Connectez le câble clavier KVM PS/2 au port clavier de l’ordinateur.
3
Alimentation de vos Ordinateurs
Mettre en marche vos ordinateurs.
Vous êtes maintenant prêts à utiliser votre Switch.
Veuillez vous référer au Guide de l’Utilisateur pour plus d’informations.
3. Connectez le câble souris KVM PS/2 au port souris de l’ordinateur.
Répétez les étapes 1, 2 et 3
pour connecter l’ordinateur
supplémentaire au Switch.
P74243ea_F1DK102P_QIG.qxd
01-04-2003
16:15
Page 6
Belkin Corporation
501 West Walnut Street
Compton • CA • 90220 • USA
Tel: +1 310.898.1100
Fax: +1 310.898.1111
Belkin Components, Ltd.
Express Business Park • Shipton Way • Rushden
NN10 6GL • Royaume-Uni
Tel: +44 (0) 1933 35 2000
Fax: +44 (0) 1933 31 2000
Belkin Components B.V.
Starparc Building • Boeing Avenue 333
1119 PH Schiphol-Rijk • Pays-Bas
Tel: +31 (0) 20 654 7300
Fax: +31 (0) 20 654 7349
OMNICUBE 2-fach Switch mit
integrierter Kabelgarnitur
Kontrollieren Sie zwei Computer mit einem
Monitor und einer PS/2-Tastatur und -Maus
Belkin GmbH
Hanebergstrasse 2
80637 München • Allemagne
Tel.: +49 (0) 89 1434050
Fax: +49 (0) 89 143405100
Assistance technique Belkin
USA:
Europe:
Australia:
+1 310.898.1100 poste 2263
+1 800.223.5546 poste 2263
00 800 223 55 460
1800 666 040
P74243
© 2003 Belkin Corporation. Tous droits réservés.
Tous les noms de marque sont des marques déposées des fabricants respectifs énumérés.
Anleitung für Schnellinstallation
(Quick Installation Guide)
F1DK102P
P74243ea_F1DK102P_QIG.qxd
01-04-2003
16:15
Page 2
Einführung
Diese Kurzanleitung führt Sie durch die wesentlichen Schritte der
Installation des 2fach-Masterswitches mit integrierter Kabelgarnitur (des
Switches). Wenn es bei der Installation zu Problemen kommt, finden Sie
weitere Informationen im Benutzerhandbuch.
1
Anschließen der Tastatur, des Bildschirms und
der Maus an die Konsolen-Ports am Switch
1. Schalten Sie alle Computer ab.
2. Schließen Sie Ihre PS/2-Tastatur und die PS/2-Maus an die
Schnittstellen KEYBOARD (Tastatur) und MOUSE (Maus) an der
Vorderseite des Switches an.
3. Schließen Sie das Bildschirmkabel Ihres Monitors an den VGA-Port an
der Vorderseite des Switches an.
Zur Installation des Switches benötigen Sie die folgenden
Komponenten:
• 2fach-Masterswitch mit integrierter Kabelgarnitur
• 1 Tastatur, 1 Monitor und 1 Maus
P74243ea_F1DK102P_QIG.qxd
2
01-04-2003
16:15
Page 4
Anschließen von Computern an den Switch
1. Schließen Sie das angeschlossene VGA-Kabel an den VGA-Port am ersten
Computer an.
2. Schließen Sie das PS/2-Masterswitch-Tastaturkabel an den Tastatur-Port
des Computers an.
3. Schließen Sie das PS/2-Masterswitch-Mauskabel an den Maus-Port des
Computers an.
Wiederholen Sie die Schritte 1
bis 3 für weitere Computer, die
an den Switch angeschlossen
werden sollen.
3
Schalten Sie Ihre Computer ein
Fahren Sie die Computer hoch.
Jetzt können Sie mit Ihrem Switch arbeiten.
Weitere Informationen hierzu finden Sie im Benutzerhandbuch.
P74243ea_F1DK102P_QIG.qxd
01-04-2003
16:15
Page 6
Belkin Corporation
501 West Walnut Street
Compton • CA • 90220 • USA
Tel: +1 310.898.1100
Fax: +1 310.898.1111
Belkin Components, Ltd.
Express Business Park • Shipton Way • Rushden
NN10 6GL • Großbritannien
Tel: +44 (0) 1933 35 2000
Fax: +44 (0) 1933 31 2000
Belkin Components B.V.
Starparc Building • Boeing Avenue 333
1119 PH Schiphol-Rijk • Niederlande
Tel: +31 (0) 20 654 7300
Fax: +31 (0) 20 654 7349
OMNICUBE 2-poorts switch
met geïntegreerde kabels
Beheer twee computers met slechts één
monitor, PS/2-toetsenbord en muis
Belkin GmbH
Hanebergstrasse 2
80637 München • Deutschland
Tel.: +49 (0) 89 1434050
Fax: +49 (0) 89 143405100
Belkin-Kundendienst
USA:
Europa:
Australien:
+1 310.898.1100 Durchwahl: 2263
+1 800.223.5546 Durchwahl: 2263
00 800 223 55 460
1800 666 040
P74243
© 2003 Belkin Corporation. Alle Rechte vorbehalten.
Alle Warenzeichen sind eingetragene Warenzeichen der angegebenen Hersteller.
Installatiehandleiding
F1DK102P
P74243ea_F1DK102P_QIG.qxd
01-04-2003
16:15
Page 2
Inleiding
Dit blad bevat een eenvoudige uitleg over het installeren van de 2poorts kvm-switch met geïntegreerde kabels (de switch). Raadpleeg
a.u.b. de handleiding als het installeren problemen oplevert.
1
Het toetsenbord, de monitor en de muis
aansluiten op de consolepoorten van de switch
1. Schakel alle computers uit.
2. Sluit de PS/2-stekkers van het toetsenbord en de muis aan op de
poorten KEYBOARD (toetsenbord) en MOUSE (muis) aan de voorkant
van de switch.
3. Sluit de videokabel van uw monitor aan op de VGA-poort aan de
voorkant van de switch.
Om de switch te kunnen installeren, heeft u het volgende nodig:
• 2-poorts kvm-switch met geïntegreerde kabels
• Toetsenbord, monitor en muis
P74243ea_F1DK102P_QIG.qxd
2
01-04-2003
16:15
Page 4
De computers aansluiten op de switch
1. Gebruik de geïntegreerde kabels en sluit de VGA-kabel aan op de
VGA-poort van de eerste computer.
2. Sluit de PS/2-toetsenbordkabel van de kvm-switch aan op de
toetsenbordaansluiting van de computer.
3. Sluit de PS/2-muiskabel van de kvm-switch aan op de muispoort van
de computer.
Herhaal de stappen 1 t/m 3
voor de andere computer die u
op de switch wilt aansluiten.
3
Zet de computers aan
Zet de computers aan.
De switch is nu klaar voor gebruik.
Meer informatie vindt u in de handleiding.
P74243ea_F1DK102P_QIG.qxd
01-04-2003
16:16
Page 6
Belkin Corporation
501 West Walnut Street
Compton • CA • 90220 • USA
Tel: +1 310.898.1100
Fax: +1 310.898.1111
Belkin Components, Ltd.
Express Business Park • Shipton Way • Rushden
NN10 6GL • Verenigd Koningrijk
Tel: +44 (0) 1933 35 2000
Fax: +44 (0) 1933 31 2000
Belkin Components B.V.
Starparc Building • Boeing Avenue 333
1119 PH Schiphol-Rijk • Nederland
Tel: +31 (0) 20 654 7300
Fax: +31 (0) 20 654 7349
OMNICUBE Conmutador
de 2 puertos con
cableado incorporado
Controla dos ordenadores utilizando un monitor
de vídeo, un teclado PS/2 y un ratón
Belkin GmbH
Hanebergstrasse 2
80637 München • Duitsland
Tel.: +49 (0) 89 1434050
Fax: +49 (0) 89 143405100
Belkin Tech Support
USA:
Europe:
Australia:
+1 310.898.1100 tstl. 2263
+1 800.223.5546 tstl. 2263
00 800 223 55 460
1800 666 040
P74243
© 2003 Belkin Corporation. Alle rechten voorbehouden.
Alle handelsnamen zijn geregistreerde handelsmerken van de betreffende rechthebbenden.
Guía de Instalación Rápida
F1DK102P
P74243ea_F1DK102P_QIG.qxd
01-04-2003
16:16
Page 2
Introducción
Esta hoja le guiará a través de los pasos básicos necesarios para instalar
el conmutador KVM de 2 puertos con cableado incorporado (el
conmutador). Si tiene algún problema durante la instalación, por favor
consulte el manual de usuario.
Necesitará los siguientes elementos para instalar el conmutador:
• Conmutador KVM de 2 puertos con cableado incorporado
• Un (cada uno) teclado, monitor y ratón
1
Conectando el teclado, vídeo y ratón en los
puertos de la consola en el conmutador
1. Apague todos los ordenadores.
2. Conecte su teclado tipo PS/2 y el ratón en los puertos del TECLADO y el
RATÓN localizados en el panel frontal del conmutador.
3. Tome el cable de vídeo que tiene conectado al monitor y conéctelo al
puerto VGA del panel frontal del conmutador.
P74243ea_F1DK102P_QIG.qxd
2
01-04-2003
16:16
Page 4
Conectando los ordenadores al conmutador
1. Utilizando los cables conectados, tome el cable VGA y conéctelo al
puerto VGA del primer ordenador.
2. Conecte el cable KVM del teclado PS/2 en el puerto del teclado del
ordenador.
3. Conecte el cable KVM del ratón PS/2 en el puerto del ratón del
ordenador.
Repita los pasos 1 a 3 para el
ordenador adicional que se
conecte al conmutador.
3
Encienda sus ordenadores
Encendido de los ordenadores.
Ahora está preparado para utilizar el Conmutador.
Consulte el Manual de usuario para obtener información adicional.
P74243ea_F1DK102P_QIG.qxd
01-04-2003
16:16
Page 6
Belkin Corporation
501 West Walnut Street
Compton • CA • 90220 • EEUU
Tel: +1 310.898.1100
Fax: +1 310.898.1111
Belkin Components, Ltd.
Express Business Park • Shipton Way • Rushden
NN10 6GL • Reino Unido
Tel: +44 (0) 1933 35 2000
Fax: +44 (0) 1933 31 2000
Belkin Components B.V.
Starparc Building • Boeing Avenue 333
1119 PH Schiphol-Rijk • Holanda
Tel: +31 (0) 20 654 7300
Fax: +31 (0) 20 654 7349
Switch a 2 porte OMNICUBE
con cablaggio incorporato
Per permettere di controllare
due computer mediante un singolo
monitor, tastiera PS/2 e mouse
Belkin GmbH
Hanebergstrasse 2
80637 München • Alemania
Tel.: +49 (0) 89 1434050
Fax: +49 (0) 89 143405100
Soporte técnico de Belkin
EEUU:
Europa:
Australia:
+1 310.898.1100 ext. 2263
+1 800.223.5546 ext. 2263
00 800 223 55 460
1800 666 040
P74243
© 2003 Belkin Corporation. Todos los derechos reservados.
Todas son marcas comerciales registradas de los respectivos fabricantes listados a continuación.
Guida rapida d’installazione
F1DK102P
P74243ea_F1DK102P_QIG.qxd
01-04-2003
16:16
Page 2
Introduzione
Questo documento vi guiderà attraverso i passi di base necessari per
l’installazione dello switch KVM a due porte con cablaggio incorporato
(lo porte switch). Se si incontrassero problemi durante l’installazione, far
riferimento al Manuale dell’utente.
1
Collegamento della tastiera, del monitor video
e del mouse alle porte “console” dello switch
1. Spegnere tutti i computer.
2. Collegare la tastiera e il mouse, ambedue di tipo PS/2, alle porte
indicati rispettivamente con KEYBOARD e MOUSE e che si trovano
sul pannello frontale dello switch.
3. Collegare il cavo video che proviene dal monitor al porto VGA che si
trova sul pannello frontale dello switch.
Per l’installazione dello switch saranno necessari i seguenti
elementi:
• Switch KVM a due porte con cablaggio incorporato
• Una tastiera, un monitor e un mouse per ciascun sistema
P74243ea_F1DK102P_QIG.qxd
2
01-04-2003
16:16
Page 4
Collegamento dei computer allo switch
1. Impiegando i cavi già collegati, connettere il cavo VGA
alla porta VGA del primo computer.
2. Collegare il cavo KVM della tastiera PS/2 alla porta
della tastiera del computer.
3. Collegare il cavo KVM del mouse PS/2 alla porta del mouse del
computer.
Ripetere i passi dall’1 al 3 per
altri computer che devano
essere collegati allo switch.
3
Accendere i computer
Accendere i computer.
Lo switch è così pronto per essere utilizzato.
Far riferimento al Manuale dell’utente per ulteriori informazioni.
P74243ea_F1DK102P_QIG.qxd
01-04-2003
16:16
Page 6
Belkin Corporation
501 West Walnut Street
Compton • CA • 90220 • USA
Tel: +1 310.898.1100
Fax: +1 310.898.1111
Belkin Components, Ltd.
Express Business Park • Shipton Way • Rushden
NN10 6GL • Gran Bretagna
Tel: +44 (0) 1933 35 2000
Fax: +44 (0) 1933 31 2000
Belkin Components B.V.
Starparc Building • Boeing Avenue 333
1119 PH Schiphol-Rijk • Paesi Bassi
Tel: +31 (0) 20 654 7300
Fax: +31 (0) 20 654 7349
Belkin GmbH
Hanebergstrasse 2
80637 München • Germania
Tel.: +49 (0) 89 1434050
Fax: +49 (0) 89 143405100
Assistenza tecnica Belkin
US:
Europa:
Australia:
+1 310.898.1100 interno 2263
+1 800.223.5546 interno 2263
00 800 223 55 460
1800 666 040
P74243
© 2003 Belkin Corporation. Tutti i diritti riservati.
Tutti i nomi commerciali sono marchi registrati dei loro produttori rispettivi elencati.
P74243ea_F1DK102P_QIG.qxd
01-04-2003
16:16
Page 8
Belkin Corporation
501 West Walnut Street
Compton • CA • 90220 • USA
Tel: +1 310.898.1100
Fax: +1 310.898.1111
Belkin Components, Ltd.
Express Business Park • Shipton Way • Rushden
NN10 6GL • United Kingdom
Tel: +44 (0) 1933 35 2000
Fax: +44 (0) 1933 31 2000
Belkin Components B.V.
Starparc Building • Boeing Avenue 333
1119 PH Schiphol-Rijk • The Netherlands
Tel: +31 (0) 20 654 7300
Fax: +31 (0) 20 654 7349
Belkin GmbH
Hanebergstrasse 2
80637 München • Germany
Tel.: +49 (0) 89 1434050
Fax: +49 (0) 89 143405100
Belkin Tech Support
US:
Europe:
Australia:
+1 310.898.1100 ext. 2263
+1 800.223.5546 ext. 2263
00 800 223 55 460
1800 666 040
P74243ea
© 2003 Belkin Corporation. All rights reserved.
All trade names are registered trademarks of respective manufacturers listed.
Scaricare