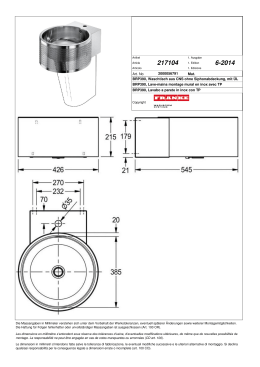
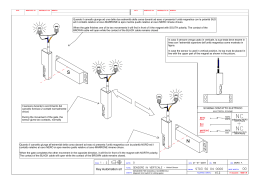
BRUCK GMBH & CO.KG
INDUSTRIESTR. 22 • 44628 HERNE
internet http://www.bruck.de
STECKERLEUCHTEN
D
UNI-LIGHTS
GB
LUMINAIRES UNI
F
121052993A
1
Ø32-34mm
STECKKONTAKT
CEILING PLUG
FUR LEICHTBAUDECKEN
ART.-NR. 156
156
156
156
000
000
000
000
al
ch
g
ws
ID-Nr. 129
129
435
129
104
111
809
128
GEBRAUCHSANLEITUNG
D
T E C H N I S C H E DAT E N
Beschreibung:
Maße:
Material:
Oberfläche:
Spannung:
Belastung:
CONTACT À FICHES
LIGHT CEILING CONSTRUCTIONS
PLAFOND À CONSTRUCTION LÉGÈRE
ART.-NR. 156
156
156
156
ART.-NR. 156
156
156
156
000
000
000
000
al
ch
g
ws
ID-Nr. 129
129
435
129
USER MANUAL
104
111
809
128
GB
TECHNICAL DATA
Steckkontakt für den Einbau
in Leichtbaudecken
zum Anschluß an 12 V
40 x 75 mm ( Ø x H )
Stahl, Kunststoff, Messing
verchromt /
vergoldet /
lackiert
12 V SELV
max. 70 W
Description:
Dimensions:
Material
Surface:
Voltage:
load:
ALLGEMEINE SICHERHEITSHINWEISE
DELIVERY SCOPE
1 Plug contact adapter, mounting materials
-
Deckenauslaß (Ø 32 - 34 mm) bohren!
Strom abschalten!
Sekundärkabel (12 V) an Klemme A anschließen.
Durch zusammendrücken der Federn B Steckkontakt in
den Deckenauslaß schieben.
- Schrauben C festziehen.
- Abdeckscheibe D aufstecken und mit
Rändelmutter E fixieren.
ANSCHLUSS DER LEUCHTE
1
2
3
MOUNTING
1
2
- Drill a hole for the ceiling cable outlet
( Ø = 32 - 34mm )
- Turn the current off!
- Connect the secondary cable (12 V) to the terminal A.
- Push the plug adapter into the ceiling cable outlet by
pressing the springs B together.
- Fasten the screws C firmly.
- Set the cover D on and fix it by means of the knurled nut E.
CONNECTING
A
F
Description:
Dimensions:
Matériaux:
Surface:
Voltage:
Wattage:
Adapteur pour contact à fiche pour
incorporer au plafond à construction
légère pour le branchement sur
le voltage de 12 V
40 x 75 mm ( Ø x Hauteur )
Acier, plastique, laiton
cromé / doré / laqué
12 V SELV
max. 70 W
B
2
1. Le montage et le raccordement du contact uni
incorporé doivent sefaire que par du personnel
spécialisé (électricien)
2. Le contact uni incorporé n’est pas approprié à
être installé dans des pièces humides
3. Attention danger d’électrocution !! Ne jamais
raccorder le contact uni incorporé directement sur le
réseau sans le transformateur !
4. Nous ne donnons aucune garantie lors de modifications
effectuées sur le matériel ou lors d’une utilisation
inadéquate
C
D
VOLUME DE LIVRAISON
1 Steckkontakt, Montagematerial
MONTAGE
MODE D´EMPLOI
104
111
809
128
CONSIGNE DE SECURITE GENERALES
1. Assembly and connection of the ceiling plugs only by
specialist personnel (electrician).
2. Ceiling plugs not suitable for installation in wet rooms.
3. Attention, electric shock hazard!!
Never connect the ceiling plug without transformer
directly to the mains voltage!!
4. No warranty claim in case of unauthorized
modifications and / or improper use!
L I E F E R U M FA N G
ID-Nr. 129
129
435
129
classe de protection:
GENERAL REMARKS ON SAFETY
1. Montage und Anschluß des Steckkontaktes nur durch
Fachpersonal (Elektriker)
2. Steckkontakt ist nicht für Feuchträume geeignet.
3. Achtung, Gefahr durch Stromschlag !! Steckkontakt
niemals ohne Trafo direkt an die Netzspannung
anschließen!
4. Kein Garantieanspruch bei eigenmächtigen
Veränderungen und oder unsachgemäßer Benutzung!
al
ch
g
ws
CARACTERISTIQUES TECHNIQUES
Plug contact adapter for incorporation
into light ceiling con
structions to be connected to 12 V
40 x 75 mm ( Ø x H )
Steel, plastic, brass
chrome - plated /
gold-plated /
laquered
12 V SELV
max.70 W
Protection class :
Schutzklasse:
000
000
000
000
3
E
1 contact à fiche, Matériel de montage
MONTAGE
1
- Perforer un orifice pour la sortie du câble au plafond
2
( Ø 32-34 mm).
- Couper le courant!
- Connecter le câble secondaire (12 V) à la borne A.
- Introduire l’adapteur pour la fiche de contact dans
la sortie de câble au plafond en pressant les ressorts B.
- Serrer bien les vis C.
- Mettre la couverture D au-dessus et la fixer à la vis moletée E.
CONEXION
3
3
BRUCK GMBH & CO.KG
INDUSTRIESTR. 22 • 44628 HERNE
internet http://www.bruck.de
LÁMPARA DE CLAVIJA
1
Ø32-34mm
A
E
C O N T A T TO A D I N N E S TO
PARA EN TECHOS DE CONSTRUCCIÓN LIGERA
PER SOFFITTI DI COSTRUZIONE LEGGERA
ART.-NR. 156
156
156
156
ART.-NR. 156
156
156
156
000
000
000
000
al
ch
g
ws
ID-Nr. 129
129
435
129
2
104
111
809
128
E
DATI TECNICI
Descripción:
Descrizione:
Adaptador para contacto de clavija
para incorporar en techos de
construcción ligera para la conexión
con un voltaje de 12 V
40 x 75 mm ( Ø x Altura )
Acero, plástico, latón
cromado / dorado / laqueado
12 V SELV
max. 70 W
D
E
ID-Nr. 129
129
435
129
104
111
809
128
I
Adattatore per contatto a spina per
incorporare in soffitti di costruzione
leggera per la connessione con il
voltaggio di 12 V
Dimensioni:
40 x 75 mm ( Ø x Altezza )
Materiale:
Acciaio, materia plastica, ottone
Superficie:
croma / indorato / laccato
Tensione:
12 V SELV
Rendimento massimo: max. 70 W
INDICACIONES GENERALES DE SEGURIDAD
AVVERTENZE GENERALI PER LA SICUREZZA
1. El montaje y la conexión del contacto de inserción
deben ser llevados a cabo solamente por personal
técnico (electricistas).
2. El contacto de inserción no es apropiado para los
locales húmedos.
3. ¡Atención peligro de electrocución!
¡El contacto de inserción no deben conectarse nunca
directamente sin transformador a la tensión de red!
4. ¡Se pierden las reivindicaciones de garantía al llevar
modificaciones a cabo por propia cuenta y / o empleo
incorrecto!
1. Il montaggio e il collegamento del contatto ad innesto
vanno effettuati esclusivamente da personale
specializzato (elettricista).
2. Il contatto ad innesto non è adatto per l’installazione
in locali umidi.
3. Attenzione, pericolo di scosse di corrente !! Non
collegare il contatto ad innesto mai direttamente alla
tensione della rete senza trasformatore!
4. Nessun diritto di garanzia in caso di modifiche apportate
di propria iniziativa e/o di utilizzo inappropriato!
VOLUME DELLA FORNITURA
VOLUMEN DE SUMINISTRO
1 contatto ad innesto, materiale di montaggio
1 conector de enchufe, material de montaje
MONTAJE
3
al
ch
g
ws
MONTAGGIO
1
1
2
- Perforare un orifizio per l’apertura d’uscita da
2
cavo sul soffitto ( Ø 32-34 mm).
- Spegnere la corrente!
- Conettere il cavo secondario (12 V) con il terminale A.
- Introdurre l’adattatore per spina di contatto nell’apertura
d’uscita da cavo sul soffitto premendo le molle B.
- Serrare bene le viti C.
- Mettere la copertura D di sopra e fissarla con la
madrevite a testa zigrinata E.
3
CONESSIONE
- Perforar un orificio para la apertura de salida de
cable en el techo ( Ø 32-34 mm).
- ¡Apagar la corriente!
- Conectar el cable secundario (12 V) con la borne A.
- Introducir el adaptador para clavija de contacto en la
apertura de salida de cable en el techo apretando los resortes B.
- Serrar bien los tornillos C.
- Poner la copertura D por encima y fijarla con la tuerca moleteada E.
CONEXIÓN
PLANUNGSHILFE
PLANNING AIDS
AIDE DE PLANIFICATION
AYUDA DE PLANIFICACIÓN
A I U TO D I P L A N I F I C A Z I O N E
Tipo di protezione:
Clase de protección:
C
000
000
000
000
ISTRUZIONI PER L´USO
D A TO S T E C N I C O S
Dimensiones:
Material:
Superficie:
Voltaje:
Carga:
I
C O N E C TO R D E E N C H U F E
INSTRUCCIONES DE EMPLEO
B
L A M P A D A A C O N N E T TO R E
3
1 cm = 1 m
Scaricare