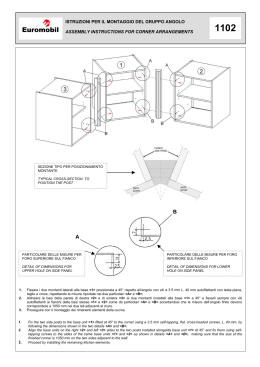
ISTRUZIONI MONTAGGIO KIT PORTATARGA HONDA CBR 1000 RR ‘08 ESTR-‐0111 IT-‐Prima di procedere alla seguente descrizione di montaggio, Evotech specifica che declina all’utente le responsabilità dovute ad un non corretto montaggio dei prodotti e al loro utilizzo improprio.E’ consigliato il montaggio del nostro kit da parte di personale specializzato. EN-‐ Before proceeding with the assembling of the product, Evotech specifies that the user is liable for any incorrect installation of the product or its improper use. We recommend the installation of the kit to qualified personnel IT-‐Attenzione: la luce targa non è compresa nel presente KIT, ma ordinabile separatamente; tuttavia viene riportata per completezza estetica. EN-‐Warning: the led light is not included in this kit but you can order separately. Product code ELT-‐001 FASI DI MONTAGGIO/ASSEMBLING PHASES: 1)IT-‐ Dopo aver smontato la sella principale e quella del passeggero, scollegare i cablaggi elettrici. EN-‐dismantle the main and the passenger’s saddle disconnecting the electric cables. IT-‐Rimuovere le 4 viti superiori di bloccaggio del codino verniciato, come rappresentato nell’immagine. EN-‐Take off the 4 screws that block the varnished tail as showed in the figure below. 2) IT-‐Sbloccare il codino dalla mostrina verniciata inferiore come indicato dalla freccia. Estrarre successivamente il codino verniciato deformando leggermente le ali laterali, fino a sfilarlo completamente dal telaio posteriore.EN-‐ Unlock the tail as indicated by the arrow. Remove the varnished tail deforming the lateral wings till you are able to completely dismantle it from the rear frame. 3) -‐ITAllentare le viti di fissaggio del dispositivo apertura sella e rimuoverlo. EN-‐ Loosen the fixing screws of the saddle’s opening system and remove it. 4) IT-‐Allentare le due viti autofilettanti come indicato in figura. Allentare di seguito le 4 viti testa a brugola di fissaggio del portatarga di serie.EN-‐Loosen the two self-‐tapping screws as indicated in the figure. Than loosen the 4 Allen screws that fix the original tail tidy. 5) IT-‐Rimuovere il portatarga di serie. EN-‐ Remove the original tail tidy 6) IT-‐ Recuperare le due boccole elastiche come indicato in figura e reinnestarle nella particolare termoformato presente nel kit. EN-‐ Use the two elastic spacers as indicated in the figure below and put them in the thermoformed under tail. 7) IT-‐Montare il particolare termoformato sul telaietto posteriore, avendo cura di innestare la linguetta inferiore nella fessura apposita. Avvitare le due viti autofilettanti nella mostrina inferiore verniciata.EN-‐ Assemble the thermoformed under tail on the rear frame and be care to put the particular indicated by the arrow in the right space. Screw up the two self-‐tapping screws in the lower varnished part. 8) IT-‐Recuperare dal portatarga di serie le 4 boccole metalliche inserite nella plastica come da figura. Successivamente montarle sul particolare Evotech interponendo il distanziale in alluminio cod. STR-‐K6D tra boccola e plastica. EN-‐ Use the original spacers of the original tail tidy. Fix them on the evotech product interposing the alu spacer. STR-‐K6D between the spacer and the plastic. 9) IT-‐Utilizzando le 4 viti di serie, vincolare il particolare termoformato Evotech al telaietto posteriore. Innestare il fanale di serie nell’apposito vano, facendo passare i cavi elettrici all’interno della struttura termoformata. EN-‐Use the 4 original screws to fix the Evotech thermoformed under tail to the rear sub frame. 10) IT-‐Rimontare il dispositivo apertura sella e procedere al montaggio del codino verniciato. EN-‐ Fix the saddle’s opening system and assemble the varnished tail Warning! As stated by the workshop manual is necessary to force the plastic tail in order to allow the assembly. Evotech denies any liability concerning a possible break of the tail, for this reason we suggest to consult the Honda mechanic IT-‐ Concludere il montaggio chiudendo gli incastri del codino con la mostrina. EN-‐ complete the assembly closing the joints of the tail. 11) IT-‐ Vincolare il codino verniciato con il portatarga e telaietto attraverso le 4 viti di serie. EN-‐ Fix the varnished tail to the tail tidy through the 4 original screws. 12) IT-‐Utilizzando la minuteria indicata nella vista esplosa in coda, montare il supporto targa alla staffa in alluminio ossidata nera. Montare il sottoassieme sulla moto, facendo passare i vari cavi di alimentazione di dispositivi di illuminazione (luce targa o frecce) eventualmente presenti. EN-‐ Using the bolts and nuts you see in the exploded view, assemble the plate’s support to the aluminium bracket. After that, fix the whole to the bike’s tail, passing the electric cables (led light and turn signals) through the bracket. 13) IT-‐ Vincolare il supporto targa al codino attraverso i 4 bulloni inox M6 forniti nel kit. EN-‐ Fix the plate’s support to the tail through the 4 M6 stainless steel bolts you find in the kit IT-‐ Regolare l’inclinazione della tabella di fissaggio targa a 30° rispetto alla verticale strada e procedere al fissaggio attraverso i bulloni M8 in inox. EN-‐ Adjust the plate’s inclination 30° respect to the road and then go on with the assembly through the M8 bolts. 14) IT-‐ Montare i dispositivi di supporto degli indicatori di direzione, attraverso i bulloni M3 inox forniti. Installare e collegare gli indicatori di direzione seguendo il relativo manuale di istruzioni. EN-‐ Assemble the supports for the indicators lights through M3 screws. Mount and connect the turn signals according to the instructions manual. N.B. Le coppie di serraggio sono tipiche della classi di viteria tradizionale. N.B. the tightening torque value is the standard value of the traditional fasteners
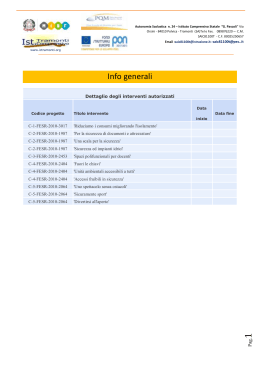
Scaricare