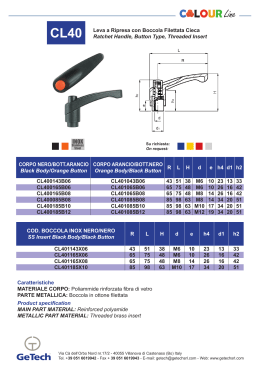
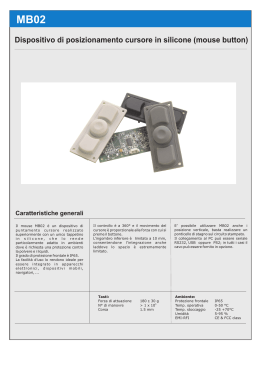
RA643
Ricevente Universale
Multifrequenza 1 canale
RA643
Ricevente universale compatta
1 uscita optoisolata
sulle frequenze 433, 868, 315, 288,
300, 303, 306, 310, 318, 330, 390,
403, 418 MHz
Frequenza ricezione
(solo per
radiocomandi
quarzati o SAW)
Numero codici
memorizzabili
Sensibilità:
Larghezza di banda:
433.92, 868.3, 315,
288, 300, 303, 306,
310, 318, 330, 390,
403.55,418 MHz
Fino a 60, dipende
dalla lunghezza codice
-102dBm
500KHz@288-390MHz
250KHz altrove
Alimentazione
7÷30Vdc o 5÷24Vac
Corrente assorbita 4÷20mA in stand-by,
26÷42mA uscita ON
Massima corrente e Max 30mA, max
tensione uscita
40Vdc
www.my-tek.it
Made in EU
Fig. 1: Schema applicativo
Scheda controllo
motore o qualsiasi
altro dispositivo con
ingresso comando in
bassa tensione
7÷30Vdc
o
5÷24Vac
Contatto in
Bassa
tensione
Antenna
supply
switch+
switchPer valutare le condizioni del contatto, verificare
con un tester che la tensione sia compresa da
2÷40Vdc e la corrente da 0 a 15mA.
Verificare inoltre la polarità.
Lungh. antenna: 17cm per 433, 8cm 868 MHz.
RA643
Ricevente Universale
Multifrequenza 1 canale
RA643
Ricevente universale compatta
1 uscita optoisolata
sulle frequenze 433, 868, 315, 288,
300, 303, 306, 310, 318, 330, 390,
403, 418 MHz
Frequenza ricezione
(solo per
radiocomandi
quarzati o SAW)
Numero codici
memorizzabili
Sensibilità:
Larghezza di banda:
433.92, 868.3, 315,
288, 300, 303, 306,
310, 318, 330, 390,
403.55,418 MHz
Fino a 60, dipende
dalla lunghezza codice
-102dBm
500KHz@288-390MHz
250KHz altrove
Alimentazione
7÷30Vdc o 5÷24Vac
Corrente assorbita 4÷20mA in stand-by,
26÷42mA uscita ON
Massima corrente e Max 30mA, max
tensione uscita
40Vdc
www.my-tek.it
Made in EU
Fig. 1: Schema applicativo
Scheda controllo
motore o qualsiasi
altro dispositivo con
ingresso comando in
bassa tensione
7÷30Vdc
o
5÷24Vac
Antenna
supply
switch+
switchPer valutare le condizioni del contatto, verificare
con un tester che la tensione sia compresa da
2÷40Vdc e la corrente da 0 a 15mA.
Verificare inoltre la polarità.
Lungh. antenna: 17cm per 433, 8cm 868 MHz.
Contatto in
Bassa
tensione
ENGLISH
Introduction: this device, very compact and easy to be installed, has an optoinsulated output which permits to control any electronic board with a low-voltage
input by almost any remote control in the market transmitting in the range 288÷868
MHz with OOK modulation and good frequency stability (using crystal or SAW
resonators). It implements a power saving system that enables the receiver only for a
short period, in order to reduce the current consumption and the power dissipated.
Installation: this device has 5 wires, one of which is used as antenna and should not
be connected anywhere. Two wires, marked as Supply, should be connected to the
power supply 7÷30Vdc or 5÷24Vac. Two wires, marked as Switch+ and Switch-,
should be connected to the input (now called start button) of the existing electronic
board , as shown in Fig. 1.
1. Check the voltage on the start button: it should be in the range 2÷40Vdc. Mark the
positive pole. Do not use this receiver if start button is supplied by alternating
current!
2. Measure the current through the start button: it should be less than 15mAdc.
3. Connect the wires marked as Supply to the power supply: don't care about polarity.
4. Connect the wire Switch+ to the positive pole of the start button and the wire
Switch- to the negative pole of the start button.
5. Configure the device (frequency, output type, power saving) if needed.
6. Learn one or more remote controls, following the instructions below.
Configuration: this device is supplied pre-configured to receive at 433.92 MHz and
to activate the output for 500ms. To modify this configuration, press quickly button
Prog a number of times corresponding to the parameter to modify: LED will flash to
notify the current value of that parameter. Then, press again button Prog for the
number of times corresponding to the desired value, as specified in the table. If
programming fails, a long flash will be emitted.
Learning remote controls: press the Prog button twice to enable learning mode:
then press a button on the remote control within 10s to learn it. Every time a new
code is learned, the 10s timeout is reload. Led flashes twice if the code is learned, 3
times if was already learned, 6 times if memory is full.
Removing remote controls: press the Prog button 3 times, then press button on
remote controls in the same way as learning procedure. Led flashes 4 times for any
removed code. To blank the whole memory, press the Prog button 10 times, wait for
Led flashing, the press Prog button 3 times.
Learning master remote controls: press the Prog button 4 times, then press button
on remote control: this remote controls will not activate the output, but can be used to
enable learning procedure without the need to access the receiver and press Prog
button. To learn new remote controls in this way, put the master remote control in
trasmission for 1-2 seconds, then start to transmit for 1-2 seconds from the new
remote controls: every time a new remote control is learned, the 10s timer is reload to
permit successive learnings.
Security and safety: do not use with systems that require a high level of anti-theft
security. Installation should be done by a qualified technician, in a well insulated
enclosure, protected by dust, high humidity, steam and contact with other circuits and
metallic parts. All responsibility, for any damage caused by not complying with the
instructions in this manual, is declined.
Warranty: the warranty complies with statutory requirements, and cover only
defects, within the product itself, in material and manufacture. Your local stockist
should be contacted in connection with any warranty-related matters. Your warranty
entitlements only apply to the country in which the device was purchased.
Parametreo
Value
2=433.92, 3=868.3, 4=315, 5=288, 6=300, 7=303, 8=306, 9=310,
5=frequenza
10=318, 11=330, 12=390, 13=403.55, 14=418
1=monostabile, 2=bistable, 3=timer 250ms, 4=timer 500ms,
6=tipo uscita
5=timer 1s, 6=timer 15s, 7=timer 30s, 8=timer 1m,
9=timer 2m, 10=timer 5m, 11=timer 10m, 12=timer 15m.
1=20mA, 2=8mA, 3=5mA, 4=4mA corrente in stand-by.
8=power saving
Nota: 1 non raccomandato se alimentato a > 25Vdc o >18Vac
2,87 cm
Antenna
+ Alimentaz.
- 10 : 35Vdc
2,87 cm
RA626
Diodo
1N4007
Bobina
Contatto
relé
Relè
Attenzione: il relé deve potersi eccitare con
una tensione di lavoro pari a quella di
alimentazione della ricevente.
Inoltre, la corrente massima assorbita dalla
bobina non deve superare i 20mA.
NB: il diodo è assolutamente necessario per evitare
extratensioni dannose per la ricevente.
Fig. 2: Connessione RA643 tramite relè
Prodotti correlati
RA640 permette di automatizzare l'apertura di qualsiasi
elettroserratura. Le dimensioni compatte (29x29x10mm) è la
facilità di installazionie (solo 2 fili da collegare in parallelo al
pulsante esistente).
RA626 Full: Radiocomando
duplicatore
multifrequenza
capace di apprende codici che
operano nel range di frequenza
da
286
a
868
MHz.
L'apprendimento avviene in
modo totalmente automatico
senza richiedere frequenzimetri
e altri strumenti. Il LED Bicolore
ne semplifica il funzionamento.
RA616 Quattro: Radiocomando
duplicatore
433,92MHz
ad alta
portata
ITALIANO
Introduzione: questo dispositivo, molto compatto e facile da installare, ha un'uscita
opto-isolata che permette di controllare ogni scheda elettronica con ingresso a bassa
tensione attraverso quasi ogni tipo di radiocomando nel mercato che trasmetta in
OOK nelle frequenze fra 288 e 868 MHz e che sia stabile in frequenza (utilizzi quarzi
o risuonatori SAW).
Implementa un sistema di risparmio energetico che abilita il ricevitore per un breve
tempo, al fine di ridurre la corrente assorbita e la potenza dissipata.
Installazione: il ricevitore ha 5 fili, di cui uno usato come antenna che deve rimanere
scollegato. Due fili, marcati come Supply, devono essere collegati all'alimentazione
7÷30Vdc o 5÷24Vac. Due fili, marcati come Switch+ e Switch-, vanno collegati
all'ingresso (di seguito chiamato start button) della scheda elettronica da controllare,
come schematizzato in Fig. 1.
1. Controllare che la tensione sullo start button si compreso fra 2 e 40Vdc: marcare
il polo positivo. Non utilizzare questo ricevitore se start button è alimentato in
corrente alternata!
2. Misurare la corrente cortocircuitando con il tester lo start button: deve essere
inferiore a 15mAdc.
3. Collegare i fili Supply all'alimentazione: la polarità è indifferente.
4. Collegare il filo Switch+ al positivo dello start button, il filo Switch- al negativo.
5. Configurare il ricevitore (frequenza, tipo di uscita, risparmio energetico), se
necessario.
6. Acquisire uno o più radiocomandi, seguendo le istruzioni sottoriportate.
Configurazione: il ricevitore viene venduto configurato per ricevere a 433.92 MHz e
per attivare l'uscita per 500ms. Per modificare questa configurazione premere
velocemente il tasto Prog per un numero di volte corrispondente al parametro da
modificare: il Led emetterà un numero di lampeggi corrispondente al valore del
parametro. Quindi premere ancora il tasto Prog per un numero di volte
corrispondente al valore desiderato, come specificato nella tabella. In caso di errori
viene emesso un lampeggio lungo.
Acquisizione radiocomandi: premere 2 volte il tasto Prog per abilitare l'acquisizione
di nuovi codici: trasmettere da un radiocomando entro 10s. Ad ogni memorizzazione,
il timeout di 10s viene ricaricato. Il Led emette 2 lampeggi ad ogni nuova
memorizzazione, 3 per codici già memorizzati, 6 nel caso in cui la memoria sia piena.
Rimozione radiocomandi: premere il tasto Prog per 3 volte, quindi seguire la
procedura precedente: il Led lampeggia 4 volte ad ogni codice rimosso. Per
cancellare tutta la memoria, premere Prog 10 volte, attendere che il Led lampeggi 10
volte, e premere 3 volte il tasto Prog.
Acquisire radiocomandi master: premere 4 volte Prog, quindi premere il pulsante
sul radiocomando: in questo modo il radiocomando non attiverà l'uscita ma potrà
essere impiegato per far partire la procedura di acquisizione radiocomandi senza
dover accedere alla ricevente. In questo modo, in futuro, sarà possibile premere il
tasto sul radiocomando master per 1-2 secondi, quindi entro 10s premere il tasto sui
nuovi radiocomandi da acquisire
Sicurezza: non usare in sistemi che richiedono un'alto livello di sicurezza antifurto.
L'installazione va eseguita da un tecnico qualificato, in una scatola chiusa e protetta
da polvere, umidità, vapore e contatto con altre parti metalliche. Si declina ogni
responsabilità per danni dovuti all'uso non conforme con queste istruzioni.
Garanzia: conforme con le normative di legge, e copre solo i difetti di fabbricazione.
Scaricare