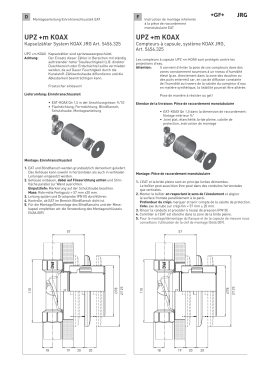
D
F
Montageanleitung
Befestigung hinten
Bei dieser Montageart wird
das UP-Ventil über die
Befestigungspunkte der
Armatur gehalten.
(Schallschutz beachten)
Instruction de
montage
Fixation à l‘arrière
Pour ce type de montage, le
robinet d‘arrêt à encastrer est
fixé à la robinetterie à l‘aide
des points de fixation. (Faire
attention à l’isolation phonique)
Schutzrohr bei 30 mm von der
fertigen Wand ablängen.
Couper la gaine de protection
à 30 mm depuis la paroi
terminée.
Den roten oder blauen MediumKennring auf den Abschlussflansch stecken und über das
Schutzrohr führen. Anschlussmutter auf das Rohrende aufsetzen und zwei Umdrehungen
von Hand aufschrauben.
Anschliessend die Mutter mit
einem Schraubenschlüssel soweit aufdrehen, bis die Dichtung
am Abschlussflansch gleichmässig an der Wand aufliegt.
Emboîter l‘anneau central de repérage rouge ou bleu sur la bride
terminale et le diriger sur la
gaine de protection. Poser l‘écrou
de raccordement sur l‘extrémité
du tube et visser directement à la
main à l‘aide de deux tours.
Ensuite visser l‘écrou à l‘aide
d‘une clé à écrou universelle
jusqu‘à ce que le joint repose de
manière régulière.
Kontrolle: Richtig angezogen
ist, wenn zwischen Fliesen
und Ring einen Spalt von
ca. 0,5 mm sichtbar ist.
Contrôle: vissage correct
lorsqu‘une fente d‘env. 0,5 mm
est visible entre le carrelage et
l‘anneau.
Das Schutzrohr an Vorderkante
der Anschlussmutter bündig
ablängen.
Couper la gaine de protection
à fleur de l‘arête avant de
l‘écrou.
Die sechskant Ventilstangenverlängerung in das Schutzrohr einführen und bis zum
Anschlag über den Sechskant
der Ventilstange stecken.
Die Vorderkante der Überwurfmutter bündig anzeichnen,
rechtwinklig ablängen und
entgraten.
Introduire la prolonge
d‘entraînement directement
dans la gaine de protection
et l‘insérer sur l‘hexagone du
chapeau du robinet jusqu‘en
butée.
Marquer l‘arête avant de
l‘écrou de serrage, scier à
angle droit et ébarber.
Die gekürzte VentilstangenVerlängerung in den Sechskant der Handradrosette
stecken, in das Schutzrohr
einführen und über den
Sechskant der Ventilstange
stecken. Die Rosette auf den
Abschlussflansch einklinken.
Emboîter la prolonge de la tige
du robinet raccourcie dans
l‘hexagone de la rosace du
volant. Introduire la rosace avec
la prolonge d‘entraînement dans
la gaine de protection et l‘insérer sur l‘hexagone de la tige du
robinet. Clipser la rosace sur la
bride terminale.
Georg Fischer JRG AG, Hauptstrasse 130, CH-4450 Sissach, Phone +41 (0)61 975 22 22, Fax +41 (0)61 975 22 00, www.jrg.ch, [email protected]
Georg Fischer JRG SA, Via Boscioro 20, CH-6962 Viganello/Lugano, Phone +41 (0)91 972 26 26, Fax +41 (0)91 972 26 27, www.jrg.ch, [email protected]
Georg Fischer GmbH, Nördl. Grünauerstr. 65, D-86633 Neuburg/Do., Phone +49 (0)8431 5817-0, Fax +49 (0)8431 5817-20, www.jrg.de, [email protected]
E
Istruzioni di
montaggio
Fissaggio posteriore
Installation
Mounting from
behind
Con questo tipo di montaggio,
la valvola incassata viene fissata
sul raccordo tramite i punti di
fissaggio.
(Considerare l’isolamento acustico)
With this mounting method the
UP valve is fixed to the fitting
via mounting points.
(Consider noise insulation)
Tagliare il tubo di protezione
a 30 mm dal muro finito.
Cut the sheath tube to 30 mm
length from the wall.
Inserire l’anello d’identificazione del fluido rosso o blu
sulla flangia cieca ed infilarlo
nel tubo di protezione. Inserire
il dado di raccordo all’estremità
del tubo ed avvitare manualmente di due giri.
Infine, avvitare il dado con chiave per viti finché la guarnizione
poggi uniformemente.
Attach the red or the blue ring
(utility markers) to the blind
flange and mount it to the sheath
tube. Put the coupling nut on the
tube end and screw it two turns
by hand.
Then tighten the nut using a
wrench until the sealing lies flat
and seals smoothly.
Controllo: Il serraggio è corretto quando tra le piastrelle e
l’anello è visibile una fessura di
circa 0,5 mm.
Check: Properly tightened if a
gap of about 0.5 mm is visible
between the ring and the tiles.
Tagliare a filo il tubo di protezione spigolo anteriore dado.
Trim the sheath tube to be
flush with the leading edge of
the nut.
Inserire il dado esagonale prolunga stelo valvola dritto nel
tubo di protezione e ripiegare
fino alla battuta tramite il dado
esagonale della parte superiore della valvola.
Contrassegnare a filo lo
spigolo anteriore del dado per
raccordi, tagliare perpendicolarmente e sbavare.
Insert the hexagonal valve
rod extension into the sheath
tube all the way to the stop.
Mark the extension to be flush
with the leading edge of the
coupling nut, trim it at right
angles, and bur it.
Inserire la prolunga dello stelo
della valvola accorciata nel dado esagonale della rondella del
volantino. Inserire la rondella
con la prolunga di azionamento
nel tubo di protezione e ripiegare tramite il dado esagonale
della parte superiore della valvola. Fissare la rondella alla
flangia cieca.
Insert the trimmed valve rod
extension into the hexagon
of the handle rosette. Insert
the rosette together with the
actuator extension into the
sheath tube and put it over the
hexagon of the top section of
the valve until it clips on the
blind flange.
Georg Fischer JRG AG, Hauptstrasse 130, CH-4450 Sissach, Phone +41 (0)61 975 22 22, Fax +41 (0)61 975 22 00, www.jrg.ch, [email protected]
Georg Fischer JRG SA, Via Boscioro 20, CH-6962 Viganello/Lugano, Phone +41 (0)91 972 26 26, Fax +41 (0)91 972 26 27, www.jrg.ch, [email protected]
Georg Fischer GmbH, Nördl. Grünauerstr. 65, D-86633 Neuburg/Do., Phone +49 (0)8431 5817-0, Fax +49 (0)8431 5817-20, www.jrg.de, [email protected]
JRG Ident-Nr. 10 620 92 / 5.10 / 25 / P&K / SMS
I
D
F
Montageanleitung
Befestigung vorne
Bei dieser Montageart wird
das UP-Ventil über die patentierte Klemmhalterung
gehalten.
Instruction de
montage
Fixation à l‘avant
Pour ce type de montage, le
robinet d‘arrêt à encastrer est
fixé sur le support de serrage.
Das bauseitig gelieferte
Befestigungsblech von min.
2 – max. 3 mm dicke muss mit
einer Bohrung von ∅ 38,0 mm
versehen sein.
La tôle de fixation d‘une épaisseur minimale de 2 – maximale de 3 mm livrée sur le
chantier doit être pourvue d‘un
percement de ∅ 38,0 mm.
Geschlitzter vormontierter
Klemmring zusammendrücken, mit dem Kragen in
die Bohrung einführen und
einklipsen.
Compresser la bague de serrage entaillée et pré-montée,
l‘introduire et la clipser dans
le percement avec le col vers
l‘arrière.
UP-Ventil von der Rückseite
durch die Klemmhalterung
einführen. Auf das gewünschte
Mass ausrichten und die drei
Blechschrauben gleichmässig
bis zum Anschlag anziehen.
(Schraubendreher Torx 15)
Introduire le robinet d‘arrêt à
encastrer depuis l‘arrière dans
la support de serrage. Ajuster
à la cote désirée et visser régulièrement les trois vis de la
tôle jusqu‘en butée (tournevis
Torx 15).
Georg Fischer JRG AG, Hauptstrasse 130, CH-4450 Sissach, Phone +41 (0)61 975 22 22, Fax +41 (0)61 975 22 00, www.jrg.ch, [email protected]
Georg Fischer JRG SA, Via Boscioro 20, CH-6962 Viganello/Lugano, Phone +41 (0)91 972 26 26, Fax +41 (0)91 972 26 27, www.jrg.ch, [email protected]
Georg Fischer JRG GmbH, Nördl. Grünauerstr. 65, D-86633 Neuburg/Do., Phone +49 (0)8431 5817-0, Fax +49 (0)8431 5817-20, www.jrg.de, [email protected]
Georg Fischer JRG GmbH, Stadlauer Strasse 39A, A-1220 Wien, Phone +43 (0)1 310 39 98-0, Fax +43 (0)1 310 39 98-75, www.jrg.at, [email protected]
E
Istruzioni di
montaggio
Fissaggio anteriore
Con questo tipo di montaggio,
la valvola incassata viene
fissata tramite il fermo.
Installation
Front mounting
With this mounting method
the UP valve is fixed using a
clamp.
La lamiera di fissaggio fornita
in situ di minimo 2 mm e
massimo 3 mm di spessore
deve essere dotata di un foro
di diametro di 38,0 mm.
The mounting panel provided
by the client with a thickness
of minimum 2 – maximum
3 mm must come with a
borehole of 38 mm diameter.
Comprimere assieme l’anello
di fissaggio fessurato premontato. Inserirlo nel foro con il
collarino rivolto all’indietro e
fissarlo.
Squeeze the slotted pre-assembled clamping ring; insert
it with the collar first through
the borehole until it clips on
the mounting panel.
Inserire la valvola incassata
dalla parte posteriore tramite
il fermo. Allineare alla dimensione desiderata e serrare le
tre viti della lamiera uniformemente fino alla battuta
(cacciavite Torx 15).
Insert the UP valve through
the clamp from the back.
Adjust it according to the
desired length and screw in
the three sheet-metal screws
fully (screwdriver torx 15).
Georg Fischer JRG AG, Hauptstrasse 130, CH-4450 Sissach, Phone +41 (0)61 975 22 22, Fax +41 (0)61 975 22 00, www.jrg.ch, [email protected]
Georg Fischer JRG SA, Via Boscioro 20, CH-6962 Viganello/Lugano, Phone +41 (0)91 972 26 26, Fax +41 (0)91 972 26 27, www.jrg.ch, [email protected]
Georg Fischer JRG GmbH, Nördl. Grünauerstr. 65, D-86633 Neuburg/Do., Phone +49 (0)8431 5817-0, Fax +49 (0)8431 5817-20, www.jrg.de, [email protected]
Georg Fischer JRG GmbH, Stadlauer Strasse 39A, A-1220 Wien, Phone +43 (0)1 310 39 98-0, Fax +43 (0)1 310 39 98-75, www.jrg.at, [email protected]
JRG Ident-Nr. 10 620 96 / 10.09 / 5.7 / P&K / SMS
I
Scaricare