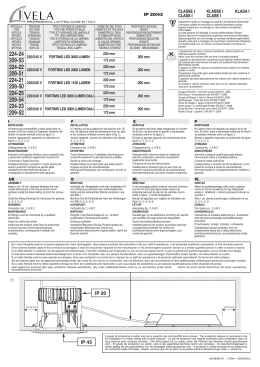
de Gebrauchsanleitung
en Instruction for Use
fr Mode d’emploi
it
Istruzioni per I´uso
nl Gebruiksaanwijzing
KF..W..
Einbaugerät
Built-in appliance
Appareil encastrable
Apparecchio da incasso
Inbouwapparaat
de Inhaltsverzeichnis
Sicherheits- und Warnhinweise ............
Hinweise zur Entsorgung .......................
Lieferumfang ............................................
Raumtemperatur, Belüftung und
Nischentiefe .............................................
Aufstellort ..................................................
Gerät anschließen ...................................
Gerät kennenlernen ................................
Gerät einschalten ....................................
Temperatur einstellen .............................
4
6
6
7
7
8
8
9
9
Touch-Light .............................................. 9
Nutzinhalt ............................................... 10
Beim Einordnen beachten ................. 10
Trinktemperaturen ............................... 10
Gerät ausschalten und stilllegen ...... 11
Gerät reinigen ....................................... 11
Energie sparen ..................................... 12
Betriebsgeräusche .............................. 12
Kleine Störungen selbst beheben .... 13
Kundendienst ........................................ 14
en Table of Contents
Safety and warning information .........
Information concerning disposal .......
Scope of delivery .................................
Room temperature, ventilation and
cavity depth ...........................................
Installation location ..............................
Connecting the appliance ..................
Getting to know your appliance ........
Switching on the appliance ................
Setting the temperature ......................
Touch Light ...........................................
fr
15
16
17
17
18
18
19
19
19
20
Usable capacity ...................................
Note when loading products .............
Drinking temperatures ........................
Switching off and disconnecting
the appliance ........................................
Cleaning the appliance .......................
Tips for saving energy ........................
Operating noises .................................
Eliminating minor faults yourself .......
Customer service .................................
20
20
20
21
21
22
22
23
24
Table des matières
Consignes de sécurité
et avertissements .................................
Conseil pour la mise au rebut ...........
Étendue des fournitures .....................
Température ambiante, aération
et profondeur de niche .......................
Lieu d'installation ..................................
Branchement de l’appareil .................
Présentation de l’appareil ...................
Enclenchement de l’appareil .............
Réglage de la température ................
25
27
27
28
28
28
29
30
30
Touch-Light ...........................................
Contenance utile ..................................
Attention lors de rangement ..............
Températures de dégustation ...........
Arrêt et remisage de l'appareil ..........
Nettoyage de l’appareil ......................
Economies d’énergie ..........................
Bruits de fonctionnement ...................
Remédier soi même aux petites
pannes ...................................................
Service après-vente .............................
30
31
31
31
32
32
33
33
34
36
it
Indice
Avvertenze di sicurezza e potenziale
pericolo ..................................................
Avvertenze per lo smaltimento ..........
Dotazione ...............................................
Temperatura ambiente, ventilazione
e profondità della nicchia ...................
Luogo d'installazione ...........................
Collegare l’apparecchio .....................
Conoscere l’apparecchio ...................
Accendere l’apparecchio ...................
Regolare la temperatura .....................
nl
37
39
39
40
40
40
41
42
42
Touch-Light ...........................................
Capacità utile totale ............................
Tenere presente nella sistemazione
Temperature di consumazione .........
Spegnere e mettere fuori
servizio l'apparecchio .........................
Pulizia dell’apparecchio ......................
Risparmiare energia ............................
Rumori di funzionamento ...................
Eliminare piccoli guasti .......................
Servizio Assistenza Clienti .................
42
43
43
43
Touch-Light ...........................................
Netto-inhoud .........................................
Attentie bij het inruimen ......................
Drinktemperaturen ...............................
Apparaat uitschakelen en buiten
werking stellen .....................................
Schoonmaken van het apparaat ......
Energie besparen ................................
Bedrijfsgeluiden ...................................
Kleine storingen zelf verhelpen .........
Servicedienst ........................................
54
55
55
55
44
44
45
45
46
48
Inhoud
Veiligheidsbepalingen
en waarschuwingen .............................
Aanwijzingen over de afvoer ..............
Omvang van de levering ....................
Kamertemperatuur, ventilatie
en nisdiepte ..........................................
De juiste plaats .....................................
Apparaat aansluiten ............................
Kennismaking met het apparaat .......
Inschakelen van het apparaat ...........
Instellen van de temperatuur .............
49
51
51
52
52
52
53
54
54
56
56
57
57
58
60
de
deInhaltsverzeichnisdeGebrauchaslnetui ng
Sicherheitsund Warnhinweise
Bevor Sie das Gerät in Betrieb
nehmen
Lesen Sie Gebrauchs- und
Montageanleitung aufmerksam durch!
Sie enthalten wichtige Informationen
über Aufstellen, Gebrauch und Wartung
des Gerätes.
Der Hersteller haftet nicht, wenn Sie
die Hinweise und Warnungen der
Gebrauchsanleitung missachten.
Bewahren Sie alle Unterlagen für
späteren Gebrauch oder für
Nachbesitzer auf.
Technische Sicherheit
Das Gerät enthält in geringer Menge das
umweltfreundliche aber brennbare
Kältemittel R600a. Achten Sie darauf,
dass die Rohre des KältemittelKreislaufes bei Transport oder Montage
nicht beschädigt werden.
Herausspritzendes Kältemittel kann
zu Augenverletzungen führen oder sich
entzünden.
Bei Beschädigung
■ offenes Feuer oder Zündquellen vom
Gerät fernhalten,
■ Raum für einige Minuten gut
durchlüften,
■
Gerät ausschalten und Netzstecker
ziehen,
■
Kundendienst benachrichtigen.
4
Je mehr Kältemittel in einem Gerät ist,
umso größer muss der Raum sein,
in dem das Gerät steht. In zu kleinen
Räumen kann bei einem Leck ein
brennbares Gas-Luft-Gemisch
entstehen.
Pro 8 g Kältemittel muss der Raum
mindestens 1 m³ groß sein. Die Menge
des Kältemittels Ihres Gerätes steht auf
dem Typenschild im Inneren des
Gerätes.
Wenn die Netzanschlussleitung dieses
Gerätes beschädigt wird, muss sie durch
den Hersteller, Kundendienst oder eine
ähnlich qualifizierte Person ersetzt
werden. Unsachgemäße Installationen
und Reparaturen können den Benutzer
erheblich gefährden.
Reparaturen dürfen nur durch den
Hersteller, Kundendienst oder eine
ähnlich qualifizierte Person durchgeführt
werden.
Es dürfen nur Originalteile des
Herstellers benutzt werden. Nur bei
diesen Teilen gewährleistet der
Hersteller, dass sie die
Sicherheitsanforderungen erfüllen.
Eine Verlängerung der
Netzanschlussleitung darf nur über den
Kundendienst bezogen werden.
de
Beim Gebrauch
■
■
■
■
■
■
■
■
■
Nie elektrische Geräte innerhalb des
Gerätes verwenden (z. B. Heizgeräte,
elektrische Eisbereiter usw.).
Explosionsgefahr!
Nie das Gerät mit einem
Dampfreinigungsgerät abtauen oder
reinigen! Der Dampf kann an
elektrische Teile gelangen und einen
Kurzschluss auslösen.
Stromschlaggefahr!
Keine spitzen oder scharfkantigen
Gegenstände verwenden, um Reifund Eisschichten zu entfernen. Sie
könnten damit die Kältemittel-Rohre
beschädigen. Herausspritzendes
Kältemittel kann sich entzünden oder
zu Augenverletzungen führen.
Keine Produkte mit brennbaren
Treibgasen (z. B. Spraydosen) und
keine explosiven Stoffe lagern.
Explosionsgefahr!
Sockel, Auszüge, Türen usw. nicht als
Trittbrett oder zum Abstützen
missbrauchen.
Zum Abtauen und Reinigen
Netzstecker ziehen oder Sicherung
ausschalten. Am Netzstecker ziehen,
nicht am Anschlusskabel.
Hochprozentigen Alkohol nur dicht
verschlossen und stehend lagern.
Kunststoffteile und Türdichtung nicht
mit Öl oder Fett verschmutzen.
Kunststoffteile und Türdichtung
werden sonst porös.
Be- und Entlüftungsöffnungen für das
Gerät nie abdecken oder zustellen.
■
Dieses Gerät ist von Personen
(einschließlich Kindern)
mit eingeschränkten physischen,
sensorischen oder psychischen
Fähigkeiten oder mangelndem Wissen
nur zu benutzen, wenn sie durch eine
für ihre Sicherheit zuständige Person
beaufsichtigt werden oder von dieser
Anweisungen erhalten haben, wie das
Gerät zu benutzen ist.
Kinder im Haushalt
■
Verpackung und deren Teile nicht
Kindern überlassen.
Erstickungsgefahr durch Faltkartons
und Folien!
■
Das Gerät ist kein Spielzeug
für Kinder!
Bei Gerät mit Türschloss:
Schlüssel außer Reichweite
von Kindern aufbewahren!
■
Allgemeine Bestimmungen
Dieses Gerät ist auschließlich zur
Lagerung von Wein bestimmt.
Dieses Gerät ist für den häuslichen
Gebrauch im Privathaushalt und das
häusliche Umfeld bestimmt.
Das Gerät ist funkentstört nach
EU-Richtlinie 2004/108/EC.
Der Kältekreislauf ist auf Dichtheit
geprüft.
Dieses Erzeugnis entspricht den
einschlägigen Sicherheitsbestimmungen
für Elektrogeräte (EN 60335-2-24).
5
de
* Verpackung entsorgen
3. Ablagen und Behälter nicht
herausnehmen, um Kindern
das Hineinklettern zu erschweren!
4. Kinder nicht mit dem ausgedienten
Gerät spielen lassen.
Erstickungsgefahr!
Die Verpackung schützt Ihr Gerät vor
Transportschäden. Alle eingesetzten
Materialien sind umweltverträglich und
wieder verwertbar. Bitte helfen Sie mit:
Entsorgen Sie die Verpackung
umweltgerecht.
Kältegeräte enthalten Kältemittel und in
der Isolierung Gase. Kältemittel und
Gase müssen fachgerecht entsorgt
werden. Rohre des KältemittelKreislaufes bis zur fachgerechten
Entsorgung nicht beschädigen.
Über aktuelle Entsorgungswege
informieren Sie sich bitte bei Ihrem
Fachhändler oder bei
der Gemeindeverwaltung.
Lieferumfang
Hinweise zur
Entsorgung
* Altgerät entsorgen
Altgeräte sind kein wertloser Abfall!
Durch umweltgerechte Entsorgung
können wertvolle Rohstoffe
wiedergewonnen werden.
Dieses Gerät ist entsprechend
der europäischen Richtlinie
2002/96/EG über Elektro- und
Elektronik-Altgeräte (waste
electrical and electronic
equipment – WEEE)
gekennzeichnet. Die Richtlinie
gibt den Rahmen für eine EU-weit
gültige Rücknahme und
Verwertung der Altgeräte vor.
ã=Warnung
Bei ausgedienten Geräten
1. Netzstecker ziehen.
2. Anschlusskabel durchtrennen und mit
dem Netzstecker entfernen.
6
Prüfen Sie nach dem Auspacken alle
Teile auf eventuelle Transportschäden.
Wenden Sie sich bei Beanstandungen an
den Händler, bei dem Sie das Gerät
erworben haben oder an unseren
Kundendienst.
Die Lieferung besteht aus folgenden
Teilen:
■ Einbaugerät
■ Ausstattung (modellabhängig)
■
■
■
■
■
■
Beutel mit Montagematerial
Gebrauchsanleitung
Montageanleitung
Kundendienstheft
Garantiebeilage
Informationen zu Energieverbrauch
und Geräuschen
de
Belüftung
Raumtemperatur,
Belüftung und
Nischentiefe
Raumtemperatur
Das Gerät ist für eine bestimmte
Klimaklasse ausgelegt. Abhängig von
der Klimaklasse kann das Gerät bei
folgenden Raumtemperaturen betrieben
werden.
Die Klimaklasse ist auf dem Typenschild
zu finden, Bild 7.
Klimaklasse
SN
N
ST
T
zulässige
Raumtemperatur
+10 °C bis 32
+16 °C bis 32
+16 °C bis 38
+16 °C bis 43
°C
°C
°C
°C
Hinweis
Das Gerät ist innerhalb der
Raumtemperaturgrenzen der
angegebenen Klimaklasse voll
funktionsfähig. Wird ein Gerät der
Klimaklasse SN bei kälteren
Raumtemperaturen betrieben, können
Beschädigungen am Gerät bis zu einer
Temperatur von +5 °C ausgeschlossen
werden.
Die Luft an der Rückwand des Gerätes
erwärmt sich. Die erwärmte Luft muss
ungehindert abziehen können. Die
Kühlmaschine muss sonst mehr leisten.
Dies erhöht den Stromverbrauch. Daher:
Nie Be- und Entlüftungsöffnungen
abdecken oder zustellen!
Nischentiefe
Für das Gerät wird eine Nischentiefe von
560 mm empfohlen. Bei einer kleineren
Nischentiefe – mindestens 550 mm –
erhöht sich die Energieaufnahme
geringfügig.
Aufstellort
Zum Aufstellen eignet sich ein trockener,
belüftbarer Raum. Der Aufstellplatz sollte
nicht direkter Sonnenbestrahlung
ausgesetzt und nicht in der Nähe einer
Wärmequelle wie Herd, Heizkörper etc.
sein. Wenn das Aufstellen neben einer
Wärmequelle unvermeidbar ist,
verwenden Sie eine geeignete
Isolierplatte oder halten Sie folgende
Mindestabstände zur Wärmequelle ein:
■
Zu Elektro- oder Gasherden 3 cm.
■
Zu Öl- oder Kohleanstellherden
30 cm.
7
de
Gerät anschließen
Nach dem Aufstellen des Gerätes mind.
1 Stunde warten, bis das Gerät in Betrieb
genommen wird. Während des
Transports kann es vorkommen, dass
sich das im Verdichter enthaltene Öl im
Kältesystem verlagert.
Vor der ersten Inbetriebnahme den
Innenraum des Gerätes reinigen (siehe
Kapitel Gerät reinigen).
Bei Insellösungen (z. B. bei Schiffen oder
Gebirgshütten), die keinen direkten
Anschluss ans öffentliche Stromnetz
haben, müssen sinusgeführte
Wechselrichter verwendet werden.
Gerät kennenlernen
Elektrischer Anschluss
Die Steckdose muss nahe dem Gerät
und auch nach dem Aufstellen des
Gerätes frei zugänglich sein.
Das Gerät entspricht der Schutzklasse I.
Über eine vorschriftsmäßig installierte
Steckdose mit Schutzleiter das Gerät an
220-240 V/50 Hz Wechselstrom
anschließen. Die Steckdose muss mit
einer 10-A bis 16-A Sicherung
abgesichert sein.
Bei Geräten, die in nicht-europäischen
Ländern betrieben werden, ist zu
überprüfen, ob die angegebene
Spannung und Stromart mit den Werten
Ihres Stromnetzes übereinstimmt. Diese
Angaben finden Sie auf dem
Typenschild, Bild 7.
ã=Warnung
Das Gerät darf auf keinen Fall an
elektronische Energiesparstecker
angeschlossen werden.
Zum Gebrauch unserer Geräte können
sinus- und netzgeführte Wechselrichter
verwendet werden. Netzgeführte
Wechselrichter werden bei
Photovoltaikanlagen verwendet, die
direkt ans öffentliche Stromnetz
angeschlossen werden.
8
Bitte klappen Sie die letzte Seite mit den
Abbildungen aus. Diese
Gebrauchsanleitung gilt für mehrere
Modelle.
Die Ausstattung der Modelle kann
variieren.
Abweichungen bei den Abbildungen sind
möglich.
Bild 1
1
2
3
4
5
Kontaktsensor
Bedienelemente/Beleuchtung
Flaschenablage
Glasablage
Touch-Light Türgriff
de
Bedienelemente
1
2
3
4
Hauptschalter Ein/Aus
Dient zum Ein- und Ausschalten
des gesamten Gerätes.
Super-Taste
Dient zum Einschalten der
Funktion Super-Kühlen (siehe
Kapitel Super-Kühlen).
Temperaturanzeige
Die Zahlen entsprechen den
eingestellten KühlraumTemperaturen in °C.
Temperatur-Einstelltaste
Mit dieser Taste wird die
Temperatur eingestellt.
Gerät einschalten
Das Gerät mit Hauptschalter Ein/Aus,
Bild 2/1, einschalten.
Die Temperaturanzeige blinkt, Bild 2/3,
bis das Gerät die eingestellte Temperatur
erreicht hat.
Das Gerät beginnt zu kühlen, die
Beleuchtung ist bei geöffneter Tür
eingeschaltet.
Es kann nach dem Einschalten mehrere
Stunden dauern, bis die eingestellte
Temperatur erreicht ist.
Temperatur einstellen
Bild 2
Die Temperatur ist von +6 °C bis +14 °C
einstellbar.
Temperatur-Einstelltaste 4 so oft
drücken, bis die gewünschte Temperatur
eingestellt ist.
Der zuletzt eingestellte Wert wird
gespeichert. Die eingestellte Temperatur
wird auf der Temperaturanzeige 3
angezeigt.
Touch-Light
Bild 5
Das Gerät ist mit einer Touch-LightFunkion ausgestattet. Wenn Sie den Griff
der Gerätetür berühren, schaltet die
Beleuchtung ein.
Durch diese Funktion bekommen Sie
einen Überblick über Ihre Getränke ohne
die Tür zu öffnen. Dadurch sparen Sie
Energie.
Haben Sie den Griff bei geschlossener
Tür berührt, schaltet die Beleuchtung
automatisch nach ca. 60 Sekunden ab.
Haben Sie die Tür geöffnet, schaltet die
Beleuchtung ca. 10 Sekunden nach
Schließen der Tür wieder ab.
Vom Werk aus empfehlen wir eine
Einstellung von +10 °C.
Hinweise zum Betrieb
Die Kühlraum-Temperatur wird wärmer:
■
■
■
durch häufiges Öffnen der Gerätetür,
durch Einlegen großer Mengen
Lebensmittel,
durch hohe Raumtemperatur.
9
de
Nutzinhalt
Trinktemperaturen
Die Angaben zum Nutzinhalt finden Sie in
Ihrem Gerät auf dem Typenschild. Bild 7
Die richtige Serviertemperatur
entscheidet über den Geschmack des
Weines und damit über Ihren
Trinkgenuss.
Wir empfehlen zum Servieren des
Weines folgende Trinktemperaturen:
Beim Einordnen
beachten
■
■
■
■
■
Insgesamt können Sie 32
Dreiviertelliter-Flaschen oder 28 LiterFlaschen auf den Flaschenablagen
einlagern. Bild 8
Diese Stückzahlen erreichen Sie,
indem Sie die Flaschen mit dem
Flaschenhals nach vorne abgelegt
einlagern. Bild 4
Die angegebenen Stückzahlen der
Flaschen können abweichen bei
anderer Flaschenform und -größe.
Bild 8
Um eine gute Luftzirkulation im Gerät
zu erhalten, dürfen die Flaschen die
Kühlraumrückwand nicht berühren.
Die Flaschen deshalb mit dem
Flaschenhals nach vorne im Gerät
lagern. Bild 4
Warme Getränke außerhalb des
Gerätes abkühlen lassen.
10
Weinart
Große Bordeaux
rot
Côtes du Rhône
rot/Barolo
Große Burgunder
rot/Bordeaux rot
Portwein
Junge Burgunder
rot
Junge Rotweine
Junger Beaujolais/
Alle Weißweine mit
wenig Restsüße
Alte Weißweine/
große Chardonnay
Sherry
Junge Weißweine
ab Spätlese
Weißweine Lire/
Entre-deux-Mers
Trinktemperatur
18 °C
17 °C
16 °C
15 °C
14 °C
12 °C
11 °C
10 °C
9 °C
8 °C
7 °C
de
Gerät ausschalten
und stilllegen
Gerät ausschalten
Bild 2
Hauptschalter Ein/Aus 1 drücken (roter
Kreis wird sichtbar).
Die Temperaturanzeige erlischt. Kühlung
und Beleuchtung sind ausgeschaltet.
Gerät stilllegen
Wenn Sie das Gerät längere Zeit nicht
benutzen:
1. Gerät ausschalten.
2. Netzstecker ziehen oder Sicherung
ausschalten.
3. Gerät reinigen.
4. Gerätetür offen lassen.
Gerät reinigen
ã=Achtung
■
■
■
Gehen Sie wie folgt vor:
1. Vor dem Reinigen Gerät ausschalten.
2. Netzstecker ziehen oder Sicherung
ausschalten.
3. Warten, bis die Reifschicht abgetaut
ist.
4. Gerät mit einem weichen Tuch,
lauwarmem Wasser und etwas pHneutralem Spülmittel reinigen. Das
Spülwasser darf nicht in die
Beleuchtung oder durch das
Ablaufloch in den
Verdunstungsbereich gelangen.
5. Die Türdichtung nur mit klarem
Wasser abwischen und danach
gründlich trocken reiben.
6. Spülwasser darf nicht durch das
Ablaufloch in den
Verdunstungsbereich laufen.
7. Nach dem Reinigen Gerät wieder
anschließen und einschalten.
Hinweis
Tauwasserrinne und Ablaufloch, Bild 3,
regelmäßig mit Wattestäbchen o.ä.
reinigen, damit das Tauwasser ablaufen
kann.
Keine sand-, chlorid- oder
säurehaltigen Putz- und Lösungsmittel
verwenden.
Keine scheuernden oder kratzenden
Schwämme verwenden. Auf den
metallischen Oberflächen könnte
Korrosion entstehen.
Nie Ablagen und Behälter im
Geschirrspüler reinigen. Die Teile
können sich verformen!
11
de
Energie sparen
■
■
■
■
Gerät in einem trockenen, belüftbaren
Raum aufstellen. Das Gerät soll nicht
direkt in der Sonne oder in der Nähe
einer Wärmequelle stehen (z. B.
Heizkörper, Herd).
Verwenden Sie ggf. eine Isolierplatte.
Nischentiefe 560 mm wählen.
Eine kleinere Nischentiefe führt zu
höherer Energieaufnahme.
Warme Getränke erst abkühlen
lassen, dann ins Gerät stellen.
Gerät so kurz wie möglich öffnen.
■
Um einen erhöhten Stromverbrauch zu
vermeiden, sollte die Geräterückseite
gelegentlich gereinigt werden.
■
Die Anordnung der Ausstattungsteile
hat keinen Einfluss auf die
Energieaufnahme des Gerätes.
Betriebsgeräusche
Ganz normale Geräusche
Brummen
Motoren laufen (z. B. Kälteaggregate,
Ventilator).
Blubbernde, surrende oder gurgelnde
Geräusche
Kältemittel fließt durch die Rohre.
Klicken
Motor, Schalter oder Magnetventile
schalten ein/aus.
Geräusche vermeiden
Das Gerät steht uneben
Richten Sie das Gerät mit Hilfe einer
Wasserwaage aus. Legen Sie, falls
notwendig, etwas unter.
Behälter oder Abstellflächen wackeln
oder klemmen
Prüfen Sie die herausnehmbaren Teile
und setzen Sie sie eventuell neu ein.
Flaschen oder Gefäße berühren sich
Rücken Sie die Flaschen oder Gefäße
leicht auseinander.
12
de
Kleine Störungen selbst beheben
Bevor Sie den Kundendienst rufen:
Überprüfen Sie, ob Sie die Störung aufgrund der folgenden Hinweise selbst beheben
können.
Sie müssen die Kosten für Beratung durch den Kundendienst selbst übernehmen –
auch während der Garantiezeit!
Störung
Mögliche Ursache
Temperatur weicht
stark von der
Einstellung ab.
Abhilfe
In einigen Fällen reicht es, wenn Sie
das Gerät für 5 Minuten
ausschalten.
Ist die Temperatur zu warm, prüfen
Sie nach wenigen Stunden, ob eine
Temperaturannäherung erfolgt ist.
Ist die Temperatur zu kalt, prüfen Sie
am nächsten Tag die Temperatur
nochmal.
Keine Anzeige
leuchtet.
Stromausfall;
die Sicherung hat
ausgelöst; der
Netzstecker sitzt nicht
fest.
Netzstecker anschließen. Prüfen, ob
Strom vorhanden ist, Sicherungen
überprüfen.
Die Beleuchtung
funktioniert nicht.
Die Glühlampe ist
defekt.
Glühlampe austauschen. Bild 6/B
1. Netzstecker ziehen bzw.
Sicherung ausschalten.
2. Glühlampe wechseln
(Ersatzlampe: 220 - 240 V
Wechselstrom, Sockel E14, Watt
siehe defekte Lampe).
Der Kontaktsensor ist
verschmutzt.
Kontaktsensor mit feuchtem Tuch
reinigen. Bild 6/1
Türgriff nur mit der bloßen Hand
Türgriff wurde mit
Handschuhen oder mit berrühren.
anderer Bekleidung
berührt.
Am Griff hängt ein
feuchtes Handtuch
Handtuch vom Türgriff entfernen.
13
de
Störung
Mögliche Ursache
Abhilfe
Der Boden des
Kühlraums ist nass.
Die Tauwasserrinne
oder das Ablaufloch
sind verstopft.
Reinigen Sie die Tauwasserrinne
und das Ablaufloch (siehe Kapitel
Gerät reinigen). Bild 3
Die Kältemaschine
schaltet immer
häufiger und länger
ein.
Häufiges Öffnen des
Gerätes.
Gerät nicht unnötig öffnen.
Die Be- und
Entlüftungsöffnungen
sind verdeckt.
Hindernisse entfernen.
Das Gerät hat keine
Kühlleistung.
■
Gerät ist
ausgeschaltet.
Hauptschalter Ein/Aus drücken.
Bild 2/1
■
Stromausfall
Sicherung ist
ausgeschaltet.
Netzstecker sitzt
nicht fest.
Prüfen, ob Strom vorhanden ist.
Sicherung überprüfen.
■
■
Kundendienst
Einen Kundendienst in Ihrer Nähe finden
Sie im Telefonbuch oder im
Kundendienst-Verzeichnis. Geben Sie
bitte dem Kundendienst die
Erzeugnisnummer (E-Nr.) und die
Fertigungsnummer (FD-Nr.) des Gerätes
an.
Sie finden diese Angaben auf dem
Typenschild. Bild 7
Bitte helfen Sie durch Nennung der
Erzeugnis- und Fertigungsnummer mit,
unnötige Anfahrten zu vermeiden. Sie
sparen die damit verbundenen
Mehrkosten.
14
Reparaturauftrag und Beratung
bei Störungen
Die Kontaktdaten aller Länder finden Sie
im beiliegenden KundendienstVerzeichnis.
D
A
CH
01801 22 33 66 0,039 €/Min.
aus dem
Festnetz,
Mobilfunk max.
0,42 €/Min.
0810 550 522
0848 840 040
en
enTable of ContentsensIntruticonforUse
Safety and warning
information
Before you switch ON the
appliance
Please read the operating and
installation instructions carefully! They
contain important information on how to
install, use and maintain the appliance.
The manufacturer is not liable if you fail
to comply with the instructions and
warnings. Retain all documents for
subsequent use or for the next owner.
Technical safety
This appliance contains a small quantity
of environmentally-friendly but flammable
R600a refrigerant. Ensure that the tubing
of the refrigerant circuit is not damaged
during transportation and installation.
Leaking refrigerant may cause eye
injuries or ignite.
If damage has occurred
■ Keep naked flames and/or ignition
sources away from the appliance,
■ thoroughly ventilate the room for
several minutes,
■ switch off the appliance and pull out
the mains plug,
inform customer service.
The more refrigerant an appliance
contains, the larger the room must be in
which the appliance is situated. Leaking
refrigerant can form a flammable gas-air
mixture in rooms which are too small.
The room must be at least 1 m³ per 8 g
of refrigerant. The amount of refrigerant
in your appliance is indicated on the
rating plate inside the appliance.
■
If the power cord of this appliance is
damaged, it must be replaced by the
manufacturer, customer service or a
similarly qualified person. Improper
installations and repairs may put the user
at considerable risk.
Repairs may be performed by the
manufacturer, customer service or a
similarly qualified person only.
Only original parts supplied by the
manufacturer may be used. The
manufacturer guarantees that only these
parts satisfy the safety requirements.
A extension cable may be purchased
from customer service only.
Important information when
using the appliance
■
Never use electrical appliances inside
the appliance (e.g. heater, electric ice
maker, etc.). Risk of explosion!
■
Never use a steam cleaner to defrost
or clean the appliance! The steam
may penetrate electrical parts
and cause a short-circuit. Risk of
electric shock!
Do not use pointed or sharp-edged
implements to remove frost or layers
of ice. You could damage
the refrigerant tubing. Leaking
refrigerant may ignite or cause eye
injuries.
Do not store products which contain
flammable propellants (e.g. spray
cans) or explosive substances in
the appliance. Risk of explosion!
■
■
■
■
Do not stand or support yourself on
the base, drawers or doors, etc.
Before defrosting and cleaning
the appliance, pull out the mains plug
or switch off the fuse. Do not pull out
the mains plug by tugging the cable.
15
en
■
■
■
■
Bottles which contain a high
percentage of alcohol must be sealed
and stored in an upright position.
Keep plastic parts and the door seal
free of oil and grease. Otherwise,
parts and door seal will become
porous.
Never cover or block the ventilation
openings for the appliance.
People (childern incl.) who have
limited physical, sensory or mental
abilities or inadequate knowledge
must not use this appliance unless
they are supervised or given
meticulous instructions.
Children in the household
■
■
■
Keep children away from packaging
and its parts.
Danger of suffocation from folding
cartons and plastic film!
Do not allow children to play with the
appliance!
If the appliance features a lock:
keep the key out of the reach of
children!
General regulations
This appliance is designed exclusively
for the storage of wine.
This appliance is intended for use
in the home and the home environment.
The appliance is suppressed according
to EU Directive 2004/108/EC.
The refrigeration circuit has been
checked for leaks.
This product complies with the relevant
safety regulations for electrical
appliances (EN 60335-2-24).
16
Information concerning
disposal
* Disposal of packaging
The packaging protects your appliance
from damage during transit. All utilised
materials are environmentally safe and
recyclable. Please help us by disposing
of the packaging in an environmentally
friendly manner.
Please ask your dealer or inquire at your
local authority about current means of
disposal.
* Disposal of your old
appliance
Old appliances are not worthless
rubbish! Valuable raw materials can be
reclaimed by recycling old appliances.
This appliance is identified
according to the European
guideline 2002/96/EC on waste
electrical and electronic
equipment – WEEE. The directive
specifies the framework for an
EU-wide valid return and re-use
of old appliances.
ã=Warning
Redundant appliances
1. Pull out the mains plug.
2. Cut off the power cord and discard
with the mains plug.
3. Do not take out the trays
and receptacles: children are
therefore prevented from climbing in!
4. Do not allow children to play with
the appliance once it has spent its
useful life. Danger of suffocation!
en
Refrigerators contain refrigerant
and gases in the insulation. Refrigerant
and gases must be disposed
of professionally. Ensure that tubing
of the refrigerant circuit is not damaged
prior to proper disposal.
Room temperature,
ventilation and cavity
depth
Ambient temperature
Scope of delivery
After unpacking all parts, check for any
damage in transit.
If you have any complaints, please
contact the dealer from whom you
purchased the appliance or our
customer service.
The delivery consists of the following
parts:
■
■
■
■
■
■
■
■
Built-in appliance
Interior fittings (depending on model)
Bag containing installation materials
Operating instructions
Installation manual
Customer service booklet
Warranty enclosure
Information on the energy
consumption and noises
The appliance is designed for a specific
climate class. Depending on the climate
class, the appliance can be operated at
the following temperatures.
The climate class can be found on
the rating plate. Fig. 7
Climate class
SN
N
ST
T
Permitted ambient
temperature
+10 °C to 32 °C
+16 °C to 32 °C
+16 °C to 38 °C
+16 °C to 43 °C
Note
The appliance is fully functional within
the room temperature limits
of the indicated climatic class. If
an appliance of climatic class SN
is operated at colder room temperatures,
the appliance will not be damaged up to
a temperature of +5 °C.
Ventilation
The air on the rear panel of
the appliance heats up. Conduction of
the heated air must not be obstructed.
Otherwise, the refrigeration unit must
work harder. This increases power
consumption. Therefore: Never cover
or block the ventilation openings!
17
en
Cavity depth
Electrical connection
A cavity depth of 560 mm
is recommended for the appliance.
If the cavity depth is smaller – at least
550 mm – the energy consumption
increases slightly.
The socket must be near the appliance
and also freely accessible following
installation of the appliance.
The appliance complies with the
protection class I. Connect the appliance
to 220–240 V/50 Hz alternating current
via a correctly installed socket with
protective conductor. The socket must
be fused with a 10 to 16 A fuse.
Installation location
Install the appliance in a dry, well
ventilated room. The installation location
should neither be exposed to direct
sunlight nor near a heat source, e. g.
a cooker, radiator, etc. If installation next
to a heat source is unavoidable, use
a suitable insulating plate or observe
the following minimum distances to a
heat source:
■
■
3 cm to electric or gas cookers.
30 cm to an oil or coal-fired cooker.
Connecting
the appliance
After installing the appliance, wait at least
1 hour until the appliance is switched on.
During transportation the oil in
the compressor may have flowed into
the refrigeration system.
Before switching on the appliance for
the first time, clean the interior of
the appliance (see chapter “Cleaning
the appliance”).
18
For appliances operated in nonEuropean countries, check whether the
stated voltage and current type match
the values of your mains supply. This
information can be found on the rating
plate. Fig. 7
ã=Warning
Never connect the appliance
to electronic energy saver plugs.
Our appliances can be used with mains
and sine-controlled inverters. Mainscontrolled inverters are used
for photovoltaic systems which
are connected directly to the national
grid. Sine-controlled inverters must be
used for isolated applications (e.g. on
ships or in mountain lodges) which are
not connected directly to the national
grid.
en
Getting to know your
appliance
Switching
on the appliance
Switch on the appliance with the main
On/Off switch. Fig. 2/1
The temperature display flashes,
Fig. 2/3, until the appliance has reached
the set temperature.
The appliance starts to cool, the light is
switched on when the door is open.
Please fold out the illustrated last page.
These operating instructions refer
to several models.
The features of the models may vary.
The diagrams may differ.
Fig. 1
1
2
3
4
5
Contact sensor
Controls/light
Bottle shelf
Glass shelf
Touch-Light door handle
Controls
1
2
3
4
After the appliance has been switched
on, it may take several hours until the set
temperature has been reached.
We recommend a factory setting
of +10 °C.
Operating tips
The refrigerator compartment
temperature rises:
■
■
■
if the appliance door is opened
frequently,
if large quantities of food are placed in
the refrigerator compartment,
if the ambient temperature is high.
Main On/Off switch
Serves to switch the whole
appliance on and off.
“super” button
Is used to switch on the super
cooling (see chapter entitled
“Super cooling”).
Temperature display
The numbers correspond
to the set refrigerator
compartment temperatures in °C.
Temperature selection button
Press this button to set the
temperature.
Setting
the temperature
Fig. 2
The temperature can be set from
+6 °C to +14 °C.
Keep pressing temperature setting
button 4 until the required temperature is
set.
The value last selected is saved. The set
temperature is indicated on temperature
display 3.
19
en
Touch Light
Fig. 5
This appliance features a Touch Light
function. When the handle
on the appliance door is touched,
the light switches on.
This function enables you to view your
drinks without opening the door. As
a result, you save energy.
If the handle was touched while the door
was closed, the light automatically
switches off after approx. 60 seconds. If
the door was opened, the light switches
off again approx. 10 seconds after
the door was closed.
■
To maintain a good air circulation
in the appliance, the bottles must not
touch the rear panel of the refrigerator
compartment. Therefore store
the bottles in the appliance with
the bottlenecks pointing forwards.
Fig. 4
■
Allow warm drinks to cool down
outside the appliance.
Drinking temperatures
The correct serving temperature
is crucial for the taste and therefore your
enjoyment of the wine.
We recommend serving wine
at the following drinking temperatures:
Usable capacity
Type of wine
Information on the usable capacity can
be found inside your appliance on
the rating plate. Fig. 7
Bordeaux red
Côtes du Rhône
red/Barolo
Burgundy red/
Bordeaux red
Port
Young Burgundy
red
Young red wine
Young Beaujolais/
all white wines
with little residual
sugar
Old white wines/
Chardonnay
Sherry
Young white wines
from late vintage
White wines Loire/
Entre-deux-Mers
Note when loading
products
■
A total of 32 ¾-litre bottles or 28
single-litre bottles can be placed
on the bottle shelves. Fig. 8
■
This number of bottles can be stored
if the bottles are placed with their
necks facing forwards. Fig. 4
■
The indicated number of bottles may
differ depending on the shape and
size of the bottles. Fig. 8
20
Drinking
temperature
18 °C
17 °C
16 °C
15 °C
14 °C
12 °C
11 °C
10 °C
9 °C
8 °C
7 °C
en
Switching off and
disconnecting the
appliance
Switching the appliance off
Fig. 2
Press the main On/Off switch 1 (red
circle becomes visible).
Temperature display goes out. Fridge
and light are switched off.
Disconnecting the appliance
If you do not use the appliance
for a prolonged period:
1. Switch off the appliance.
2. Pull out mains plug or switch off fuse.
3. Clean the appliance.
4. Leave the appliance door open.
Cleaning the appliance
Proceed as follows:
1. Before cleaning: Switch off
the appliance.
2. Pull out mains plug or switch off fuse.
3. Wait until the layer of frost has thawed.
4. Clean the appliance with a soft cloth,
lukewarm water and a little pH neutral
washing-up liquid. The rinsing water
must not run into the light or through
the drainage hole into the evaporation
area.
5. Wipe the door seal with clear water
only and then wipe dry thoroughly.
6. Rinsing water must not run through
the drainage hole into the evaporation
area.
7. After cleaning reconnect and switch
the appliance back on.
Note
Regularly clean the condensation
channel and drainage hole, Fig. 3, with
a cotton bud or similar implement
to ensure that the condensation can
drain.
ã=Caution
■
Do not use abrasive, chloride or acidic
cleaning agents or solvents.
■
Do not use scouring or abrasive
sponges. The metallic surfaces could
corrode.
■
Never clean shelves and containers
in the dishwasher. The parts may
become deformed!
21
en
Tips for saving energy
■
■
■
■
■
■
Install the appliance in a dry, well
ventilated room! The appliance should
not be installed in direct sunlight
or near a heat source (e.g. radiator,
cooker).
If required, use an insulating plate.
Select 560 mm cavity depth.
A smaller cavity depth will result in
a higher energy consumption.
Allow warm drinks to cool down
before placing in the appliance.
Open the appliance as briefly as
possible.
Occasionally clean the rear
of the appliance to prevent an
increased power consumption.
The arrangement of the fittings does
not affect the energy rating of the
appliance.
Operating noises
Quite normal noises
Droning
Motors are running (e.g. refrigerating
units, fan).
Bubbling, humming or gurgling noises
Refrigerant is flowing through the tubing.
Clicking
Motor, switches or solenoid valves are
switching on/off.
Preventing noises
The appliance is not level
Please align the appliance with a spirit
level. If required, place something
underneath.
Containers or storage areas wobble
or stick
Please check the removable parts
and re-insert them correctly if required.
Bottles or receptacles are touching
each other
Move the bottles or receptacles slightly
away from each other.
22
en
Eliminating minor faults yourself
Before you call customer service:
Please check whether you can eliminate the fault yourself based on the following
information.
Customer service will charge you for advice – even if the appliance is still under
guarantee!
Fault
Possible cause
Temperature differs
greatly from the set
value.
Remedial action
In some cases it is adequate
to switch off the appliance
for 5 minutes.
If the temperature is too high wait
a few hours and check whether
the temperature has approached
the set value.
If the temperature is too low check
the temperature again the next day.
Displays
do not illuminate.
Power failure; the fuse Connect mains plug. Check whether
has been switched off; the power is on, check the fuses.
the mains plug
has not been inserted
properly.
The light does not
work.
The bulb is defective.
Replace bulb. Fig. 6/B
1. Pull out mains plug or switch off
fuse.
2. Change the bulb.
(Replacement bulb: 220240 V a.c., E14 bulb holder, see
defective bulb for wattage.)
The contact sensor is
dirty.
Clean the contact sensor with
a damp cloth. Fig. 6/1
Door handle was
touched with glove
or other item
of clothing.
Touch door handle with bare hand
only.
A damp towel is
hanging from
the handle.
Remove towel from the door handle.
23
en
Fault
Possible cause
Remedial action
Bottom
of the refrigerator
compartment is wet.
The condensation
channel or drainage
hole are blocked.
Clean the condensation channel
and the drainage hole. See chapter
Cleaning the appliance. Fig. 3
The refrigerating unit
is switching on more
frequently and for
longer.
Appliance opened
frequently.
Do not open the appliance
unnecessarily.
The ventilation
openings have been
covered.
Remove obstacles.
Appliance has no
refrigeration capacity.
■
■
■
■
Appliance has been Press main On/Off switch. Fig. 2/1
switched off.
Check whether the power is on.
Power failure.
Check the fuse.
The fuse has been
switched off.
The mains plug has
not been inserted
properly.
Customer service
Your local customer service
can be found in the telephone directory
or in the customer-service index. Please
provide customer service
with the appliance product number
(E-Nr.) and production number (FD).
These specifications
can be found on the rating plate. Fig. 7
To prevent unnecessary call-outs, please
assist customer service by quoting
the product and production numbers.
This will save you additional costs.
24
Repair order and advice
on faults
Contact information for all countries can
be found on the enclosed customer
service list.
GB
0844 892 8999
IE
US
01450 2655
866 447 4363
Calls from a BT
landline will be
charged at up
to 3 pence per
minute. A call
set-up fee of up
to 6 pence may
apply.
toll-free
fr
frTable des matièresfr Moded’emploi
Consignes de sécurité
et avertissements
Avant de mettre l'appareil en
service
Veuillez lire attentivement et entièrement
les informations figurant dans les notices
d'utilisation et de montage. Elle
contiennent des remarques importantes
concernant l'installation, l'utilisation
et l'entretien de l'appareil.
Le fabricant décline toute responsabilité
si les consignes et mises en garde
contenues dans la notice d'utilisation ne
sont pas respectées. Veuillez conserver
ces documents en vue d’une réutilisation
ultérieure ou pour le cas où l’appareil
changerait de propriétaire.
Sécurité technique
Cet appareil contient une petite quantité
d’un fluide réfrigérant écologique mais
inflammable, le R 600a. Pendant le
transport et la mise en place de
l’appareil, veillez à ne pas endommager
les tuyauteries du circuit frigorifique. Si le
fluide réfrigérant jaillit, il peut provoquer
des lésions oculaires ou s’enflammer.
Si l'appareil est endommagé
■ éloignez de l'appareil toute flamme
nue ou source d'inflammation,
■ aérez bien la pièce pendant quelques
minutes,
■ éteignez l'appareil puis débranchez la
fiche mâle de la prise de courant,
■
Plus l'appareil contient du fluide
réfrigérant et plus grande doit être la
pièce dans laquelle il se trouve. Dans les
pièces trop petites, un mélange gaz-air
inflammable peut se former en cas de
fuite.
Comptez 1 m³ de volume minimum de la
pièce pour 8 g de fluide réfrigérant. La
quantité de fluide présente dans
l'appareil est indiquée sur la plaque
signalétique située à l'intérieur de ce
dernier.
Si le cordon d’alimentation électrique
de cet appareil a été endommagé, il faut
confier son remplacement au fabricant,
au service après-vente ou à une
personne détenant des qualifications
similaires. Les installations et réparations
inexpertes peuvent engendrer des
risques considérables pour l’utilisateur.
Les réparations ne pourront être
réalisées que par le fabricant, le service
après-vente ou une personne détenant
des qualifications similaires.
Il ne faut utiliser que les pièces d'origine
du fabricant. Le fabricant ne garantit que
les pièces d'origine car elles seules
remplissent les exigences de sécurité.
S’il faut allonger le cordon
de raccordement au secteur avec
un prolongateur, procurez-vous-le
exclusivement auprès du service aprèsvente.
prévenez le service après-vente.
25
fr
Pendant l’utilisation
■
■
■
■
N’utilisez pas d’appareils électriques
à l’intérieur de l’appareil (par ex.
appareils de chauffage, machine
à glaçons, etc.). Risque d’explosion !
Ne dégivrez et nettoyez jamais
l’appareil avec un nettoyeur à vapeur !
La vapeur risque d’atteindre des
pièces électriques et de provoquer
un court-circuit. Risque
d’électrocution !
Pour détacher le givre ou les couches
de glace, n’utilisez jamais d’objets
pointus ou présentant des arêtes
vives. Vous risqueriez d’endommager
les tubulures dans lesquelles circule
le produit réfrigérant. Le fluide
réfrigérant en train de jaillir risque
de s’enflammer ou de provoquer des
lésions oculaires.
Ne stockez dans l’appareil ni produits
contenant des gaz propulseurs
inflammables (par ex. bombes
aérosols) ni produits explosifs. Risque
d’explosion !
■
Ne vous servez pas des socles,
clayettes et portes comme
marchepieds ou pour vous appuyer.
■
Pour dégivrer et nettoyer l’appareil,
débranchez la fiche mâle de la prise
de courant ou retirez le fusible /
désarmez le disjoncteur. Pour
débrancher l’appareil, tirez sur la fiche
mâle et non pas sur son cordon.
Stockez les boissons fortement
alcoolisées en position verticale dans
des récipients bien fermés.
L’huile et la graisse ne doivent pas
entrer en contact avec les parties en
matières plastiques et le joint
de porte. Ces derniers pourraient
sinon devenir poreux.
■
■
26
■
Ne recouvrez et n’obstruez jamais les
orifices de ventilation de l’appareil.
■
Cet appareil ne pourra être utilisé par
des personnes (enfants compris)
présentant des capacités physiques,
sensorielles ou psychiques restreintes
ou manquant de connaissances que
sous la surveillance d’une personne
chargée de leur sécurité ou après que
cette dernière leur aura enseigné
à utiliser l’appareil.
Les enfants et l’appareil
■
■
■
Ne confiez jamais l’emballage et ses
pièces constitutives aux enfants.
Ils risquent de s'étouffer avec les
cartons pliants et les feuilles
de plastique !
L’appareil n’est pas un jouet pour
enfants !
Appareils équipés d’une serrure :
rangez la clé hors de portée des
enfants !
Dispositions générales
Cet appareil est exclusivement destiné
à stocker du vin.
Cet appareil est destiné à un usage
domestique dans un foyer privé,
et à l’environnement domestique.
L’appareil a été antiparasité
conformément à la directive UE 2004 /
108 / EC.
Le circuit frigorifique a subi un contrôle
d’étanchéité.
Ce produit est conforme aux dispositions
de sécurité applicables visant
les appareils électriques (EN 60335-224).
fr
Conseil pour la mise au
rebut
* Mise au rebut de l'emballage
L’emballage protège votre appareil
contre les dommages susceptibles de
survenir en cours de transport. Tous les
matériaux qui le composent sont
compatibles avec l’environnement et
recyclables. Aidez-nous : à éliminer
l’emballage dans le respect
de l’environnement.
Pour connaître les circuits actuels de
mise au rebut, adressez-vous s.v.p.
à votre revendeur ou à l’administration
de votre commune.
* Mise au rebut de l'ancien
appareil
Les appareils usagés ne sont pas des
déchets dénués de valeur ! Leur
élimination dans le respect de
l'environnement permet d'en récupérer
de précieuses matières premières.
Cet appareil est marqué selon la
directive européenne 2002 / 96 /
CE relative aux appareils
électriques et électroniques
usagés (waste electrical and
electronic equipment – WEEE).
La directive définit le cadre pour
une reprise et une récupération
des appareils usagés applicables
dans les pays de la CE.
ã=Mise en garde
3. Pour dissuader les enfants de grimper
dans l’appareil, ne retirez pas les
clayettes et les bacs !
4. Ne permettez pas aux enfants de
jouer avec l’appareil lorsqu’il ne sert
plus. Risque d’étouffement !
Les appareils réfrigérants contiennent du
fluide réfrigérant. L’isolant contient des
gaz. Il faut que le fluide réfrigérant et les
gaz soient éliminés dans les règles de
l’art. Jusqu'à l'enlèvement de l'appareil,
veillez bien à ce que son circuit
frigorifique ne soit pas endommagé.
Étendue
des fournitures
Après avoir déballé, vérifiez toutes les
pièces pour détecter d’éventuels dégâts
dus au transport.
En cas de réclamation, veuillez vous
adresser au revendeur auprès duquel
vous avez acquis l’appareil ou auprès de
notre service après-vente.
La livraison comprend les pièces
suivantes :
■
■
■
■
■
■
■
■
Appareil encastrable
Équipement (selon le modèle)
Sachet avec visserie de montage
Notice d’utilisation
Notice de montage
Carnet de service après-vente
Pièce annexe de la garantie
Informations relatives à la
consommation d’énergie et aux bruits
Avant de mettre au rebut l'appareil qui ne
sert plus :
1. Débranchez sa fiche mâle.
2. Sectionnez son câble d’alimentation et
retirez-le avec la fiche mâle.
27
fr
Température ambiante,
aération et profondeur
de niche
Profondeur de niche
Une profondeur de niche de 560 mm est
recommandée pour cet appareil. Si la
niche est moins profonde (profondeur
minimum = 550 mm), la consommation
d'énergie augmente légèrement.
Température ambiante
L’appareil a été conçu
pour une catégorie climatique précise.
Suivant la catégorie climatique,
l’appareil est utilisable dans les
températures ambiantes suivantes.
La catégorie climatique de l’appareil
figure sur sa plaque signalétique, Fig. 7.
Catégorie
climatique
SN
N
ST
T
Température ambiante
admissible
+10 °C à 32 °C
+16 °C à 32 °C
+16 °C à 38 °C
+16 °C à 43 °C
Remarque
L’appareil est entièrement fonctionnel
à l’intérieur des limites de température
ambiante prévues dans la catégorie
climatique indiquée. Si un appareil de la
catégorie climatique SN est utilisé
à des températures ambiantes plus
basses, il est possible d’exclure que
l’appareil s’endommage jusqu'à
une température de +5 °C.
Aération
L’air entrant en contact avec la paroi
arrière de l’appareil se réchauffe. L’air
chaud doit pouvoir s’échapper sans
obstacle. S’il ne le peut pas, le groupe
frigorifique doit fonctionner plus
longtemps, ce qui augmente
la consommation de courant. Pour cette
raison, ne recouvrez ni et n’obstruez
jamais les orifices d’aération
de l’appareil.
28
Lieu d'installation
Un local sec et aérable convient pour
installer l'appareil. Evitez de placer
l'appareil à un endroit directement
exposé aux rayons solaires
ou à proximité d'une source de chaleur
telle une cuisinière, un radiateur, etc.
Si l'installation près d'une source
de chaleur est inévitable,
utilisez une plaque isolante appropriée
ou respectez les distances minimales
suivantes :
■
3 cm par rapport aux cuisinières
électriques ou à gaz.
■
30 cm par rapport à un appareil
de chauffage au fuel ou au charbon.
Branchement
de l’appareil
Après l’installation de l’appareil
en position verticale, attendez
au moins une heure avant de le mettre
en service. Il peut en effet arriver,
pendant le transport, que l’huile présente
dans le compresseur se déplace vers
le circuit frigorifique.
Avant la première mise en service,
nettoyez le compartiment intérieur
de l’appareil. (Voir le chapitre
« Nettoyage de l’appareil ».)
fr
Branchement électrique
La prise doit être proche de l’appareil et
demeurer librement accessibles même
après avoir installé ce dernier.
L’appareil est conforme à la classe
de protection I. Raccordez l’appareil au
courant alternatif 220–240 V / 50 Hz,
via une prise femelle installée
réglementairement et comportant un
fil de terre. La prise doit être protégée
par un fusible supportant un ampérage
de 10 A à 16 A.
Sur les appareils qui fonctionneront dans
des pays non européens, il faut vérifier
que la tension et le type de courant
mentionnés sur la plaque signalétique
correspondent bien avec celle et celui
offert par votre secteur. Vous trouverez
ces indications sur la plaque
signalétique. Fig. 7
ã=Mise en garde
Il ne faut en aucun cas raccorder
l’appareil à des fiches électroniques
d’économie d’énergie.
Nos appareils peuvent être alimentés via
des onduleurs pilotés par le secteur ou à
pilotage sinusoïdal. Directement
raccordées au réseau public,
les installations photovoltaïques font
appel à des onduleurs pilotés par le
secteur. Dans les solutions en îlots
(p. ex. sur les bateaux ou les refuges
de montagne), ne disposant pas d’un
raccordement direct au réseau
électrique public, il faut utiliser
des onduleurs à pilotage sinusoïdal.
Présentation
de l’appareil
Veuillez déplier la dernière page,
illustrée, de la notice. La présente notice
d’utilisation vaut pour plusieurs modèles.
L’équipement des modèles peut varier.
Selon le modèle, l’appareil peut différer
du contenu des illustrations.
Fig. 1
1
2
3
4
5
Capteur à contact
Éléments de commande /
Éclairage
Clayette à bouteilles
Clayette en verre
Poignée de porte Touch-Light
Éléments de commande
1
2
Interrupteur principal Marche /
Arrêt
Sert à allumer et éteindre
l’ensemble de l’appareil.
Touche « super »
Sert à allumer la fonction Superréfrigération (voir le chapitre
« Super-réfrigération »).
29
fr
3
Affichage de température
Les chiffres correspondent
aux températures °C réglées
dans le compartiment
réfrigérateur.
Touche de réglage de la
température
Cette touche permet de régler la
température.
4
Enclenchement
de l’appareil
Allumez l’appareil par l’interrupteur
principal Marche / Arrêt, Fig. 2/1.
L’affichage de température clignote,
Fig. 2/3, tant que l’appareil n’a pas
atteint la température réglée.
L’appareil commence à réfrigérer ; porte
en position ouverte, l’éclairage est
allumé.
Après son allumage, l’appareil peut avoir
besoin de plusieurs heures pour
atteindre la température réglée.
Nous recommandons de régler sur
+10 °C (réglage usine).
Remarques concernant
le fonctionnement de l’appareil
La température du compartiment
réfrigérateur augmente temporairement :
■
Si vous ouvrez fréquemment la porte
de l’appareil.
■
Si vous rangez de grandes quantités
d’aliments.
En présence d’une température
ambiante élevée.
■
30
Réglage de la
température
Fig. 2
La température est réglable entre +6 °C
et +14 °C.
Appuyez sur la touche de réglage
de la température 4 jusqu’à ce que
la température souhaitée soit réglée.
L’appareil mémorise la valeur réglée en
dernier. La température réglée s’affiche
à l’affichage de température 3.
Touch-Light
Fig. 5
Cet appareil est équipé d’une fonction
Touch-Light. Lorsque vous touchez la
poignée de porte de l’appareil,
l’éclairage s’allume.
Cette fonction vous livre une vue
d’ensemble des boissons rangées sans
avoir à ouvrir la porte. Vous économisez
ainsi de l’énergie.
Si vous avez touché la poignée de la
porte fermée, l’éclairage s’éteint
automatiquement 60 secondes plus tard
environ. Si vous avez ouvert la porte,
l’éclairage s’éteint environ 10 secondes
après avoir l’avoir refermée.
fr
Contenance utile
Vous trouverez les indications relatives
à la contenance utile sur la plaque
signalétique de votre appareil. Fig. 7
Attention lors
de rangement
■
Sur les clayettes, vous pouvez ranger
au total 32 bouteilles de 75 cl
ou 28 bouteilles d’un litre. Fig. 8
■
Vous parviendrez à stocker
ce nombre de bouteilles si vous
rangez les bouteilles avec le goulot
regardant vers l’extérieur de l’appareil.
Fig. 4
■
Le nombre de bouteilles indiqué peut
différer si les bouteilles présentent une
forme et un volume différents. Fig. 8
■
Pour obtenir une bonne circulation
de l’air dans l’appareil, veillez bien
à ce que les bouteilles ne touchent
pas la paroi arrière du compartiment
réfrigérateur. Pour cette raison, rangez
les bouteilles avec leurs goulots
tournés vers vous. Fig. 4
Avant de ranger des boissons
chaudes, laissez-les refroidir en
dehors de l’appareil.
■
Températures
de dégustation
La bonne température à laquelle vous
servirez les vins décide de leur goût,
donc du plaisir de leur dégustation.
Nous recommandons de servir les vins
ci-après aux températures suivantes :
Type de vin
Bordeaux rouge
Côtes du Rhône
rouge / Barolo
Bourgogne rouge /
Bordeaux rouge
Porto
Jeunes Bourgogne
rouges
Jeunes vins
rouges
Jeunes Beaujolais
/ Tous les vins
blancs demisecs à secs
Vins blancs grand
âge / Chardonnay
Sherry
Vins blancs jeunes,
depuis ceux
vendangés
tardivement
Vins blancs de la
vallée de la Loire /
Entre-deux-mers
Températures
de dégustation
18 °C
17 °C
16 °C
15 °C
14 °C
12 °C
11 °C
10 °C
9 °C
8 °C
7 °C
31
fr
Arrêt et remisage
de l'appareil
Coupure de l’appareil
Fig. 2
Appuyez sur l’interrupteur principal
Marche / Arrêt 1 (le cercle rouge devient
visible).
L’indicateur de température s’éteint. La
réfrigération et l’éclairage sont éteints.
Remisage de l'appareil
Si l'appareil doit rester longtemps sans
servir :
1. Éteignez l'appareil.
2. Débranchez la fiche mâle du secteur
ou ramenez le disjoncteur en position
éteinte.
3. Nettoyez l'appareil.
4. Laissez la porte de l'appareil ouverte.
Nettoyage de l’appareil
ã=Attention
■
■
■
N’utilisez aucun produit de nettoyage
ni aucun solvant contenant du sable,
du chlorure ou de l’acide.
N’utilisez jamais d’éponges abrasives
ou susceptibles de rayer. Des zones
corrodées pourraient apparaître sur
les surfaces métalliques.
Ne nettoyez jamais les clayettes et les
bacs au lave-vaisselle. Ces pièces
pourraient se déformer !
32
Procédure :
1. Éteignez l’appareil avant de le
nettoyer.
2. Débranchez la fiche mâle du secteur
ou ramenez le disjoncteur en position
éteinte.
3. Attendez que la couche de givre ait
fondu.
4. Ne nettoyez l’appareil qu’avec
un chiffon doux, de l’eau tiède
et du produit à vaisselle présentant
un pH neutre. Veillez à ce que l'eau de
rinçage ne pénètre pas dans
l'éclairage et qu'elle ne gagne pas la
zone d'évaporation via l'orifice
d'écoulement.
5. N’essuyez le joint de porte qu’avec
un chiffon et de l’eau propre ; ensuite,
séchez-le à fond.
6. Veillez à ce que l’eau de nettoyage ne
traverse pas le trou d’écoulement
et ne pénètre pas dans la zone
d’évaporation.
7. Après le nettoyage : rebranchez
la fiche mâle de l’appareil puis
réenclenchez-le.
Remarque
Avec un bâtonnet ouaté ou assimilé,
nettoyez régulièrement les rigoles et le
trou d’écoulement de l’eau de dégivrage,
Fig. 3, afin que cette eau puisse bien
s’écouler.
fr
Economies d’énergie
■
■
■
■
■
■
Placez l’appareil dans un local sec
et aérable. Veillez à ce que l’appareil
ne soit pas directement exposé aux
rayons solaires et qu’il ne se trouve
pas à proximité d’une source
de chaleur (par ex. radiateur,
cuisinière).
Utilisez le cas échéant une plaque
isolante.
Choisir une profondeur de niche
de 560 mm.
Une niche d'une profondeur inférieure
accroît la consommation d'énergie.
Attendez que les boissons chaudes
aient refroidi avant de les mettre dans
l’appareil.
N’ouvrez la porte de l’appareil que
le plus brièvement possible.
De temps en temps, nettoyez le dos
de l’appareil, ceci pour éviter une
hausse de la consommation
d’électricité.
L'agencement des pièces
d'équipement n'influe pas sur l'énergie
absorbée par l'appareil.
Bruits
de fonctionnement
Bruits parfaitement normaux
Bourdonnement sourd
Les moteurs tournent (par ex. groupes
frigorifiques, ventilateur).
Clapotis, sifflement léger ou gargouillis
Le fluide frigorigène circule dans
les tuyaux.
Cliquetis
Le moteur, les interrupteurs ou les
électrovannes s’allument / s’éteignent.
Éviter la génération de bruits
L’appareil ne repose pas d’aplomb
Veuillez mettre l’appareil d’aplomb
à l’aide d’un niveau à bulle. Si
nécessaire, insérez quelque chose
dessous.
Les bacs ou surfaces de rangement
vacillent ou se coincent
Vérifiez les pièces amovibles puis
remettez-les en place correctement.
Des bouteilles
ou récipients se touchent
Eloignez légèrement les bouteilles
ou récipients les uns des autres.
33
fr
Remédier soi même aux petites pannes
Avant d'appeler le service après-vente (SAV) :
Vérifiez svp si vous ne pouvez pas remédier vous-même au dérangement à l'aide
des instructions qui suivent.
Vous éviterez des dépenses inutiles car le déplacement du technicien du SAV vous
sera facturé même pendant la période de garantie.
Dérangement
La température dévie
fortement par rapport
au réglage.
Aucun
voyant ne s'allume.
34
Cause possible
Remède
Dans certains cas, il suffira
d'éteindre l'appareil pendant
5 minutes.
Si la température est trop élevée,
vérifiez au bout de seulement
quelques heures
si un rapprochement
de la température a eu lieu.
Si la température est trop basse,
vérifiez à nouveau la température
le lendemain.
Coupure de courant ; Branchez la fiche mâle dans la prise
disjoncteur disjoncté ; de courant. Vérifiez s'il y a
fiche
du courant, vérifiez les fusibles /
mâle pas complèteme disjoncteurs.
nt branchée dans la
prise.
fr
Dérangement
Cause possible
Remède
L’éclairage ne
fonctionne pas.
L’ampoule est grillée.
Changez l’ampoule. Fig. 6/B
1. Débranchez la fiche mâle
de la prise de courant et /
ou ramenez le disjoncteur
en position éteinte.
2. Changez l’ampoule
(Ampoule de rechange : 220 240 V , courant alternatif, culot
E14. Puissance : voir l’inscription
sur l’ampoule défectueuse).
Le capteur de contact
s’est sali.
Nettoyez le capteur de contact avec
un essuie-tout humide. Fig. 6/1
Vous avez touché
N’ouvrez la porte qu’avec les mains
la poignée de porte
nues.
avec des gants ou une
autre pièce
vestimentaire.
Une serviette humide
est suspendue
à la poignée.
Enlevez cette serviette
de la poignée.
Le fond du
compartiment
de réfrigération est
mouillé.
La rigole à eau de
dégivrage ou le trou
d'écoulement sont
bouchés.
Nettoyez la rigole d’écoulement
de l’eau de condensation et le tuyau
d’écoulement voir « Nettoyage
de l’appareil ». Fig. 3
Le groupe frigorifique
s'enclenche de plus
en plus souvent
et longtemps.
Vous avez ouvert
fréquemment
l'appareil.
N'ouvrez pas l'appareil inutilement.
Les orifices d'apport
Enlevez ces obstacles.
et d'évacuation d'air
sont
recouverts par des obj
ets faisant obstacle.
35
fr
Dérangement
Cause possible
L’appareil ne refroidit
pas.
■
■
■
■
L’appareil est éteint. Appuyez sur l’interrupteur principal
Marche / Arrêt. Fig. 2/1
Coupure
de courant.
Vérifiez la présence de courant.
Vérifiez le fusible / disjoncteur.
Le fusible /
disjoncteur a été
retiré / se trouve
en position éteinte.
Fiche mâle
incorrectement
branchée dans la
prise de courant.
Service après-vente
Pour connaître le service après-vente
situé le plus près de chez vous,
consultez l'annuaire téléphonique
ou le répertoire des services après-vente
(SAV). Veuillez indiquer au SAV
le numéro de série (E-Nr.) de l'appareil
et son numéro de fabrication (FD).
Vous trouverez ces indications
sur la plaque signalétique Fig. 7
Aidez-nous à éviter des déplacements
inutiles : indiquez les numéros de série
et de fabrication. Vous économiserez
ainsi des suppléments de frais inutiles.
36
Remède
Commande de réparation
et conseils en cas
de dérangements
Vous trouverez les données de contact
pour tous les pays dans l’annuaire cijoint du service après-vente.
FR
B
CH
01 40 10 12 00
070 222 142
0848 840 040
it
itIndiceitIstruozinipeI´r suo
Avvertenze
di sicurezza
e potenziale pericolo
Prima di mettere in funzione
l'apparecchio
Leggere attentamente tutte le istruzioni
per l'uso ed il montaggio. Esse
contengono importanti informazioni per
l'installazione, l'uso e la manutenzione
dell'apparecchio.
Il produttore non è responsabile se voi
trascurate le indicazioni ed avvertenze
del libretto d’istruzioni per l’uso.
Conservare tutta la documentazione
per l'uso futuro oppure per eventuali
successivi proprietari.
Elementi tecnici di sicurezza
Quest’apparecchio contiene una piccola
quantità di gas refrigerante (R600a),
un gas Eco-Compatibile,
ma infiammabile. Prevenire
danneggiamenti ai raccordi del circuito
refrigerante durante il trasporto
o l’installazione dell’apparecchio. Il gas
fuoriuscendo per effetto della pressione,
può provocare irritazioni agli occhi.
La quantità di gas refrigerante contenuta
nel vostro apparecchio, circa 8 gr.
è indicata nella targhetta d'identificazione
posta all'interno dell'apparecchio. Nel
caso in cui il cavo di collegamento
elettrico dovesse subire danni,
è necessario sostituirlo,
coinvolgere il servizio assistenza clienti
autorizzato o un elettricista qualificato ad
eseguire questa operazione.
Installazioni o riparazioni eseguite da
personale non autorizzato, possono
potenzialmente creare pericolo per
l’utente e danni all’apparecchio.
Le riparazioni vanno eseguite dal servizio
assistenza clienti autorizzato
Le riparazioni vanno eseguite dal servizio
assistenza clienti autorizzato o da
personale qualificato ad eseguire questa
operazione.
È consentito usare solo parti di ricambio
originali del costruttore. Solo con
l’impiego di detti componenti
il costruttore garantisce che i requisiti
di sicurezza del prodotto siano rispettati.
Il prolungamento del cavo elettrico
di alimentazione deve essere eseguito
dal servizio assistenza clienti autorizzato.
In caso di danni:
■ tenere lontano dall'apparecchio
fiamme o fonti di accensione,
■ ventilare l'ambiente per alcuni minuti,
■
spegnere l’apparecchio ed estrarre
la spina di alimentazione elettrica,
■
informare il Servizio Assistenza Clienti
autorizzato.
37
it
Nell’impiego quotidiano
■
■
■
■
■
■
■
■
■
Non introdurre mai apparecchi elettrici
nell’interno di questo elettrodomestico
(es. apparecchi di riscaldamento,
produttori di ghiaccio elettrici ecc.).
Potenziale rischio di deflagrazioni!
Non sbrinare o pulire l’apparecchio
con una idropulitrice a vapore.
Il vapore può raggiungere parti
elettriche e provocare cortocircuiti.
Pericolo di scariche elettriche!
Non utilizzare oggetti appuntiti o affilati
per rimuovere la brina o il ghiaccio.
Così facendo si possono danneggiare
i raccordi del circuito refrigerante.
Il gas fuoriuscendo sotto effetto della
pressione, può provocare irritazione
agli occhi.
Non conservare nell’apparecchio
prodotti contenenti propellenti gassosi
combustibili (per es. bombolette
spray) e sostanze infiammabili.
Potenziale rischio di deflagrazioni!
Non usare impropriamente lo zoccolo,
i cassetti estraibili, le porte ecc. quale
punto di appoggio o come sostegno.
Per lo sbrinamento e la pulizia
dell’apparecchio, estrarre la spina
elettrica o disinserire l’interruttore
di sicurezza. Evitare di esercitare
trazioni sul cordone elettrico,
ma impugnare correttamente la spina.
Conservare alcool ad alta gradazione
in un contenitore ermeticamente
chiuso, e posto in posizione verticale.
Evitare che olii o grassi imbrattino
parti plastiche o le guarnizioni delle
porte. I grassi aggrediscono
il materiale plastico e la guarnizione
della porta diventano fragili e porose.
Non ostruire le aperture per
il passaggio dell’aria di aereazione
dell’apparecchio.
38
■
L’uso di questo apparecchio
è consentito a persone (bambini
compresi) con ridotte capacità fisiche,
sensoriali o psichiche o con
insufficienti conoscenze, presupposto
che siano sorvegliate da persona
responsabile della loro sicurezza o da
questa adeguatamente istruite nell’uso
dell’apparecchio.
Bambini in casa
■
Non abbandonare parti
dell'imballaggio che possano essere
fonte di gioco per i bambini.
Pericolo di soffocamento causato
da scatole di cartone, fogli di plastica,
polistirolo!
■
L'apparecchio non è un giocattolo per
bambini!
■
Per apparecchi con serratura
della porta:
conservare la chiave fuori
della portata dei bambini!
Norme generali
Questo apparecchio è destinato
esclusivamente alla conservazione di
vino.
Questo apparecchio è destinato
esclusivamente all’uso domestico
e da collocarsi in ambiente domestico.
L’apparecchio è dotato di schermatura
contro i radiodisturbi in allineamento alle
direttive UE 2004/108/EC.
La tenuta ermetica del circuito
refrigerante è stata sottoposta
a controllo.
Questo prodotto è conforme alle vigenti
norme di sicurezza per gli apparecchi
elettrici (EN 60335-2-24).
it
Avvertenze per
lo smaltimento
* Smaltimento
dell'imballaggio
3. Non estrarre i ripiani e i contenitori,
questo rende più difficile ai bambini
di entrare nel vano frigo
dell'apparecchio!
4. Vietare ai bambini di giocare con
un apparecchio dismesso. Pericolo
di asfissia!
L'imballaggio ha protetto l'apparecchio
da eventuali danni da trasporto. Tutti
i materiali impiegati sono EcoCompatibili e riciclabili. Il Vostro
contributo: smaltite l'imballaggio
secondo la vigenti norme.
Chiedere informazioni circa
le piattaforme di smaltimento locale alla
propria amministrazione comunale.
I frigoriferi contengono gas nel circuito
refrigerante e gas nell'isolamento.
Refrigerante e gas devono essere
smaltiti in modo appropriato. Evitare
di danneggiare i raccordi del circuito
refrigerante, durante il conferimento
dell’apparecchio alla piattaforma
di riciclaggio.
* Rottamazione
di un apparecchio dismesso
Dotazione
Gli apparecchi dismessi dispongono
ancora di un valore residuo! Un corretto
smaltimento nel rispetto dell’ecologia,
permette di recuperare materie prime
pregiate.
Questo apparecchio dispone
di contrassegno ai sensi della
direttiva europea 2002/96/CE
in materia di apparecchi elettrici
ed elettronici (Waste Electrical
and Electronic Equipment –
WEEE). Questa direttiva definisce
le norme per la raccolta
e il riciclaggio degli apparecchi
dismessi valide su tutto il territorio
dell’Unione Europea.
ã=Avviso
In caso di apparecchi fuori uso
1. Estrarre la spina di alimentazione.
2. Troncare il cavo elettrico
di collegamento e rimuoverlo
unitamente alla spina.
Dopo il disimballo controllare
l’apparecchio per accertare eventuali
danni di trasporto.
In caso di contestazioni rivolgersi
al Vs. fornitore, presso il quale
l’apparecchio è stato acquistato.
La dotazione comprende i seguenti
componenti:
■
■
■
■
■
■
■
■
Apparecchio da incasso
Accessori (a secondo del modello)
Busta con il materiale utile
al montaggio
Istruzioni per l’uso
Istruzioni per il montaggio
Libretto del servizio assistenza clienti
autorizzato
Allegato di garanzia convenzionale
Informazioni sul consumo energetico
e sui possibili rumori
39
it
Temperatura ambiente,
ventilazione
e profondità della
nicchia
Temperatura ambiente
L’apparecchio è progettato per una
specifica classe climatica. In funzione
di questa, l’apparecchio può essere
usato alle seguenti temperature
ambientali.
La classe climatica è indicata nella
targhetta porta-dati. Figura 7
Classe
climatica
SN
N
ST
T
Temperatura ambiente
ammessa
da +10 °C a 32 °C
da +16 °C a 32 °C
da +16 °C a 38 °C
da +16 °C a 43 °C
Avvertenza
L’apparecchio è perfettamente efficiente
nei limiti di temperatura ambiente della
classe climatica indicata. Se un
apparecchio della classe climatica SN
viene messo in funzione a temperature
ambiente inferiori, possono essere
esclusi danni all’apparecchio fino ad una
temperatura di +5 °C.
Ventilazione
L’aria sulla parete posteriore
dell’apparecchio si riscalda. L’aria
riscaldata deve poter defluire
liberamente. Altrimenti il refrigeratore
deve lavorare di più. Questo aumenta
il consumo di energia elettrica. Perciò:
evitare assolutamente di coprire o di
ostruire le aperture di afflusso e deflusso
dell’aria!
40
Profondità della nicchia
Per l'apparecchio si consiglia
una profondità della nicchia di 560 mm.
Una minore profondità della nicchia –
minimo 550 mm – fa aumentare
leggermente l'assorbimento di energia.
Luogo d'installazione
Per l'installazione è idoneo un ambiente
asciutto ventilato. Il luogo d'installazione
non deve essere esposto all'irradiazione
solare diretta e non essere vicino
ad una fonte di calore, come stufa,
calorifero ecc. Se è inevitabile
l'installazione accanto ad una fonte
di calore, utilizzare un idoneo pannello
isolante, oppure rispettate le seguenti
distanze minime dalla fonte di calore.
■
■
Da cucine elettriche o a gas 3 cm.
Da stufe ad olio o a carbone 30 cm.
Collegare
l’apparecchio
Dopo avere posizionato l’apparecchio,
attendere circa 1 ore prima di metterlo
in funzione, questo assicura che l’olio
lubrificante si raccolga nella parte bassa
del motore e non penetri nel circuito
di raffreddamento.
Pulire l’interno dell’apparecchio prima
di attivarne la funzione (vedi capitolo
«Pulizia dell’apparecchio»).
it
Allacciamento elettrico
La presa elettrica deve essere vicino
all’apparecchio ed accessibile anche
ad installazione avvenuta
dell’apparecchio.
L’apparecchio è conforme alla classe
d’isolamento I. Collegare l’apparecchio
a tensione alternata di 220–240 V/
50 Hz utilizzando una presa elettrica
dotata di connettore di messa a terra.
La presa deve essere protetta con
dispositivo elettrico di sicurezza da 10–
16 A.
Per apparecchi, che vengono impiegati
in paesi non europei, controllare
se la tensione indicata corrisponda
ai valori della locale rete elettrica. Questi
dati sono riportati nella targhetta portadati. Figura 7
ã=Avviso
I nostri apparecchi possono essere
collegati ad un inverter sinusoidale
di rete.
Gli inverter di rete vengono utilizzati
in abbinamento a impianti fotovoltaici
e collegati direttamente alla rete elettrica
pubblica. Usare inverter sinusoidali nel
caso di soluzioni speciali
(es. imbarcazioni oppure nelle baite
in montagna), laddove non sia
disponibile un collegamento elettrico
diretto alla rete pubblica.
Conoscere
l’apparecchio
Svolgere l’ultima pagina con le figure.
Questo libretto d’istruzioni per l’uso
è valido per vari modelli,
pertanto le dotazioni possono variare.
Nelle illustrazioni sono possibili
differenze.
Figura 1
1
2
3
4
5
Sensore di contatto
Elementi di comando/
illuminazione
Ripiano bottiglie
Ripiano in vetro
Maniglia della porta Touch-Light
Elementi di comando
1
2
Interruttore principale Acceso/
Spento
Serve per accendere e spegnere
l’intero apparecchio.
Pulsante «super»
Serve per attivare la funzione
super-raffreddamento (vedi
capitolo «Super-raffreddamento»).
41
it
3
4
Display della temperatura
I numeri corrispondono alle
temperature del vano frigo
regolate in °C.
Pulsante di regolazione
temperatura
Con questo pulsante si regola
la temperatura.
Accendere
l’apparecchio
Accendere l’apparecchio con il pulsante
principale Acceso/Spento, figura 2/1.
L’indicatore di temperatura lampeggia,
figura 2/3, finché l’apparecchio non ha
raggiunto la temperatura regolata.
L’apparecchio comincia a raffreddare,
a porta aperta l’illuminazione è accesa.
Dopo l’accensione possono trascorrere
diverse ore prima di raggiungere
la temperatura regolata.
Consigliamo una regolazione di +10 °C.
Istruzioni per il funzionamento
La temperatura nel frigorifero aumenta:
■ a causa della frequente apertura
della porta dell’apparecchio,
■ a causa dell’introduzione di grandi
quantità di alimenti,
■ a causa di un’alta temperatura
ambiente.
42
Regolare
la temperatura
Figura 2
La temperatura può essere regolata
da +6 °C a +14 °C.
Premere ripetutamente il pulsante
di regolazione temperatura 4 finché non
è regolata la temperatura desiderata.
L’ultimo valore regolato viene
memorizzato. La temperatura regolata
è visualizzata nel display della
temperatura 3.
Touch-Light
Figura 5
Questo apparecchio è dotato di una
funzione Touch-Light. L’illuminazione si
accende toccando la maniglia della
porta dell’apparecchio.
Questa funzione permette di vedere tutte
le bevande, senza aprire la porta. Con
questo si risparmia energia.
Dopo avere toccato la maniglia a porta
chiusa, l’illuminazione si spegne
automaticamente dopo ca. 60 secondi.
Se la porta è stata aperta, l’illuminazione
si spegne nuovamente ca. 10 secondi
dopo la chiusura della porta.
it
Capacità utile totale
I dati di volume utile sono indicati sulla
targhetta d'identificazione
dell'apparecchio. Figura 7
Tenere presente nella
sistemazione
■
■
■
■
■
Complessivamente sui ripiani bottiglie
possono essere conservate
32 bottiglie da 750 ml oppure bottiglie
da litro, bottiglie da litro. Figura 8
Queste quantità possono essere
raggiunte se si depongono le bottiglie
con il collo della bottiglia rivolto verso
avanti. Figura 4
Le quantità di bottiglie indicate
possono differire in caso di diversa
forma e dimensione delle bottiglie.
Figura 8
Per avere una buona circolazione
dell’aria nell’apparecchio, le bottiglie
non devono toccare la parete
posteriore del frigorifero. Conservare
perciò le bottiglie nell’apparecchio
con il collo della bottiglia rivolto verso
avanti. Figura 4
Fare raffreddare le bevande calde
fuori dell’apparecchio.
Temperature
di consumazione
La giusta temperatura di degustazione
è decisiva per il gusto del vino
e di conseguenza per il piacere
nel gustarlo.
Per servire il vino consigliamo
le seguenti temperature
di consumazione:
Tipo di vino
Bordeaux rosso
Côtes du Rhône
rosso/Barolo
Borgogna rosso/
Bordeaux rosso
Porto
Borgogna nuovo
Vini rossi nuovi
Beaujolais nuovo/
tutti i vini bianchi
con poco residuo
di gusto amabile
Vini bianchi
vecchi/
Chardonnay
Sherry
Vini bianchi nuovi
di vendemmia
tardiva
Vini bianchi
della Loira/Entredeux-Mers
Temperatura
di consumazione
18 °C
17 °C
16 °C
15
14
12
11
°C
°C
°C
°C
10 °C
9 °C
8 °C
7 °C
43
it
Spegnere e mettere
fuori servizio
l'apparecchio
Spegnere l’apparecchio
Figura 2
Premere l'interruttore principale Acceso/
Spento 1 (il cerchio rosso è ora visibile).
La spia temperatura si spegne.
Raffreddamento ed illuminazione sono
spenti.
Mettere fuori servizio
l’apparecchio
Quando non si usa l'apparecchio per
un lungo periodo:
1. Spegnere l’apparecchio.
2. Estrarre la spina di alimentazione
o disinserire il dispositivo elettrico
di sicurezza.
3. Pulire l’apparecchio.
4. Lasciare aperta la porta
dell’apparecchio.
Pulizia
dell’apparecchio
ã=Attenzione
■
Non utilizzare prodotti per pulizia
e solventi chemici contenenti sabbia,
cloro o acidi.
■
Non usare spugne abrasive o spugne
che graffiano. Sulle superfici
metalliche potrebbe formarsi macchie
da corrosione.
44
■
Non lavare mai in lavastoviglie i ripiani
ed i contenitori. Questi elementi
si possono deformare!
Procedere come segue:
1. Prima di iniziare la pulizia spegnere
l’apparecchio.
2. Estrarre la spina di alimentazione
o disinserire il dispositivo elettrico
di sicurezza.
3. Attendere lo sbrinamento dello strato
di brina.
4. Pulire l’apparecchio con un panno
morbido, acqua tiepida e poco
detergente a pH neutro. L'acqua di
lavaggio non deve penetrare
nell'illuminazione o, attraverso il foro di
scarico, nella zona di evaporazione.
5. Lavare la guarnizione della porta solo
con acqua pulita e poi asciugarla
con cura.
6. Evitare che l’acqua di lavaggio
defluisca attraverso il foro di scarico
che conduce alla vaschetta
di evaporazione.
7. Dopo la pulizia: ricollegare
ed accendere l’apparecchio.
Avvertenza
Affinché l’acqua di sbrinamento possa
defluire liberamente, pulire regolarmente
i convogliatori ed il foro di scarico,
figura 3, utilizzando bastoncini cotonati
o simili.
it
Risparmiare energia
■
■
Installare l’apparecchio
un in ambiente asciutto ventilabile.
L’apparecchio non deve essere
esposto direttamente al sole o vicino
ad una fonte di calore (per es.
calorifero, stufa).
Altrimenti usare un pannello isolante.
Profondità della nicchia consigliata
560 mm.
Una minore profondità della nicchia
provoca un maggiore assorbimento di
energia.
Rumori
di funzionamento
Rumori normali
Ronzio
Motori in funzione (ad es. gruppi
frigoriferi, ventilatore).
Gorgoglìo, scroscio o fruscìo
Derivano dal gas refrigerante, che circola
nei i raccordi del circuito refrigerante.
Breve scatto
Motore, interruttori ed elettrovalvole
s'inseriscono/disinseriscono.
■
Lasciare prima raffreddare le bevande
calde, dopo metterle nell’apparecchio!
■
Aprire la porta dell’apparecchio
il tempo più breve possibile.
Per evitare un consumo eccessivo
di energia elettrica, la zona del motore
dell’apparecchio dovrebbe essere
pulita saltuariamente.
Evitare i rumori
La disposizione delle parti
dell'attrezzatura non ha influenza
sull'assorbimento di energia
dell'apparecchio.
I contenitori o i ripiani traballano o non
sono correttamente inseriti
Controllare le parti estraibili
ed eventualmente inserirle di nuovo
correttamente.
■
■
L’apparecchio non è livellato
Livellare l’apparecchio con una livella
a bolla d’aria. Se necessario, mettere
sotto uno spessore.
I contenitori all’interno dell’apparecchio
si toccano tra loro
Allontanare un poco le bottiglie
o i contenitori.
45
it
Eliminare piccoli guasti
Prima di rivolgersi al customer service:
provare ad eliminare autonomamente l’inconveniente con l’aiuto delle seguenti
istruzioni.
L’intervento del Servizio Assistenza Clienti in caso di corretto funzionamento
del prodotto, è a carico del consumatore.
Guasto
Causa possibile
La temperatura
si discosta
notevolmente dalle
impostazioni iniziali.
Tutte le spie spente.
46
Rimedio
In alcuni casi basta spegnere
l'apparecchio per 5 minuti.
Se la temperatura è troppo alta,
controllare dopo qualche ora
se vi è stata una normalizzazione
della temperatura.
Se la temperatura è troppo bassa,
ricontrollare la temperatura il giorno
seguente.
Interruzione
dell’energia elettrica;
è scattato il dispositivo
elettrico di sicurezza;
la spina
d’alimentazione non
è inserita
correttamente.
Collegare la spina di alimentazione.
Controllare se vi è energia elettrica
e controllare il dispositivo elettrico
di sicurezza.
it
Guasto
Causa possibile
Rimedio
L’illuminazione non
funziona.
La lampadina
ad incandescenza
è fulminata.
Sostituire la lampadina
ad incandescenza. Figura 6/B
1. Estrarre la spina di alimentazione
o disinserire il dispositivo elettrico
di sicurezza.
2. Sostituire la lampadina.
(Lampadina di ricambio: 220240 V corrente alternata,
portalampada E14, Watt vedi
lampadina guasta.)
Il sensore di contatto è Pulire il sensore di contatto con un
sporco.
panno umido. Figura 6/1
La maniglia della porta Toccare la maniglia solo a mano
è stata toccata con un nuda.
guanto o con altro
capo d’abbigliamento.
Il fondo del vano
frigorifero è bagnato.
Sulla maniglia
è appeso
un asciugamano
umido.
Togliere l’asciugamano dalla
maniglia.
Il convogliatore
di convogliamento
dell'acqua
di sbrinamento
o il foro di scarico
sono otturati.
Pulire il convogliatore dell’acqua
di sbrinamento ed il foro di scarico
(vedi «Pulire l’apparecchio»).
Figura 3
Il refrigeratore
Frequente apertura
si accende sempre più della porta
spesso e più a lungo. dell'apparecchio.
Non aprire inutilmente la porta
dell’apparecchio.
I passaggi dell'aria per Liberare le aperture.
l'areazione sono
ostruiti.
47
it
Guasto
Causa possibile
L’apparecchio non ha
potenza
di raffreddamento.
■
■
■
■
L’apparecchio
è spento.
Interruzione
dell’energia
elettrica.
L’interruttore
di sicurezza
è scattato.
La spina
d’alimentazione non
è inserita
correttamente.
Servizio Assistenza
Clienti
Trovate un centro d’assistenza clienti
autorizzato a voi vicino tramite i numeri
verdi (800…) in Internet oppure
nell’elenco del Servizio Assistenza Clienti
in dotazione all’apparecchio. Indicate
al Servizio Assistenza Clienti autorizzato
la sigla del prodotto (E-Nr.) e il numero
di fabbricazione (FD) dell’apparecchio.
Trovate questi dati sulla targhetta
d’identificazione. Figura 7
Indicando la sigla del prodotto
ed il numero di fabbricazione contribuite
ad evitarci interventi inutili. Risparmiate
così la relativa spesa.
48
Rimedio
Premere l’interruttore principale
Acceso/Spento. Figura 2/1
Controllare se vi è energia elettrica.
Controllare il dispositivo elettrico
di sicurezza.
Ordine di riparazione
e consulenza in caso di guasti
Trovate i dati di contatto di tutti i paesi
nell’accluso elenco dei centri
di assistenza clienti.
I
CH
800-018346
0848 840 040
Linea verde
nl
nlIn houd nlGebruiksanawiznji g
Veiligheidsbepalingen
en waarschuwingen
Voordat u het apparaat
in gebruik neemt
Lees de gebruiksaanwijzing en het
installatievoorschrift nauwkeurig door.
U vindt daarin belangrijke informatie over
plaatsing, gebruik en onderhoud van het
apparaat.
De fabrikant aanvaardt geen
aansprakelijkheid als de aanwijzingen
en waarschuwingen
in de gebruiksaanwijzing niet in acht
worden genomen. Bewaar
de gebruiksaanwijzing en het
montagevoorschrift voor later gebruik
of voor een eventuele latere bezitter.
Technische veiligheid
Het apparaat bevat een geringe
hoeveelheid van het milieuvriendelijke
maar brandbare koelmiddel R600a. Let
erop dat de leidingen van het koelcircuit
bij het transport of de installatie niet
beschadigd worden. Koelmiddel dat naar
buiten spuit kan vlam vatten of tot
oogletsel leiden.
Hoe meer koelmiddel het apparaat
bevat, des te groter moet de ruimte zijn
waarin het apparaat wordt opgesteld.
In een te kleine ruimte kan bij een lek
een ontvlambaar mengsel van gas
en lucht ontstaan.
Per 8 g koelmiddel moet het vertrek
minstens 1 m³ groot zijn. De hoeveelheid
koelmiddel in uw apparaat vindt u op het
typeplaatje aan de binnenkant van het
apparaat.
Als de aansluitkabel van het apparaat
beschadigd raakt, moet deze worden
vervangen door de fabrikant, de
klantenservice of een andere
gekwalificeerde persoon. Onvakkundige
installatie en reparaties kunnen groot
gevaar opleveren voor de bezitter.
Reparaties mogen uitsluitend worden
uitgevoerd door de fabrikant, de
klantenservice of een andere
gekwalificeerde persoon.
Er mogen alleen originele onderdelen
van de fabrikant gebruikt worden. Alleen
bij deze onderdelen garandeert de
fabrikant dat ze aan de veiligheidseisen
voldoen.
Een verlengsnoer voor de aansluitkabel
mag uitsluitend via de klantenservice
worden aangeschaft.
Bij beschadiging
■ Open vuur of andere
ontstekingsbronnen uit de buurt van
het apparaat houden;
■ Ruimte gedurende een paar minuten
goed luchten;
■ Apparaat uitschakelen en de stekker
uit het stopcontact trekken;
■ Contact opnemen met
de Servicedienst.
49
nl
Bij het gebruik
■
■
■
■
■
■
Nooit elektrische apparaten in het
apparaat gebruiken (bijv.
verwarmingsapparaten, elektrische
ijsmaker etc.). Gevaar voor explosie!
Het apparaat nooit met een
stoomreiniger ontdooien of
schoonmaken! De hete stoom kan in
de elektrische onderdelen
terechtkomen en kortsluiting
veroorzaken. Kans op een elektrische
schok!
Gebruik geen puntige of scherpe
voorwerpen om een laag ijs of rijp
te verwijderen. Hierdoor kunt u
de koelleidingen beschadigen.
Koelmiddel dat naar buiten spuit kan
vlam vatten of tot oogletsel leiden.
Geen producten met brandbare
drijfgassen (bijv. spuitbussen) en geen
explosieve stoffen in het apparaat
opslaan. Gevaar voor explosie!
Plint, uittrekbare manden of laden,
deuren etc. niet als opstapje
gebruiken of om op te leunen.
Om te ontdooien of schoon te maken:
stekker uit het stopcontact trekken
resp. de zekering uitschakelen of
losdraaien. Altijd aan de stekker
trekken, nooit aan de aansluitkabel.
■
Dranken met een hoog
alcoholpercentage altijd goed
afgesloten en staand bewaren.
■
Geen olie of vet gebruiken op
kunststof onderdelen en
deurdichtingen. Ze kunnen poreus
worden.
■
De be- en ontluchtingsopeningen van
het apparaat nooit afdekken.
50
■
Personen (inclusief kinderen) met
fysieke, sensorische of psychische
beperkingen of gebrekkige kennis
mogen dit apparaat uitsluitend
gebruiken indien ze onder toezicht
staan van een persoon die
verantwoordelijk is voor hun veiligheid
of door deze persoon zijn ingelicht
over de wijze waarop het apparaat
dient te worden gebruikt.
Kinderen in het huishouden
■
Verpakkingsmateriaal en onderdelen
ervan zijn geen speelgoed voor
kinderen.
Verstikkingsgevaar door opvouwbare
kartonnen dozen en folie!
■
Het apparaat is geen speelgoed voor
kinderen!
■
Bij een apparaat met deurslot:
sleutel buiten het bereik van kinderen
bewaren!
Algemene bepalingen
Dit apparaat is uitsluitend bestemd voor
het opslaan van wijn.
Dit apparaat is bestemd voor
privégebruik in het huishouden en
de huiselijke omgeving.
Het apparaat is ontstoord volgens EU
richtlijn 2004/108/EC.
Het koelcircuit is op dichtheid
gecontroleerd.
Dit apparaat voldoet aan
de veiligheidsbepalingen voor
elektrische apparaten (EN 60335-2-24).
nl
Aanwijzingen over
de afvoer
* Afvoeren van de verpakking
van uw nieuwe apparaat
De verpakking beschermt uw apparaat
tegen transportschade. De gebruikte
materialen zijn onschadelijk voor het
milieu en kunnen opnieuw worden
gebruikt. Help daarom mee en zorg
dat de verpakking milieuvriendelijk wordt
afgevoerd.
U kunt bij uw leverancier
of bij de reinigingsdienst
in uw gemeente informeren hoe
u uw oude apparaat en het
verpakkingsmateriaal van het nieuwe
apparaat kunt (laten) afvoeren voor een
milieuvriendelijke verwerking.
* Afvoeren van uw oude
apparaat
Oude apparaten zijn geen waardeloos
afval! Door een milieuvriendelijke afvoer
kunnen waardevolle grondstoffen worden
teruggewonnen.
Dit apparaat is gekenmerkt
in overeenstemming met
de Europese richtlijn 2002/96/
EG betreffende afgedankte
elektrische en elektronische
apparatuur (waste electrical
and electronic equipment –
WEEE). Deze richtlijn geeft het
kader aan voor een in de EU
geldende terugname
en verwerking van oude
apparaten.
ã=Waarschuwing
Bij afgedankte apparaten
1. Stekker uit het stopcontact trekken.
2. Aansluitkabel doorknippen en samen
met de stekker verwijderen.
3. Legplateaus en voorraadvakken niet
eruit halen om het kinderen moeilijk
te maken erin te klimmen!
4. Laat kinderen niet met het afgedankte
apparaat spelen. Verstikkingsgevaar!
Koelapparaten bevatten koelmiddel
en in de isolatie gas. Die zorgvuldig
moeten worden afgevoerd. Met het oog
op een doelmatige en milieuvriendelijke
afvoer mogen de leidingen van het
koelcircuit tot het moment van transport
niet beschadigd worden.
Omvang van
de levering
Controleer na het uitpakken alle
onderdelen op eventuele
transportschade.
Voor klachten kunt u terecht bij de winkel
waar u het apparaat hebt aangeschaft of
bij onze klantenservice.
De levering bestaat uit de volgende
onderdelen:
■ Inbouwapparaat
■ Uitrusting (modelafhankelijk)
■
■
■
■
■
■
Zakje met montagemateriaal
Gebruiksaanwijzing
Montagevoorschrift
Klantenserviceboekje
Garantiebijlage
Informatie over energieverbruik en
geluiden
51
nl
Kamertemperatuur,
ventilatie en nisdiepte
Omgevingstemperatuur
Het apparaat is voor een bepaalde
klimaatklasse geconstrueerd. Afhankelijk
van de klimaatklasse kan het apparaat
bij de volgende omgevingstemperaturen
gebruikt worden.
De klimaatklasse staat op
het typeplaatje, afb. 7.
Klimaatklasse
SN
N
ST
T
Toelaatbare
omgevingstemperatuur
+10 °C tot 32 °C
+16 °C tot 32 °C
+16 °C tot 38 °C
+16 °C tot 43 °C
Aanwijzing
Het apparaat is volledig functioneel
binnen de binnentemperatuurgrenzen
van de aangegeven klimaatklasse.
Wanneer een apparaat uit klimaatklasse
SN wordt gebruikt bij een lagere
binnentemperatuur, kunnen
beschadigingen aan het apparaat
worden uitgesloten tot een temperatuur
van +5 °C.
Beluchting
De lucht aan de achterzijde van
het apparaat wordt warm. De verwarmde
lucht moet ongehinderd afgevoerd
kunnen worden. Anders moet de
koelmachine meer presteren. Waardoor
het energieverbruik toeneemt. De
be en ontluchtingsopeningen mogen dan
ook nooit worden afgedekt!
52
Nisdiepte
Voor het apparaat wordt een nisdiepte
van 560 mm aanbevolen. Bij een
kleinere nisdiepte – minstens 550 mm –
wordt het energieverbruik iets hoger.
De juiste plaats
Geschikt voor het opstellen zijn droge,
ventileerbare vertrekken. Het apparaat
liefst niet in de zon of naast een fornuis,
verwarmingsradiator of een andere
warmtebron plaatsen. Is plaatsing naast
een warmtebron niet te vermijden, maak
dan gebruik van een isolerende plaat of
neem de volgende minimumafstanden in
acht:
■
■
Naast elektrische of gasfornuizen
3 cm.
Naast een CV-installatie 30 cm.
Apparaat aansluiten
Na het plaatsen van het apparaat moet
u minimaal 1 uur wachten voordat u het
apparaat in gebruik neemt. Tijdens het
transport kan het gebeuren dat de olie
van de compressor in het koelsysteem
terecht komt.
Vóór het eerste gebruik de binnenruimte
van het apparaat schoonmaken (zie
hoofdstuk „Schoonmaken van
het apparaat”).
nl
Elektrische aansluiting
Het stopcontact moet zich in de buurt
van het apparaat bevinden en ook na het
opstellen van het apparaat goed
bereikbaar zijn.
Het apparaat voldoet aan
beschermklasse I. Het apparaat
aansluiten op een volgens
de voorschriften geïnstalleerd 220–
240 V/50 Hz wisselstroomstopcontact
met aardleiding. Het stopcontact moet
zijn beveiligd met een zekering van 10 A
tot 16 A.
Bij apparaten die in niet Europese landen
worden gebruikt op het typeplaatje
controleren of de aansluitspanning
en de stroomsoort overeenkomen met
de waarden van uw elektriciteitsnet.
U vindt deze gegevens
op het typeplaatje. Afb. 7
ã=Waarschuwing
Het apparaat mag in geen geval worden
aangesloten op elektronische
energiebesparingsstekkers.
Voor onze apparaten kunnen
netvoedingsinverters en sinusinverters
worden gebruikt. Netvoedingsinverters
worden gebruikt bij fotovoltaïsche
installaties die rechtstreeks zijn
aangesloten op het openbare
elektriciteitsnet. Bij losstaande systemen
(bijv. op schepen of in berghutten) die
geen rechtstreekse aansluiting op het
openbare elektriciteitsnet hebben, moet
een sinusinverter worden gebruikt.
Kennismaking met
het apparaat
De laatste bladzijde met de afbeeldingen
uitklappen. Deze gebruiksaanwijzing is
op meer dan één type van toepassing.
De uitrusting van de modellen kan
variëren.
Kleine afwijkingen in de afbeeldingen zijn
mogelijk.
Afb. 1
1
2
3
4
5
Contactsensor
Bedieningselementen/Verlichting
Flessenrek
Glasplaat
Touch-Light deurgreep
Bedieningselementen
1
2
Hoofdschakelaar Aan/Uit
Om het hele apparaat in en uit te
schakelen.
Toets „super”
Dient voor het inschakelen van de
functie superkoelen (zie het
hoofdstuk Superkoelen).
53
nl
3
Temperature display
De cijfers komen overeen met
de ingestelde temperaturen
in de koelruimte in °C.
Temperatuurinsteltoets
Met deze toets wordt de
temperatuur ingesteld.
4
Inschakelen van
het apparaat
Het apparaat inschakelen met
de hoofdschakelaar Aan/Uit, afb 2/1.
De temperatuurindicatie knippert, afb. 2/
3, tot in het apparaat de ingestelde
temperatuur is bereikt.
Het apparaat begint te koelen,
de verlichting is ingeschakeld wanneer
de deur open is.
Na het inschakelen kan het een aantal
uren duren voordat de ingestelde
temperatuur is bereikt.
De fabriek adviseert een instelling van
+10 °C.
Aanwijzingen bij het gebruik
De temperatuur in de koelruimte wordt
warmer:
■
■
■
als de deur van het apparaat te vaak
geopend werd,
door het inladen van grote
hoeveelheden levensmiddelen,
door een hoge
omgevingstemperatuur.
54
Instellen van
de temperatuur
Afb. 2
De temperatuur is instelbaar van +6 °C
tot +14 °C.
Temperatuur-insteltoets 4 net zo vaak
indrukken tot de gewenste temperatuur
is ingesteld.
De laatst ingestelde waarde wordt in het
geheugen opgeslagen. De ingestelde
temperatuur wordt aangegeven op de
temperatuurindicatie 3.
Touch-Light
Afb. 5
Het apparaat beschikt over een TouchLight-functie. Wanneer u de handgreep
van de apparaatdeur aanraakt, schakelt
de verlichting in.
Door deze functie krijgt u een overzicht
van uw dranken zonder de deur te
openen. Hiermee bespaart u energie.
Wanneer u de handgreep van de
gesloten deur hebt aangeraakt, schakelt
de verlichting na ca. 60 seconden
automatisch uit. Wanneer u de deur hebt
geopend, schakelt de verlichting
ca. 10 seconden na het sluiten van de
deur weer uit.
nl
Netto-inhoud
Drinktemperaturen
De gegevens over de netto-inhoud vindt
u op het typeplaatje in uw apparaat.
Afb. 7
De juiste schenktemperatuur is
doorslaggevend voor de smaak van
de wijn en daarmee voor het drinkgenot.
Wij raden bij het schenken van de wijn
de volgende temperaturen aan:
Attentie bij
het inruimen
■
In totaal kunnen
32 driekwartliterflessen of 28literflessen op de flessenrekken
worden ondergebracht. Afb. 8
■
Dit aantal kan bereikt worden als
de flessen met de hals naar voren
worden neergelegd. Afb. 4
■
Het aantal flessen kan bij een andere
vorm of grootte van de flessen van het
aangegeven aantal afwijken. Afb. 8
■
Om de goede luchtcirculatie in het
apparaat te behouden mogen
de flessen de achterwand van
de koelruimte niet raken. Leg daarom
de flessen met de hals naar voren
in het apparaat. Afb. 4
Warme dranken buiten het apparaat
laten afkoelen.
■
Soort wijn
Rode Bordeaux
Côtes du Rhône,
rood/Barolo
Rode Bourgogne/
rode Bordeaux
Port
Jonge rode
Bourgogne
Jonge rode wijn
Jonge Beaujolais/
alle witte
wijnen met weinig
suikergehalte
Oude witte wijn/
Chardonnay
Sherry
Jonge witte wijn
vanaf Spätlese
Witte Loirewijn/
Entre-deux-Mers
Drinktemperatuur
18 °C
17 °C
16 °C
15 °C
14 °C
12 °C
11 °C
10 °C
9 °C
8 °C
7 °C
55
nl
Apparaat uitschakelen
en buiten werking
stellen
Uitschakelen van het apparaat
Afb. 2
Hoofdschakelaar Aan/Uit 1 indrukken
(rode cirkel wordt zichtbaar).
De temperatuurindicatie gaat uit. Koeling
en verlichting zijn uitgeschakeld.
Buiten werking stellen van
het apparaat
Als u het apparaat langere tijd niet
gebruikt:
1. Uitschakelen van het apparaat.
2. Stekker uit het stopcontact trekken of
de zekering losdraaien resp.
uitschakelen.
3. Schoonmaken van het apparaat.
4. Deur van het apparat open laten.
Schoonmaken van
het apparaat
ã=Attentie
■
■
■
Gebruik geen schoonmaak of
oplosmiddelen die zand, chloride of
zuren bevatten.
Geen schurende of krassende
sponsjes gebruiken. Op de metalen
oppervlakken kan corrosie ontstaan.
De legplateaus en voorraadvakken/
laden mogen niet in de afwasmachine
gereinigd worden. Ze kunnen
vervormen!
56
U gaat als volgt te werk:
1. Vóór het schoonmaken het apparaat
uitschakelen.
2. Stekker uit het stopcontact trekken of
de zekering losdraaien resp.
uitschakelen.
3. Wachten tot de rijplaag is ontdooid.
4. Het apparaat schoonmaken met
een zachte doek en lauw water
met een scheutje pH neutraal
schoonmaakmiddel. Het afwaswater
mag niet in de verlichting of via het
afvoergat in het verdampingsgedeelte
terechtkomen.
5. Deurafdichting alleen met schoon
water schoonmaken en grondig
droogwrijven.
6. Het sop mag niet via het afvoergaatje
in het verdampingsgedeelte
terechtkomen.
7. Na het schoonmaken apparaat weer
aansluiten en inschakelen.
Aanwijzing
Dooiwatergootje en afvoergaatje, afb. 3,
regelmatig met een wattenstaafje of iets
dergelijks schoonmaken zodat het
dooiwater kan weglopen.
nl
Energie besparen
■
■
Het apparaat in een droge, goed
te ventileren ruimte plaatsen! Het
apparaat niet direct in de zon of in de
buurt van een warmtebron plaatsen
zoals een verwarmingsradiator of een
fornuis.
Gebruik eventueel een isolatieplaat.
Een nisdiepte van 560 mm
aanhouden.
Een kleinere nisdiepte leidt tot een
hoger energieverbruik.
■
■
■
■
Warme dranken laten afkoelen
voordat u ze in het apparaat zet.
Deuren van het apparaat zo kort
mogelijk openen.
Om een verhoogd stroomverbruik te
vermijden, dient de achterkant van het
apparaat af en toe gereinigd te
worden.
De ordening van de uitrustingsdelen
heeft geen invloed op de
energieopname van het apparaat.
Bedrijfsgeluiden
Heel normale geluiden
Brommen
De motoren lopen (bijv. koelaggregaten,
ventilator).
Borrelen, zoemen of gorgelen
Koelmiddel stroomt door de buizen.
Klikgeluiden
Motor, schakelaar of magneetventielen
schakelen in/uit.
Voorkomen van geluiden
Het apparaat staat niet waterpas
Het apparaat met behulp van een
waterpas stellen. Leg er zo nodig iets
onder.
Reservoirs of draagplateaus wiebelen
of klemmen
Controleer de delen die eruit gehaald
kunnen worden en zet ze eventueel
opnieuw in het apparaat.
Flessen of serviesgoed raken elkaar
De flessen of het serviesgoed los van
elkaar zetten.
57
nl
Kleine storingen zelf verhelpen
Voordat u de hulp van de Servicedienst inroept:
Controleer eerst of u aan de hand van de volgende punten de storing kunt verhelpen.
Als u om een monteur vraagt, en het blijkt dat hij alleen maar een advies (bijv. over
de bediening of het onderhoud van het apparaat) hoeft te geven om de storing
te verhelpen, dan moet u, ook in de garantietijd, de volledige kosten van dat bezoek
betalen!
Storing
Eventuele oorzaak
De temperatuur wijkt
erg af van
de instelling.
Oplossing
In sommige gevallen is
het voldoende om het apparaat
gedurende 5 minuten uit
te schakelen.
Als de temperatuur te warm is: na
enkele uren controleren of
de temperatuur
de temperatuurinstelling genaderd
is.
Als de temperatuur te koud is:
de volgende dag de temperatuur
nogmaals controleren.
Geen enkele indicatie
brandt.
58
Stroomuitval;
de zekering is
uitgeschakeld;
de stekker zit niet
goed in
het stopcontact.
Stekker in het stopcontact steken.
Controleer of er stroom is.
Controleer de zekeringen.
nl
Storing
Eventuele oorzaak
Oplossing
De verlichting
functioneert niet.
Het lampje is kapot.
Lampje vervangen. Afb. 6/B
De bodem van
de koelruimte is nat.
1. Stekker uit het stopcontact
trekken of de zekering losdraaien
resp. uitschakelen.
2. Lampje vervangen.
(Reservelamp: 220-240 V
wisselstroom, fitting E14, voor
wattage zie het kapotte lampje.)
De contactsensor is
vuil.
Contactsensor reinigen met een
vochtige doek. Afb. 6/1
De deurgreep werd
met handschoenen of
met bijv. een doekje
aangeraakt.
Deurgreep alleen met de blote hand
aanraken.
Aan de deurgreep
hangt een vochtige
doek.
Handdoek van de deurgreep
verwijderen.
De dooiwatergoot of
het afvoergat is
verstopt.
Het dooiwatergootje en het
afvoergaatje schoonmaken (zie
„Schoonmaken van het apparaat”).
Afb. 3
De koelmachine wordt De deur van
steeds vaker en langer het apparaat werd
ingeschakeld.
te vaak geopend.
Deur van het apparaat niet onnodig
openen.
De be en
Afdekkingen verwijderen.
ontluchtingsopeningen
zijn afgedekt.
Het apparaat koelt
niet.
■
■
■
■
Het apparaat is
uitgeschakeld.
Stroomuitval.
De zekering is
uitgeschakeld.
Hoofdschakelaar aan/uit drukken.
Afb. 2/1
Controleren of er stroom is.
Zekering controleren.
De stekker zit niet
goed in
het stopcontact.
59
nl
Servicedienst
Adres en telefoonnummer van
de Servicedienst in uw omgeving kunt u
vinden in het telefoonboek of
in de meegeleverde brochure met
service-adressen. Geef a.u.b. aan
de Servicedienst het E-nummer (E-Nr.)
en het FD-nummer (FD) van
het apparaat op.
U vindt deze gegevens op
het typeplaatje. Afb. 7
Door vermelding van het fabrikaat- en
productnummer kunt u onnodige
voorrijdkosten vermijden. Zo bespaart u
zich de daarmee verbonden meerkosten.
Verzoek om reparatie en advies
bij storingen
De contactgegevens in alle landen vindt
u in de bijgesloten lijst met
Servicedienstadressen.
NL
B
60
088 424 4020
070 222 142
1
2
3
4
5
6
E - Nr
FD - Nr
7
8
9000865208
de, en, fr, it, nl (9212)
9000865208
Siemens-Elektrogeräte GmbH
Carl-Wery-Str. 34, 81739 München
Germany
Scarica