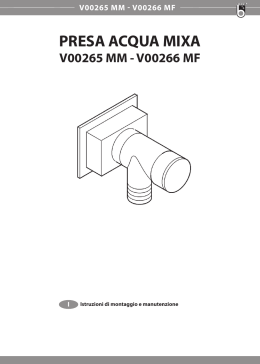
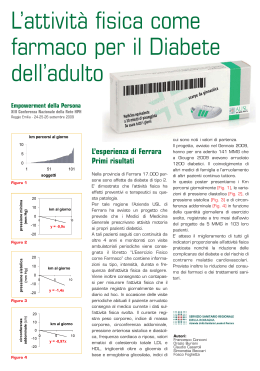
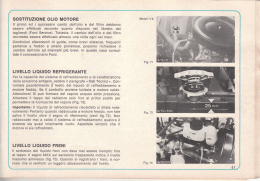
A 349 - A 360
USO - MANUTENZIONE
USE - MAINTENANCE
EMPLOI - ENTRETIEN
BEDIENUNG - WARTUNG
USO - MANTENIMIENTO
CARATTERISTICHE - TECHNICAL FEATURES - CARACTERISTIQUES
MERKMALE - CARACTERISTICAS -
Tipo motore
Type engine
Type moteur
Motortyp
Tipo de motor
4 tempi
4 stroke
4 temps
4 Takt
4 tiempos
Sistema di accensione
Ignition system
Système d'allumage
Zundsystem
Sistema de encendido
Elettronica
Electronic
Electronique
Elektronisch
Electronico
Sigla commerciale
Model number
Sigle commercial
Motortyp
Sigla comercial
A 349
Cilindri - Cylinders - Cylindres - Zylinder - Cilindros
A 360
N.
1
Alesaggio - Bore - Alésage - Bohrung - Diámetro
mm
82
Corsa - Stroke - Course - Hub - Carrera
mm
66
Cilindrata - Displacement - Cylindrée - Hubraum - Cilindrata
Giri/min - RPM - Tours/min - U/min - r.p.m.
3
349
cm
n.
3000/4000
3000/4000
5,5/7,5
Potenza max kW/CV- Max Rating kW/HP
Puissance max kW/CH - Max Leistung kW/PS
Potencia max kW/CV
N (80/1269/CEE)
Coppia max - Max torque
Couple maximum
Max Drehmoment - Par maximo
Nm
Consumo spec. min. - Min. specific fuel consumpt.
Min. consomm. specif. - Spez. Mindestkraftstoffverbr.
Cons. especifico min.
5,9/8
6/8,2
6,7/9,1
18,6
19,1
g/kW h
405
Capacità serbatoio - Fuel tank capacity
Contenance du réservoir - Tankinhalt
Capacidad deposito
l
5,2
Capacità carter olio - Oil sump capacity
Contenance carter huile - Schmierölfüllung
Capacidad carter aceite
l
0,6
kg
23
Peso a secco - Dry weight Poids à vide - Trockengewicht
Peso en seco
fig. 1
2
Aria forzata
Forced air
Air forcé
Geblasekuhlung
Aire forzado
Sistema di raffreddamento
Cooling system
Système de refroidissement
Kuhlsystem
Sistema de refrigeración
)-0)!.4/%,%442)#/%,%#42)#0,!.4).34!,,!4)/.%,%#42)15%
%,%+42)3#(%!.,!'%).34!,!#)/.%,%#42)#!
"!44%2)!
"!44%29
"!44%2)%
"!44%2)%
"!4%2)!
MM
2%'/,!4/2%4%.
6/,4!'% 2%'5,!4/2
2%'5,!4%524%.3
30!..5.'32%',%2
2%'5,!$/24%.3)/.
MM
MM
MM
MM
!,4%2.!4/2%
!,4%2.!4/2
!,4%2.!4%52
$2%(342/-'%.%2!
!,4%2.!$/2
MM
).4%22544/2%%#()!6%
+%937)4#(
).4%22504%52!#,%&
3#(,â33%,3#(!,4%2
).4%22504/2!22!.15%
-/4/2)./$g!66)!
34!24).' -/4/2
$%-!22%52
!.,!33-/4/2
-/4/2!22!.15%
MM
4%,%2544/2%
34!24%22%,!9
4%,%2504%52
&%2.3#(!,4%2
4%,%2504/2
"/").!!##%.3)/.%
#/),
"/").%
:5.$305,%
"/").!
MM
,!-0!$!30)!
"!4#(!2'7!2.).',)'(4
4%-/).#(!2'%"!44%2)%
,!$%!.:%)',!-0%
).$)#!$/2#!2'!"!4%2)!
lG
-/4/2/),($
!0)3%##
-),,"#
lG
lG
6!2)!.4)0%2-/4/2)!0%42/,)/6!2)!4)/.3&/2+%2/3%.%6!2)!4)/.30/52-/4%523!0%42/,%
!"Ë.$%25.'%.&Ã20%42/,%5--/4/2%.6!2)!#)/.%30!2!-/4/2%3!0%42/,%/
PAG
PAG
$)30/3)4)6//),7!4#(/),7!4#($%6)#%$)30/3)4)&/),7!4#(/),7!4#(6/22)#(45.'
$)30/3)4)6//),7!4#(
6!2)!.4)0%2-/4/2)&5.:)/.!.4)!'!36!2)!4)/.3&/2,0'%.').%36!2)!4)/.30/52-/4%523&/.#4)/..!.4!g'!3
6!2)!.4%.&â2'!3"%42)%"%.%-/4/2%.-/$)&)#!#)/.%30!2!-/4/2%315%&5.#)/.!.#/.'!3
PAG
33
CHIUSO
OFF
fig. 5
fig. 6
fig. 7
fig. 8
APERTO
ON
fig. 9
fig. 10
fig. 11
fig. 12
Livello
Level
Niveau
Ölstand
Nivel
4
fig. 13
fig. 14
fig. 15
fig. 16
Oil level
fig. 17
fig. 19
0,8 mm
fig. 18
fig. 20
0,15 mm
5
ITALIANO
!
Ì
NOTE: QUESTO SIMBOLO ATTIRA
L'ATTENZIONE SU IMPORTANTI
NORME DI SICUREZZA CHE, SE NON
RISPETTATE, POSSONO CAUSARE
DANNI ALLA SICUREZZA PERSONALE VOSTRA O ALTRUI.
PRIMA DELL'AVVIAMENTO
Leggere attentamente il presente libretto
ed attenersi scrupolosamente alle istruzioni
in esso contenute ed a quelle riportate nel
manuale d'uso che accompagna la macchina
sulla quale il motore è montato. PER LE
PRIME 25 ORE DI FUNZIONAMENTO, NON
PRELEVARE POTENZE SUPERIORI AL 70%
DI QUELLA MASSIMA.
LUBRIFICANTE E COMBUSTIBILE
Rimuovere il tappo-asta rifornimento olio (fig.
12) e, con motore in piano, riempire lentamente
il carter (fig. 5) con olio della qualità prescritta
in fig. 4, fino al traboccamento.
NOTA: Se il motore viene comandato a
distanza, attenersi alle istruzioni allegate alla
macchina, che devono far assumere alle leve
le posizioni sopraddette.
1) MOTORE CON AVVIATORE AUTOAVVOLGENTE
Impugnare la manopola e tirare lentamente fino
ad avvertire il punto di massima compressione.
Far riavvolgere lentamente la corda.
Avviare con uno strappo deciso ed accompagnare il rientro della corda (fig. 10).
Se il motore stenta a partire, posizionare
la leva dello starter (choke) a metà corsa
(fig. 8).
A motore avviato, riportare la leva dello
starter nella posizione di farfalla tutta aperta
(riportarla nella posizione iniziale), portare la
leva acceleratore al minimo e lasciare girare
il motore in queste condizioni per un po' di
tempo prima dell'utilizzazione.
CONTROLLARE FREQUENTEMENTE IL
LIVELLO DELL'OLIO, SPECIALMENTE
DURANTE IL PERIODO DI RODAGGIO.
Assicurarsi che, durante il funzionamento
del motore, il tappo rifornimento olio sia
ben inserito.
Riempire il serbatoio combustibile con benzina
super o verde, priva di impurità (fig. 6).
!
Ì
NON EFFETTUARE IL RIFORNIMENTO IN LOCALE CHIUSO E
CON IL MOTORE IN MOTO
2) MOTORE CON AVVIAMENTO ELETTRICO
Girare la chiave su AVVIAMENTO (START)
(fig. 3). A motore avviato aprire lo starter.
Si consiglia una batteria da 36 A/h.
In moto: chiave su ON; da fermo: chiave
su OFF.
Oliare periodicamente il pignone del motorino
di avviamento. Tutti i motori montano il
decompressore automatico.
Non riempire completamente il serbatoio,
ma tenersi a circa 2 cm dal livello massimo,
onde permettere un certo movimento del
carburante. Prima di avviare, asciugare
eventuali fuoriuscite di benzina.
AVVIAMENTO A CALDO (quando il motore
ha funzionato da poco ed è ancora caldo)
Ripetere le operazioni senza inserire lo
starter (fig. 8).
!
Ì
!
Ì
NON AVVIARE IL MOTORE IN
LOCALE CHIUSO O POCO VENTILATO.
AVVIAMENTO A FREDDO (quando il motore
non ha funzionato di recente).
Aprire il rubinetto (fig. 7), inserire la leva
dello starter (fig. 8) e posizionare la leva
dell'acceleratore a metà corsa (fig. 9).
6
ATTENZIONE: LA TEMPERATURA
DELLA MARMITTA E DELLE ZONE
ADIACENTI E' ELEVATA. EVITARE
DI TOCCARLE.
SI CONSIGLIA DI NON FARE FUNZIONARE PER
LUNGO TEMPO IL MOTORE AL MINIMO.
ITALIANO
ARRESTO DEL MOTORE
Chiudere il rubinetto della benzina (fig. 7),
decelerare il motore portandolo al minimo,
quindi, dopo averlo lasciato girare per qualche
minuto, premere il pulsante STOP (fig. 11).
NOTA: Se il motore viene comandato a
distanza, attenersi alle istruzioni allegate alla
macchina sulla quale esso è montato.
Smontare e verificare lo stato della candela,
pulire le incrostazioni con una spazzola
metallica, verificare la distanza fra gli elettrodi,
che deve essere di 0,8 mm.
Nel caso di elettrodi consumati o isolante
scheggiato, sostituire la candela con una della
stessa gradazione termica (vedi CANDELE
CONSIGLIATE). Prima di rimontare la candela,
versare una goccia di olio sul filetto. Rimontare
la candela, serrandola bene.
MANUTENZIONE
CANDELE CONSIGLIATE:
OGNI 8 ORE:
Controllare il livello olio nel
carter con il motore in piano
(fig. 12). Eventualmente
rabboccare con olio della
qualità prescritta in fig. 4
Filtro aria a bagno d'olio: Controllare l'olio,
se sporco sostituirlo ripristinando il livello
come indicato in fig. 13. Lavare la massa
filtrante con gasolio.
OGNI 25 ORE:
Filtro aria a secco: Controllare la cartuccia;
se intasata sostituirla (fig.
14).
SOSTITUIRE COMPLETAMENTE L'OLIO NEL
CARTER DOPO LE PRIME 25 ORE DI FUNZIONAMENTO
NON FARE FUNZIONARE IL MOTORE SENZA
FILTRO ARIA. IL MOTORE SI USUREREBBE
RAPIDAMENTE.
OGNI 50 ORE:
Sostituire completamente
l'olio nel carter motore (fig.
16).
CHAMPION RL 95 YC
BOSCH WR10 AC
NGK BR5 HS
OGNI 400 ORE: Sostituire la candela di
accensione, controllare il
gioco valvole che deve
essere di 0,15 mm per
entrambe a motore freddo
(fig. 19). Sostituire la valvola
sfiato (fig. 20).
OGNI 1500 ORE: Revisionare il motore controllando le parti soggette
ad usura: cilindro, segmenti, biella, albero motore,
valvole, guidevalvole, carburatore.
IMMAGAZZINAGGIO
In caso di lunga inattività del motore, togliere
la benzina dal serbatoio, vuotare il carburatore
premendo il pulsante di drenaggio, togliere
l'olio dal carter, versare un cucchiaio di olio
motore (0,03 l) nel foro candela e pulire le
alette della testa e del cilindro.
Conservare il motore coperto e all'asciutto.
OGNI 100 ORE: Pulizia del sistema di raffreddamento (fig. 17).
Controllare lo stato della
candela (fig. 18).
Togliere la cuffia aria e
il convogliatore, ripulire
le alette della testa e del
cilindro dai depositi accumulati.
Eseguire una pulizia più frequente, se
necessario.
Pulire e lavare con benzina il filtro del
combustibile sul rubinetto (fig. 15).
7
ENGLISH
!
Ì
NOTE: THIS SYMBOL POINTS OUT
IMPORTANT SAFETY INSTRUCTIONS
WHICH, IF NOT FOLLOWED, COULD
ENDANGER THE PERSONAL SAFETY
OF YOURSELF OR OTHER PEOPLE.
BEFORE THE STARTING
Carefully read and follow all instructions in this
booklet as well as all those provided with the
equipment on which this engine is used.
FOR THE FIRST 25 RUNNING HOURS, DO
NOT USE THE ENGINE WITH MORE THAN
70% OF THE MAXIMUM POWER.
LUBRICATING OIL & FUEL
Remove the dip-stick (fig. 12) and, when the
engine is level, slowly fill the oil sump (fig. 5)
with high quality oil as in fig. 4, until it comes
out from the dip-stick hole.
OIL LEVEL SHOULD BE FREQUENTLY CHECKED, PARTICULARLY DURING THE INITIAL
ENGINE RUNNING-IN PERIOD.
1) RECOIL STARTING ENGINE
Grasp the starter handle and pull the rope
out slowly, until the engine reaches the
compression Top Dead Center. Let the rope
rewind slowly. Giving a rapid, continuous pull,
on the starters handle (fig. 10).
If the engine fails to start, pull the choke knob
to the middle position (fig. 8).
When the engine starts, push the choke knob
(choke throttle open), bring the accelerator
lever to idling position and let the engine run
for some time before using it.
2) ELECTRIC STARTING ENGINE
Make sure that the dip-stick is securely
tightened into fill hole, when the engine is
running.
Fill the fuel tank with fresh, clean regular
grade gasoline (fig. 6).
Turn the key on STARTING (fig. 3). As soon
as the engine has started, open the choke. A
battery of 36 A/h is recommended (fig. 2).
While the engine is running: key on ON;
when the engine is stopped: key on OFF.
Periodically oil the starting motor pinion.
The engines are equipped with automatic
compression release.
!
Ì
WARM ENGINE START (when engine still
warm after recent running)
Repeat the same operations without inserting
the starter (fig. 8).
NEVER FILL THE FUEL TANK
WHEN THE ENGINE IS RUNNING
OR WHILE IT IS HOT
Do not fill the fuel tank completely, but just up
to 2 cm (0.64 in) from the top of the tank, to
provide space for fuel movement. Wipe any
fuel spillage from engine before starting.
!
Ì
NEVER START THE ENGINE
INDOORS OR IN ENCLOSED
POORLY VENTILATED PREMISES
COLD ENGINE START (when the engine has
not been running recently).
Open the fuel valve (fig. 7), insert the choke
knob (fig. 8) to the close throttle position
and put the accelerator lever in half stroke
position (fig. 9).
NOTE: If the engine is remotely controlled, keep
to the equipment manifacturer's instructions
for remote control position which have to
correspond to engine control levers positions
as above mentioned.
8
!
Ì
WARNING: TEMPERATURE OF
MUFFLER AND NEARLY AREAS IS
HIGH. AVOID TOUCHING THEM
DO NOT LEAVE THE ENGINE IDLE FOR A LONG
PERIODS.
ENGINE STOPPING
Close the fuel valve (fig. 7), idle a few minutes,
push the STOP button (fig. 11).
NOTE: If the engine is remotely controlled, keep
to the equipment manifacturer's instructions
for remote control position.
ENGLISH
MAINTENANCE
EVERY 8 HOURS:
Check the oil level
when the engine is
level (fig. 12). Add
high quality oil as in
fig. 4, if necessary.
Oil bath air cleaner: Check oil, if dirty replace
it and fill again until the level shown in fig. 13.
Clean the filtering element with diesel oil.
EVERY 25 HOURS:
Dry air cleaner:
Check the cartridge;
if clogged replace it
(fig. 14).
insulation material, replace the spark plug
with another one in the same heat range and
reach (see SUGGESTED SPARK PLUGS).
Before replacing the spark plug pour a drop
of oil on the thread. Install the spark plug and
tighten it to 1,5 Kgm (11 Ft-Lbs.).
SUGGESTED SPARK PLUGS:
CHAMPION RL 95YC
BOSCH WR10 AC
NGK BR5 HS
EVERY 400 HOURS:
Change the spark
plug, check
the
valve
clearance
which has to be 0.15
mm (.006 in) for both
intake and exhaust
with engine cold (fig.
19). Replace the
crank-case breather
(fig. 20).
CHANGE COMPLETELY THE LUBRICATING OIL
AFTER THE FIRST 25 HOURS OF OPERATION.
NEVER RUN THE ENGINE WITHOUT THE AIR
CLEANER PAPER CARTRIDGE. RAPID ENGINE
WEAR WILL RESULT.
EVERY 50 HOURS:
Change completely
the oil in the crankcase (fig. 16).
EVERY 100 HOURS:
Cooling system cleaning (fig. 17).
Check the condition
of the spark plug (fig.
18).- Remove the
air cooling duct and
the flywheel cover,
clean the head and
cylinder fins by removing the debris.
EVERY 1500 HOURS: Overhaul the engine
checking cylinder,
piston rings, connecting rod, crankshaft, valves, valve
guides, carburetor.
STORAGE
If the engine is to be un-used for one month
or more, remove all the fuel from the tank,
drain carburator by pressing drain plunger,
remove the oil from the crankcase, pour one
teaspoon (0.03 liter) of the engine oil into
spark plug hole and clean the cylinder head
and the cylinder fins.
Keep the engine under cover and dry.
Clean everything more frequently if debris
is eccessive.
Clean and wash the fuel filter in the valve
(fig. 15).
- Remove and inspect the spark plug.
Clean it with a wire brush, check the gap
between the electrodes - this should be 0,8
mm (0,0315 in).
In case of worn electrodes or damaged
9
FRANÇAIS
!
Ì
REMARQUE: CE SYMBOLE ATTIRE
L’ATTENTION SUR DES NORMES DE
SECURITE IMPORTANTES QUI, Sl
NON RESPECTEES, PEUVENT NUIRE
A VOTRE SECURITE PERSONNELLE
ET A CELLE D’AUTRUI.
AVANT LE DEMARRAGE
Lire attentivement cette notice d’entretien et
suivre scrupuleusement les instructions qui
y figurent ainsi que celles qui sont reportées
dans le Manuel d’utilisation qui accompagne
chaque machine sur laquelle est monté le
moteur.
POUR LES PREMIERES 25 HEURES DE
FONCTIONNEMENT, NE PAS UTILISER
DES PUISSANCES SUPERIEURES A 70%
DE LA PUISSANCE MAXIMALE.
LUBRIFIANT ET COMBUSTIBLE
Enlever la jauge d’huile (fig. 12) et, s’assurant
que le moteur soit sur une surface plane,
remplir lentement le carter (fig. 5) avec de
l’huile de la qualité indiquée à la fig. 4, jusqu’à
quand il sort du trou de la jauge.
CONTROLER FREQUEMMENT LE NIVEAU
DE L’HUILE, SPECIALEMENT PENDANT LA
PERIODE DU RODAGE.
Pendant le fonctionnement du moteur,
s’assurer que la jauge d'huile soit bien
insérée.
Remplir le réservoir combustible avec de
l’essence ordinaire ou super, sans impureté
(fig. 6).
!
Ì
LE REMPLISSAGE NE DOiT PAS
ETRE FAIT DANS UN LOCAL
FERME ET LE MOTEUR NE DOIT
PAS ETRE EN MARCHE
Il est conseillé de ne pas remplir complètement
le réservoir, mais de s’arrêter a 2 cm environ
du niveau maximum afin de permettre un
peu de mouvement au combustible. Avant de
procéder au démarrage, essuyer des sorties
éventuelles d’essence.
Ì
!
LE MOTEUR NE DOIT JAMAIS
ETRE DEMARRE DANS DES
LOCAUX FERMES OU PEU
AERES.
DEMARRAGE A FROID (lorsque le moteur n’a
pas fonctionné pendant quelque temps).
Ouvrir le robinet (fig. 7), insérer le bouton
du starter (choke) (fig. 8) de façon à ce
que le papillon soit complètement fermé
et le levier de I’accélérateur soit à moitié
course (fig. 5).
10
REMARQUE: Si le moteur est équipé de
commandes à distance, s’en tenir aux
instructions indiquées dans la notice d’entretien
de la machine qui préciseront les positions
que devront avoir les leviers.
1) - MOTEUR AVEC DEMARRAGE PAR LANCEUR.
Prendre la poignée du lanceur en tirant lentement jusqu’à sentir le point de compression
maximale. Réenrouler de nouveau lentement
la corde. Démarrer en tirant avec décision
et en accompagnant successivement le
réenroulement de la corde (fig. 10).
Si le moteur a un peu de difficulté à partir,
abaisser le levier du starter (choke) vers la
position centrale (fig. 8).
Une fois que le moteur a démarré, repositionner
le levier du starter (choke) de façon à ce
que le papillon soit complètement ouvert, le
levier de I’accélérateur au minimum et laisser
tourner ainsi le moteur pendant quelques
instants, avant I’emploi.
2) - MOTEUR AVEC DEMARRAGE ELECTRIQUE.
Tourner la clef sur DEMARRAGE (START)
(fig. 3). Lorsque le moteur est en marche,
ouvrir le starter.
Il est conseillé une batterie de 36 A/h (fig.
2-3).
Moteur en fonction: clef sur MARCHE (ON);
en arrêt: clef sur ARRET (OFF). Huiler
périodiquement le pignon du démarreur.
Les moteurs sont equipés de série avec
décompresseur automatique.
DEMARRAGE A CHAUD (lorsque le moteur
vient de fonctionner et donc il est encore
chaud).
Répéter les mêmes opérations sans insérer
le starter (fig. 8).
!
Ì
ATTENTION: LA TEMPERATURE
DU POT D’ECHAPPEMENT ET
DES PARTIES QUI LUI SONT
PROCHES EST ELEVEE. IL FAUT
EVITER DE LES TOUCHER.
IL EST CONSEILLE DE NE PAS FAIRE FONCTIONNER LONGTEMPS LE MOTEUR AU REGIME
MINIMUM.
FRANÇAIS
ARRET DU MOTEUR
Fermer le robinet de l'essence (fig. 7),
décélérer en portant le moteur au minimum,
puis, après l'avoir laissé tourner quelques
minutes, pousser sur le bouton de STOP
(fig. 11).
REMARQUE: Si le moteur est équipé des
commandes à distance, suivre les instructions
indiquées sur la notice accompagnant la
machine sur laquelle le moteur est monté.
ENTRETIEN
TOUTES LES
8 HEURES:
Contrôler le niveau d'huile
dans le carter en faisant
attention à ce que le moteur
soit sur une surface plane
(fig. 12). Si nécessaire,
ajouter de l'huile de la qualité
indiquée à la fig. 4 jusqu'au
débordement.
Filtre à air en bain d'huile: Contrôler l'huile,
s'il est encrassé, le remplacer et remplir à
nouveau comme indiqué dans la fig. 13. Laver
la masse filtrante avec du gasoil.
TOUTES LES
25 HEURES:
Filtre à air sec: Contrôler la cartouche, s'elle
est encrassée la remplacer
(fig. 14).
REMPLACER COMPLETEMENT L’HUILE DANS
LE CARTER APRES LES PREMIERES 25
HEURES DE MARCHE.
NE PAS FAIRE MARCHER LE MOTEUR SANS
LA CARTOUCHE DU FILTRE A AIR.
CELA ENTRAINERAIT UNE USURE PREMATUREE DU MOTEUR
TOUTES LES
50 HEURES:
Remplacer complètement
l'huile dans le carter (fig.
16).
TOUTES LES 100 HEURES:
Nettoyez le système de
refroidissement (fig. 17).
Contrôlez l'état de la bougie
(fig. 18). Enlevez le capot
ventilateur et le convoyeur.
Nettoyez les aubes de la
tête et du cylindre pour
enlever tous débris.
Nettoyez plus souvent si le cas.
Nettoyer et laver avec de l'essence le filtre
com-bustible sur le robinet (fig. 15).
Démontez et contrôlez l'état de la bougie,
enlevez la crasse à l'aide d'une brosse
métallique, vérifiez que la distance entre les
électrodes soit de 0,8 mm.
En cas d'électrodes usés ou d'un isolant
ébréché, remplacez la bougie avec une de
même gradation thermique (voir BOUGIES
CONSEILLEES). Avant de remonter la bougie,
versez une goutte d'huile sur le filet. Remontez
la bougie et serrez-la.
TYPES BOUGIES CONSEILLEES:
CHAMPION RL 95YC
BOSCH WR10 AC
NGK BR5 HS
TOUTES LES
400 HEURES:
Remplacer la bougie. Contrôler le jeu des soupapes
qui doit être de 0,15 mm
pour toutes les deux (fig.
19). Remplacer le clapet
reniflard (fig. 20).
TOUTES LES
1500 HEURES:
Révisionner le moteur et
vérifier les compo-sants
plus usés: cylindre, segments, bielle, vilebrequin,
soupapes, guide-soupapes, carburateur.
EMMAGASINAGE
Si le moteur demeure sans fonctionner pour
une certaine période, enlever l’essence du
réservoir, vider le carburateur en poussant
sur le bouton de drainage, vidanger le carter
d’huile, introduire une petite cuillère d’huile
moteur (0,03 I) dans le trou de la bougie
et nettoyer les ailettes de la culasse et du
cylindre.
Placer le moteur dans un endroit sec en
le couvrant.
11
DEUTSCH
!
Ì
BEMERKUNG: DIESES ZEICHEN
WEIST AUF WICHTIGE SICHERHEITSANWEISUNGEN HIN, DEREN
MISSACHTUNG IHRE PERSÖNLICHE
SICHERHEIT ODER DIE ANDERER
PERSONEN GEFÄHRDET.
VOR DEM STARTEN
Lesen Sie alle Hinweise in diesem Buch sowie
solche, die mit dem Gerät geliefert werden,
auf das der Motor aufgebaut ist.
BELASTEN SIE DEN MOTOR DIE ERSTEN
25 BETRIEBSSTUNDEN NICHT MEHR ALS
70% SEINER HOECHSTLEISTUNG.
KRAFTSTOFF UND SCHMIERÖL
Stellen Sie das Gerät so auf, daß der Motor
waagerecht ist (Abb. 12). Nehmen Sie den
Öleinfüllstopfen heraus und befüllen Sie
das Kurbelgehäuse (Abb. 5) langsam mit
sauberem Qualitätsöl (Abb. 4) zum Überlaufen,
siehe Abb. 12. Den Öleinfüllstopfen während
der Kontrolle des Ölstandes nur aufsetzen.
NICHT EINSCHRAUBEN.
DER ÖLSTAND SOLLTE BESONDERS WÄHREND
DER EINLAUFZEIT DES MOTORS HÄUFIGER
KONTROLLIERT WERDEN.
Die Öleinfüllstopfen muß bei den betrieb des
motors fest eingeschraubt sein.
Füllen Sie den Tank mit frischem, sauberem
Normal-oder Superbenzin (Abb. 6).
!
Ì
TANKEN SIE NIEMALS IN GESCHLOSSENEN RÄUMEN ODER
SOLANGE DER MOTOR LÄUFT, bzw.
NOCH HEISS IST.
Füllen Sie den Tank nicht zum Überlaufen,
sondern lassen Sie etwa 2 cm bis zur
Oberkante des Tanks frei, damit sich der
Kraftstoff noch ausdehnen kann. Wischen Sie
verschütteten Kraftstoff vor Inbetriebnahme
auf.
!
Ì
LASSEN SIE DEN MOTOR NIE IN
GESCHLOSSENEN ODER SCHLECHT BELÜFTETEN RÄUMEN LAUFEN.
VERGIFTUNGSGEFAHR!
STARTEN DES KALTEN MOTORS (der
Motor war längere Zeit abgestellt)
Öffnen Sie den Benzinhahn (Abb. 7), einschalten Sie die Starterklappe (Abb. 8) und stellen
Sie den Gashebel halbweg zwischen "MAX"
und "MIN" (Abb. 9).
BEMERKUNG: Wird der Motor durch Fernbedienung gesteuert, beachten Sie die
Vorschriften des Geräteherstellers wegen
der Positionen der Fernbedienungshebel. Sie
müssen mit den o.g. Positionen des Motors
übereinstimmen.
12
1) - REVERSIERSTARTER
Mit dem Handgrlff das Seil langsam herausziehen bis der Kompressionswiderstand zu
spühren ist. Das Seil wieder aufrollen lassen
und anschließend kräftig aber gleichmaßig
ziehen. Halten Sie den Startergrlff fest und
führen Sie ihn langsam zurück. Startergriff
nicht zurückschnellen lassen (Abb. 10).
Falls der Motor nicht anspringt, gehen Sie
mit der Starterklappe auf Mittelstellung und
wiederholen Sie den Startversuch (Abb. 8).
Sobald der Motor angesprungen ist, muß
die Starterklappe voll geöffnet werden und
bringen Sie den Gashebel in Leerlauf-Position.
Lassen Sie den Motor kurz warm werden,
bevor Sie ihn belasten.
2) - MOTOR MIT ELEKTROSTART.
Drehen Sie den Zündschlüssel auf ANLASSEN
(Abb. 3). Sobald der Motor anläuft, öffnen Sie
die Starterklappe.
Verwenden Sie eine Batterie von 36 A/h
(Abb. 2).
Betrieb: Zündschlüssel in Stellung LAUFEN
(ON) lassen. Nach Stillstand Zündschlüssel
in position STOP (OFF) bringen. Ölen Sie
gelegentlich das Ritzel des Anlassers. Die
Motoren sind werkseitig mit automatischer
Dekompression ausgerüstet.
STARTEN
DES
BETRIEBSWARMEN
MOTORS (der Motor ist vom letzten Gebrauch
noch warm)
Wiederholen Sie die gleichen Schritte wie beim
Starten ohne die Starterklappe einzuschalten
(Abb. 8).
!
Ì
WARNUNG: DIE TEMPERATUR DES
AUSPUFFS UND SEINER UNMITTELBAREN UMGEBUNG IST HOCH.
NICHT
BERÜHREN!
VERBRENNUNGSGEFAHR!
LASSEN SIE DEN MOTOR NICHT ÜBER LÄNGERE ZEIT IM LEERLAUF LAUFEN.
DEUTSCH
ABSTELLEN DES MOTORS
Schließen Sie den Benzinhahn (Abb. 7).
Lassen Sie den Motor einige Minuten im
Leerlauf laufen und drücken Sie den "STOP"
Drückknopf (Abb. 11).
BEMERKUNG: Wenn der Motor durch eine
Fernbedienung kontrolliert wird, beachten
Sie die Vorschriften des Geräteherstellers
zum Abstellen.
WARTUNG
ALLE 8
BETRIEBSSTUNDEN: Kontrollieren Sie den Ölstand bei
waagerecht stehender Maschine
(Abb. 12). Füllen Sie ein Motorenöl laut Spezifikation (Abb. 4)
nach, falls notwendig.
Ebenfalls ist der Ölstand im
Ölbadluftfilter zu kontrollieren
und gegebenenfalls nachzufüllen. Bei Verschmutzung ist es
zu ersetzen (Abb. 13). Luftfilterpatrone mit Diesel Kraftstoff
reiningen.
NACH 25
BETRIEBSSTUNDEN: Nach den ersten 25 Stunden soll
das Motoröl gewechset werden
(Abb. 16).
ALLE 25
BETRIEBSSTUNDEN: Bei Ölbadluftfilter bzw. Trockenluftfilter den Filtereisatz mit
Pressluft von niedrigem Druck
reinigen. Ist der Trockenluftfilter
verstopft ist er zu erneuern.
DEN MOTOR NIEMALS OHNE LUFTFILTER
LAUFEN LASSEN, DA DIES ZU BESCHLEUNIGTEM VERSCHLEIß DES MOTORS FÜHRT.
ALLE 50
BETRIEBSSTUNDEN: Wechseln Sie das Öl im Kurbelgehäuse (Abb. 16).
ALLE 100 STUNDEN:
Kühlsystem reinigen (Abb. 17).
Zustand der Kerze überprüfen
(Abb. 18).- Lüftergehäuse
und Kühlerhaube abnehmen,
Rippen des Zylinderkopfes und
Zylinders von angesammelten
Verunreinigungen säubern.
Falls erfolderlich, häufiger reinigen.
Reinigen Sie den Kraftstoffilter im Benzinhahn
(Abb. 15).
- Zündkerze ausbauen und Zustand
prüfen; Verkrustungen mit einer Metallbürste
entfernen, Elektrodenabstand prüfen, muß
0,8 mm betragen.
Sind die Elektroden abgenutzt oder das
Isolationsmaterial gesprungen, Kerze wechseln, gleichen Wärmewert einhalten (Siehe
empfohlene Zündkerzen). Vor Einschrauben
der Kerze einen Tropfen Öl auf das Gewinde
geben und diese gut festschrauben.
EMPFOHLENE ZÜNDKERZEN:
CHAMPION RL95YC
BOSCH WR10 AC
NGK BR5 HS
ALLE 400 BETRIEBSSTUNDEN:
Ersetzen Sie die Zündkerze,
kontrollieren Sie das Ventilspiel, das 0,15 mm für beide
betragen soll (Abb. 19).
Das Entlüftungsventil ersetzen
(Abb. 20).
ALLE 1500 BETRIEBSSTUNDEN:
Überholen Sie den Motor,
indem Sie den
Zylinder,
die Kolbenringe,
die
Pleuelstange,
die Kurbelwelle, die Ventile, die Ventilführungen, den Vergaser
überprüfen.
EINLAGERUNG
Falls der Motor für einen Monat oder
länger nicht benutzt wird, entleern Sie den
Kraftstofftank und den Vergaser dadurch, daß
Sie den Ablaßknopf am Vergaser drücken.
Lassen Sie das Motorenöl ab und geben
Sie einem Teelöffel (0,03 Liter) Motorenöl
durch die Öffnung der Zündkerze in den
Zylinderkopf und drehen Sie den Motor
einige Umdrehungen mit der Hand. Reinigen
Sie alle Kühlrippen vom Zylinderkopf und
Zylinder.
Lagern Sie den Motor abgedeckt in einem
trockenen Raum.
13
ESPAÑOL
!
Ì
ATENCION: ESTE SIMBOLO LLAMA
LA ATENCION SOBRE ALGUNAS
NORMAS DE SEGURIDAD IMPORTANTES QUE, SI NO SON RESPETADAS, PUEDEN CAUSAR DANOS A LA
SEGURIDAD PERSONAL VUESTRA
Y DE OTRAS PERSONAS.
ANTES DE LA PUESTA EN MARCHA
Leer atentamente el presente folleto y respetar
escrupulosamente las instrucciones en él
contenidas y las que están indicadas en el
manual de uso que acompaña la máquina
sobre la cual está montado el motor.
EN LAS PRIMERAS 25 HORAS DE FUNCIONAMIENTO NO USAR EL MOTOR CON MAS
DEL 70% DE SU POTENCIA MAXIMA.
LUBRICANTE Y COMBUSTIBLE
Quitar el tapon-varilla del aceite (fig. 12) y,
con el motor en plano, llenar lentamente
el carter (fig. 5) con aceite de la calidad
come especificado en la fig. 4, hasta el
desbordamiento.
CONTROLAR FRECUENTEMENTE EL NIVEL
DEL ACEITE, ESPECIALMENTE DURANTE EL
PERIODO DE RODAJE.
1) - MOTOR CON ARRANQUE RECUPERABLE.
Empuñar la manopla y tirar lentamente hasta
notar el punto de maxima compresión. Hacer
envolver lentamente la cuerda. Poner en
marcha con un tirón decidido y acompañar el
regreso de la cuerda (fig. 10).
Si el motor tiene dificultad en arrancar, bajar
la palanca (fig. 8).
2) - MOTOR CON ARRANQUE ELECTRICO.
Girar la llavecita a la posición ARRANQUE
(START) (fig. 3). Apenas el motor ha arrancado,
abrir el starter.
Se aconseja una bateria de 36 A/h (fig.
2-3)
En marcha: llave en posición MARCHA
(ON); parado: llave en posición STOP (OFF).
Lubrificar periódicamente el piñon del motor
de arranque. Los motores montan de serie el
descompresor automático.
Asegurarse que, durante el funcionamiento
del motor, el tapon del aceite esté bien
puesto.
Llenar el tanque combustible con gasolina de
alto otanaje, sin impurezas (fig. 6).
!
Ì
NO
EFECTUAR
EL
ABASTECIMIENTO EN AMBIENTE CERRADO Y CON MOTOR EN MARCHA.
No llenar completamente el tanque, dejar 2
cm. desde el nivel maximo, para permitir un
cierto movimiento del combustible. Antes de
poner en marcha, secar eventuales derrames
de gasolina.
Ì
!
NO PONER EN MARCHA EL MOTOR
EN AMBIENTE CERRADO O POCO
VENTILADO.
PUESTA EN MARCHA CON MOTOR FRIO
(cuando el motor no ha funcionado recientemente).
Abrir el grifo (fig. 7), insertar el mando (choke)
(fig. 8) en la posición de mariposa toda
cerrada y poner la leva acelerador a mitad
carrera (fig. 9).
NOTA: Si el motor es accionado a distancia,
seguir las instrucciones pertenecientes a la
maquina, que deben hacer tomar a las levas
las posiciones antes descritas.
14
PUESTA EN MARCHA CON MOTOR
CALIENTE (cuando el motor ha funcionado
recientemente y está todavia caliente).
Repetir las operaciones sin insertar el
starter.
!
Ì
ATENCION: LA TEMPERATURA DEL
ESCAPE Y DE LAS ZONAS CERCANAS ES MUY ALTA. EVITAR DE
TOCARLAS.
SE ACONSEJA DE NO HACER FUNCIONAR POR
MUCHO TIEMPO EL MOTOR AL MINIMO.
ESPAÑOL
PARADA DEL MOTOR
Cerrar el grifo de la gasolina (fig. 7), desacelerar
el motor llevándolo al minimo, entonces,
después de haberlo dejado funcionar por
algunos minutos, empujar el mando STOP
(fig. 11).
NOTA: Si el motor es accionado a distancia,
seguir las instrucciones pertenecientes a
la máquina sobre la cual el motor está
montado.
Desmontar y comprobar el estado de la bujia,
limpiar las incrostaciones con un cepillo
metálico, comprobar la distancia entre los
electrodos que debe ser de 0,8 mms.
En el caso de electrodos gastados o aislante
astillado, hay que sustituir la bujia con una de
la misma gradación térmica (véase BUJIAS
ACONSEJADAS). Antes de volver a montar
la bujia, hay que echar una gota de aceite
en la rosca. Volver a montar la bujia fijándola
bien.
MANUTENCION
CADA 8 HORAS:
BUJIAS RECOMENDADAS:
CHAMPION RL 95YC
BOSCH WR10 AC
NGK BR5 HS
Controlar el nivel aceite
en el carter con el
motor en plano (fig. 12).
Eventualmente, agregar
aceite de la calidad
prescrita en fig. 4.
Filtro aire a baño de aceite: Controlar el aceite;
si está sucio sustituirlo y llenar hasta el
nivel (fig. 13). Lavar la massa filtrante con
gasoleo.
CADA 25 HORAS:
Filtro aire en seco: Controlar el cartucho;
si está obstruido substituirlo.
SUBSTITUIR COMPLETAMENTE EL ACEITE EN
EL CARTER DESPUES DE LAS PRIMERAS 25
HORAS DE FUNCIONAMIENTO.
NO HACER FUNCIONAR EL MOTOR SIN EL CARTUCHO DEL FILTRO AIRE. SI LO HACE OCURRIRA UN RAPIDO DESGASTE DEL MOTOR.
CADA 50 HORAS: Substituir completamente el aceite en el
carter motor (fig. 16).
CADA 400 HORAS: Sustituir la bujia, controlar el juego válvulas
que debe ser de 0,15
mm para ambas (fig.
19).Substituir el respiradero de la bancada
(fig. 20).
CADA 1500 HORAS:
Revisar el motor controlando las partes sujetas
a usura: cilindro, anillos,
biela del cigueñal, valvulas, guias de valvulas,
carburador.
ALMACENAMIENTO
En caso de larga inactividad del motor, quitar
la gasolina del tanque, vaciar el carburador
apretando el botón de drenaje, quitar el aceite
del carter, meter una cucharadita de aceite
motor (0,03 l.) en el orificio bujia y limpiar las
aletas de la culata y del cilindro. Conservar
el motor cubierto y seco.
CADA 100 HORAS: Limpleza del sistema de
refrigeración (fig. 17).
Controlar el estado de
la bujia (fig. 18).
Quitar la envoltura aire
y el conductor, volver a
limpiar las aletas de la
cabeza y del cilindro de
los depósitos acumulados.
Si es necesario, realizar limpiezas más
frecuentemente.
Limpiar y lavar con gasolina el filtro del
combustible en el grifo (fig. 15).
15
VARIANTI PER MOTORI A PETROLIO - VARIATIONS FOR KEROSENE ENGINES - VARIATIONS POUR MOTEURS
A PETROLE - ABÄNDERUNGEN FÜR PETROLEUM-MOTOREN - VARIACIONES PARA MOTORES
COMBUSTIBILE - FUEL - COMBUSTIBLE - KRAFTSTOFF - COMBUSTIBLE
Usare benzina e petrolio di buona qualità. Si
consiglia il filtraggio (fig. 1).
Use regular grade gasoline or kerosene of high
quality. Filtering is recommended (fig. 1).
Utilizer de l'essence et du pétrole de bonne qualité.
Le filtrage est conseillé (fig. 1).
Verwenden Sie Normalbenzin und ggfs. Petroleum
von guter Qualität. Filtern Sie den Kraftstoff
(Abb. 1).
Usar gasolina y petróleo de buena calidad. Se
aconseja la filtración (fig. 1).
BENZINA
ESSENCE
GASOLINE
BENZIN
GASOLINA
L.0,2
L. 4
PETROLIO
PETROLE
KEROSENE
PETROLEUM
PETROLEO
1
AVVIAMENTO - STARTING - DEMARRAGE - STARTEN - ARRANQUE
Aprire il rubinetto (posizione 1 fig. 2), chiudere
lo starter (fig. 8) e posizionare l'acceleratore al
massimo (fig. 9). A motore caldo commutare a
petrolio (posizione 2).
Open the fuel valve (position 1 fig. 2), close the
choke (fig. 8) and put the accelerator in maximum
position (fig. 9). When the engine is warmed up
change over to kerosene (position 2).
Ouvrir le robinet essence (position 1 fig. 2), fermer
le starter (fig. 8) et positionner l'accélerateur au
maximum (fig. 9). A moteur chaud changer à
pétrole (position 2).
Den Benzinhahn öffnen (Stellung 1, Abb. 2), die
Starterklappe schließen (Abb. 8) und Vollgas geben
(Abb. 9). Wenn der Motor warm ist, auf Petroleum
umstellen (Stellung 2).
Abrir el grifo (posición 1 fig. 2), cerrar el starter
(fig. 8) y poner el accelerador al maximo (fig. 9).
Apenas el motor se ha calientado conmutese a
petroleo (posición 2).
BENZINA
ESSENCE
GASOLINE
BENZIN
GASOLINA
1
2
0
CHIUSO
FERME
CLOSED
ZU
CERRADO
PETROLIO
PETROLE
KEROSENE
PETROLEUM
PETROLEO
2
CANDELE CONSIGLIATE:
RECOMMENDED SPARK PLUGS:
TYPER BUGIES CONSEILLES:
EMPFHOLENE ZÜNDKERZEN:
Champion RL95YC
Bosch WR10 AC
NGK BR 5HS
BUJIAS RECOMENDADAS:
ARRESTO DEL MOTORE - STOPPING - ARRET - ABSTELLEN - PARADA
Riportare il rubinetto sulla posizione 1 (benzina) (fig. 2), lasciar girare il motore al minimo per qualche minuto,
quindi premere il pulsante STOP (fig. 11), o girare la chiave sulla posizione OFF (fig. 3).
Turn the fuel valve to the gasoline side (position 1) (fig. 2), idle a few minutes, push thz STOP button
(fig. 11) or turn the key on OFF (fig. 3).
Remettre le robinet sur la position 1 (essence) (fig. 2), laisser fonctionner le moteur au minimum
pour quelques minutes, pousser ensuite sur le bouton STOP (fig. 11), ou tourner la clef sur la
position OFF (fig. 3).
Nach Petroleumbetrieb den Motor einige Minuten mit Benzin (Stellung 1, Abb. 2) bei Leerlaufdrehzahl
laufen lassen. Den STOP-Knopf (Abb. 11) bis zum vollständigen Abstellen des Motors drücken, oder
den Zündschlüssel auf OFF drehen (Abb. 3).
Reponer en posición 1 (gasolina) el grifo (fig. 2), dejar girar el motor al minimo por algunos
minutos, luego
16
DISPOSITIVO OIL WATCH - "OIL WATCH" DEVICE - DISPOSITIF OIL WATCH "OIL WATCH" VORRICHTUNG - DISPOSITIVO "OIL WATCH"
Si tratta di un sistema di protezione che interviene spegnendo il motore quando il livello olio, durante il
funzionamento, scende al di sotto del livello previsto.
Il dispositivo denominato OIL WATCH interviene nei casi di: 1) mancanza di olio; 2) basso livello olio.
Nel primo caso il motore non si avvia, mentre nel secondo il motore si avvia, spegnendosi
però subito dopo. In entrambi i casi l'OIL WATCH segnala l'intervento tramite l'accensione della
lampada spia. Se ciò dovesse accadere, aggiungere olio fino a traboccamento (fig. 5) e riavviare il
motore seguendo le istruzioni.
It is a protection system which stops the engine when the oil level goes under the minimum while
running.
This device, which is called "oil watch", intervenes in case of lack of oil or low oil level. In the first
case the engine does not start, in the second case the engine starts but stops immediately. In both
cases the "oil watch" warning light glows.
Should you face the mentioned case, add oil until overflow (fig. 5) and start the engine again following
the instructions.
Il s'agit d'un système de protection qui intervient en stoppant le moteur, lorsque le niveau d'huile descend en
dessous du niveau préconisé durant le fonctionnement.
Le dispositif appelé "OIL WATCH" intervient aussi dans les cas suivants:
1) Absence d'huile; 2) Niveau d'huile insuffisant
Pour le premier cas le moteur ne démarre pas, alors que dans le second cas le moteur démarre et
s'arrête aussitôt. Dans les deux situations le dispositif OIL WATCH signale l'anomalie à travers un témoin
qui s'allume. Si cela se produit, ajouter de l'huile jusqu'au débordement (voir fig. 5) et puis redémarrer
le moteur en suivant les instructions.
Hierbei handelt es sich um eine Schutzeinrichtung, die den Motor stopt, wenn der Ölstand während des
betriebes unter die Minimum-marke absinkt.
Diese Vorrichtung, die "Oil-Watch" genannt wird, setzt dann ein, wenn kein Öl aufgefüllt wurde oder der Ölstand
zu niedrig ist. Im ersten Fall wird der Motor nicht starten, im zweiten Fall startet der Motor, geht aber sofort wieder
aus. In beiden Fällen glimmt eine Kontrollampe, die mit der "Oil-Watch" verbunden ist.
Nach dem Befüllen des Motors mit der vorgeschriebenen Ölmenge (abb.5) läßt sich dieser entsprechend
der Bedienungsanleitung starten.
Es un aparato de protección que apaga el motor cuando el nivel de aceite, durante el funcionamiento,
descende por de bajo del nivel previsto.
El aparato, llamado Oil Watch, interviene en los casos de: 1) Falta de aceite; 2) Bajo nivel de aceite.
En el primer caso el motor no se pone en marcha; mientras que, en el segundo, el motor se pone
en marcha pero se apaga de immediato. Enambos casoo el Oil Watch señalala intevenciòn a traves
de la lampara espia. Si eso ocurre, añadir aceite hasta la rebosadura (fig.5) y poner en marcha el
motor siguiendo las instrucciones.
SCHEMA ELETTRICO
ELECTRIC DIAGRAM
SCHEMA ELECTRIQUE
ELEKTRISCHE ANLAGE
INSTALACION ELECTRICA
17
VARIANTI PER MOTORI FUNZIONANTI A GAS.
(Preparazione del motore)
a) Preparare il motore con le 2 viti (A=MINIMO-B=MASSIMO) avvitate completamente ed allentarle
di 2 giri.
b) Avviare il motore a benzina, far girare il motore per qualche decina di secondi quindi chiudere
il rubinetto della benzina.
Le istruzioni relative all’avviamento sono riportate nel libretto di uso e manutenzione che accompagna
ogni motore.
c) Far funzionare il motore con la benzina rimasta nel carburatore fino a percepire il classico pendolamento
per mancanza di carburante. A questo punto aprire il rubinetto del gas ed attendere la completa
stabilizzazione di regime.
(Regolazione del massimo)
Portare il motore, senza carico al regime massimo previsto dalla taratura.
Allentare la vite B di regolazione di portata del gas fino a percepire allo scarico il classico “borbottio” da
carburazione grassa; riavvitare lentamente la vite B fino alla scomparsa del “borbottio”.
NOTE: Lasciare girare il motore per qualche minuto a pieno carico, quindi verificare la colorazione
del collettore di scarico: se diventa incandescente (rosso vivo) significa che la carburazione del
motore è magra, quindi si dovrà intervenire aumentando la quantità di gas, allentando di circa ½
giro la vite B di regolazione.
Le condizioni di funzionamento ottimali si avranno quando, dopo un certo periodo di funzionamento a pieno
carico, lo scarico si presenterà di colore naturale o al massimo di colore “rosso cupo”, con passaggio dal
MIN al MAX rapido e senza vuoti di carburazione.
(Regolazione del minimo)
Con motore a regime termico stabilizzato, regolare il minimo con la vite A precedentemente posizionata
come descritto nel punto (a).
La regolazione sarà corretta quando con motore a regime minimo, agendo sulla vite A avremo un
aumento di regime con una successiva diminuzione dello stesso; la vite deve essere posizionata nel
punto in cui il regime minimo è più alto.
N.B.: La pressione massima in arriva al riduttore non deve superare le 15 bar.
VARIATIONS FOR LPG ENGINES
(Engine’s preparation)
a) Prepare the engines with the screw A “minimum” and B “maximum” fully tightened and then
loose them approximately 2 turns.
b) Start the engine and let it run for 30/40 seconds, then close the gasoline tap.
c) In this condition the engine is running with the gasoline contained in the float chamber. When the engine starts
hunting, open the LPG valve, and then wait for the completely evenness of the engine’s rpm.
(Maximum speed adjustment)
Start the engine and at no load move the accelerator lever to the max. position according to the engine setting.
Loosen the screw B until the carburation becomes rich, that means until you hear that the exhaust sound is like
a grumbling; gently tighten the screw B again until the grumbling sound disappears.
NOTE: Let the engine run for some minutes at full load, then check the exhaust manifold colour : if the
manifold becomes cherry red, the mixture is lean. In this case loosen the screw B of ½ turn. If the
mixture is rich, tighten the screw B of ½ turn.
The best running condition is obtained when the exhaust manifold colour is natural or dull red, and when the
engine’s rpm go from min. to max. without any carburation misses.
( Minimum speed adjustment)
With the screw A adjust the minimum speed. The adjustment will be right when, leaving the accelerator lever
in the minimum position, the highest rpm is found. Such operation is particularly delicate and it is necessary
to carry it out many times to be sure to have found the right position.
N.B.: 15 bar are the maximum feeding pressure to the pressure reduction unit.
18
VARIATIONS POUR MOTEURS FONCTIONNANT A’ GAZ
(Préparation du moteur)
a) Préparer le moteur avec les deux vis (A= minimum – B=maximum) complètement vissées, puis
desserrer de deux tours.
b) Démarrer le moteur à essence, faire fonctionner le moteur pour quelques dizaines de secondes,
puis fermer le robinet de l’essence.
Les instructions concernant le démarrage sont indiquées dans le livret d’emploi et entretien qui
accompagne chaque moteur
c) faire fonctionner le moteur avec l’essence qui est restée dans le carburateur jusqu’à entendre le typique
débattement causé par le manque de carburant. A ce moment : ouvrir le robinet du gaz et attendre
la complète stabilisation du régime de tours.
(Régulation du maximum)
Porter le moteur, sans charge, au régime prévu par le tarage.
Desserrer la vis B de régulation du débit du gaz jusqu’à entendre, à l’échappement, le typique
« gargouillement » d’une carburation grasse ; revisser lentement la vis B jusqu’à ce que
le gargouillement disparaisse.
NOTE : laisser fornctionner le moteur pour quelques minutes à pleine charge, puis vérifier la couleur
du collecteur d’échappement : s’il devient incandescent (rouge vif) cela signifie que la carburation du
moteur est maigre. Il faudra donc intervenir et augmenter la quantité de gaz en desserrant d’environ
un demi-tour la vis B de régulation.
Les conditions de fonctionnement optimales se réaliseront quand, après une certaine période de fonctionnement
à pleine charge, le collecteur d’échappement se présentera de couleur naturelle ou au maximum de couleur «
rouge foncé », avec un passage rapide du MIN au MAX et sans vides de carburation.
(Régulation du minimum )
Avec un moteur stabilisé du point de vue thermique, régler le minimum avec la vis A précédemment
positionnée comme décrit ci-dessus au point (a).
La régulation sera correcte lorsqu’en agissant sur la vis A, avec le moteur à régime minimum, nous aurons
une augmentation de régime avec une successive diminution de ce dernier ; la vis doit etre positionnée au
point où le régime minimum est le plus élevé.
NB : La pression maximum qui arrive du réducteur de doit pas etre supérieure à 15 bar.
19
VARIANTEN FÜR GASBETRIEBENE MOTOREN
Vorbereitung des Motors
a) Bereiten Sie den Motor so vor, daß die 2 Schrauben (A=Leerlauf, B=Höchstdrehzahl) komplett
eingeschraubt sind, und lösen Sie sie um 2 Umdrehungen.
b) Starten Sie den Motor mit Benzin, lassen Sie ihn ca. 10 – 20 Sekunden laufen, dann schließen
Sie den Benzinhahn. Die Startanweisungen finden Sie in der Betriebsanleitung, die mit jedem
Motor geliefert wird.
c) Lassen Sie den Motor mit dem Benzin laufen, der im Vergaser übrig bleibt, bis Sie das bekannte
Pendeln wegen Kraftstoffmangels hören. Jetzt öffnen Sie den Gashahn und warten dann, bis Sie
eine Gleichmäßige Drehzahl haben.
Einstellung der Höchstdrehzahl
Bringen Sie den Motor ohne Belastung zur maximalen Drehzahl, wie Sie durch den Gerätehersteller
vorgesehen ist.
Lockern Sie nun die Schraube B, die den Gasfluss einstellt, bis Sie am Auspuff das bekannte „Gebrumm“
hören, das durch eine fette Vergasung verursacht wird; Schrauben Sie die Schraube B langsam
wieder ein, bis das „Gebrumm“ verschwindet.
ANMERKUNGEN: Lassen Sie den Motor einige Minuten lang mit Volllast laufen und überprüfen dann
die Färbung des Auspuffkrümmeres: Wenn dieser glühend (flammend rot) wird, heißt es, daß die
Vergasung zu mager ist. In diesem Fall müssen Sie den Gasfluss erhöhen, indem Sie die Schraube
B um eine halbe Umdrehung herausdrehen.
Die optimalen Laufbedingungen werden in dem Augenblick erreicht, wenn der Auspuff seine natürliche
Färbung hat, bzw. dunkelrot wird. Das richtige Gemisch ist dann eingestellt, wenn Sie einen sauberen
Übergang zwischen Leerlauf und Vollgas haben.
Einstellung des Leerlaufs
Sobald der Motor thermisch richtig eingestellt ist, stellen Sie den Leerlauf mit der Schraube A ein, die früher
positioniert wurde, wie im Punkt a) beschrieben.
Die Einstellung ist dann korrekt, wenn Sie bei Leerlauf eine Drehzahlerhöhung mit einer darauffolgenden
Drehzahlverminderung erhalten, wenn Sie die Schraube A drehen. Lassen Sie die Schraube in der
Position, wo die Leerlauf am höchsten ist.
N.B.: Der maximale Druck, der am Druckreduzierer ankommt, darf 15 bar nicht überschreiten.
20
MODIFICACIONES PARA MOTORES QUE FUNCIONAN CON GAS
(Preparaciòn del motor)
a) Preparar el motor con los 2 tornillos ( A=Mìnimo-B=Màximo ) atornillar completamente yaflojar
con 2 giros.
b) Poner en marcha el motor de gasolina, hacer girar el motor durante unos diez segundo, y seguidamente,
cerrar la llave de la gasolina.
Las instrucciones relativas a la puesta en marcha del motor estan explicadas en el libro de uso y
mantenimientoque accompaña cada motor.
c) Hacer funcionar el motor con la gasolina restante del carburador hasta percibirla subida y la bajada
de la vueltas por falta de carburante . A este punto, abrir la llave del gas y esperar la completa
estabilidad del régiment.
(Regolaciòn del màximo)
Llevar el motor, sin carga al régiment màximo previsto de la tara.
Aflojar el tornillo B de la regulaciòn de fuerza del gas hasta percibir del escape el clàsico ruido
de carburaciòn grasa; volver a atornillar lentamenete el tornillo B hasta la desapariciòn de
ese ruido.
NOTAS: Dejar girar el motor durante algùn minuto con carga completa, y después controlar el color
del colector de escape; si aparece incandescente (rojo vivo) significa que la carburaciòn del motor
es floja, asì pues, se tendrà que aumentar la cantidad de gas, aflojando al menos de ½ giro el
tornillo B de regulaciòn.
(Regolaciòn del mìnimo)
Con motor con régimen térmico estabilizado, regular el m'nimo con el tornillo A, anteriormente colocado
como descrito en el punto (a):
La regulaciòn serà correcta cuando con el motor con régimen mìnimo, actuando en el tornillo A tendremos
un aumento de régimen con una sucesiva disminuciòn del mismo; el tornillo tiene que estar colocado en el
punto donde el régiment mìnimo es màs alto.
N.B.: La presiòn màxima en llegada al reductor no tiene que superar los 15 atm.
B
A
A
21
Scaricare