PFAFF®
I
3
Bedienungsanleitung
Instruction Book
Mode d’emploi
Libretto istruzioni
Diese Seite nach aufen kiappen
Fo’d out this page
Rabattre ce volet vers I’extérieur
Girare questa pagina verso I’esterno
4 Sicherheitshinweise
4 Mesures de sécurité
für Haushaltnähmaschineri
nach DIN 57 700 Tell 28 bzw. IEC 335
Tell 28
a) Der Benutzer hat wegen der auf- und
abgehenden Nadel genügend Vorsicht
walten zu lassen und die Nähstelle bei
der Arbeit standig zu beobachten.
b) Beim Verlassen der Maschine, bei
Wartungsarbeiten oder beim Wech
sein von mechanischen Teilen oder
Zubehör ist die Maschine durch Her
ausziehen des Netzsteckers aus der
Steckdose vom Netz zu trennen.
c) Die maximal zulässige Leistung der
Lampe beträgt 15 Watt.
d) Die Spannung des Antriebsriemens
darf nur von einem Pfaff-echaniker
eingestellt werden.
Some safety rules
a) Take care to avoid injury to your fin
gers by the needle during sewing.
b) Be sure to unplug the power cord
whenever you leave the machine or
wish to clean it, oil it or change
mechanical and accessory parts.
c) Be sure to use only a 15-watt light
bulb in the sewing lamp.
d) The drive belt must never be adjusted
by anyone but an authorized Pfaff
agent.
a) Toujours faire preuve de prudence et
continuellement surveiller le travail.
b) Toujours débrancher Ia machine du
secteur avant de quitter Ia machine,
avant es travaux d’entretien et en cas
de remplacement de pièces mécani
ques ou d’accessoires.
c) Puissance maximale admissible de
l’ampoule: 15 Watts.
Norme di sicurezza per macchine per
cucire per uso famiglia secorido
DIN 57 700 parte 28 oppure IEC 335
parte 28
a) In virtü del movimento alternativo
dell’ago, l’utente deve prestare suffi
ciente attenzione e tenere costante
mente d’occhio il punto di lavoro.
b) Nel cambiare ago, piedino, spolina e
placca d’ago, nelle interruzioni non
custodite del lavoro e durante i avon
di manutenzione si deve disinserire Ia
corrente della macchina togliendo Ia
spina dalla presa a muro.
c) La potenza massima consentita per a
lampadina e di 15 Watt.
For safety rules applicable to the UK
please see page 88.
lnhaltsverzeichnis
Contents on page
Seite6
67,)
able des matières, page
lndice pagina
69
7,)
_______
_____
_____
____
______
100
.
101
102
I
Jj
113
112
111
PEAFF
I
1
tlptroc 71
**
[ T°
j_i
133
F’\ 114
110
\iiz
116
117
104
107
/
105
-‘
L
106
118
132
18 19
122
iJi
121
1
1
[
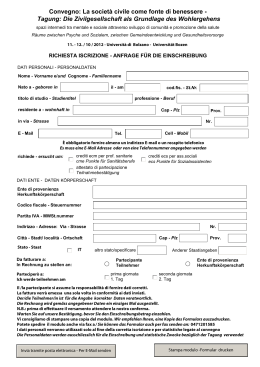
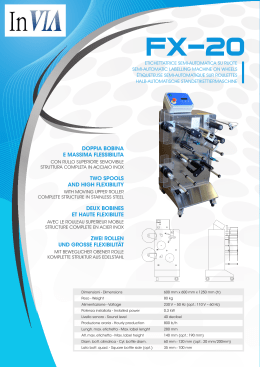
Bedienungsteile der Nähmas
chine
100 Tragegriff
101 Klappdeckel
102 Handrad
103 Auslösescheibe
104 Hauptschalter
105 Tipptasten
106 Stichlangen-Einsteller
107 Verwandlungs-Nahfläche mit
Zubehörkâstchen und Zubehörfach
108 Stichplatte
109 NähfuBhalter mit Nähful
11 0 Nadeleinfädler
111 Unterfaden-Kontrollanzeige (tipt
ronic)
11 2 Taste ,,nadel unten” (tiptronic
)
113 Taste ,,langsam nähen” (tiptrorii
c)
114 Stoffdrückerhebel
11 5 Taste ,,heftstich” (tiptronic)
116 Nadelhaiter mit Halteschraub
e
11 7 RUckwärtstaste
11 8 Programmtabelle
119 Spuler
120 Bodenplatte
121 Verschlulklappe, dahinter G
reifer
122 Freiarm
123 Einfädelschlitz
124 Oberfadenspannung
125 Spuler-Fadenführung
126 Fadenhebel
127 Spuler-Fadenführung
(ausschwenken)
128 Garnrollenhalter mit
Ablaufscheibe
129 Zweiter Gamrollenhalter
(hochschwenken)
130 Doppefter Stofftransport
mit Fadenabschneider
131 Stoffdrückerstange
132 Fach für Bordüren-Ubersicht
133 Zierstich-Einstellrad (Modelle
mit
Zierstichen)
4
Parts of your sewing machine
100 Carrying handle
101 Hinged top cover
102 Hand wheel
103 Stop motion knob
104 Master switch
105 Finger-tip stitch buttons
106 Stitch length control
107 Detachable work support with
accessory box and compartment
108 Needle plate
109 Sewing foot holder with sewi
ng
foot
110 Needle threader
111 Bobbin thread indicator light
(tiptronic)
11 2 “Needle down” button (tiptronic
)
11 3 “Sew slow” button (tiptronic)
114 Presser bar lift
11 5 “Basting stitch” button (tiptronic
)
116 Needle holder with retaining
screw
11 7 Reverse-feet control
118 Stitch program chart
119 Bobbin winder
120 Base plate
121 Free arm cover enclosing sewi
ng
hook
122 Free arm
123 Threading slots
124 Needle thread tension
125 Bobbin winder thread guide
126 Take-up lever
127 Bobbin winder thread guide
(swing-out>
128 Spool holder with unreeling disc
129 Sewing spool holder (swing up)
130 Dual fabric feed with thread cutte
r
131 Presser bar
132 Compartment for border-stitch
table
133 Fancy-stitch thumb wheel
(Models with fancy stitches)
I
(
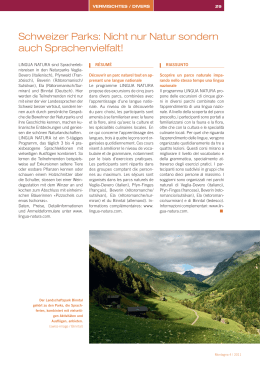
Kofferhaube abheben. Trag
egnif
pen. Fach N st für den FuFa
nIasser und
die Bedienungsanleitung.
Lift off the cover. Fold dow
n the caring
handle. Compartment N cont
ains foot
control and Instruction book
.
N
Enlever le couvercle de Ia
valisette.
Rabattre a poignee. Dans
a case N sont
ranges le rheostat a pedale
et a notice
d’emploi de a machine.
Sollevare ii coperchio della
valigetta.
Ribaltare a maniglia. Lo
scomparto N e
per ii pedale d’avviamento
e per le istru
zioni per luso,
4
‘V
(
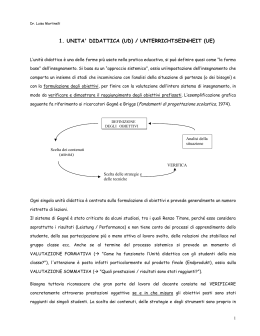
Klappdeckel 101
Tilt cover 101 backwards.
:::
c::r:o
Netzkabel anschlielen.
Plug in the machine
-
-.-
Brancher le cable.
2
Collegare il cavo elettrico
a rete.
2
Kabel aus dem Anlasser ziehen.
Pull the power lead out of the toot
control.
Dérouler le cébie du rheostat
a
I
pédale.
Estrarre ii cavo dal reostato
4 Anlasserkabel an die
Maschine
anschlieRen und den Anlasser auf den
Boden stellen.
Plug the foot control lead into the
machine socket and place the foot
control on the floor.
Brancher le cable du rheostat sur Ia
machine et poser le rheostat sur le sol.
Collegare ii cavo del reostato alla mac
china e porre 1 reostato sul pavimento.
I
Hauptschalter 104 drücken, wobei das
Nàhlicht aufleuchtet.
Push master switch 104; the sewing light
goes on.
Enfoncer le bouton de l’interrupteur
general 104; Ia lampe sallume.
Premendo l’interruttore principale 104 si
accende il riflettore.
3
-
4Spuen vorbereiten:
Unter die Nähfl
greifen und die
dche
se nach inks sch
wenken,
Bobbin winding
preparations: Re
ach
under the work
support and swing
t out
toward the left,
Preparer le bobin
age: Passer Ia
main
sous a boite de
rangement at fai
re pivoter
celle-ci vers Ia ga
uche.
Preparazione pe
r avvolgere Ia
spolina:
afferrare ii piano
di lavoro da so
tto e
girarlo verso sin
istra.
4 Verschlu
Pklappe 121 nach
unten Otfnen.
Open free arm co
ver 121.
Ouvrir le capot 121
vers Ia bas.
Aprire lo sportell
o 121 verso 1 ba
sso.
4 * Hauptscha/te
r 104 ausschalte
n.
Klappe N anhebe
n und die Spule
nkapsel
herauszehen.
• Switch off maste
r switch 104. Ra
ise
latch N and pull
out the bobbm
case.
• Thurner flnter
rupteur général 104
sur
‘rrdt’ Lever le
loquet N et retire
r Ia bolte
a canette.
4
• Disinserire I’Lnterrutto
re pr/nc/pale 104
.
Soilevare 1 chiusino
N e tog here a
capsula della
spohina.
Klappe
N loslassen und
die Spule heraus
nehmen.
4
Release latch N
and take out the
bobbn
Lãcher he loquet
N et retirer Ia ca
nette.
Rilasciare il chius
ino N e toghiere
Ia
spohina.
Spule auf den Spuler 119 stecken. Stift
N
muB in Schlitz 0.
Place a bobbin on spindle 119, makin
g
sure pin N enters slot 0.
/
Mettre Ia canette sur le dévidoir 119;
le
tenon N doit s’engager dans Ia fente
0
Inserire ía spolina sullo spolatore 119
e
girarla finché II perno N si nserisce
nella
fessura 0.
j
I
Nähwerk ausschalten: Handrad festh
al
ten und Scheibe 103 nach vorn dreher.
Disengaging the sewing mechanism:
Hold the hand wheel steady and turn
knob 103 toward you.
Débrayer le mécanisme: Retenir le
volart et tourner le disque 103 vers
‘avant.
Disinnestare ii meccanismo di cucit
o:
tenere fermo 1 volartino e girare 1 disco
103 in avanti.
‘II.’
4
Zweiten GarnroIlenhalter nach hinten
schwenken.
Swing the sewing spool holder toward
the back.
Basculer le deuxième porte-bobines vers
l’arrière.
Orier tare in sü 1 secordo portarocchetto
.
4Garnrolle und kleine Abiaufscheibe P auf
den Halter schieben.
Push a spool of thread and small
thrust
collar P onto the holder.
Passer ía bobine de fil et le petit déro
uleur
P sur ía broche porte-bobine.
Porre ía spagnoletta di fib con 1 piccolo
disco di scorrimento P sul portarocc
hetto.
5
____
-Jr 1
11
L
F
11
it___
ci...
119
I
I
4
Spulen von einer zweiten
Garnrolle:
• Hauptscha/ter einscha/ten
. Spulerfaden
fuhrung 127 nach vorn
schwenken. Den
Faden in die Führung 125
und, wie die
Zeichnung zeigt, in die Fuh
rung 127 zie
hen, wobei der Faden zwi
schen die Füh
rung und die Spannungsfed
er N kommen
muB. Nun den Faden eini
ge Male urn die
Spule wickeln. Die Spule
nach rechts
drücken, Den Anlasser beta
tigen und auf
spulen. Die voile Spule nac
h links drük
ken, abnehrnen, den Faden
nach vorn zie
hen und rn Abschneider
0 durchschnei
den.
Wichtig: Bei Garnrollen mit
Fadenhaite
schlitz muB der Schlitz beir
n Aufschieben
rechts sein.
6
Winding the bobbin from
a second
spool:
Switch on master switch.
Tilt
spool pin 1 27 forwarci. Pull
the thread
into guide 1 25 and mo
guide 127 as
shown in the drawing, mak
ing sure that
the thread passes between
the guide and
tension spring N. Now win
d the thread a
few turns around the bob
bin. Push the
bobbin to the right. Press
the toot control
to wind the bobbin. Push
the filled bobbin
to the left, remove it, pul
l the thread to
the front and cut it in thre
ad cutter 0.
Important note: On spools
with thread
retaining slots the slot mu
st face right
when the spool is fitted.
Remplissa
ge de Ia ca
nette a part
d’une deux
ir
ième bobine
:
• Tourner l’
/nterrupteur
généraL Bas
le guide4il 12
culer
7 vers ‘avant
. Passer le
par le guide
fil
fil 125 puis,
selon le dess
dans le guid
in,
e4il 127, en
tr
e
ressort de te
ce guide et
le
nsion N. Enr
ouler le fil de
quelques to
urs sur a ca
ne
tt
e et Ta pou
ser vers Ia dr
s
oite. Appuy
er sur le rheo
et bobiner. P
stat
ousser a ca
ne
tt
a gauche: Ia
e garnie vers
retirei tirer
le fil vers ‘a
et le couper
vant
sur le coupefil 0.
Important: V
eiller a ce qu
e es fentes
maintien du
de
fil de Ia bobi
ne passee su
broche se tr
r a
ouvent a dr
oite.
Avvolgere
Ia spolina
da un seco
rocchetto:
ndo
• loser/re li
nterruttore
principale.
in avanti Ia
Spostare
guida 127 pe
r To spolator
Tenere il fib
e.
nella guida
125 e, com
cato nel dise
e mdi
gno, nebba
guida 127
attenzione
facendo
che ii fib pa
ssi tra Ia gu
mofla di tens
ida e Ia
ione N. Avv
olgere ora
alcune vo[te
ii fib
attorno alla
spolina. Pre
Ia spolina ve
mere
rso destra.
Azionare II
stato e avvo
reo
lgere Ta bobi
na. Premere
spolina pien
Ia
a verso sini
stra, toglierl
tirare ml fib
a,
in avanti a
re
ci
fib 0.
derlo nel ta
gbia
Importante:
quando si
usano rocche
con intaglio
tb
fermafili, oc
corre inseri
parte intagl
re Ia
iata verso de
stra.
4N-äh
werk einsch
alten: Han
ten und Sch
drad festha
eibe 103 na
l
ch hinten dr
Dann Handr
ehen.
ad nach vo
rne drehen,
einrastet.
bis es
Engaging
the sewing
mechanism
Hold the ha
:
nd wheel fir
mly and turn
103 toward
disk
the back, th
en turn the
wheel forw
hand
ard again un
til it snaps
in.
Embrayage
dii mécanis
me Retenir
volant et to
le
urner le disq
ue 103 vers
rière. Tourne
‘ar
r le vobant ve
rs ‘avant ju
ce qu’ib s’encb
squ’a
enche.
nserimento
meccanism
o di cucito
tenere ferm
:
o 1 vobantin
o e girare ii
103 verso di
disco
etro. Girare
qu
indi ii vobant
in avanti finc
ino
hè s’innest
a.
,1
7
-
4’
4
-
-—-
,,
4
V
-‘
4
-
--
?
Spulen durch die Nadel:
• Hauptschaiter einschalten. Doppelter
Stofftransport einschalten. Den NähfuE
anheben. Nadelstellung oben. Die Spule
auf den Spuler 119 aufstecken, Nähwerk
ausschalten. Den Oberfaden unter dern
Nähful nach rechts und durch die Füh
rung 127 ziehen (siehe Zeichnung>, Den
Faden einige Male urn die Spule wickein
und diese nach rechts drücken, Den
Anlasser betdtigen und aufspulen. Die
voile Spule nach links drücken, abneh—
men, den Faden nach vorn ziehen und im
Abschneider “N” durchschneiden.
‘4’.
Winding through the needle eye (0)
• Switch on master switch. Engage dual
feet. Raise the sewing foot. The needle
must be in its ‘up’ position. Place a bobbin
on spindle 119. Disengage the sewing
mechanism. Draw the needle thread
under the sewing foot, up and into guide
127 (see drawing>. Wind the thread
around the bobbin a few times and push
the bobbin toward the right>. Press the
foot control pedal and wind the bobbin.
Push the full bobbin toward the left and
take it out, pulling the thread into thread
cutter. Reengage the sewing mechanism.
8
I
(
I
Remplissage de Ia canette avec le fil
d’aiguille:
• Thurner I?nterrupteur généra/ Embrayé
entramnement double, Relever le pied pres—
seur a aiguille en position haute. Placer Ia
canette sur le dévidoir 119. Débrayer le
mécanisme. Passer le fit d’aiguille sous le
pied presseur, vers Ia droite par le passefit 127 avant de i’enrouler de quetques
tours sur Ia canette et de pousser cetle-ci
vers Ia droite. Appuyer sur le rheostat et
bobiner. Pousser Ia canette garnie vers Ia
gauche, I’enlever et tirer le fit vers avant
puis, le couper sur le coupe-fit N.
4
Avvolgere Ia spolina attraverso I’ago:
• Inserire I’interruttcre principale. lnserito
doppio trasoorto. Alzare it piedino. Posi
zione ago superiore. Inserire Ia spolina
sulto spolatore 119. Disinserire ii mecca
nismo di cucito. Portare it fib superiore
sotto it piedino verso destra attraverso Ia
guida 127 (vedere disegno). Avvolgere it
fib alcune volte attorno alta spotina e pre
merba quindi verso destra. Azionare it reo
stato e bobinare.
Premere Ia spohna piena verso sinistra,
toglierla, tirarla in avanti e recidere ii fib
net tagliafibo “N”.
3
I
Ndhwerk einschalten: Handrad festhal
ten und Scheibe 103 nach hinten drehen.
Dann Handrad nach vorne drehen, bis es
einrastet.
Engaging the sewing mechanism:
Hold the hand wheel firmly and turn disk
103 toward the back, then turn the hand
wheel forward again until it snaps in.
Embrayage du mécanisme Retenir le
volant et tourner le disque 103 vers ‘ar
rière. Tourner le volant vers I’avant Jusqu’à
ce qu’iI s’enclenche.
U
Inserimento meccanismo di cucito:
tenere fermo ii volantino e girare it disco
103 verso dietro. Girare quindi it volantino
in avanti finchè s’innesta.
9
-
I
Spule einlegen N (Faden nach hinten).
Den Faden in den Schlitz 0 und bis zur
Offnung P ziehen.
Inserting the bobbin (N), wit the thread
unreeling toward the back. Drai the
thread into slot 0 and into eye R
Mise en place de Ia canette (N), le fil se
déroulant vers l’arrière. Tirer le fil par Ia
fente 0 jusqu’ä l’ouverture P.
lnserimento della spolina N
(il capo del fib va rivolto verso dietro).
Introdurre ii fib nella fessura 0, quindi
tirare fino all’apertura P.
Unterfadenspannung prüfen: Kapsel
leicht, ruckartig aufwärtsbewegen. Sie
mul stufenweise niedersinken.
(Einstellschraube Q nach links drehen =
loser; nach rechts drehen = fester).
Checking the bobbin thread tension:
With a brief, sharp upward movement of
your hand, the bobbin must gradually slip
downwards. (Turn screw Q counter-clock
wise for a weaker tension, or clockwise
for a tighter tension.)
Tension du fil de canette: Laisser
pendre Ia canette garnie au fil de Ia
canette. Elle doit descendre graduelle
ment quand on imprime a Ia main de
légeres saccades ascendantes. Rotation
de Ia vis Qvers Ia gauche: reduction de Ia
tension; rotation vers Ia droite: renforce
ment.
Controllo della tensione inferiore:
Tirare Ia capsula con leggeri colpetti verso
l’alto.
Deve abbassarsi gradatamente (girando Ia
vite di regolaggio Q a sinistra si allenta,
verso destra si rinforza).
10
4 Spulenkapsel einsetzen:
N
• Hauptscha/ter 104 ausschalten. Kiappe
N anheben und die Kapsel bis zum
Anschlag auf Stift 0 schieben. Ausschnitt
P mul’ dabei nach oben zeigen.
Inserting the bobbin case:
• Switch off master switch 104. Raise
latch N and push the bobbin case onto
stud 0 as far as it will go, making sure
cutout P points upwards.
Mise en place de Ia boIte a canette:
• Tourner I7nterrupteur généra! 104
‘4rrêt’ Relever le loquet N et glisser Ia
bolte a canette, l’ouverture P en haut, a
fond sur le tourillon 0.
Come inserire Ia capsula della spolina:
• Disinserire linterruttore princioa/e 104.
Sollevare il chiusino N e inserire Ia cap
sula fino all’arresto sul perno 0. Lapertura
P deve essere rivolta verso ‘alto.
4Garnrolle aufschieben:
Vor kleine Rollen
die kleine oder mittlere Ablaufscheibe Q
schieben, vor grofe Rollen die groe
Ablaufscheibe R.
Placing spool of thread on pin: Place
the small or medium-size unwinding col
lar Q in front of small spools, and the
large unreeling disc R in front of large
spools.
Mise en place de Ia bobine de fil: Utili
ser le dérouleur Q (petit diamètre) devant
les petites bobines et le grand dérouleur R
devant es grosses bobines.
Inserimento del rocchetto del fib:
Davanti a piccoli rocchetti porre ii disco di
scorrimento piccolo o medio 0, davanti a
grandi rocchetti porre ii disco di scorn
mento grande R.
}11
f
Oberfaden einlegen:
• Hauptschalter 104 aeisschalten. Nadelstel
lung oben. Nâhful anheben. Den Faden den
Pfeilen nach in Schlitz N. links an der Füh
rung P vorbei, von unten in Schlitz 0, in den
Fadenhebel 126, zurück in Schlitz 0 und in
die rechte Führung am Nadeihalter ziehen.
Taste B tippen (Seite 21).
Upper threading:
• Switch off master switch 104. With the
needle positioned at the top, raise the
sewing foot. Draw the thread into slot N to
the left past guide P. from below into slot 0
and take-up lever 126 (see arrows), then
back into slot 0 and into the right thread
guide on the needle holder.
Press button B (see page 22).
Passage du fil d’aiguille:
• Toumer I’interrupteur gênra/ 104
‘Arrêt’ Aiguille et releveur de fil en position
haute. Tirer le fil dans Ia fente N selon les
flèches, a gauche du passe-fil P; remonter
par Ia fente 0 dans le releveur de fil 126,
redescendre par a fente 0 et passer le fil
par le guide-fil droit au pince-aiguille.
Appuyer sur Ia touche B (page 23).
Inserimento d& fib superiore:
• Disinserire I’lnterruttore princloa/e 104.
Posizione ago alto. Aizare il piedino. Tirare 1
fib seguendo le freccie verso fessura N, a
sinistra accanto alla guida P. da sotto nella
fessura 0, nella eva tendifilo 126 di ritorno
nella fessura 0 e nella guida destra del mor
setto d’ago.
Premere tasto B (pag. 23).
Oberfaden hinter den Haken Q legen und
halten. Einfädler 110 ganz nach unten zie
hen.
Place the needle thread behind hook Q
and hold it there. Pull thread 110 fully
downwards.
Coucher le fib d’aiguille derriere le crochet
Q et maintenir. Tirer l’enfileur 110 entière
ment vers le bas.
Appoggiare 1 fib superiore dietro ii gan
cio 0 e tenerlo fermo. Tirare l’infilatore
110 verso dietro e completamente in
basso.
\
4
Einfädler nach vorn an die Nadel schwen
ken,
Push the threader forward against the
needle.
Basculer l’enfileur vers l’avant par l’aiguille.
Far girare I’infilatore in avanti verso ‘ago.
Den Faden von unten in den Haken R hangen.
Place the thread in hook R form below.
Accrocher le fil den bas sur le crochet R.
Agganciare il fib da sotto net gancio R.
4
Einfädter nach hinten schwenken, den
Faden dabei loslassen und den Einfädler
hochgleiten lassen. Dann den Faden ganz
durch das Nadeböhr ziehen.
Turn the threader to the left, letting go of
the thread at the same time, and allow
the threader to move upwards. Pull the
thread fully through the needle eye.
/
Basculer l’enfileur vers l’arriëre en làchant
le fit et en laissant glisser l’enfileur vers le
haut. Ensuite faire passer le fit par be chas
de l’aiguille.
Girare l’infilatore verso dietro e rilasciarlo
contemporaneamente e lasciare che
ritorni in sü. Tirare quindi il fib completa
mente attraverso a cruna dell’ago.
13
Oberfaden festhalten. Handrad nach v
drehen und einen Stich ndhen bis Nadel
und Fadenhebel wieder oben stehen. r
dem Oberfaden den Unterfaden nach
oben ziehen.
0
Hold the needle thread taut, Turn the
hand wheel toward you until the needle
moves down and up again. Pull the
bobbin thread up by pulling on the needi
thread.
Retenir le fil d’aiguille. Tourner le volant
vers l’avant. Coudre un point. Tirer le ft d
canette vers le haut a ‘aide du fil d’ai
guille.
Tenere fermo II fib superiore. Girare 1
volantino in avanti. Cucire un purto. Tirar
lb fib inferiore verso l’alto con I’aiuto del
fib superiore.
-
Ober- und Unterfaden nach rechts unter
den Nähful legen.
0
Place both threads toward the right unde
the sewing foot.
0
Coucher les deux fils vers l’arrière
droite sous be pied presseur.
a
Porre i fili superiore ed inferiore verso
destra sotto Il piedino.
-‘I
4 Verschlu1.klappe 121 nach oben schlieBer
Close the free arm cover.
Refermer be cache 121.
Chiudere bo sportelbo 121 verso ‘alto.
121
14
2
I
N
Nähfläche 107 an die Maschine schw
en
ken.
I
Swing work support 107 back against
the
free arm.
Remettre en place a bolte de rangement
107 contre le bras.
Avvicinare ii piano variabile 107 alla macchina.
4
N
• Hauptschalter 104 ausscha)ten.
Stoff unter den NähfuL legen.
• Switch off master switch 104.
Place fabric under the sewing foot.
• Tournar I’interrupteur général 104
‘Arrêt’ Placer du tissu sous le pied pres
seur.
• Disinserire I’interruttore principale 104.
Porre (a stoffa sotto ii piedino,
4
Beim Einlegen extrem dicker Stofflagen
Hebel 114 höher anheben.
To insert extra-thick fabric plies raise
lever 114
Pour les tissus trés épais, ever davantag
e
le levier 114.
In caso di spessori di stoffa estremam
ente
grossi alzare ulteriormente Ia eva 114.
4
• Hauptschalter einschalten. 7
Stoffdrückerh
114 senken, (N st die Stellung zum Stopien). ebe
• Switch on master switch. Lower presser
bar
lifter 114. (N shows the darning position).
• Tourner /‘interrupteurgénéraL Descendre le
levier 114. Pour a reprisage, utiliser a
position
N.
• Inser
ire linterruttore princiaIe. Abbas
sare Ia lava 114 (N corrisponde alla posizio
ne
per rammendo).
I
15
4 Anlasser niedertreten.
Je tiefer man
drückt, urn so schneller näht die Pfaff
Operating the foot control: The r
you press down the pedal, the fastcr
t[e
machine runs.
Abaisser Ia pédale du rheostat. Plus
Ia
pédale sera abaissée, plus a Pfaff
coudra vite.
Premere ii reostato: Piü a fondo si
preme II pedale, piü veloce cucirà Ia
Pfaff.
Oberfadenspannung 124
N = Einstellrnarkierung.
Needle thread tension 124
N = Setting mark.
Tension du fil d’aiguille 124
N = repère de reglage.
Tensione superiore 124
N = marcatura per Ia regolazione.
Fadenspannung Uberprtifen:
Die normale Einstellung liegt im weien
Bereich von 3-5. Je höher die ZahI, je
fester die Spannung.
Die UberprUfung wird mit dem Zickzack
stich vorgenommen.
Eine kurze Naht nâhen. Die Fadenverkno
tung soIl in der Mitte der Stofflagen lie
gen.
/cANV\
16
Checking the needle thread tension:
The normal setting is in the white range
between 3 and 5. The higher the
number, the tighter the tension. To
check the tension, set the machine at the
zigzag stitch.
Sew a short seam. The threads should
interlock in the middle of the material.
/6/vvv\A
Tensions des fils:
Position de réglage normale dans a plage
blanche, entre 3 et 5. Tension d’autant
plus forte que le chiffre est élevé. ContrO
er a l’aide du point zigzag. Coudre quel
ques points. Les fils doivent se nouer
dens l’épaisseur des tissus.
4
Controllo della tensione del fib:
La regolazione normale Si trova nel settore da 3-5. Piü alto il numero piü forte
sara a tensione.
II controllo viene fatto con lo zig-zag piü
largo.
Cucire una breve cucitura. Lannodarnento
dei fill deve awenire al centro dello spes
sore del materiale.
/1vvw\1
I
4Stoffdrückerhebel 114 hochst
nach hinten herausnehmen.
elien. Stoff
Raise presser bar lifter 114. Rernove the
fabric by pulling it toward the back.
Relever le levier 114. Degager le tissu vers
I’arrière.
Alzare Ia leva alzapiedino 114. Togliere a
stoffa verso dietro.
Fadenabschneider N. Fäden einlegen
und nach unten ziehen.
Thread cutter N. Draw the threads into
the slot and pull them downwards.
Coupe-fil N. Coucher les fils dans a fente
et es tirer vers le bas.
Tagliafibo N. Inserire I
basso.
fiji
e tirarli verso II
17
4Doppelter Stofftransport:
Er verhindert das Verschieben
der Stoff
bahnen gegeneinandec
Vor dem Em- oder Ausschalten
den Nàh..
fuB anheben.
Dual fabric feed
This prevents shifting of the fabric
plies
against each other.
Before engaging or disengaging,
raise the
presser foot.
Entralnement double du tissu:
II empêche le decalage des couches
de
tissu. Avant l’embrayage ou le
débrayage
relever le pied presseur.
Doppio trasporto:
Evita lo spostamento dei singoli strati
di
stoffa tra di oro. Prima di innestarlo
e
disinnestarlo alzare ii piedino.
\
Einschalten: Obertransport 130 nach
unten schieben bis er einrastet.
Ausschalten: Leicht nach unten drücken,
nach hinten ziehen und hochgleiten as
sen.
To engage: push top feed 130 down
so
that it snaps in place. To disengage: push
top feed lightly down and towards
the
back.
Embrayage: Abaisser le pied entralneu
r
130 jusqu% son encliquetage. Debrayage:
Abaisser le pied légèrement, le pousser
vers l’arriére et le laisser revenir vers le
haut.
Innesto: Spingere 1 trasporto superiore
130 verso basso finchè s’innesta.
Disinnesto: premerlo leggermente in
basso, quindi tirarlo verso basso e
lasciarlo scivolare in alto.
18
N
4
Stichlänge einstelien:
Die Zahien auf dem Stichlängen-Einsteller
106 geben die Stichlänge in mm an. Der
Einstellbereich ist 0 bis 6 mm. Die
gewünschte Stichlänge wird an die Em
steilmarkierung N gedreht.
Die Abbildung 0 unten zeigt die Einstel
lung des Stichlängen-Einstellers zum
Nähen der rot abgebildeten Stretchstiche
auf den Tasten.
Regulating the stitch length
The numbers on stitch length control 106
indicate the stitch length in millimeters.
The stitch length range is 0 to 6 mm. Turn
the control to set the number indicating
the stitch length at mark N.
Fig. 0 (bottom) shows how to set the
stitch length control for sewing stretch
stitches (red stitch symbols on push buttons).
Reglage de Ia longueur du point:
Les chiffres sur le disque 106 indiquent Ia
longueur du point en mm. La longueur du
point est réglable entre 0 et 6 mm. La
longueur do point choisie est indiquee
face au repére N.
Lillustration 0 (en bas) montre le réglage
du regle-point pour Ia couture des points
elastiques marques en rouge sur les tou
ches.
Regolazione della Iunghezza del punto:
I numeri sul bottone regolatore della un
ghezza del punto 106 corrispondono alla
lunghezza del punto in mm. La regola
zione si estende da 0 a 6 mm. La lun
ghezza del punto desiderata si regola
sulla marcatura N.
La figura 0 sotto mostra Ia regolazione
del bottone regolatore per cucire i punti
flexi (stretch) raffigurati in rosso sui tasti.
19
4 RUckwärtsnähen:
Die Taste 117 niederdrücken, Solange die
Taste gedruckt wird, näht die Maschine
rückwärts.
Reverse sewing
Press button 117. As long as you hold this
button the machine sews backwards.
Couture en marche arrière:
Abaisser Ia touche 117. La machine coud
en arrière aussi longtemps que a touche
est maintenue en bas.
.I.
La cucitura indietro:
Premere ii tasto 117. Finchè il tasto rimane
premuto Ia macchina cuce indietro.
1:1
I
I
LW
20
4
I
fl
.
A
B
C
Tipptasten:
A, B, C Knopflochtasten
Die Taste B st gleichzeitig die Ausschaft
taste zum Läsen der getippten Tasten und
linke Stichiage (siehe Seite 27).
D Stretch-3fach-Zickzackstich 2 mm
Zickzackstich 2 mm
E Stretch-3fach-Zjckzackstich 3,5 mm
Zickzackstich 3,5 mm
F Stretch-3fach-Zickzackstjch 5 mm
Zickzackstich 5 mm
G Stretch-3fach-Geradstich
Geradstich
H PuHoverstich
Blindstjch
Geschlossener Overlockstich
Verbindungsstich
D
-E
K Ovedockstich
Muschelkantenstich
L Federstich
Zierelastikstich
M Wabenstich
E(astikstich
Im Klappdeckel 1st die Programmtabelle
mit den Stichen und Stichkombinationen
abgebildet. In der Tabelle auf den Seiten
72-75 finden Sie die dazugehörenden
Hinweise für ihre Verwendung.
Bel Modell 1171 muI zum Nähen der
Stiche auf den Tipptasten das Zierstich
Einstellrad ausgeschaltet werden. Dazu
den wei1?en Punkt unter die Einstellmar
kierung drehen, siehe Seite 28.
21
‘0,
Finger-tip controls
A, B, C: Buttons for buttonholing
Button B is also used as clearing button
for releasing the pushed buttons and for
setting the left stitch length (see page
27).
D Elastic triple zigzag stitch, 2 mm
2-mm zigzag stitch
E Elastic triple zigzag stitch, 3.5 mm
3.5 mm zigzag stich
F Elastic triple zigzag stitch, 5.0 mm
5-mm zigzag stitch
G Elastic triple straight stitch
Straight stitch
H Pullover stich
Blindstitch
Closed overlock stitch
Joining stitch
K Overlock stitch
Shell-edge stitch
L Feather stitch
Elastic decorative stitch
M Honeycomb stitch
Elastic stitch
A stitch program chart is found on the
inside of the hinged top cover. This chart
is also reproduced on pages 76-79 of
this booklet and shows all stitches and
stitch combinations together with their
possible applications.
On Model 1171 the fancy-stitch thumb
wheel has to be disengaged in order to
sew the stitches on the finger-tip buttons.
To do so, set the white dot at the setting
mark, see page 28.
22
r
Touches:
A, B, C Touches boutonniere
La touche B sort également a débrayer
es
touches enfoncées et a déporter le point
a
gauche (voir page 27).
D Triple point zigzag élastique, 2 mm
Point zigzag 2 mm
E Triple point zigzag élastique, 3,5 mm
Point zigzag 3,5 mm
F Triple point zigzag élastique, 5 mm
Point zigzag 5 mm
G Triple couture droite élastique
Point droit
H Point pullover
Point invisible
Point do surjet fermé
Point d’assemblage
K Point de surjet
Point bord coquille
L Point d’épi
Point élastique décoratif
M Point nid d’äbeille
Point élastique
Dans le couvercle, vous trouverez le
tableau de programmes illustrant los
points et los combinaisons de points.
Dans le tableau sur les pages 80à 83,
vous trouverez les indications correspon
dantes pour Ia couture.
Sur le modèle 1171, ii faut débrayer le
règ
b-point pour points décoratifs si ‘on
veut
coudre les points reproduits sur les tou
ches. Pour ce faire, régler le point blanc
face au repére de réglage, page 28.
J
I tasti automat ici:
A, B, C: tasti per occhiello autom
atico,
II tasto B serve inoltre come tasto
di
annullamento dei tasti inseriti e per
a
posizione delrago a sinistra (vedi
pag. 27).
D punto a zig-zag stretch
tripbo 2 mm
punto a zig-zag 2 mm
E punto a zig-zag stretch
tripbo 3,5 mm
punto a zig-zag 3,5 mm
F punto a zig-zag stret
ch tripbo 5 mm
punto a zig-zag 5 mm
G punto dritto stretch triplo
punto drifto
H punto pullover
punto invisible
I
punto overlock chiuso
punto giuntura
K punto overlock
orb a conchiglia
L punto piuma
punto elastico ornamentale
M punto nido d’ape
punto elastico
Nel coperchio della macchina a raffigurata
una tabella dei programmi con i punti e
le
relative combinazioni. Nella tabella a
pagine 84-87troverete le relative istru
zioni per l’applicazione.
Per cucire i punti dei tasti automatici nel
Modello 1171 bisogna disinnestare prima
ii regolatore punto ornamentale ruotando
ii punto bianco sotto Ia marca di registra
zione (vedi pag. 28).
23
H
Nutzstiche einstellen:
(weile Symbole)
Taste tippen und die gewunschte Stich
lange zwischen 1 und 6 einstellen.
Selecting utility stitches
(white symbols>
Push the button required and set the
stitch length between 1 and 6.
Alle Zickzack- und Nutzstiche werden
durch zusàtzliches Tippen der Taste G in
der Breite halbiert.
All zigzag, and utility stitches are halved
in width when button G is pressed.
)
4 Reglage des
points utilitaires:
(symboles blancs)
Appuyer sur a touche et regler Ia Ion
gueur de point désirée entre 1 et 6.
En appuyant également sur Ia touche G,
tous les points zigzag et utilitaires sent
réduits de moitié.
24
4--
I punti utili:
(simboli bianchi>
Premere il tasto e regolare Ia lunghezza
del punto desiderata tra 1-6.
Tutti i punti a zig-zag, elastici e stretch
vengono dimezzati nella loro larghezza, se
si preme in aggiunta ii tasto G.
Stretchstiche einstellen:
(rote Symbole)
Taste tippen und Stichlangen-Einsteller
bis zum Anschlag auf rotes Symbol stel
en.
Selecting stretch stitches
(red symbols)
Push the button required and turn the
stitch length control as far as it will go
(red symbol>.
Alle Stretchstiche werden durch zusätzli
ches Tippen der Taste G in der Breite hal
biert.
Réglage des points elastiques:
(symboles rouges)
Appuyer sur a touche et régler le règle
point de Ia Iongueur de points sur
a sym
bole rouge, jusqu’ä Ia butée.
Tous es points élastiques
soot réduits de
motie en appuyant sur Ia
touche G.
By also pressing button G, all stretch stit
ches can be halved in width.
4
Regolazione dei punti flexi (stretch):
(simboli rossi)
Premere il tasto e girare il regolatore per
Ia lunghezza del punto fino all’arresto sul
simbolo rosso.
Tutti i punti flexi si dimezzano in ar
ghezza, premendo in aggiunta il tasto G.
25
Nutz- unci 4
Stretchstich-Kombination
n
Die Stichkombinationen sind auf der
Programmtabelle im Klappdeckel angeg
ben und am Ende dieser Anleitung mit
Nähhinweisen. Zum Beispiel der Elasti
sche-Blindstich: Taste M und F gleichzej
tig tippen. Stichlãnge zwischen 1 und 4
whIen.
Utihty- and stretch-stitch combina
tions
The various stitch combinations are
shown in the chart on the inside of the
hinged top cover and at the end of this
booklet, together with sewing instruc
tions. For example, if you want to sew an
elastic blindstitch, push buttons M and F,
select a stitch length between 1 and 4.
Points utilitaires et elastiques
combines:
Les combinaisons de points possibles
sont indiquees, avec des conseils et idées,
sur le tableau des points a Ia fin cie ce
mode d’emploi. Pour le point invisible
élastique, par exemple, il faut enfoncer les
touches F et M et choisir une longueur de
point entre 1 et 4.
Le combinazioni dei punti utili con i
punti flexi (stretch>:
Le combinazioni dei punti sono indicate
sulla tabella dei programmi nel coperchio
e al termine di questo libretto, con con
sigh per il cucito. Ad esempio il punto
invisibile elastico: tasto M e F premuti
insieme. Sceghiere lunghezza del punto tra
1 e 4.
\
26
4
N
C?D
ri
>
LJ
H
4
Stichiage einstellen bei Geradstich:
Stichiage links: Taste B tippen
Stichiage Mitte: Taste G tippen
Stichlage rechts: Taste H und I tippen
i
4
Selecting the needle position for
straight stitching
Left needle position: push button B
Central needle position: push button G
Right needle position: push buttons H and
J
Deport du point droit:
Deport a gauche: appuyer sur Ia touche B
Deport au milieu: appuyer sur Ia touche G
Deport a droite: appuyer sur les touches
H et
Regolazione della posizione d’ago nella
cucitura diritta:
Posizione ago sinistra: premere tasto B
Posizione ago centro: premere tasto G
Posizione ago destra: premere tasti H e I
27
/
o.U
flflfl]]fflTj--N
-r
I
f
Einstellrad für Zierstiche
(Modelle mit Zierstichen):
Jedem Zierstich ist em Buchstabe
zugeordnet. Den Zierstich auf der Tabelle
auswählen. Mit dem Einstellrad ,,N” den
entsprechenden Buchstaben unter die
Einstellmarkierung ,,0” drehen. Die Stich
lange zwischen 0,5 und 1 wählen.
Zum Náhen der Nutzstiche mul, das Em
stellrad ,,N” der Zierstiche ausgeschaltet
werden. Dazu den weifen Punkt unter die
Emnstellmarkierung ,,0” drehen.
4 Disque de reglage des points
d’orne
mentation (Modèle avec points d’orne
mentation):
Chaque point d’ornementation est
désigné par une lettre-code. A l’aide du
disque ,,N” placer Ia lettre-code du motif
désiré sous le repère ,,0”. Régler Ia Ion
gueur de point désirée entre 0,5 et 1.
Pour pouvoir coudre les points utilitaires,
debrayer le disque de reglage ,,N” des
points d’ornementation en placant le point
blanc de ce disque sous le repère ,,0”.
28
4 Thumb wheel for fancy stitches
(Models with fancy stitches):
Every fancy stitch is provided with a letter.
Select the fancy stitch from the table. Set
the correspondin9 letter at mark “0” by
turning thumb wheel N. Select a stitch
length between 0,5 and 1.
For sewing utility stitches, thumb wheel N
for fancy stitches must be disengaged. To
do so, set the white dot at mark “0’.
4
Regolatore punti ornamentali
(Modelli con punti ornamentali):
Ad ogni punto ornamentale corrisponde
una lettera. Scegliere il punto secondo Ia
riproduzione nella tabella. Col selettore di
registrazione ,,N” ruotare Ia lettera deside
rata sotto a marca di registrazione ,,0”.
Regolare Ia lunghezza del punto deside
rata tra 0,5—1.
Per cucire con i punti comuni disinserire ii
regolatore “N” dei punti ornamentali. Allo
scopo ruotare il punto bianco sotto a
marca di registrazione “0”
4
I—i...
D CD
>
IIII_,iIHh1I_dhIIIIIk..IIIIItl_.,IIIlIt,..,IItIh,.,,IIIIC._ >< (9
IiIlI hhhllhI [lhhI1hllhI I 1hhi1lIlIlI Iluutl l hI11uhhll
_.1IllIll___JJIIIfIL_...ilIIllL_JlIIllL_1JllhIL
I)IIIIfIJlJJij}lIIl!IlIlII!iiIjIlIIJjI
D
N
ItlI{lIIdIIIIIIIlIIllhlI,ICIII!fhC.IIl!hII.d?f1IIbllII!II. D (9
Ii I i( IlI IhI 11Il hIul Il h!11wiI I Il Iu1II Il
tIIIIIIliitIIII!IliiIIIIIlIljiiIIIIIllUiiiItIIIIIIii!III
IiI I I P1lI I 1l1I1I I ITtJIlI I I 11IIl1l IJI l hlI 11II
IIIIIIIllflUIllhIHhIIIIItIIflhIIfT!IIIIflhIIlIlItIllhIIttII
I
‘ 11111 ‘ ‘11111 ‘‘‘lIIlI ‘ 111111 111111 ‘‘Ij
,I,nfl,,1llhF’lIlnIflIIlmiNIulm
stretch
0
.0
a)
0.0
-o-5
-D
C:
C:0
.0
.00
.D
C:
Cu
0
Ø4l)
xu
.2
0
4‘-C:
0o
.E.-CD4-
C
stretch
>
.0
C:
0
C:
tretch
gg
>-o•—
CD
0
0
o
C
0
C
u>-
a)
-tt
C
*CD000
.0 Cu Cu 0
>.$
0(I)
-;s
o0
o”-2
C:
5
,
J
1
)
0.04-0.0
4
C
0
€
.0
Cu
0
a).0:J’
=
0
:
—a)
-D
C:
C
2
—
0
IC)
D
.9
0
D
c:
CuDCu
09
C:
.2--
a)
a)a)
4-
D)-0
D(3)
C: C:
202>22
E
.OCu
0
,..
.0-—
100 CC) a)
— .0
D_CUCuC
9
±5 .0
CNCi...
a>
C:
(3) )
-D C:.0 o-C:
V- or CC) 0 0
0
C:) 0 0)
(1)
C:
CC)
co°a,
C:
(3) 2.C0)
(U
) — C:
u .._0 0 I— — Cl)
2
40
0)
E.0oC:
stretch
stretch
x
stretch
c’——.
MLL
ND
< D
...,CIIIIL_.ClIltII 1
C__
1111__.(3IId!I._..lI!IIl___
_,
CCII >— (9
IIli!iii)lIIiiI1IIIiIIIIJiiiIIIii,iIIIIiiIlI!iti!.
N
C
CU
-
C
CCC
E
0
.
C:
Cu
Cu’-0.
.-Cu_
0— 0
C:
Cu
0
2
C
o
-—
-
0
-
.!
c
._
2
0
Cu
0
D
-
0
D
—
)
0
-
0) 0
Cu
0.0
2Cu
0
2-’
C:
Cu.0
g
)
0 C CC) C/)
0
0 0.0C .0
0. D a)
0 .0 >
0 0.o 0
0
C:
.
a> 0. Ct
-
0.0
0.0
O..-....D
Cu
-J
(I)
0 —
0 .C
C:C:
0
0
0Cua)4)
.
—
0
4- 0
0—
.0
0
0
C
C
:4-a)a)a
0
)
C
.D
oJ
o$0. 0
C
CU
E
CU-—
o
CU
.0
4
\
<
c
0
0.0
N
C:C:a)0
E2EE
C
._0—oC
0
g0.0-oG),
-a)a)
00.0.
a)oDC:c
C:
C
.cDca)
0
C:C
.
Q_
:0
00
C.
•D
0
0CuoC:
a
0
0.+
+2
C
CDCu
.2
1’>
2
04)
C0
0
E
0
•
-
Q)
(3)
-w O
(((OS
-
CL 0
00 D
0 -D
C:
-
0
C
E-.. 8
2
.0
0 (IC
(I)
-
r
)
4
tiptronic
Bedieriurigsteile der Elektro
nic
Nadeistellung unten und
oben:
Nach dem Beenden elnes Nhv
organges
steht die Nadei immer oben.
Wenn man
die Taste ,,nadei unten” drückt,
leuchtet
die Funktionsanzeige N, und
die Nadel
bleibt bei jedem Anhaiten der
Maschine
unten im Stoff stehen (zum Eck
ennhen
und Stoffdrehen). Wird die Tast
e wieder
gedrückt, erlischt die Funktio
nsanzeige,
die Nadel geht nach oben und
bleibt nach
jedem Anhalten oben.
Das DrUcken der Taste kann auc
h wäh
rend des Nähens geschehen.
Elektronische
Endgeschwindigkeitsvorwah
l:
Durch Drücken der Taste ,,lan
gsam
nähen” läf,t sich die Endges
chwindigkeit
der Nähmaschine auf die Hälf
te reduzie
ren. Die Funktionsanzeige 0 Ieu
chtet
dabei auf. Wird die Taste wie
der gedruckt,
erlischt die Funktionsanzeige,
und die
Maschine näht mit höchste
r Endge
schwindigkeit. Bei jeder Ges
chwindigkeit
bieibt die voile Durchstichkra
ft der Nadel
erhalten.
30
Heften:
Die Taste ,,heftstich” tippen; dab
ei leuch
tet die Funktionsanzeige P auf.
Den Trans
porteur versenken (Seite 44) und
den
Stopffu1 anschrauben (Seite 39).
Das
Nähgut unter den Nähfu1 legen.
Bei
jedem Drücken und Loslassen
des Anlas
sers näht die Maschine einen Stich
.
Den Stoff unter dem Nähful hind
urch
ziehen, bei der gewunschten Stic
hlänge
anhalten, den Aniasser niederdrüc
ken und
losiassen. Diesen Arbeitsgang stän
dig
wiederholen.
1st das Heften beendet, den Fui
vom
Anlasser nehmen und die Tast
e ,,heft
stich” tippen. Hierbei eriischt die
Funk
tionsanzeige R Die Transporte
urversen
kung wieder nach links schiebe
n. Ver
schiuRkiappe 121 wieder schlieBen
.
Elektronische
UnterfadenUberwachung:
Die rote Untertaden-Kontrollan
zeige 111
beginnt zu blinken, wenn der Unt
erfaden
vorrat zu Ende geht. Die Kontroll
anzeige
erlischt, wenn eine voile Spule eing
esetzt
ist und weitergenäht wird.
Wichtig: Die VerschIuikiappe 121
mu!?,
immer geschlossen gem.
t
tiptrOniC
Controls of the electronic system
Needle positions “up” and “down”
After sewing the needle is always
retained at its “up’ position. When you
press the “needle down” button, indicator
light N lights up and the needle remains
down in the fabric (for sewing corners
and turning the fabric) whenever sewing
is interrupted. When you press the button
again, the indicator light goes out, the
needle moves upwards and is retained in
its “up” position whenever the machine
stops.
The button can be pressed during sewing.
Electronic top speed selection
By pressing the “sew slow” button, the
top speed of your machine can be halved.
At the same time indicator light 0 lights
up. When you press this button
again, the
Indicator light goes off and the machine
speed can be varied at will. The full pier
cing power of the needle
remains the
Same at any speed.
Basting
Press the basting stitch button. The green
indicator lamp P lights up. Drop the
machine feed (page 44) and screw on the
darning foot (page 39). Place the fabric
under the sewing foot. Each time you
press and release the foot pedal the
machine sews one stitch. Move the fabric
under the sewing foot until the length of
stitch required is obtained, then holding
the fabric in this position, press down the
foot pedal and release it again. Repeat
this operation for each basting stitch.
When you have finished basting move
your foot from the pedal and press
basting stitch button again. The green
indicator lamp P goes out. Push the dropfeed control to the left again. Close free
arm cover 121.
Electronic bobbin thread monitor
The red signal lamp of bobbin thread
monitor Ill starts to flash when the bobbin
thread is running out. The lamp goes out
when a full bobbin is inserted and sewing
continues.
Important: Free arm cover 121 must be
kept closed.
31
4
tiptronic
Organes de commande electroniques
Positionnement haut et bas de
l’aiguifle:
Après le dernier point de Ia couture, l’ai
guille s’arrète toujours en haut. En enfon
cant Ia touche “aiguille en bas”, Ia lampe
témoin N s’allume. at I’aiguille s’immobi
use, a chaque arrét de a machine, en bas
dans l’ouvrage (pour coudre es coins at
tourner l’ouvrage). En appuyant a nouveau
sur cette méme touche, Ia lampe-témoin
s’éteint, l’aiguille monte at s’immobilise en
position haute a chaque arrêt de Ia
machine.
La touche peut ëtra enfoncée même en
cours de couture.
Selection électronique de Ia vitesse
finale:
On pourra diminuer Ia vitesse finale de Ia
couture a Ia moitié en enfoncant Ia touche
“Couture vitesse réduite”. Ce faisant, Ia
lampe-témoin 0 s’allume. En enfonçant
une nouvelle fois cette touche, Ia lampe
témoin s’éteint et Ia machine coud a Ia
vitesse finale maximala.
A toutes las vitesses, Ia force de pénétra
tion de I’aiguille est garantia.
32
Travaux de bâtissage:
Enfoncer a touche “point béti” at Ia lam
pa-témoin P s’allume. Abaisser Ia griffe
(voir page 44) at fixer le pied a repriser
(voir page 39). Mettra a tissu sous le pied
prasseur. Chaque fois qua I’on appuie sur
Ia pédale et Ia relãche, Ia machine coud
un point.
Faire passer Ia matière sous le pied pres
seur at I’arrèter a Ia longueur de point
voulue at appuyer sur Ia pédale at a ralâ
cher. Répéter continuellement cette opér
tion da couture. Après avoir tarminé le
bétissaga, Iâcher Ia pédale at enfoncer Ia
touche “point bâti”. Ce faisant, a lampe
témoin P s’étaint. Poussar Ia bouton
abaisse-griffe vers Ia gauche. Rafermer le
cache 121.
Contrôle electronique du fil de canette
La lampa-témoin rouge 111 commence a
clignoter Iorsque Ia fil de canette s’épuise.
La lampe-témoin s’éteint lorsqu’une
canatte garnie est mise an place at qua
l’on continua a coudra.
Important: La cache 121 doit toujours
étra farmé.
tiptronic
Elementi di comando dell’elettronica:
Posizione ago bassa e alta:
Al termine della cucitura l’ago si ferma
sempre in alto. Premendo ii tasto “ago
basso” s’illumina l’indicatore di funzione
N e ‘ago rimarrà al termine delle cuciture
semprein posizione bassa nella stoffa
(per cucire angoli e per girare Ia stoffa),
Premendo nuovamente ii tasto si spegne
l’indicazione di funzione N, ‘ago ritorna in
alto a si fermerà al termine di ogni cuci
tura in alto. Si pub premere ii tasto anche
durante Ia cucitura.
Preselezjone elettronica della velocità
finale:
Premendo il tasto “ridurre velocità” a
velocità finale della macchina per cucire
pub essere ridotta a metà. In questo caso
si illumina l’indicatore di funzione 0.
Premendo nuovamente il tasto si spegne
l’indicazione a Ia macchina cuce a velocità
finale massima Con ogni velocità rimane
invariata Ia piena forza di penetrazione
dell’ago.
L’imbastitura:
Premere il tasto “imbastitura”: s’illumina
l’indicatore di funzione R Abbassare il tra
sporto (pagina 44) e applicare il piedino
per rammendo (pagina 39), Porre ii capo
da cucire sotto il piedino. Ogni qualvolta
si preme e rilascia ii reostato Ia macchina
cuce un punto.
Tirare Ia stoffa sotto ii piedino a fermarsi
alla distanza desiderata, premere il reo
stato a rilasciarlo. Continuare a ripetere
questa operazione.
Al termine dell’imbastitura togliere il
piede dal reostato a premere il tasto
“imbastitura”. L’indicazione P si spegne.
Spostare ii dispositivo del trasporto nuo
vamente verso sinistra. Chiudere lo spor
tello 121.
Controllo elettronico del fib inferiore:
La spia controllo rossa per il fib inferiore
111 inizia a lampeggiare quando a scorta
del fib inferiore sta terminando. La spia di
controllo si spegne quando si inserisce
una spolina piena e si continua a cucire.
Importante: Lo sportello 121 deve essere
sempre chiuso.
33
f
Unter die Nähfläche greifen und
diese
nach links schwenken.
Reach under the work support and
swing it out toward the left
Passer Ta main sous Ia boite de
rangeme
et faire pivoter celle-ci vers Ia
gauche.
Prendere iT piano variabile da sotto
e
spostarlo verso sinistra.
7Q
34
N
Verwandlungsnähfläche und Zubehör:
Nähfläche kann herausgenommen werden
N. Nähfläche öffnen, Zubehbrkästchen P
herausnehmen. Unter dem Zubehörkäst
chen ist em Zubehärfach 0. Abbildung Q
zeigt, wie NähfüRe, Nadeln und Spulen
eingeordnet werden müssen.
o Normalndhful
1
2
3
4
5
6
7
8
Zierstichfu6 für Obertransport
Zierstichful?, nicht für Obertransport
Blindstich- und 0verlockful?
Reilverschlul- und Kantenful
KnopflochfuR
Stopffu1,
Säumer
Lineal
j
Detachable work support and
accessories:
The work support can be lifted out (N).
Open its lid and take out accessory box R
Underneath the box is an accessory com
partment 0. Illustration Q shows how to
arrange sewing feet, needles and bobbins
in the accessory box.
O Ordinary sewing foot
1 Fancy-stitch foot for top feed
2 Fancy-stitch foot (without top feed)
3 Blindstitch and overlock foot
4 Zip foot
5 Buttonhole foot
6 Darning foot
7 Hemmer
8 Edge guide
BoIte de rangement et accessoires:
Enlever Ia boite de rangement N, I’ouvrir
et enlever Ia bolte d’accessoires P Sous
celle-ci se trouve le casier 0. Figure Q
vous montre comment ranger Ies pieds
presseurs, les aigullles et les canettes.
0 pied presseur normal
1 pied pour points décoratifs,
avec entralnement supérieur
2 pied pour points décoratifs,
sans entrainement supérieur
3 pied a point invisible et pour surjet
4 pied pour poser es fermetures a
glissière et pour piqüres au bord
5 pied a boutonnières
6 pied a repriser
7 pied ourleur
8 guide-bord
II piano di lavoro variabile e gli acces
son:
II piano di lavoro pub essere to[to (N).
Aprire ii piano di lavoro, togliere II casset
tine degli accessori R Sotto ii cassettino
degli accessori si trova uno scomparto per
accessori 0. Figura Q mostra come siste
mare piedini, aghi e spoline.
o piedino normale
1 piedino per ricamo per doppio trasporto
2 piedino per ricamo
(senza doppio trasporto)
3 piedino per punto invisibile e per
Overlock
4 piedino per cerniere lampo
5 piedino per occhielli
6 piedino per rammendo
7 piedino orlatore
8 lineale
35
J
Nahful auswechseln: • Hauptsch.it
104 ausscha!ten. Die Nadel hoch. lli.
Den Nähful hinten nach unten drückn
und vorne etwas anheben. Den Knopt..
lochful vorne nach unten drücken.
Changing the sewing foot: Switch
off master switch 104. Raise the needle.
Push down the sewing foot at the rear
and lift it lightly at the front. Push down
the buttonhole foot at the front.
Remplacement de Ia semelle du pied
presseur: Mettre Ia machine hors cir
cuit a I7nterrupteur gênóra/ 104. Relever
l’aiguille. Abaisser Ia semelle du pied a
I’arrière et Ia lever a ‘avant. Le pied a
boutonnières est a pousser vers le bas a
‘avant.
Sostituzione del piedino: Disinserire
I’interruttore principale 104. Alzare l’ago.
Premere il piedino verso basso e aizarlo
leggermente davanti. Premere ii piedino
per occhielli verso basso.
Nähful anbringen: Stoffdrückerhebel
senken und den Fu1 dabei so schieben,
dal! die Stege N in die Nuten 0 einrasten.
Replacing the sewing foot: lower the
presser bar lifter and move the foot so
that pins N snap into grooves 0.
Mise en place de Ia semelle du pied
presseur: Abaisser le levier du pied pres
seur, déplacer Ia semelle de manière que
es étriers N s’engagent dans es rainures
0.
Applicazione del piedino: abbassare Is
eva premistoffa e spingere il piedino con
temporaneamente in maniera che II perno
N si innesti nella scanalatura 0.
4P und Q sind zum Zubehör befestigen.
R st die NähfulThalterschraube.
Screws P and Q are for securing accesso
ries. R is the Sewing foot retaining screw.
P et ci servent a fixer les accessoires. R
est Ia vis de fixation du support de
semelle.
P e ci servono per fissare gli accessori.
R è Ia vite di fissaggio del supporto per
piedino.
36
)
Nähfüle (Normalzubehör)
0 Normalnähfu8
1 Zierstichfult, für Obertransport
2 ZierstichfuB nicht für Obertransport
3 Blindstich- und Overlocktull,
4 ReiBverschlul,- und Kantenfuf
5 KnopflochfuE,
6 StopffuZ
7 Säumer
8 lineal
98-694 816-00
Sewing feet (standard accessories)
o Ordinary sewing foot
4W
2
98-694 897-00
4
98-694 884-00
5
98-694 882-00
1
2
3
4
5
6
7
8
Fancy-stitching foot, for top feed
Fancy-stitching foot (without top feed)
Blindstitching or overlock foot
Zip- and edge-stitching foot
Buttonhole foot
Darning foot
Hemmer
Edge guide
Semelles de pieds presseurs
(accessoires courants)
O pied presseur normal
1 pied pour points décoratifs,
avec entrainement supérieur
2 pied pour points décoratifs,
sans entralnement supérleur
3 pied a point invisible et pour surjet
4 pied pour poser es fermetures a glissibre et
pour piqüres au bord
5 pied a boutonnières
6 pied repriser
7 pied ourleur
B guide-bord
Piedini (di corredo)
piedino normale
1 piedino per ricamo per doppio trasporto
2 piedino per ricamo (senza doppio trasporto)
3 piedino per punto invisibile a per Overlock
4 piedino per cerniere lampo a per
impunture su bordi
5 piedino per occhielli
6 piedino per rammendo
7 piedino orlatore
8 lineale
o
6
93-035 960-91
7
98-694 818-00
37
4
Blindstich- und Overlockfu1:
Blindstichnähen (N): Mit Schraube P die
Fuhrung Q nach links stellen. Die Fuhrung
wird dann für den Nadeleinstich reguliert.
An der Fuhrungskante R läuft der Bruch
des Oberstoffes entlang.
4 Blindstitching
and overlook foot
Blindstitching (N): turn screw P to set
guide Q at the left. The guide is then
adjusted according to the needle penetra
tions. The folded edge of the material
runs along guide edge R.
Overlocknhen (0): Mit Schraube P die
Führung Q bis zum Anschlag nach rechts
drehen. Der Stoff läuft an der Fuhrungs
kante R entlang.
4
Pied a point invisible et pour surjet:
Couture au point invisible (N): Déplacer le
guide Q a gauche par Ia vis R Le guide est
régle pour Ia pénétration de laiguille dans
le tissu. La cassure du tissu supérieur
longe le bord du guide R.
Couture au point de surjet (0): Tourner le
guide Q par Ia vis P vers Ia droite jusquà
Ia butée. Le tissu longe le bord R du
guide.
38
Overlock stitching (0): Turn screw P to set
guide Q to the far right. The fabric runs
along guide edge R.
4
Piedino per punto irivisibile e per
Overlook:
Punto invisibile (N): Portare con vite P Ia
guida Q verso sinistra. La guida viene
quindi regolata per Ia corretta dntrata
delI’ago. La piegatura della stoffa scorre
lungo ii bordo di guida R.
Cucitura Overlook (0): Spostare con Ia
vite P Ia guida Q a destra fino alI’arresto.
La stoffa scorre lungo il bordo di guida R.
Stopffu(:
Die Nadel hochstellen. Den Bugel P nach
hinten drücken und festhalten. Den Stift
des FuIes in die Bohrung N einführen, die
Gabel R greift dabei urn die Stoffdrücker
stange, und den FuB bis zurn Anschlag
einsetzen. Den Bugel P loslassen, wobei
er sich auf die Halteschraube Q Iegt. Die
Schraube 0 festdrehen.
Bairn Stopfen mit Wolle wird der Woilfa
den in die Führung S gezogen.
Pied a repriser:
Lever Ia barre a aiguille. Deplacer l’étrier P
vers I’arrière et le maintenir. Introduire le
tenon de Ia semelle dans le trou N; a
fourche R entoure a barre du pied pres
seur; introduire le pied jusqu’a Ia butée.
Làcher létrier P; ii Se pose stir Ia vis de
maintien Q, Ensuite resserrer Ia vis 0.
En reprisant de Ia lame, enfiler
le fil de
lame dans le guide S.
Darning foot:
Position the needle up. Push bar P to the
back and hold it there. Fit the pin of the
foot in hole N: at the same time, fork R
engages the presser baG and push the
foot fully in. Let go of bar P, which then
rests on retaining screw 0. Tighten screw
0.
For wool darning the woollen thread is
pulled into guide S.
4
II piedino da rammendo:
Alzare ‘ago. Premere Ia staffa P verso
dietro e tenerla ferma. Inserire il perno del
piedino riel foro N, Ia forcella R si aggan
cia in tal rnaniera sulla barra premistoffa,
quindi innestare il piedino fino all’arresto.
Rilasciare Ia staffa P che si appoggeré
sulla vite di fissaggio 0. Awitare Ia vite 0.
Rammendando con lana infilarla nella
guida S.
J
39
ReUverschIu(ful (KantenfuiM (N):
Der ReiRverschlulfu wird für die jewei
lige Rei1verschluBhälfte links oder rechts
eingerastet.
Zipper foot (edge sewing foot (N):
The zipper foot is secured on the left or
right, depending on the side of the zip to
be sewn (N)
FUhrungslineal (0):
Das Lineal in die Bohrung Q schieben und
nach Einstellen des gewünschten Abstan
des Schraube P festdrehen.
Edge guide (0):
Push the edge guide into hole 0, set the
required edge distance and tighten it
there.
4Pied pour fermeture a glissiere (Pied a
40
piquer au bord avec guide-bord) (N):
Déplacer Ia semelie du pied vers Ia
gauche ou vers Ia droite et I’encliqueter
dans cette position.
II piedino per cerniere lampo
(piedino per impunture su bordi) (N):
II piedino per cerniere si innesta a destra
o sinistra a seconda della parte della cer
niera da cucire.
Guide-bord (0):
Glisser le guide-bord dans le trou Q régler
Ia distance souhaitée et resserrer ensuite
Ia vis R
Lineale di guida (0):
Infilare il lineale nel foro Q e awitare Ia
vite P dopo aver regolato Ia distanza desi
derata.
Knopfloch einstellen:
Taste C tippen. Oberfadenspannung in
den Knopflochbereich bei 3 stellen.
KnopflochfuI anbringen. Stichdichte im
Knopflochbereich N einstellen, Einlauffa
den wie folgt irn Nähful eintegen:
Faden über die hintere Nocke legen, straff
ziehen und in der vorderen Nocke 0 em
klemmen.
Beim Nähen läuft der Pfeil P an der Skala
R entlang. Dadurch kann die Knopfloch
lange bestimmt werden.
Zum Knopflochnähen feines Nahgarn ver
wenden.
Buttonhole setting:
Push button C. Set the needle thread ten
sion at range 3 for buttonhole sewing.
Attach the buttonhole foot. Set the stitch
density at range N. Insert a gimp thread in
the sewing foot as shown in the illustra
tion: Place the thread over the back ridge,
and pull it taut so that it is hold in tab 0
at the front. During sewing, arrow P runs
along scale R. This is how the buttonhole
length is determined.
For sewing buttonholes use light sewing
thread.
J
Réglage de Ia boutonniere:
Appuyer sur Ia touche C. Regler a tension
du fil daiguille dans a zone boutonnières
sur 3. Fixer a semelle boutonniere. Régler
Ia densite des points clans Ia zone bouton
nière N. Introduire le fil de passe dans Ia
semelle comme suit: Coucher le fit sur le
crochet arrière et le pincer dans le pince
fil 0. Pendant a couture Ia flèche
P cou
lisse le long de l’échelle graduée R. Ainsi,
il est possible de determiner
Ia Iongueur
‘e Ia boutonniere Utiliser du fit coudre
a
N
4
Regolazione per l’occhiello:
Premere it tasto C. Regolare Ia tensione
superiore net settore occhiello 3. Appli
care it piedino per occhielli.
Fittezza del punto net settore per occhietli
N.
Inserire come segue it fib rinforzo:
appoggiare it fib sopra ii gancio poste
riore, tenderlo bene e fissarlo net gancio
anteriore 0. Cucendo, Ia freccia P scorre
lungo Ia scala R. In tale maniera si pub
determinare con esattezza Ia lunghezza
detl’occhiello. Usare per l’occhiello del
filato fine.
N
I
41
J
Knopflochnähen:
Schiene bis zum Anschlag nach vorne zie
hen.
Erste Raupe in der gewünschten
Lange nähen.W
2 Taste B tippen und festhalten, 4 bis 6
Riegeistiche nahen. Den Stoff dabel
festhalten. Ct] Taste loslassen.
3 Taste A tippen. Zweite Raupe in der
gleichen Lange wie die erste nähen.
Ct]
4 Taste B tippen und festhalten, 4 bis 6
Riegeistiche nahen. Den Stoff dabei
festhalten. Ct] Taste loslassen.
5 Elnige Vernahstiche nähen. Den Stoff
herausnehmen. Einlauffaden anziehen
und abschneiden.
6 Knopfloch aufschneiden.
Achtung!
Bel den tipmatic-Modellen muB die Nadel
hochgestellt werden wo das Symbol Ct]
in der Nâhbeschreibung erscheint.
Es empfiehlt sich, vor dem Nahen der
Knopflöcher in das Kleidungsstück em
Probeknopfloch zu nahen.
42
4Sewing buttonholes
Pull the bottom of the buttonhole foot for
ward as far as it will go.
1 Sew first buttonhole seam. Raise the
needle. 1]
2 Push button B in until 4 to 6 bartack
ng stitches are sewn, holding the
workpiece firmly, [1] then release the
button.
3 Push button A. Sew the second but
tonhole seam the same length as the
first. [1]
4 Push button B in until 4 to 6 bartacking stitches are sewn, holding the
material firmly, [1] then release the
button.
5 Sew a few tying stitches. Remove the
fabric, pull the filler cord taut and trim.
6
Cut the buttonhole open.
Important:
On tipmatic models the needle must be
raised when the Ct] symbol appears in
the description of sewing.
Before sewing buttonholes in the garment
it is recommended to sew a buttonhole as
a test.
Zeichnungen sind ohne NShfuI.
Drawings do not include sewing foot.
Les illustrations ne montrent pas Ia semelle du
pied presseur.
disegni sono eseguiti senza piedino.
Execution do boutonnières:
Tirer a semelle mobile vers ‘avant jusqu’à
Ia butée.
Executer Ia premiere Ièvre a Ia Ion
gueur désirée. [Ti
2 Appuyer sur a touche B et a mainte
nir pendant 4 a 6 points d’arrêt. Main
tenir Ia matière. [Ti Relâcher Ia
touche.
3 Appuyer sur Ia touche A. Executer Ia
deuxième lèvre dans Ia memo Ion
gueur quo Ia premiere. ETJ
4 Appuyer sur Ia touche B et Ia mainte
nir pendant 4 a 6 points d’arrêt. Main
tenir a matiére. [Ti Relâcher Ia
touche.
5 Brider par quelques points de nouage.
Enlever a matjère. Tenir le fil do passe
légerement tendu at le couper.
6 Ouvrir Ia boutonnièr.
4Confezionare occhielli:
N
Spostare a feritoia in avanti sino all’
arresto.
Cucire Ia prima costina nella lunghezza
desiderata. [Ti
2 Premendo II tasto B, cucire 4—6 punti
di travetta. II lavoro va tenuto nel frat
tempo fermo. [Ti Rilasciare 1 tasto B.
3 Premere II tasto A. Cucire Ia seconda
costina nella stessa Iunghezza della
prima. [Ti
4 Premere II tasto B e tenerlo premuto,
mentre Si cucioni 4—6 punti di travetta.
[Ti Rilasciare il tasto.
5 Cucire alcuni punti di fissaggio.
Togliere il tessuto. Tirare II cordoncino
e tagliarlo.
6 Aprire I’occhiello con ii taglia-asole.
Attenzione!
Nei modelli Tipmatic I’ago deve essere
portato in posizione superiore nei punti
dove appare nelle istruzioni di cucito 1
simbolo [Ti.
mportant!
Sur es modèles tipmatic, l’aiguille est a
placer en haut Iorsque le symbole [Ti
apparait dans Ia description de I’opération
de couture.
Si consiglia di eseguire un campione
primo di cucire sul capo.
Nous recommandons d’exécuter une bou
tonnière a titre d’essai sur le vétement
dvant de commencer a coudre es bouton
P ores.
\
)43
4 Nadel auswechseln (System
130’7
Hauptschalter 104 ausschalten. Sch
ubedI
N ldsen. Nadel herausnehmen. Neu
ladeflhII
(flache Kolbenseite nach hinten) gang
oben schieben. Schraube festdrehen
Changing the needle (System 130/705
• Switch off master switch 104. Loosen
screw N. Take out theneedle. Push the
needle up as far as it will go (with its flat side
facing toward the back). Tighten the screw.
Remplacement de l’aiguille
(système 130/705 H):
• Thurner /‘interrupteur général 104 sur
‘Arrêt’ Desserrer a vis N et retirer faiguille.
Engager I’aiguille neuve (le méplat du talon
vers I’arrière) jusqu’à a butée et serrer Ia vis.
Come cambiare l’ago (sistema 130/705 H):
• Disinserire /‘/nterruttore pr/nc/pale 104.
Svitare Ia vite N. Togliere rago. Inserire un
nuovo ago (Ia parte piatta del fusto verso
dietro) spingendolo verso I’alto fino all’ar
resto. Fissare bene Ia vite.
4Transporteur versencen:
Klappe 121 öffnen.
Versenkschieber nach P schieben = ver
senkt, nach 0 schieben = zum Nähen.
Dropping the feed dog:
Open free arm cover 121. Push the dropfeed control toward D (feed dog dropped)
or toward 0 (sewing position).
Abaissement de Ia griffe:
Ouvrir le cache 121 et déplacer le curseur
abaisse-griffe dans le sens P = griffe
escamotée; le déplacer vers 0 pour a
couture.
Come abbassare ii trasporto:
Aprire 0 sportello 121. Spostare Ia eva
dell’abbassatore verso P = abbassato,
spostando verso 0 = per cucire.
/
44
4
Reinigen und Olen:
Netzstecker ziehen. Stichplatte hinten
anheben N und herausnehmen 0. Mit
dam Pinsel den Transporteur und den
Greiferraum reinigen. Die Unterfadenübe
r
wachung wird nach den Hinweisen auf
.Seite 57 gereinigt. Die Maschine nicht
dlen. Nur ab und zu einen Tropfen 01, wie
die Zeichnung zeigt, in die Greiferbahn
geben.
7-
1
Nettoyage et huilage:
Sortir a fiche rje Ia prise mura
le. Remon
ter a plaque a aiguille
N a l’arrière et
l’enlever vers 0. A l’aide d’un
pinceau,
nettoyer Ia griffe et le
compartiment du
crochet. Nettoyer le
contrOleur du fil de
canette comma décr
it page 61. Ne pas
huiler Ia machine.
Ne verser que de temps
a autre une gout
te d’huile dans Ia cour
sihm du crochet
(cf. croquis ci-dessus).
N
N
Cleaning and oiling
Pull out the mains plug. Tilt the needle
plate up at the back (N) and take it out
(0). Clean the feed dog and the parts in
the sewing hook area with a soft brush.
Clean the bobbin thread monitor as
instructed on page 59. Do not oil the
machine. Only apply a drop of oil in the
hook raceway (see ill.) occasionally.
f
Pulizia e lubrificazione:.
Togliere Ia spina dalla presa a muro.
Sollevare Ia placca d’ago da dietro (N) e
toglierta (0). Con un pennello pulire ii
trasportatore a II vano crochet. II controllo
del fib inferiore 51 pulisce seguendo le
istruzioni a pag. 63. Non lubrificare Ia
macchina. Mettere solamente ogni tanto
una goccia d’olio net crochet, come da
disegno.
45
4 Glühlampe auswechseln:
Netzstecker ziehen. Klappdeckel schlief?,en
und Tragegriff hochstellen. Führungslineal
zwischen Kopfdeckel und Gehäuse sowie
durch den Ausschnitt Q stecken. Lampen
gehäuse niederdrücken und festhalten.
Lampe Richtung N drehen und heraus
nehmen. Neue Lampe mit den Nocken in
die Schlitze P schieben, hochdrücken und
in Richtung 0 drehen. Lineal herausneh
men.
4-Changing the light bulb:
Pull out the mains plug. Close the hinged
top cover and swing up the carrying
handle. Insert the edge guide into cutout
0. push down the lamp housing and hold
it there. Turn the light bulb toward N and
take it out. Insert the new bulb so that its
pins slide in slots R Push it up and turn it
toward 0. Pull out the edge guide.
\-
Changement de l’ampoule:
Sortir Ia fiche de Ia prise murale. Fermer
le couvercie et redresser Ia poignée. Enga
ger Ie guide-bord dans Ia fente entre le
capot et le carter ainsi que dans Ia rainure
0.. Abaisser et maintenir le corps de I’am
poule. Tourner l’ampoule dans le sens N et
l’enIever Placer l’ampoule neuve de
manière que les tenons glissent dans les
fentes R Pousser I’ampoule vers le haut et
Pa tourner vers 0. Enlever le guide-bord.
46
Come sostitUire Ia lampadina:
Togliere Ia spina dalla presa a muro. Chiu
dere il coperchio della macchina e alzare
Ia maniglia. Inserire il lineale di guida tra ii
frontalino e a testa della macchina nellIa
apertura 0.. Premere ii portalampade verso
ii basso e tenerlo in questa posizione.
Girare Ia lampadina in direzione N e
toglierla. Inserire Ia lampadina nuova con i
perni nelle fessure 0, premere in alto e
girare in direzione 0. Togliere ii lineale.
En
U
tiptronic
tiptronic
Sicherung auswechseln:
Netzstecker ziehen. Mit Schraube
ndreher
Sicherungshalter N eine viertel
Umdre
hung nach links drehen, loslassen
und
herausnehmen. Sicherung 0 her
auszie
hen. Neue Sicherung in Halter
schieben.
Halter einsetzen, mit Schraube
ndreher
nach hinten drücken und einer
viertel
Umdrehung nach rechts befestige
n.
(Sicherung Stârke F2A). 110
V Maschinen
haben keine Sicherung,
Changing the fuse
Pull out the mains plug. Turn fuse
holder
N left a quarter turn with a screwdrive
r,
release it and take it out. Pull out
fuse B.
Insert a new fuse in the hold
eG replace
the holder, push it in with the screw
driver,
then turn it clochwise a quarter turn.
(The fuse is type F2A.) 110-volt mach
ines
have no fuse.
4 tiptron
f tiptror
ic
Remplacernn
du fusible:
fr Ia fiche de Ia
prise murale. A l’aide
tournevis, tourner
le support du
rusible N dun
quart de tour a gauche,
le
‘‘3r at I’enleven
Engager le fusible neuf
is le support,
I’enfoncer a ‘aide du
..Ournevjs et le fixer
en le tournant d’un
quart de tour a
drojte. (Fusible F2A).
Las
lachines a 110
V nìe disposer-it pas
de
isibles
Come sostituire ii fusibile:
Togliere Ia spina dalla presa
a muro. Con
un cacciavite girare il portafusib
ile N un
quarto di giro verso sinistra,
rilasciare e
togliere. Estrarre ii fusibile. Insen
ire il
nuovo fusibile nel portafusibile,
premerlo
con ii cacciavite e fissarlo giran
do un
quarto di giro verso destra (fusi
bile
resistenza F2A). Le macchine a
110 V, non
hanno fusibili.
I
47
Nadel-Tabelle
Die Wahl der richtigen Nadel garantiert
elne bessere Verarbeitung des Nãhmaterials
Stoffqualitãt
Stoffqualitat
Stoffqualitat
Ieicht
mittel
schwer
Nadel
60 70 75
Nadel
80 90
100
Nadel
110 120
Nadelspitzen
Bezeichnung
Profil
‘ Nadelspitze und
Nadelöhr
1301705 H
Nadelstärke:
70/80
130/705 H-SIlK
Nadelstärke:
70/110
Geeignet für
kleine Kugelspitze Universalnadel für feinmaschige
Synthetik
gewebe, feines Leinen, Chiffon, Batist,
Organdy, Wollstoffe, Samt, Ziernähte,
Stickereien
mittlere
Kugelspitze
Grobmaschige Strickstoffe, Wirkstoffe,
Lastex, Interlock, Quiana, Simplex
mittlere
Kugelspitze
Speziell für Pfaff entwickelte Stretchnadel.
Besonders gut geeignet für empfindliche
Stretch- und Wirkstoffe
grol3e
Kugelspitze
Grobmaschige Miederwaren, Lycra,
Simplex. Lastex
130/705 H-J
Nadelstãrke:
90—110
spitze
Rundspitze
Köper, Berufsbekleidung, schwere Leinen
stoffe, Blue Jeans, feines Segeltuch
130/705 H-LR
Nadelstärke:
70—120
Schneidspitze
(rechts
schneidend)
Leder, Wildieder, Kalbsleder, Ziegenleder
130/705 H-PCL
Nadelstärke:
80—110
Schneidspitze
mit Spitzenrinne
(Iinkslaufend)
Kunstleder, Plastic, Folien, Wachstuch
130 H-N
Nadelstärke:
70—110
kleine Kugelspitze Absteppnähte mit Knopflochseide
langes Nadelähr
oder synthetischem Garn 30/3
—
—
—
130/705 H-PS
Nadelstârke:
75 + 90
130/705 H-SKF
Nadelstärke:
70/110
130/705 H-WING
Nadelstärke:
100
48
EE
--
-C
Hohlsaum-Spitze
Effektvolle Hohlsaumnähte bei stark appre
tierten Geweben, Organdy, Glasbatist
N ad el-Ta belie
Bezeichnung
StchIange
130/705 H-ZWI
Stärke: 80
2,5mm
2,5mm
130/705 H-ZWI
Stärke: 80
Stärke: 90
Stärke: 100
2,5mm
2,5 mm
3,0 mm
Stichbr&te
Nadel
entfernung
Geeignet für
1,6mm
2,0mm
normale Biesen
normale Biesen
2,5 mm
3,0mm
4,0mm
breite Biesen
extra breite
Biesen
Ziermuster mit Zwiflingsnaden
Bevor Sie die gewünschte Verzierung
ausnähen, koritrollieren Sie durch Orehun
g
die Nadeln einwandfrei einstechen.
Dadurch wird em Nadelbrechen weitgehendstdes Handrades, ob
ausgeschaitet
u
Zierstichmuster/Zickzack-Musfer
130/705 H-ZWI
Stärke: 80
Stärke:80
Stärke:80
0,5—1,5mm
0,5—1,5 mm
0,5—1,5mm
breit
schma!
schmal
1,6mm
2,0mm
2,5mm
Verzierungen
Verzierungen
Verzierungen
Hohsaum/Spezial Doppelnadel
130/705
H-ZWI-HO
Stärke: 80
Stärke: 100
1
2,0—3,0 mm
2,0—3,0 mm
sehr schmal
sehr schmal
Dekorativer
Hohlsaumeffekt.
Stark appretierte
Gewebe und
Glasbatist sind
besonders gut
geeignet
49
I
Needle chart
Using the adequate nee
dle guarantees a better
working up of the materia
l.
Fabric weight:
light
Needle size:
60, 70, 75
Fabric weight:
medium
Needle size:
80,90
Fabric weight:
heavy
Needle size:
100, 110, 120
Needle points
System & No.
Profile
130/705 H
70,80
130/705 H-SIJK
70, 110
130/705 H-PS
75, 90
130/705 H-SKF
70, 110
130/705 H-J
90—110
130/705H-LR
70—120
130/705 H-PCL
80-110
130 H-N
70—110
130/705 H-WING
100
50
C
Point & eye
Suitable for
Light ball point
Universal needle for fine-meshe
d
synthetics, fine linen, chiffon
organdy, woolens, velvet, fan, batiste,
cy seams
and embroidery work.
Medium
ball point
Coarse knitted fabrics, Lastex,
jersey fabrics, Guiana and Sim doubleplex.
Medium
ball point
Stretch-fabric needle developed
especially for Pfaff. Particularl suit
able
for delicate stretch and knittedy
fabrics.
Heavy
ball point
Wide-meshed corsetry, Lycra, Simp
lex
and Lastex.
Acute
round point
Twill, workwear, heavy linen, blu
e jeans
and light canvas.
Narrow
twist point
Leather, suede, calf and goatski
n
leathers.
Narrow wedge
point with
left-twist groove
Imitation leathers, plastic materia
ls,
plastic sheeting and oilcloth.
Light ball point,
long eye
Seams topstitched with buttonhol
e silk
or No. 3013 synthetic thread.
Hemstitching
point
Attractive hemstitching on heavily
dressed materials, organdy and
glass cambric.
Needle chart
1R
System & No.
Stitch length
130/705 H-ZWI
80
130/705 H-ZWI
80
90
100
Stitch width
Needle
spacing
Suitable for
2.5 mm
2.5 mm
1.6mm
2.0 mm
Medium-wide
cording
2.5 mm
2,5mm
3.0 mm
2.5mm
3.0mm
4.0 mm
Wide cording
Extra wide cording
Extra-wide cording
Decorative designs sewn with twin need
les
Before you start sewing, turn the handwheel
and check to make sure the needles stitch
fabric properly. In this way, needle brea
into the
kage can be largely avoided.
Decorative and zigzag patterns
130/705 H-ZWI
80
80
80
0.5—1.5mm
0.5—1.5 mm
0.5-1.5 mm
wide
narrow
narrow
1.6mm
2.0 mm
2.5 mm
Ornamentations
Ornamentations
Ornamentations
Special hemstitching twin needle
p
130/705
H-ZWI-I-fo
80
100
2.0-3.0 mm
2.0—3.0mm
very narrow
very narrow
Decorative hem
stitching effect
Heavily dressed
fabrics are par
ticularly suitable.
51
Tableau des aiguilles
Le choix de a pointe d’aiguille adequate est très
important et garantit de meilleurs résultats.
Matiéres:
Matiéres:
Iégères
moyennes
Matièrcs:
lourdes
Aiguilles:
60 70 75
Aiguilles:
80 90
Aiguilles:
100 110 120
Pointes d’aiguille
Designation
130/705 H
Grosseur de
I’aiguille: 70, 80
130/705 H-SUK
Grosseur de
‘aiguille: 70 a 110
Forme
de pointe
EEE
E
Pointe et
chas de l’aiguille
Utilisations
pointe
bile fine
Aiguille universelle pour tissus synthétiques
maifle fine, in fin, chiffon, batiste, organdi,
tissus lame, velours, pour coutures dome
mentation et pour broderies
pointe
bille moyenne
J
Tissus tricotés grande maille, tissus maille,
Lastex, Interlock, Quiana, Simplex
1 30/705 H-PS
Grosseur de
l’aiguille: 75 a 90
pointe
bile moyenne
Aigu mile Stretch, spécialement déveioppée
pour machines Pfaff. Convient tout particullé
rement pour tissus stretch et maille délicats.
130/705 H-SKF
Grosseur de
‘aiguille: 70 a 110
grande pointe
bile
Lycra grande maille (gaines, combines, etc.)
Lycra, Simplex, Lastex
130/705 K-i)
Grosseur de
faiguile: 90 a 110
pointe ronde
pointue
Croisé, vêtements cle travail, tins lourds,
blue-jeans, toiie a voiles fine
130/705 H-LR
Grosseur de
l’aiguille: 70 a 120
a droite
pointe coupante
Cuir, daim, veau, chevreau
130/705 H-PCL
Grosseur de
‘aiguille: 80 a 110
pointe coupante Similicuir, plastique, feuilles plastiques,
avec rainure obli toile cirée
que (a gauche)
130 H-N
Grosseur de
l’aiguille: 70 a 110
petite pointe
bile,
chas long
PiqOres avec sole a boutonniere ou
fl synthétique 3013
pointe pour
broderies ajours
Coutures ajours trés décoratives sur
tissus fins, organdi, batiste.
130/705 H-Wing
Grosseur de
Vaiguille: 100
52
—
C
-
Tableau des aiguilies
Designation
LL
‘
Longueur de
point
130/705F1-ZWI
Grosseur:80
2,5 mm
2,5 mm
130/705 H-ZWI
Grosseur: 80
Grosseur: 90
Grosseur: 100
2,5mm
2,5mm
3,0 mm
Largeur de
point
Espacement
des aiguilles
Utilisations
1,6mm
2,0 mm
nervures
normales
2,5 mm
3,0 mm
4,0 mm
nervures larges
nervures
extra-larges
Coutures d’omementation avec
Avant Ia couture d’ornementation,aiguilles jumelées
ment dans Ia plaque. Ainsi vous tournez le volant et contrôlez si les aiguilles pénétrent imp
ecc
ne risquez pas que les aiguilles
cassent au cours de Ia couture. able
n
Motifs au point d’omementatio
n/Motifs au point zigzag
130/705 H-ZWI
Grosseur: 80
Grosseur: 80
Grosseur: 80
Owlet ajour/Aiguille double
130/705
H-ZWI-HO
Grosseur: 80
Grosseur: 100
III
0,5—1,5mm
0,5—1,5mm
0,5—1,5mm
large
étroite
étroite
1,6 mm
2,0 mm
2,5 mm
Ornementations
Ornementations
Ornementations
spéciale
2,0—3,0 mm
2,0—3,0 mm
très étroite
trés étroite
Effet décoratif
d’ourlet ajours.
Sont particulière
ment appropriés
es tissus trés ap
prétés et le
batiste.
53
Tabella degli aghi
La scelta deIl’ago giusto garantisce una migliore
lavorazione del materiale da cucire.
Qualit delta stoffa
leggera
Qualita della stoffa
media
Qualitá della stoffa
pesante
ago
60/70/75
ago
80/90
ago
100/110/120
Le punte degli aghi
Denominazione
Punta e Cruna
ndicata per
punta a sfera
piccola
ago universale per tessuti sintetici a
maglia fine, line fine, chiffon, batista,
organdis, stoffe di lana, velluto, cuciture
ornamentali, ricami.
punta a sfera
media
stoffe a maglia larga, tessuti in maglia in
genere, Lastex, Interlock, Qulana,
Simplex.
130/705 H-PS
Grossezza ago:
75+ 90
punta a sfera
media
ago speciale Pfaff per punti flexi. Adatto
particolarmente per stoffe delicate
elastiche e in maglia.
130/705 H-SKF
Grossezza ago
70/110
punta a sfera
g rande
Tessuti per busti a maglia larga, Lycra,
Simplex, Lastex.
130/705 H-J
Grossezza ago:
90-110
punta rotonda
fustagno, abiti da lavoro, tessuti di line
pesante blue jeans, tela per vela fine.
130/705 H-LR
Grossezza ago:
70/120
punta a lama
(taglio a destra)
pelle, scamosciato, nappa, capretto.
Profilo
130/705 H
Grossezza ago:
70/80
130/705 H-SUK
Grossezza ago:
70/110
E
EEE
punta a ama
(scanalatura
cruna verse
sinistra)
punta a sfera
piccola
cruna lunga
130/705 H-PCL
Grossezza ago:
80-110
130 H-N
Grossezza ago:
70-110
130/705 H-Wing
Grossezza ago:
100
54
cE
punta per punto
a giorno
similpelle, plastica, fogli di nailon, tela
cerata
Impunture con seta grossa o fib sintetico
30/3
lavori di punto a giorno di effetto su
tessuti fortemente apprettati, organdis,
batista rigido
Tabella degli aghi
Denominazione
tunghezza
punto
130/705 H-ZWI
Grossezza: 80
2,5 mm
2,5 mm
130/750 H-ZWI
Grossezza: 80
Grossezza: 90
Grossezza: 100
2,5 mm
2,5 mm
3,0 mm
Iarghezza
punto
distanza aghi
Indicato per:
1,6mm
2,0 mm
nervature normali
nervature normali
2,5 mm
3,0 mm
4,0 mm
nervature Iarghe
nervature parti
colarmente Iarghe
Motivi ornamentali
con aghi gemelli
Prima di eseguire ii
motivo ornamentale
deside
entrano senza difficolt
á nel foro della placca rato controllare girando ii volantino Se
gil agh
dago. Si evitano cos
i possibili rotture di agh
i.
Motivi ornamentali/Mo
tivi
130/705 H-ZW1
Grossezza: 80
Grossezza: 80
Grossezza: 80
a zigzag
0,5 1,5mm
0,5 1,5mm
0,5 1,5 mm
-
-
-
largo
stretto
stretto
1,6mm
2,0 mm
2,5 mm
motivi ornamentali
motivi ornamentali
motivi ornamentali
Orb a giorno/cucitu
ra speciale doppia
130/705
H-ZW1+ HO
Grossezza: 80
Grossezza: 100
2,0 3,0 mm
-
molto stretto
Effetto a punto
a giomo decora
five. Si prestaflo
particolarmente
tessuti fortemente
apprettati e tes
sati in batista
rig ido.
55
Nahstorungen urid ihre Beseitigung
Ursache:
1. Die Maschine IäBt Stiche aus
Die Nadel ist nicht richtig eingesetz
t.
Es ist eine falsche Nadel eingesetzt.
Die Nadel ist verbogen oder stumpf.
Die Maschine st nicht richtig eing
efädelt.
Die Nadel st für das Cam zu fein.
2. Den Oberfaden reift
Aus vorgenannten Gründen.
Bei zu starker Fadenspannung.
Bei schlechtem oder knotigem Garn
,
oder bei soichem, das clurch lange Lage
rung zu trocken geworden ist.
3. Die Nadel bricht ab
Die Nadel ist nicht bis zum Anschlag
eingesetzt.
Die Nadel ist verbogen.
Die Nadel ist zu dunn oder zu dick
.
Durch Ziehen oder Schieben des Stof
fes
wird die Nadel verbogen und staRt
auf die
Stichplatte.
Die Spulenkapsel ist nicht richtig
eingesetzt.
4. Die Naht 1st nicht gIeichmaIig
Die Spannung ist verstelit.
Zu starkes, knotiges oder hartes Cam
.
Der Unterfaden ist ungleich aufgespu
lt.
Fadenischlingen unterhaib oder ober
halb
des Stoffes.
56
Beseitigung:
Nadel bis zum Anschlag hochschie
ben.
Flache Kolbenseite nach hinten.
Nadel System 130/705 H einsetzen.
Neue Nadel einsetzen.
Einfädelweg uberprüfen.
Stärkere Nadel einsetzen.
Siehe unter 1.
Fadenspannung regulieren.
Nur gutes Nähgarn verwenden.
Neue Nadel bis zum Anschlag schie
ben.
Neue Nadel einsetzen.
Nadeltabelle beachten.
Maschine aflein transportieren lasse
n.
Nähgut nur leicht führeh.
Beim Einsetzen der Spulenkapsel diese
bis zum Anschlag nach hinten schie
ben.
Ober- und Unterfadenspannung
kontrollieren.
Nur einwandfreies Garn verwenden.
Nicht freihandig aufspulen, sondern
den
Faden durch die Spulervorspannung
au
fen lassen.
Richtig einfädeln. Ober- und Unterfade
n
spannung kontrollieren.
Ursache:
Beseitigung:
5. Die Maschirie transportiert nicht oder nur unregelmaiig
Zwischen den Transporteur-Zahnreihen
hat sich Ndhstaub festgepreSt.
Stichplatte abnehmen, Nähstaub mit
Pinsel entfernen.
Transporteur st versenkt.
Versenl•:schieher steht rechts,
Versenkschieber nach links stellen.
6. Die Maschine geht schwer
Fadenreste befinden sich in der
Grederhahn.
Fadenreste entfernen und nur einen
Tropfen Olin die Greiferbahn geben.
7. Die Maschine näht die Stiche auf den Tipptasten nicht
(Modete mit Zierstichen)
Zierstict-EinsteIIrad st eingeschaltet.
Einstellrad aussch&ten; auf den weiien
Punkt stellen.
8. Elektronische Unterfadenuberwachung setzt aus (tiptro
nic)
Fadenreste und Schmutz sitzen in der
Fadenreste und Schmutz entfernen;
VerschluItklappe über dem Kontroltauge,
mit besonderer Vorsicht von dem zweiten
rn Groiferraurn, in der Spulenkapsel,
Kontrollauge.
hinter dem Greifer und auf dem zweiten
Kontroteuge rechts hinter dem Greifer.
9. Das lMählicht Ieuchtet und die Maschine
Iäuft nicht (tiptronic)
Sicherung st defekt.
Neue Sicherung einsetzen.
Wichtjge Hinweise
Vor dem Auswechseln von Nähfüen und
Nadein muS der Hauptschafter 104
ausgeschaltet werden.
Die eingefddelte Maschine nicht
ohne Stoff in Bewegung setzen.
-n Verlassen der Maschine, auch kurzfri
stig, den Hauptschalter ausschalten.
Dies st wichtig, wenn Kinder in
der Nähe sind.
Fault finding
Cause:
Remedy:
1. Machine skips stitches
Needle not inserted correctly.
Push needle up as far as it will go, ft fiat
shank side facing toward the back.
Insert system 130/705 H needle.
Wrong needle used.
Needle bent or blunt.
Machine threaded incorrectly.
Check threading.
Needle too thin for thread used.
Insert thicker needle.
Insert new needle.
2. Needle thread breaks
For any of the above reasons.
Thread tension too strong.
Poor-quality or knotty thread used,
or thread that has become too dry
by excessive storage.
See par. 1 above.
Regulate thread tensions.
Use only good-quality thread.
3. Needle breaks
Needle not pushed up as far as it
will go.
Insert new needle and push it up as far as
it will go.
Needle bent.
Insert new needle.
Needle too thin or too thick.
Needle bent and strikes needle plate
because work is pushed or pulled.
Bobbin case improperly inserted.
Refer to needle table.
Allow machine feed to work alone.
Only guide the material lightly.
When inserting the bobbin case, push
it in as for as it will go.
4. Seam is not uniform
Tension out of adjustment.
Thread too thick, knotty or hard.
Bobbin thread wound unevenly.
Kinks appear on top and bottom of
material
58
Check upper and lower tensions.
Use first-class thread only.
During bobbin winding, do not hold
thread in hand, but pass it through the
bobbin tension stud.
Thread machine properly and check
both tensions.
j
Cause:
Remedy:
5. Machine feeds irregularly or not at all
Lint has accumulated between tooth
rows of feed dog.
Remove needle plate and clean out lint.
Feed dog dropped. (Drop-feed control
is at right.)
6. Machine runs with difficulty
Thread ends in hook raceway
Set drop-feed control at left.
Remove thread ends and put a drop of oil
into hook raceway.
7. The machine does not sew the stitches on the push
-buttons
(Models with fancy stitches)
Fancy-stitch thumb-wheel is engaged
Disengage thumb-wheel: set at white dot.
8. Electronic bobbin thread monitor does
Thread ends and dirt have collected in the
free arm cover over the indicator lamp, in
the hook raceway, in the bobbin case,
behind the hook and on the second indi
cator lamp to the right behind the hook.
not work (tiptronic)
Remove thread ends and dirt. Special care
should be taken in the area round the
second indicator lamp.
9. The sewing lamp lights up, but the machin
e does not run. (tiptronic)
Fuse is faulty.
Insert new fuse.
10. Important note:
Before exchanging either sewing foot or needle
, switch off master switch 104.
Never run a threaded machine unless there
is a piece of fabric under the sewing
foot. If you have to leave the machine, even
for a short while, be sure to switch
off the master switch. This is particularly
important when children are around.
59
4
Causes de derangements et remèdes
Causes:
Remèdes:
1. Points manqués
Laiguille n’est pas placée selon les pres
criptions.
Laiguille n’est pas du système prescrit.
Engager l’aiguille a fond, a méptat du
talon vers l’arrière.
N’utiliser que des aiguilles du système
130/705 H.
Laiguille est déformée ou épointée.
Utiliser une aiguille neuve.
Lenfilage n’est pas correct
Contrôler les passages du fit.
Laiguille est trop fine pour le fit.
Mettre en place une aiguille plus forte.
2. Casse du fil d’aiguiNe
Pour les causes précitées.
Voir 1
Tensions trop fortes.
Régler convenablement es tensions.
Fit de mauvaise qualite, noueux ou cas
sant.
N’employer que du fit de qualite.
3. Casse d’aiguille
Laiguille n’est pas engagée
Introduire Ia nouvelle aiguille
fond.
Laiguille est déformée.
Remplacer l’aiguille.
Laiguille est trop grosse ou trop fine.
Tenir compte du tableau des aiguilles.
En tirant ou poussant l’ouvrage, ‘aiguille
dévie sur Ia plaque aiguille.
Laisser Ia machine entrainer seule.
Guider Iégèrement l’ouvrage.
La boite è canette n’est pas introduite
correctement.
Appuyer sur Ia bolte a canette a sa mise
en place, jusqu’à l’emboitage perceptible.
4. Couture laissant
60
a fond.
a desirer
La tension est déréglee.
Verifier les tensions des fits d’aiguille et de
crochet.
Le fit est trop gros noueux ou dur.
N’utiliser que des fits de bonne qualité.
Canette irrégulièrement garnie.
Ne pas bobiner a main libre mais faire
passer le fit par Ia pretension du dévidoir.
Des boucles de fil se forment sur ou sous
l’ouvrage.
Veiller a I’enfilage correct; contrOler les
tensions des fits.
Causes:
Remèdes
5. La machine n’entraIn
e pas ou irrégulièrement
Bourres agglomérées entr
e les dents de Ia
Enlever Ia plaque a aigu
griffe.
ille, Oter es bour
res au pinceau.
Griffe abaissée (levier de
marche arrière
Placer le bouton abaisse
en position droite).
-griffe a gauche.
6. La machine est bloqué
e
Des bribes de fil se sont pris
es dans Ia
coursière du crochet.
Enlever les bribes de fil
et mettre une
goutte d’huile dans Ia cou
rsière.
7. La machine ne coud
pas les points comma
ndés par touche.
(Modèle avec points d’o
rnementation)
Le disque de reglage des
points d’orne
Débrayer ce disque; le plac
mentation est embrayé.
er sur le point
blanc.
8. Défaillance du contrô
le électronique dii fil de
canette (tiptronic)
Des bribes de fil et de
Ia poussiere se
Enlever les bribes de fil
trouvent dans Ia cache auet Ia poussière en
dessus de Ior
faisant très attention au
gane de contrOle, dans le
second organe de
compartiment
surveillance.
crochet, dans Ia bolte
a
canette, derriere
a crochet et sur le sec
ond organe de
contrôle se trouvant a
droite derriere le
crochet.
9. L.a lampe d’éclairag
e est allumee mais
Ia machine ne fonctionne
pas (tiptronic)
Fusible défectueux.
Le remplacer par un neuf.
Remarques importan
tes
Pour remplacer Ia pied
presseur et (‘aiguille, plac
er l’interrupteur general
Ne jamais mettre
en marche Ia machine enf
104 sur ‘Y\rrêt”.
iléc sans tissu sous le pied
Ne pas oublier de
presseur.
toujours débrayer l’interr
upteur général, méme
machine qua pour
si Von ne quitte Ia
quelques instants. Cela
est surtout nécessaire s’iI
dans a méme pièc
e.
y a des enfants
61
Possibili inconveriienti e come ovviarli
Inconveniente
Come ovviare
1. La macchina salta punti
Lago non è inserito bene.
Inserire ‘ago fine all’arresto, Con parte
piatta del fuste verse dietro.
E stato inserito un age sbagliato.
Lago è storto o spuntate.
Inserire un ago sistema 130/705 H.
Cambiare I’age.
La macchina non è infilata bene.
Lago è treppo fine per ii file.
Controllare l’infilatura.
Impiegare aghi piü grossi.
2. II fib
superiore si rompe
Vedi per i motivi precedenti.
La tensione è troppo stretta.
Filato nodoso e di cattiva qualità
troppo secco perchè vecchio.
Vedi sotto 1.
0
filato
Regolare bene a tensiene.
Usare sempre solo filato di buena qualità.
3. L’ago Si rompe
Lago non è state inserito sine all’arresto.
Lago è storto.
Lago è troppo sottile 0 troppo grosso.
Tirando o spingendo ii materiale durante
a cucitura ‘ago si piega e urta sulla
placca delrago.
La capsula non è stata bene inserita.
4. La cucitura non è regolare
La tensione non è corretta.
62
Inserire rage nuovo sine all’arresto.
Cambiare l’age.
Si osservi a tabebia degli aghi.
La macchina deve trasportare ii materiale
da sola. II tessute va solamente guidato
con mane leggera.
Dope avere inserito Ia capsula premere
beggermente finchè non si è innestata.
Controllare Ia tensione superiere e quella
inferiore.
Filate troppe nodoso, grosso e duro.
II fib inferiore non è stato bobinato in
maniera regolare.
Usare solo filato perfetto.
Mai bobinare a mane libera, ma passare
il file sempre attraverso Ia tensione per
l’annaspatoio.
Si formano delbe asebe sopra o setto ii
tessuto.
Infibare bene e controllare bene le tensioni
superiore ed inferiore.
I nconveniente
Come owiare
5. La macchina non traspo
rta a trasporta
Tra i dentini del traspo
rto si è pressata
della polvere di cucito.
II trasporto è abbassato
. II dispositivo per
abbassare ii trasporto Si
trova a destra.
6. La macchina sforza
Vi sono dei residui nel cro
chet.
solo irregolarmente
Togliere a placca dell’ag
o e pulire i dentini
con tin penriello.
Spostare ii dispositivo a
sinistra.
Eliminare i residui dei fili
e mettere una
goccia di olio sul croche
t.
7. La macchina non cuc
e i punti del tasti autom
atici
(Modelli con punti orname
ntali)
II regolatore punto orname
ntale è inserito.
Disinserire il regolatore
ruotandolo al
punto bianco.
8. II dispositivo di coritro
llo del fib inferiore non
funziona (tiptronic)
Sotto il chiusino della
capsula oppure
Elim
inar
e residui di fili e sporco
nello sportello di chiusura
. Con par
, sopra Ia spia di
ticolare attenzione davanti
controllo, dietro il croche
alla seconda
t o sulla seconda
spia
di
con
spia di controllo a destra
trollo.
dietro il crochet
si sono fermati dei resi
dui di fili o dello
Sporco.
9. La lampadina è acc
esa, ma Ia macchina non
cuoe (tiptronic)
ii fusible è difettoso.
Inserire un nuovo fusibile
.
Avvisi importanti
&uando si sostituiscono
piedini ed aghi, l’interrutto
re principale 104 deve
disinserfto.
essere
La macchina per
cucire non deve essere
azio
nata
senza porre stoffa sotto
Abbandonando a mac
ii piedino.
china anche per breve tem
po, spegnere l’interrutto
re principale,
Sonderzubehor
I
Das Sonderzubehär ist für
spezielle Näharbeiten. Es
st be) lhrem Händter geg
lich. Das Zubehör ohne Bes
en Berechnung
teilnummer st in Vorbereitu
erhäft’
ng und kann noch nicht
erworbc, .erd
en
“ubehär
ApplikationsfuS
Bandeinfasser
(NShfu5halter entfernen)
BiesenfuB 5 Rillen
(Zwillingsnadeln mit Nadelab
stond 1,8-25)
BiesenfuB 7 Rillen
(Zwiltingsnadeln mit Nadelab
stand 1,4-1,8)
Biesenzunge (2 Stuck)
FransenfuB
GeradstichfuB
Stichplatte mit Rundloch
Kapper 4,5 mm
Kapper 6,5 mm
Krâuselfu6,
Kordonierfulf,
Lochstickplatte
Säumer 4 mm
(für Obertransport)
\rickkantenfuS
64
Bestell-Nr.
Näharbeit
93-042 941-91
zum Applizieren
98-053 484-91
zum Einfassen von Kanten mit
Band
93-042 950-91
93-042 953-91
zum Biesennähen
(Nadelstärke 80,
für feine Biesen
Nadelstrke 70)
93-035 952-45
93-042 943-91
98—694 821 —00
98—694 822—00
zum Nähen von Fransen und
zum
Durchschlagen
für Absteppnáhte und zum
Nähen von
besonders feinen und weiche
n Stoffen
(Seidenjersey etc.)
93-042 946-9 1
93-042 948-91
für Kappnhte
93-036 998-9 1
zum Kräuseln von Volants etc.
93-036 915-91
zum Kordonieren
93-036 975-45
für Lochstickerei
98-694 823-00
zum Säumen von Kanten
93-042 957-9 1
zum Nähen von Strickmaterial
rihaltsverzeichnis
Anlasser
Doppelter Stofftransport
EnsteHrad für Zierstiche (Modelle mit Zierstichen
Elektrscher AnschIu
Elektronische Endgeschwindigkeitsvorwahl
Eektronische Unterfadenüberwachung
Fadenabschneider
Garnrolle aufschieben
Glühlampe auswechsein
Heften
Knopfiochn hen
Nadel auswechseln
Nadeistellung unten und oben
Nadeltabelle
NhfD1e
NtihfDRe auswechseln
Nthstörungen und ihre Beseitigung
Ndhwerk ausschalten
Ndhwerk enschaIten
Nutzstiche einstellen
Nutz- und Stretchstichkombinationen
Oberfaden einlegen und Nadel einfädeln
Oberfadenspannung prüfen
Programmtabelle
Rengen und Olen
RDckwdrtsnähen
Sicherung auswechseln
Sonderzubehar
SpezialnàhfD5e
Spulen vorbereiten
Spulen von amer zweiten Garnrolle
Spulen durch die Nadel
Spule einlegen
Spumenkapsel einsetzen
Stichiage einstellen bei Geradstich
Stichldnge einstelien
Stoffdrdckerhebel
Stretchatiche einstellen
Tipptasten
Transporteur versenken
Unterfaden heraufholen
Unterfactenspannung prüfen
Verwandlungsflcthflache und
Zubehörkctstchen
Ziersticne und Kombinatione
n (Modelle mit Zierstichen)
Seite
3, 1 6
18
28
2
30
30
17
11
46
30
41-43
44
30
48, 49
37
36
56, 57
5
7, 9
24
26
12,13
16
72—75
45
20
47
64
3 8—40
4
6, 7
8, 9
10
11
27
19
15
25
21
44
14
10
34, 35
28, 29
65
Special accessories
The special accessories listed below are
intended for special sewi
ng work. They can be
your dealer.
obtained fro
Accessories without part numbers are
in preparation and
not yet available.
4
Accessory
Appliqué foot
Binder
(remove sewing foot holder)
Cording foot, 5 grooves
(twin needle with 1.8-2,5 mm needle gauge)
Cording foot, 7 grooves
(twin needle with 1.4-1.8 mm needle gauge)
Cording blade (2 ea.)
Fringe sewing foot
Straight-stitch foot
Needle plate with round hole
Felling foot, 4.5 mm
Felling foot, 6.5 mm
Shirring foot
Single-needle cording foot
Eyeletting plate
Hemmer foot (for top feed) 4 mm
Knitted edge foot
66
Part. No.
Sewing Operation.
93-042 941-91
For appliqué work
98-053 484-91
For binding edge with tape
93-042 950-91
93-042 953-91
93-035 952-46
93-042 943-91
98-694 821—CO
98—694 822—00
For cording work
(Needle size 80,
for fine cording
needle size 70)
For sewing fringes and for basti
ng
For topstitching and
sewing very delicate
and soft fabrics (silk jersey, etc.)
93-042 946-91
93-042 948-91
For felled seams
93-036 998-91
For shirring valances, etc.
93-036 915-91
For single-needle cording
93-036 975-45
For eyeletting
98-694 823-00
For hemming edges
93-042 957-91
For sewing knitted materials
0)
-
U
CD
n
CD
0-
CD:
CiCCC0-.
iI
-
0-
.
z
CD
CD
D
0-.
:
:
(CC
C)
0-CY.
-:
—•
C)).
—•
—
o
ill rn
CD CD C
C))
:3
o
—.
2
Hi
CD
00
000)
-
CO
:::::::::
01
C)1
0)0)
CC)
0
0)00
C.)
I
WC
I
C)
CD -.J 0) CO —.1(000) —J
I
4 0) --.10(0
.-.-“CO
COJ’.4
00) lCD CD CD - - I’.) -4)
0) 4 4 (SC 01010) 00)
-P. 0) -.J CO
i.
:
.0
DC
:::::::::
::::::::::::::::
:::::::::.::::::
::::::::::::::::
CDCD
:
0
C
(g.(C’.
CD50-:
H! H
0
CD
CD CD
cm cm cm cm cm cm cm w
CDCD
°o
::::3
:P::
o-gC):
DCDg
—.
(()
n -n rn
DDC)D0-DCD
DDCDC)DDD
CD
(C)
CD CD CC) (C)
:
)
-n n
gg: :
C) CD CD
C
::::::::::::
-:
:::::::::::.::::
Ca
Z
CD
o.
3:CD
o’D.:
-U
.(CDCCD(C)(DCD
:0::::::::
0
CD
0
CDCD0-
C)CD:
0
,_
C
D
-
CD CD
CCD
_‘C)
DC
CD
-‘
C ‘ CD CD (C)
C
<<C C 4 CO CO CO CO CO Cl) CO
_—C)CD DCDV CD CD
CD CDCD
U,
CD
(U
‘:1
C)
Ca
C)
:3
0
Accessoires spéciaux
Ces accessoires pour des travaux particuliers
sont en vente chez votre dépositaire Pfaff contre
factu..
ration.
Les pièces sans référence sont en preparation.
ENes seront iivrables une date ultérieure.
a
7-
Accessoi res
Références
Operations
Pied pour applications
93-042 941 -91
applications
98-053 484-91
bordage
Bordeur
(enlever support du pied)
Je de pieces pour nervures, comprenant:
Pied nervures, 5 rainures (aiguilles
jumelées en écartements de 18-2,5 mm)
Pied a nervures, 7 rainures (aiguilles
jumelées en écartements de 1,4; 1,8 mm)
93-042 953-9 1
2 anguettes pour nervures
93-035 952-45
Pied pose franges
93-042 943-91
Pied pour point droit
98—694 821—00
a
Plaque
a aiguille avec trou rond
93-042 950-9 1
98—694 822—00
Rabatteur 4,5 mm
93-042 946-9 1
Rabatteur 6,5 mm
93-042 948-91
couture de frangesi patissage
surpiqcires et coutures sur tissus
trës fins et souples (jersey de sole)
coutures rabattues
Pied fronceur
Pied guide-cordonnet
Plaque pour broderie
couture de nervures
(aiguilles no 80;
pour nervures fines,
aiguilles no 70)
a jour
93-036 998-91
froncement de volants, etc.
93-036 91 5-91
pose de cordons
a jours
93-036 975-45
broderies
Ourleur 4 mm
(pour entrainement supèrieur)
98-624 823-00
ourlage
Pied guide-bord pour tricot
93-042 957-91
coutures tissus-mailles
68
:
I
Table des matières
Abaissement de Ia griffe
Accessoires spéciaux
44
Boltes de rangement et accessoir
68
es
Branchement électrique
34, 35
Causes de derangements et remë
2
des
Changement de I’ampoule
60, 61
Changement de Ia semelle du pied
46
presseur
Coupe-fit
36
Couture en marche arrière
17
Deport du point droit
20
Disque de reglage des points
27
d’ornementation
(Modèle avec points d’ornementatio
n)
Embrayage du mécanisme
28
Execution de boutonnières
7, 9
Mise en place de Ia bobine de fit
42et43
Mise en place de a boite a cane
11
tte
Mise enplace de Ia canette
11
Nettoyage et huilage
10
Passage du fit d’aiguille
45
Pieds spéciaux
12
Points d’ornementation, points
38 a 40
combines (Modele avec points
d’ornementation)
Points utilitaires et elastiques
29
combines
Positionnement haut et bas de
26
I’aiguille
Preparation du bobinage
31
Reglage de Ia boutonniere
4
Réglage des points élastiques
41
Réglage de Ia longueur du poin
25
t
Reglage des points utilitaires
19
Remplacement de l’aiguille
24
Remplacement du fusible
44
Remplissage de Ia canette avec
47
le fil d’aiguille
Remplissage de Ia canette a parti
9
r d’une deuxième bobine
Rheostat a pédale
7
Selection électronique de a
16
vitesse finale
Semelles de pieds presseurs
32
Tableau des programmes
37
Tableau des aiguilles
80 a 83
Tension des fils
48et49
Tension du fit de canette
16
Touches
10
Travaux de bâtissage
23
32
69
Accessori fuori correclo
Gli accessori fuori corredo servono per
avon di cucito speciali. Si possono acqu
istare pesc. 1 VOstconcessionario Pfaff contro pagamento.
Accessori senza numero di catalogo non
sono ancora disponibi)i in quanto in via
di preparazione
Accessorio
Piedino per applicazioni
Bordatore a nastro
(togliere ii supporto del piedino)
N. dordine
Lavoro di cucito
93-042 941 -91
per eseguire applicazioni
98-053 484-91
per bordare bordi con nastro
Piedino nervature 5 scanalature
(ago gemello con distanza aghi 1,8-2,5 mm)
Piedino nervature 7 scanalature
(ago gemello con distanza aghi 1,4-1,8)
93-042 953-91
Linguetta per nervature
93-035 952-45
Piedino per frange
Piedino per punto diritto
93-042 950-91
93-042 943-9 1
98—694 821—00
Placca d’ago con foro rotondo
98—694 822—00
Piedino ribattitore 4,5 mm
93-042 946-91
Piedino ribattitore 6,5 mm
93-042 948-9 1
Piedino arricciatore
cuciture di nervature
(grossezza ago 80,
per nervature fini 70)
per cucire frange e passare le marche
per impunture e per cucire
tessuti particolarmente fini e morbidi
(maglina di jersey eec.)
per ribattitore
93-036 998-91
per arricciare volants eec.
93-036 91 5-91
per eseguire cordoncini
Placchetta per punto inglese
93-036 975-45
per eseguire ricami inglesi
Piedino orlatore 4 mm
(per doppio trasporto)
98-694 823-00
per orlare bordi
Piedino per impunture su maglia
93-042 957-9 1
per eseguire impunture su materiali
Piedino per cordoncino
70
in maglia
nd ice
Abbassare II trasporto
Accessori fuori corredo
Bobinare attraverso l’ago
Bobinare da un secondo rocchetto
Collegamento elettrico
Combinazioni del punti, utili e flexi (stretch)
Confezionare occhielli
Controllo del fib inferiore
Controlbo della tensione superiore
Controlbo ebettronico del fib inferiore
Cucire indietro
Dopplo trasporto
Far salire II fib inferiore
bmbastitura
Inconvenienti e come ovviarbi
Inserimento della spolina
Inserimento della capsula della spolina
Inserire II portarocchetto
Inserimento del fib superiore e infibatura
dell’ago
I tasti automatici
Leva alzapiedino
Piano di lavoro variabile e scomparto per
accessori
Piedini
Piedini speciali
Posizione ago bassa e alta
Posizione dell’ago nella cucitura diritta
Preparazione per bobinare
Preselezione della velocità finale
Pubizi e lubrificazione
Rasafilo
Regolazione del punti flexi (stretch)
Regobazione del punti utili
Regolazione della lunghezza del punto
Regolatore punti ornamentali (Modebli con
punti ornamentali)
Reostato
Sostituzione del piedini
Sostituzione del fusibile
Sostituzione dell’ago
Sostituzione della lampadina
Tabella degbi aghi
labella del programmi
.
44
70
9
7
2
26
41-43
10
16
33
20
18
14
33
62, 63
10
11
11
12,13
22, 23
15
35
37
38—40
33
27
4
33
45
17
25
24
19
28, 29
3,16
36
47
44
46
54, 55
84—87
Programmtabelle
Die Tabelle zeigt die Programmnummer,
den dazugehörenden Stich und darunter
die Einstellung der Maschine. Bei allen
01
I
I
I
Programmen mit dem Hinweis ,,stretch” st
der Stichlängen-Einsteller bis zum
Anschlag auf ,,stretch” zu drehen. Bej alien
02
I
I
\
/
\
cDcDcD<
0
G
H
I
—--
--
-..--.-.-,
—---
-
--.---.
<<<
D
E
E
F
03
04
ir III
Ill
lI
Il
II
II
I
I
III
II
ll Ill
HI
Jl
_J = L_ CD CD
A
C
B
—.---
-
—--
—
M
.
C
-
4r.
---
--
0
C)
F
Bezeichnung
Anwendung
01
Geradstich
Für alle Näharbeiten und einen
6 mm Ziersteppstich.
02
Zickzackstich
Vielseitig anwendbar; zum Versäubern von Nähten,
Applizieren, Spitzen einsetzen, Nähen von Raupen
nähten, Sticken und Stopfen usw.
03
Knopflocher
Ohne Drehen des Stoffes, nur tippen und das Knopf
loch 1st fertig. Die Stichdichte läl3t sich regulieren.
04
Stretch3fach
Geradstich
Nähte, die etwas aushalten müssen, dehnen sich bel
jeder Beanspruchung ohne zu reil3en mit.
05
Stretch-3fachZickzackstich
Besonders flache, elastische Nahtverstarkung,
zum Beispiel für Miederwaren.
06
Elasticstich
Zum Einsetzen von Flicken oder Ausbessern
von Rissen in dehnbarem Material.
07
Zierelasticstich
Zum Flicken einsetzen oder Risse ausbessern
in dehnbarem Material oder für dekorative Schmuck
nähte auf elastischen Geweben.
08
Kronenstich
Eine Schmucknaht, zum Beispiel für Nachthemden.
09
Elastischer Blindstich
Eine unsichtbare Saumnaht für dehnbare Materialien.
10
Langettenstich
Verziert zum Beispiel Taschentücher.
72
I
übrigen ist die Stichlange nach Wunsch
zu
wählen. In derTextta belle sind Bezeich
07
08109
-
I\
(
2
—
‘
\
-
--
11
12
,
/\/
\/\
/\/
\/\
/1/
\I\
/1/
\t\
‘
,
/
‘I
I
10
-
,
/\/
7
‘.
‘.
--
E
/1/
\/\
\I\
F
G
13
14
15
16
*_\\
-#
Ii\
I__I
I/
.4/
i- i
—
C)
T
nung und Anwendung der einzelnen
Pro
gramme angegeben.
-‘
1
C)
C)
—//
•—\
—I
-‘\
I/
II\
I/
Ii\
11/
17
18
ZJ
—I
—
Lm
19
I
I
—I
I__I
—I
—
L
—,
M
M
1
C)
D
—
C)
D
0
I
F
I
20
L
j
Th
-
Th
I
G
r
L
F
K
Bezeichnung
Anwendung
Wabenstich
Zum Aufnähen von Gummifäden oder
zum
Uberdecken von Frotteenähten.
12
Fugenstich
Eine kraftige, dekorative Verbindungsn
aht.
13
Florentinerstich schmal
Eine Saumdekoration, zum Beispiel für
Bettwäsche.
14
Florentinerstich breit
Zum Beispiel für Schmucknähte
an Schlafzimmertextilien.
15
Hahnentritt
Eine Ziernaht, zum Beispiel für die Deko
ration
von Frühstückstisch-Textilien.
Griechenstich, breit
Eine klassische Dekorationsnaht für aIle
Unistoffe.
11
—
r
jienerstich
Dekoriert zum Beispiel Servietten.
enerstichbrejt
Dekoriert zum Beispiel Tischdecken.
19
Griechenstich schmal
J.
LjscheIkantenstich
Eine klassische Dekorationsnaht für Unis
toffe.
Effektvoller KantenabschluB an zarte
n Materialien.
73
21
22
L
23
24
25
26
i
r-J
øi
%J
INI
i/I
I’\I
I/I
INI
I/I
\I
/I
\J
/-l
\-J
/-I
ILl)
I
I
1I
I—’
i
-
K
D
K
G
I-I
-S
CD
C)
1
S
-t
27
Ii
I—
C)
D
:z-iJzr
C)
29
3031
I,
—‘I
\/\
32
33
\\\
Ii
-,
C)
K
D.
Z
C)
ic
1(d)
.—I-
1(Q)
I
C)
-+
C)
I
—,
/
“
.
C)
28
\\
H
D
<
<
L
C
,_
C
c
L
0
D
Bezeichnung
Anwendung
21
Efastischer Kantenstich
Zum Einfassen von wenig fransenden Stoffkanten.
22
Musch&kantenstich
schmal
Em
23
Geschlossener
Overlockstich
Zum schmückenden und materialgerechten
Ubernähen offener Saumkanten.
24
Wimpeistich
Eine dekorative Verbindungsnaht
zum Aufnähen von Bordüren.
25
Geschossener
Overlockstich schmal
Zum Aufnahen zarter Spitzen.
26
Türkischer Stich
Eine Absteppnaht auf Patchwork.
27
Overlockstich
Elastische SchIief3- und Versäuberungsnaht
für Maschenware.
28
Pfauenstich
Em festliches Ornament,
zum BeispieI für Tischwäsche.
29
Overlockstich schmal
Eine zarte Randverzierung.
30
Kordeistich
Eine lockere Schmucknaht für luftige Bekleidung.
31
Blindstich breit
Für unsichtbare Saumnähte an dickeren Stoffen.
32
Biindstich schmal
Für unsichtbare Saumnähte an dünnen Stoffen.
33
Kaiserstich
Eine zarte Dekorationsnaht,
zum Beispiel für Damentaschentücher.
Konigsstich
Elne Dekorationsnaht,
zum Beispiel für Kinderservietten.
Dekorstich, zum Beispiel für Mädchenkleider,
35
36
N
-j
L
F
37
—9I
jI
—II
L
—II
II
38
—II
LI
—II
39
/11
/11
\It
/11
\li
H H H
CD D G.
C•)
:T
C)
C)
40
41
/A
\\\
42
/A
4
M
‘a
\‘
,‘
IC,)
CD
C)
L
D.
43
N
N
N
S...”
I
Ci)
C,)
L
FR.
C)
.-+
lCD
C)
45
46
47
XI
III
48
‘I’
‘ft
XI
III
‘ft
XI
XI
‘II
L I_I0 L IC,) L”
K. D. E. G.
C)
C)
C)
IT J\ C)
D
+
‘-4-
Bezeichnung
Anwendung
35
Wienerstich schmal
Dekoriert zum Beispiel Tischwasche.
36
Griechenstich schmal
Eine kassische Dekorationsnaht für Unistoffe.
37
PuHoverstich breit
Elastische SchIieI3- und Versauberungsnaht
für Jerseymateriahen.
38
Pulloverstich mittel
Elastische SchlieB- und Versauberungsnaht
für Polostoffe.
39
PuHoverstich schmal
Elastische Schlie8- u nd Versäuberungsnaht
für dünne Jersey-Crepe.
40
Federstich
Eine schmückende Uberdecknaht,
zum Beispiel für Schürzen.
41
Hoiländerstich
Eine Ziernaht zum Beispiel für KüchentexNien.
42
Sch neckenstich
Eine Dekornaht,
zum Beispiel für Badezimmerutensilien.
Webstich
Eine Schmucknaht, zum Beispiel für rustikale Kleider.
44
Diagonaf-Stich
45
Rosenstich
Eine Schmucknaht,
zum Beispiel für moderne, schlichte Kielder.
Eine Verzierungsnaht,
zum Beispiel für duftige Damenkleider.
[
Zweigstich
Elne rassige Naht, zum Beispiel für Wanderkleider.
Randstich
Eine Schmucknaht,
zum Beispiel für die Ränder von Taschen,
Dreiecksstich
Eine Ziernaht, zum Beispiel für Kindernachthemd
en.j
75
Stitch program chart
Listed in this chart are the stitch program
number, the corresponding stitch and,
in
the lower half, the buttons to be press
ed
01
I
I
I
I
I
I
I
I
I
I
I
I
02
/
\
/
03
;-I
II
\
=
ccc: K
G
H
I
0
to sew this seam pattern. For all
programs marked “stretch”, turn stitch
length control toward “stretch” the Stitch
as far as it
D
E
E
F
A
04
—
r
II ii
ii
=
05
Ill
Ill
II
III
Ill
JGD>
BC
GDM
.
C)
D
76
C)
—C)
Fzr
Stitch
Application
01
Straight stitch
All ordinary sewing operations and 6-mm
fancy
stitching operations.
02
Zigzag stitch
Edge finishing, appliqué work, inserting
lace, button
sewing, satin stitching, embroidering, darn
ing etc.
03
Buttonholes
Just push the buttons and the buttonhol
e is finished.
The stitch density can be regulated.
04
Elastic triple
straight stitch
Seams exposed to great stress which
stretch under stress.
05
Elastic triple
zigzag stitch
Flat, elastic reinforcing seams, as
well as sewing and mending corsetry.
06
Elastic stitch
Inserting patches and darning rips on
elastic
fabrics.
07
Elastic ornamental
stitch
Inserting patches and darning tears on
elast
or sewing ornamental seams on elastic fabriic materials
cs.
08
Crown stitch
An ornamental seam, e.g. on night gowns.
09
Elastic blindstitch
Hemming elastic fabrics with invisible
stitches.
10
Scallop stitch
For decorating handkerchiefs, for example.
will go. For all other programs,
select the
stitch length as desired. The ind
ividual
stitch programs and their app
lication are
07
08
C
(
(
09
10
I
11
12
,\,
13
/1/
-4/
//
—‘I,
/1/
-4,
/\/
\‘\
L
M
E
M
F
M
G
r.A Cl)
+
-I
CD
C)
C)
M.
E.
C)
described in more detail in the
table
below.
14
15
16
U\
17
18
—‘
—I
—I
K
I/
II\
l/
M5f. M.
F. G.
0
L
4
_
j
20
L_
I
-Th
—I
•—i
19
I-i
-Th
I—
L
I
C)
D
F
G
:r
Stitch
Application
11
Honeycomb stitch
Sewing on elastic threads
or covering seams on terry clot
h.
12
Joint stitch
13
Florentine stitch,
narrow
For decorating hems, e.g. on bed
linen.
14
Florentine stitch,
wide
Ornamental seams, e.g. on bed
linen.
15
Houndstooth stitch
16
Lampshade stitch,
wide
17
Viennese stitch,
narrow
Ornamental seams, e.g. on nap
kins.
18
Viennese stitch,
wide
Ornamental seams, e.g. on table
cloths.
19
Lampshade stitch,
narrow
Shelledge stitch,
Wide
A durable ornamental joining
seam.
Ornamental seams, e.g. on tabl
e linen.
Classical ornamental seam on all
plain fabrics.
Classical ornamental seam on
plain fabrics.
Effective edge finish on dainty
fabrics.
77
21
._
.
.(
<_—
22
i,
23
24
L—.1
25
..i
26
ll
1.-i
27
\-J
/-i
0
.,
r—-..i
L
i...—1
..
I.—9
r—.J
..
I
D
.01
-..3
..o’i
r—
G
r4.
-.‘
‘%.!
J
ol
1.-I
\—J
-i
ICo
I
+
ICo
I r+
-‘
0
D
C)
0
ft
/0’
‘.
ft
I S
-‘
C)
/.0
+.
C)
K
D.
29
(if
Ill
I,
Ill
(if
“Co
I
0
..$.
C)
30
31
32
-J
\/\
—II
\/\
-j
-J
H
H
0
I(Cfl
I’
,4.
M.
0
33
34
/
L
C
Stitch
Application
21
Elastic edge stitch
Finishing edges that do not fray
22
Shell-edge stitch
narrow
23
Closed overlock
stitch, wide
Covering folded
fabric edges with a fancy seam.
24
Pennant stitch
Decorative joining seam and sewing on bord
ers.
25
Closed overlock
stitch, narrow
Sewing on dainty lace.
26
Turkish stitch
Topstitching patches.
27
Overlock stitch,
wide
Elastic assembly and edge finishing
seams on knitted fabrics.
28
Peacock stitch
Festive ornamental seam, e.g. on table
linen.
29
Overlock stitch,
narrow
30
Knurl stitch
Ornamental seams on light clothing.
31
Blindstitch, wide
Hemming heavier fabrics with invisible
stitches.
32
Blindstitch,
narrow
Hemming light-weight fabrics with
invisible
stitches.
33
Peak stitch
A dainty ornamental seam, e.g. on ladies’
handkerchiefs.
Mound stitch
Ornamental seam, e.g. on children’s napk
ins.
\
78
\.J
/-i
FGK2.
Dl
/o.
r*
-
INI
I/L
INI
Ii
28
Ornamental seams, e.g. on girls’ dress
es.
Dainty border ornamentation.
L
D
36
37
ll
ll
ll
II
Th
L
-JI
38
ll
Jl
-il
II
li
ll
H
39
40
41
42
/11
\II
/11
\fl
/11
\ll
ji
\\\
/\\
‘II
M
M
I-IC,,
IC,,
L_ —
D. G.
C)
C)
C)
:,z.
CD
C)
CD
‘-4.
I
,-4.
r.
\‘
/\\
L°’
D.
:z
‘It
I
L
U)
,.+
1
C)
43
N
II
N
II
N
I_ lCD
C)
44
45
46
47
48
XI
If\
Ill
Xl
‘It
\)<i
XI
10
I-.
Xl
ll
0
L
K9. D.
C)
Ill
C)
10
‘-4.
‘II
‘II
‘II
0
L
G.
C)
I’. D
Stitch
Application
35
Viennese stitch,
narrow
Ornamental seams, e.g. on table linen.
36
Lampshade stitch,
narrow
Classical ornamental seam on plain fabri
cs.
37
Pullover stitch,
wide
Elastic edge finishing seams on
jersey fabrics.
38
Pullover stitch,
medium
Elastic edge finishing seams on
polo shirt farbrics.
39
Pullover stitch,
narrow
Elastic edge finishing seams on
lightweight jersey crepe.
40
Feather stitch
Decorative cover seams, e.g. on aprons.
41
Dutch stitch
Ornamental seam, e.g. on kitchen texti
les.
42
Snail stitch
Ornamental seam, e.g. for bath room
furrishings.
43
Loom stitch
Ornamental seam, e.g. for country-look
dresses.
44
Diagonal stitch
Ornamental seam, e.g. for plain-look, mod
ern dresses.
45
Trellis sfitch
Ornamental seam, e.g. for airy ladie
s’ dresses.
46
Twig stitch
Ornamental seam, e.g. for hiking wear
.
47
Border stitch
Ornamental seam, e.g. for border orna
mentations on
pockets.
stitch
Ornamental seam, e.g. for children’s
night dresses.
79
Tableau des programmes
Le tableau indique le numéro du pro
gramme, le schema du point corresp
on
dant et les différents réglages a effectuer
01
02
/
\
I
/
“
I
I
€DcDc<
G
H
D
I
I
I
I
—
—----
.—‘
—
—
—---
<<<
D
E
E
F
sur Ia machine. Pour tous
les program
pourvus de Ia mention “stretch”,
le Hréglant la long ueur du point
est a tourr
03
—1
lI
E II
II
EJI
_J
=
A
B
=
04
r
III
II
II E III
III
II
ii
lii
III
lL I’
L_ €D
GD
C
G
D
M
-‘
-‘
••‘
—..—__.
--
—-‘
C)
C)
z
4
N°
•-“‘--.
C)
F
Designation des points
Utilisations
01
Point droit
Point de base pour executer les coutures
réaliser un point décoratif de 6 mm (surp et pour
iqüres)
02
Point zigzag
Emplois multiples: surfilage, applications,
incrusta
tions de dentelle, nervures, broderies.
03
Boutonniere
Sans tourner I’ouvrage; il suffit d’appuye
r sur des
touches: densité des points reglable
04
Triple couture point
droit
Coutures elastiques soumises effort;
elles s’étirent
sans cassure du fil (pantalons de ski
.
.
05
Triple point zigzag
Renforcement de coutures elastiques (gain
es,
combines, soutiens-gorge.
.
80
06
Point zigzag piqué
Pose de pièces ou raccomodage dans
les tissus
elastiques
07
Point zigzag fantaisie
Pose de pièces ou raccomodage dans
les tissus
elastiques ou encore pour coutures déco
ratives sur
tissus élastiques
08
Point de couronne
Couture decorative pour lingerie de nuit
09
Point invisible
élastique
Ourlets invisibles sur tissus elastiques
10
Point d’anse
Couture decorative sur les mouchoirs
a fond sur a position “stretch”. Pour les
autres programmes, Ia longueur du point
peut être choisie a volonté. Dans le
07
08
(
o9_10
/—
—(
I
‘s-.
<
I—
11
/\/
\)
\/\
M
E
13
14
15
—I,
-;‘
/1/
\l\
/1/
—I,
II\
1W
II\
1W
II\
—I,
—.\\
—4”
—\\
-I
16
17
18
5
J
—I
19
C)
C)
20
L
1W
K
,-..
.
C)
r
N°
12
/1/
<
\/\
VIA Cl)
M
MM. M. WI
FG
D. E
4....
L
tableau descriptif figurent es designations
et les applications des différents points.
F. G.
C)
:ry
C)
F
D
G
D
Designation des points
Uti lisations
11
Point nid d’abeille
Pose de fils élastiques (smocks) et couture
d’assemblage sur tissu éponge
12
Point d’écaille
Couture d’assemblage decorative
13
Point de Florence
étroit
Pour décorer les bords
14
Point de Florence large
Couture decorative sur parures de lit
15
Point pied-de-poule
Couture decorative sur nappes et serviettes
Point grec large
Couture decorative classique sur tous les tissus fins
17
Point deVienne
Couture decorative sur es serviettes
18
Point de Vienne large
Couture decorative sur les nappes
19
Point grec
Couture decorative classique sur les tissus unis
20
Point Cocotte
Réalisation d’un bord coquille
trèS
résistante
I
81
21
22
I-I
<
lj
<
82
1
I—i
<—
K
D
24
ri
—
4
23
I—’
<
K
G
25
N.j
I/I
INI
I/I
INJ
IA
\I
/-i
F G. K.
C)
C)
27
‘—I
Icf
IC,)
CD
C-)
26
C)
Li D
K
28
29
I,
Ill
\\\
I,
,-UI
\\\
I,
K K
CD
,-t
C)
C)
C,
30
—I,
31
1
3
33
34
H
D
N
L
C
L
0
1f
\, \
\/ \
11(1
I
-
M.
zr
C)
H
N°
Designation des points
Utilisations
21
Point de surfilage
élastique
Surfilage des tissus qui s’effilent facilement
22
Point cocotte étroit
Couture decorative sur les robes de fillettes
23
Point overlock fermé
large
Pour fixer et raccommoder Tes bords et executer
des ourlets apparents sur es sous-vétements
24
Point fanion
Couture d’assemblage decorative pour Ia pose
de
ganses
25
Point overlock fermé
étroit
Pose de dentelle fine
26
Point turc
Couture sur patchwork
27
Point overlock
Assemblage et surfilage elastique sur tissus
28
Point de paon
Couture decorative élégante, notamment sur le
linge
de table
29
Point overlock étroit
Delicate bordure decorative
30
Point de corde
Couture decorative fine pour vétements leger
s
31
Point invisible large
Ourlets invisibles sur tissus moyens et épais
32
Point invisible étroit
Ourlets invisibles sur tissus fins
33
Point de l’Empereur
Fine couture decorative sur les mouchoirs fémi
nins.
34
Point du Roi
Couture decorative sur serviettes de table pour
enfants,
a mailles
La tabella dei programmi
La tabella indica ii programma, ii relativo
punto e, sotto, quail tasti occorre premere.
01
I
I
02
I
I
I
I
cD CD c
G
H
I
\
\
/
—...
•-S’-S
—-5----
——-—-.
D
‘—S
D
E
—S
E
F
in tutti i programmi conmdicazione “fiexi”
occorre regolare ii regolatore del punto
fino aiI’arresto su “stretch”.
03
1 =
ii
II
ii
JI
_i =
A
B
04
! Ii
ifl
ll
I I E Ill
III
II
ii
iii
I
L ED CD
C
-5
-‘
—
--
C)
D
C)
D
----—.—
———
--
-
M
,-4-
—C)
FD
4No
Descrizione
Applicazione
01
punto diritto
per tutti I lavori di cucito in genere e per una
cucitura di 6 mm su bordi
02
punto zig-zag
moto versatile; per rifinire bordi, eseguire
applicazioni, inserire pizzi, cucite cordoncini,
ricamare, attaccare bottoni, rammendare ecc.
03
occhieiii
Si
04
cucitura tripia flexi
per cuciture resistenti; si estende sotto sforzo senza
rompere
05
cucitura tripla zig-zag
flexi
rinforzo della cucitura elastico e particolarmente
piatto, ad esempio per busti
06
punto elastico
per inserire toppe o rammendare strappi nei tessuti
ealsticizzati
07
punto elastico
ornamentale
per inserire toppe e rammendare strappi in tessuti
elasticizzati o cuciture ornamentali su stoffe
estensibili
08
punto corona
cucitura ornamentale, ad eS. per camicie da notte
09
punto invisibile elastico
per eseguire orli invisibili su tessuti elastici
10
cucitura a festone
per ornare ad es. fazzoletti
84
eseguono senza dover girare Ia stoffa, basta
premere i tasti. La fittezza del punto è egoIabile
35
36
Th
-j
L
L
F
L
37
—Il
iI
—Ii
II
—11
H
CD
‘-4.
C)
38
39
40
—Il
41
/11
\lI
‘U
\U
‘II
42
M
\\\
‘It
—Il
—II
1%.
IA
/\\
\‘
H L L.
CD
D. GCD
D.
C)
C)
‘-p
C)
:3-
C)
I
L
.-+
CD
C)
:1-
43
N
N
N
L.
lCD
—p
C,
44
45
46
‘<I
‘II
‘XI
‘II
XI
IC,)
I_
4.
II
I Cl)
i_ -
0
L
K. D.
C)
C)
:3r
47
XI
III
XI
48
‘II
‘II
//\
III
‘II
XI
L L!.
M.
C)
I\ D
“C)
r
D
-
N°
Designation des pornts
Utilisations
35
Point de Vienne étroit
Couture decorative, notamment sur
le tinge de table.
36
Point grec étroit
Couture decorative classique sur tissu
s unis
37
Point de tricot large
Assemblage et surfilage du jersey
38
Point de tricot moyen
Assemblage et surfitage des articles
de bonneterie
39
Point de tricot étroit
Assemblage et surfilage du jersey fin
40
Point d’épi
Couture decorative sur tabliers
41
Point hollandais
Couture decorative, entre autres sur le
linge de
cuisine
42
Point d’escargot
Couture decorative pour le tinge de toile
tte
43
Point de tissage
Couture decorative sur robes folktoriqu
es
44
Point en diagonale
Couture decorative sur robes de coupe
simple...
45
Point de rose
Couture decorative sur robes vaporeuse
s.
46
Point de branche
Couture decorative, notamment sur les
robes sport
47
Point de bordure
Couture decorative, notamment sur es
bords de
poches
48
Point triangle
Couture decorative sur chemises de nuit
d’enfants
‘
83
L
In tutti gli altri punti si pub reg
olare Ia
Iunghezza del punto a voo
ntà. NeHa tabella
07
08
—
-
—‘
....
09
—I‘.
—
5
-I--
11
7
12
/\/
\/\
/\/
\/\
/\/
\/\
13
/V
\\
.-‘//
-\
4/
I
.‘
—
...
10
/
—,.
\.
,
,—
—‘
\
--
E
—\
\
--
F
\.,.
/1/
\i\
/1/
\l\
.-4/
•-•-\
-wM
G
C)
T
Descrizione
punto nido d’ape
spugna
b descritto denominazione
e applicazione
dei singoli programmi.
14
15
—.\\
I1\
R/
ii\
-\\
j
-\\
U\
fl/
16
....
I
M M T
C)
D
C)
D
C)
D
17
I
C)
D
18
19
—
—
—
—
—
L
T
T
F
20
I—
I
I
I
D
FG
k
Appi icazione
per applicare
flu
elastici o per coprire cucitu
re su
punto fungo
una cucitura robusta per giu
nture
13
punto fiorentino,
stretto
una decorazione per bordi,
ad es. per biancheria da
lettQ
14
punto fiorentino,
argo
15
punto gaHo
16
punto greco, argo
17
punto viennese
18
punto viennese largo
per decorare ad es. tovagl
ie
19
punto greco stretto
una classica decorazione
per stoffe in tinta unita
20
orb a conchiglia
rifinitura di effetto su bor
di di stoffe morbide
ad esempio come cucitura orn
amentale per
biancheria da letto
cucitura ornamentale, ad
es. per biancheria da
tavola
una classica decorazione per
stoffe a tinta unita
per decorare salviette ad es.
85
2.
0. C
CDD
0 C
0)D
30)
V
CD
0
Co
0
-t
CD
Ci)
0)
CD
0)
0
CD
-F
CD
3
0)
1
C
1
0)
0
-F
C,
3
CD
0
CD
-S
V
CD
U)
-S
00
0)0
0.
CD
U) Co
3Co
0)
N
N3
9.CD
CD
_*- ,-4.
-+0)
CD
CD
CO
CO
CD
-,
CD
CD
0
‘-I.
U)
C’)
C
0
CO
0
0
-4-
CD
V
CD
U)
0)
0
C
U)
U)
D
V
CD
V
CD
0
U)
2.
-F
Co
0
CD
-F
‘-4-
0)
CD
-
-.
CD
U)
rr
<
U)
D
<
U)
-F
0
V
C
C)
V
C
z
,-fr
0
CA)
U)O)
0’
C,0)
c;C,
0)C
NC,
V
CD
0
-I.
0
-‘
CD
0
rt
V
C
CA)
c)
0
V
C
L)
0
CD
0
Co
CD
Co
CD
D
-40
3
0)
Co
0)
0
0
‘O
CD
0
D
-f
0
0)
CD
3
0)
-S
0
C
0
0.
0)
C,
V
C
D
-.
0
CA)
0
0
0
-S
0.
0)
0.
-t
-t
D
-h
-‘
0)
‘-4a)
C,
0)
0
CD
C
0
-4-4-
CD
-4-
U)
)c
C,
0
0
0
<
CD
-F
V
C
Co
CD
0)
Co
0
-S
U)
V
CD
0)
0.
CD
0
U)
0
DCD
DCD
0)
Co
CD
-‘
CD
-t
C,)
3U)
0)0)
D
-4-
0
C,
-4-
V
0)
-S
C
-S
0)
V
CD
-4-
C,
C
C,
0)
DC
C,
C
DO)
-4
CDC,
0
C,
C
0
‘-4
V
C
7,’)
0)
C,C
-
C,
0
V
C
D
‘-4.
0
0
<
CD
CD
—4,
0
-4-
CD
3
0)
-S
0
C
CD
<
0
a)
V
C
D
0
V
co
-,
C
-
-F
0)
C,
0.
CD
N
0)
1
CD
‘O
N
C,
0)
-o
V
-S
V
CD
E
CDCD
3’
D
C,
01
CD
C,
0)
-D
V
0)
-S
V
CD
0)
‘-F
0)
-S
0
C,
CD
0
C
0)
-F
D
C
Co
DC
CD-s
D. 0)
CD
0)
00)
U)
0CC,
DC
V C
CD
()
D
‘-F
0
V
0)
<
CD
C
V
7’.)
C,
0
V
CD
U)
-S
CD
0
0)
-F
CD
D
3
0)
0
D
0)
D
CD
0)
3
D
CD
1
-S
0
V
C,
-S
CD
D
C
C,)
0
C,
7c
C,
0
-‘
0
0
<
CD
‘-4-
V
C
7’.)
C’)
0)
D
3
0
0)
0)
0.
‘-4-
-F
CD
U)
1
V
CD
cd)
0)
0.
CD
0
-4-
0)
-S
0
C,
CD
0.
V
C
D
0
I
--
7,’)
7’.)
C,
0)
D
Co
0)
0
-h
U)
0
V
0
CD
0)
CD
U)
‘-F
0
:1,
0
0
-‘
‘O
CD
0
C,
-4-.
U)
a)
CD
0
0
:,
U)
0)
N
0
D
CD
C,
‘0
0
0
D
CD
N
C,
CD
C’)
0
0
z
ZVV\
Dr’
0i-
ZI
qoes
;::
qoeis
qoais
394S
/
\
i
J\J\
‘
C’)
qoeis LLL C)
qoe4s
qoe4s
fr
‘V”\I’
35
36
38
37
-1I
—I
-jJ
—II
It
—I’
—II
r
L
F
—II
II
L
CD
-4.
C)
39
/11
\II
‘II
42
40
41
ji
\\\
/\\
il
/\\
\‘
4’
‘II
4’
M
‘II
‘ft
Jl
N5. HS.
D. GR.
C)
IC),
l_
*
‘LI)
CD
-4.
D.
C)
C)
I
L
Cl)
,..+
F
:-
C)
43
NJ
NJ
‘U,
L
.-+
45
46
‘<I
‘II
XI
XI
‘<I
‘II
IC))
IC))
44
‘1
I_
‘-4.
‘II
L.
‘-4
L’
K. D.
C)
C)
C)
K
:r
47
XI
48
‘II
‘II
XI
III
/11
XI
I,”
‘Cl)
L
G. M.
L.
,-4.
C)
C)
I\ D
No
Descrizione
Applicazione
35
punto viennese stretto
per decorazione su biancheria da tavola
36
punto greco stretto
una classica decorazione su stoffe in tinta unita
37
punto pullover largo
una cucitura elastica per unire e rifinire
contemporaneamente stoffe in maglia
38
punto pullover medio
una cucitura elastica per unire e rifinire
contemporaneamente maglina
39
punto pullover stretto’
una cucitura elastica per unire e rifinire tessuti
leggeri tipo jersey-crepe
40
punto piuma
una cucitura di copertura, ad es. per grembiuli
41
punto olandese
una cucitura ornamentale ad es. per tessuti per cucina
42
punto chiocciola
una cucitura ornamentale, ad es. per biancheria da
bagno
43
punto tessuto
una cucitura onramentale, ad es. per abiti rusticali
44
punto diagonale
una cucitura ornamentale, ad es. per abiti semplici e
moderni
45
punto rose
una cucitura ornamentale, ad es. per decorare abiti
da donna vaporosi
46
punto ramo
una cucitura decisa, ad es. per abiti da passeggio
47
punto bordo
una cucitura ornamentale, ad es. per bordi dell
tasche
48
punto triangolo
una cucitura ornamentale, ad es. per pigiama per
bambini
87
Scarica