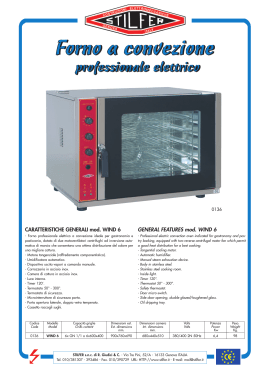
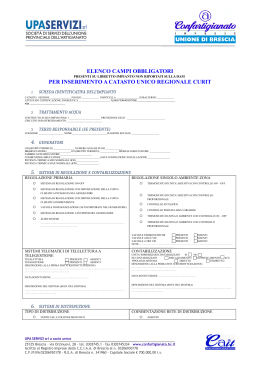
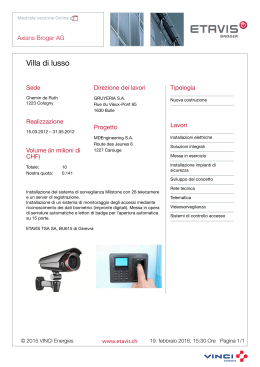
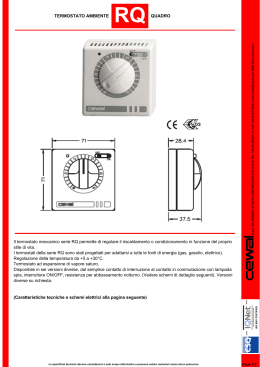
0,5 Pag. 04 Serie BluFire : Esperienza e Tecnologia – Versioni e Potenzialità – Una soluzione per ogni esigenza BluFire Serie : Experience and Tecnology – Versions and Capacities – A solution to all needs Le potenzialità termiche disponibili per la serie BluFire sono 4: da 23,65 kW resi a 59,85 kW resi. The BluFire serie has 4 available heating capacities: heat output from 23,65 kW to 59,85 kW. Potenze Termiche utili Heating capacities Output (kW) 60 50 Stadio – Stage MAX 42,43 40 30 59,85 Stadio – Stage min 33,00 23,65 20 36,67 33,42 23,82 19,06 10 0 BF 25 Versione Version BF-E BF 35 BF 45 Modelli - Models Versione Version BF-C Unità indipendenti a convezione forzata equipaggiate di Bruciatore Premiscelato 2-Stadi Multigas e ventilatore per il riscaldamento ambiente. Il generatore BPS Serie BluFire può essere installato direttamente in tutti gli ambienti industriali, civili e del settore terziario ed agricolo (serre ed impianti di allevamento) in cui è consentito il ricircolo dell’aria ambiente, rispettando comunque le norme applicabili. Sicuri, modulari, di rapida e semplice installazione, i generatori pensili Serie BluFire funzionano a metano e GPL. La loro concezione modulare permette un riscaldamento a zone, adattandoli perfettamente al volume dei locali da riscaldare. La gamma di modelli offerti è ampia: il generatore d’aria calda pensile BPS serie BluFire è, infatti, disponibile nelle seguenti versioni: Versione BF-E : Adatta per installazione interna Grado di protezione macchina IP 30 Generatore d’aria calda a Gas Pensile con ventilatore elicoidale (adatto per installazione normale a lancio libero). Versione BF-C : Adatta per installazione interna Grado di protezione macchina IP 30 Generatore d’aria calda a Gas Pensile con ventilatore centrifugo (adatto sia per installazione normale a lancio libero sia per installazione canalizzata - l’installazione deve avvenire all’interno del locale da riscaldare o in centrale termica). BF 65 Versione Version BF-EC Independent units, forced convection heating units, equipped with fan and Multi-gas 2-Stage Premixed Burner, designed for room heating. The BPS BluFire Series heater can be installed directly in every industrial, commercial environments, in greenhouses and breeding farms, where the recirculation of the ambient air is allowed, and anyhow respecting the applicable norms. Safe, modular, easy to be installed, the BluFire Series heaters can work both on natural gas and on LPG. Their modular conception allows them to be perfectly adapted to the size of the environments to be heated. The range of models is wide: the BPS BluFire Series suspended warm air heater is suitable for following versions: BF-E Version : Suitable for internal installation Appliance protection degree IP 30 Gas Fired unit Heater whit helicoidal fan (suitable for application). free blowing BF-C Version : Suitable for internal installation Appliance protection degree IP 30 Gas Fired unit Heater with centrifugal fan (suitable for free blowing application and for ducted application - They must be installed inside the room to heat or in the central thermal room). Versione BF-EC : Adatta per installazione esterna Grado di protezione macchina IP 33 Generatore d’aria calda a Gas Pensile con ventilatore centrifugo (sono stati progettati e certificati per essere installati all’aperto, il collegamento con l’ambiente da riscaldare deve avvenire per mezzo di canalizzazione). Versione appositamente progettata e certificata per installazione all’esterno, quando la natura dei materiali presenti all’interno dei locali da riscaldare o la destinazione d’uso dei locali stessi, non consente l’installazione interna delle unità: - autoriparazioni ; autocarrozzerie - locali di pubblico spettacolo - falegnamerie ; verniciature e tutte quelle applicazioni per le quali, per vincoli normativi o necessità legate alle lavorazioni interne, non è possibile l’installazione all’interno dei locali. Questa versione presenta tutte le caratteristiche di funzionamento e di totale sicurezza della versione BF-E + protezione elettrica specifica per installazione esterna. NOTA: Unità standard (tutte le Versioni) fornite senza griglia mandata aria. A richiesta è disponibile una ampia gamma di griglie mandata aria a semplice o doppio ordine di alette orientabili, plenum mandata aria, ecc. (accessori). BF-EC Version : Suitable for external installation Appliance protection degree IP 33 Gas Fired unit Heater for external installation with centrifugal fan (They have been designed and certified to be installed outside. They are linked to the room to heat by canalisation). Version specifically designed and certified for external installation, where the type of material present inside the rooms to be heated or the room purpose itself does not allow internal installation of the units: - auto repair shops ; carpentry - public entertainment arenas - painting entities and all applications for which (standard rules or needs are linked to internal works) installation inside the buildings is not possible. This version have all the same functions and total safety features of the BF-E version + specific electrical protections for external installation. NOTE: Standard unit (all Versions) supplied without air supply grill. On request, a wide variety of single or double bank adjustable air-supply grills, air supply plenum, etc. (accessories). Pag. 33 Limiti di funzionamento – Operating limits Alimentazione elettrica (unità) Power supply (unit) 230 V ± 15% / 1 Ph / 50 Hz (Max 265 V ; Min 195 V) Alimentazione elettrica (comandi remoti) Power supply (remote control) 230 V ± 15% / 1 Ph / 50 Hz (Max 265 V ; Min 195 V) Temperatura di funzionamento (aria ambiente) Temperature work limits (environment air) - 5 °C ÷ + 40 °C Umidità di funzionamento (aria ambiente) Humidity work limits (environment air) 10 % ÷ 90 % U.R. – R.H. (senza condensa - non condensing) Lunghezza tubo scarico fumi + Lunghezza tubo aspirazione aria comburente Length of the smokes exhaust pipe + Length of the intake combustion air pipe Max 6+6 m Lunghezza tubo scarico fumi (senza tubo aspirazione aria comburente) Length of the smokes exhaust pipe (without intake combustion air pipe Max 12 m Diametro tubo scarico fumi Diameter of the smokes exhaust pipe 80 mm Diametro tubo aspirazione aria comburente Diameter of the intake combustion air pipe 80 mm Pressione alimentazione gas Feeding gas pressure Valori di targa - Data on the label ± 1 mbar Massima temperatura acqua ingresso plenum PCA Maximum entering water temp. plenum PCA 160 °C (acqua surriscaldata – hight temp. hot water) Minima temperatura media acqua plenum PCA Minimum water medium temp. plenum PCA 6 °C Massima pressione di esercizio (acqua) plenum PCA Maximum working pressure (water) plenum PCA 15 Bar Perdita di carico acqua batteria plenum PCA Water coil pressure drop plenum PCA Max 200 kPa - Min 0,1 kPa Glicole etilenico (max % in peso) plenum PCA Etylene glycol (max % by weight) plenum PCA 80 % - Min 1+1 m Min 1 m Osservazioni – Remarks Ai fini di un utilizzo corretto e sicuro dell’unità, il progettista, l’installatore, l’utente ed il manutentore, per le rispettive competenze, sono tenuti ad osservare scrupolosamente quanto indicato nel presente manuale. To use the unit correctly and safely, the installer, the user and the maintenance man, for their respective competencies, must comply with what is indicated in this manual. Conservare questo bollettino tecnico in luogo asciutto, per evitare il deterioramento, per almeno 10 anni per eventuali riferimenti futuri. Leggere attentamente e completamente tutte le informazioni contenute in questo bollettino tecnico : forniscono importanti indicazioni riguardanti la sicurezza d'installazione, uso e manutenzione. Prestare particolare attenzione alle norme d’uso accompagnate dalle scritte “PERICOLO” o “ATTENZIONE” in quanto, se non osservate, possono causare danno all’unità e/o a persone e cose. Per anomalie non contemplate da questo bollettino tecnico, interpellare tempestivamente il Servizio Assistenza di zona. Assicurarsi che questo libretto accompagni sempre l’unità. Il libretto costituisce parte integrante ed essenziale del prodotto e dovrà essere consegnato all’utilizzatore. Se l’unità dovesse essere venduta, o trasferita ad altro proprietario, assicurarsi sempre che il libretto accompagni l’unità in modo che possa essere consultato dal nuovo proprietario e/o dall’installatore. BPS S.r.l. declina ogni responsabilità per qualsiasi danno dovuto ad un uso improprio dell’unità, ad una lettura parziale o superficiale delle informazioni contenute in questo bollettino. I dati tecnici, le caratteristiche estetiche, i componenti e gli accessori riportati nel presente manuale non sono impegnativi. La BPS S.r.l. si riserva la facoltà di apportare in qualsiasi momento tutte le modifiche ritenute necessarie per il miglioramento del proprio prodotto. I riferimenti a leggi, normative o regole tecniche citate nel presente manuale sono da intendersi a puro titolo informativo e riferiti alla data di stampa dello stesso. L’entrata in vigore di nuove disposizioni o di modifiche a quelle vigenti non costituirà motivo di obbligo alcuno della BPS S.r.l. nei confronti di terzi. La BPS S.r.l. è responsabile della conformità del proprio prodotto alle leggi, direttive e norme di costruzione vigenti al momento della commercializzazione. La conoscenza e l’osservanza delle disposizioni legislative e delle norme inerenti la progettazione degli impianti, l’installazione, l’esercizio e la manutenzione sono ad esclusivo carico, per le rispettive competenze, del progettista, dell’installatore e dell’utente. ATTENZIONE! E' importante verificare che il progetto e l’installazione siano conformi alle norme vigenti (Norme EN, Norme di sicurezza antincendi, Regolamenti locali) e siano approvati, quando previsto, dagli enti competenti al controllo in materia. Store this technical bulletin in a dry location to avoid deterioration, as they must be kept for at least 10 years for any future reference. All the information in this technical bulletin must be carefully read and understood : as they’ll be all very useful for both safe installation and proper use & maintenance operations. Pay particular attention to the operating norms marked with “DANGER” or “WARNING” signals as their disrepect can cause damage to the unit and/or person or objects. For any malfunctions not mentioned in this technical bulletin, contact the local Aftersales Service immediately. Always keep this handbook with the unit. This manual is an integral and essential part of the product and must be given to the user. Should the unit be sold or transferred to another owner, please ensure that the manual remains with the unit for use by the new owner and/or installer. BPS S.r.l. declines all responsibility for any damage whatsoever caused by improper use of the unit, and a partial or superficial acquaintance with the information contained in this bulletin. The technical data, styling characteristics, components and accessories reported in this manual are not binding. BPS S.r.l. reserves the right to make changes, at any time, that are considered necessary to improve the product. The lawful references, standards or technical rules mentioned in this manual are presented merely for the sake of information and should be considered valid as of the date this manual is printed. If new regulations or amendments to current laws go into effect, this will not obligate BPS S.r.l. in any way with regard to others. BPS S.r.l. is responsible for ensuring that its product conforms to the laws, directives and construction standards in force at the time the product is sold. Knowledge and compliance with legal regulations and standards regarding plant design, installation, operation and maintenance are the exclusive responsibility, for the respective competencies, of the designer, installer and user. WARNING! It is important to verify that the design and installation conform with current standards. Ensure that the environment in which the air heater will be installed will not create a hazard, i.e. where excessive (volatile) dust, flammable or corrosive substances and/or vapours and combustible materials may be present. Simboli di sicurezza – Safety symbols ATTENZIONE Pericolo !!! PERICOLO: Tensione PERICOLO: Togliere Tensione PERICOLO: Tempratura Pericolosa PERICOLO: Alta Temperatura ATTENTION Danger !!! DANGER: Power Supply DANGER: Disconnect Power Line DANGER: Dangerous Temperature DANGER: Hight Temperature PERICOLO: Infiammabile PERICOLO: Organi in movimento OBBLIGATORIO: Usare guanti protettivi OBBLIGATORIO: Solo Personale Qualificato DANGER: Inflammable DANGER: Moving parts COMPULSORY: Use protective gloves COMPULSORY: Only Qualified Personnel OBBLIGATORIO: Messa a Terra OBBLIGATORIO: Usare carrello VIETATO FUMARE VIETATO Usare fiamme libere COMPULSORY: Earthing COMPULSORY: Use undercarriage NO SMOKING FORBIDDEN Use free flames OBBLIGATORIO: Valvola intercettazione gas GAS COMPULSORY: Shut-off gas valve VIETATO FORBIDDEN Pag. 34 Prescrizioni di sicurezza – Safety measures Nel corso DELL’INSTALLAZIONE, MESSA IN FUNZIONE, USO E MANUTENZIONE delle unità serie BluFire devono essere rispettate le seguenti norme di sicurezza: Observe the following regulations when INSTALLING, STARTING UP, USING AND SERVICING the BluFire serie units: L'installazione deve essere effettuata in ottemperanza alle vigenti normative del Paese di utilizzo, secondo le istruzioni del costruttore, da personale professionalmente qualificato, o dai Centri di Assistenza autorizzati dal costruttore. Solo personale precedentemente addestrato e qualificato può eseguire le operazioni di installazione e manutenzione dell’unità. Per personale professionalmente qualificato si intende quello avente specifica competenza tecnica nel settore dei componenti di impianti di riscaldamento. In ogni caso telefonando all’Ufficio Tecnico BPS potrete ricevere le informazioni necessarie. Solo per Italia: Attenersi comunque alle norme vigenti ed in particolare al D.M. del 12 aprile 1996 che regola la progettazione, la costruzione e l’esercizio degli impianti termici alimentati da combustibili gassosi, alla legge nº46/90 e al relativo regolamento di attuazione (D.P.R. 447 del 1991) sulla sicurezza degli impianti termici. Installation is to be carried out always strictly complying with the current standards of the country where the appliance is going to be used and following, of course, the instructions given by the maker. Only skilled operators and Authorized Assistance Centers will be entitled to carry out installation. The installation and maintenance operations of the unit can be carried out by qualified and trained personnel only. Qualified service engineers are those having specific technical experience in the field of heating installation unit for home use according to CORGI Register. In any case, telephone in BPS Technical department and you can receive all informations. Comply with all existing standards and in particular CORGI regulations. Sulla base del progetto di installazione, predisporre le linee di alimentazione del gas, dell’acqua refrigerata (solo per accessorio plenum PCA) e della energia elettrica, nonché le mensole di supporto dell’unità. Non mettere in funzione l’unità senza che essa ed i suoi componenti elettrici siano stati collegati all’impianto di terra dell’edificio. GAS According to the installation project, install the gas supply lines, the chilled water lines (only for optional PCA plenum), the electric power lines and a suitable support bracket for the unit. Always make sure that the unit and all its electrical parts have been correctly earthed prior to starting up the unit. Se l’unità deve essere smontata, proteggere le mani con guanti da lavoro. Fare attenzione agli spigoli di lamiera all’interno dell’unità Fare attenzione agli spigoli esterni dell’unità Tenere libere le griglie di aspirazione. If you have to disassemble the unit, use special protective gloves. Beware of sharp edges inside the unit Beware of roof corners of outdoor units Keep suction grids clear. Per le unità con ventilatori accessibili, non mettere in funzione l’unità se la stessa non è stata montata all’interno di un vano accessibile solo con l’uso di utensili. Le ventole possono raggiungere la velocità di 1000 giri/min. Non inserire oggetti nell’elettroventilatore né tantomeno le mani. In the unit with accessible fans, don’t start the unit if the the unit itself is not closed inside a room accessible only with the use of proper tools. Fans can reach a speed of 1000 rpm. Do not insert any object nor hands in the electric fan. Installare in prossimità dell’unità, in posizione facilmente accessibile, un interruttore di sicurezza che tolga la corrente alla macchina. Prima di qualsiasi operazione di pulizia o manutenzione togliere l’alimentazione elettrica dall’unità. Prima di accedere all’unità assicurarsi che tutte le utenze elettriche siano state interrotte. In particolare prima di aprire i pannelli d’ispezione accertarsi che il ventilatore sia spento e che non possa essere riacceso all’insaputa di chi sta intervenendo sulla unità stessa. VERIFICARE IL COLLEGAMENTO DELLA MESSA A TERRA !! OFF We recommend to install a safety switch which can be easily reached to cut off the current, near the unit. Before any cleaning and servicing operation, cut off the power line to the unit. Before opening the unit, make sure that all electrical parts have been switched off. In particular, make sure that the fan is off and cannot be inadvertently started prior to opening inspection panels. CHECK THE EARTHING !! Assicurarsi che la valvola di alimentazione del gas sia chiusa. Assicurarsi che la valvola di alimentazione dell’acqua sia chiusa (solo per accessorio plenum PCA per condizionamento estivo). Attendere che lo scambiatore si sia raffreddato. GAS OFF GAS Be sure that the inlet gas valve is closed. Be sure that the inlet water valve is closed (only for optional PCA plenum for summer cooling). The exchange device has cooled down. Questa unità dovrà essere destinata solo all'uso di riscaldamento-condizionamento. Ogni altro uso è da considerarsi improprio e quindi pericoloso. Se l'unità viene installata in ambienti con persone inabili e/o bambini, dovrà essere posizionata in modo che non sia di facile accesso. Assicurarsi che la porta di accesso ai comandi interni sia sempre chiusa. Un’errata installazione può causare danni a persone, animali e cose, nei confronti dei quali il costruttore non può essere considerato responsabile. Il costruttore non può essere considerato responsabile per eventuali danni derivanti da usi impropri, erronei o irragionevoli. This unit is designed to be used for heating-cooling purposes only. Any different use is not allowed as it may be dangerous. Should the unit work in a house where disabled people and/or children live, it must be placed safely away from their reach. Always make sure that the access door to the inside control board stay locked. An incorrect installation can cause damages to people, animals and property. In case of erroneous installation, the manufacturer cannot be held responsible for such damages. The manufacturer cannot be held responsible for such damages by improrer uses, errate uses, etc. Non usare l’unità come sostegno per altro macchinario Non lasciare all’interno dell’unità utensili, stracci, parti di ricambio, ecc. Non lasciare i pannelli di ispezione parzialmente chiusi: accertarsi che tutte le viti siano perfettamente serrate. Non esporre l’unità a gas infiammabili. Never use the unit to support other equipment. Never leave tools, spare parts, etc. inside the unit. Make sure that all inspection panels are closed properly. Do no expose the unit to inflammable gases. In caso di guasto o cattivo funzionamento dell'unità, disattivarla, astenendosi da qualsiasi tentativo di riparazione e chiedere l'intervento dell'installatore. Dal momento che si decide di non utilizzare più l'unità, si dovranno rendere innocue quelle parti che potrebbero essere fonti di pericolo. In case of breakdown or failure: turn unit off, do not try to repair it on your own, call operator. If you are going to leave the generator off for a long time, first make sure that in no way this could cause harm to anyone in any way. Tenere presente che modifiche elettriche, meccaniche e manomissioni in genere fanno decadere la garanzia !! Please do not forget that warranty cannot be applied in case of electric, mechanical and other general modifications !! Pag. 35 Imballo – Packing Le unità vengono spedite con imballo standard costituito da uno scatolone in cartone e pallets; gli accessori vengono forniti sfusi imballati a parte o già montati sull’unità (vedi listino prezzi). All'interno dello sportello dell'unità si trova una busta contenente: il manuale di installazione, uso e manutenzione ed il certificato di garanzia. Se l’unità viene spedita dalla fabbrica con taratura a Metano, viene fornita come standard anche una busta contenente il diaframma ed il necessario per l’eventuale cambio di tipo di gas, con la relativa etichetta adesiva. Se l’unità viene spedita con taratura a GPL il diaframma è già montato sulla macchina. Units are shipped with carton boxes on pallet as standard packing; accessories are supplied loose in packed separately or supplied mounted in the unit (see price list). There is an envelope inside the service door of the unit containing: the installation, use and maintenance manual, the warranty and the service documents. If the unit is supplied with methane setting, an envelope containing the diaphragm and all the necessary part for the change, with the relative adhesive label, is given along with the unit. If the unit is sold with LPG setting, the diaphragm is already mounted in the unit. Su ogni singola unità è applicata l’etichetta di identificazione riportante: x Dati del costruttore x Modello dell’unità e Codice di identificazione x Dati tecnici , Tipo gas e pressione di alimentazione DATI COSTRUTTORE (società costruttrice): B.P.S. S.r.l. – Via Eistein – Fontane di Villorba Modello della macchina K 40 EC Codice di identificazione 00123/01/2001 MODELLO 10 20 30 40 50 60 70 Potenza frigorifera kW 12 15 17 34 56 77 84 Potenza termica KW 23 33 43 53 63 65 90 Portata aria mc 330 550 670 750 770 850 910 Assorbimento elettrico W 18 20 45 90 120 150 150 Corrente assorbita A 1 2 2 3 3 4 4 Data di produzione 1 5 Lotto di produzione 1 9 3 7 / 2 0 0 1 / 1 0 / 2 0 0 1 The identification label bearing the following data is applied on each unit: x Manufacturer’s data x Model of the unit and Identification code x Technical data, Gas type and feeding pressure Trasporto, Ricevimento, Movimentazione – Transport, Receipt, Handling L’unità viene spedita, trasportata e consegnata racchiusa in un apposito imballo di protezione che deve essere mantenuto integro fino al posizionamento sul luogo di installazione. Controllare che l’unità sia completa nelle sue parti come da ordine. Controllare che non vi siano danni e che la sigla dell’unità corrisponda al modello ordinato. Ogni unità viene collaudata in fabbrica prima della spedizione, quindi se vi sono stati danni avvisare immediatamente il trasportatore. Il trasporto, lo scarico e la movimentazione devono essere effettuati con la massima cura per evitare possibili danneggiamenti utilizzando come punto di presa unicamente la base della macchina ed evitando di usare come punti forza i componenti dell’unità. Fare attenzione nel sollevamento della unità il cui baricentro può anche essere fuori asse. The unit has a special safety packing for transport and delivery which must be kept in good conditions till the unit is positioned on the installation place. Make sure that the unit has all its parts, as specified in the order. Check if there are any damages and if the unit abbreviation is the same as the one of the ordered model. Every unit is factory tested before shipment, therefore, if there are damages, report them immediately to the carrier. Shipping, unloading and handling of the goods are all operations to be carried out very carefully in order not to damage goods. Try not to use the unit’s components as handholds. When lifting, bear in mind that the centre of gravity of the unit may be off-centre. 35 Kg NON BAGNARE DO NOT WET NON CALPESTARE DO NOT TRAMPLE NON LASCIARE GLI IMBALLI SCIOLTI DURANTE IL TRASPORTO NON SPOSTARE L’UNITÁ DA SOLI SE IL SUO PESO SUPERA I 35 Kg DO NOT LEAVE LOOSE PACKAGES DURING THE TRANSPORT DO NOT HANDLE THE UNIT ALONE IF ITS WEIGHT IS OVER 35 Kg Installazione: Notizie per l’installatore qualificato - Installation : Information to qualified installer L’INSTALLAZIONE DEVE AVVENIRE NEL RISPETTO DELLE NORME VIGENTI THE INSTALLATION MUST BE ALWAYS COMPLIANT WITH THE CURRENT LOCAL LAWS Prima di iniziare l’installazione è necessario assicurarsi che siano state espletate le fasi progettuali e di ottenimento delle autorizzazioni eventualmente necessarie. Verificare la corrispondenza dell’unità e delle sue caratteristiche tecniche rispetto a quanto previsto dal progetto o da altri documenti. L'indicazione del tipo di gas per cui l’unità è predisposta, con relativa pressione di alimentazione, si trova sia sull’esterno dell’imballaggio che in un’apposita etichetta posta sul lato interno dello sportello dell’unità. ATTENZIONE! Qualora il tipo di gas per cui l’unità è predisposta sia diverso da quello di effettivo utilizzo, l’operazione di adattamento potrà essere eseguita dal Centro Assistenza Tecnica autorizzato dalla BPS S.r.l., su richiesta dell’utente. Disimballare l’unità avendo cura di verificare che non abbia subito danni durante il trasporto o la movimentazione. In caso di danni o di sigla errata, contattare il proprio rivenditore. Non lasciare gli elementi dell'imballaggio a portata dei bambini in quanto fonti di pericolo. ATTENZIONE! L’unità può essere movimentata con carrello elevatore o transpallet, avendo cura di bilanciarne il peso sugli appoggi. Per ragioni di sicurezza, dato il peso relativamente elevato, non tentare di sollevare a mano l’unità. Evitare sospensioni tramite imbracature o funi, poiché non sono presenti specifici punti di ancoraggio. Indossare adeguati indumenti di protezione prima di procedere all’installazione dell’unità. Utilizzare idonea attrezzatura per prevenire incidenti nel corso dell’installazione. The requirements of the “Local Building Standards Office”, the premises “Insurance” company and the “Fire Office” must also be observed. Check that the unit and its technical characteristics match what is indicated by the design or other documents. The type of gas for which the unit has been designed and the relative supply pressure are found on the exterior of the packing and on a special label located on the inside of the unit service door. WARNING! If the type gas for which the unit has been designed is different from the one being used, the adaptation operation must be carried out by skilled technical personnel, during the first start-up operation and relative tests. Unpack the unit, carefully checking that it has not been damaged. In case of damages or wrong abbreviation, please contact the supplier. Always keep packing parts away from children reach, as they may be harmful. The unit can be handled with a fork-lift truck or transpallet, making sure to balance its weight on the supports. For safety reasons, considering the relatively heavy weight, do not try to lift the unit by hand. Do not hang with slings or ropes, since there are no specific anchor points. Before the unit installation, please wear suitable protective clothes. Use suitable equipments and tools to avoid any installation accident. Pag. 36 Installazione: Campo di impiego – Installation: Fields of use Con le unità BPS serie BluFire è possibile realizzare impianti modulari, costituiti da uno o più apparecchi, per soddisfare il fabbisogno termico di piccoli volumi come laboratori artigianali, ecc., fino a grandi volumi, come capannoni industriali, magazzini, impianti sportivi. E' necessario quindi valutare le dispersioni termiche dell'edificio e di conseguenza la potenza termica necessaria, scegliendo il numero ed il tipo di unità in funzione di valori come: portata e lancio d'aria, prevalenza disponibile in caso di utilizzo di canali di distribuzione, effettiva copertura delle zone da riscaldare, eventuale necessità di ricambi d’aria, ecc. Le versioni BF-E e BF-C sono costruite per installazione all’interno di locali, siano essi appositamente destinati alle unità (centrali termiche) che destinati ad altre attività (cioè direttamente all’interno dell’ambiente da riscaldare). La qualità e le dimensioni dei materiali impiegati sono stati scelti per garantire una durata di vita ragionevole e sono adatti al funzionamento delle unità, sia nel loro insieme che nei loro componenti, sotto riserva di un’installazione realizzata a regola d’arte ed in condizioni di sollecitazioni meccaniche, chimiche e termiche corrispondenti ad un’utilizzazione normale. ATTENZIONE! Le unità serie BF non sono previste per l’utilizzo in processi industriali e/o per l’installazione in ambienti con atmosfera corrosiva o esplosiva: non posizionare l’unità in locali in cui sono presenti gas infiammabili, sostanza acide, aggressive e corrosive che possono danneggiare i vari componenti in modo irreparabile. Per installazioni all’esterno, a cielo libero, è necessario utilizzare la versione BF-EC, appositamente progettata e costruita per questo scopo. Compatibilmente con quanto prescritto dalle vigenti norme di installazione, le soluzioni di impiego delle unità serie BluFire (versioni: BF-E ; BF-C ; BF-EC) si possono così riassumere: si possono utilizzare le unità versione BF-E con ventilatori elicoidali a mandata libera se non esistono particolari problematiche di distribuzione dell’aria o non sono presenti ostacoli fisici alla sua corretta diffusione, quali pareti divisorie, scaffalature o macchinari ingombranti, ecc. In questi casi si dovrà valutare, in funzione del lancio d’aria delle unità, l’effettiva copertura delle zone da riscaldare si possono utilizzare le unità versioni BF-C e BF-EC con ventilatori centrifughi canalizzabili nei casi in cui non sia possibile servire in modo efficace la zona desiderata con la mandata d’aria libera. Le unità versione BF-EC sono inoltre indicate qualora sia necessario applicare un filtro sulla ripresa d’aria (occorrono infatti i ventilatori centrifughi a causa delle perdite di carico indotte dal filtro stesso) e/o sia richiesto un ricambio con aria esterna, da prelevare per mezzo di canalizzazioni. BluFire series BPS units can be used to build modular plants, consisting of one or more appliances, to meet the heating requirements of small spaces such as artisan laboratories, etc., up to large volumes, such as industrial sheds, warehouses, churches and sports facilities. Therefore, the heat dispersion of the building must be calculated as well as the required heating power, selecting the number and type of units in relation to the values, such as: air flow and throw, head available when using distribution ducts, effective coverage of the areas to be heated, any air changes, etc. The BF-E and BF-C versions are built for installation in rooms, whether they are specially designed for the units (technical room) or other activities (i.e. directly inside the environment to be heated). The quality and the dimensions of the materials used have been chosen to guarantee a reasonable service life and are suitable to operate the units, both in their entirety and relative to their parts, provided that the appliances are professionally installed and are subjected to mechanical, chemical and thermal stress conditions corresponding to normal use. ATTENTION! The BF series units must not be installed under conditions for which it was not specifically designed, e.g. where the atmosphere is highly corrosive or salty: do not locate the unit in a place where flammable gasses, acid, aggressive or corrosive substances are present which could damage the various components in an irreparable way. For “open” outdoor installations, it is necessary to use the BF-EC version, which have been specifically designed and built for this purpose. Based on what is prescribed by the current installation standards, the BluFire serie units (versions: BF-E ; BF-C ; BF-EC) applications may be summarised as follows: BF-E version units with helicoidal, free-delivery fans can be used if there are no special air distribution problems or there are no physical obstacles to obstruct such distribution, such as partitions, shelving or bulky machinery, etc. In these cases, the effective coverage of the areas to be heated must be evaluated in relation to the air throw of the units BF-C and BF-EC versions units with ductable centrifugal fans can be used for the cases in which, it is not possible to serve the desired area efficiently with the free air delivery. The BF-EC version units are also suitable if a filter must be applied to the air intake (in fact, centrifugal fans are needed due to the load losses induced by that filter) and/or a change is required with outdoor air, to be conveyed by ducts. Installazione: Posizionamento unità – Installation: Unit location Per ottenere il massimo comfort e rendimento dall’impianto si consiglia di osservare le seguenti regole: Prima di procedere all’installazione si raccomanda di montare sull’unità gli eventuali accessori separati seguendo le istruzioni di montaggio contenute in ogni singolo Kit. Decidere la posizione di installazione. Posizionare l’unità su di una struttura solida che non causi vibrazioni e che sia in grado di sopportare il peso della macchina. In alcuni casi può anche risultare opportuno installare le unità in vicinanza di portoni in modo che svolgano anche la funzione di barriera d’aria al momento dell’apertura dei portoni. Quando in uno stesso locale vengono installate più unità, è conveniente distribuire l'aria calda secondo direzioni di flusso contrapposte. To obtain the maximum system efficiency it is advisable to comply with the following rules: Before the unit installation we recommand to muont on the unit the eventual separating optionals by following the assembly instructions contained in each single kit. Decide the installation position. Locate the unit on a solid structure which does not cause vibrations and is able to support the machine weight. In some cases it may also be suitable to place the units close to the main doors, so that they can also operate as air barriers when doors are opened. When more than one unit is installed in the same room, it is recommended to distribute the warm air in opposing directions. Ambiente grande - Big environment Ambiente medio – Medium environment Ambiente piccolo Lower environment Pag. 37 Installazione: Posizionamento unità – Installation: Unit location L’unità deve essere installata in posizione tale da consentire facilmente la manutenzione ordinaria e straordinaria. Installare l’unità in una posizione tale da non compromettere l’aspirazione e l’emissione dell’aria (consentire il regolare ricambio dell’aria da riscaldare). L’unità deve essere installata in posizione tale da presentare facilità di collegamento alla rete del combustibile. L’unità deve essere installata in posizione tale da presentare facilità di collegamento del condotto di scarico fumi ed aspirazione aria comburente. Posizionare l’unità il più vicino possibile alla zona occupata, anche per quanto riguarda l'altezza di installazione, senza tuttavia rischiare di investire direttamente le persone presenti con il flusso d’aria calda. In caso di installazione all’interno dell’ambiente da riscaldare, l'altezza d’installazione ha un’importanza diretta sulla ripartizione ottimale dell'aria calda. Per questo è consigliabile che l’unità venga installata con la sua base ad una altezza da terra di 2,5 metri, che corrisponde anche alla quota minima prescritta dalle norme. Evitare di installare l’unità a quote più elevate rispetto al suolo, in modo da limitare la stratificazione dell’aria. Eventuali materiali combustibili in deposito nei pressi dell’unità dovranno trovarsi ad una distanza minima da esso pari a 1,5 m. Le unità non devono essere inserite in nicchie. Tenere conto dell'esistenza di ostacoli, come pilastri, scaffali, materiali in stoccaggio, che potrebbero impedire la corretta diffusione dell'aria calda. Evitare che l’eccessiva vicinanza dell’unità al soffitto e alla parete crei una depressione tale da non consentire un regolare afflusso d’aria di raffreddamento alla camera di combustione. Eseguire eventuali aperture di ventilazione previste dalle norme in vigore. The unit has to be installed in order to allow ordinary maintenance and special maintenance. Install the unit in mode that the intake and supply air is not compromised (grant correct recycling of the air to be heated). The unit has to be installed in order to always grant easy connection to the fuel mains. The unit has to be installed in order to always grant easy connection between appliance and smokes exhaust and combustion air suction pipes. Position the unit as close as possible to the occupied area, also for what concerns the installation height, without however taking the risk of striking people directly with the flow of warm air. If the unit is installed in the room to be heated, the installation height has a direct effect on the optimum distribution of the warm air. For this reason the unit should be installed with its base at a height of 2.5 metres from the ground. Do not install the unit at higher levels from the ground, this limiting the stratification of the air. Any combustible materials stored near the unit must be at least 1.5 metres away from the unit. The units must never be placed in wall recesses. Consider the presence of obstacles, such as pilasters, shelving and stored materials which might prevent the warm air from being delivered. Make avoid depression conditions, as these would be a handicap to the correct cooling air flow inside the combustion chamber. If required by law, make necessary ventilation holes. 500 500 500 ALTEZZE E DISTANZE MINIME DI RISPETTO - MINIMUM HEIGHTS AND DISTANCES 300 600 400 300 2.500 ÷ 3.000 2.500 ÷ 3.000 1.500 Installazione: Collegamento meccanico – Installation: Mechanical connections L’unità viene normalmente installata su mensole (il punto di appoggio deve essere unicamente il fondo dell’unità) da fissare adeguatamente ad idonea struttura. INSTALLAZIONE MENSOLA BPS S.r.l. fornisce delle mensole di facile montaggio, appositamente previste per le proprie unità (accessorio): Segnare, attraverso le 6 aperture di fissaggio predisposte sulla struttura portante, la posizione dei tasselli di sostegno ad espansione. Eseguire la foratura per i tasselli. Installare le mensole con viti ad espansione 10 MA. Qualora le mensole di supporto siano realizzate diversamente, provvedere all'adeguato fissaggio dell'unità, fare attenzione alla sua distanza dalla parete e riferirsi allo schema sottoriportato. 160 E SCHEMA PER MONTAGGIO MENSOLE DRAWING FOR BRACKET INSTALLATION SF 80 AC D C 80 1/2" LG 150 Legenda - Legend SF Imbocco scarico fumi – Smokes exhaust connection AC Imbocco aria comburente – Combustion air connection LG Collegamento linea gas – Gas line connection Taglia - Size A mm B mm C mm D mm E mm 12 150 50 400 50 315 99 125 The unit is usually placed on wall hanging shelves ( the leaning point must only be the bottom of the unit). Assemble the unit firmly to a suitable support. BRACKET INSTALLATION BPS S.r.l. supplies an optional, easy-to-install bracket specifically designed for each unit: Throught the 6 fixing openings foreseen on the bearing structure, sign the position of the holding expansion dowels. Do the holes for the dowels. Install the support brackets with expansion screws 10 MA. If the support brackets are built differently, attach the unit as required respecting the proper distance from the wall and please refer to the diagram below. A B 125 BF 25 550 800 650 555 160 BF 35 750 1.000 650 555 170 BF 45 900 1.150 650 555 170 Dimensioni valide per tutte le versioni ( BF-E ; BF-C ; BF-EC ) Dimensions for all versions ( BF-E ; BF-C ; BF-EC ) BF 65 1.050 1.300 700 605 170 Pag. 38 Installazione: Collegamento condotti di aspirazione aria ed evacuazione fumi Installation: Air intake and flue exhaust discharge ducts connections WARNING! The intake and exhaust ducts, including the relative terminals, are considered by the standards to be integral parts of the unit. Therefore, they must be requested from BPS S.r.l., together with the unit. Upon request, BPS can supply rigid pipes, coaxial ducts and terminals, all of approved type. If the ducts and terminals supplied by BPS S.r.l. are not used, use approved ducts according to the type of installation to be made and the following must be taken into consideration: It is recommended to use ducts with a smooth interior surface, the diameter of which should not be less than the exhaust fitting on the unit The duct and terminal material must be suitable for the specific use, in relation to the heat and chemical stress exerted by the combustion products. Connect the ducts to the attachments on the unit and make sure they are properly sealed by using the special fittings: the joints must guarantee an efficient seal and the attachment of various elements must be stable over time. WARNING! The material comprising the external wall crossed by the ducts and any covering must not be sensitive to the heat produced by the flue duct. If not, the passage hole must be protected with insulation that insulates the wall or the covering. The flue should terminate in a freely exposed position and must be situated so as to prevent the combustion products from entering any opening in a building in such a concentration that may be considered a health risk or become a nuisance. WARNING! In solution “Type B23”, the room must be adequately ventilated to ensure the correct amount of combustion air, by means of openings on the sides of the room, with the dimensions and characteristics established by the current safety standards. ATTENZIONE! I condotti di aspirazione ed evacuazione, compresi i relativi terminali, sono considerati dalle norme parti integranti dell’unità. Essi dovranno quindi essere richiesti, unitamente all’unità, alla BPS S.r.l. BPS dispone su ordinazione di tubi rigidi, condotti coassiali e terminali omologati. Nel caso in cui non si utilizzino condotti e terminali forniti dalla BPS S.r.l., utilizzare condotti omologati in funzione del tipo di installazione che si intende effettuare e tenere presente quanto segue: Si raccomanda l’utilizzo di condotti con superficie interna liscia, il cui diametro non deve essere inferiore a quello del raccordo di scarico presente sull’unità. Il materiale del condotto e del terminale deve essere idoneo all’uso, in relazione alle sollecitazioni termiche e chimiche da parte dei prodotti della combustione. Collegare i condotti agli attacchi sull’unità ed assicurarne la tenuta per mezzo degli appositi raccordi: le giunzioni devono garantire la tenuta ed il fissaggio dei diversi elementi deve essere stabile nel tempo. ATTENZIONE! Il materiale costituente la parete esterna attraversata ed il suo eventuale rivestimento non devono essere sensibili al calore prodotto dal condotto di evacuazione fumi. In caso contrario è necessario proteggere il foro di passaggio con una coibentazione che garantisca l’isolamento della parete o del rivestimento. Verificare che il materiale costituente la parete esterna non contenga componenti chimicamente aggressivi per l’alluminio con cui è realizzato il condotto. ATTENZIONE! Nella soluzione “Tipo B23” si dovrà assicurare il corretto apporto di aria comburente, tramite aperture ricavate sulle pareti del locale, nelle dimensioni e con le caratteristiche stabilite dalle vigenti normative di sicurezza. In tutti i casi per i condotti di aspirazione aria ed evacuazione fumi devono essere rispettati i limiti e le prescrizioni delle leggi e normative locali. 2 ÷ 3 cm/m In all the cases outlined above the length of the ducts must always respect the limits described in the local law and norms. Nel caso di installazione di tubi orizzontali di lunghezza superiore ad 1 metro, per evitare che eventuali gocce di condensa raggiungano lo “scambiatore di calore – camera di combustione”, è necessario installare il tubo fumi con una contro pendenza di 2 o 3 cm per ogni metro di lunghezza. Nel caso di installazione di tubi verticali, per evitare che eventuali gocce di condensa raggiungano lo “scambiatore di calore – camera di combustione”, è necessario prevedere sulla base del tubo fumi posto in verticale un elemento a ”T” per la raccolta dell’eventuale condensa (si raccomanda di provvedere allo scarico della eventuale condensa nella parte più bassa). Se il percorso del condotto verticale è esterno all’edificio, si raccomanda di utilizzare tubi coibentati. If horizontal pipes having lengths above 1 metre are installed, the flue pipe must be mounted with a slope of 2 to 3 cm each 1 metre length, to prevent that condense drops entering the unit. If vertical pipes are installed, at the base of the vertically mounted flue pipe a T-shaped piece should be fitted to collect the condense, to prevent any condense drops entering the unit (heat exchanger + combustion chamber) - (it is recommended to drain off any condensate in the lower part). If the vertical duct runs outside the building, it is recommended to use insulated pipes. 2 4 DUCT LENGTH LIMITS The length of the ducts must not exceed the limits as stated in the following drawings, otherwise the resulting load losses might prevent the unit from operating in the right way, making the burner and the unit stop. The relative position of the external terminals must comply in general with what is indicated in the following drawings and in particular with the specific instructions included in the duct kit supplied on request. It should be recalled that: For each 90° elbow an increment of 0,8 m in length should be added. For each T-shaped piece an increment of 1,5 m in length should be added. For each 45° elbow an increment of 0,6 m in length should be added. If the total length of the flue system exceeds 6+6 metres, it is advisable that the local BPS agent is contacted. 1 A LIMITI DELLO SVILUPPO DEI CONDOTTI Lo sviluppo in lunghezza dei condotti deve mantenersi entro i limiti riportati nei disegni seguenti, altrimenti le perdite di carico provocate potrebbero non consentire il corretto funzionamento, con conseguente spegnimento del bruciatore e blocco dell’unità. La posizione relativa dei terminali esterni deve rispettare in generale quanto indicato nei disegni seguenti ed in particolare le specifiche istruzioni incluse nel kit dei condotti forniti a richiesta. Tenere conto che: Per ogni curva a 90°considerare un incremento di lunghezza pari a 0,8 m. Per ogni elemento a ”T” considerare un incremento di lunghezza pari a 1,5 m. Per ogni curva a 45° considerare un incremento di lunghezza pari a 0,6 m. Se la lunghezza totale del sistema tubi supera i 6+6 metri si consiglia di contattare telefonicamente il Servizio Tecnico BPS S.r.l. B C 1 4 5 5 300 TIPO – TYPE : B23 2 3 4 5 3 300 1 1 150 1 TIPO – TYPE : B23 Fori di aerazione (seguire leggi e normative in vigore nel Paese di Installazione) Ventilated holes (please follow the norms and laws in use in the installation country) Testina antivento + terminale antipioggia – Wind-proof top + rain-proof top Terminale antivento - Wind-proof top Tubo scario fumi – Smokes exhaust pipe 80 mm Tubo aspirazione aria comburente – Intake combustion air pipe 80 mm Lunghezza tubi - Pipe length Max mm Min mm A+B 12.000 1.000 C 12.000 1.000 Pag. 39 Installazione: Collegamento condotti di aspirazione aria ed evacuazione fumi Installation: Air intake and flue exhaust discharge ducts connections 2 2 4 3 150 6 300 4 6 500 A 5 B 300 4 D 1 C 1 C 150 3 E F 5 4 5 5 TIPO – TYPE : C13 TIPO – TYPE : C13 TIPO – TYPE : C33 1 TIPO – TYPE : C53 300 1 2 3 4 5 6 Lunghezza tubi Pipe length Max mm Min mm Griglia con ostruzione non superiore a 40 cm2 della superficie totale Grid with obstruction not wider than 40 cm2 of the total area Testina antivento + terminale antipioggia – Wind-proof top + rain-proof top Terminale antivento - Wind-proof top 80 mm Tubo scario fumi – Smokes exhaust pipe 80 mm Tubo aspirazione aria comburente – Intake combustion air pipe Tubo coassiale per aspirazione aria comburente e scarico fumi Coaxial pipe for intake combustion air and smokes exhaust A B A+B C D+E+F 6.000 1.000 6.000 1.000 12.000 1.000 12.000 1.000 12.000 1.000 Versione BF-EC (Installazioni esterne Tipo B23) – BF-EC version (External installations B23 Type) 1 1 1 2 2 B B B 2 A A A 3 3 3 1 B A 3 2 1 B A 3 1 2 3 Testina antivento + terminale antipioggia – Wind-proof top + rain-proof top 80 mm Tubo scario fumi – Smokes exhaust pipe 80 mm Tubo aspirazione aria comburente – Intake combustion air pipe Lunghezza tubi - Pipe length Max mm Min mm A+B 12.000 1.000 2 Pag. 40 Installazione: Allacciamenti aeraulici (solo per versioni BF-C e BF-EC canalizzabili) Installation: Duct connections (only for ductable BF-C and BF-EC versions) Important: it is prohibited to operate the unit if the ventilator funnels are not channelled or protected by a safety net in compliance 98/37/CEE directive and following ones. The ducts must be dimensioned according to the system and airhydraulic characteristics of the unit fans. A miscalculation of ducts would cause loss of power or the possible intervention of devices located in the system. In order to attenuate the noise level to use of air cased ducts is recommended. To avoid the transmission of possible vibrations from the machine to the environment, it is recommended to use an anti-vibration junction between the ventilator funnel and the ducts. Connect the canvas to the unit by screwing it with self-tapping screws to the flange of the unit. Ensure that the duct and the unit are equipotential by means of an earth cable bridging the vibration damping joint. The initial section of the air supply duct should be 2 times longer than the shorter side of the duct; curves, branching or obstructions will affect fan performance. Branching sections should not be inclined at an angle greater than 7°. When installing BF-C and BF-EC ducted versions, it should be recalled that, to perform maintenance, there must be free access to the front of the exchanger which contains the fan and safety control thermostats. Importante: si fa divieto di mettere in funzione l’unità se le bocche dei ventilatori non sono canalizzate o protette con rete antifortunistica secondo direttiva 98/37/CEE e successive. I canali devono essere dimensionati in funzione dell’impianto e delle caratteristiche aerauliche dei ventilatori dell’unità. Un errato calcolo delle canalizzazioni causa perdite di potenza o l’intervento di eventuali dispositivi presenti sull’impianto. Per attenuare il livello di rumorosità si consiglia di utilizzare canali coibentati. Per evitare di trasmettere le eventuali vibrazioni della macchina in ambiente, è consigliato installare un giunto antivibrante fra le bocche ventilanti ed i canali. Il giunto antivibrante si collega avvitandolo lateralmente con viti autoforanti alla flangia dell’unità. Deve essere garantita l’equipotenzialità elettrica fra canale ed unità con un cavo di terra che faccia da ponte sul giunto antivibrante. Si raccomanda che il canale di mandata inizi con un tratto dritto lungo almento 2 volte il lato minore del canale prima di curve, diramazioni ed ostruzioni tipo serrande, per evitare cali nelle prestazioni dell’unità. I tratti divergenti non devono presentare inclinazioni superiori a 7°. Nel caso di installazione delle versioni BF-C e BF-EC canalizzate, tenere presente che, per l’eventuale manutenzione, dovrà risultare accessibile la zona frontale dello scambiatore, sulla quale sono collocati i termostati di comando ventilazione e di sicurezza. C B 140 D 60 60 D B BF 65 1.300 700 950 500 60 140 Dimensioni per attacchi canale (solo per versioni BF-C e BF-EC) Dimensions for duct connections (only for BF-C and BF-EC versions) Taglia - Size BF 25 BF 35 BF 45 A mm 800 1.000 1.150 B mm 650 650 650 C mm 450 650 800 D mm 450 450 450 A 880 500 Installazione: Collegamento linea gas – Installation: Gas supply connections GAS NOTE : Before installing the unit, make sure with the “Gas Supplying Agency” that the maximum gas capacity would be actually available for the unit, and that mains pressure and the kind of gas are compatible with the data stated in our Technical Data Table here above. Connect the gas supply line to the threaded fitting on the unit by using a removable rigid connector. Connections have to be made by means of metal connections in compliance with the installation rules currently in force. It is recommended to mount a manual gas on-off valve along the piping in an easy-to-access position. At the end works check the seal of the gas piping and make sure that it is installed in conformity with the current standards regarding gas plants. The units are supplied with a thread nipple at the gas intake point, this is the ISO 7/1 R1”½ or the ½” G J ISO 228, depending on the country where the unit will be employed. Pay attention not to strain the nipple. NOTE : Prima di installare il generatore, accertarsi presso l’”Azienda del Gas” che la portata massima di gas necessaria all’unità sia disponibile e la pressione della rete ed il tipo di gas siano compatibili con i dati riportati nella tabella delle caratteristiche tecniche. Collegare la linea di alimentazione gas all'attacco filettato presente sull’unità per mezzo di un raccordo rigido smontabile (giunto a 3 pezzi). L'allacciamento deve essere effettuato con collegamenti metallici in accordo alle norme di installazione vigenti. Si raccomanda di montare lungo la tubazione, in posizione facilmente accessibile, un rubinetto d'intercettazione gas manuale. A fine lavoro verificare la tenuta della tubazione gas ed assicurarsi che essa sia stata eseguita in conformità con le normative vigenti sugli impianti a gas. Le unità dispongono all'entrata del gas di un raccordo maschio filettato ISO 7/1 R1”½ o di ½” G J ISO 228 a seconda le paese di destinazione. L'allacciamento deve avvenire senza forzare il raccordo. SCHEMA LINEA METANO (G20 – G25) METHANE (G20 – G25) LINE PLAN Linea - Line G20-G25 1 2 3 5 Bruciatore - Burner SCHEMA LINEA BUTANO (G30) E PROPANO (G31) BUTANE (G30) AND PROPANE (G31) LINE PLAN Linea - Line G30-G31 1 2 3 4 5 Bruciatore - Burner 1/2" Montaggio a cura dell’installatore To be supplied by the installer 1 Rubinetto gas – Gas tap 2 Filtro gas – Gas filter 3 Giunto antivibrante – Vibration-free joint 4 Regolatore di pressione – Pressure adjuster Dispositivi a corredo dell’unità Equipments included in the unit Gruppo bruciatore premiscelato (Elettrovalvola di sicurezza, Filtro gas, Cono Venturi, Turbina) 5 Premixed burner unit (Safety electrovalve, Gas filter, Venturi Cone,High static pressure Turbine) Installazione: Collegamento idraulico (solo per accessorio Plenum PCA con batteria acqua fredda) Installation: Water supply connections (only for optional PCA cooling plenum by chilled water coil) Pag. 41 Effettuare i collegamenti idraulici. La posizione e il diametro degli attacchi idraulici sono riportati nei dati dimensionali di questo bollettino tecnico. Attenzione: Usare sempre chiave e controchiave per l’allacciamento della batteria alle tubazioni. Collegare l’entrata con una valvola a sfera e l’uscita con un detentore ( o installare 2 valvole a sfera). Le batterie di scambio termico per acqua sono collaudate alla pressione di 30 Bar e pertanto sono idonee a funzionare in esercizio sino alla pressione massima di 15 Bar. Nel caso di installazione in zone con climi particolarmente freddi, svuotare l’impianto dall’acqua in previsione di lunghi periodi di fermata dell’impianto. IN MAX 15 BAR Make hydraulic connections. Refer to this technical bulletin dimensional data to find the position and the diameter of water connections side. Attention: Always use a key and second turn to connect the coil to the pipes. Connect the inlet water with a shut off valve and the outlet with a balancing valve (or installed 2 shut off valves). The water coils are tested at a pressure of 30 Bar and therefore they can operate at a maximum pressure of 15 Bar. If the unit is installed in particularly cold rooms, fill out the water tank during long rest periods. OUT Installazione: Scarico condensa (solo per accessorio Plenum PCA con batteria acqua fredda) Installation: Drain pipe (only for optional PCA cooling plenum by chilled water coil) Si consiglia di isolare adeguatamente le tubazioni dell’acqua per evitare gocciolamenti durante il funzionamento in raffreddamento. La rete di scarico condensa deve essere opportunamente dimensionata e le tubazioni posizionate in modo da mantenere lungo il percorso una adeguata pendenza (min. 3%) e non deve presentare tratti ascendenti o strozzature per consentire un regolare deflusso. É opportuno che lo scarico condensa sia sifonato. Lo scarico condensa va collegato alla rete di scarico pluviale. Non utilizzare scarichi di acque bianche o nere (rete fognaria) per evitare possibili aspirazioni di cattivi odori verso gli ambienti nel caso di evaporazione dell’acqua contenuta nel sifone. A fine lavori verificare il regolare deflusso della condensa versando dell’acqua sulla bacinella. Appropriatly insulate water pipes to prevent dripping in cooling mode. Install an appropriate size condensate drainage system and place it to favour the discharge (min 3% slope) and must not have rising parts or stranglings in order to allow a regular downflow. Install a siphon in condensate drainage system. The drain pipe will be connected to an unloading rain network. Do not use white or black water (sewage system) to prevent unpleasant odour return into the room in case of evaporation of the water contained in the siphon. When the works are finished check the regular discharge of the condensation by pouring water on the pan. 3 cm/m La vasca di raccolta condensa è provvista di scarico ij 26 mm. Un sistema di scarico deve prevedere un adeguato sifone per: Permettere il libero scarico della condensa. Prevenire l’indesiderata entrata d’aria nei sistemi in depressione. Prevenire l’indesiderata uscita d’aria nei sistemi in pressione. Prevenire l’infiltrarsi di odori o insetti. NOTA: Il sifone deve essere dotato di tappo per la pulizia nella parte bassa o deve comunque permettere un veloce smontaggio per la pulizia. Di seguito si danno le regole da seguire per il dimensionamento e l’esecuzione dei sifoni. The drain pan is provided with a drain pipe ij 26 mm. The drainage system should feature an adequately sized siphon to: Ensure free condensate drainage. Prevent the inadvertent entry of air into the circuit under negative pressure. Prevent the inadvertent leakage of air from the pressurised circuit. Prevent the entry of unpleasant odours and insects. NOTE: The siphon should have a plug to facilitate cleaning of the lower section, and be easy to disassemble. Follow the indications below for design the siphon. P= P= Pressione Negativa Negative Pressure Pressione Positiva Positive Pressure Bacinella raccoglicondensa - Drain pan Dove P è la pressione espressa in mm di colonna d’acqua (1 mm c.a. = 9.81 Pa) Where P is pressure expressed in mm of water gauge (1 mm c.a. = 9.81 Pa) H1 (mm) = 20 min H2 (mm) = P + 30 min H3 (mm) = H1 + H2 = P + 50 min Dove P è la pressione espressa in mm di colonna d’acqua (1 mm c.a. = 9.81 Pa) Where P is pressure expressed in mm of water gauge (1 mm c.a. = 9.81 Pa) H1 Pressione positiva Positive pressure H3 H3 H2 H1 (mm) = P + 30 min H2 (mm) = H1 = P + 30 min H3 (mm) = H1 + H2 = 2P + 60 min H1 Pressione negativa Negative pressure H2 Bacinella raccoglicondensa - Drain pan Pag. 42 Installazione: Collegamento elettrico - Installation: Electrical connections ATTENZIONE: prima di effettuare qualsiasi intervento, assicurarsi che l’alimentazione elettrica sia disinserita. ATTENZIONE: i collegamenti elettrici, l’installazione dell’unità e dei suoi accessori devono essere eseguiti solo da personale specializzato. Tenere presente che modifiche elettriche, meccaniche e manomissioni in genere fanno decadere la garanzia. CAUTION: make sure that electrical power to the unit is turned off before making any electrical connection. CAUTION: wiring connections, unit installation and all accessories have to be made only by specialised installers. Please do not forget that warranty cannot be applied in case of electric, mechanical and other general modifications. UNITÀ COSTRUITA IN CONFORMITÀ ALLA DIRETTIVA CEE 73/23: Osservare le norme di sicurezza vigenti nel paese di installazione. Verificare che le caratteristiche della rete elettrica siano conformi ai dati di targa dell’unità. Alimentazione elettrica unità e comandi remoti: Verificare che la rete sia monofase 230V / 1Ph / 50Hz e che la tensione di alimentazione rientri nei limiti Vmin >195 ÷ Vmax <265. Il funzionamento dell’unità con tensioni non comprese nei limiti suddetti fa decadere la garanzia. Assicurarsi che l’impianto elettrico sia in grado ad erogare oltre alla corrente di esercizio richiesta dall’unità anche la corrente necessaria per alimentare elettrodomestici ed unità già in uso. UNIT MANUFACTURED ACCORDING WITH CEE 73/23 STANDARD: Compliance with the safety norms/laws applied in the country where the unit is installed. Make sure that the technical data concerning the network meet the data indicated on the identification unit label. Unit and remote control power supply: Check that the line is singlephase 230V / 1Ph / 50Hz and that the voltage remains within the limits Vmin >195 ÷ Vmax <265. The work of the unit with voltages that are not within the above mentioned limits makes the guarantee unvalid. Make sure that the electrical plant is able to supply in addition to the working current required by the unit also the current required to supply the domestic units already in use. VERIFICARE IL COLLEGAMENTO DELLA MESSA A TERRA: La sicurezza elettrica dell’unità è raggiunta soltanto quando la stessa è correttamente collegata ad un efficace impianto di messa a terra, eseguito come previsto dalle vigenti norme di sicurezza. Non utilizzare i tubi gas come messa a terra di unità elettriche. Al momento del collegamento, il cavo di terra sia più lungo di quelli sotto tensione. Sarà l’ultimo cavo a strapparsi in caso venga accidentalmente tirato il cavo di alimentazione e rimarrà quindi assicurata una buona continuità di terra. CHECK THE EARTHING: The electrical safety of the unit is attained only when the unit itself is correctly connected and efficiently earthed according to the existing safety standards. Do not use gas tubes to earth electrical units. When connecting, ensure that the earth wire is longer than the live wires, so that it will be the last wire to break if the supply cable is stretched, thus ensuring a good earth continuity. CARATTERISTICHE DEI CAVI DI COLLEGAMENTO: Eseguire il collegamento dell’unità e di tutti i suoi accessori con cavi di sezione adeguata alla potenza impegnata e nel rispetto delle normative locali. La loro dimensione deve comunque essere sufficiente per realizzare una caduta di tensione in fase di avviamento inferiore al 3% di quella nominale. Usare cavi tipo H05 VVF 3x1,5 mm2 , con diametro esterno massimo di 8,4 mm , con isolamento 300/500 V incassati in tubo o canalina. Tutti i cavi devono essere incassati in tubo o canalina finchè non sono all’interno della morsettiera dell’unità. I cavi all’uscita dal tubo o canalina devono essere posizionati in modo da non subire sollecitazioni a trazione o torsione e comunque protetti da agenti esterni. Cavi a trefolo possono essere usati solo con capicorda. Assicurarsi che i trefoli dei fili siano ben inseriti. CONNECTION CABLES SPECIFICATIONS: Carry out all unit connections using cables of adeguate dimensions for the power used in accordance with the local laws in force. Their dimensions must be of such dimensions to cause a phase voltage drop of less 3% of the nominal voltage. Use wire type H05 VVF 3x1 mm2 with a maximum external diameter of 8,4 mm , .insulated cables with 300/500 V, piped or ducted. All cables have to be piped or ducted until they are not placed inside the terminal board of the unit. The cables coming out of the pipe/duct have not to be subjected to stretch or twist. They must be protected from weathering. Stranded cables shall only be used in connection with terminating sleeves. Make sure that all individual cables are correctly inserted in the sleeve. COLLEGAMENTO ELETTRICO: Effettuare l’allacciamento elettrico secondo lo schema elettrico di montaggio. Tutti gli schemi elettrici sono soggetti ad aggiornamento: è opportuno fare riferimento allo schema elettrico allegato all’unità. Per l’alimentazione generale dell’unità non è consentito l’uso di adattatori, prese multiple e/o prolunghe. É dovere dell’installatore prevedere il montaggio il più vicino possibile all’unità del sezionatore dell’alimentazione elettrica !! Per proteggere l’unità contro i cortocircuiti, l’unità dovrà essere collegata alla linea di alimentazione elettrica mediante un appropriato interruttore omnipolare magnetotermico con apertura minima dei contatti di 3 mm (per la scelta dell’interruttore più adatto, vedi tabella assorbimenti elettrici). Si definisce interruttore omnipolare quello con possibilità di apertura sia sulla fase che sul neutro. Questo significa che alla sua apertura entrambi i contatti risultano aperti. L’interruttore omnipolare o la eventuale spina (collegamento per mezzo di cavo e spina ) devono essere posizionati in luoghi accessibili. ELECTRICAL CONNECTIONS: Carry out the electrical connections according to the installation wiring diagram. All wiring diagrams are subjected to updatings: we suggest to make reference to the wiring diagram included in every unit. The use of adapters, multi-plugs and/or extension cords is not permitted for unit main power supply. It is the installer’s responsibility to install the unit as close as possible to the general power switch !! To prevent short circuits, the unit should be connected to the electric supply line by means of an omnipolar magnetothermic switch with a minimum contact opening of 3 mm (see electrical absorbing schedule to chose the right switch). An omnipolar switch is a '’Double pole isolating switch’’, i.e. a switch capable of disconnecting both on phase and neutral. This means that when the switch is opened, both contacts are disconnected. The omnipolar switch or the plug (connection by means of cable and plug) must be mounted in places easy to reach. ATTENZIONE ! E' indispensabile il corretto collegamento “Fase – Neutro”. Il mancato rispetto della polarità comporta il blocco dell'apparecchiatura ! WARNING ! The “ Neuter-Phase” connection must be absolutely correct. Any failure to observe the polarity might cause the blockage of the unit ! ATTENZIONE ! In presenza di rete fase – fase (alimentazione elettrica 230V – 3 Ph), con elevati valori di capacità passiva o con gravi difetti di isolamento fra i conduttori della linea e la terra, per garantire un funzionamento sicuro è necessario ricorrere all'impiego di un trasformatore d'isolamento. In tal caso rivolgersi al servizio assistenza. WARNING ! With a phase-phase net (power supply 230V – 3Ph), involving high values of passive capacity or serious insulating faults between line and earth wire: in order to guarantee the safe working, we recommend to employ an insulating transformer. To this end please contact the service centre nearest to you. Installazione: Collegamento elettrico - Installation: Electrical connections Pag. 43 ALLACCIAMENTO CON SPINA A 6 POLI (STANDARD: Morsettiera “Plug 6 poli”) L’unità standard è provvista di una spina a 6 poli (SE1) idonea per il collegamento ai seguenti dispositivi remoti (componenti da installare a cura del cliente): Interruttore generale magnetotermico ( *IMT ) + Termostato ambiente ( *TA ) + Lampada di blocco ( *LB ). È consigliabile l’installazione di un termostato ambiente ( *TA ) collegandolo all’unità secondo lo schema elettrico di montaggio. Si raccomanda di posizionare il termostato (o l’elemento sensibile di questo) a circa 1,5 m dal pavimento, al riparo da correnti d’aria, esposizione diretta ai raggi di sole, influenza da fonti di riscaldamento diretto (lampade, flussi d’aria calda dell’unità stessa ecc.) e possibilmente NON su pareti confinanti con l’esterno, per non falsare la temperatura rilevata e quindi il funzionamento dell’impianto. Si eviteranno così avviamenti ed arresti dell’impianto non voluti e si garantirà un ottimale comfort nell’ambiente. L'allacciamento deve avvenire mediante cavo del tipo H05 VV-F a 6 poli (sezione 1,5 mm2). Il collegamento deve avvenire sull’apposita spina (SE1) posta sul pannello posteriore dell’unità rispettando scrupolosamente lo schema elettrico e la stampigliatura posta all’interno della spina. CONNECTION WITH 6 POLE PLUG (STANDARD: Terminal board “6 pole Plug”) The standard unit is provided with 6 pole plug (SE1) suitable to remote connections with the follow components (equipments to be installed by the customer) : General magnetothermic switch ( *IMT ) + Room thermostat ( * TA ) + Blockage spy light ( *LB ). It is recommended to install a room thermostat ( *TA ) connected to the unit according to the installation wiring diagram . It is recommended to place the sensor at about 1.5 m from the floor, protected against air draughts, direct exposure to sun rays and direct heat sources (lamps, hot air flows from the unit itself, etc.). If possible, DO NOT place the thermostat on walls bordering the outside, to avoid false temperature readings and therefore system operation. If the room thermostat is properly installed, unwanted starting and stopping of the system will be avoided and adequate room comfort will thus be ensured. Connection must be made by means of a “H05 VV-F” cable, 6 poles, (section 1,5 mm2). Connect through the proper plug (SE1), the one on the rear panel, strictly attaining to the wiring diagram and the lettering printed inside the plug. ALLACCIAMENTO CON SPINA A 6+3 POLI (ACCESSORIO: Morsettiera “Plug 6+3 poli”) In alternativa alla spina 6 poli (SE1) può essere richiesta la spina 6+3 poli (SE1+SE2 disponibile come accessorio). La spina 6+3 poli è idonea per il collegamento ai seguenti dispositivi remoti (componenti da installare a cura del cliente): Interruttore generale magnetotermico (*IMT) + Termostato ambiente (*TA) + Pulsante di sblocco luminoso (*PSL) + Deviatore ventilazione estiva (*DV). In alternativa a questi dispositivi può essere installato il comando remoto QUA-1 (accessorio). Il collegamento a questi dispositivi remoti (o all’accessorio comando remoto QUA-1) deve avvenire mediante cavo del tipo H05 VV-F a 6+3 poli (sezione 1,5 mm2). Il collegamento deve avvenire sull’apposita spina (accessorio: Spina 6+3 poli SE1+SE2 per predisposizione per comando remoto) posta sul pannello posteriore dell’unità rispettando scrupolosamente lo schema elettrico e la stampigliatura posta all’interno della spina. CONNECTION WITH 6+3 POLE PLUG (OPTIONAL: Terminal board “6+3 pole Plug”) As alternative to the 6 pole plug (SE1), the customer can request a 6+3 pole plug (SE1+SE2 available as optional). The 6+3 pole plug is suitable to remote connections with the follow components (equipments to be installed by the customer) : General magneto-thermal switch (*IMT) + Room thermostat (*TA) + Blockage clearing light switch (*PSL) + Summer ventilation switch (*DV). As alternative to these equipments, can be installed a remote control QUA-1(optional). The connection with these remote equipments (or remote control QUA-1, optional) must be made by means of a “H05 VV-F” cable, 6+3 poles (section 1,5 mm2). Connect through the proper plug (optional: plug 6+3 poles SE1+SE2 set for remote control), the one on the rear panel, strictly attaining to the wiring diagram and the lettering printed inside the plug. Ph N T1 T2 S3 = = = = = = Spina a 6 poli (SE1) : Collegamento terra obbligatorio (filo giallo - verde) Collegamento alla fase attiva Collegamento a fase neutro Collegamento al termostato ambiente Collegamento al termostato ambiente Collegamento alla lampada di blocco (fase attiva) Spina a 3 poli (SE2) : T 1 = Collegamento al pulsante di sblocco NA T 2 = Collegamento al pulsante di sblocco comune S 3 = Collegamento interruttore oppure commutatore ventilazione estiva DISPOSITIVI A CORREDO DELL’UNITÁ 6 Pole plug (SE1) : Compulsory earth connection (yellow-green wire) Active phase connection Neuter phase connection Room thermostat connection Room thermostat connection Blockage spy light connection (active phase) 3 Pole plug (SE2) : T 1 = Connection to the NA releasing key T 2 = Connection to the mutual releasing key S 3 = Connection to the switch or commutator for the summer ventilation - EQUIPMENTS INCLUDED IN THE UNIT F Fusibile 5x20T 3.15A (per versione BF-E) Fusibile 5x20T 6.3A (per versioni BF-C e BF-EC) Fuse 5x20 T 3.15A (for BF-E version) Fuse 5x20T 6.3 A (for BF-C and BF-EC versions) MC1 Motore ventilatore 1 - Fan motor 1 MC2 Motore ventilatore 2 (solo per modelli BF 45 - BF 65 - tutte le versioni) Fan motor 2 (only for BF 45 - BF 65 models - all versions) TM Termostato di “Massima” (Termostato di Sicurezza) “Maximum” thermostat (= Safety thermostat) TL Termostato “Limit” – “Limit” thermostat TF Termostato “Fan” – “Fan” thermostat TMN Termostato comando potenza MAX-min del bruciatore bistadio MAX-min capacity of the 2-stage burner control thermostat LF Lampada di funzionamento (verde) - Working spy light (green) LB = Ph = N = T1 = T2 = S3 = Lampada di blocco (rossa) - Blockage spy light (red) MV Morsettiera ventilatore - Fan terminal board MI Morsettiera interna - Inside terminal board SE1 EV EI Spina esterna (Morsettiera “Plug 6 poli” esterna per collegamento elettrico) Outer plug (External terminal board “6 pole Plug” for electrical connections) Elettrovalvola gas - Gas electrovalve Elettrodo di ionizzazione - Ionisation electrode EA Elettrodo di accensione - Starting electrode BR Bruciatore premiscelato - Premix burner VB Turbina ad alta prevalenza (ventilatore combustione) High static pressure Turbine (combustion fan) SCM Scheda elettronica di premiscelazione – Pre-mix electronic card PSL Pulsante sblocco luminoso - Blockage clearing light switch ACCESSORI - ACCESSORIES SE2 QUA-1 Spina esterna (Morsettiera “Plug 3 poli” esterna per collegamento elettrico) - Outer plug (External terminal board “3 pole Plug” for electrical connections) Comando remoto con Reset e Termostato elettronico – Remote control with Reset and Electronic thermostat * ESTERNO = DISPOSITIVI DA INSTALLARE A CURA DEL CLIENTE - COMPONENTI NON FORNITI (O FORNITI SOLO SU RICHIESTA) * OUTSIDE = EQUIPMENTS TO BE INSTALLED BY THE CUSTOMER - EQUIPMENTS NOT SUPPLIED (OR SUPPLIED ONLY ON REQUEST) *IMT Interruttore magnetotermico generale (230V – 2 contatti: Fase,Neutro) General magnetothermic switch (230V – 2 contacts: Phase, Neutral) *TA Termostato ambiente - Room thermostat *LB Lampada di blocco (rossa) - Blockage spy light (red) *PSL Pulsante sblocco luminoso - Blockage clearing light switch *DV Deviatore ventilazione estiva - Summer ventilation switch Pag. 44 Installazione: Collegamento elettrico - Installation: Electrical connections Schema elettrico modelli BF 25 - BF 35 con Spina a 6 Poli (STANDARD: Morsettiera “Plug 6 poli”) Wiring diagram models BF 25 - BF 35 with 6 Pole Plug (STANDARD: Terminal board “6 pole Plug”) Schema elettrico modelli BF 25 - BF 35 con Spina a 6+3 Poli (ACCESSORIO: Morsettiera “Plug 6+3 poli”) Wiring diagram models BF 25 - BF 35 with 6+3 Pole Plug (OPTIONAL: Terminal board “6+3 pole Plug”) Installazione: Collegamento elettrico - Installation: Electrical connections Schema elettrico modelli BF 45 - BF 65 con Spina a 6 Poli (STANDARD: Morsettiera “Plug 6 poli”) Wiring diagram models BF 45 - BF 65 with 6 Pole Plug (STANDARD: Terminal board “6 pole Plug”) Schema elettrico modelli BF 45 - BF 65 con Spina a 6+3 Poli (ACCESSORIO: Morsettiera “Plug 6+3 poli”) Wiring diagram models BF 45 - BF 65 with 6+3 Pole Plug (OPTIONAL: Terminal board “6+3 pole Plug”) Pag. 45 Pag. 46 INSTALLAZIONE E COLLEGAMENTO AL COMANDO REMOTO QUA-1 (ACCESSORIO) Quando l’unità è provvista di morsettiera “Plug 6+3 poli” SE1+SE2 (accessorio) può essere installato il comando remoto QUA-1 (altro accessorio). Essendo il quadro comando remoto QUA-1 completo di termostato ambiente, si raccomanda di posizionarlo a circa 1,5 m dal pavimento, al riparo da correnti d’aria, esposizione diretta ai raggi di sole, influenza da fonti di riscaldamento diretto (lampade, flussi d’aria calda dell’unità stessa ecc.) e possibilmente NON su pareti confinanti con l’esterno, per non falsare la temperatura rilevata e quindi il funzionamento dell’impianto. Si eviteranno così avviamenti ed arresti dell’impianto non voluti e si garantirà un ottimale comfort nell’ambiente. Il luogo di montaggio del comando remoto QUA-1 deve essere scelto in modo che i limiti di temperatura ed umidità ambiente massimo e minimo vengano rispettati (-5 ÷ +40°C ; < 90% U.R.). Il comando remoto QUA-1 non può essere montato su una parete metallica, salvo che questa sia collegata alla presa di terra in modo permanente. Ogni comando remoto QUA-1 può controllare una sola unità. Installazione: Collegamento elettrico - Installation: Electrical connections Esempio collegamento QUA-1 con unità mod. BF 45 - BF 65 Example connection QUA-1 with unit mod. BF 45 - BF 65 Per l’installazione del comando remoto con pulsante di reset QUA-1 procedere come segue: Togliere tensione. Fissare la scatola comandi nella posizione desiderata con viti ad espansione. Predisporre quindi il cavo 6+3 poli (sezione 1,5 mm2) di lunghezza adeguata. Collegare i cavi al comando remoto QUA-1. Collegare i cavi alla morsettiera predisposta all’interno dell’unità seguendo le indicazioni riportate sullo schema elettrico di montaggio. Ridare tensione. Accendere l’unità. Controllare quindi che, togliendo il gas, dopo qualche secondo si illumini la spia di blocco sulla scatola comandi. Controllare poi che riaprendo il gas e premendo il pulsante di reset la spia si spenga e l’unità si riavvii. QUA-1 Comando Remoto Remote Control 4 5 3 6 8 7 N INSTALLATION & CONNECTION OF THE REMOTE CONTROL QUA-1 (OPTIONAL) When “6+3 pole Plug” terminal board SE1+SE2 (optional) is mounted in the unit, can be installed a remote control QUA-1 (another optional). As the remote control QUA-1 is provided with room thermostat, it has recommended to be installed at about 1,5 m from the floor, protected against air draughts, direct exposure to sun rays and direct heat sources (lamps, hot air flows from the unit itself, etc.). If possible, DO NOT place the thermostat on walls bordering the outside, to avoid false temperature readings and therefore system operation. If the room thermostat is properly installed, unwanted starting and stopping of the system will be avoided and adequate room comfort will thus be ensured. For installation of remote control QUA-1 choose an area where the max and min. room temperature and humidity limits are respected (-5 ÷ +45°C ; < 90% U.R.). Do not install the remote control QUA-1 on metallic walls, if the metallic wall is not permanently earthed. Each remote control QUA-1 can control a single unit. To install the remote control with reset button QUA-1 proceed as follows: Isolate the unit from power supply. Secure the control box in the desired location using expansion bolts. Prepare an adequate length of cable with 6+3 poles (section 1,5 mm2 ). Connect the remote control QUA-1 to the cable. Connect the cables of the terminal board inside the unit following the indications given in the installation diagram. Start the unit. Check that, when the gas supply is cut off, the lock out warning light on the control box lights up. Then check that the unit restarts and the light goes out when gas is supplied and the reset button is pushed. DISPOSITIVI A CORREDO DELL’UNITÁ EQUIPMENTS INCLUDED IN THE UNIT F Fusibile 5x20T 3.15A (per versione BF-E) - Fusibile 5x20T 6.3A (per versioni BF-C e BF-EC) Fuse 5x20 T 3.15A (for BF-E version) - Fuse 5x20T 6.3 A (for BF-C and BF-EC versions) MC1 Motore ventilatore 1 - Fan motor 1 MC2 Motore ventilatore 2 (solo per modelli BF 45 – BF 65 – tutte le versioni) Fan motor 2 (only for BF 45 – BF 65 models – all versions) TM Termostato di “Massima” (Term. Di Sicurezza) – “Maximum” thermostat (= Safety therm.) TL Termostato “Limit” – “Limit” thermostat TF Termostato “Fan” – “Fan” thermostat TMN Term. comando potenza MAX-min bruciatore - MAX-min capacity 2-stage burner therm. LF Lampada di funzionamento (verde) - Working spy light (green) LB Lampada di blocco (rossa) - Blockage spy light (red) MV Morsettiera ventilatore - Fan terminal board MI Morsettiera interna - Inside terminal board SE1 Spina esterna (Morsettiera “Plug 6 poli” esterna per collegamento elettrico) Outer plug (External terminal board “6 pole Plug” for electrical connections) SE2 Spina esterna (Morsettiera “Plug 3 poli” esterna per collegamento elettrico - Accessorio) Outer plug (External terminal board “3 pole Plug” for electrical connections - Optional) EV EI Elettrovalvola gas - Gas electrovalve Elettrodo di ionizzazione - Ionisation electrode EA Elettrodo di accensione - Starting electrode BR Bruciatore premiscelato - Premix burner VB Turbina ad alta prevalenza (ventil. combust.) – High static pressure Turbine (combustion fan) SCM Scheda elettronica di premiscelazione 2 stadi – 2-stages Pre-mix electronic card PSL Pulsante sblocco luminoso - Blockage clearing light switch QUA-1 Comando remoto (Accessorio) – Remote Control (Optional) * ESTERNO = DISPOSITIVI DA INSTALLARE A CURA DEL CLIENTE * OUTSIDE = EQUIPMENTS TO BE INSTALLED BY THE CUSTOMER *IMT Interruttore magnetotermico generale – General magnetothermic switch Informazioni per l’installatore: Scheda elettronica di premiscelazione 2 stadi Honeywell W4115B1564 Pag. 47 Information to installer: Premix Electronic card 2 stages Honeywell mod. W4115B1564 Questo sistema di regolazione è stato progettato per il controllo bistadio della potenzialità di una unità a gas equipaggiata con gruppo di combustione premiscelato aria/gas ed una turbina ad alta prevalenza di combustione con motore in corrente continua 230 V rettificato. Il circuito di regolazione mantiene la velocità di rotazione della turbina stabile in tutte le condizioni di esercizio su due valori MAX/min, impostati tramite due regolazioni indipendenti. La commutazione tra il regime di velocità min (bassa potenzialità) e quello MAX (alta potenzialità), è ottenuta tramite la chiusura di un termostato. E’ disponibile inoltre un sistema di lenta partenza regolabile e temporizzato che garantisce in tutte le condizioni l’accensione ottimale del bruciatore. X1 J3 This special adjusting system was planned in order to have a 2-stage control on the performance of a gas unit provided with a premixed air/gas combustion group and a combustion high static pressure turbine the rectified engine of which works on 230 V direct current. The adjusting circuit keeps unchanged the rotating speed of the turbine, under all working conditions, on two MAX/min values, to be selected by two separate controls. The speed can be changed from the min (low performance) to the MAX (high performance) by locking a thermostat. Furthermore, a special adjustable slow-start system is available, being timer-controlled so to grant the most appropriate start of the burner under all conditions. Pmax X1(3-4) Alimentazione – Feeding X1 (1-2) Alimentazione scheda - Card feeding X3 (1-2) Modulazione min/MAX - min/MAX modulation X3 (4-5) Termostato ambiente - Room thermostat Pmin X4 (1-2) Alimentazione controllo fiamma Flame check feeding X4 (5-6) Alimentazione ventilatore - Fan feeding X5 (2-3) Segnali misura velocità - Speed measuring signals Pisg X6 (1-2-3-4) Segnale di modulazione - Modulation signal J3 Pmax Jumper di lenta accensione - Slow start jumper Trimmer potenza massima Maximum power trimmer Pmin Trimmer potenza minima Minimum power trimmer Pisg Trimmer soglia di partenza – Starting trimmer X3 X4 X5 X6 ATTENZIONE ! QUALSIASI REGOLAZIONE AI TRIMMER SULLA SCHEDA DI MODULAZIONE DEVE ESSERE ESEGUITA CON CACCIAVITI DI PLASTICA O DI CERAMICA E’ ASSOLUTAMENTE VIETATO L’UTILIZZO DI CACCIAVITI CON PUNTE METALLICHE. WARNING ! MAKE ADJUSTMENTS ON TRIMMERS ON THE MODULATION CARD EXCLUSIVELY BY MEANS OF PLASTIC OR CERAMICS SCREWDRIVERS! NEVER USE METAL-END SCREWDRIVERS! FUNZIONAMENTO La scheda prevede 3 trimmer per l’impostazione del regime di velocità della Turbina ad alta prevalenza in fase di accensione (“Pisg”), in bassa potenza (“Pmin”) ed in alta potenza (“Pmax”). WORKING The card has 3 trimmers to set the High static pressure turbine speed system when at start (“Pisg”), or low power (“Pmin”) or high power (“Pmax”). GRADINO DI PARTENZA Ad ogni accensione la Turbina ad alta prevalenza è mantenuta al valore impostato “Pisg” per circa 8 sec a partire dall’effettiva apertura della valvola gas. Trascorsi gli 8 sec, il regime di velocità è controllato “Pmax” o “Pmin”. in base allo stato del contatto Alta/Bassa. Questa funzione garantisce l’accensione del bruciatore alla potenzialità ottimale in tutte le condizioni di avviamento. START-OFF STEP At every start, the High static pressure turbine stays on the pre-set “Pisg” figure for about 8 seconds after the real opening of the gas valve. After this time, the speed range is “Pmax” or “Pmin” controlled, depending on the High/Low contact rank. This task grants always the most suitable start to the burner, at the most suitable power degree, under all conditions. TARATURA GRADINO DI PARTENZA (“Pisg”) Per la taratura del gradino di partenza, seguire la seguente procedura : Togliere tensione all’unità. Inserire il ponticello “J3”. Dare tensione all’unità. In questo modo viene disattivato il timer di accensione (8 sec), consentendo la precisa taratura della “Pisg”. Agire sul trimmer “Pisg” per impostare il numero di giri desiderato (il range del “Pisg” è regolabile da 600 giri/min (+/-25 %) al valore massimo di “Pmax”). Togliere il ponticello “J3”. Verificare la taratura con un ciclo di accensione completo. START-OFF STEP ADJUSTING (“Pisg”) To adjust the start-off step, follow the procedure as indicated below: Disconnect the unit. Introduce the small “J3” bridge. Connect the unit. In this way, you’re deactivating the starting timer (8 seconds) and allowing the “Pisg” correct adjusting position. Now set the number of revolutions you require on the “Pisg” trimmer (The “Pisg” range is adjustable from 600 rpm (+/-25 %) to the maximum “Pmax” value). Remove the little “J3” bridge. Check the adjustment you just made by a thorough starting cycle. POTENZIALITA’ MINIMA (“Pmin”) In questo modo di funzionamento, il contatto Alta/Bassa deve essere aperto. Trascorsi gli 8 sec dall’accensione del bruciatore, è possibile regolare la potenzialità minima agendo sul trimmer “Pmin” nel campo 600 giri/min (+/-25%) y 3.600 giri/min (+/-10%). MINIMUM PERFORMANCE (“Pmin”) Working this way, the High/Low contact must stay open. 8 seconds after burner’s start, it will be possible to adjust the minimum power on the trimmer “Pmin” on the 600 rpm field (+/-25 %) y 3.600 rpm (+/-10 %). POTENZIALITA’ MASSIMA (“Pmax”) In questo modo di funzionamento, il contatto Alta/Bassa deve essere chiuso. Trascorsi gli 8sec dall’accensione del bruciatore, è possibile regolare la potenzialità massima agendo sul trimmer “Pmax” nel campo 2.300 giri/min (+/-15%) y 4.800 giri/min (+/-10%). MAXIMUM PERFORMANCE (“Pmax”) Working this way, the High/Low contact must stay open. 8 seconds after burner’s start, it will be possible to adjust the minimum power on the trimmer “Pmax” on the 2.300 rpm field (+/-15 %)y 4.800 rpm (+/-10 %). MISURA DEL NUMERO DI GIRI Tramite il connettore “X5” è possibile effettuare la misura del numero di giri impostato tramite un Voltmetro. Collegando un Voltmetro DC (fondo scala 10 V) tra i terminali “2” e “3” del connettore “X5”, è possibile calcolare la velocità di lavoro in quel determinato momento applicando la formula: Velocità giri/minuto = Volt x 1.000 HOW TO DETERMINE THE NUMBER OF REVOLUTIONS By a voltmeter, it is possible to determine the number of revolutions set. By connecting a DC Voltmeter (range 10 V) between the terminal ends “2” and “3” in the “X5” connector, it is possible to calculate the working speed in that very moment by using the following parameter: Speed RPM = Volt x 1.000 Pag. 48 Informazioni per l’installatore: Elettrovalvola gas Honeywell mod. VK4115 Information to installer: Gas electrovalve Honeywell mod. VK4115 Valvola multifunzionale di sicurezza con integrato il regolatore aria/gas pretarato con rapporto 1:1. NOTA : LA VALVOLA NON NECESSITA DI NESSUNA REGOLAZIONE. La variazione di portata è ottenuta cambiando la quantità di flusso dell’aria, il flusso del gas seguirà il flusso dell’aria secondo il rapporto stabilito. Multitask safety valve including an air/gas control device inside, which is pre-set as per the ratio: 1:1. PLEASE NOTE: THIS VALVE DOESN’T NEED TO BE ADJUSTED. The output modification can be achieved by changing the airflow quantity. The gas flow will follow the airflow, according to the pre-set ratio. Informazioni per l’installatore: Apparecchiatura di comando-controllo Honeywell mod. S4565C Information to installer: Control board Honeywell mod. S4565C E’ del tipo elettronico con circuiti di rilevazione fiamma ad ionizzazione e con accensione a scarica capacitiva. L’apparecchiatura controlla tutte le funzioni del generatore d’aria calda (ad eccezione della ventilazione): determina il tempo di prelavaggio della camera di combustione; comanda il gruppo elettrovalvola gas; determina l’accensione del bruciatore; in caso di anomalie sulle funzioni comandate, l’apparecchiatura va in blocco, interrompendo l’erogazione del gas e tutte le funzioni; il ripristino può avvenire solo manualmente, premendo il pulsante luminoso rosso posto all’interno del vano bruciatore (o premendo il tasto “Reset” sull’accessorio quadro comando remoto QUA-1). This is an electronic control board, with flame intercepting ionisation circuits and capacity spark ignition. This kind of board controls all the gas-fired air heaters tasks (excepting ventilation): it controls the pre-washing time in the combustion chamber; it controls the gas electrovalve; it runs the burner’s start; in case of failure in any of the required operations, the control board gets blocked, it breaks gas feeding and all functions; the electronic board can be reset only by hand, by pushing the red light key inside the burner’s housing (or pushing the “Reset” button in the optional remote control QUA-1). Informazioni per l’installatore: Cono di Venturi per la miscela aria-gas Honeywell Information to installer: Air-gas mixing Venturi cone Honeywell Viene posizionato nel lato aspirazione della Turbina ad alta prevalenza, permettendo così una miscela ottimale aria/gas con rapporto costante. Il cono Venturi è formato da due camere separate concentriche. La quantità di gas utilizzata viene ottenuta regolando la vite “A” posta a fianco del cono; avvitando si diminuisce l’afflusso del gas al cono e svitando si aumenta. NOTA : LA REGOLAZIONE DELLA VITE VIENE ESEGUITA IN FABBRICA. A Elenchiamo la codifica dei coni di miscelazione in base al loro utilizzo: • BF 25 = Honeywell cod. 052 • BF 45 = Honeywell cod. 001 • BF 35 = Honeywell cod. 052 • BF 65 = Honeywell cod. 051 This is placed on the suction side of the High static pressure turbine , by so enabling a perfect air/gas mixing bearing a constant ratio. The Venturi cone consists in two separate concentric chambers. The gas quantity used is achieved by adjusting the “A” screw placed on the cone side: by screwing and unscrewing it, the gas flow decreases or increases. PLEASE NOTE: THE SCREW IS ADJUSTED BEFORE LEAVING THE FACTORY. Here below please note the mixing cones code numbers depending on the application: • BF 25 = Honeywell cod. 052 • BF 45 = Honeywell cod. 001 • BF 35 = Honeywell cod. 052 • BF 65 = Honeywell cod. 051 Informazioni per l’installatore: Turbina ad alta prevalenza EBM mod. G1G126 Information to installer: High static pressure turbine EBM mod. G1G126 Turbina ad alta prevalenza = Elettroventilatore 230 V specifico per bruciatori premiscelati con possibilità di regolazione dei giri della turbina tramite scheda elettronica di premiscelazione bruciatori 2 stadi Honeywell mod. W4115B1564. Regolazione dei giri tramite corrente continua a 24V. High static pressure turbine = 230 V electric fan most suitable for premixed burners. By the Honeywell mod. W4115B1564 premix 2 stages burner electronic card, you can select the number of revolutions of the turbine. Revolutions adjusted by 24V direct current. Pag. 49 Installazione: Regolazione gruppo bruciatore – Installation: Burner unit adjustment Controllare che esista una adeguata fornitura di gas e rete di distribuzione (Vedi tabella “Pressioni alimentazione gas” - pag.17). In particolare se l’unità è alimentato con: Gas naturale METANO G20 Assicurarsi che la pressione della rete di alimentazione gas, con unità funzionante, sia regolata sul valore di 20 mbar (tolleranza ammessa dall’unità: ± 2 mbar). Gas naturale METANO G25 Assicurarsi che la pressione della rete di alimentazione gas, con unità funzionante, sia regolata sul valore di 20 o 25 mbar a seconda del paese di utilizzo (tolleranza ammessa dall’unità: ± 2 mbar). G.P.L. BUTANO G30 È indispensabile montare un riduttore di pressione di primo salto in prossimità del serbatoio di gas liquido per ridurre la pressione a 1,5 bar e un riduttore di secondo salto da 1,5 bar a 28-30 o 50 mbar in prossimità del generatore a seconda del paese di utilizzo (tolleranza ammessa dall’unità: ± 2 mbar). G.P.L. PROPANO G31 È indispensabile montare un riduttore di pressione di primo salto in prossimità del serbatoio di gas liquido per ridurre la pressione a 1,5 bar e un riduttore di secondo salto da 1,5 bar a 30, 37 o 50 mbar in prossimità del generatore a seconda del paese di utilizzo (tolleranza ammessa dall’unità: ± 2 mbar). Make sure that gas coming from your net is actually the appropriate one (See “Feeding gas pressure” Table – pag.17). To this regard, please check following issues. Natural gas METHANE G20 The gas feeding net pressure, when the unit is working, must be adjusted to 20 mbar (unit allowed tolerance: ± 2 mbar) Natural gas METHANE G25 The gas feeding net pressure, when the unit is working, must be adjusted to 20 or 25 mbar, depending on the country where the generator is used (unit allowed tolerance: ± 2 mbar). L.P.G. BUTANE G30 It is compulsory to mount a pressure reducer of first jump near the liquid gas tank in order to reduce pressure to 1,5 bar and a reducer of second jump 1,5 bar to 28-30 or 50 mbar, near the unit, depending on the country where the heater is being installed (unit allowed tolerance: ± 2 mbar) L.P.G. PROPANE G31 It is compulsory to mount a pressure reducer of first jump near the liquid gas tank in order to reduce pressure to 1,5 bar and a reducer of second jump 1,5 bar to 30, 37 or 50 mbar, near the unit, depending on the country where the heater is being installed (unit allowed tolerance: ± 2 mbar). Per un corretto funzionamento, il gruppo bruciatore (Turbina alta prevalenza + Cono Venturi) deve essere regolato come indicato nelle tabelle seguenti. NOTA: Valori richiesti per tutte le 3 versioni ( BF-E ; BF-C ; BF-EC ) To enable a safe process, the burner unit (High static pressure turbine + Venturi cone) must be adjusted as suggested in the following charts. NOTE: Values required for all the 3 versions ( BF-E ; BF-C ; BF-EC ) GAS NATURALE (METANO G20) – NATURAL GAS (METHANE G20) Turbina ad alta prevalenza – High static pressure turbine Modello Velocità massima Velocità minima Velocità di accensione Model Maximum speed Minimum speed Starting speed giri/min - RPM giri/min - RPM giri/min - RPM BF 25 3.060 2.550 2.700 BF 35 4.600 3.380 2.800 BF 45 4.600 3.630 3.500 BF 65 5.100 3.630 3.400 GAS NATURALE (METANO G25) – NATURAL GAS (METHANE G25) Turbina ad alta prevalenza – High static pressure turbine Modello Velocità massima Velocità minima Velocità di accensione Model Maximum speed Minimum speed Starting speed giri/min - RPM giri/min - RPM giri/min - RPM BF 25 3.150 2.550 2.700 BF 35 4.800 3.650 2.800 BF 45 4.600 3.630 3.500 BF 65 5.100 3.630 3.400 BUTANO (G30) – BUTANE (G30) Turbina ad alta prevalenza – High static pressure turbine Modello Velocità massima Velocità minima Velocità di accensione Model Maximum speed Minimum speed Starting speed giri/min - RPM giri/min - RPM giri/min - RPM BF 25 2.950 2.460 2.420 BF 35 4.300 3.010 2.800 BF 45 4.250 3.450 2.650 BF 65 5.050 3.400 3.900 PROPANO (G31) – PROPANE (G31) Turbina ad alta prevalenza – High static pressure turbine Modello Velocità massima Velocità minima Velocità di accensione Model Maximum speed Minimum speed Starting speed giri/min - RPM giri/min - RPM giri/min - RPM BF 25 2.950 2.460 2.420 BF 35 4.400 3.200 2.800 BF 45 4.550 3.630 2.650 BF 65 5.050 3.400 3.900 CO2 nei fumi CO2 in the smokes Altezza vite di regolazione Cono Venturi per miscela aria-gas Adjustment screw height in the air-gas mixing Venturi cone 12,8 mm 12,4 mm 13,0 mm 6,3 mm % 8,5 8,8 8,2 8,5 ÷ ÷ ÷ ÷ 9,0 9,5 8,7 9,0 CO2 nei fumi CO2 in the smokes Altezza vite di regolazione Cono Venturi per miscela aria-gas Adjustment screw height in the air-gas mixing Venturi cone 11,1 mm 11,2 mm 11,5 mm 3,0 mm % 8,3 8,8 8,2 8,4 ÷ ÷ ÷ ÷ 8,8 9,2 8,7 8,8 CO2 nei fumi CO2 in the smokes Altezza vite di regolazione Cono Venturi per miscela aria-gas Adjustment screw height in the air-gas mixing Venturi cone 15,0 mm 15,2 mm 15,2 mm 12,5 mm % 9,8 ÷ 10,4 10,4 ÷ 11,0 10,0 ÷ 10,7 10,5 ÷ 11,0 CO2 nei fumi CO2 in the smokes Altezza vite di regolazione Cono Venturi per miscela aria-gas Adjustment screw height in the air-gas mixing Venturi cone 14,2 mm 14,7 mm 15,0 mm 11,6 mm % 8,9 ÷ 9,4 10,0 ÷ 10,7 9,2 ÷ 9,7 9,5 ÷ 10,0 DIAFRAMMA TRA VALVOLA GAS E CONO VENTURI – DIAPHRAGM BETWEEN GAS VALVE AND VENTURI CONE Trasformazione da gas naturale (Metano G20 - G25) a G.P.L. (Butano G30 – Propano G31) : INSERIRE il diaframma Trasformazione da G.P.L. (Butano G30 – Propano G31) a gas naturale (Metano G20 - G25) : TOGLIERE il diaframma Transformation from natural gas (Methane G20 - G25) to L.P.G. (Butane G30 – Propane G31) : PLACE the diaphragm Transformation from L.P.G. (Butane G30 – Propane G31) to natural gas (Methane G20 - G25) : REMOVE the diaphragm Prima di eseguire la trasformazione accertarsi che il foro del diaframma corrisponda al valore riportato nella tabella a fianco. Before carrying out the transformation, please make sure that the matches the figure stated in the chart here to the right. Modello - Model Foro diaframma - Diaphragm hole (Ø mm) Codice diaframma - Diaphragm code BF 25 BF 35 BF 45 6 7 8.5 BF 65 10 DFR 60 DFR 70 DFR 85 DFR 100 Pag. 50 Installazione: Regolazione gruppo bruciatore – Installation: Burner unit adjustment UNITÁ SPEDITE IN CATEGORIA “ I ...” Ogni singola unità viene spedita dalla fabbrica senza il diaframma (unità idonea per funzionamento a Metano) o con montato il diaframma (unità idonea per funzionamento a GPL), su richiesta del cliente, e con bruciatore già tarato per il tipo di gas previsto. Il tipo di gas e la pressione di alimentazione sono riportati sulle etichette esterne all’imballo e sull’etichetta all’interno del quadro comandi di ogni singola unità. Per questi motivi, le unità partono dalla fabbrica in categoria “ I ”. Non è richiesto nessun tipo di intervento (Nessuna regolazione richiesta) ma si consiglia di: Controllare che il consumo di gas corrisponda a quello indicato nelle caratteristiche tecniche. Se non corrispondente avvitare o svitare lentamente la vite “A” (vedi Cono Venturi per miscela aria-gas, pag. 48) controllando sul contatore che il consumo di gas corrisponda a quello di targa. Controllare con un analizzatore di combustione che con la nuova regolazione si ottenga una combustione ottimale. Rilevare dalle tabelle a pag. 49 la percentuale di CO2 minima e massima consigliata per un corretto funzionamento rispetto al tipo di gas utilizzato. Controllare se il numero di giri della Turbina ad alta prevalenza corrisponde ai valori della tabella a pag. 49 , seguendo le istruzioni del paragrafo “Scheda elettronica di premiscelazione 2 stadi”, misurazione del numero di giri (pag. 47). UNITÁ CERTIFICATE IN CATEGORIA “II ...” Le nostre unità sono certificate in categoria “ II ” (= unità previste per trasformazione gas in utenza). In ogni caso, le unità serie BluFire vengono fornite collaudate e regolate per funzionamento a gas metano o GPL per il paese di destinazione stabilito (specificare in fase di ordine): per questo motivo, le unità partono dalla fabbrica in categoria “I”. Il tipo di gas e la pressione di alimentazione sono riportati sulle etichette esterne all’imballo e sull’etichetta all’interno del quadro comandi di ogni singola unità. Le unità sono comunque predisposte per la trasformazione a gas differente da quello di taratura. x La trasformazione a GPL (o metano) è semplice e veloce, anche ad unità installata. Per la trasformazione deve essere montato o tolto il diaframma tra valvola gas e Cono Venturi (se l’unità viene spedita dalla fabbrica con taratura a Metano, viene fornita come standard anche una busta contenente il diaframma ed il necessario per l’eventuale cambio di tipo di gas. Se spedita con taratura a GPL il diaframma è già montato sull’unità). UNITS SHIPPED IN CATEGORY “ I ...” Every single unit is shipped from the factory without diaphragm (unit suitable for Methane functioning) or with diaphragm (unit suitable for L.P.G. functioning), on client request, and burner setting with different functioning gas type. The gas type and feeding pressure are shown by the labels on the package and by a label inside the control panel of each unit. For these reasons, the units shipped from the factory in category “ I ”. No intervention is required (No setting is required). However we recommend you what follows: Make sure that the gas consumption value goes with the one stated in the technical data table. If not, slowly screw in or unscrew the “A” screw (see air-gas mixing Venturi Cone, page 48), by so checking on the gas meter. Using a combustion analyser, you’ll be able to check whether the new adjustment is suitable to provide the optimum combustion. Please refer to charts on page 49, where you may see the maximum allowed residual CO2 percentage figure to enable the best working level depending on the gas used. Now ensure that the number of high static pressure Turbine revolutions actually match the values specified in the page 49 table, following the instructions given under the paragraph “Premix electronic card 2 stages”, number of revolutions measured (page 47). UNITS CERTIFIED IN CATEGORY “II ...” The our units are certified in category “ II ” (= units suitable for gas transformation by the user). In any case, the BluFire serie units are supplied tested and set to work on natural gas or LPG for the destination country (please specify in order): for this reason, the units are shipped from the factory in category “I”. The gas type and feeding pressure are shown by the labels on the package and by a label inside the control panel of each unit. In any case, the units are suitable for gas trasformation in different setting gas. To convert the unit to LPG (or natural gas) is quick and simple, even after the unit has been installed. To do this, you’ll have to mount or remove the diaphragm between gas valve and Venturi Cone. (If the unit is supplied with methane setting, an envelope containing the diaphragm and all the necessary parts for the change is given along with the unit. If the unit is sold with LPG setting, the diaphragm is already mounted in the unit). TRASFORMAZIONE A GAS DIFFERENTE DA QUELLO DI TARATURA L‘operazione deve essere effettuata da personale qualificato. Un errato montaggio del circuito gas può causare pericolose fughe di gas su tutto il circuito ed in particolare nelle zone manomesse. Utilizzare il kit di trasformazione originale BPS. Usare, inoltre, su tutti i raccordi adeguati sigillanti. CONVERSION FROM ORIGINAL ADJUSTED GAS TO DIFFERENT TYPE This operation must be carried out by qualified engineers. Wrong and careless assembly of the gas circuit may cause dangerous gas leaks throughout the circuit and especially in the tampered areas. To this purpose it will be used the original transformation kit BPS. Furthermore, use adequate seals on all connections. Se il tipo di gas indicato dall’etichetta non corrisponde a quello da utilizzare, l‘unità deve essere convertita e adattata al tipo di gas che si intende usare. Per tale operazione procedere come segue: 1. Chiudere il gas e togliere tensione all’unità staccando la spina posta sul retro. 2. Togliere l’apparecchiatura di comando e controllo “A” posta sopra la valvola dopo aver svitato la vite di fissaggio posta sul fianco destro. 3. Sfilare tirando verso destra la curva dal Cono di miscelazione “H”. 4. Separare il tubo adduzione gas dalla valvola svitando le viti della curva in alluminio facendo attenzione all‘ o-ring di tenuta. 5. Svitare le due viti “B” che tengono unito il cono di miscelazione alla Turbina ad alta prevalenza facendo attenzione a non danneggiare la guarnizione in sugherite “C”. 6. In mano avrete a questo punto il gruppo Valvola – Cono. Separando ulteriormente i due componenti (viti “D”) si accede alla valvola “G”. 7. Inserire il diaframma per la trasformazione a G.P.L. G30/G31 nell’orifizio “E” dentro la sede della guarnizione di gomma “F”, controllando che l’inserimento avvenga senza forzature e che raggiunga il battente interno della guarnizione. ( per il Metano G20/G25 il diaframma si deve togliere). 8. Rimontare il cono di miscelazione facendo attenzione che la guarnizione sia perfettamente piana (un montaggio errato compromette la funzionalità del sistema). 9. Procedere al montaggio dei componenti seguendo in senso inverso i punti 5,4,3,2,1 facendo attenzione a non danneggiare le guarnizioni di tenuta. Guarnizioni fuori sede, mal posizionate o danneggiate compromettono il buon funzionamento del sistema. 10. Riportare il numero di giri della Turbina (pag. 48) a quello impostato per G30/G31 o per G20/G25 a seconda della trasformazione eseguita, rilevabile dalla tabella pag. 49 agendo sulla scheda elettronica di premiscelazione 2 stadi seguendo il paragrafo a pag. 47. 11. Al temine applicare all’unità la targhetta di cambio gas e variare la sigla del tipo di gas sulla targa dei dati tecnici. 12. Controllare con un analizzatore di combustione che i valori siano corretti e che il CO2 corrisponda a quello indicato a pag. 49. If the type of gas shown on the label does not correspond to the one which will be used, the unit must be converted and adapted to the type of gas you wish to use. For this operation proceed as follows: 1. Shut gas feeding and disconnect the unit by removing the plug on the rear. 2. Remove the control electronic board “A” placed over the valve, after unscrewing the fixing screw placed on the right side. 3. Remove the elbow from the mixing Cone “H” by pulling it to the right. 4. Split the gas-feeding pipe apart from the valve by unscrewing the aluminium elbow (beware the sealing O-ring!). 5. Unscrew the two “B” screws that keep the mixing cone linked to the high static pressure Turbine, paying attention not to hurt the cork sealing “C”. 6. Now you’re holding the Cone-Valve group. By splitting again the two parts, “D” screws, you’re getting to the “G” valve. 7. Place the diaphragm for L.P.G. G30/G31 gas switching in the “E” hole inside the “F” rubber sealing place, avoiding any forcing or that the diaphragm affects the inner side of the sealing (remove the diaphragm for Methane G20/G25). 8. Now re-assemble the mixing cone, making sure to put down the sealing perfectly horizontally (wrong assembling would affect the system’s tasks). 9. Go ahead re-assembling all pieces, following the points 5,4,3,2,1 backward, always avoiding hurting the sealing. Remember that should a sealing be out of place, placed in the wrong way or damaged - this would affect the correct working of the whole system. 10. Re-establish the Turbine’s number of revolutions (page 48) to the one set for the G30/G31 gas or the G20/G25 depending on the kind of switching that has been made, as from the table on page 49, by adjusting the premix electronic card 2 stages (paragraph on page 47). 11. In the end, place a new plate on the unit, mentioning the gas-switch carried out and modify the lettering identifying the kind of gas on the technical data label. 12. By a combustion analysing device please check that values would be actually correct and that the CO2 would correspond to the value show at page 49. Prima accensione – First start Pag. 51 ATTENZIONE! Le operazioni di prima accensione devono essere effettuate da personale qualificato. ATTENZIONE! Quando si effettuano operazioni o controlli visivi sull’unità con lo/gli sportelli aperti, operare con la massima cautela ed in condizioni di sicurezza. Non esporre parti del corpo (mani, viso, ecc.), soprattutto all’effetto di eventuali accensioni del bruciatore che possano avvenire in condizioni non completamente prevedibili o sotto controllo. WARNING! The unit initial start-up operations and the relative tests must be performed by skilled technical personnel. WARNING! When operations or visual inspections are performed on the unit with the door(s) open, be extremely cautious and work under safe conditions. Never expose parts of the body (hands, face, etc.), especially to the effect of any burner ignition which may occur under conditions that cannot be completely predicted or controlled. PRIMA DI AVVIARE L’UNITÀ VERIFICARE I SEGUENTI PUNTI Ancoraggio dell’unità al soffitto o al muro, pavimento, tetto, ecc.. Connessione del cavo di terra e serraggio di tutti i morsetti elettrici (non utilizzare i tubi del gas come messa a terra di unità elettriche). Eventuale collegamento dei canali. Chiusura dei pannelli ispezionabili. Tensione di alimentazione disponibile. Verificare che la pressione di alimentazione del gas sia compresa nei valori di targa dell’unità. Controllare che l’impianto di alimentazione del gas sia dimensionato per la portata necessaria all’unità e che sia dotato di tutti i dispositivi di sicurezza e controllo prescritti dalle norme vigenti. Verificare la regolazione della portata del gas secondo la potenza richiesta dall’unità. Verificare che l’unità sia predisposta (vedi Diaframma tra valvola gas e cono Venturi) per il gas effettivamente in uso. Controllare che i rubinetti d'intercettazione gas sul contatore ed in prossimità dell’unità siano aperti. Assicurarsi di aver effettuato lo spurgo dell’aria presente all’interno della tubazione di alimentazione gas. Controllare tenuta interna-esterna dell’impianto adduzione combustibile. Assicurarsi che siano state rispettate le disposizioni e le norme vigenti sulla installazione di queste unità, soprattutto riguardo alla corretta esecuzione del condotto di evacuazione dei prodotti della combustione, del condotto di adduzione dell’aria comburente e della tubazione di alimentazione gas. BEFORE THE FIRST STARTUP THE UNIT CHECK THE FOLLOWING POINTS Fastening of the unit at the ceiling or at the wall, floor, roof, etc.. Hearth wiring and all electrical connections have been tightened (do not use gas pipes to earth electrical units). Ducts connection. Fastening of the inspection panels. Available feeding voltage. Check that the gas supply pressure is within unit rating limits. Check that the gas supply system is suitable to the unit and all safety and check-over devices prescribed by existing standards are duly installed. Check that gas flow set according to the unit’s power requirements. Check that the set unit is suitable (see diaphragm between gas valve and Venturi cone) to the type of gas to be used. Check that the gas on-off valves on the meter and near the unit are open. Make sure that the air inside the gas supply piping has been bled off. Check the internal and external seal of the gas supply pipe system. Make sure that all the current norms, laws and standards relative to the installation of these units have been observed, especially for what concerns the correct positioning of the combustion product exhaust duct, combustion air feed duct and gas supply piping. PER EFFETTUARE LA PRIMA ACCENSIONE, OPERARE NEL SEGUENTE MODO Assicurarsi che l'interruttore generale magnetotermico sia inserito. Aprire il rubinetto del gas e sfiatare la tubazione principale per eliminare l'aria svitando la vite posta sulla valvola. Ad operazione ultimata avvitare la vite controllando la tenuta. ATTENZIONE ! QUESTA OPERAZIONE COMPORTA UNA USCITA DI GAS !! Dare tensione all'unità. Regolare il termostato ambiente ad una temperatura superiore di alcuni gradi a quella esistente. Togliere eventuali blocchi, segnati dalla lampada rossa, premendo l'apposito pulsante di ripristino. Dopo il prelavaggio della camera di combustione, l'apparecchiatura elettronica alimenta il dispositivo di accensione e l'elettrovalvola del gas. E' possibile che, a causa di presenza d’aria nella tubazione, l'apparecchiatura elettronica vada in blocco. In questo caso è necessario ripetere l'accensione premendo il pulsante di sblocco. TO CARRY OUT THE FIRST START-UP PLEASE FOLLOW THE INSTRUCTIONS BELOW Put the magneto-thermal main switch on. Open the gas tap and let air leak out from the main pipeline, by unscrewing the screw placed on the valve. Once you’ll have done so, turn the screw on again and check the sealing. WARNING ! THIS OPERATION MAY CAUSE GAS ESCAPE !! Give voltage to the unit. Set the room thermostat temperature a few degrees higher than the real one. Remove any blockages, detected by the red light by pushing the special reset key. After the pre-washing of the combustion chamber, the electronic board will be feeding the starting device and the gas electrovalve. It may occur that, because of air still left inside the piping, the electronic board blocks up. In this case it will be necessary to start up again the unit by pushing the release button. AD UNITÀ IN FUNZIONE VERIFICARE WITH THE UNIT IN OPERATION CHECK Absorbed current - Air flow. Make sure that the gas consumption value as you now can read from the gas meter, does correspond to the one stated in the technical data table here above. The burner start must be silent and plain Note: the exchanger heating phase begins after the burner has been ignited. The exchanger reaches the rated operating temperature after about three minutes and at that point a thermostat starts the fan(s) to distribute warm air in the environment. Turn the room thermostat dial to the minimum value and check that the burner shuts off. Note: when the burner turns off, the fan(s) will continue to operate for a few minutes, to properly cool the exchanger. Therefore, it is important not to turn off the air heater using the mains switch, that also cuts off the power supply to the fan(s), since this might lead to overheating and trip the safety thermostat. Then repeat the start-up operation to observe and check that the burner has ignited correctly and that the flame is stable. If the BF-C or BF-EC versions units are installed with warm air distribution ducts, operate the unit for at least 30 minutes. In the meantime, check that warm air flows freely from the duct grilles or outlets, under the foreseen design conditions. Any obstructions, improper adjustments of the outlets or incorrect dimensioning of the ducts might cause the unit to overheat, and trip the safety thermostat. If this occurs, try to identify and eliminate the possible causes of such overheating. Assorbimento elettrico - Portata aria. Assicurarsi che il consumo del gas letto sul contatore corrisponda alla quantità indicata nella tabella delle caratteristiche tecniche. Controllare che l’accensione del bruciatore sia silenziosa e uniforme. Nota: dopo l'accensione del bruciatore inizia la fase di riscaldamento dello scambiatore, che raggiunge dopo circa tre minuti la temperatura di regime, alla quale un termostato comanda la partenza del/dei ventilatori per la diffusione dell'aria calda in ambiente. Ruotare la manopola del termostato ambiente al minimo valore e verificare che il bruciatore si arresti. Nota: allo spegnimento del bruciatore, il/i ventilatori continuano a funzionare ancora per qualche minuto, per raffreddare correttamente lo scambiatore. E' quindi importante non spegnere il generatore tramite un interruttore generale che toglie alimentazione anche al/ai ventilatori, poiché si potrebbero verificare surriscaldamenti e potrebbe intervenire di conseguenza il termostato di sicurezza. Successivamente ripetere l'avviamento per osservare e verificare che l'accensione del bruciatore sia regolare e che la fiamma sia stabile. In caso di installazione di unità versioni BF-C o BF-EC, con canali di distribuzione dell’aria calda, far funzionare l'unità per almeno 30 minuti. Verificare nel frattempo che dalle griglie o bocchette della canalizzazione l'aria calda esca liberamente, nelle condizioni previste dal progetto. Eventuali ostacoli, improprie regolazioni delle bocchette o errato dimensionamento dei canali potrebbero causare il surriscaldamento dell’unità, con conseguente intervento del termostato di sicurezza. Se ciò avvenisse, cercare di individuare ed eliminare le possibili cause del surriscaldamento. OPERAZIONI FINALI A controlli ultimati, assicurarsi di chiudere correttamente il/gli sportelli dell’unità. A questo punto l’unità è pronta per essere utilizzata. FINAL ACTIONS Once the tests have been completed, close the unit service door(s) correctly. … and now the unit is ready to work. INFORMAZIONI ALL'UTENTE Si raccomanda di informare l'utente su tutte le operazioni necessarie al corretto funzionamento dell’unità, con particolare riguardo alle fasi di accensione e spegnimento; sugli obblighi di legge relativi alla conduzione dell’impianto e ai controlli periodici, che dovranno essere effettuati da personale specializzato e appositamente abilitato. USEFUL INFORMATION It is recommended to inform the user about all the operations necessary to use the unit correctly, with particular reference to the ignition and shutdown phases and about the importance of periodic tests, which must be performed at least once every year by skilled personnel. Pag. 52 Norme per l’utente: Uso – Information for the user: Use Queste unità sono destinate al riscaldamento di edifici adibiti ad uso commerciale, artigianale, industriale, ricreativo, ecc. Questa unità dovrà essere destinata solo all’uso per il quale è stata espressamente prevista. Ogni altro uso è da considerarsi improprio e quindi pericoloso. Versione BF-E : l’installazione deve avvenire all’interno del locale da riscaldare o in centrale termica. Versione BF-C (unità adatte per realizzare impianti canalizzati) : l’installazione deve avvenire all’interno del locale da riscaldare o in centrale termica. Versione BF-EC : unità adatte per essere installate all’aperto, il collegamento con l’ambiente da riscaldare deve avvenire per mezzo di canalizzazione. Non possono essere installate a diretto contatto degli agenti atmosferici se non previa copertura superiore dell’unità. This unit has been designed to be used on industrial plants, trade buildings, artisan workshops, warehouses, gyms, hothouses, pools, and many other public or private places. This unit must be exclusively used for the purpose it was intended. Any other use is to be considered improper and therefore dangerous. BF-E version : They must be installed inside the room to heat or in the central thermal room . BF-C version (units suitable for ductable systems) : They must be installed inside the room to heat or in the central thermal room . BF-EC version : units suitable to be installed outside. They are linked to the room to heat by canalization. Never use it in open-air, unless under a special protecting shed. AVVIAMENTO E SPEGNIMENTO DELL’UNITÁ ATTENZIONE! La prima accensione dell’unità è di competenza esclusiva di personale tecnico specializzato ed in particolare della ditta installatrice che, avendo completato i lavori dell’impianto, è in grado di verificarne la sicurezza e la funzionalità nel suo complesso. Prima della prima accensione dell’unità, verificare che la ditta installatrice abbia effettuato tutte le operazioni di propria competenza. Non lasciare l’unità inutilmente alimentata quando la stessa non è utilizzata e chiudere sempre il rubinetto gas. STARTING AND STOPPING THE UNIT WARNING! It should be recalled that the first start-up of the unit and the relative tests must be performed by skilled technical personnel. Noncompliance with this procedure will invalidate the warranty conditions and release the manufacturer from all responsibilities. Before first start-up of the unit, make sure that the installer has correctly carried out all the operations under his competence. Avoid unnecessary supply when the unit is not in use and always close the gas cock. GUASTO O CATTIVO FUNZIONAMENTO In caso di guasto e/o di cattivo funzionamento dell’unità: Disattivare l’unità (scollegare l’alimentazione elettrica e chiudere il rubinetto del gas). Astenersi da qualsiasi tentativo di riparazione o di intervento diretto. Rivolgersi esclusivamente a personale professionalmente qualificato. L’eventuale riparazione dell’unità dovrà essere effettuata solamente da un Centro di Assistenza autorizzato dalla casa costruttrice utilizzando solamente ricambi originali. Il mancato rispetto di quanto sopra può compromettere la sicurezza dell’unità. NOTA: L’eventuale stato di blocco dell’unità indica generalmente un guasto od un difetto di funzionamento. Si consiglia quindi di rivolgersi ad un Centro Assistenza Tecnica. ATTENZIONE ! Per garantire l’efficienza dell’unità e per il suo corretto funzionamento è indispensabile fare effettuare, da personale professionalmente qualificato, la manutenzione annuale, attenendosi alle indicazioni del costruttore. FAILURE OR POOR OPERATION In case of failure and/or poor operation: Isolate the unit (disconnect it from the power supply and close the gas cock). Do not attempt any repair or direct servicing. Call qualified service engineers only. Any repair to the units must only be carried out by the manufacturer’s authorised service centres using only original spare parts. Misapplication of the above might compromise the safety of the unit. NOTE: Generally, the unit blocks during a fault or operating defect. Therefore, it is recommended to contact a Technical Service Centre. WARNING ! To ensure unit efficiency and correct operation, it is essential that qualified service engineers carry out annual maintenance following the manufacturer’s instructions. PERICOLO ! : SE SI AVVERTE ODORE DI GAS Non azionare interruttori elettrici, il telefono e qualsiasi altro oggetto o dispositivo che possa provocare scintille. Aprire immediatamente porte e finestre per aerare il locale. Chiudere i rubinetti del gas. Chiedere l’intervento di personale professionalmente qualificato. DANGER ! : IF YOU SMELL GAS Do not operate electric switches, telephones or any other object or device which may cause sparks. Open immediately doors and windows to let fresh air in. Shut-off the gas supply. Call for a qualified service engineer. Norme per l’utente: Usi impropri – Information for the user: Improper use NON STRATTONARE IL CAVO ELETTRICO !! È molto pericoloso tirare, calpestare, schiacciare o fissare con chiodi o puntine il cavo elettrico di alimentazione. Il cavo danneggiato può provocare corto circuiti e danni alle persone. NON INFILARE OGGETTI SULL’USCITA DELL’ARIA Non inserire oggetti di nessun tipo nelle feritoie di uscita dell’aria. Ciò potrebbe provocare ferimenti alla persona e danni all’unità. NEVER JERK OR TWIST THE POWER CABLE !! Never pull, walk over, crush or secure the electric power cable with nails or tacks. A damaged cable could cause short circuits or physical injury. NON SEDERSI SOPRA L’UNITÁ DO NOT SIT ON THE UNIT NEVER INSERT OBJECTS IN THE AIR OUTLET Never insert objects in the air outlet slats. This could cause physical injury or damage the unit. ORIENTARE CORRETTAMENTE IL GETTO D’ARIA Orientare le alette in modo che il flusso d’aria non investa direttamente le persone, creando sensazioni di disagio. CORRECT AIR JET POSITIONING Adjust the fins so that the air flow is not aimed directly at person. NON USARE L’UNITÁ IN MODO IMPROPRIO L’unità non va utilizzata per allevare, far nascere e crescere animali. Su richiesta: versioni speciali (es. acciaio INOX). IMPROPER USE OF THE UNIT CONSTITUTES A HAZARD The unit is not designed for any type of animal breeding or similar applications. On request: special versions (ex. stainless steel). PER PULIRE L’UNITÁ: Non indirizzare getti d’acqua sull’unità. Può causare scosse elettriche o danneggiarla. Non usare acqua calda, sostanze abrasive o solventi; per pulire l’unità usare un panno soffice. TO CLEAN THE UNIT: Do not splash water on the unit. It could result in electrical shock or damage to the unit. Do no use hot water, abrasive powders or strong solvents; to clean the unit use a soft cloth. NON COPRIRE L’UNITÁ CON OGGETTI O TENDAGGI CHE OSTRUISCANO ANCHE PARZIALMENTE IL FLUSSO DELL’ARIA. ATTENZIONE: Durante il funzionamento non posare oggetti o panni ad asciugare sulla griglia di uscita aria, ne ostruirebbero il passaggio con pericolo di danneggiamento dell’unità. DO NOT COVER THE UNIT WITH OBJECTS OR CURTAINS WHICH MAY PARTIALLY OBSTRUCT AIR FLOW. ATTENTION: When the unit is running do not place any object or cloths to dry on the air outflow grill, they would obstruct the flow and damage the unit. Norme per l’utente: Funzionamento – Information for the user: Working steps INVERNO Dare tensione all’unità chiudendo l'interruttore generale. Controllare che il rubinetto gas sia aperto. Portare l’indice del termostato ambiente al valore massimo (con deviatore sulla posizione “Inverno”). Si avvia la Turbina ad alta prevalenza e, dopo il prelavaggio della camera di combustione, si accende il bruciatore. Dopo il tempo di prelavaggio (circa 30 secondi), si apre l’elettrovalvola del gas e l’elettrodo di accensione inizia a scintillare per un tempo di sicurezza max di 5 secondi. In presenza della fiamma l’elettrodo di rilevazione interrompe automaticamente lo scintillio mantenendo in funzione l’unità. In caso contrario, la centralina di controllo manda in blocco l’unità accendendo la spia rossa di blocco sull’unità e sul comando remoto. Al verificarsi del punto precedente, premere il pulsante di reset. Se l’accensione è avvenuta regolarmente portare l’indice del termostato ambiente al valore desiderato. Se l’accensione è avvenuta regolarmente, rimane accesa la spia verde di funzionamento e l’unità diventa automatica in ogni sua funzione. Dopo qualche minuto dall'accensione del bruciatore si avvia automaticamente il ventilatore, diffondendo l'aria calda nell'ambiente. Al raggiungimento della temperatura prefissata sul termostato ambiente, il bruciatore si arresta e, dopo circa 4 minuti, si ferma anche il ventilatore. L'intero ciclo si ripete automaticamente ogni qualvolta la temperatura scende sotto il valore prefissato sul termostato ambiente. ATTENZIONE ! Se l’accensione avviene dopo un lungo periodo di inattività, o al momento della prima accensione dell’unità, può essere necessario ripetere più volte l’operazione a causa dell’aria presente nelle tubazioni. Pag. 53 WINTER Supply the unit with electric power by closing the main switch . Check that the gas cock is open. Set the room thermostat to the highest temperature (with switch in “Winter” position). The high static pressure Turbine starts working and, after a pre-washing time, the burner starts running too. After the pre-purge period (about 30 seconds), the gas solenoid valve opens and the ignition electrode begins to sparkle for a maximum period of 5 seconds. When the flame is ignited, the flame sensor automatically interrupts the spark while the unit continues to function. Otherwise the flame control unit locks out the unit: the gas supply to the burner is shut off and a lockout red light on the unit and on the remote control are turned on. Should this happen (see previous point), press the reset button. If ignition has occurred smoothly, set the room thermostat to the desired temperature. If ignition has occurred smoothly, you can see a green light on and so the unit now becomes automatic in all its functions. A few minutes after the burner’s start, the fan will start working too, blowing hot air into the room. As soon as the room temperature will have raised to the figure scheduled on the room thermostat, the burner will stop and, about 4 minutes later, the fan will stop too. The whole cycle will be automatically repeated from the beginning every time that the real room temperature will go below the temperature scheduled by the room thermostat. WARNING ! After a long period of unit inactivity or at the first start-up, it may be necessary to repeat the ignition operation a few times due to the presence of air in the piping. ARRESTO O FERMATA MOMENTANEA Per arrestare il funzionamento dell’unità, agire esclusivamente sull'interruttore macchina o sul termostato ambiente. Per spegnere l’unità portare l’indice del termostato ambiente al valore minimo. Il bruciatore si spegnerà, mentre i ventilatori continueranno a funzionare finché l’unità non si è completamente raffreddata. In caso di non utilizzo prolungato, dopo l’operazione di cui sopra e dopo aver atteso lo spegnimento dei ventilatori, chiudere il rubinetto gas e togliere tensione elettrica per mezzo dell’interruttore generale omnipolare posto sulla linea di alimentazione. É assolutamente da evitare, in quanto dannoso all’unità, lo spegnimento dell’unità togliendo l’alimentazione elettrica, perché così facendo si provoca l’arresto immediato dei ventilatori e l’intervento del termostato di “Massima” (= Termostato di sicurezza) che dovrà essere riarmato manualmente. Inoltre tale operazione provoca dei surriscaldamenti dello scambiatore di calore. STOP OR TEMPORARY STOP To stop the unit, just turn off the unit switch or the room thermostat. To turn off the unit, set the room thermostat to the lowest temperature. The burner is turned off, while the fan will continue to operate until the unit is completely cold. In case of long inactivity, after carrying out the above operation and after the fans have turned off, close the gas cock and disconnect the electric supply by using the general omnipolar switch placed on the supply line. It is not good practice to turn the unit off by disconnecting the electric power supply, as this may damage the unit. In fact, this causes the immediate stop of the fans, unit overheating and possibly the activation of the temperature “Maximum” thermostat (= Safety thermostat). Necessary to reset it by hand. Also, this wrong operation would involve overheating to the heat exchanger. VENTILAZIONE ESTIVA Abilitata solo su unità con morsettiera “Plug 6+3 poli” (accessorio). Per ottenere la sola ventilazione estiva, procedere nel seguente modo: Unità non provviste di comando a distanza: Ź chiudere il rubinetto di intercettazione del gas, Ź portare l’indice del termostato ambiente sul valore minimo, Ź agire sull’interruttore di ventilazione o sul commutatore. Ź In questo modo si otterrà il funzionamento del/i solo/i ventilatore/i. Unità provviste di comando remoto QUA-1 (accessorio): Ź chiudere il rubinetto di intercettazione del gas, Ź agire sul commutatore “1” del quadro comando a distanza posizionando l’indice sul simbolo di ventilazione. Ź In questo modo si otterrà il funzionamento del/i solo/i ventilatore/i. SUMMER VENTILATION This is possible only on units having “6+3 pole Plug” terminal board (optional). If you wish to use only the fan, to bring fresh air in during the hot season, just do as follows: Units without remote control Ź Shut gas detecting tap Ź Take thermostat indicator to the lowest figure (MINIMUM) Ź Turn on ventilation switch or commutating switch Ź In this way you’ll have the fan/s working alone. Units with remote control QUA-1 (optional) Ź Shut gas detecting tap Ź Turn on commutator “1” on the remote control board, setting the indicator to the ventilation symbol Ź In this way you’ll have the fan/s working alone. 1 2 3 4 Comando remoto QUA-1 ; Remote control QUA-1 65 mm 1 2 3 4 Commutatore Estate/Inverno - Summer/Winter switch Spia Blocco - Blockage spy light Pulsante di Reset - Reset button Termostato ambiente elettronico - Electronic Room Thermostat 135 mm Norme per l’utente: Messa a riposo a fine stagione Information for the user: Reset the end of the cold season Togliere la tensione all'unità tramite l’interruttore generale omnipolare posto sulla linea di alimentazione. Chiudere il rubinetto del gas posto sulla linea di alimentazione gas. Take current off definitely, by depressing the general omnipolar switch placed on the supply line. Shut gas tap placed on the gas supply line. Pag. 54 Norme per l’utente: Manutenzione , Pulizia – Information for the user: Maintenance , Cleaning Le unità BPS sono costruite con tecnologie moderne che ne assicurano l’efficienza ed il funzionamento nel tempo. Per un regolare funzionamento e buona conservazione dell'unità, si raccomanda di far effettuare, da personale tecnico qualificato, le periodiche operazioni di manutenzione almeno una volta all'anno, meglio a fine stagione. È essenziale stabilire e seguire un regolare programma di ispezioni e manutenzione. Il programma di manutenzione seguente è stabilito considerando condizioni ottimali sullo stato di inquinamento dell’aria del luogo di installazione. Quindi le indicazioni dei tempi di intervento per una corretta manutenzione sono puramente indicativi e possono variare in relazione alle effettive condizioni di lavoro. Le condizioni atmosferiche più aggressive si hanno quando nell’aria esiste una quantità anomala di fumi industriali, sali, fumi chimici e polveri industriali. The BPS units are constructed with state of the art technology that ensures long-terms efficiency and operation. In order to grant the unit always the best performance and upkeep, carry out timely maintenance operations at least once a year, possibly at the end of the cold season. Remember that maintenance operations are to be carried out by qualified personnel only. It is essential to provide a very specific inspection and maintenance program in functions of those fluids characteristics. The following maintenance program is established by taking into consideration the unit optimal conditions relative to the air quality and the installation site characteristics. The response time for a correct servicing very much depends on the above conditions. The most aggressive atmospheric conditions happen when in the air there is an abnormal quantity of industrial fumes, salts, chemical fumes and airborne dust. ATTENZIONE! Togliere tensione prima di iniziare le operazioni di pulizia dell’unità. Qualsiasi intervento sulle unità deve essere fatto a freddo, escludendo prima l'alimentazione elettrica e chiudendo il rubinetto del gas. WARNING! Switch off power supply before cleaning unit. All maintenance operations have to be carried out only when the unit is cold, with electric power disconnected and gas tap shut. PER PULIRE L’UNITÁ Non indirizzare getti d’acqua sull’unità. Può causare scosse elettriche o danneggiare l’unità. Non usare acqua calda, sostanze abrasive o solventi; per pulire l’unità usare un panno soffice. Evitare possibilmente il funzionamento durante la pulizia dei locali. TO CLEAN THE UNIT Do not splash water on the unit. It could result in electrical shock or damage to the unit. Do not use hot water, abrasive powders or strong solvents; to clean unit use a soft cloth. If possible avoid the working during the cleaning of the rooms. MANUTENZIONE ORDINARIA RISERVATA ALL’UTENTE NOTA: Una manutenzione accurata è sempre fonte di risparmio e di sicurezza. Si raccomanda di eseguire all'inizio di ogni stagione di riscaldamento e successivamente almeno ogni mese di funzionamento le seguenti operazioni: Verificare che il condotto di evacuazione dei prodotti della combustione e l'eventuale condotto di aspirazione dell'aria, compresi i relativi terminali esterni, non siano ostruiti o il loro materiale deteriorato. Pulire semplicemente con un panno umido le parti esterne dell’unità. Togliere con l'aiuto di un pennello o di un getto d'aria compressa i depositi di polvere dalle superfici esterne dello scambiatore, dalla griglia di aspirazione del ventilatore e dalle sonde dei termostati (termostati “Fan”, “Limit”, controllo stadi MAX-min bruciatore “TMN”, di “Massima”). Controllare che le fasi di funzionamento siano regolari. Verifica ventilatore di riscaldamento: Accertarsi che la girante sia pulita. In caso contrario pulirla mediante soffiaggio di aria compressa e comunque in modo da non danneggiare la girante. Verifica parte elettrica: Verificare tutta l’apparecchiatura elettrica ed in particolare il perfetto serraggio delle connessioni elettriche. ROUTINE MAINTENANCE TO BE PERFORMED BY THE USER NOTE: Adequate maintenance ensures safety and savings. It is recommended to carry out the following operations at the beginning of each heating season and then at least once every month during operation: Check that the combustion product exhaust and any air intake ducts, including the external terminals, are not obstructed or that their material has deteriorated. Clean the external parts of the unit simply by using a damp cloth. Use a brush or a jet of compressed air to remove the dust deposits on the external surfaces of the exchanger, on the fan intake grille and on the thermostat sensors (thermostats “Fan”, “Limit”, MAX-min burner stages controlled “TMN”, “Maximum”) . Make sure that the operating phases are regular. Heating Fan check: Check the wheel is clean. If this is not the case clean it using compressed air in such a way not to damage the wheel. Electrical equipment check: Check all the electrical apparatus and in particular the tightness of the electrical connections. ACCESSORI: FILTRO ARIA (se presente - Pulizia: ogni 15 giorni): La pulizia può essere effettuata mediante sbattimento del materassino, lavandolo con un getto d’acqua e detersivo, oppure con un getto d’aria compressa. IMPORTANTE: per pulire il filtro, i getti di aria o acqua devono essere rivolti in senso contrario a quello normale di aspirazione dell’aria e non devono essere troppo violenti da danneggiare la massa filtrante. Se i filtri vengono puliti con acqua, prima del loro utilizzo lasciarli asciugare con cura per non compromettere l’efficienza del sistema. BATTERIA PER ACQUA (solo per accessorio PCA): La batteria di scambio termico deve essere mantenuta in perfetto stato per garantire le caratteristiche tecniche di progetto. Controllare periodicamente che la parete alettata non presenti ostruzioni al passaggio dell’aria: se necessario pulirla avendo cura di non danneggiare le alette di alluminio. Per la pulizia usare uno scopino o meglio un aspirapolvere. Nel caso di installazione in zone con climi particolarmente freddi, svuotare l’impianto dall’acqua in previsione di lunghi periodi di fermata dell’impianto. SCARICO CONDENSA (solo per accessorio PCA): Durante la stagione estiva controllare che lo scarico condensa non sia ostruito e che la bacinella sia pulita da polvere od altro. Eventuale sporcizia potrebbe otturare lo scarico provocando tracimazioni dell’acqua di condensa. ACCESSORIES: AIR FILTER (if present - Cleaning: every 15 days): The cells may be cleaned by a simple flapping, or by washing them into water detergent, or by using compressed air blast. IMPORTANT: when cleaning the cells make sure that the water/air blast is crossing the media in the opposite direction of the one of normal unit operation. The blasting over the media must not be too hard or near, so to avoid possible damages of the filtering mass. If the cells are washed with water detergent, dry them up in open air before re-installation in order not to affect the system efficiency. WATER COIL (only for PCA optional): The water coil must be kept in a perfectly good condition to guarantee the technical design features. Verify periodically that the finned wall has no obstructions to airflow: if necessary, clean it and be careful not to damage the aluminium fins. To clean it use a little brush or a vacuum cleaner which is even better. If the unit is installed in particularly cold rooms, fill out the water tank during long stop periods. DRAIN PIPE (only for PCA optional): During the summer time check that the unload of the condensation is not obstructed and that the pan is clean without dust or other things. Eventual dirt may obstruct the unload causing the overflowing of the condensations water. Norme per l’utente: Manutenzione , Pulizia – Information for the user: Maintenance , Cleaning Pag. 55 MANUTENZIONE OGNI FINE STAGIONE INVERNALE (CONTROLLO ANNUALE) MAINTENANCE WHEN THE WINTER SEASON IS OVER (YEARLY CHECK) ATTENZIONE! Il controllo periodico deve essere eseguito da personale specializzato. Allo scopo di ridurre al minimo la possibilità di guasti e mantenere la perfetta efficienza dell’unità, quindi il miglior rendimento e la minor spesa di esercizio, è consigliabile eseguire almeno una volta l'anno un controllo generale dell'unità, in accordo anche con gli obblighi di legge. WARNING! Specific technical skills are required to test the control and safety devices and this is why it is important to contact skilled personnel. To reduce possible failures to a minimum and to keep the unit operating at peak efficiency, and therefore providing the best output and ensuring the lowest operating costs, it is recommended to perform a general inspection of the unit at least once a year. More frequent servicing may be required depending on the environmental conditions where the unit is installed. Regular inspections area necessary, especially in dirty areas, to assess the servicing frequency. Pannello asportabile Removable panel Vano bruciatore e quadro elettrico Burner housing and electical box Portina di ispezione e pulizia Door for checking and cleaning Pannello asportabile Removable panel Si raccomanda di curare particolarmente la pulizia degli scambiatori di calore e delle griglie ventilatore, che dovranno essere spazzolati accuratamente all’esterno. PULIZIA DELLO SCAMBIATORE: Per questa operazione procedere nel seguente modo: x Togliere il pannello sul lato opposto al vano bruciatore e quadro elettrico dell'unità. x Smontare la portina di ispezione posta sul collettore fumi. x Pulire gli elementi di scambio con uno scovolo di acciaio. x Asportare con un aspiratore dalla camera di combustione l'eventuale fuliggine caduta dagli elementi di scambio. x Pulire anche le superfici esterne dello scambiatore. x Sostituire, se necessario, la guarnizione della portina di ispezione per assicurare sempre una perfetta tenuta. Please, taking particular care of cleaning the heat exchangers and the fan grilles, which should be externally brushed. CLEANING THE EXCHANGER : For this operation just take the following steps: x Remove the panel in opposite side of burner housing and electrical box of the unit. x Remove little inspection door placed on the smokes collector. x Clean exchanging elements by using a stainless steel tube brush. x By a vacuum cleaner remove any soot from combustion chamber, coming from exchanging elements. x Also clean exchanger outer areas. x If necessary, replace little inspection door gasket, in order to ensure always perfect sealing. BRUCIATORE: Rimuovere eventuali incrostazioni con attenzione per evitare danni al bruciatore e liberare con aria compressa le feritoie da residui. TERMOSTATO “FAN”: Pulire la sonda del termostato “Fan” da eventuali accumuli di polvere. TERMOSTATO “LIMIT”: Pulire la sonda del termostato “Limit” da eventuali accumuli di polvere. TERMOSTATO “TMN”: Pulire la sonda del termostato “TMN” (controllo stadi MAX-min bruciatore) da eventuali accumuli di polvere. TERMOSTATO DI “MASSIMA”: Pulire la sonda del termostato di “Massima” (= Termostato di sicurezza) da eventuali accumuli di polvere. TURBINA AD ALTA PREVALENZA: Controllare che non vi siano depositi sulle pale della ventola ed eventualmente pulire. TUBI SCARICO FUMI E ASPIRAZIONE ARIA COMBURENTE: Rimuovere eventuali ostruzioni e/o depositi che possono essersi formati all'interno. Controllare che i condotti non siano deteriorati e che non ci siano depositi al loro interno. APPARECCHIATURE DI COMANDO, CONTROLLO E SICUREZZA: Verificare l'efficienza e funzionalità di tutta l’apparecchiatura elettrica ed in particolare verificare lo stato dell'impianto elettrico e l'efficienza dei collegamenti. SCHEDA ELETTRONICA DI PREMISCELAZIONE BRUCIATORE 2 STADI: Verificare l'efficienza e funzionalità di tutta l’apparecchiatura elettrica ed in particolare verificare lo stato dell'impianto elettrico e l'efficienza dei collegamenti. VITI E BULLONI: Verifica del serraggio di tutti i bulloni, dadi e flange che le vibrazioni avrebbero potuto allentare. VENTILATORE DI RISCALDAMENTO (GRUPPO MOTORE-VENTILATORE): Ź Sia il motore sia le ventole ruotano su cuscinetti autolubrificanti che non richiedono manutenzione. Ź Verificare che il ventilatore funzioni senza vibrazioni o rumori anomali. Ź Verificare che l’ingresso del circuito di ventilazione (se presente) non sia ostruito, con conseguente possibilità di surriscaldamento degli avvolgimenti del motore. Ź Verificare che la coclea del ventilatore sia libera da sporcizia e qualunque corpo estraneo. Ź Verificare che il motore ed il ventilatore non presentino tracce di polvere, sporcizia o altre impurità. Eventualmente pulire con un pennello o con aria compressa. BURNER : Carefully remove any incrustations, pay attention not to damage the burner. By compressed air clear the dirt out of the grids. “FAN” THERMOSTAT: Clean the “Fan” thermostat sensor, removing any dust deposits. “LIMIT” THERMOSTAT: Clean the “Limit” thermostat sensor, removing any dust deposits. “TMN” THERMOSTAT: Clean the “TMN” thermostat sensor (MAX-min burner stages controlled), removing any dust deposits. “MAXIMUM” THERMOSTAT: Clean the “Maximum” thermostat (= Safety thermostat) sensor, removing any dust deposits. HIGH STATIC PRESSURE TURBINE: Check that no dirt was left on the blades. Keep them clean. SMOKE EXHAUST AND COMBUSTION AIR SUCTION DUCTS : Remove any dirt that may be on the inside. Check that the ducts has not deteriorated and that there are no deposits inside. ELECTRONIC CONTROL AND SAFETY BOARDS : Check all the electrical equipment and their good performance, in particular check the condition of the electric system and check the efficiency of the connections. PREMIX ELECTRONIC CARD 2 STAGES BURNER : Check all the electrical equipment and their good performance, in particular check the condition of the electric system and check the efficiency of the connections. SCREWS AND NUTS: Check the tightness of all the nuts, bolts and flanges which may have been loosened by vibrations. HEATING FAN (FAN-MOTOR GROUP): Ź As well the motor as the fans rotate on self-lubricating bearings which do not need any lubrication. Ź Check that it operates without vibrations or abnormal noise. Ź Check that the ventilation circuit inlets (if present) are not obstructed, causing consequently the possibility of motor winding overheating. Ź Check that the fan scroll is free of dirt and foreign bodies. Ź Check there are no traces of dust, dirt or other impurities on the motor and on the fan. Eventually, clean by a paintbrush or compressed air. A fine lavori, rimontare accuratamente i componenti e controllare il regolare funzionamento. When the works are finished, carefully replace the components and check that they operate regularly. Pag. 56 Norme per l’utente: Assistenza – Information for the user: After-sales service ATTENZIONE ! Per tutte le operazioni di installazione, messa in funzione, manutenzione, cambi gas, ecc.. avvalersi sempre dell’opera di personale professionalmente qualificato. A questo riguardo BPS S.r.l. dispone di una rete di Centri di Assistenza che possono essere raggiunti tramite il venditore, l’agente di zona, oppure telefonando direttamente a BPS S.r.l. che vi fornirà l’indirizzo del servizio assistenza più vicino a voi. Prima di telefonare al Servizio Tecnico BPS S.r.l. accertarsi di avere a portata di mano la documentazione della macchina e possibilmente: Modello unità Numero di matricola Pressione e tipo di gas di alimentazione Descrizione, anche sommaria, del tipo di installazione WARNING ! For all installation operations, start-up, gas changes, etc. always consult a qualified service engineer. You can get technical assistance either asking directly your retailer or applying direct to BPS S.r.l. who will give you the address of the assistance service nearest to you. Before calling for service, make sure the unit technical data and manual is within reach and namely: Unit model Product serial no. Gas supply pressure and type Brief description of the installation type Norme per l’utente: Ricambi – Information for the user: Spare parts Ai fini della sicurezza e della qualità si raccomanda di utilizzare per le sostituzioni componenti e ricambi originali. Per l’ordinazione delle parti di ricambio citare sempre il modello dell’unità e la descrizione del componente. For safety and quality reasons, it is recommended to use original spare parts when replacing components. To order spare parts, you always have to indicate the unit model and the description of the part. SOSTITUZIONE COMPONENTI Per la sostituzione dei componenti è necessaria una specifica competenza tecnica, per cui si raccomanda di rivolgersi sempre ad un Centro Assistenza Tecnica autorizzato. ATTENZIONE! Tutte le operazioni di sostituzione ricambi devono essere eseguite con l’unità non funzionante, escludendo l'alimentazione gas ed elettrica. REPLACING PARTS Since specific technical skills are required to replace the spare parts, it is recommended to always contact skilled technical personnel. WARNING! All the replace spare parts operations must be carried out while the unit is turned off, disconnecting the gas and electric supplies. Irregolarità di funzionamento: Cause e Rimedi – Malfunctions: Causes and Remedies RIARMO DEL TERMOSTATO DI SICUREZZA Operazione a cura di personale professionalmente qualificato !! Il termostato di “Massima” (= Termostato di sicurezza) arresta il bruciatore in caso di riscaldamento eccessivo dell’unità. Il riarmo si effettua agendo sul pulsante posto sul pannello comandi all’interno del vano bruciatore, dopo aver svitato il cappuccio di protezione. Riposizionare il cappuccio dopo aver riarmato il termostato. ATTENZIONE ! L’intervento del termostato di sicurezza è SEMPRE indice di una condizione anomala. Per questo motivo il riarmo del termostato di limite è di competenza di personale professionalmente qualificato, che ripristinerà il funzionamento dell’unità solo dopo aver individuato la causa del surriscaldamento. PRIMA DI PROCEDERE A CONTROLLI PARTICOLARI, ACCERTARSI CHE: L'alimentazione elettrica sia correttamente collegata (con particolare riguardo alla polarità fase-neutro e alla presa di terra) e gli eventuali organi di regolazione esterna, quali termostato ambiente o orologio programmatore, funzionino regolarmente. Non manchi corrente elettrica (230 V – 1 Ph – 50 Hz) e non vi siano sbalzi di tensione superiori a ± 15%. I fusibili siano efficienti. I terminali esterni dei condotti di aspirazione aria comburente e di scarico dei prodotti della combustione non siano ostruiti o il loro materiale deteriorato. L'alimentazione gas sia corretta ed il rubinetto d'intercettazione gas sia aperto. Verificare che la pressione e la portata del gas corrispondano ai valori indicati nelle caratteristiche tecniche. Ad una pressione inferiore a quella indicata dal costruttore, corrisponde una insufficiente alimentazione gas. Le cause possono essere: Ź Se l’unità funziona a Gas naturale: Contatore insufficiente e/o lunghezza delle tubazioni gas ed il numero di curve eccessive rispetto al diametro utilizzato. Ź Se l’unità funziona a G.P.L.: Può accadere che dopo un primo spegnimento del bruciatore, al momento della riaccensione l’unità vada in blocco - in questo caso è possibile che il riduttore abbia portata insufficiente. Se non si raggiunge la pressione indicata è possibile che il serbatoio non abbia una portata adeguata, oppure che la lunghezza delle tubazioni gas ed il numero delle curve siano eccessive rispetto al diametro utilizzato. HOW TO RESET THE SAFETY THERMOSTAT Operation by professional technicians only !! The “Maximum” thermostat (= Safety thermostat) makes the burner stop in case the unit goes overheated. It can be easily reset using the button on the control panel inside the burner's housing, after unfastening the protection top. Replace down the top after resetting the thermostat. CAUTION! When the safety thermostat goes on, this is always due to some anomalous condition. For this reason, only professional technicians are entitled to carry out the limit thermostat reset procedure: they will restore the heater's performances after discovering the source of the overheating. BEFORE PERFORMING SPECIFIC TESTS, MAKE SURE THAT: The electric power supply is properly connected (with particular attention focused on the phase-neutral polarity and earth connector) and that any external adjustment components, such as a room thermostat or timer, operate correctly. Correct electric supply is provided (230 V – 1 Ph – 50 Hz) and should a rush of current occur, this mustn’t exceed ± 15%. Fuses must be in order. The external terminals of the combustion air intake and combustion product exhaust ducts are not obstructed or that their material has deteriorated. The gas supply is correct and the gas on-off valve is open. Check that gas pressure and capacity values must be exactly as stated in the technical data here above. (They are within the limits recommended by the manufacturer). A pressure lower than the given limits will result in insufficient gas inlet. The causes for this may be the following: Ź If the unit is fed with natural Gas: Poor gas meter performance and/or the length of the pipes and the number of elbows are excessive with respect to the diameter. Ź If the unit is fed with L.P.G.: It can happen that after the first time the burner turns off, the unit locks out at the moment of ignition - in this case it may be that the reducer flow is insufficient. If the required pressure is not reached, it may be either that the meter does not provide adequate flow or the length of the pipes and the number of elbows are excessive with respect to the diameter. Irregolarità di funzionamento: Cause e Rimedi – Malfunctions: Causes and Remedies Pag. 57 ATTENZIONE! Prima di aprire la portina laterale per accedere al quadro elettrico TOGLIERE TENSIONE all’unità mediante l’interruttore omnipolare posto a monte dell’unità. Le eventuali riparazioni devono essere effettuate soltanto da personale tecnico qualificato utilizzando ricambi originali. Non è permesso aprire o manomettere i componenti dell’unità ad esclusione delle sole parti previste nella manutenzione. SOLO A QUESTO PUNTO PROCEDERE AL CONTROLLO DEL GUASTO IN PARTICOLARE !! WARNING! Before opening the side door to access the control panel, CUT OUT THE POWER SUPPLY to the unit using the omnipolar switch. All repairs must be carried out by qualified skilled technical personnel only. Only original spare parts can be used. It is not allowed to open the unit or tampering with unit components, other than maintenance authorized parts. ONLY NOW, YOU CAN GO AHEAD AND FIND OUT THE PRECISE FAILURE !! Qui di seguito vengono elencati i possibili guasti con l’elenco delle probabili cause: The following is a list of possible defects along with their probable causes: CASO N°1: L’UNITÁ VA IN BLOCCO DURANTE LA PRIMA FASE DI ACCENSIONE Il collegamento della fase non è stato rispettato. L’elettrodo di accensione è rotto o mal posizionato (NOTA: Per una corretta accensione del bruciatore la distanza dell’elettrodo di accensione dalla testa del bruciatore deve essere tra i 4 e i 6 mm). L’elettrodo di rilevazione è rotto, o mal posizionato, o tocca la massa dell’unità (NOTA: La corretta distanza dell’elettrodo di rilevazione dalla testa del bruciatore deve essere tra i 10 e i 15 mm). Avaria della centralina di accensione o dei suoi collegamenti elettrici. Avaria della valvola gas o dei suoi collegamenti elettrici. Inefficace impianto di messa a terra (l’elettrodo di rilevazione non lavora). Presenza di aria nella tubazione gas. OCCURRENCE N°1: THE UNIT LOCKS OUT DURING THE FIRST IGNITION PHASE The phase connection had not been respected. The ignition electrode is broken or badly positioned (NOTE: For correct burner ignition, the distance of the ignition electrode from the burner head should be between 4 mm and 6 mm). The detecting electrode is broken or incorrectly positioned or touches the unit ground (NOTE: the correct distance of the detecting electrode from the burner head should be between 10 mm and 15 mm). Failure in the flame control unit or in its electrical connections. Failure in the gas valve or in its electrical connections. Check that the unit has a good earth (detecting electrode no work). Air is inside the gas pipes. CASO N°2: L’UNITÁ VA IN BLOCCO DURANTE IL FUNZIONAMENTO L’erogazione di gas viene a mancare istantaneamente per avaria dell’impianto gas; la centralina di comando ripete il ciclo di accensione, dopodiché chiude la valvola gas mandando in blocco l’unità (interruzione accidentale dell’alimentazione gas). L’erogazione di corrente elettrica viene a mancare istantaneamente per avaria della rete di alimentazione esterna, il termostato di “Massima" interviene mandando in blocco l’unità e impedendo il riavviamento della macchina; al ritorno della corrente lo si dovrà riarmare premendo il pulsante posto sul termostato stesso all’interno del quadro comando dell’unità (interruzione accidentale dell’alimentazione elettrica). L’elettrodo di rilevazione tocca la massa dell’unità o è interrotto. La valvola gas non si apre per avaria propria (es. bobina) o dei suoi collegamenti. OCCURRENCE N°2: THE UNIT LOCKS OUT DURING OPERATION The gas supply is suddenly cut off due to a failure in the gas system. The ignition control repeats the ignition cycle, after which the gas valve closes locking out the unit (accidental gas inlet cut off). The power supply is suddenly cut off due to a failure in the electrical supply mains, the “Maximum” temperature thermostat locks out the unit, thus preventing re-ignition. When electricity returns, push the reset button which is placed on the thermostat, inside the unit control panel (accidental power supply break). The flame sensor touches the unit ground or it is disconnected. The gas valve does not open due to a failure of the valve itself (ex. coil) or of its electrical connections. CASO N°3: IL TERMOSTATO DI “MASSIMA” ARRESTA IL BRUCIATORE Si sono surriscaldati gli scambiatori di calore: verificare il funzionamento del ventilatore ( perdita di giri o pale intasate di polvere ) o la quantità in eccesso di gas bruciato. Gli scambiatori si surriscaldano per accumulo di sporcizia o per ostruzione della bocca di mandata. Pulire gli scambiatori o liberare la bocca di mandata (si può ostruire anche la griglia di ventilazione). Per riarmare il termostato premere il pulsante posto sul termostato stesso (sotto il tappo nero a vite) all’interno dell’unità. OCCURRENCE N°3: THE “MAXIMUM” TEMPERATURE THERMOSTAT STOPS THE BURNER The heat exchangers have overheated. Check the fan working, (possibly reduced revolutions or blades full of dust) or the exceeding amount of burned gas. The exchangers overheat due to accumulation of dirt. Clean the exchangers (dirt can also obstruct ventilation and supply grille). To reset the thermostat push the button placed on the thermostat itself (under the black screw lead) inside the unit control panel. CASO N°4: IL BRUCIATORE SI SPEGNE E NON RIPARTE, ANCHE SE LA TEMPERATURA AMBIENTE LO RICHIEDE Controllare il funzionamento del termostato ambiente, e relativi collegamenti elettrici. Rivedere la posizione del termostato ambiente (controllare che non sia influenzato da sorgenti di calore esterne). OCCURRENCE N°4: THE BURNER GOES OUT AND DOES NOT RE-IGNITE EVEN IF ROOM TEMPERATURE REQUIRES IT Check the performance of the room thermostat and its electrical connections. Check the position of the room thermostat (check that it is not influenced by external heat sources). CASO N°5: LA TURBINA ARIA/GAS NON PARTE Verificare l’alimentazione alla scheda elettronica di premiscelazione bruciatore 2 stadi. Verificare l’integrità del fusibile della scheda elettronica di premiscelazione e l’integrità della sua linea di alimentazione. Verificare che il termostato ambiente richieda calore e sia correttamente collegato. Verificare i collegamenti elettrici della turbina. Verificare che non sia intervenuto il termostato “Limit”. Turbina in avaria. Termostato “limit” bruciatore guasto: Sostituirlo. OCCURRENCE N°5: THE AIR/GAS TURBINE DOESN’T START-OFF Check feeding to the premix electronic card 2 stages burner. Check the fuse in the premix electronic card and card supply line. Check the room thermostat requiring heat and its connections. Check the turbine’s electrical connections. Check if this was due to an input by the “Limit” thermostat. Turbine breakdown. “Limit” thermostat damaged: Replace it. Pag. 58 Irregolarità di funzionamento: Cause e Rimedi – Malfunctions: Causes and Remedies CASO N°6: LA TURBINA ARIA/GAS FUNZIONA MA L’UNITÁ NON SI ACCENDE I tubi di aspirazione e scarico sono ostruiti o troppo lunghi. La centralina d’accensione non inizia il ciclo: sostituire la centralina stessa. Elettrovalvola gas non funziona (bobine interrotte): Sostituirle. CASO N°7: IL VENTILATORE ARIA DI RISCALDAMENTO NON SI AVVIA Motore interrotto. Condensatore esaurito. Termostato “Fan” guasto. OCCURRENCE N°6: THE AIR/GAS TURBINE IS WORKING BUT THE UNIT DOESN’T START-OFF The suction/exhaust piping system is blocked or too long. The starting electronic board doesn’t begin to run the cycle: replace the board. The gas electrovalve is not working because of breakdown in the opening coils: replace them. OCCURRENCE N°7: THE HEATING AIR FAN DOESN’T START-OFF Motor disconnected. Condenser exhausted. Breakdown in the “Fan” thermostat. SOLO PER ACCESSORIO “PCA” (PLENUM DI RAFFREDDAMENTO CON BATTERIA AD ACQUA REFRIGERATA): Qui di seguito vengono elencati i possibili guasti con l’elenco delle probabili cause. ONLY FOR OPTIONAL “PCA” (COOLING PLENUM WITH CHILLED WATER COIL): The following is a list of possible defects along with their probable causes. CASO N°8: L’UNITÀ “PCA” NON RAFFREDDA COME IN PRECEDENZA Mancanza di acqua fredda: Controllare il refrigeratore e la pompa acqua fredda. Impostazione errata del pannello comandi: Impostare correttamente il pannello comandi. Controllare che: Il filtro (quando previsto un filtro aria) e la batteria siano puliti. Non sia entrata aria nel circuito idraulico, sfiatando dall’apposita valvola sfiato aria. L’impianto idraulico sia bilanciato correttamente. Il refrigeratore funzioni. La pompa acqua fredda funzioni. OCCURRENCE N°8: THE “PCA” UNIT DOES NOT COOL UP AS BEFORE Chilled water supply lack: Control the chiller and the chilled water pump. Wrong setting on control panel: See control panel settings. Make sure that: The filter (if air filter is present) and the coil are clean. Air did not enter in the hydraulic circuit, check it using provided air vent valve. The hydraulic circuit is well balanced. The chiller is functioning. The chilled water pump is functioning. CASO N°9: FENOMENI DI CONDENSAZIONE SULLA STRUTTURA ESTERNA DELL’UNITÀ “PCA” Sono state raggiunte le condizioni limite di temperatura acqua descritte nel Bollettino Tecnico (Limiti di funzionamento): Innalzare la temperatura acqua oltre i limiti minimi descritti nel Bollettino Tecnico. Problemi di drenaggio dell’acqua di condensa: verificare la bacinella e lo scarico condensa. Raggiunta la temperatura ambiente desiderata il ventilatore si ferma mentre continua a circolare acqua fredda attraverso la batteria: predisporre il sistema di regolazione dell’impianto in modo che a temperatura raggiunta, oltre allo stop del ventilatore, il flusso dell’acqua attraverso la batteria si blocchi (valvola 3 vie, valvola 2 vie, OFF della pompa, OFF del refrigeratore, ecc.). OCCURRENCE N°9: CONDENSATE ON THE EXTERNAL STRUCTURE OF THE “PCA” UNIT Temperature limit conditions (indicated in the Technical Bullettin operating limits) have been reached: Race the water termperature over the minimum limits mentioned in the Technical Bulletin. Condensate water draining problems: check the drain pan and the drain pipe. When the requested environment temperature is reached the fan stops while chilled water is still circulating in the coil: provide a regulation where water supply is stopped when environment temperature is reached (fan stop) - (3 way valve – 2 way valve – pump OFF – Chiller OFF, etc.). Per anomalie non contemplate, interpellare tempestivamente il Servizio Assistenza For anomalies don’t hesitate, contact the aftersales service immediately Smaltimento – Waste disposal A fine vita le unità serie BluFire devono essere smaltite nel rispetto delle normative vigenti nel paese di installazione. I materiali che compongono le unità sono: Lamiera aluzink Lamiera acciaio inox Lamiera acciaio zincato Rame Alluminio Poliestere Polietilene Fibra di vetro Acciaio inox Plastica At the end of its operating life the BluFire version unit must be disposed according to the regulation in force in the installation country. The units are manufactured with the following materials: Aluzink plates Stainless steel plates Galvanized steel plates Copper Aluminium Polyester Polyethylene Glass fibre Stainless steel Plastic
Scarica