G2618C-I1
8/24/00 4:40 PM
Page 1
FORNO A MICROONDE
G2618C
Istruzioni per l’Uso
e
Guida alla cottura
CODE NO. : DE68-01129B
G2618C-I1
8/24/00 4:40 PM
Page 2
Congratulazioni per l’acquisto
di un forno a microonde SAMSUNG.
I
Questa guida di Istruzioni per l’Uso contiene
molti consigli ed informazioni sulla cottura a
microonde. Si consiglia di leggere queste
istruzioni per sfruttare appieno le
potenzialità del forno a microonde.
Indice
◆ Forno.........................................................................................................................
2
◆ Pannello di Controllo ................................................................................................
3
◆ USO DI QUESTA GUIDA DI ISTRUZIONI PER I’USO ......................................................
4
◆ INSTALLAZIONE E PREPARAZONE DEL FORNO A MICROONDE
■
■
■
■
■
■
Norme di Sicurezza .......................................................................................
Accessori .......................................................................................................
Installazione del Forno a Microonde..............................................................
Funzionamento del Forno a Microonde.........................................................
Verifica del Corretto Funzionamento del Forno.............................................
Cosa Fare in Caso di Dubbi o di Difficoltà.....................................................
5
7
8
9
9
10
◆ COTTURA CON IL FORNO A MICROONDE
■
■
■
■
■
■
Cottura/Riscaldamento ..................................................................................
Interruzione della Cottura ..............................................................................
Aumento del Tempo di Cottura......................................................................
Scongelamento Manuale...............................................................................
Guida alla Cottura Automatica.......................................................................
Livelli di Potenza e Variazioni del Tempo di Cottura .....................................
11
12
12
13
13
14
◆ METODI DI COTTURA TRADIZIONALI
■
Cottura con Grill.............................................................................................
15
◆ RACCOMANDAZIONI PER L’USO
■
■
■
■
■
Guida agli Utensili..........................................................................................
Guida alla Cottura..........................................................................................
Pulizia del Forno a Microonde .......................................................................
Conservazione e Riparazione del Forno a Microonde ..................................
Dati Tecnici....................................................................................................
1
16
17
24
24
25
G2618C-I1
8/24/00 4:40 PM
Page 3
Forno
I
MANOPOLA
TIMER
FORI DI VENTILAZIONE
FORI DI VENTILAZIONE
MANOPOLA DI
CONTROLLO
POTENZA COTTURA
VARIABILE
GRILL
SERRATURE
SPORTELLO
SPORTELLO
TASTO DI
APERTURA
SPORTELLO
PIATTO DI VETRO
ANELLO
ROTANTE
FORI SERRATURA DI
SICUREZZA
BASE
RUOTANTE
2
G2618C-I1
8/24/00 4:40 PM
Page 4
Pannello di Controllo
I
SCONGELAMENTO
COTTURA
IMMEDIATA
TASTO DI
APERTURA
SPORTELLO
3
G2618C-I1
8/24/00 4:40 PM
Page 5
Uso di questa Guida di Istruzioni per l’Uso
I
Congratulazioni per aver acquistato un forno a microonde SAMSUNG. Le Istruzioni per l’Uso contengono
molte informazioni e consigli sulla cottura a microonde, in particolare:
◆ Precauzioni di sicurezza
◆ Accessori ed utensili specifici
◆ Consigli pratici per la cottura
Alla fronte del manuale sono riportate le illustrazioni del forno e soprattutto del pannello di controllo, che
è diverso a seconda dei modelli.
Le procedure passo-passo usano due simboli diversi.
☛
➢
Importante
Nota
PRECAUZIONI PER PREVENIRE POSSIBILI ESPOSIZIONI A LIVELLI ECCESSIVI DI
ENERGIA A MICROONDE
L’inosservanza delle seguenti norme di sicurezza potrebbe comportare un’esposizione dannosa all’energia a
microonde.
(a) In nessun caso tentare di usare il forno con lo sportello aperto o di manomettere le chiusure di sicurezza
(dispositivi di bloccaggio dello sportello) o di introdurre alcunché nei fori delle chiusure di sicurezza.
(b) Non collocare alcun oggetto tra lo sportello del forno e la battuta anteriore. Evitare l’accumulo di residui di cibo o di
detersivi sulle superfici di contatto tra lo sportello e la battuta anteriore. Controllare che lo sportello e le superfici di
contatto con la battuta anteriore del forno siano sempre pulite, sfregandole dopo l’uso prima con un panno umido
e quindi con un panno asciutto e morbido.
(c) Non usare il forno se presenta segni di danni sino a che non sia stato riparato da un centro di assistenza tecnica
autorizzato.
E’ particolarmente importante che lo sportello del forno si chiuda perfettamente e che non vi siano danni a carico
di:
(1) Sportello, superfici di contatto tra lo sportello e la battuta anteriore del forno
(2) Cerniere dello sportello (rotte o allentate)
(3) Cavo di alimentazione
(d) Il forno deve essere regolato o riparato solo da centri di assistenza tecnica autorizzati.
4
G2618C-I1
8/24/00 4:40 PM
Page 6
Norme di Sicurezza
I
Prima di scongelare, riscaldare o cuocere alimenti o liquidi nel forno a microonde, accertarsi di aver
preso le seguenti misure di sicurezza.
1
NON usare utensili metallici nel forno a microonde:
◆
◆
◆
Contenitori metallici
Piatti con decorazioni in oro o in argento
Spiedini, forchette, ecc.
Motivo:
2
NON scaldare:
◆
Vasetti, bottiglie o contenitori a chiusura ermetica o sotto vuoto
Esempio:
Vasetti di alimenti per bambini
◆
Alimenti ermetici
Esempio:
Uova, noci nel guscio, pomodori
Motivo:
Consiglio:
3
Consiglio:
Lasciare sempre un bicchiere d’acqua all’interno del forno che possa assorbire le microonde nel caso il
forno venga accidentalmente acceso mentre è vuoto.
Il tessuto o la carta potrebbero prendere fuoco a causa dell’aria molto calda che fuorisce dal forno.
Alcuni recipienti assorbono le microonde ed il calore viene sempre trasferito dal cibo al recipiente stesso,
che, pertanto, scotta.
NON toccare la serpentina o le pareti interne del forno.
Motivo:
7
Le pareti del forno potrebbero subire dei danni.
Usare SEMPRE guanti da forno per estrarre un piatto dal forno.
Motivo:
6
Togliere i coperchi e forare bucce, sacchetti, ecc.
NON coprire le fessure di ventilazione con panni o carta.
Motivo:
5
L’aumento di pressione potrebbe farli esplodere.
NON accendere il forno a microonde vuoto.
Motivo:
4
Si possono verificare scintille o scariche elettriche che possono danneggiare il forno.
Le pareti potrebbero essere sufficientemente calde da provocare scottature, anche a cottura terminata, ed
anche se non sembrano scottare. Evitare il contatto di materiali infiammabili con le pareti interne del forno.
Attendere che il forno si raffreddi.
Per ridurre i rischi di incendi all’interno del forno:
◆ Non lasciare nel forno materiali infiammabili
◆ Togliere i legacci metallici dai sacchetti di carta o di plastica
◆ Non usare il forno a microonde per asciugare giornali
◆ In presenza di fumo, tenere chiuso lo sportello del forno e spegnerlo o togliere la spina dalla presa elettrica.
5
G2618C-I1
8/24/00 4:40 PM
Page 7
Norme di Sicurezza (continua)
I
8
Prestare particolare attenzione nel riscaldamento di liquidi o di alimenti per bambini.
◆
◆
◆
◆
◆
◆
◆
9
Prestare attenzione a non danneggiare il cavo elettrico.
◆
◆
10
Attendere SEMPRE almeno 20 secondi dopo che il forno ha raggiunto il termine del programma di cottura per
consentire la distribuzione uniforme del calore.
Se necessario, mescolare durante la cottura e SEMPRE dopo la cottura.
Per evitare che i liquidi raggiungano il punto di ebollizione divenendo un potenziale pericolo di scottatura, mescolare,
prima, durante e dopo la cottura.
In caso di scottature:
•
Immergere l’area interessata in acqua fredda per almeno 10 minuti.
•
Fasciare con una benda asciutta e pulita.
•
Non applicare creme, olii, o lozioni.
NON riempire mai il contenitore sino al bordo. Usare un contenitore più largo nella parte superiore, per evitare che il
liquido trabocchi durante l’ebollizione. Le bottiglie a collo stretto potrebbero esplodere se surriscaldate.
Controllare SEMPRE la temperatura degli alimenti o del latte prima di darli ai bambini.
NON scaldare un biberon con la tettarella applicata, in quanto la bottiglia potrebbe esplodere se surriscaldata.
Non immergere in acqua il cavo elettrico o la spina e tenere il cavo lontano da superfici calde.
Non usare questo apparecchio se il cavo o la spina sono danneggiate.
Stare alla distanza di un passo dal forno durante l’apertura dello sportello.
Motivo:
11
Tenere pulito l’interno del forno.
Motivo:
12
Le particelle di cibo o gli schizzi di unto sulle pareti o sul pavimento del forno ne possono danneggiare la
verniciatura e ridurne l’efficienza.
Quando il forno è in funzione, particolarmente nel modo “scongelamento” si possono sentire dei “clic”.
Motivo:
13
L’aria calda o il vapore rilasciati potrebbero provocare scottature.
Quando l’energia elettrica in uscita cambia, si può sentire questo suono. E’ normale.
Quando il forno a microonde funziona a vuoto, l’alimentazione elettrica viene interrotta automaticamente per motivi di
sicurezza. Dopo 30 minuti, è possibile usare normalmente il forno.
IMPORTANTI ISTRUZIONI DI SICUREZZA
Durante la cottura, occorre ispezionare periodicamente l’interno del forno quando il cibo viene scaldato
o cotto in contenitori usa e getta di plastica, carta o altri materiali combustibili.
IMPORTANTE
NON consentire ai bambini di usare o giocare con il forno.
NON lasciarli senza sorveglianza nelle vicinanze del forno a microonde acceso.
NON conservare o nascondere oggetti appetibili per i bambini all’interno o sopra al forno.
ATTENZIONE
Radiazioni a microonde le persone non devono essere esposte all energia a microonde che puo’essere
irradiata dal magnetron o da alto dispositivio generatore di microonde nel caso di una utilizzazione o
una connessione non corretta. Tutte le connessioni a microonde di entrata e di uscita, le guide d’onda,
le flange e l giunti devono essere sicuri. Non fare funzionare il generatore il generatore senza un carico
previsto per assorbire l’energia a microonde. Non guardare mai all’interno di una guide d’onda aperta o
di una antenna mentre il generatoree’in funzione.
6
G2618C-I1
8/24/00 4:40 PM
Page 8
Accessori
I
A seconda del modello acquistato, sono forniti diversi accessori da
impiegare in svariati modi.
1
1
Perno, già collocato sull’albero del motore nella base del forno.
Impiego: Fa ruotare il piatto di vetro.
2
Anello rotante, da installare al centro del forno.
2
Impiego: Sostiene il piatto di vetro.
3
Piatto di vetro, da collocare sull’anello rotante con il centro inserito nel
perno.
Impiego: Serve da superficie principale di cottura, può essere estratto
facilmente per la pulizia.
4
3
Griglia in metallo, da collocare sul piatto di vetro.
Impiego: Per la cottura contemporanea di due piatti. E’ possibile collocare
un piatto piccolo sul piatto di vetro ed un secondo piatto sulla
griglia. La griglia metallica può essere usata per la cottura a grill
e la cottura combinata.
☛
4
NON usare il forno a microonde senza l’anello
rotante ed il piatto di vetro.
7
G2618C-I1
8/24/00 4:40 PM
Page 9
Installazione del Forno a Microonde
I
Collocare il forno su una superficie piana, orizzontale e
sufficientemente robusta.
sopra
20 cm
dietro
10 cm
di lato
10 cm
1
Mantenere una zona libera di almeno 10 cm dietro e ai lati del
forno e di 20 cm sopra al forno per la corretta ventilazione
dell’apparecchio.
2
Togliere tutto il materiale di imballaggio all’interno del forno.
Posizionare l’anello e la base rotante.
Verificare che la base rotante giri liberamente.
☛
☛
☛
8
Non otturare le fessure per l’areazione in quanto il forno può
surriscaldarsi e spegnersi automaticamente. Rimarrà non operativo sino
che si sarà sufficientemente raffreddato.
Connettere il cavo di alimentazione ad una presa a 3 conduttori, 230
Volt, 50Hz, AC con collegamento di terra. Nel caso il cavo risultasse
danneggiato, sostituirlo con un cavo speciale (I-SHENG SP022, KDK
KKP4819D, EUROELECTRIC 3410, SAMIL SP-106B, MOONSUNG EP48E). Per la sostituzione rivolgersi al rivenditore SAMSUNG più vicino.
Non installare il forno a microonde in prossimità di calore eccessivo o di
umidità, per esempio vicino ad un forno tradizionale o ad un calorifero.
Le specifiche dell’alimentazione del forno devono essere rispettate ed
eventuali prolunghe del cavo di alimentazione devono avere le stesse
caratteristiche del cavo in dotazione del forno. Prima di usare il forno per
la prima volta, pulirne le pareti interne e la maniglia con un panno umido.
G2618C-I1
8/24/00 4:40 PM
Page 10
Funzionamento del Forno a Microonde
I
Le microonde sono onde elettromagnetiche ad alta frequenza;
l’energia rilasciata consente la cottura od il riscaldamento degli
alimenti senza alterarne la forma o il colore.
Il forno a microonde può essere usato per:
◆ Scongelare
◆ Riscaldare
◆ Cuocere
Principi di Cottura
1
Le microonde generate dal magnetron vengono distribuite uniformemente
grazie alla rotazione del cibo sul piatto di vetro. Gli alimenti vengono
pertanto cotti in modo uniforme.
2
Le microonde vengono assorbite dal cibo sino ad una profondità di circa
2.5 cm. La cottura procede tramite la diffusione del calore nell’alimento.
3
I tempi di cottura variano in base al tipo di recipiente usato ed alle
caratteristiche del cibo:
◆ Quantità e densità
◆ Contenuto di acqua
◆ Temperatura iniziale (da frigorifero o meno)
☛
Poiché il centro dell’alimento viene cotto mediante
diffusione di calore, la cottura continua anche dopo
aver estratto il cibo dal forno. Pertanto i tempi di
attesa specificati nelle ricette ed in questa guida
devono essere rispettati per garantire:
◆ La cottura completa ed uniforme della parte
interna del cibo
◆ La temperatura uniforme dell’alimento
Verifica del Corretto Funzionamento del Forno
La semplice procedura che segue consente di verificare il corretto
funzionamento del forno ogni volta che lo si usa. In caso di dubbi,
vedere la sezione dal titolo “Cosa Fare in caso di Dubbi o di
Difficoltà” nella pagina seguente.
➢
◆
◆
◆
Il forno deve essere connesso ad una presa di
corrente idonea.
Il piatto di vetro deve essere collocato
correttamente nel forno.
Se si seleziona un livello di potenza inferiore al
massimo, il tempo di ebollizione dell’acqua si
allunga.
1
Aprire lo sportello del forno premendo il tasto grande nell’angolo inferiore
di destra del pannello di controllo. Mettere un bicchiere d’acqua sul piatto
di vetro. Chiudere lo sportello.
2
Impostare il livello massimo di potenza ruotando la manopola di
CONTROLLO DELLA POTENZA DI COTTURA.
3
Impostare 4 o 5 minuti ruotano la manopola del TIMER.
9
G2618C-I1
8/24/00 4:40 PM
Page 11
Cosa Fare in Caso di Dubbi o di Difficoltà
I
Acquisire familiarità con un nuovo apparecchio, richiede sempre un certo periodo di tempo. Nel caso si
incontrasse uno dei problemi elencati di seguito, si consiglia di sperimentarne le soluzioni suggerite, per
evitare perdite di tempo e inutili chiamate al centro di assistenza.
Problema
◆
◆
◆
◆
Condensa all’interno del forno
Fuoriuscita di aria dallo sportello e dal
mobile esterno
Riverbero di luce attorno allo sportello
ed al mobile esterno
Fuoriuscita di vapore dallo sportello o
dalle fessure di aerazione
Controlli / Spiegazione / Soluzione
Queste quattro condizioni sono da considerarsi normali.
Il forno non parte quando si ruota la manopola del TIMER.
◆ Lo sportello è perfettamente chiuso?
Il cibo non è per niente cotto
◆ Il timer è stato impostato correttamente?
◆ Lo sportello è chiuso?
◆ Il circuito elettrico è stato sovraccaricato provocando la fusione di
un fusibile o lo scatto di un interruttore di sicurezza?
Il cibo è troppo cotto o poco cotto
◆ E’ stato impostato il tempo di cottura appropriato per il tipo di
alimento?
◆ E’ stata selezionata la potenza corretta?
Scintille e crepitii all’interno del forno (scariche)
◆ Il piatto ha delle decorazioni metalliche?
◆ Sono stati lasciati inavvertitamente utensili o posate in metallo
all’interno del forno?
◆ Il foglio di alluminio è troppo vicino alle pareti interne?
Il forno provoca interferenze radio o televisive
◆ Si potrebbero rilevare leggere interferenze alla radio o alla
televisione durante il funzionamento del forno. Questo è un fatto
normale.
Soluzione: Installare il forno lontano da apparecchi televisivi,
radio ed antenne.
Se questi consigli non fossero risolutivi, prendere nota di:
◆ Numero di modello e di serie, generalmente impressi sul retro del forno
◆ I dettagli della garanzia (data e luogo di acquisto)
◆ Una chiara descrizione del problema
Contattare quindi il rivenditore locale o il servizio postvendita SAMSUNG.
10
G2618C-I1
8/24/00 4:40 PM
Page 12
Cottura/Riscaldamento
I
Le istruzioni seguenti spiegano come cuocere o riscaldare il cibo.
☛
Controllare SEMPRE le impostazioni di cottura prima
di lasciare il forno senza sorveglianza.
1
Aprire lo sportello del forno premendo il tasto grande nell’angolo inferiore
di destra del pannello di controllo. Mettere il cibo al centro del piatto di
vetro. Chiudere lo sportello.
2
Impostare il livello massimo di potenza ruotando la manopola di
CONTROLLO DELLA POTENZA DI COTTURA.
Modello
G2618C
POTENZA MASSIMA
3
800 W
Impostare il tempo ruotando la manopola del TIMER.
Risultato:
➢
La luce del forno si accende ed il piatto di vetro comincia a
ruotare. La cottura ha inizio.
E’ possibile cambiare il livello di potenza durante la
cottura ruotando la manopola di CONTROLLO DELLA
POTENZA DI COTTURA.
11
G2618C-I1
8/24/00 4:40 PM
Page 13
Interruzione della Cottura
I
Il processo di cottura può essere interrotto in qualsiasi momento
per:
◆ Controllare il cibo
◆ Girare il cibo o mescolarlo
◆ Lasciarlo riposare
Per interrompere la cottura ...
Eseguire quanto segue ...
Temporaneamente
◆ Aprire lo sportello
Risultato:
La cottura si interrompe.
Per riprendere la cottura, chiudere lo
sportello.
Definitivamente
Ruotare la manopola del TIMER su ‘0’.
Aumento del Tempo di Cottura
Come nella cottura tradizionale, può accadere che, a causa delle
caratteristiche del cibo o dei propri gusti, occorra una leggera
modifica del tempo di cottura. E’ possibile:
◆ Controllare in qualsiasi momento come procede la
cottura semplicemente aprendo lo sportello
◆ Aumentare il tempo di cottura residuo
Per aumentare il tempo di cottura, è sufficiente girare la manopola del TIMER sul
tempo desiderato.
➢
12
E’ possibile regolare il tempo durante la cottura soltanto
quando si seleziona il modo a microonde, grill o cottura
alternata con microonde e grill.
G2618C-I2
8/24/00 4:41 PM
Page 13
Scongelamento Manuale
I
1
Aprire lo sportello del forno premendo il tasto grande nell’angolo inferiore
di destra del pannello di controllo.
2
Mettere nel forno il cibo surgelato e chiudere lo sportello.
3
Ruotare la manopola di CONTROLLO DELLA POTENZA DI COTTURA
mettendola sul simbolo dello scongelamento.
4
Ruotare la manopola del TIMER per scegliere il tempo idoneo.
Risultato:
Lo scongelamento ha inizio.
Guida alla Cottura Automatica
1
Mettere il cibo nel forno e chiudere lo sportello.
2
Ruotare la manopola di CONTROLLO DELLA POTENZA DI COTTURA
mettendola nella posizione di massima potenza.
3
Ruotare la manopola del TIMER per selezionare la cottura automatica
(bevande, minestre/salse e verdure fresche).
➢
Simbolo
Vedere la tabella seguente per le istruzioni sulla cottura
automatica.
Cibo
Bevande
Quantità
150 ml
Tempo di attesa
1 - 2 min.
Minestre/Salse
200 ~ 300 ml
2 min.
Verdure fresche
200 ~ 300 g
2 min.
13
G2618C-I2
8/24/00 4:41 PM
Page 14
Livelli di Potenza e Variazioni del Tempo di Cottura
I
Funzionamento
Ruotare la manopola di CONTROLLO DELLA POTENZA DI
COTTURA portandola sul livello idoneo.
La funzione livello di potenza consente di definire la quantità di
energia dissipata e pertanto il tempo richiesto per la cottura o il
riscaldamento del cibo, in base alla tipologia ed alla quantità
dell’alimento. I livelli di potenza disponibili sono parecchi.
G2618C
LIVELLO POTENZA
%
MWO
GRILL
ALTA
100%
800W
-
MEDIO-ALTA
70%
560W
-
MEDIA
50%
400W
-
MEDIO-BASSA
30%
240W
-
SCONGELAMENTO (
20%
160W
-
BASSA
15%
120W
-
GRILL (
)
-
-
1000W
Cottura alternata con
microonde e grill
Proporzione di tempo durante
un ciclo di cottura di 100 secondi
100%
800W
1000W
18%
82%
)
I tempi di cottura indicati dalle ricette e da questa guida
corrispondono allo specifico livello di potenza indicato.
14
Selezionando una ...
Il tempo di cottura va ...
Potenza maggiore
Ridotto
Potenza minore
Aumentato
G2618C-I2
8/24/00 4:41 PM
Page 15
Cottura con Grill
I
Il grill consente di riscaldare e dorare rapidamente il cibo senza
usare le microonde. Per questo scopo il forno a microonde è dotato
di una griglia apposita in metallo.
☛
Usare sempre guanti da forno in quanto gli utensili
raggiungono temperature molto elevate.
1
Preriscaldare il grill alla temperatura desiderata, portando la manopola di
CONTROLLO DELLA POTENZA DI COTTURA sul GRILL(
) e
mettendo la manopola del TIMER sul tempo appropriato.
2
Aprire lo sportello e mettere il cibo sulla griglia.
3
Ruotare la manopola di CONTROLLO DELLA POTENZA DI COTTURA
portandola sul simbolo GRILL (
).
4
Ruotare la manopola di TIMER portandola sul tempo appropriato.
Risultato:
➢
La grigliatura comincia.
Non occorre preoccuparsi se la serpentina del grill si accende
e si spegne durante la cottura. Questo sistema è stato
progettato per evitare il surriscaldamento del forno.
15
G2618C-I2
8/24/00 4:41 PM
Page 16
Guida agli Utensili
I
Per cuocere i cibi, le microonde devono poter penetrare negli alimenti, senza essere riflesse o assorbite
dai recipienti che li contengono.
E’ quindi importante fare attenzione al tipo di utensile che viene usato. Se il recipiente è marcato come
idoneo alle microonde, non c’è motivo di preoccuparsi.
La tabella seguente elenca i vari tipi di utensili ed indica se o come debbano essere impiegati per la
cottura in un forno a microonde.
Utensile
Idoneo alle microonde Commenti
Foglio di alluminio
✔ ✘
Da usare in piccole quantità per limitare la cottura di parti di
cibo. Può provocare scintille se il foglio è troppo grande o
troppo vicino alle pareti del forno.
Piatto per dorare
✔
Non preriscaldare per più di otto minuti.
Porcellana e terracotta
✔
Porcellana, ceramiche, terracotte smaltate o porcellana cinese
sono generalmente adatte, a patto che non siano decorate in
metallo.
Piatti di carta o plastica
✔
Alcuni cibi surgelati sono confezionati in questi contenitori.
✔
Utili per scaldare i cibi. Il surriscaldamento può sciogliere il
polistirene.
Potrebbero prendere fuoco.
Potrebbe provocare scintille.
Contenitori fast-food
• Tazze e contenitori in
polistirene
• Sacchetti di carta o giornali
• Carta riciclata o decorazioni
in metallo
Vetro
✘
✘
•
•
Pirex
Vetro fine
✔
✔
•
Vasetti di vetro
✔
Metallo
• Piatti
• Legacci per sacchetti da congelatore
Carta
•
•
Piatti, tazze, tovaglioli e
carta da cucina
Carta riciclata
Plastica
• Contenitori
•
Pellicola in plastica
•
Sacchetti per congelatore
Carta da forno
16
Può essere usato, purché non sia decorato in metallo.
Può essere usato per scaldare cibi o liquidi. Il vetro delicato
potrebbe rompersi o creparsi se scaldato con rapidità.
Occorre togliere il tappo. Idonei solo per riscaldare.
✘
✘
Potrebbero provocare scintille o incendi.
✔
Per tempi di cottura minimi ed a temperatura media. Inoltre
assorbono eccessiva umidità.
Potrebbe provocare scintille.
✘
✔
✔
✔ ✘
✔
In particolare se di termoplastica resistente al calore. Alcune
plastiche potrebbero deformarsi o scolorirsi a temperature
elevate. Non usare melanina.
Può essere usata per conservare l’umidità. Non deve toccare il
cibo. Fare attenzione alla fuoriuscita di vapore bollente mentre
si toglie la pellicola.
Solo se idonei alla bollitura e per forno. Non devono essere
ermetici. Se necessario, bucarli con una forchetta.
Da usare per trattenere l’umidità ed evitare gli schizzi.
G2618C-I2
8/24/00 4:41 PM
Page 17
Guida alla cottura
I
Alcune tecniche di cottura
Per ottenere una cottura regolare del cibo nel forno a
microonde, disporre il cibo con cura applicando le seguenti
semplici tecniche.
NON dimenticare di rispettare i tempi di riposo.
Tabella di conversione dal sistema Per evitare che le parti più sottili di
alcuni alimenti cuociano troppo,
imperiale al sistema metrico
ONCES/
ONCES
LIQUIDES
GRAMMES/
MILLILITRES
APPROX.
1
25
2
50
3
75
4 (1/4 lb)
100
5 (1/4 pint)
150
6
175
7
200
8 (1/2 lb)
225
9
250
10 (1/2 pint)
275
11
300
12 (3/4 lb)
350
13
375
14
400
15 (3/4 pint)
425
16 (1 lb)
450
17
475
18
500
19
550
20 (1 pint)
575
coprire le punte con pezzettini di
foglio di alluminio (tenere lontano
dalle pareti del forno).
Per evitare che le parti più sottili di
alcuni alimenti cuociano troppo,
coprire le punte con pezzettini di
foglio di alluminio (tenere lontano
dalle pareti del forno).
Esempi: La testa e la coda del
pesce intero, le ali del pollo
intero.
Esempi: La testa e la coda del
pesce intero, le ali del pollo
intero.
Se si devono cuocere diversi pezzi
dello stesso tipo di alimento,
dividere l’alimento in parti uguali e
disporle ad anello attorno al piatto.
Occorre punzecchiare con una
forchetta gli alimenti che hanno una
buccia o una pelle per evitare la
fuoriuscita di vapore e la rottura
dela pelle o dela buccia.
Esempi: Patate, cavolfiori,
pomodori.
Esempi: Patate, pomodori, salsicce,
tuorli d’uovo, pesce intero.
17
G2618C-I2
8/24/00 4:41 PM
Page 18
Riscaldamento
Alimenti
I
PORTATE
PRINCIPALI
VERDURA
CIBI AMIDACEI
Tempo di cottura
(minuti)
2-3
3 - 4 1/2
6-8
MEDIO-ALTO (70%)
Carne cotta, pollo, braciole, hamburger, ecc.
1 porzione
2 porzioni
1 1/2 - 3
2 1/2 - 4 1/2
MEDIO-ALTO (70%)
Piatti in casseruola mescolabili
1 porzione
2 porzioni
4-6 porzioni
2-4
4-6
6 - 10
MEDIO-ALTO (70%)
• Coprire con pellicola.
• Mescolare bene dopo 1 minuto.
Piatti non mescolabili
(es.: LASAGNE)
1 porzione
2 porzioni
4 porzioni
5-8
9 - 12
12 - 16
MEDIO-BASSO (30%)
MEDIO-BASSO (30%)
MEDIO (50%)
• Coprire con pellicola.
• Ruotare il piatto ad intervalli di 2 minuti.
1 porzione
2 porzioni
4 porzioni
1 - 1 1/2
1 1/2 - 3
3 1/2 - 6
ALTO (100%)
7 -10
MEDIO-ALTO (70%)
2
3 1/2 - 4
ALTO (100%)
ALTO (100%)
Torte farcite
1 tortina singola
4 tortine singole
1/4 - 1/2
3/4 - 2 1/2
ALTO (100%)
ALTO (100%)
Pizza
1 pizza intera
1 fetta di pizza
3-4
1 1/2 - 2
MEDIO-ALTO (70%)
ALTO (100%)
Riso
1 porzione cotta
4 porzioni cotte
1 porzione di riso al
curry
2-3
8 - 10
3-5
MEDIO-ALTO (70%)
Pasta
1 porzione
4 porzioni
3-4
10 - 12
MEDIO-ALTO (70%)
2-3
3-4
ALTO (100%)
• Trasferire in un contenitore idoneo da forno.
• Coprire con pellicola.
• Mescolare bene dopo 1 e 2 minuti.
Budino spugnoso
1 porzione
2 porzioni
1 - 1 1/2
2-3
ALTO (100%)
Christmas pudding
1 porzione
Intero (450 g)
• Coprire con pellicola.
• Lasciare riposare per 2 - 3 minuti prima di
servire, particolarmente se il budino è ricoperto di marmellata.
1/2 - 1
4-5
ALTO (100%)
MEDIO-ALTO (70%)
• Riscaldare con attenzione in un contenitore
scoperto, in quanto l’elevato contenuto di
alcool e di zucchero potrebbe far bruciare
il budino in caso di surriscaldamento.
Cibi pronti (fagioli stufati,
spaghetti), zuppe e budini
di riso
200 g
425 g
BUDINI
18
Commenti
Piatti singoli con contorno
1 piatto
2 piatti
4 piatti
Torte
1 torta famiglia, tenuta
in freddo
1 tortina singola
2 tortine singole
CIBI IN SCATOLA
Livello di
potenza
• Coprire la carne con il sugo, disponendo la
carne e la verdura verso l’esterno del piatto.
• Girare a metà del ciclo di riscaldamento.
• Impilare i piatti usando un impilatore.
• Coprire con pellicola.
• Cambiare una volta la disposizione durante
cottura.
• Coprire con pellicola.
• Mescolare bene a metà cottura.
• Se necessario, togliere dal vassoio il foglio
di alluminio.
• Lasciar riposare e coprire con carta assorbente da cucina.
• Aggiungere del brodo, panna o burro per:
– aumentare l’umidità
– evitare che il cibo si attacchi
• Aggiungere del brodo, panna o burro per:
– aumentare l’umidità
– evitare che il cibo si attacchi
G2618C-I2
8/24/00 4:41 PM
Page 19
Scongelamento
Alimenti
CARNE
PESCE
FRUTTA
FARINACEI
Tempo di
riposo (minuti)
Commenti
I
Pezzi interi (manzo,
agnello, maiale, ecc.)
8 - 11
20 - 30
• Proteggere eventuali estremità sottili o strette con foglio di alluminio.
• Capovolgere due volte durante lo scongelamento.
Manzo/agnello tritato
7-9
10 - 15
• Smuovere spesso.
• Togliere non appena possibile le parti scongelate e lasciare riposare.
Bistecche, costolette,
cotolette
6-9
10 - 15
• Girare a metà scongelamento.
• Se necessario proteggere estremità ed ossa
con foglio di alluminio.
Salsicce, bacon
4-5
5
15
5 minuti a metà
scongelamento
5 minuti alla fine
Spezzatino
7-8
10 - 15
Pollo, tacchino, anatra,
ecc. interi
8 - 10
20 - 30
• Proteggere le ali, lo sterno, i fusi con foglio
di alluminio.
• Cominciare lo scongelamento con il petto
rivolto verso il basso e capovolgere a metà
del ciclo di scongelamento.
Fusi, ali, cosce
piccoli
grandi
6-8
7-9
10 - 15
10 - 15
• Disporre le estremità più sottili verso il centro del piatto.
• Capovolgere e cambiare la disposizione due
volte durante il ciclo di scongelamento.
Pesce intero (trote, sgombri)
4-5
5 - 10
Filetti (platessa, aringhe)
3-5
10 - 15
Bistecche (merluzzo, salmone)
4-5
10 - 15
• Proteggere se necessario le estremità sottili
con foglio di alluminio.
• Disporre in un unico strato.
• Capovolgere una volta durante il ciclo di
scongelamento.
Gamberetti, pettini
5-6
(225 g)
5 - 10
• Mescolare a metà ciclo di scongelamento.
Pesce confezionato
3-5
5
• Punzecchiare il sacchetto e metterlo in un
piatto da forno.
• Capovolgere a metà ciclo di scongelamento.
Frutta molle (ciliege,
fragole, frutti di bosco)
6-8
5 - 10
Frutta dura (mele, pesche,
pere)
7-8
5 - 10
• Misurare la quantità richiesta.
• Mescolare una volta e ridisporre durante lo
scongelamento ed il tempo di riposo.
Puree di frutta
7 - 10
10 - 15
• Mescolare con attenzione durante lo scongelamento.
Torte di frutta, zuppa
inglese, crostate di frutta
3-4
10 - 15
• Appoggiare su piatto di portata.
Pane
pagnotta grossa affettata/non affettata
5-7/6-8
10 - 15
pagnotta piccola affettata/non affettata
3-5/4-6
10 - 15
•
•
•
•
1 fetta
10 - 20 sec
–
15 - 15 sec
30 sec
1 - 1 1/2
1-2
1-2
1-2
Piatti cotti in casseruola
POLLAME
Tempo di cottura
(minuti/450 g)
Panini e brioches
1
2
4
• Separare e cambiare la disposizione due
volte durante lo scongelamento.
• Staccare e mettere da parte le parti scongelate.
Togliere dalla plastica.
Appoggiare su carta da cucina assorbente.
Capovolgere a metà ciclo di scongelamento.
L’eccessivo scongelamento disidrata il pane.
19
G2618C-I2
8/24/00 4:41 PM
Page 20
Scongelamento (continua)
I
Alimenti
FARINACEI
(continuazione)
Tempo di cottura
(minuti/450 g)
Tempo di
riposo (minuti)
1
(225 g)
20
• Togliere dalla confezione.
• Appoggiare su carta da cucina assorbente.
• Girare spesso in modo che si riscaldi uniformemente.
Flan ripieni (18-20 cm)
4-5
5 - 10
• Appoggiare su carta da cucina sul piatto di
portata.
• Togliere la carta prima di servire.
Salsiccioni (4)
2-3
5
• Avvolgere ciascun salsiccione in carta da
cucina per assorbire l’umidità.
• E’ essenziale lasciar riposare per il tempo
indicato.
1 - 1 1/2
40 - 60 sec
5 - 10
Pasta per dolci non cotta
Pan di spagna
intero
porzioni singole
20
Commenti
• Appoggiare su carta da cucina.
G2618C-I2
8/24/00 4:41 PM
Page 21
Cottura della carne
Alimenti
MANZO
Carne arrosto sottile (filetto)
al sangue
medio
ben cotta
MAIALE
VITELLO
PROSCIUTTO
Livello di
potenza
Commenti
I
6
6-8
8-9
ALTO (100%)
per i primi 3 minuti
quindi MEDIO (50%)
• Girare a metà del ciclo di cottura.
• Lasciar riposare per 15-25 minuti.
10 - 12
13
14 - 15
ALTO (100%)
per i primi 5 minuti
quindi MEDIO (50%)
• Coprire l’osso ed il bordo esterno con foglio
di alluminio.
• Girare a metà del ciclo di cottura.
• Lasciar riposare per 15-25 minuti.
Punta di pezzo e brasato
(ben cotto)
20
ALTO (100%)
per i primi 5 minuti
quindi SCONGELAMENTO (30%)
Bistecca (225 g)
al sangue
ben cotta
3
5
MEDIO-ALTO (70%)
Tagli teneri
(coscia, filetto)
medio
ben cotto
10 - 12
12 - 14
ALTO (100%)
per i primi 5 minuti
quindi MEDIO (50%)
• Girare a metà del ciclo di cottura.
• Lasciar riposare per 15-25 minuti.
Tagli più duri
(spalla, costine)
ben cotto
15
Carne arrosto spessa
(costata, culaccio, parte
superiore)
al sangue
medio
ben cotto
AGNELLO
Tempo di cottura
(minuti/450 g)
• Cuocere con coperchio.
• Lasciar riposare per 20 minuti.
Costolette, cotolette
ben cotte
8 - 10
MEDIO-ALTO (70%)
• Disporre le estremità sottili verso il centro
del piatto.
• Lasciar riposare per 5 minuti.
Coscia, spalla
ben cotto
10 -12
ALTO (100%)
per i primi 5 minuti
quindi MEDIO (50%)
• Girare a metà del ciclo di cottura.
• Lasciar riposare per 15-25 minuti.
Costolette
ben cotte
8 - 10
MEDIO-ALTO (70%)
• Disporre le estremità sottili verso il centro
del piatto.
• Lasciar riposare per 5 minuti.
Coscia, spalla, lombata,
costata
ben cotto
15
ALTO (100%)
per i primi 5 minuti
quindi MEDIO (50%)
• Girare a metà del ciclo di cottura.
• Lasciar riposare 15-20 minuti.
Pezzo intero (ben cotto)
10 - 12
MEDIO (50%)
• Girare a metà del ciclo di cottura.
• Lasciar riposare per 15-20 minuti.
6-8
MEDIO-ALTO (70%)
• Girare a metà del ciclo di cottura.
• Lasciar riposare per 5 minuti.
3/4 - 1 1/4
1 1/2 - 2 1/4
2 3/4 - 4
ALTO (100%)
Bistecca (ben cotta)
Bacon
1 fetta
2 fette
4 fette
• Coprire con carta da cucina.
21
G2618C-I2
8/24/00 4:41 PM
Page 22
Cottura della verdura fresca
Alimenti
I
PATATE
FAGIOLI, PISELLI, ecc.
VERZE, CAVOLFIORI, ecc.
4-5
6-8
12 - 14
• Lavare bene le patate e punzecchiare la
buccia con una forchetta.
• Quando sono quasi cotte, avvolgerle in foglio
di alluminio e lasciarle riposare per 5 minuti.
Patate sbucciate tagliate a
cubetti da 3 cm
3
6-7
• Mettere le patate in un grande piatto da forno
e coprire a tenuta.
• Mescolare bene a metà del ciclo di cottura.
• Se si vuol fare un puree di patate, aumentare
il tempo di cottura di 1-2 minuti.
Fagiolini
450 g
6-8
Fagioli di spagna affettati
450 g
5-6
• Aggiungere 30 ml di acqua.
• Assaggiare dopo il tempo di cottura minimo.
• Servire immediatamente.
Fave
225 g
4-5
Piselli
225 g
4-6
Taccole
375 g
6-7
1/2 di dimensione
media
5-7
450 g
225 g
8 - 10
5-7
1 intero
10
Broccoli
450 g
225 g
7-8
4-5
Spinaci
450 g
5-6
Erbette
450 g
7-8
Carote (affettate sottili)
450 g
225 g
10
6-7
4 medie
12 - 15
Rape
450 g
10 - 12
Radice di pastinaca
(divisa in 4 parti)
450 g
Funghi
225 g
2-3
• Cuocere in un piatto coperto con burro fuso.
• Non cuocere eccessivamente.
2 grandi
4-5
4-6
2-3
• Cuocere in un piatto coperto senza aggiunta di acqua.
Pomodori
2
2-3
• Tagliare i pomodori a metà.
• Cospargere con burro o formaggio grattugiato.
• Cuocere in un piatto non coperto.
Zucchini
225 g
3-4
• Cuocere in poca acqua fino a che sono
morbidi.
4 gambi
2-3
• Aggiungere 30 ml di acqua.
1
2
4
2-3
3-4
6-8
• Avvolgere ogni pannocchia in pellicola o
mettere le pannocchie in un piatto da forno
poco profondo.
• Girare due volte durante il ciclo di cottura.
Asparagi
450 g
5-6
• Aggiungere 60 ml di acqua.
Carciofi
1
4-5
• Avvolgere ogni carciofo in pellicola.
225 g
6-7
• Mettere in un piatto da forno grande e coprire a tenuta.
• Mescolare bene a metà del ciclo di cottura.
• Se si vuole fare una purea, prolungare il tempo di cottura di 2 minuti.
Verza (tagliata grossolanamente)
Barbabietola (non sbucciata)
Cipolle
intere
divise in quarti
Gambi di sedano (divisi
a metà)
Pannocchie di mais
Zucca a cubetti di 3 cm
22
Commenti
1
2
4
Cavolfiore, diviso a ciuffi
ALTRE VERDURE
Tempo di cottura
(min. a potenza ALTA)
Patate intere non sbucciate
Cavolini di Bruxelles
RADICI
Quantità
• Aggiungere 60 ml di acqua.
• Aggiungere 60 ml di acqua.
• Disporre i ciuffi con il gambo verso il
centro del piatto.
• Cuocere le foglie tenere con pochissima
acqua.
• Coprire non a tenuta.
• Aggiungere 60 ml di acqua.
• Aggiungere 60 ml di acqua.
• Coprire a tenuta.
• Mescolare a metà del ciclo di cottura.
• Avvolgere in pellicola o cuocere in un
piatto coperto.
G2618C-I2
8/24/00 4:41 PM
Page 23
Cottura di verdura surgelata
Alimenti
PATATE
FAGIOLI, PISELLI, ecc.
VERZE, CAVOLFIORI, ecc.
RADICI
ALTRE VERDURE
Quantità
Tempo di cottura
(min. a potenza ALTA)
1
2
4-5
6-8
• Le patate fritte non si prestano per la cottura
nel forno a microonde.
Fagiolini
450 g
8 - 10
Fave
375 g
7-8
• Aggiungere 30 ml di acqua.
• Mettere in un piatto da forno poco profondo
e coprire.
Piselli
125 g
225 g
450 g
2-3
4-5
8
Taccole
225 g
4-5
Verdura mista
125 g
225 g
3-4
4-6
Verze
225 g
3-4
• Aggiungere 45 ml di acqua.
Cavolini di Bruxelles
225 g
4-5
• Aggiungere 30 ml di acqua.
• Assaggiare dopo il tempo di cottura minimo
per evitare una cottura eccessiva.
Cavolfiori
225 g
5-6
• Aggiungere 30 ml di acqua.
• Cambiare la disposizione a metà del ciclo
di cottura.
• Lasciar riposare per 1-2 minuti e salare a
proprio piacimento.
Broccoli
225 g
5
Spinaci
225 g
4-5
Carote
225 g
4-6
• Aggiungere 30 ml di acqua.
Pannocchie di mais
1
3-4
2-3
8 - 10
• Aggiungere un pezzetto di burro.
Mais dolce
225 g
3-4
• Aggiungere 30 ml di acqua.
Patate affettate
(spessore 1 cm)
Commenti
I
• Aggiungere 30 ml di acqua.
• Non aggiungere acqua.
23
G2618C-I2
8/24/00 4:41 PM
Page 24
Pulizia del Forno a Microonde
I
Pulire regolarmente i componenti seguenti per evitare incrostazioni
di grassi e particelle di cibo:
◆ Superfici interne ed esterne
Raccomandazioni
◆ Sportello e battute di chiusura
NON versare liquidi attraverso le
fessure di aerazione.
◆ Piatto in vetro ed anello rotante
NON usare prodotti abrasivi o solventi
chimici.
☛
Prestare particolare cura durante la
pulitura delle battute dello sportello per
evitare che le particelle di cibo:
◆ Si accumulino
◆ Impediscano la corretta chiusura
dello sportello
Controllare SEMPRE che le battute di chiusura dello
sportello siano pulite e che lo sportello si chiuda
correttamente.
1
Pulire le superfici esterne con un panno morbido ed acqua saponata
calda. Sciacquare ed asciugare.
2
Togliere eventuali schizzi o macchie dalle superfici interne o sull’anello
rotante con un panno insaponato. Sciacquare ed asciugare.
3
Per sciogliere le particelle di cibo indurite ed eliminare i cattivi odori,
collocare una tazza di succo di limone diluito sul piatto di vetro e riscaldare
per dieci minuti alla potenza massima.
4
Lavare il piatto di vetro in lavastoviglie se necessario.
Conservazione e Riparazione del Forno a Microonde
Quando si ripone o si fa riparare il forno a microonde, vanno
seguite alcune semplici precauzioni.
Il forno non deve essere usato se lo sportello o le battute di
chiusura dello sportello sono danneggiate:
◆ Cerniera rotta
◆ Ganci deteriorati
◆ Pareti esterne del forno piegate o deformate
Le riparazioni devono essere eseguite esclusivamente da tecnici
qualificati e specializzati in forni a microonde.
☛
NON togliere mai il mobile esterno del forno. Se il
forno è guasto e deve essere riparato o se sorgono dei
dubbi sul suo corretto funzionamento:
◆ Estrarre la spina dalla presa di corrente
◆ Rivolgersi al più vicino centro di assistenza tecnica
Conservazione del forno
Se si desidera riporre temporaneamente il forno, scegliere un luogo asciutto e non
polveroso.
Motivo:
24
La polvere e l’umidità potrebbero influire negativamente sul corretto
funzionamento di alcuni componenti del forno.
G2618C-I2
8/24/00 4:41 PM
Page 25
Dati Tecnici
I
SAMSUNG investe costantemente nella ricerca per il miglioramento dei suoi prodotti. Pertanto sia i dati
tecnici che le istruzioni per l’uso sono soggetti a modifica senza preavviso.
Modello
G2618C
Alimentazione
230 V ~ 50 Hz CA
Potenza assorbita
Microonde
Grill
Modo combinato
1200 W
1000 W
1350 W
Potenza in uscita
800W
Frequenza operativa
2 450 MHz
Magnetron
OM75SH(31)
Raffreddamento
Motore con ventola
di raffreddamento
Dimensioni (L x A x P)
Esterno
Cavità forno
489 x 275 x 364 mm
306 x 181 x 322 mm
Volume
0,6 piedi cubi
Peso
Netto
15.5 kg circa
25
G2618C-I2
8/24/00 4:41 PM
Page 26
QUESTO APPARECCHIO E’ PRODOTTO DA:
ELECTRONICS
Stampato in UK
G2618C1(GB)
8/24/00 4:48 PM
Page i
MICROWAVE OVEN
G2618C
Owner’s Instructions
and
Cooking Guide
G2618C1(GB)
8/24/00 4:48 PM
Page 1
You have just purchased a
SAMSUNG microwave oven.
GB
Your Owner’s Instructions contain much
valuable information on cooking with your
microwave oven. Take the time to read them
as they will help you take full advantage of
the microwave oven features.
Contents
◆ OVEN ........................................................................................................................
2
◆ CONTROL PANEL ......................................................................................................
3
◆ USING THIS INSTRUCTIONS BOOKLET ........................................................................
4
◆ INSTALLING AND PREPARING YOUR MICROWAVE OVEN
■
■
■
■
■
■
Safety Precautions ........................................................................................
Accessories ...................................................................................................
Installing Your Microwave Oven ....................................................................
How a Microwave Oven Works .....................................................................
Checking that Your Oven is Operating Correctly...........................................
What to Do if You are in Doubt or Have a Problem.......................................
5
7
8
9
9
10
◆ COOKING WITH YOUR MICROWAVE OVEN
■
■
■
■
■
■
Cooking/Reheating ........................................................................................
Stopping the Cooking ....................................................................................
Adjusting Extra Time .....................................................................................
Manual Defrosting Food ................................................................................
Instant Reheat Guide.....................................................................................
Power Level and Time Variations..................................................................
11
12
12
13
13
14
◆ TRADITIONAL COOKING METHODS
■
Grilling ...........................................................................................................
15
◆ RECOMMENDATIONS FOR USE
■
■
■
■
■
CookWare Guide ...........................................................................................
Cooking Guide...............................................................................................
Cleaning Your Microwave Oven ....................................................................
Storing and Repairing Your Microwave Oven ...............................................
Technical Specifications ................................................................................
1
16
17
23
23
24
G2618C1(GB)
8/24/00 4:48 PM
Page 2
Oven
GB
TIMER KNOB
VENTILATION HOLES
HEATING ELEMENT
VARIABLE
COOKING POWER
CONTROL KNOB
VENTILATION HOLES
DOOR LATCHES
COUPLER
ROLLER RING
DOOR
GLASS PLATE
2
OPEN DOOR
PUSH BUTTON
SAFETY INTERLOCK
HOLES
G2618C1(GB)
8/24/00 4:48 PM
Page 3
Control Panel
GB
DEFROST
INSTANT COOK
OPEN DOOR PUSH
BUTTON
3
G2618C1(GB)
8/24/00 4:48 PM
Page 4
Using this Instructions Booklet
GB
You have just purchased a SAMSUNG microwave oven. Your Owner’s Instructions contain much
valuable information on cooking with your microwave oven:
◆ Safety precautions
◆ Suitable accessories and cookware
◆ Useful cooking tips
At the front of the booklet you will find illustrations of the oven, and more importantly the control panel,
correspanding to your microwave model type.
The step-by-step procedures use two different symbols.
☛
➢
Important
Note
PRECAUTIONS TO AVOID POSSIBLE EXPOSURE TO EXCESSIVE MICROWAVE ENERGY
Failure to observe the following safety precautions may result in harmful exposure to microwave energy.
(a) Under no circumstances should any attempt be made to operate the oven with the door open or to tamper with
the safety interlocks (door latches) or to insert anything into the safety interlock holes.
(b) Do not place any object between the oven door and front face or allow food or cleaner residues to accumulate
on sealing surfaces. Ensure that the door and door sealing surfaces are kept clean by wiping after use first with
a damp cloth and then with a soft dry cloth.
(c) Do not operate the oven if it is damaged until it has been repaired by a qualified microwave service technician
trained by the manufacturer.
It is particularly important that the oven door closes properly and that there is no damage to the:
(1) Door, door seals and sealing surfaces
(2) Door hinges (broken or loose)
(3) Power cable
(d) The oven should not be adjusted or repaired by anyone other than a properly qualified microwave service
technician trained by the manufacturer.
4
G2618C1(GB)
8/24/00 4:48 PM
Page 5
Safety Precautions
GB
Before cooking food or liquids in your microwave oven, please check that the following safety
precautions are taken.
1
DO NOT use any metallic cookware in the microwave oven:
◆
◆
◆
Metallic containers
Dinnerware with gold or silver trimmings
Skewers, forks, etc.
Reason: Electric arcing or sparking may occur and may damage the oven.
2
DO NOT heat:
◆
Airtight or vacuum-sealed bottles, jars, containers
Example:
Baby food jars
◆
Airtight food
Example:
Eggs, nuts in shells, tomatoes
Reason: The increase in pressure may cause them to explode.
Tip:
3
Remove lids and pierce skins, bags, etc.
DO NOT operate the microwave oven when it is empty.
Reason: The oven walls may be damaged.
Tip:
4
Leave a glass of water inside the oven at all times. The water will absorb the microwaves if you accidentally
set the oven going when it is empty.
DO NOT cover the rear ventilation slots with cloths or paper.
Reason: The cloths or paper may catch fire as hot air is evacuated from the oven.
5
ALWAYS use oven gloves when removing a dish from the oven.
Reason: Some dishes absorb microwaves and heat is always transferred from the food to the dish.
The dishes are therefore hot.
6
DO NOT touch heating elements or interior oven walls.
Reason: These walls may be hot enough to burn even after cooking has finished, although they do not appear to be so.
Do not allow inflammable materials to come into contact with any interior area of the oven. Let the oven cool
down first.
7
To reduce the risk of fire in the oven cavity:
◆ Do not store flammable materials in the oven
◆ Remove wire twist ties from paper or plastic bags
◆ Do not use your microwave oven to dry newspapers
◆ If smoke is observed, keep the oven door closed and switch off or disconnect the oven from the power supply
5
G2618C1(GB)
8/24/00 4:48 PM
Page 6
Safety Precautions (continued)
GB
8
Take particular care when heating liquids and baby foods.
◆
◆
◆
◆
◆
◆
◆
9
NEVER fill the container to the top and choose a container that is wider at the top than at the bottom to prevent the
liquid from boiling over. Bottles with narrow necks may also explode if overheated.
ALWAYS check the temperature of baby food or milk before giving it to the baby.
NEVER heat a baby’s bottle with the teat on, as the bottle may explode if overheated.
Be careful not to damage the power cable.
◆
◆
10
ALWAYS allow a standing time of at least 20 seconds after the oven has been switched off to allow the temperature
to equalize.
Stir during heating if necessary and ALWAYS stir after heating.
To prevent eruptive boiling and possible scalding, you should stir before, during, and after heating.
In the event of scalding, follow these FIRST AID instructions:
•
Immerse the scalded area in cold water for at least 10 minutes.
•
Cover with a clean, dry dressing.
•
Do not apply any creams, oils or lotions.
Do not immerse the power cable or plug in water and keep the power cable away from heated surfaces.
Do not operate this appliance if it has a damaged power cable or plug.
Stand at arm’s length from the oven when opening the door.
Reason: The hot air or steam released may cause scalding.
11
Keep the inside of the oven clean.
Reason: Food particles or spaltered oils stuck to oven walls or floor can cause the damage of painting and reduce the
efficiency of the oven.
12
“Clicking” sound might be noticed while operating, especially at defrosting mode.
Reason: When the power output is changing electrically, you may hear that sound. This is normal.
13
When the microwave oven is operating without any load, the power will be cut off automatically for safety. After standing
over 30 min, you can operate the oven normally.
IMPORTANT SAFETY INSTRUCTIONS
During cooking, you should look into the oven from time to time when food is being heated or cooked
in disposable containers of plastic, paper or other combustible materials.
IMPORTANT
Young children should NEVER be allowed to use or play with the microwave oven.
Nor should they be left unattended near the microwave oven when it is in use.
Items of interest to children should not be stored or hidden just above the oven.
CAUTION
Microwave radiations
Person must not be exposed to microwave energy, which can be irradiated by magnetron or other
microwave generator due to a wrong connection or use.
All the in and out microwave connections.
The wave guide, the flange and the joints must be safe.
Don’t let the generator work without a loan which absorbs the microwave energy.
Never look inside an open wave guide or an aerial while the generator is working.
6
G2618C1(GB)
8/24/00 4:48 PM
Page 7
Accessories
GB
Depending on the model that you have purchased, you are supplied
with several accessories that can be used in a variety of ways.
1
1
Coupler, already placed over the motor shaft in the base of the oven.
Purpose: The coupler rotates the glass plate.
2
Roller ring, to be placed in the centre of the oven.
2
Purpose: The roller ring supports the glass plate.
3
Glass plate, to be placed on the roller ring with the centre fitting on to the
coupler.
Purpose: The glass plate serves as the main cooking surface; it can be
easily removed for cleaning.
4
3
Metal rack, to be placed on the glass plate.
Purpose: The metal rack can be used to cook two dishes at the same
time. A small dish may be placed on the glass plate and a
second dish on the rack. The metal rack can be used in grill and
combination cooking
☛
4
DO NOT operate the microwave oven without the
roller ring and the glass plate.
7
G2618C1(GB)
8/24/00 4:48 PM
Page 8
Installing Your Microwave Oven
GB
Place the oven on a flat, level surface strong enough to safely bear
the weight of the oven.
20 cm
above
10 cm
behind
10 cm
on the side
1
When you install your oven, Make sure there is adequate
ventilation for your oven by leaving at least 10 cm
(4 inches) of space behind, on the sides of the oven
and 20 cm (8 inches) of above.
2
Remove all packing materials inside the oven.
Install the roller ring and turntable.
Check that the turntable rotates freely.
☛ Never block the air vents as the oven may overheat and
automatically switch itself off.
It will remain inoperable until it has cooled sufficiently.
☛ For your personal safety, plug the cable into a 3-pin, 230 Volt,
50Hz, AC earthed socket. If the power cable of this appliance
is damaged, it must be replaced by a special cable
(I-SHENG SP022, KDK KKP4819D, EUROELECTRIC 3410,
SAMIL SP-106B, MOONSUNG EP-48E). Contact your local
dealer to have it replaced. The power cable of ISRAEL is
PENCON(ZD16A), S/AFRICA APEX LEADS SA16 and
NIGERIA, GHANA, KENYA and U.A.E is PENCON(UD13A1).
☛ Do not install the microwave oven in hot or damp
surroundings like next to a traditional oven or radiator.
The power supply specifications of the oven must be
respected and any extension cable used must be of the same
standard as the power cable supplied with the oven.
Wipe the interior and the door seal with a damp cloth before
using your microwave oven for the first time.
8
G2618C1(GB)
8/24/00 4:48 PM
Page 9
How a Microwave Oven Works
GB
Microwaves are high-frequency electromagnetic waves; the energy
released enables food to be cooked or reheated without changing
either the form or the colour.
You can use your microwave oven to:
◆ Defrost
◆ Reheat
◆ Cook
Cooking Principle
1
The microwaves generated by the magnetron are distributed uniformly as
the food rotates on the glass plate. The food is thus cooked evenly.
2
The microwaves are absorbed by the food up to a depth of about 1 inch
(2.5 cm). Cooking then continues as the heat is dissipated within the food.
3
Cooking times vary according to the recipient used and the properties of
the food:
◆ Quantity and density
◆ Water content
◆ Initial temperature (refrigerated or not)
☛
As the centre of the food is cooked by heat
dissipation, cooking continues even when you have
taken the food out of the oven. Standing times
specified in recipes and in this booklet must therefore
be respected to ensure:
◆ Even cooking of the food right to the centre
◆ The same temperature throughout the food
Checking that Your Oven is Operating Correctly
The following simple procedure enables you to check that your
oven is working correctly at all times. If you are in doubt, refer to
the section entitled “What to Do if You are in Doubt or Have a
Problem” on the next page.
➢
◆
◆
◆
The oven must be plugged into an appropriate
wall socket.
The glass plate must be in position in the oven.
If a power level other than the maximum is used,
the water takes longer to boil.
1
Open the oven door. Place a bowl of water on the glass plate.
Close the door.
2
Set the power level to maximum by turning COOKING POWER CONTROL
knob.
3
Set the time to 4 to 5 minutes by turing the TIMER knob.
9
G2618C1(GB)
8/24/00 4:48 PM
Page 10
What to Do if You are in Doubt or Have a Problem
GB
Becoming familiar with a new appliance always takes a little time. If you have any of the problems listed
below, try the solutions given. They may save you the time and inconvenience of an unnecessary service
call.
Problem
◆
◆
◆
◆
Condensation inside the oven
Air flow around the door and outer casing
Light reflection around the door and outer casing
Steam escaping from around the door or vents
Checks/Explanation/Solution
This is normal.
The oven does not start when you turn the TIMER knob.
◆ Is the door completely?
The food is not cooked at all
◆ Have you set the timer correctly?
◆ Is the door closed?
◆ Have you overloaded the electric circuit and caused a fuse to
blow or a breaker to be triggered?
The food is either overcooked or undercooked
◆ Was the appropriate cooking length set for the type of food?
◆ Was an appropriate power level chosen?
Sparking and cracking occur inside the oven (arcing)
◆ Have you used a dish with metal trimmings?
◆ Have you left a fork or other metal utensil inside the oven?
◆ Is aluminium foil too close to the inside walls?
The oven causes interference with radios or televisions
◆ Slight interference may be observed on televisions or radios
when the oven is operating. This is normal.
Solution: Install the oven away from televisions, radios and
aerials.
If the above guidelines do not enable you to solve the problem, take a note of:
◆ The model and serial numbers, normally printed on the rear of the oven
◆ Your warranty details (date and place of purchase)
◆ A clear description of the problem
Then contact your local dealer or SAMSUNG after-sales service.
10
G2618C1(GB)
8/24/00 4:48 PM
Page 11
Cooking/Reheating
GB
The following procedure explains how to cook or reheat food.
☛
ALWAYS check your cooking settings before leaving
the oven unattended.
1
Open the oven door by pushing the large button in the button right-hand
corner of the control panel. Place the food in the centre of the glass plate.
Close the door.
2
Set the power level to maximum by turning COOKING POWER CONTROL
knob.
3
Model
G2618C
MAXIMUM POWER
800W
Set the time by turning TIMER knob.
Result:
➢
The oven light comes on and the glass plate starts rotating.
Cooking starts.
You can change the power level during cooking by
turning the COOKING POWER CONTROL knob.
11
G2618C1(GB)
8/24/00 4:48 PM
Page 12
Stopping the Cooking
GB
You can stop cooking at any time so that you can:
◆ Check the food
◆ Turn the food over or stir it
◆ Leave it to stand
To stop the cooking...
Then...
Temporarily
◆ Open the door
Result:
Cooking stops.
To resume cooking, close the door.
Completely
Turn the TIMER knob to ‘0’..
Adjusting Extra Time
Like traditional cooking, you may find that, depending on the
food’s characteristics or your tastes, you have to adjust the cooking
times slightly. You can:
◆ Check how cooking is progressing at any time simply by
opening the door
◆ Increase the remaining cooking time
To increase the cooking time of your food, simply move the TIMER knob to any
increased setting that you require.
➢
12
You can only adjust the time during cooking when the
microwave grill or alternating function of microwave and
grill are selected.
G2618C2(GB)
8/24/00 4:49 PM
Page 13
Manual Defrosting Food
GB
1
Open the oven door by pushing the large button in the button right-hand
corner of the control panel.
2
Place the frozen food in the oven and close the door.
3
Turn the COOKING POWER CONTROL knob to defrost symbol.
4
Turn the TIMER knob to select the appropriate time.
Result:
Defrosting begins.
Instant Reheat Guide
1
Place the food in the oven and close the door.
2
Turn the COOKING POWER CONTROL knob to Max Power.
3
Turn the TIMER knob to select instant cook,(drinks, soup/sauce and fresh
vegetable).
➢
Symbol
Refer to the table below about instant cook.
Recipes
Serving size
Standing Time
Drinks
(Reheating)
150 ml
1 - 2 mins.
Soup/
Sauce
(Reheating)
200~300 ml
2 mins.
Fresh
Vegetables
(Cooking)
200 ~ 300 g
2 mins.
13
G2618C2(GB)
8/24/00 4:49 PM
Page 14
Power Levels and Time Variations
GB
Operation ;
Set the COOKING POWER CONTROL knob to the appropriate
power level by turning it.
The power level function enables you to adapt the amount of
energy dissipated and thus the time required to cook or reheat your
food, according to its type and quantity. You can choose between
several power levels.
POWER LEVEL
%
G2618C
MWO
GRILL
HIGH
100%
800W
-
MEDIUM HIGH
70%
560W
-
MEDIUM
50%
400W
-
30%
240W
-
20%
160W
-
15%
120W
-
-
-
1000W
100%
800W
1000W
18%
82%
MEDIUM LOW
DEFROST (
)
LOW
GRILL (
)
Alternating function of MW
and GRILL
Proportion of the time during the
running function for 100 sec.
The cooking times given in recipes and in this booklet correspond
to the specific power level indicated.
14
If you select a...
Then the cooking time must be...
Higher power level
Decreased
Lower power level
Increased
G2618C2(GB)
8/24/00 4:49 PM
Page 15
Grilling
GB
The grill enables you to heat and brown food quickly, without
using microwaves. To this aim, a grill rack is supplied with your
microwave oven.
☛
Always use oven gloves when touching the recipients
in the oven, as they will be very hot.
1
Preheat the grill to the required temperature, by turning the COOKING
POWER CONTROL knob to GRILL symbol (
), and turning the TIMER
knob to the appropriate time.
2
Open the door and place the food on the rack.
3
Turn the COOKING POWER CONTROL knob to GRILL symbol (
4
Turn the TIMER knob to the appropriate time.
Result:
➢
).
Grilling starts:
Please don’t mind if heater turns off and on while grilling. This
system is originally designed to prevent overheating of the
oven.
15
G2618C2(GB)
8/24/00 4:49 PM
Page 16
Cookware Guide
GB
To cook food in the microwave oven, the microwaves must be able to penetrate the food, without being
reflected or absorbed by the dish used.
Care must therefore be taken when choosing the cookware. If the cookware is marked microwave-safe,
you do not need to worry.
The following table lists various types of cookware and indicates whether and how they should be used in
a microwave oven.
Cookware
Microwave-Safe
Comments
Aluminium foil
✔ ✘
Browning plate
✔
Do not preheat for more than eight minutes.
China and earthenware
✔
Porcelain, pottery, glazed earthenware and bone china are
usually suitable, unless decorated with a metal trim.
Disposable polyester
cardboard dishes
✔
Some frozen foods are packaged in these dishes.
✔
Can be used to warm food. Overheating may cause the
polystyrene to melt.
May catch fire.
May cause arcing.
Fast-food packaging
• Polystyrene cups and
containers
• Paper bags or newspaper
• Recycled paper or metal trims
Glassware
• Oven-to-table ware
• Fine glassware
•
•
Can be used, unless decorated with a metal trim.
Can be used to warm foods or liquids. Delicate glass may
break or crack if heated suddenly.
Must remove the lid. Suitable for warming only.
✔
Dishes
Freezer bag twist ties
✘
✘
May cause arcing or fire.
Plates, cups, napkins and
kitchen paper
Recycled paper
✔
For short cooking times and warming. Also to absorb excess
moisture.
May cause arcing.
Paper
•
✔
✔
Glass jars
Metal
•
•
✘
✘
Can be used in small quantities to protect areas against
overcooking. Arcing can occur if the foil is too close to the oven
wall or if too much foil is used.
Plastic
• Containers
✘
✔
✔
•
Cling film
•
Freezer bags
✔ ✘
Wax or grease-proof paper
✔
16
Particularly if heat-resistant thermoplastic. Some other plastics
may warp or discolour at high temperatures. Do not use
Melamine plastic.
Can be used to retain moisture. Should not touch the food.
Take care when removing the film as hot steam will escape.
Only if boilable or oven-proof. Should not be airtight. Prick with
a fork, if necessary.
Can be used to retain moisture and prevent spattering.
G2618C2(GB)
8/24/00 4:49 PM
Page 17
Cooking Guide
GB
A Few Cooking Techniques
To ensure even cooking of the food in your microwave oven, lay the
food out carefully using the following simple techniques. DO NOT
forget to observe standing times.
Imperial/Metric Conversion Chart
OUNCES/FLUID
OUNCES
APPROXIMATE
GRAMMES/MILLILITRES
1
25
2
50
3
75
4 (1/4 lb)
100
5 (1/4 pint)
150
6
175
7
200
8 (1/2 lb)
225
9
250
10 (1/2 pint)
275
11
300
12 (3/4 lb)
350
13
375
14
400
15 (3/4 pint)
425
16 (1 lb)
450
17
475
18
500
19
550
20 (1 pint)
575
When cooking food with irregular
forms, place the thinnest parts, which
will cook faster, towards the centre of
the dish.
Examples: Chicken legs, lamb cutlets,
whole fish.
If you are cooking several pieces of
the same type of food, try to have
them of even sizes and place then in
a ring around the dish.
Examples: Potatoes, cauliflower
pieces, tomatoes.
To prevent the thinnest parts of some
food from becoming overcooked,
cover the tips with small pieces of
aluminium foil (keep away from the
oven walls).
Examples: Heads and tails of whole
fish, wings on a whole
chicken.
Food with skins must be pricked with
a fork to allow the steam to escape
and to prevent the skin from breaking.
Examples: Potatoes, tomatoes,
sausages, egg yolks,
whole fish.
17
G2618C2(GB)
8/24/00 4:49 PM
Page 18
Reheating
Cooking Time
(Mins.)
Power Level
Individual plates of food
1 plate
2 plates
4 plates
2-3
3 - 41/2
6-8
MED-HIGH (70%)
Cooked meats, chicken,
chops, burgers, etc.
1 serving
2 servings
11/2 - 3
21/2 - 41/2
Food
GB
MAIN
COURSES
MED-HIGH (70%)
Non-stirrable dishes
(eg. LASAGNE)
1 serving
2 servings
4 servings
5-8
9 - 12
12 - 16
MED-LOW (30%)
MED-LOW (30%)
MEDIUM (50%)
1 - 11/2
11/2 - 3
31/2 - 6
HIGH (100%)
7 - 10
2
31/2 - 4
MED-HIGH (70%)
HIGH (100%)
HIGH (100%)
1/4 - 1/2
3/4 - 21/2
HIGH (100%)
HIGH (100%)
Pizza
1 whole individual pizza
1 slice of pizza
3-4
11/2 - 2
MED-HIGH (70%)
HIGH (100%)
Rice
1 serving cooked
4 servings cooked
Individual curry with rice
2-3
8 - 10
3-5
MED-HIGH (70%)
Pasta
1 serving
4 servings
3-4
10 - 12
MED-HIGH (70%)
• Add a little stock, cream or butter to:
- Add moisture
- Prevent sticking
2-3
3-4
HIGH (100%)
• Transfer to a suitable oven-proof dish.
• Cover with cling film.
• Stir well after 1 and 2 minutes.
1 - 11/2
2-3
HIGH (100%)
• Cover with cling film.
• Leave to stand for 2 to 3 minutes before
serving, particularly if topped with jam.
1/2 - 1
HIGH (100%)
MED-HIGH (70%)
• Reheat carefully in an uncovered dish, as
the high alcohol and sugar content could
cause the pudding to burn if overheated.
mince pies
1 individual pie
4 individual pie
CANNED FOODS
Convenience foods
(baked beans, spaghetti),
soups and rice pudding
7oz (200g)
15oz (425g)
Sponge pudding
1 serving
4 servings
PUDDINGS
Christmas pudding
1 serving
Whole (1lb-450g)
18
• Cover with cling film.
• Re-arrange once during cooking.
2-4
4-6
6 - 10
Pies
1 family pie, chilled
1 individual pie
2 individual pies
STARCHY
FOODS
• Cover the meat with gravy, with the meat and
vegetables towards the outside of the plate.
• Turn half way through heating.
• Stack on a plate stacker.
Stirrable casseroles
1 serving
2 servings
4-6 servings
1 serving
2 servings
4 servings
VEGETABLES
MED-HIGH (70%)
Comments
4-5
• Cover with cling film.
• Stir well after 1 minute.
• Cover with cling film.
• Rotate dish at 2-minute intervals.
• Cover with cling film.
• Stir well half way through cooking.
• If necessary, remove from foil tray.
• Stand on and cover with absorbent
kitchen paper.
---
• Add a little stock, cream or butter to:
- Add moisture
- Prevent sticking
G2618C2(GB)
8/24/00 4:49 PM
Page 19
Defrosting
Food
MEAT
FISH
FLOUR
PRODUCTS
Comments
8 - 11
20 - 30
• Shield any thin or narrow ends with foil.
• Turn twice during defrosting.
Minced beef/lamb
7-9
10 - 15
• Break apart frequently.
• Remove thawed pieces as soon as
possible and leave to stand.
Steak, chops, cutlets
6-9
10 - 15
• Turn half way through defrosting.
• Shield ends and bones with foil, if necessary.
Sausages, bacon
4-5
5
• Separate and re-arrange twice during defrosting.
15
5 mins. half way,
5 mins. at end
• Break up and set aside thawed pieces as they
defrost.
Cubed meat
7-8
10 - 15
Whole chicken, duck,
turkey, etc.
8 - 10
20 - 30
• Shield wings, breast bone, drumsticks with
foil, as necessary.
• Defrost breast side down first and turn half
way through defrosting.
Drumsticks, wings, thighs
Small
Large
6-8
7-9
10 - 15
10 - 15
• Arrange thinner ends towards the centre of the dish.
• Turn and re-arrange twice during defrosting.
Whole fish (trout, mackerel)
4-5
5 - 10
Fillets (plaice, kippers)
3-5
10 - 15
• Shield thin ends with foil, if necessary.
• Arrange in a single layer.
• Turn once during defrosting.
Steaks (cod, salmon)
4-5
10 - 15
5-6
(per 8oz/225g)
5 - 10
Boil in bag fish
3-5
5
Loose, soft fruit
(raspberries, cherries,
strawberries)
6-8
5 - 10
Loose, hard fruit
(apples, peaches, rhubarb)
7-8
5 - 10
Purees, fruit dessert
7 - 10
10 - 15
• Stir carefully during defrosting.
Fruit pie, trifles, cheesecakes
with fruit toppings
3-4
10 - 15
• Stand on serving plate.
Bread
Large sliced/unsliced loaf
5-7/6-8
10 - 15
Small sliced/unsliced loaf
3-5/4-6
10 - 15
•
•
•
•
10 - 20 secs.
-
15 - 15 secs.
30 secs.
1 - 11/2
1-2
1-2
1-2
Uncooked pastry
1
(per 8oz-225g)
20
Filled flans
(7-8 in/18-20 cm)
4-5
5 - 10
Sausage rolls (4)
2-3
5
1 - 11/2
40 - 60 secs.
5 - 10
Prawns, scallops
FRUIT
Standing Time (Mins.)
Whole joints (beef, lamb,
pork, etc.)
Cooked casseroles
POULTRY
Cooking Time
(Mins. per lb/450g)
1 slice
Bread rolls and croissants
1
2
4
Sponge cakes
Whole
Individual
• Stir half way through defrosting.
• Pierce the bag and place in an oven-proof dish.
• Turn half way through defrosting.
• Measure out required amount.
• Stir once or re-arrange during defrosting
and standing time.
Remove from plastic wrapping.
Stand on absorbent kitchen paper.
Turn over halfway through defrosting.
Over-defrosting will dehydrate the bread.
• Remove from wrapping.
• Stand on absorbent kitchen paper.
• Turn frequently so that it does not get warm in places.
• Stand on kitchen paper on the serving plate.
• Remove paper before serving.
• Wrap each roll in kitchen paper to absorb moisture.
• The standing time is essential.
• Stand on kitchen paper.
19
GB
G2618C2(GB)
8/24/00 4:49 PM
Page 20
Cooking Meat
GB
Food
BEEF
HIGH (100%)
for first 3 min. then
MEDIUM (50%)
• Turn over half way through cooking.
• Stand for 15 - 25 minutes.
Thick roasts
(rib, rump, top side)
Rare
Medium
Well done
10 - 12
13
14 - 15
HIGH (100%)
for first 5 min. then
MEDIUM (50%)
• Shield bone and outer edge with foil.
• Turn over half way through cooking.
• Stand for 15 - 25 minutes.
20
HIGH (100%)
for first 5 min. then
DEFROST (20%)
• Cook covered.
• Stand for 20 minutes.
3
5
MED-HIGH (70%)
10 - 12
12 - 14
HIGH (100%)
for first 5 min. then
MEDIUM (50%)
• Turn over half way through cooking.
• Stand for 15 - 25 minutes.
Tender cuts
(leg, fillet, crown)
Medium
Well done
Tougher cuts
(shoulder, boned breast)
Well done
VEAL
15
8 - 10
MED-HIGH (70%)
• Arrange the thin ends towards the centre of the dish.
• Stand for 5 minutes.
Leg, shoulder
Well done
10 - 12
HIGH (100%)
for first 5 min. then
MEDIUM (50%)
• Turn over half way through cooking.
• Stand for 15 - 25 minutes.
Chops
Well done
8 - 10
MED-HIGH (70%)
• Arrange the thin ends towards the centre of the dish.
• Stand for 5 minutes.
15
HIGH (100%)
for first 5 min. then
MEDIUM (50%)
• Turn over half way through cooking.
• Stand for 15 - 20 minutes.
Joints (well done)
10 - 12
MEDIUM (50%)
• Turn over half way through cooking.
• Stand for 15 - 20 minutes.
Steaks (well done)
6-8
MED-HIGH (70%)
• Turn over half way through cooking.
• Stand for 5 minutes.
3/4 - 11/4
11/2 - 21/4
23/4 - 4
HIGH (100%)
Bacon
1 slice
2 slices
4 slices
20
---
Chops, cutlets
Well done
Leg, shoulder, loin, rack
Well done
GAMMON
Comments
6
6-8
8-9
Steak (225g)
Rare
Well done
PORK
Power Level
Small roasts (fillet)
Rare
Medium
Well done
Brisket and pot roasts
(well done)
LAMB
Cooking Time
(Mins. per lb/450g)
• Loosely cover with kitchen paper.
G2618C2(GB)
8/24/00 4:49 PM
Page 21
Cooking Fresh Vegetables
Quantityl
Cooking Time
(Mins. at HIGH)
Whole jacket potatoes
1
2
4
4-5
6-8
12 - 14
Pealed potatoes cut into
1 inch (3 cm) cubes
3
6-7
• Place in a large oven-proof dish and cover tightly.
• Stir well half way through the cooking time.
• If mashing, add 1 - 2 minutes to the cooking time.
French beans
1lb (450g)
6-8
Sliced runner beans
1lb (450g)
5-6
• Add 2 fl. oz (30ml) of water.
• Taste after the minimum cooking time.
• Serve immediately.
Broad beans
8oz (225g)
4-5
Peas
8oz (225g)
4-6
Mange-tout
12oz (375g)
6-7
Cabbage
(roughly chopped)
1/2 medium
5-7
Brussel sprouts
1lb (450g)
8oz (225g)
8 - 10
5-7
1 whole
10
Broccoli
1lb (450g)
8oz (225g)
7-8
4-5
Spinach
1lb (450g)
5-6
Spring greens
1lb (450g)
7-8
Carrots
(thinly sliced)
1lb (450g)
8oz (225g)
10
6-7
Beetroot (unpeeled)
4 medium
12 - 15
Swede and turnip
1lb (450g)
10 - 12
Parsnips (quartered)
1lb (450g)
Mushrooms
8oz (225g)
2-3
• Cook in a covered dish with melted butter.
• Do not overcook.
2 large
4-5
4-6
2-3
• Blanch in a covered dish with no additional water.
Tomatoes
2
2-3
• Halve crosswise.
• Dot with butter or grated cheese.
• Cook in an uncovered dish.
Courgettes
8oz (225g)
3-4
• Cook in a little water until just soft.
4 stalks
2-3
• Add 2 fl. oz (30ml) of water.
1
2
4
2-3
3-4
6-8
• Wrap individually in cling film or place in a
shallow oven-proof dish.
• Turn twice during cooking.
Asparagus
1lb (450g)
5-6
• Add 4 fl. oz (60ml) of water.
Artichokes
1
4-5
• Wrap individually in cling film.
8oz (225g)
6-7
• Place in a large oven-proof dish and cover tightly.
• Stir well half way through cooking.
• If mashing, add 1 - 2 minutes to the cooking time.
Food
POTATOES
BEANS,
PEAS, etc.
CABBAGE,
CAULIFLOWER,
etc.
Cauliflower, divided into
flowerets
ROOT
VEGETABLES
OTHER
VEGETABLES
Onions
Whole
Quartered
Celery stalks (halved)
Corn on the cob
Pumpkin in 1 inch (3 cm)
cubes
Comments
• Wash well and prick all over with a fork.
• When almost cooked, wrap in foil and leave to stand
for 5 minutes.
• Add 4 fl. oz (60ml) of water.
• Add 4 fl. oz (60ml) of water.
• Arrange the flowerets with the stalks
towards the centre of the dish.
• Cook tender leaves only with very little water.
• Cover lightly.
• Add 4 fl. oz (60ml) of water.
• Add 4 fl. oz (60ml) of water.
• Cover tightly.
• Stir half way through cooking.
• Wrap in cling film or cook in a covered dish.
21
GB
G2618C2(GB)
8/24/00 4:49 PM
Page 22
Cooking Frozen Vegetables
Quantityl
Cooking Time
(Mins. at HIGH)
1
2
4-5
6-8
• Oven chips are unsuitable for microwave
cooking.
French beans
1lb (450g)
8 - 10
Broad beans
12oz (375g)
7-8
• Add 2 fl. oz (30ml) of water.
• Place in a shallow oven-proof dish and
cover.
Peas
4oz (125g)
8oz (225g)
1lb (450g)
2-3
4-5
8
Mange-tout
8oz (225g)
4-5
Mixed vegetables
4oz (125g)
8oz (225g)
3-4
4-6
Cabbage
8oz (225g)
3-4
• Add 3 fl. oz (45ml) of water.
Brussel sprouts
8oz (225g)
4-5
• Add 2 fl. oz (30ml) of water.
• Taste after the minimum cooking time to
avoid overcooking.
Cauliflower
8oz (225g)
5-6
• Add 2 fl. oz (30ml) of water.
• Rearrange half way through cooking.
• Leave to stand for 1 - 2 minutes and salt to taste.
Broccoli
8oz (225g)
5
Spinach
8oz (225g)
4-5
ROOT
VEGETABLES
Carrots
8oz (225g)
4-6
•
Add 2 fl. oz (30ml) of water.
OTHER
VEGETABLES
Corn on the cob
1
3-4
2-3
8 - 10
•
Add a knob of butter.
8oz (225g)
3-4
•
Add 2 fl. oz (30ml) of water.
GB
Food
POTATOES
BEANS,
PEAS, etc.
CABBAGE,
CAULIFLOWE
R, etc.
Potato slices
(1/2 inch/1cm thick)
Sweet corn
22
Comments
• Add 2 fl. oz (30ml) of water.
• Do not add any water.
---
G2618C2(GB)
8/24/00 4:49 PM
Page 23
Cleaning Your Microwave Oven
GB
The following parts of your microwave oven should be cleaned
regularly to prevent grease and food particles from building up:
◆ Inside and outside surfaces
Recommendations
DO NOT spill water in the vents.
◆ Door and door seals
◆ Glass plate and roller ring
☛
ALWAYS ensure that the door seals are clean and the
door closes properly.
1
Clean the outside surfaces with a soft cloth and warm, soapy water. Rinse
and dry.
2
Remove any splashes or stains on the inside surfaces or on the roller ring
with a soapy cloth. Rinse and dry.
3
To loosen hardened food particles and remove smells, place a cup of
diluted lemon juice on the glass plate and heat for ten minutes at maximum
power.
4
Wash the dishwasher-safe plate whenever necessary.
☛
NEVER use any abrasive products or
chemical solvents.
Take particular care when cleaning the
door seals to ensure that no particles:
◆ Accumulate
◆ Prevent the door from closing
correctly
Clean the microwave oven cavity right ofter each use
with a mild detergent solution, but let the microwave
oven cool down before cleaning in order to avoid
injury.
Storing and Repairing Your Microwave Oven
A few simple precautions should be taken when storing or having
your microwave oven serviced.
The oven must not be used if the door or door seals are damaged:
◆ Broken hinge
◆ Deteriorated seals
◆ Distorted or bent oven casing
Only a qualified microwave service technician should perform
repairs.
☛
NEVER remove the outer casing from the oven. If the
oven is faulty and needs servicing or you are in doubt
about its condition:
◆ Unplug it from the wall socket
◆ Contact the nearest after-sales service centre
Storing the Oven
If you wish to store your oven away temporarily, choose a dry, dust-free place.
Reason:
Dust and damp may adversely affect the working parts in the oven.
23
G2618C2(GB)
8/24/00 4:49 PM
Page 24
Technical Specifications
GB
SAMSUNG strives to improve its products at all times. Both the design specifications and these user
instructions are thus subject to change without notice.
Power source
230 V ~ 50 Hz
Power consumption
Microwave
Grill
Combined mode
1200 W
1000 W
1350 W
Output power
800 W (IEC-705 )
Operating frequency
2,450 MHz
Magnetron
OM75SH(31)
Cooling method
Cooling fan motor
Dimensions (W x H x D)
Outside
489 x 275 x 364 mm
Oven cavity
306 x 181 x 322 mm
Volume
0.6 cubic feet
Weight
Net
15.5 kg approx.
24
G2618C2(GB)
8/24/00 4:49 PM
Page 25
ELECTRONICS
Printed in UK
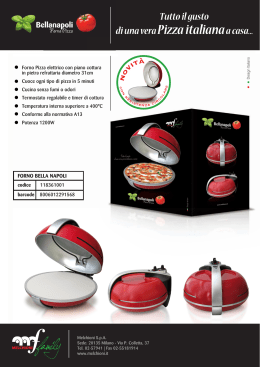
Scarica