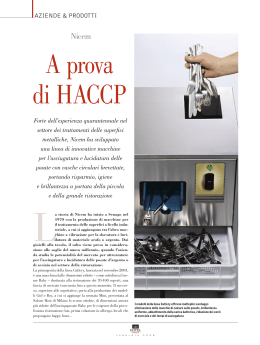
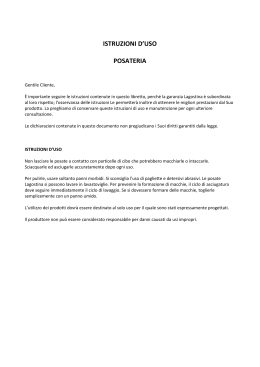
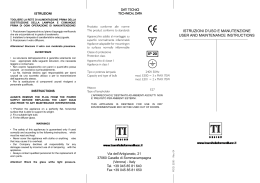
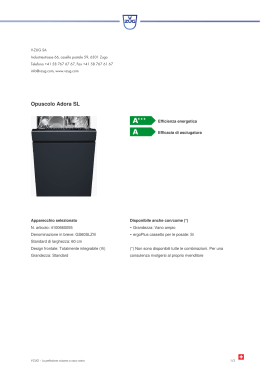
AVVERTENZE
– Leggere e attenersi attentamente alle avvertenze e alle istruzioni.
– Conservare sempre il presente libretto di istruzioni che deve accompagnare l’apparecchio anche se
ceduto a terzi.
Il presente libretto dovrà essere usato sempre come riferimento per gli operatori del settore.
– Prima dell’utilizzo, verificare che la tensione della rete corrisponda a quella indicata nella targa dei dati
tecnici della macchina.
– Collegare l’apparecchio solo a prese di corrente aventi portata di 10 A e dotate di una efficace messa a
terra.
STACCARE SEMPRE LA SPINA DALLA PRESA DI CORRENTE PRIMA DI ESEGUIRE QUALSIASI
MANUTENZIONE O PULIZIA SUGLI APPARECCHI.
USARE L’APPARECCHIO SOLO PER LE FUNZIONI AL QUALE È DESTINATO, QUALSIASI ALTRO
USO È DA CONSIDERARSI IMPROPRIO E QUINDI PERICOLOSO E SOLLEVA LA CASA
COSTRUTTRICE DA QUALSIASI RESPONSABILITÀ PER I DANNI DERIVATI
– Non manomettere in alcun modo gli apparecchi.
– Per qualsiasi riparazione rivolgersi esclusivamente a rivenditori Vema o a centri di assistenza qualificati.
– Distendere il cavo di alimentazione e non usarlo arrotolato.
– Non tirare mai il cavo di alimentazione per staccare la spina dalla presa.
– Non lasciare mai incustodito l’apparecchio acceso, tenerlo lontano dalla portata dei bambini e di persone
incapaci.
– Non mettere in funzione l’apparecchio che sembri difettoso.
– Non utilizzare l’ apparecchio per un tempo maggiore di quello indicato
– Per le riparazioni e l’acquisto delle parti accessoriali, rivolgersi esclusivamente al proprio rivenditore.
– Togliere qualsiasi eventuale pellicola protettiva prima dell’uso.
– Usare solo accessori e ricambi originali.
– Non utilizzare gli apparecchi all’aperto o in ambienti umidi.
– Non immergere o bagnare in acqua o altro liquido gli apparecchi.
– Non coprire mai gli apparecchi per evitare pericoli d’incendio.
– Disinserire la spina se l’apparecchio non è in funzione.
– Impedire al cavo di alimentazione di venire a contatto con l’apparecchio.
– Prima di spostare gli apparecchi lasciarli raffreddare.
– Sistemare gli apparecchi a una distanza minima di 5 cm. dalle pareti in modo da consentire l’ottimale
aerazione e comunque distanti da lavelli getti d’acqua.
– Lavorare sempre in condizioni di sicurezza evitando di usare l’apparecchio con mani o piedi bagnati o a
piedi nudi.
– Ai fini della sicurezza gli apparecchi sono da ritenersi sempre con presa inserita e quindi sempre in
tensione.
– Per la pulizia degli apparecchi (da effettuarsi solamente dopo aver disinserito la spina e aver atteso il
raffreddamento) usare panni umidi ben strizzati e prodotti specifici per acciaio inox-alluminio-verniciaturecromature delle carrozzerie; i componenti destinati al contatto con gli alimenti possono essere lavati
separatamente, a mano, con acqua e detersivo per stoviglie (non lavare in lavastoviglie).
– Non usare panni, spugne o detergenti abrasivi sulle carrozzerie per evitare di strisciarle o scalfirle.
TRATTANDOSI DI APPARECCHI PROFESSIONALI L’UTILIZZO È RISERVATO AGLI OPERATORI
DEL SETTORE.
PER MACCHINE DOTATE DI DISPOSITIVO DI ARRESTO AUTOMATICO IN CASO DI MANCANZA DI
ALIMENTAZIONE ELETTRICA:
In caso di mancanza di corrente la macchina (dotata su richiesta di questo dispositivo) si spegne e rimane
spenta fintanto che non viene fatto il ripristino manuale come segue: 1° portare a 0 l’interruttore; 2°
attendere un secondo circa; 3° riaccendere l’interruttore.
La casa produttrice si riserva di apportare modifiche agli apparecchi e alla dotazione degli accessori senza
alcun preavviso
ISTRUZIONI
Tipo di apparecchio ASCIUGA POSATE ECONOMICO
Apparecchio destinato all’asciugatura e alla lucidatura delle posate appena lavate tramite
immersione ed estrazione delle stesse manualmente o inserimento e sollevamento sempre manuale
del cesto su granulare di cellulosa di mais (tutolo) che ne assorbe l’umidità residua e le lucida per
vibrazione
Prima di mettere in funzione la macchina inserire nella vasca il tutolo di mais fino a raggiungere il livello
“max level” stampato sulle due pareti lunghe della stessa • accendere la macchina premendo il pulsante
generale verde e lasciare che il tutolo si scaldi bene per almeno 15 minuti o più prima di avviare il
primo ciclo di asciugatura • la macchina si può usare senza o con il cesto (acquistabile separatamente
come optional) :
1° se non si usa il cesto inserire manualmente circa 60/70 posate dentro il tutolo di mais dopo aver
azionato il pulsante bianco che fa partire la vibrazione • il ciclo di asciugatura dura circa 2 minuti ma la
vibrazione si ferma dopo 3 • togliere dunque le posate pescandole con le mani dal tutolo di mais •
riavviare con il pulsante bianco la vibrazione e fare altri cicli di asciugatura fino a finire le posate da trattare
2° se si usa il cesto inserire le posate dentro lo stesso, azionare il pulsante bianco per avviare la
vibrazione, appoggiare il cesto sopra il tutolo che vibra e spingerlo delicatamente dentro la vasca fino a far
entrare i fori presenti nelle maniglie sui pioli di sostegno • dopo 2 minuti il ciclo di asciugatura è completato
ma la vibrazione dura ancora 1 minuto per permettere l’ estrazione del cesto senza fatica • il cesto con
tutte le posate deve essere introdotto ed estratto sempre e solo mentre il tutolo vibra, se il ciclo fosse
terminato riavviarlo con il pulsante bianco • fare altri cicli di asciugatura fino a finire le posate da trattare •
cambiare il tutolo di mais dopo circa 3 mesi di uso • spegnere sempre l’interruttore generale dopo ogni
operazione e a fine lavoro • staccare sempre la spina prima di qualsiasi manutenzione o pulizia.
ATTENZIONE: organi in movimento • macchina che scalda, pericolo di scottature.
Tipo di apparecchio ASCIUGA POSATE AUTOMATICO
Apparecchio destinato all’asciugatura e alla lucidatura delle posate appena lavate tramite
immersione e sollevamento automatico del cesto su granulare di cellulosa di mais (tutolo) che ne
assorbe l’umidità residua e le lucida per vibrazione
Prima di mettere in funzione la macchina inserire nella vasca il tutolo di mais fino a raggiungere il livello
“max level” stampato sulle due pareti lunghe della stessa • accendere premendo il pulsante generale
verde e lasciare che il tutolo si scaldi bene per almeno 15 minuti o più prima di avviare il primo ciclo
di asciugatura (si consiglia di fare qualche ciclo a vuoto per ottimizzare il riscaldamento del tutolo
facendo andare su e giù il cestello a mezzo del pulsante bianco di avviamento ciclo) • non introdurre
mai le mani nella macchina o intorno al cestello durante il funzionamento • iniziare quindi le operazioni di
asciugatura inserendo nel cestello sollevato una cinquantina circa di posate appena tolte dalla
lavastoviglie o, se questa operazione non si potesse fare immediatamente, si consiglia di tenere a bagno in
acqua fredda tutte le posate lavate e inserirle nella vasca un po’ alla volta ben sgocciolate e nella quantità
sopra consigliata (questa operazione è molto importante in quanto, se le posate dovessero asciugarsi
prima dell’inserimento nella macchina, resterebbero comunque macchiate) • il ciclo di asciugatura dura 2
minuti dopo di che il cestello si alza automaticamente fuori dalla vasca continuando a vibrare ancora 10
secondi per permettere l’eliminazione di eventuali residui di tutolo • finito il primo ciclo il cestello si ferma
alzato per permettere la rimozione manuale delle posate oppure, sganciandolo tramite le maniglie nere, di
rovesciarle tutte assieme su un vassoio • rimontare quindi il cestello agganciando bene le maniglie (se lo si
avesse smontato) oppure ricaricarlo con altrettante posate per fare un nuovo ciclo di asciugatura • dopo
ogni ciclo di lavoro la lampada spia verde lampeggia per comunicare il pronto macchina ad una nuova
operazione • continuare così fino ad aver esaurito tutte le posate • cambiare il tutolo di mais dopo circa 3
mesi di uso • spegnere sempre l’interruttore generale dopo ogni operazione e a fine lavoro • staccare
sempre la spina prima di qualsiasi manutenzione o pulizia.
ATTENZIONE: organi in movimento • macchina che scalda, pericolo di scottature • non introdurre
mai le mani nella vasca specialmente durante il movimento del cesto.
WARNINGS
– Read thoroughly and stick closely to the instructions and warnings.
– Always keep this booklet and pack it along the appliance
– Before use, ensure that the mains voltage is the same as the voltage indicated on the data plate of the
machine.
– Connect the appliance only to 10 Amp sockets that are efficiently earthed.
ALWAYS REMOVE THE PLUG FROM THE SOCKET BEFORE CARRYING OUT ANY MAINTENANCE
OR CLEANING OF THE APPLIANCES.
ONLY USE THE APPLIANCE FOR THE PURPOSES IT IS MEANT FOR; ANY OTHER USE IS
CONSIDERED IMPROPER AND IS THEREFORE DANGEROUS; THE MANUFACTURER WILL BE
NOT LIABLE FOR DERIVATED DAMAGES.
– Never tamper with the machines anyway.
– For all interventions on the machines, always apply only to the authorized centre service.
– Never pull the power cable to remove the plug from the socket.
– Take care to extend the power cable before use
– Never leave the machine unguarded when switched on; keep it out of the reach of children and
incompetent people.
– Never switch on a machine that seems to be faulty.
– Never use more than the right time advised.
– For repairs and the purchase of accessories, always apply only to the dealer.
– Remove any protective film before use.
– Only use original accessories and parts.
– Do not use the appliance outside or in damp environments.
– Do not immerse or bathe the appliances in water or any other liquid.
– To avoid the danger of fire, never cover the appliances.
– Unplug the appliance from the mains when it is not in use.
– Ensure the power cable does not come into contact with appliance.
– Let the appliances cool down before moving them.
– Position the appliance a minimum of 5 cm. from walls so as to allow optimum aeration and away from
sinks and jets of water.
– Always work under the best possible safety conditions. Avoid using the appliance with wet feet or hands
or barefoot.
– In the interests of safety, the appliances must always be considered as live.
– To clean the appliances, (which must be performed only when they have been unplugged from the mains
and have cooled), use a well-wrung damp cloth and specific products to clean stainless
steel/aluminium/paint/chrome on the body; components that come into contact with food can be cleaned
separately by hand with water and washing-up liquid (do not put them in the dish washer).
– To avoid dragging or scratch on the body never use cloth, sponge or detersive with abrasive action.
AS THESE ARE PROFESSIONAL APPLIANCES, THEIR USE IS RESERVED TO SPECIALIZED
OPERATORS
FOR MACHINES FITTED WITH AN AUTOMATIC STOPPING DEVICE IN CASE OF LOSS OS
ELECTRICITY: if there is a loss of current, the machine (fitted with this device on request) will switch off
and remain switched off until it is manually reset as follows: 1) set the switch to 0; 2) wait for approx. a
second; 3) reset the switch.
The manufacturer reserves the right to make alteration to the appliances and to the accessories supplied
without prior notice.
INSTRUCTIONS
Type of appliance ECONOMIC CUTLERY DRYER
Machine designed for drying and polishing cutlery just washed by manual dipping it into corn-cob
granules which absorb remaining dampness and polish the cutlery by vibration
Before turning the machine on, put some corn-cob into the basin until it reaches the max level printed
on the two long sides.• Press the white button to turn on the machine and let the corn-cob warm up
thoroughly for at least 15 minutes before starting the first drying cycle • the economic cutlery dryer
can be used with or without the stainless steel basket which is charged as an optional.
1° if you use the machine without the basket press the white button • about 60 pieces of cutlery are put
into and taken out of the vibrant granulated cob by hand after 2 minutes cycle
2° if you use the basket put about 60 pieces of cutlery into the same • press the white button, put the
basket on the vibrant corn cob and press it into the same until the holes in the handles come into their
supports • after 2 minutes cycle basket and cutlery can be taken off the granulated cob when it is still
vibrating, by hand, without effort (if vibration stopped press again the white button) . • Continue like that
until all of the cutlery has been done. • Change the corn-cob after 3 months of use. • Always turn off the
main switch after each operation and when work is finished. • Always remove the plug from the
socket before any upkeep or cleaning.
WARNING: Parts in motion. Machine is heating, danger of scalding. Do not put your hands in the
basin especially while the basket is in motion.
Type of Machine AUTOMATIC CUTLERY DRYER
Machine designed for drying and polishing cutlery just washed by dipping it into corn-cob granules
which absorb remaining dampness and polish the cutlery by vibration
Before turning the machine on, put some corn-cob into the basin until it reaches the max level printed
on the two long sides.• Press the green button to turn on the machine and let the corn-cob warm up
thoroughly for at least 15 minutes before starting the first drying cycle. (We advise you to run a few
empty cycles to optimise heating of the corn-cob by letting the basket move up and down using the white
circular start button.) • Never put your hands in the basin especially while the basket is in motion. • Start
drying the cutlery by putting in the basket about fifty pieces of cutlery just taken out of the dishwasher or, if
you cannot do this at once, we advise you to keep the cutlery in cold water and put it in the basin a little at a
time in the quantities advised above, once the excess water has dripped off. (This operation is very
important because, if the cutlery dries before going into the machine, they will remain stained.) • The drying
cycle takes 2 minutes. • Afterwards the basket rises automatically out of the basin and continues to vibrate
for another 10 seconds to shake off all the remaining corn-cob. • When the first cycle has finished the
basket stops to allow the removal of the cutlery by hand, or it may be unhooked using the black handles,
and turned onto a tray. • Replace the basket by carefully hooking the handles back on (if they had been
taken off) or reload it with the same amount of cutlery for another drying cycle. • After each cycle the green
pilot light flashes to signal that the machine is ready for another operation. • Continue like that until all of the
cutlery has been done. • Change the corn-cob after 3 months of use. • Always turn off the main switch
after each operation and when work is finished. • Always remove the plug from the socket before
any upkeep or cleaning.
WARNING: Parts in motion. Machine is heating, danger of scalding. Do not put your hands in the
basin especially while the basket is in motion.
Scaricare