PIANO INDUZIONE 2 IN
IT
Installazione - Uso - Manutenzione
INDUCTION HOB 2 IN
GB
Installation - Use - Maintenance
TABLE À INDUCTION 2 IN
FR
Installation - Emploi - Entretien
INDUKTIONSKOCHFELD 2 IN
DE
Installation - Gebrauch - Wartung
PLACA INDUCCION 2 IN
ES
Installación - Uso - Mantenimiento
INDUCTIE-KOOKPLAAT 2 IN
NL
Installatie - Gebruik - Onderhound
PLANO A INDUÇAO 2 IN
PT
Instalação - Uso - Manutenção
BASIC
G4
IT
GB
FR
&#
"(
"/ 201,*"/
& "(
'"((!"(
&"&-!#
#"&() !#$& ' (((
)'(#")#*#
$&##((#
)&(!"(
$&#(((##'(&)(#
#"!(& $&!''!%) (04
'((#)&(!"(
# )(#$&$#(&
'#'&()(( )
'"-)"
$&((#(()&
"1%+(6,2+!
,+$/12)1"6,2,+6,2/
%,& "
!&('"4&'
3 ((#"'$#)& #+%)*#)'*(
"#)*)$&#)(
3* #$$3*'#"(
&%)3*'
!(4&'(#)(
$&!4&%) (33(3
'#")'!"(
$#)&'('&(#)('
#'+"':)"
)''#"$&(
$&!#$&("(#
&&'$((&
'(&)-#"
$&!((&""#
&)"& "(
&') (('" $&!)( ---#"
#"%)'(#!#&"#
$$&#
#&!) !#"#'(&$
**))&
%&0+"4 /"#2))6
!"0&$+"!-/,!2 1
*+2# 12/"!4&1%1%"
%&$%"01.2)&16*1"/&)0
%0""+ /"#2))61"01"!
1,01&0#6))6,2/
,,(&+$!"*+!0
"4,2)!1%"/"#,/"
/".2"016,21,/"!+!
#,)),41%"0""06
&+01/2 1&,+04%& %4&))
)),46,21,,1&+
"5 "))"+1/"02)10/&$%1
#/,*1%"01/1
64"4&0%6,2))1%"
3"/6"014&1%6,2/
*,!"/+--)&+ "
! !
&$$("&
#)'*#)''#)(#"'
)""(4&($ "
'('(#"%)"(0
:)( '(#"(
$$& !#&"
76<-6<;
&"$#
)"-#"!"(#
-"/1&+$
/&+ &-)"
# )$*":( )
$
&"$
#"(#""!"( "'(&)-#"
$& :)("(
0"/:0
+01/2 1&,+0
"'(&)(#"'
$#)& :)'&
"'(&)-#"
$& :"'( (#&
42
+01))"/:0
+01/2 1&,+0
42
"'(&)(#"'
$#)& :"'( ()& 42
$"
QUESTO PRODOTTO È STATO
CONCEPITO PER UN IMPIEGO DI
TIPO
DOMESTICO.
IL
COSTRUTTORE DECLINA OGNI
RESPONSABILITÀ NEL CASO DI EVENTUALI
DANNI A COSE O PERSONE DERIVANTI DA
UNA NON CORRETTA INSTALLAZIONE O DA
USO IMPROPRIO, ERRONEO OD ASSURDO.
L’APPARECChIO NON DEVE
ESSERE USATO DA PERSONE
(COMPRESI
BAMBINI)
CON
RIDOTTE CAPACITÀ fISIChE,
SENSORIALI O MENTALI, O DA PERSONE
ChE MANCANO DELL’ESPERIENZA E DELLE
CONOSCENZE NECESSARIE SE NON SOTTO
LA SUPERVISIONE O DIETRO ISTRUZIONI
SULL’USO DELL’APPARECChIO DA PARTE DI
UNA PERSONA RESPONSABILE PER LA
LORO SICUREZZA. I BAMBINI DEVONO
ESSERE CONTROLLATI PER ASSICURARSI
ChE NON GIOChINO CON L’APPARECChIO.
2
) - &
(("(*!"( '
"'(&)(#"''!$ '
$#&(3'')&(("#(
%)*#)'$&!((&#"(
:#("&:+ "('
&3') (('4' $&!4&)( '(#"
-$"
THIS APPLIANCE IS CONCEIVED
FOR DOMESTIC USE ONLY. THE
MANUFACTURER SHALL NOT IN
ANY WAY BE HELD RESPONSIBLE
FOR WHATEVER INJURIES OR DAMAGES ARE
CAUSED BY INCORRECT INSTALLATION OR
BY UNSUITABLE, WRONG OR ABSURD USE.
THIS APPLIANCE IS NOT
INTENDED FOR USE BY
PERSONS
(INCLUDING
CHILDREN) WITH REDUCED
PHYSICAL, SENSORY OR MENTAL
CAPABILITIES,
OR
LACk
OF
ExPERIENCE AND kNOWLEDGE,
UNLESS THEY HAVE BEEN GIVEN
SUPERVISION OR INSTRUCTION
CONCERNING USE OF THE APPLIANCE
BY A PERSON RESPONSIBLE FOR
THEIR SAFETY. CHILDREN SHOULD BE
SUPERVISED TO ENSURE THAT THEY
DO NOT PLAY WITH THE APPLIANCE.
CE PRODUIT EST CONÇU
EXCLUSIVEMENT POUR USAGE
DOMESTIQUE. LE CONSTRUCTEUR
DÉCLINE TOUTE RESPONSABILITÉ
POUR DOMMAGES ET BLESSURES CAUSÉES
PAR UNE INSTALLATION INCORRECTE OU PAR
UN USAGE IMPROPRE, ERRONÉ OU ABSURDE.
L’APPAREIL NE DOIT PAS êTRE
UTILISÉ PAR DES PERSONNES
(ENfANTS INCLUS) DISPOSANT DE
CAPACITÉS
PhySIQUES,
SENSORIELLES OU MENTALES RÉDUITES, OU
PAR DES PERSONNES N’AyANT PAS
L’EXPÉRIENCE OU LES CONNAISSANCES
REQUISES, SI CE N’EST SOUS LA SURVEILLANCE
D’UNE PERSONNE RESPONSABLE DE LEUR
SÉCURITÉ OU APRÈS AVOIR REÇU DE CELLE-CI
LES INSTRUCTIONS RELATIVES À L’UTILISATION
DE L’APPAREIL. LES ENfANTS DOIVENT êTRE
SURVEILLÉS, AfIN DE S’ASSURER QU’ILS NE
jOUENT PAS AVEC L’APPAREIL.
("%"'"&"
!+%,"&%$ %*&
8-:)<16/
:16+184-
("%"' !&%*"&%% $ %*
&$
:'(#') $&#$&(0
((&#!"(
!#&$&(
&$"($& #(()&
1"5-),&101%"")" 1/,
*$+"1& -/,-"/1&"0,#
*,01 ,,(&+$3"00")0
''')& '
$&#$&3(3'
3 (&#!"3(%)'
$ )$&('
&3$"(')''#"
&)(# ((&#"#
#*&" )"-#"
!"(# #"
")((#&&"()"
!$#!"(#
#&4(&'!''#
#'(''#&$"(
#
#(()&**"
#!'#((#'&((#
!"!'$&'#"
(#&"!"(#
&(&# $"(# '( '# #
'# *!"(#$&#*#
)(#!(!"(
:&&'(# ''(!
''(! ((&#"#
$&!(( !''!
'' (0"--
&# -#"
4
%" ,&)&+!2 1,/
4%& %-/,!2 "01%"
")" 1/,*$+"1& #&")!&0
,-"/1"!+! ,+1/,))"!
61%"")" 1/,+& &/ 2&1
&)(3 (&#"%)
#"(&8 #"(#"
"!"( #"
")()&%)&3)"
!$!"3(%)
%"%"1&01/+0*&11"!1,
#,,!61%" ,,(&+$
3"00")&10")#
:'( &3$"(
)''#"!5!%)
(&"'!( )&
%" ,,(&+$-/, "00
)+ !"('
1("0-) "0!"0 /&"!
"),4
)''#" )
#!!3&(
),00,#%"1&0
''#)'
*&+&*2*%&$%
"##& &"+ 6
3$&(#"!"! 1%"0601"*01,-0
)(&"!"(
21,*1& ))64%"+1%"
','(4!':&&5(
3"00")&0/"*,3"!,/
)(#!(%)!"('
"3"+'201)"!#/,*1%"
:#"&(&#)') %,
!"('#) 4* 1%"")" 1/,+& &/ 2&1
''&# $2/+1""0*5&*2*
','(4!
#)"5&&)&16+!#&+"
3 (&#"%)&"((
!'201*"+10
!+!)!
+ (3(
$&3'#"&3 IT
FR
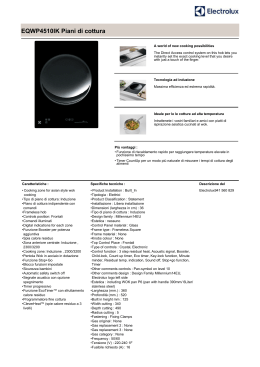
IMPORTANT
This apparatus is
not suitable for use
by persons (children
included) with
reduced mental and
physical capacity or
with lack of experience
and knowledge unless
having previously
received suitable
training for its use by
persons responsible
for their safety.
IMPORTANT
L’emploi de cet appareil
ne doit pas être confié à
des personnes (enfants
compris) dont les capacités
mentales et physiques
sont réduites ou qui
manquent d’expérience et
de connaissance, si elles
n’ont pas reçu au préalable
les instructions d’emploi
adéquates concernant
leur sécurité de la part de
personnes responsables.
I bambini devono essere
It must be ensured that
controllati per assicurarsi children do not play
che non giochino con
with the apparatus
l’apparecchio
Les enfants doivent être
surveillés afin d’être sûr
qu’ils ne jouent pas avec
l’appareil.
IMPORTANTE
Questo apparecchio
non è adatto per essere
utilizzato da persone
(bambini incusi) con
ridotte capacità mentali e
fisiche o con mancanza di
esperienza e conoscenza
se preventivamente
non abbiano ricevuto
adeguate istruzioni
per l’uso da persone
responsabili per la loro
sicurezza.
6
GB
IT
8
GB
FR
Accensione/
spegnimento del
Touch Control
On/off
of the Touch
Control
Mise en marche /
arrêt du Touch
Control
(Fig. 2 e 2a)
(Fig. 2 e 2a)
(Fig. 2 et 2a)
L’elettronica Touch
Control viene
attivata azionando il tasto
ON/OFF e commuta
dalla modalità OFF alla
modalità di attesa. A tale
scopo occorre azionare il
tasto ON/OFF come tasto
unico e per la durata di 1
s. Si sentirà un breve bip.
Nella modalità di attesa
sul display della zona di
cottura viene visualizzato
staticamente “0”.
Eventualmente questa
visualizzazione può
andare in secondo piano a
causa di una segnalazione
di calore residuo oppure
di errore.
The electronic
Touch Control
is activated by means
of the ON/OFF
button and switches
from the OFF mode
to the Standby mode.
To do so it is
necessary to press
the ON/OFF button
for 1 second. A short
Beep will be heard.
When in standby,
“0” is displayed on
the display of the
cooking zone.
This display may go
into background due
to a residual heat or
error signal.
L’électronique
Touch Control
s’enclenche en actionnant
la touche ON/OFF et en
commutant le mode OFF
en mode d’attente. Pour
ce faire, il faut enclencher
la touche ON/OFF en
touche unique durant 1
sec. On percevra un bip
rapide.
En mode d’attente,
l’afficheur du foyer
de cuisson affiche
statiquement “0”.
Eventuellement, cet
affichage peut passer au
second plan à cause d’un
signalement de chaleur
résiduelle ou d’erreur.
Se entro il tempo della
modalità di attesa (10 s)
viene attivata una zona
di cottura, il controllo
commuta nella modalità
attiva.
Se entro 10 s non viene
effettuata nessuna
introduzione, il controllo
commuta automaticamente
con un breve bip nella
modalità OFF.
If a cooking zone
is activated during
the standby time
(10 sec.), the control
switches over to the
On mode.
If no introduction
is made within the
10 sec., the control
automatically
switches to OFF with
a short beep.
Si un foyer est
enclenché durant le
délai de mode d’attente
(10 sec), le contrôle
passe en mode actif.
Si aucune commande
n’advient dans
les 10 sec, le
contrôle commute
automatiquement en
mode OFF avec un bip
rapide.
Nella modalità attivo o
nella modalità di attesa,
l’elettronica può venire
commutata in ogni
momento nella modalità
OFF azionando il tasto
ON/OFF. La funzione
di spegnimento ha
sempre priorità durante
il funzonamento; vale
a dire che il controllo
si spegne, anche
attivando più tasti
contemporaneamente.
The electronics can
be switched to the
OFF mode at any time
during the ON mode
or the Standby mode
by pressing the ON/
OFF button. The Off
function has priority
when operating,
meaning that the
control switches off
even by activating
several buttons at the
same time.
En mode actif ou
en mode d’attente,
l’électronique peut
être commutée à tout
moment en mode OFF
à l’aide de la touche
ON/OFF. La fonction
d’arrêt a toujours
priorité durant le
fonctionnement, ce qui
signifie que le contrôle
s’éteint même en
enclenchant plusieurs
touches simultanément.
IT
GB
Accensione di una Switching on a
zona di cottura
cooking zone
Mise en marche
d’un foyer
Nella modalità di attesa
o in quella attiva, una
zona di cottura può venire
attivata mediante i tasti
Più/Meno, a Meno che
la zona di cottura non si
trovi in quel momento nella
programmazione timer
(vedi capitolo timer).
Se s’inizia con il tasto “+”,
il livello di cottura passa da
“0” a “6/4”. Se s’inizia con il
tasto “-”, il livello di cottura passa da “0” a “12/9”.
En mode d’attente ou en
mode actif, un foyer peut être
enclenché à l’aide des touches
Plus/Moins, à moins que la
zone de cuisson ne se trouve
en programmation minuterie
à ce moment-là (voir chapitre
minuterie).
Si on commence avec la touche
“+”, le niveau de cuisson
passe de “0 » à « 6/4 ». Si on
commende avec la touche “-”,
le niveau de cuisson passe de
“0 » à « 12/9 ».
When in the Standby or On
mode, a cooking zone can be
switched on by means of the
Plus/Minus button, as long
as the cooking zone is not
in the timer programming
mode at that moment (see
Timer chapter).
If starting with the “+”
button, the cooking level
changes from “0” to “6 /4". If
starting with the “-“ button,
the cooking level changes
from “0” to “12/9”.
Spegnimento di una Switching off a
zona di cottura
cooking zone
10
FR
Arrêt d’un foyer
a) Azionando contemporaneamente il tasto
“+” e “-” della zona di
cottura desiderata
b) Selezionando il livello
di cottura “0” della
zona di cottura desiderata con il tasto “-”
a) Pressing the “+” and a) En actionnant
simultanément la
“-” buttons of the
touche “+” et “-” du
desired cooking zone
foyer voulu
at the same time
b) en sélectionnant le
b) Selecting cooking
niveau de cuisson «
level “0” of the
0 » du foyer voulu à
desired cooking zone
l’aide de la touche “-”
with the “-” button
Se si spegne l’ultima zona di
cottura, il controllo commuta
nella modalità OFF dopo 10 s
se non ci sono altre attivazioni.
Tutte le zone di cottura
vengono spente con effetto
immediato azionando il tasto
ON/OFF.
If the last cooking zone is
switched off, the control
switches to the OFF mode
after 10 sec. if nothing else is
switched on.
All cooking zones are
switched off immediately by
pressing the ON/OFF button.
Si on éteint le dernier foyer,
le contrôle commute en mode
OFF après 10 sec s’il n’y a
pas d’autres commandes.
Tous les foyers s’éteignent
immédiatement en
enclenchant la touche
ON/OFF.
Livelli di cottura e Cooking and
di potenza
power levels
Niveaux de cuisson
et de puissance
I livelli di cottura e di
potenza delle zone di cottura
vengono visualizzati tramite un display a 7 segmenti
assegnato. Secondo standard vengono visualizzati
i livelli di potenza con i
numeri da “1” a “12”.
Les niveaux de cuisson
et de puissance des foyers
de cuisson sont affichés à
l’aide d’un afficheur spécial
à 7 segments. Selon les
standard, les niveaux de
puissance sont affichés avec
des numéros de “1” à “12”.
The cooking and power
levels of the cooking
zones are shown on the
display with 7 allotted
segments. In accordance
with standards, the power
levels are displayed with
numbers from “1” to “12”.
IT
Indicatore di calore
residuo
Serve a indicare all’utente
che il vetro è ad una
temperatura pericolosa in
caso di contatto con tutta
l’area sovrastante la zona
cottura. La temperatura
viene determinata seguendo
un modello matematico e
un eventuale calore residuo
viene indicato con una “H”
dal corrispondente display
a sette segmenti.
Il riscaldamento e il
raffreddamento sono
calcolati in relazione a:
- Il livello si potenza
selezionato(da“0”a“12/9”);
- Il periodo di attivazione
dei relè dopo aver spento la
zona cottura.
Il corrispondente display
mostra “H” fino a che la
temperatura della zona non
scende al di sotto del livello
critico (< 60 °C) secondo il
modello matematico.
12
GB
Residual heat
indicator
Indicates to the user
that the glass is at a
dangerous temperature
if in contact with the
area over the cooking
zone. The temperature is
determined by means of a
mathematical model and
possible residual heat is
indicated by “H” on the
corresponding 7 segment
display.
Heating and cooling are
calculated based on:
- The selected power level
(from “0” to “12/9”);
- The relay activation time
after the cooking zone
has been switched off.
The corresponding
display shows “H” until
the zone temperature
drops below the critical
level (< 60 °C) according
to the mathematical
model.
FR
Indicateur de chaleur
résiduelle
Sert à indiquer à
l’utilisateur que le verre est à
une température dangereuse
en cas de contact avec
toute la surface au-dessus
du foyer. La température
est définie en suivant un
modèle mathématique et une
chaleur résiduelle éventuelle
est indiquée par un « H »
sur l’afficheur correspondant
à sept segments.
Le chauffage et le
refroidissement sont calculés
en fonction :
- du niveau de puissance
sélectionné (de “0” à “12/9”).
- la période d’enclenchement
des relais après avoir éteint
le foyer.
L’afficheur correspondant
affiche « H » jusqu’à ce que
la température du foyer
descende sous le niveau
critique (< 60 °C) selon le
modèle mathématique.
IT
GB
FR
Funzione Timer Timer function Fonction minuterie
14
La funzione Timer può
venire utilizzata come
timer per la zona di
cottura o come sveglia
indipendente, però mai
per entrambe le funzioni.
I due display a 7
segmenti della rispettiva
zona di cottura servono
per la visualizzazione
del tempo rimanente in
minuti, fino a quando
non viene fatto scattare
l’allarme del timer.
The Timer function
can be used as a
cooking zone timer
or independent alarm
but never for both
functions. The two
7 segment displays
of the respective
cooking zones are
used to view the
remaining time in
minutes up until
the timer alarm is
activated.
La fonction minuterie
peut être utilisée comme
minuterie pour le
foyer ou comme réveil
indépendant mais
jamais pour les deux
fonctions. Les deux
afficheurs à 7 segments
du foyer respectif
servent à afficher
le temps restant en
minutes, jusqu’à ce que
retentisse l’alarme de la
minuterie.
Selezione timer
Timer selection
Sélection de la
minuterie
- Per programmare un
timer, il touch deve
trovarsi nella modalità
di attesa o nella
modalità attiva.
- L’azionamento del
tasto timer serve per la
selezione della funzione
timer per una zona di
cottura.
- La segnalazione della
programmazione di
un timer mediante
i tasti Più/Meno
avviene attraverso il
led 8. Ol led del timer
lampeggiante segnala
che il valore dei display
a 7 segmenti si riferisce
al timer e può venire
modificato. Quando
un contatore continua
a funzionare nella
modalità OFF, il led
del timer s’illumina
staticamente. Ciò
indica che il valore
raffigurato sui display
appartiene al timer,
ma non può venire
mmentaneamente
modificato
direttamente; a tale
scopo occorrerebbe
- Pour programmer la
- To program a
minuterie, la touche
timer, the touch
doit se trouver en
control must be in
mode d’attente ou en
the Standby or On
mode actif.
mode.
- L’enclenchement de
- The timer button
la touche minuterie
is pressed in order
sert à sélectionner la
to select a timer
fonction minuterie
function for the
pour un foyer de
cooking zone.
cuisson.
- LED 8 signals
- La programmation
the timer
d’une minuterie par
programming
les touches Plus/
by means of the
Moins est signalée
+/- buttons. The
par le voyant 8. Le
flashing timer LED
voyant clignotant
signals that the 7
de la minuterie
segment display
signale que la valeur
value refers to the
des afficheurs à 7
timer and can be
segments se rapporte
modified. When a
à la minuterie et peut
timer continues to
être modifiée. Quand
function in the OFF
un compteur continue
mode, the timer
à fonctionner en mode
LED remains on.
OFF, le voyant de la
This indicates that
minuterie s’éclaire
the value on the
statiquement. Ceci
display is related
indique que la valeur
to the timer, but
sur les afficheurs se
cannot be directly
réfère à la minuterie,
modified at that
mais ne peut être
particular moment;
directement modifiée
to do so, the
momentanément. Pour
control must be
IT
GB
FR
riattivare il controllo.
ce faire, il faudrait
reactivated.
- L’azionamento del
réenclencher le
- The activation of
tasto timer dipende
contrôle.
the timer button
dalle condizioni
- L’enclenchement de la
depends on the
di funzionamento
touche de minuterie
conditions of the
precedentemente
dépend des conditions
previously set
impostate:
de fonctionnement
function:
a) La zona di cottura
programmées auparavant.
a) The cooking zone
corrispondente al timer
a) Le foyer
corresponding to the
è attivata (livello di
correspondant à la
timer is on (cooking
cottura > 0):
minuterie est enclenché
level > 0):
Il timer viene
(niveau de cuisson > 0):
The timer is
programmato in
La minuterie est
programmed in
riferimento alla zona
programmée en
reference to the
di cottura; quando
référence au foyer.
cooking zone;
si azzera, spegne
Quand elle est remise
the cooking zone
automaticamente la
à zéro, elle éteint
automatically
zona di cottura; non
automatiquement
switches off
è possibile selezionare
le foyer. Il n’est pas
when reset; an
un contatore
possible de sélectionner
independent timer
indipendente. Un
un compteur
cannot be selected.
ulteriore azionamento
indépendant. Une
The cooking level
del tasto timer
nouvelle remise à zéro
setting is accessed
commuta direttamente
de la touche minuterie
when the timer
all’impostazione del
commute directement
button is pressed
livello di cottura.
à la programmation du
again.
b) La zona di cottura
niveau de cuisson.
b) The cooking zone
corrispondente al timer
b) Le foyer
corresponding to the
è disattivata (livello di
correspondant à la
timer is off (cooking
cottura = 0):
minuterie est déclenché
level = 0):
Il timer viene
(niveau de cuisson = 0):
The timer is
progtammato
La minuterie
independently
indipendentemente e
est programmée
programmed
continua a funzionare
indépendamment et
and continues to
anche nello stato
continue à fonctionner
function even in
di OFF. Finchè il
même en OFF. Tant que
OFF. The cooking
contatore funziona, non
le compteur fonctionne,
zone cannot be
è possibile attivare la
il n’est pas possible
activated until the
zona di cottura.
d’enclencher le foyer.
timer is functioning.
Impostazione del
valore di timer
Setting of the
Timer value
Programmation de la
valeur de la minuterie
- In seguito alla selezione - Following the
- Suite à la sélection de
del timer avvenuta, il
la minuterie, le voyant
selection of the
led assegnato lampeggia
attribué clignote comme
time, the related
come sopra descritto.
décrit ci-dessus. Avec
LED flashes as
Con i tasti Più/Meno
les touches Plus/Moins,
described above.
è possibile impostare il
on peut programmer
The countdown time
tempo di count down
le temps de compte à
of the desired timer
del timer desiderato.
rebours de la minuterie.
can be set by means
- Iniziando con il tasto
- En commençant pas la
of the +/- buttons.
Più, il primo valore
touche Plus, la première
- Starting with
visualizzato salta
valeur affichée saute
the plus button,
16
IT
-
-
-
-
18
su “01” e aumenta
progressivamente da 1
fino a un massimo di
“99” (limite superiore).
Iniziando con il
tasto Meno, il
valore visualizzato
sull’indicazione salta
su “30” e diminuisce in
passi da 1 fino allo “01”
(primo limite inferiore).
Al suo raggiungimento
viene emesso un
segnale acustico. Per
raggiungere lo “00”,
occorre prima rilasciare
il tasto Meno e poi
riattivarlo. Azionando
ulteriormente il
tasto Meno, la
visualizzazione “00”
non verrà modificata
(secondo limite
inferiore).
L’impostazione
può avvenire anche
tramite azionamenti
permanenti dei
tasti Più o Meno o
tramite azionamenti
singoli (selezionare:
azionamento tasto,
rilascio, azionamento,
rilascio, ecc.).
In caso di azionamento
permanente del
tasto, si verifica
un’accelerazione
automatica della
velocità di regolazione,
vale a dire che il tempo
tra un passo e quello
successivo si riduce,
finchè il tasto rimane
premuto.
Se entro 10 s
(parametro) il tasto
Più o il tasto Meno
non viene nuovamente
premuto, dopo aver
selezionato il timer della
zona di cottura corrente
(il display rimane su
“00”), l’indicazione e
GB
the first value
displayed is “01”
and progressively
increases from 1 to a
maximum value of
“99” (upper limit).
- Starting with the
minus button, the
value displayed on
the indication is
“30” and diminishes
to “01” (first lower
limit). When this
value is reached, an
acoustic signal is
emitted. By pressing
the minus button
again, the display
“00” will not be
modified (second
lower limit).
- Setting can be
performed by
permanently
pressing the plus
or minus buttons
or by intermittently
pressing them
(selection: press
button, release,
press button,
release, etc).
- If the button is
permanently
pressed, the
regulation speed
automatically
accelerates,
meaning that the
time between one
step and the next is
reduced, until the
button is released.
- If the Plus or Minus
buttons are not
pressed within 10
sec. (parameter),
after having selected
the timer of the
current cooking
zone (the display
remains on “00”),
the indication
and allocation of
FR
-
-
-
-
sur “01” et augmente
progressivement de 1
jusqu’à un maximum
de « 99 » (limite
supérieure).
En commençant par la
touche Moins, la valeur
affichée sur l’indication
saute à “30” et diminue
de un cran jusqu’à «
01 » (première limite
inférieure). Une fois
atteinte, un signal
acoustique retentit.
Pour atteindre le “00”,
il faut d’abord lâcher
la touche Moins,
puis la réenclencher.
En appuyant encore
sur la touche Moins,
l’affichage « 00 » ne sera
pas modifié (seconde
limite inférieure).
La programmation
peut se faire par
enclenchements
permanents des touches
Plus ou Moins ou
par enclenchements
individuels (sélectionner
: enclenchement de la
touche, déclenchement,
enclenchement,
déclenchement, etc.)
En cas d’enclenchement
permanent de la
touche, on constate
une accélération
automatique de la
vitesse de réglage, cela
signifie que le temps
entre une étape et la
suivante se réduit,
jusqu’à ce que la touche
reste enfoncée.
Si dans les 10 sec
(paramètre), la touche
Plus ou la touche Moins
n’est pas à nouveau
sollicitée, après avoir
sélectionné la minuterie
du foyer utilisé
(l’affichage reste sur «
00 »), l’indication et
IT
-
-
-
-
20
l’assegnazione dei tasti
Più/Meno commutano
automaticamente alla
zona di cottura.
Quando un timer
viene utilizzato come
contatore (sveglia),
l’indicazione e
l’assegnazione dei tasti
non commutano alla
zona di cottura, dato
che essa non può venire
attivata.
Un timer parte in
genere con il count
down, se quest’ultimo è
stato programmato con
dei valori non uguali
a 0. Esempio: il timer
parte con il rilascio del
tasto Più dopo aver
impostato il valore
timer “01”.
Le impostazioni
di timer sono
prioritarie rispetto alla
delimitazione del tempo
di funzionamento
in presenza di
impostazioni di livelli
alti di cottura.
Se viene programmata
solo una sveglia, il
controllo dapprima
rimane nella modalità
di attesa (nessun’altra
zona di cottura è
attivata). Se non
vengono introdotti
altri valori nuovi, il TC
si comporta come sopra
descritto e commuta
nella modalità di OFF.
GB
the +/- buttons
automatically switch
to the cooking zone.
- When a timer is
used as an alarm,
the indication
and allocation of
the buttons does
not switch to the
cooking zone, being
that this cannot be
activated.
- The timer
normally starts
in countdown, if
programmed with
two values that are
not 0. For example:
the timer starts
when the Plus
button is released
after the timer value
has been set at “01”.
- The timer settings
have priority over
the delimitation of
the operating time if
high cooking levels
have been set.
- If only one
alarm has been
programmed, the
control remains at
first in the standby
mode (no other
cooking zone is
on). If no other
new values are
introduced, the
TC behaves as
described above
and switches to the
OFF mode.
FR
-
-
-
-
l’attribution des touches
Plus/Moins commutent
automatiquement sur le
foyer.
Quand une minuterie
est utilisée comme
compteur (réveil),
l’indication et
l’attribution des touches
ne commutent pas sur le
foyer, puisqu’il ne peut
être enclenché.
Une minuterie part en
général avec le compte
à rebours si ce dernier
a été programmé avec
des chiffres non égaux
à 0. Exemple : la
minuterie démarre avec
le déclenchement de la
touche Plus après avoir
programmé la valeur
minuterie de “01”.
Les programmations
de minuterie sont
prioritaires par rapport à
la délimitation du temps
de fonctionnement
en présence de
programmations de
niveaux élevés de
cuisson.
On programme
uniquement un réveil, le
contrôle reste de prime
abord en mode d’attente
(aucun autre foyer
n’est enclenché). Si on
n’introduit pas d’autres
valeurs, la minuterie se
comporte comme décrit
plus haut et commute en
mode OFF.
Scadere del timer/
allarme del timer
e conferma
Timer laps/
timer alarm and
confirmation
Déclenchement de la
minuterie/alarme de la
minuterie et confirmation
- Gli ultimi 10 s prima
dello scadere del timer
vengono visualizzati
sul display (count
down fino all’allarme).
- Una volta scaduto il
- The last 10
sec. before the
timer lapses
are displayed
(countdown up to
alarm).
- Les 10 dernières sec.
avant l’échéance de la
minuterie sont affichées
sur l’afficheur (compte
à rebours jusqu’à
l’alarme).
IT
GB
FR
tempo impostato di un
timer, scatta l’allarme
del timer, la zona di
cottura assegnata viene
subito spenta.
- Il display, insieme al led
del timer selezionato,
lampeggia alternando il
livello di cottura “00”
con “H”, in caso di
calore residuo.
- La segnalazione
dell’allarme dura al
massimo 2 minuti, se
l’utente non interviene
prima.
- Al termine dei 2
minuti o azionando
un tasto qualsiasi,
la segnalazione
dell’allarme viene
sospesa.
Il segnalino acustico
(cicalino) nonchè la spia
di controllo del timer
vengono disattivati.
- Once the set time
of the timer has
lapsed, the timer
alarm is activated
and the assigned
cooking zone is
switched off.
- The display and the
selected timer LED
flash alternating the
cooking level from
“00” to “H”, if there
is residual heat.
- The warning alarm
lasts for at least 2
minutes if the user
does not switch it
off before.
- The alarm signal
switches off after
the 2 minutes is up
or if any button is
pushed.
The buzzer and the
timer control light
are switched off.
- Une fois que le temps
programmé est
écoulé, l’alarme de la
minuterie se déclenche,
le foyer en question est
immédiatement éteint.
- L’afficheur et le
voyant de la minuterie
clignotent en alternant
le niveau de cuisson « 00
» avec « H » en cas de
chaleur résiduelle.
- Le signalement de
l’alarme dure au
maximum 2 minutes, si
l’utilisateur n’intervient
pas avant.
- A la fin des 2 minutes
ou en actionnant une
touche quelconque, le
signalement de l’alarme
est suspendu.
Le signal acoustique
(sonnerie) et le voyant de
contrôle de la minuterie
sont déclenchés.
Spegnimento del
timer/Modifica
delle impostazioni
del timer
Timer off
/Modification
of the timer
setting
Arrêt de la minuterie
/Modification des
programmations de la
minuterie
- E’ possibile modificare
- Il est possible de modifier
- The timer settings
il valore impostato del
la valeur programmée
can be modified in
timer, nella modalità
sur la minuterie, en
the Standby or On
di attesa o attiva, in
mode d’attente ou actif,
mode at any time
ogni momento dopo
à tout moment après la
after the selection
selezione avvenuta,
sélection, en enclenchant
has been made by
attivando il tasto Più o
la touche Plus ou Moins.
pressing the Plus or
Meno.
- Il est possible d’éteindre
Minus buttons.
- E’ possibile spegnere il
la minuterie en
- The timer can be
timer, portandolo sul
l’amenant sur la valeur
switched off, setting
valore “00” premendo il
“00” en appuyant sur
it to value “00”, by
tasto Meno o premendo
la touche Moins ou en
pressing the Minus
un’unica volta
appuyant une seule fois
button or by pressing
contemporaneamente i
simultanément sur les
the Plus and Minus
tasti Più o Meno.
touches Plus ou Moins.
buttons together.
22
IT
Key Lock
GB
Key Lock
(sicurezza bambini) (child safety)
BASIC
BASIC
24
FR
Verrouillage des
touches Key Lock
(sicurezza bambini)
BASIC
Bloccaggio/
attivazione Key
Lock
Locking/
unlocking of the
Key Lock
Blocage/enclenchement
du Verrouillage des
touches
L’azionamento del tasto
Key-Lock nella modalità di
attesa o attiva, comporta
il bloccaggio della tastiera;
il led Key-Lock “9” si
illumina in modo statico.
Il controllo continua a
lavorare nella modalità
precedentemente impostata,
ma non può più essere
comandato da altri tasti,
tranne che dal tasto KeyLock o dal tasto ON/OFF.
Lo spegnimento con il tasto
ON/OFF è possibile anche
in stato di bloccaggio. Il led
corrispondente del tasto
key lock si spegne quando
si disattiva il touch e la
funzione Key-Lock. Il led
è nuovamente attivo in
caso di riaccensione (entro
10 s) fino a quando verrà
disattivata azionando
nuovamente il tasto
Key-Lock. L’attivazione/
disattivazione della funzione
Key-Lock nella modalità di
OFF non è possibile.
The keypad is blocked
when the Key Lock
button is pressed in the
Standby or On mode; the
Key-Lock LED “9” lights
permanently.
The control continues to
operate in the previously
set mode but can no
longer be controlled by
other buttons, except by
the Key-Lock button or
the ON/OFF button.
Switching off with the
ON/OFF button is also
possible when locked.
The Key-lock button
LED switches off when
the Touch control and
Key-Lock function are
switched off. The LED
lights again if reactivated
(within 10 sec.) until it is
deactivated by pressing
the Key-Lock button once
again. The activation/
deactivation of the
Key-Lock function is not
possible in the OFF mode.
L’enclenchement de la touche
Key-Lock (verrouillage des
touches) en mode d’attente ou
actif implique le blocage du
clavier, le voyant Key-Lock «
9 » s’allume en mode statique.
Le contrôle continue
à travailler en mode
programmé mais ne peut plus
être commandé par d’autres
touches, sauf par la touche
Key-Lock ou par la touche
ON/OFF.
L’arrêt avec la touche
ON/OFF est possible même
en état de blocage. Le voyant
correspondant à la touche
Key-Lock s’éteint quand
on déclenche la touche et
la fonction Key-Lock. Le
voyant est à nouveau actif
en cas de remise en marche
(dans les 10 sec) jusqu’à
ce qu’il soit déclenché à
nouveau à l’aide de la touche
Key-Lock. L’enclenchement/
déclenchement de la fonction
Key-Lock en mode OFF n’est
pas possible.
Sbloccaggio/
disattivazione Key
Lock - BASIC
Unlocking/
Déblocage/déclenchement
deactivation of the du Verrouillage des
Key Lock - BASIC touches Key-Lock -BASIC
Il nuovo azionamento
del tasto Key-Lock
nella modalità di attesa
o attiva comporta lo
sbloccaggio della tastiera
e lo spegnimento del led
Key-Lock assegnato. Tutti i
tasti sensore possono venire
nuovamente azionati.
The keypad is
unlocked and the KeyLock LED is switched
off when the Key-Lock
button is pressed again
in the Standby or
On mode. All sensor
buttons can once again
be activated.
Le nouvel enclenchement
de la touche Key-Lock en
mode d’attente ou actif
implique le déblocage
du clavier et l’arrêt du
voyant Key-Lock attribué.
Toutes les touches capteurs
peuvent être à nouveau
enclenchées.
IT
26
GB
FR
Key-Lock
Key-Lock
Key-Lock
(sicurezza
bambini)
G4
(child safety)
G4
(sécurité enfants)
G4
Aivazione e
disaivazione
Activation and
deactivation
Activation et
désactivation
L’azionamento del
tasto key-lock nella
modalità di aesa o
aiva comporta il
disinserimento della
potenza in entrambi
i fuochi. Sul display
compare il simbolo “11”.
È possibile solo il totale
spegnimento con il tasto
ON/OFF o lo sblocco
azionando il simbolo
key-lock e dopo il bip il
simbolo “+” o “-”.
The activation of the
key-lock in the pause
or active mode causes
the deactivation of the
power to both burners.
The symbol “11”
appears on the display.
It can only be totally
turned off with the
ON/OFF buon or the
release by activating
the key-lock symbol
and then the “+” o “-”
symbol aer the beep.
L’actionnement de
la touche key-lock en
mode d’aente ou actif
entraîne la désactivation
de la puissance au
niveau des deux
flammes. L’afficheur
indique « 11 ». La touche
ON/OFF ne permet
que l’extinction totale
ou le déverrouillage en
actionnant le symbole
key-lock et, après le Bip,
le symbole « + » ou « - ».
Per bloccare in sicurezza
la regolazione di
un fuoco, azionare
contemporaneamente
il simbolo TIMER e
il simbolo “-” relativi
al fuoco stesso. Il led
key-lock “9” si accende.
Il controllo continua a
lavorare nella modalità
precedentemente
impostata e non può
essere comandata da
altri tasti, tranne
lo spegnimento con
il tasto key-lock.
Lo sblocco avviene
azionando di nuovo
contemporaneamente
il simbolo TIMER e il
simbolo “-”
To block the
regulation of a burner
in safety, activate
the TIMER symbol
and the “-” symbol
related to the burner
at the same time. The
key-lock “9” LED will
light. The control will
continue to operate
in the previously set
mode and cannot be
controlled by other
buons, except for
switching off with the
key-lock buon. The
release is performed
by activating again
the TIMER symbol
and the “-” symbol
together.
Pour verrouiller en
toute sécurité le réglage
d’une flamme, actionner
simultanément le
symbole TIMER et le
symbole « - » relatifs à
la flamme en question.
La LED key-lock
« 9 » s’allume. Le
contrôle continue à
travailler dans le mode
sélectionné et ne peut
pas être commandé
par d’autres touches
; seule l’extinction
est possible au moyen
de la touche key-lock.
Pour le déverrouillage,
actionner de nouveau
simultanément le
symbole TIMER et le
symbole « - ».
IT
28
GB
FR
Booster e Gestione
della potenza per
l’induzione - G4
Booster and
induction power
management - G4
Booster et gestion
de la puissance pour
l’induction – G4
(Fig. 2a)
(Fig. 2a)
(Fig. 2a)
All “G4” induction
Tutte le zone di cottura
and cooking zones
ad induzione “G4”
dispongono di una funzione have a Booster
function. The
Booster. Il generatore, con
generator, with
Booster attivato, mette a
Booster On, gives
disposizione della zona
the cooking zone
di cottura una potenza
power that is
significativamente
significantly greater
superiore alla potenza
than the rated
nominale. Il Booster
permette un riscaldamento output. The booster
allows a particularly
particolarmente rapido
rapid heating of the
del cibo e permette quindi
food thereby saving
all’utente di risparmiare
the user time.
del tempo.
Tous les foyers à
induction “G4” sont
munis d’une fonction
Booster. Lorsque le
Booster est enclenché,
le générateur produit
une puissance
nettement supérieure à
la puissance nominale
pour le foyer. Le Booster
permet un chauffage
particulièrement
rapide des aliments et
permet à l’utilisateur
d’économiser du temps.
La funzione Booster può
essere attivata nel seguente
modo:
- La zona cottura deve
trovarsi sul livello
massimo possibile;
- Azionando ulteriormente
il tasto “+”, si attiva
la funzione Booster.
Sull’indicazione della
zona di cottura viene
visualizzato in modo
statico una “P”.
The Booster function
can be activated as
follows:
- The cooking zone
must be at the
maximum possible
level;
- The Booster function is
activated by pressing
the “+” button again. A
fixed “P” is displayed
on the indication of the
cooking zone.
La fonction Booster peut
être enclenchée comme
suit :
- Le foyer doit se
trouver au niveau le
plus élevé,
- En enclenchant
encore la touche
“+”, on enclenche
la fonction Booster.
L’indication du foyer
affiche un « P » en
mode statique.
1 - da 1400 a 1800 W
2 - da 2300 a 3200 W
1 - from 1400 to 1800 W
2 - from 2300 to 3200 W
1 - de 1400 à 1800 W
2 - de 2300 à 3200 W
Per motivi di sicurezza, la
funzione Booster per ogni
zona di cottura può essere
attivata solo per una durata
limitata di 10 minuti. Se
durante il tempo Booster
la pentola viene tolta dalla
zona di cottura, la funzione
Booster rimane attivata e
anche il tempo Booster non
viene disattivato.
Con il Booster attivato,
l’azionamento del tasto “-”
comporta il disinserimento
della funzione Booster.
L’azionamento del tasto “+”
non comporta alcuna reazione.
For safety reasons,
the Booster function
for each cooking zone
can only be activated
for a limited time of
10 minutes. If the pan
is removed from the
cooking zone during
the Booster time,
the Booster function
remains on and also
the Booster time is not
deactivated.
The Booster is switched
off by pressing the “-“
button. The “+” has no
effect whatsoever.
Pour des raisons de sécurité,
la fonction Booster ne peut
être enclenchée pour chaque
foyer que durant une durée
maximum de 10 minutes. Si
durant le temps Booster, on
retire la casserole du foyer,
la fonction Booster reste
enclenchée et le temps de
Booster n’est pas déclenché.
Lorsque le Booster est
enclenché, l’enclenchement
de la touche “-”implique le
déclenchement de la fonction
Booster. L’enclenchement de
la touche « + » n’entraîne
aucune réaction.
IT
30
GB
FR
Funzione mantenimento della temperatura (Lo Temp)
Fonction de maintien
Keep- warm
function (Lo Temp) de la température
(Lo Temp)
La funzione mantenimento della temperatura
serve per mantenere
riscaldati i cibi pronti
su una zona di cottura.
A tale scopo, la zona di
cottura prescelta viene
alimentata con una
potenza bassa.
The keep-warm
function serves
to keep the food
on a cooking
zone warm. To do
so, the selected
cooking zone is
supplied with a
lower power.
La fonction de
maintien de la
température sert à
garder au chaud les
aliments prêts sur
un foyer. Pour ce
faire, le foyer choisi
est alimenté par une
faible puissance.
La funzione di mantenimento della temperatura
viene attivata impostando il livello di cottura
tra 0 e 1; su entrambe
le indicazioni delle zone
di cottura viene quindi
visualizzato il simbolo
“Lo” (vedi sopra).
Abbassando i gradi
di cottura con il tasto
Meno premuto, ci
si ferma al livello di
cottura di mantenimento della temperatura;
per commutare a livello
0 occorre un nuovo
azionamento.
The keep-warm
function is activated
by setting the
cooking level
between 0 and 1.
The “Lo” symbol is
thereby indicated on
both cooking zone
displays (see above).
Lowering the
cooking temperature
with the “-“ button
pressed, the
temperature stops
on the keep-warm
cooking level. Push
the button again to
switch to “0”.
La fonction de maintien
de la température
est enclenchée en
programmant le niveau
de cuisson entre 0 et 1.
Sur les deux indications
des foyers, le symbole
« Lo » s’affiche (voir
ci-dessus).
En diminuant les
degrés de cuisson avec
la touche Moins, on
s’arrête au niveau de
cuisson de maintien de
la température. Pour
commuter au niveau
O, il faut appuyer à
nouveau.
IT
;$;!&; ;'%
%#;
%
;!'
$$;&'!;
; &%&
%;$$
%%;$
; '%;$;!'%%
%;$$%%
$;
%P$
;; ; &#;$$;
;%%;'&;
;!$; ;$$'
%;;
; ;$
%;$$'
%
%;&'$;%
;;
$$;'$
$$$;!#;'
#;;#;%%
%;&&;&;&'$$
&'!; $;%;
;#;&;&$ %
;%$$;';%;
%;;!% % %;&%;
; ;% %
$
;$%'$;
;&$ %;;'%
; ';
%'
;$;'; ;$
%
%;% %; ;
&'$;!% ;%;
%;
%
;;
'
%;
&$% !'%
%
; ;$'&;&%;%
$&; &&
%;&%;;;
%%;!;!! %;&'$
$; ;%$
32
GB
*$H#-,%)(+
A;R-;#
1%;7.3;$%2%#2;
#0
#+;(.5%4%0;1,
;R2(%;(.";130&
#%
R,,%$R
2%7;$R1#.--%#2
2(%;.5%0;137
A;5(%-;2(%;(.";R1;R-;31%
+%%;
;,
-%2R8
"%
."*%#21;
5
7;#0%$R2
#
0$1;&.7;$R1+1
#
#3
2.01;
-$;1.;.-
A;$.;-.2;31%;
-7
3,R-R3,;&.R;.0;
#%
-7;&..$123&&1;50
%$;R
3,R-R3,;&.R;$R0%#27
.-;2(%;(."
A;$.;-.2;
#%;
-7;,%2
."*%#21;13#(;
1;+-R4%1
&.0+1;1..-1;
-$;R$1;.2(%;(.";130&
#%;
1;2(%7
5R;(%
2;3
A;5(%-;#..+R-;R-;
;-.-A
12R#+;
-;5R2(.32
1%
1.-R-;$.;-.2;%6#%%$
A;+R,21%0@;./%A(%!1R,'
1R+%
A;4(%,;#--*R,';&--$;1(!1
+!5;%!0R5;01R#*;01!/1;!1;!
-4;.-4%/;-21.21;%3%
!,$;1(%,;0-45;R,#/%!0%
4(R%;/%'2!/5;01R//R,'
A;!&1%/;#--*R,';R0
&R,R0(%$;04R1#(;-&&;20R,'
1(%;#-,1/-;./-3R$%$;12/,
$-4,;1-;78;!,$;$-;,-1
/%5;-,;1(%;.!,;0%,0-/
FR
;&;'&;%&;$
%; '%;!&&';
0
$/1;&';$;&'!; '
$%; ;'&&%; /P%#
/ %;$$
;% %;$
$;/$%
';
/$;
%/&P$
$;';&; ;/ ; &
'&;$'$&;
;%'$&;
&; ;
$'
%'
;%;$
%; $
%&
%$/&; %&;$;
$'
%'
;&';$;$%; '&&%
;%';&; P&
/$$'&;$&;';'
';!'#&;'$$&;
'$&;&';$;&'!; '
$%; ;'&&%;';/
'$&;&;#'!!%
;&;'&;!!';$;'&&%
';
%; ;&&$&
% #/&&;;&%&;&&
&%%
%;$
;$;
&
;#'!!;,;'%;'; '
%'&
;$&; ;$;'&&%; $
%&;';'%
#;&';$;!% ; ;$
&&$;
%;,
'&&%;
%
$;
'
%;&&
%
';%;
'%;&'%
%;!%; '$&%;/% %;%%%;&';$; &&
!;/';,;;!!; //
%;'&',;;;%;&
&;!;'; /'; ;
&
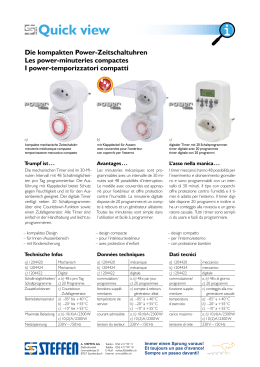
)LJ$EE$IE
UHFLSLHQWHYHVVHOFDVVHUROH*HIlHUHFLSLHQWHSDQUHFLSLHQWH
FRUUHQWHLQGRWWDLQGXFHGFXUUHQWFRXUDQWLQGXLW,QGXNWLRQVVWURPFRUULHQWHLQGXFLGDLQGXFWLHVWURRP
FRUUHQWHLQGX]LGD
FDPSRPDJQHWLFRPDJQHWLFILHOGFKDPSPDJQpWLTXH0DJQHWIHOGFDPSRPDJQpWLFRPDJQHWLVFKYHOG
FDPSRPDJQpWLFR
LQGXWWRUHLQGXFWRULQGXFWHXU,QGXNWRULQGXFWRULQGXFWRULQGXWRU
FLUFXLWRHOHWWURQLFRHOHFWURQLFFLUFXLWFLUFXLWpOHFWURQLTXH6WURPNUHLVFLUFXLWRHOHFWUyQLFRVWURRPFLUFXLW
FLUFXLWRHOHFWUyQLFR
DOLPHQWD]LRQH HOHWWULFD SRZHU VXSSO\ DOLPHQWDWLRQ pOHFWULTXH 6WURP]XIXKU VXPLQLVWUR HOpFWULFR VWURRPWRHYRHUDOLPHQWDomRHOpFWULFD
34
BASIC
C2INB1
dEC2G2INBA; dEC2G2INBA-S
2
2
1
1
INDUCTION
2
2
1
1
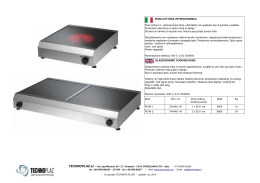
1. zona cottura Ø 160/1400W - cooking zone Ø 160/1400W - zone de cuisson Ø 160/1400W - Kochzone Ø
160/1400W - zona de cocción Ø 160/1400W - kookplaat Ø 160/1400W - zona de cozimento Ø 160/1400W
2. zona cottura Ø 200/2300W - cooking zone Ø 200/2300W - zone de cuisson Ø 200/2300W - Kochzone Ø
200/2300W - zona de cocción Ø 200/2300W - kookplaat Ø 200/2300W - zona de cozimento Ø 200/2300W
8
7
8
5
3b
4
6
9
5
3a
4
2
1
1. accensione/spegnimento - On/Off - mise en marche/arrêt - Ein-/Ausschalten - encendido/apagado inschakeling/uitschakeling - activação/desactivação
2. sicurezza bambini (key lock) - Child safety (key lock) - sécurité enfants (key-lock) - Kindersicherung
(Key Lock) - seguridad niños (key lock) - kinderveilig (key lock) - dispositivo de segurança para as
crianças (key lock)
3. indicazione zona cottura - Cooking zone indication - indication du foyer - Kochfeldanzeige - indicación
zona de cocción - aanduiding kookzone - indicação da zona de cozedura
4. incremento potenza - Power increase - augmentation de la puissance - Leistung steigern - aumento
potencia - verhoging vermogen - incremento da potência (0-9)
5. decremento potenza - Power Decrease - diminution de la puissance - Leistung mindern - reducción
potencia - afname vermogen - decremento da potência (9-0)
6. Timer/a - Timer/a - Minuterie/a - Timer/a - Temporizador/a - Timer/a - Timer/a
7. Timer/b - Timer/b - Minuterie/b - Timer/b - Temporizador/b - Timer/b - Timer/b
8. Led timer - Timer Led - voyant de minuterie - LED Timer - Led temporizador - Led timer - Led Timer
9. Led key lock - Key lock Led - Voyant key-lock - LED Key Lock - Led key lock - Led key lock - Led key lock
Fig. 2 - Abb. 2 - Afb. 2
35
G4
C2IN41
dEC2G2ING4; dEC2G2ING4-S
2
2
INDUCTION
1
2
1
2
1
1
1. zona cottura Ø 145/1400W - cooking zone Ø 145/1400W - zone de cuisson Ø 145/1400W - Kochzone Ø
145/1400W - zona de cocción Ø 145/1400W - kookplaat Ø 145/1400W - zona de cozimento Ø 145/1400W
2. zona cottura Ø 210/2300W - cooking zone Ø 210/2300W - zone de cuisson Ø 210/2300W - Kochzone Ø
210/2300W - zona de cocción Ø 210/2300W - kookplaat Ø 210/2300W - zona de cozimento Ø 210/2300W
8
7
8
5
3b
4
6
9
5
3a
4
2
1
1. accensione/spegnimento - On/Off - mise en marche/arrêt - Ein-/Ausschalten - encendido/apagado inschakeling/uitschakeling - activação/desactivação
2. sicurezza bambini (key lock) - Child safety (key lock) - sécurité enfants (key-lock) - Kindersicherung
(Key Lock) - seguridad niños (key lock) - kinderveilig (key lock) - dispositivo de segurança para as
crianças (key lock)
3. indicazione zona cottura - Cooking zone indication - indication du foyer - Kochfeldanzeige - indicación
zona de cocción - aanduiding kookzone - indicação da zona de cozedura
4. incremento potenza - Power increase - augmentation de la puissance - Leistung steigern - aumento
potencia - verhoging vermogen - incremento da potência (0-12)
5. decremento potenza - Power Decrease - diminution de la puissance - Leistung mindern - reducción
potencia - afname vermogen - decremento da potência (12-0)
6. Timer/a - Timer/a - Minuterie/a - Timer/a - Temporizador/a - Timer/a - Timer/a
7. Timer/b - Timer/b - Minuterie/b - Timer/b - Temporizador/b - Timer/b - Timer/b
8. Led timer - Timer Led - voyant de minuterie - LED Timer - Led temporizador - Led timer - Led Timer
9. Led key lock - Key lock Led - Voyant key-lock - LED Key Lock - Led key lock - Led key lock - Led key lock
Fig. 2a - Abb. 2a - Afb. 2a
36
38
IT
GB
FR
3HQWRODPH
)LJ
VHXQDFDODPLWD
DYYLFLQDWDDOIRQGRGL
XQUHFLSLHQWHULPDQH
DWWUDWWDTXHVWDSXzJLj
HVVHUHXQDSHQWROD
DGDWWDDOODFRWWXUDDG
LQGX]LRQH
SUHIHULUHSHQWRODPH
GLFKLDUDWRDQFKHSHU
FRWWXUDDGLQGX]LRQH
SHQWRODPHDIRQGR
SLDWWRHVSHVVR
XQDSHQWRODGLFP
GLGLDPHWURSHUPHWWHGL
VIUXWWDUHODPDVVLPD
SRWHQ]D
XQDSHQWRODSL
SLFFRODULGXFHOD
SRWHQ]DPDQRQ
FDXVHUjGLVSHUVLRQH
G·HQHUJLD
(·FRPXQTXH
VFRQVLJOLDELOHO·XWLOL]]R
GLUHFLSLHQWLGL
GLDPHWURLQIHULRUHD
FP
UHFLSLHQWLLQR[FRQ
IRQGRPXOWLVWUDWRR
LQR[IHUULWLFRVH
SUHFLVDWRVXOIRQGR
SHULQGXFWLRQ
UHFLSLHQWLLQJKLVD
PHJOLRVHFRQIRQGR
VPDOWDWRSHUHYLWDUH
JUDIILDWXUHDOSLDQR
YHWURFHUDPLFR
VRQRVFRQVLJOLDWLH
QRQFRQYHQJRQR
UHFLSLHQWLLQYHWUR
FHUDPLFDWHUUDFRWWD
UHFLSLHQWLLQDOOXPLQLR
UDPHRLQR[QRQ
PDJQHWLFR
DXVWHQLWLFR
&RRNLQJYHVVHOV
)LJ
DPDJQHWDWWUDFWLQJ
YHVVHOPD\EHDVXLWDEOH
YHVVHOIRULQGXFWLRQ
FRRNLQJ
SUHIHUYHVVHOVZKLFKDUH
HVSHFLDOO\GHFODUHGWREH
VXLWDEOHIRULQGXFWLRQ
FRRNLQJ
IODWDQGWKLFN
ERWWRPHGYHVVHOV
DYHVVHOZLWKD
FHQWLPHWHUGLDPHWHU
HQVXUHVWKHPD[LPXP
H[SORLWDWLRQRISRZHU
DVPDOOHUYHVVHOUHGXFHV
SRZHUH[SORLWDWLRQEXW
GRHVQRWFDXVHDQ\
HQHUJ\ORVV
:HZRXOGDQ\KRZQRW
UHFRPPHQGWKHXVHRI
YHVVHOVZLWKGLDPHWHUV
VPDOOHUWKDQFP
VWDLQOHVVVWHHOYHVVHOV
ZLWKPXOWLOD\HURU
IHUULWLFVWDLQOHVVVWHHO
ERWWRPVZKHQVSHFLIL
FDOO\VXLWHGIRULQGXFWLRQ
FRRNLQJ
FDVWLURQSUHIHUDEO\
HQDPHOERWWRPHGYHVVHOV
WRDYRLGVFUDWFKLQJWKH
S\URFHUDPVXUIDFH
ZHGRQRWUHFRPPHQG
WKHXVHRIDQ\JODVV
FHUDPLFHDUWKHQZDUH
DOOXPLQLXPFRSSHURU
QRQPDJQHWLFDXVWHQLWLF
VWDLQOHVVVWHHOYHVVHOV
&DVVHUROHV
)LJ
XQHFDVVHUROHGRQWOH
IRQGDWWLUHO·DLPDQW
VHUDLWGpMjXQD
FDVVHUROHDGDSWpHjOD
FXLVVRQjLQGXFWLRQ
HPSOR\H]SOXW{WGHV
FDVVHUROHVJDUDQWLHV
SRXUODFXLVVRQj
LQGXFWLRQ
FDVVHUROHVDXIRQG
SODWHWpSDLV
XQHFDVVHUROHGH
FPGHGLDPqWUHYRXV
SHUPHWWUDG·H[SORLWHU
ODSXLVVDQFHGXSODQGH
FXLVVRQDXPD[LPXP
XQHFDVVHUROHSOXV
SHWLWHUpGXLWOD
SXLVVDQFHPDLVQH
FDXVHUDSDVGH
GpSHUGLWLRQG·pQHUJLH
1RXVFRQVHLOORQV
TXDQGPrPHGHQHSDV
XWLOLVHUGHUpFLSLHQWV
DYHFXQGLDPqWUH
LQIpULHXUjFP
UpFLSLHQWVHQDFLHU
LQR[\GDEOHSRXUYXV
G·XQIRQGjFRXFKHV
PXOWLSOHVRXHQDFLHU
LQR[\GDEOHIHUULWLTXHVL
VSpFLILTXHPHQW
SURGXLWVSRXUFXLVVRQ
jLQGXFWLRQ
UpFLSLHQWVHQIRQWHGH
SUpIpUHQFHDXIRQG
pPDLOOpTXLQHUD\HSDV
OHSODQYLWURFpUDPLTXH
QRXVGpFRQVHLOORQV
OHVUpFLSLHQWVHQYHUUH
HQFpUDPLTXHHQWHUUH
FXLWHHQDOXPLQLXPHQ
FXLYUHRXHQDFLHU
LQR[\GDEOHQRQ
PDJQpWLTXH
DXVWpQLWLTXH
DE
ES
NL
PT
.RFKJHIlH
$EE
:LUGHLQ0DJQHWGHUDQ
GHQ%RGHQHLQHV*HIlHV
DQJHQlKHUWZLUGYRQ
GLHVHPDQJH]RJHQVRLVW
GLHVHLQ]XP,QGXNWLRQV
NRFKHQJHHLJQHWHU7RSI
9RU]LHKHQYRQ
.RFKJHIlHQGLHDXFKIU
GDV,QGXNWLRQVNRFKHQ
DXVJHZLHVHQVLQG
XQGYRQ.RFKJHIlHQ
PLWIODFKHPXQGGLFNHP
%RGHQ
(LQ7RSIPLWFP
'XUFKPHVVHUQXW]WGLH
/HLVWXQJDPEHVWHQDXV
HLQNOHLQHUHU7RSI
YHUULQJHUWGLH/HLVWXQJ
YHUXUVDFKWDEHUNHLQHQ
(QHUJLHYHUOXVW
(VZLUGWURW]GHPYRP
*HEUDXFKYRQ*HIlHQ
DEJHUDWHQGHUHQ
'XUFKPHVVHUNOHLQHUDOV
FPLVW
(PSIRKOHQZLUGGDV
$QZHQGHQYRQ
URVWIUHLHQ*HIlHQPLW
PHKUIDFKEHVFKLFKWHWHP
%RGHQRGHUDXVURVWIUHLHP
)HUULWZHQQDXIGHP
%RGHQDQJHJHEHQLVWSHU
LQGXFWLRQ
JXHLVHUQHQ*HIlHQ
EHVVHUPLWHPDLOOLHUWHP
%RGHQXP9HUNUDW]XQJHQ
GHU*ODVNHUDPLNIOlFKH]X
YHUPHLGHQ
(VZLUGDEJHUDWHQYRQ
*HIlHQDXV*ODV
.HUDPLN7HUUDFRWWD
$OXPLQLXP.XSIHURGHU
QLFKWPDJQHWLVFKHP
DXVWHQLWLVFKHP
URVWIUHLHP6WDKO
2OODV
)LJ
6LDFHUFDQGRXQLPiQ
DOIRQGRGHXQ
UHFLSLHQWHSHUPDQHFH
DWUDtGRHVWDROOD
SXHGHVHUDSWDSDUDOD
FRFFLyQSRULQGXFFLyQ
SUHIHULUROODV
GHFODUDGDVLGyQHDV
SDUDODFRFFLyQSRU
LQGXFFLyQ
ROODVFRQIRQGRSODQR
\HVSHVR
XQDROODGHFPGH
GLiPHWURSHUPLWH
DSURYHFKDUODPi[LPD
SRWHQFLD
XQDROODPiVSHTXHxD
UHGXFHODSRWHQFLD
SHURQRFDXVDUi
GLVSHUVLyQGHHQHUJtD
'HWRGDVPDQHUDVQR
HVDFRQVHMDEOHHOXVR
GHUHFLSLHQWHVFRQ
GLiPHWURLQIHULRUD
FP
UHFLSLHQWHVLQR[FRQ
HOIRQGRDFDSDV
P~OWLSOHVRLQR[
IHUUtWLFRVLVREUHHO
IRQGRVHSUHFLVDSDUD
LQGXFFLyQ
UHFLSLHQWHVHQKLHUUR
IXQGLGRPHMRUVL
WLHQHQHOIRQGR
HVPDOWDGRSDUDHYLWDU
UD\DGXUDVDOSODQRGH
YLGULRFHUiPLFD
QRVHDFRQVHMDQ\QR
FRQYLHQHQUHFLSLHQWHV
HQYLGURFHUiPLFD
EDUURFRFLGRUHFL
SLHQWHVHQDOXPLQLR
FREUHRLQR[QR
PDJQpWLFRDXVWHQtFR
.RRNSDQQHQ
$IE
$OVHUHHQPDJQHHWWRWGH
ERGHPYDQHHQSDQ
QDGHUELMJHEUDFKWZRUGW
HQKLMGRRUGH]H
DDQJHWURNNHQEOLMIW]RLV
GH]HSDQJHVFKLNWRPYRRU
LQGXFWLHNRNHQJHEUXLNWWH
ZRUGHQ
'HYRRUNHXUJHYHQDDQ
SDQQHQGLHRRNYRRU
LQGXFWLHNRNHQEHVWHPG
]LMQ
HQDDQSDQQHQPHW
YODNNHHQGLNNHERGHP
'RRUJHEUXLNYDQHHQ
SDQPHWHHQPLGGHOOLMQ
YDQFPNXQWXKHW
YHUPRJHQKHWEHVWH
EHQXWWHQ
HHQNOHLQHUHSDQ
YHUPLQGHUWGHVWHUNWHYDQ
KHWNRRNWRHVWHOPDDU
YHURRU]DDNWJHHQ
HQHUJLHYHUOLHV
+HWJHEUXLNYDQ
NRRNSRWWHQZDDUGH
PLGGHOOLMQYDQNOHLQHULV
GDQFPLVLQLHGHUJHYDO
DIWHUDGHQ
'HYRRUNHXUJHYHQDDQ
SDQQHQXLWURHVWYULMVWDDO
PHWPHHUYRXGLJH
ERGHPODDJRIXLWURHVWYULM
IHUULHWDOV]HRSGHERGHP
KHWRSVFKULIWGUDJHQSHU
LQGXFWLRQ
JLHWLM]HUHQSDQQHQEHWHU
PHWJHsPDLOOHHUGHERGHP
RPGHRSSHUYODNWHXLW
JODVFHUDPLHNGRRUNUDVVHQ
QLHWWHEHVFKDGLJHQ
(UZRUGWDIJHUDGHQYDQ
SDQQHQXLWJODVFHUDPLHN
WHUUDFRWWDDOXPLQLXP
NRSHURIURHVWYULMQLHW
PDJQHWLVFKDXVWHQLWLVFK
VWDDO
3DQHODV
)LJ
VHXPtPDQDSUR[LPDGR
DRIXQGRGHXPUHFLSLHQWH
ILFDDWUDLGRHVWDMiSRGH
VHUXPDSDQHODDGHTXDGD
jFR]HGXUDDLQGXomR
SUHIHULUWDPEpPSDQHODV
GHFODUDGDVSDUDD
FR]HGXUDDLQGXomR
SDQHODVFRPRIXQGROLVR
HJURVVR
XPDSDQHODFRPFP
GHGLkPHWURSHUPLWHGH
H[SORUDUDPi[LPD
SRWrQFLD
XPDSDQHODPDLV
SHTXHQDUHGX]DSRWrQFLD
PDVQmRFDXVDUi
GLVSHUVmRGHHQHUJLD
1RHQWDQWRp
GHVDFRQVHOKiYHOD
XWLOL]DomRGHUHFLSLHQWHV
FRPGLkPHWURLQIHULRUD
FP
UHFLSLHQWHVLQR[FRP
IXQGRGHGLYHUVRVFDPDGDV
RXLQR[IHUUtIHURVH
HYLGHQFLDGRQRIXQGR
SDUDLQGXomR
UHFLSLHQWHVHPIHUUR
FRDGRPHOKRUVHFRPR
IXQGRHVPDOWDGRSDUD
HYLWDUDUUDQKDGXUDVDR
SODQRGHYLGURFHUkPLFD
VmRGHVDFRQVHOKDGDVH
QmRFRQYrPUHFLSLHQWHVHP
YLGURFHUkPLFDEDUUR
UHFLSLHQWHVHPDOXPtQLR
FREUHRXLQR[QmR
PDJQpWLFRDXVWHQLWLFR
39
IT
GB
Manutenzione
(Fig. 4)
Tracce di fogli di
alluminio, residui di
cibo spruzzi di grasso,
zucchero o cibi
fortemente saccariferi
devono essere
immediatamente
rimossi dal piano di
cottura con un
raschietto per evitare
possibili danni alla
superficie del piano.
Successivamente pulire
con SIDOL o STANFIX
e carta da cucina, indi
risciacquare con acqua
e asciugare con uno
straccio pulito.
In nessun caso usare
spugne o strofinacci
abrasivi; evitare anche
lÊuso di detersivi
chimici aggressivi
come FORNOSPRAY o
SMACCHIATORI.
-AINTENANCE
(Fig. 4)
By means of a scraper
immediately remove any
alluminium foil bits,
food spills, grease
splashes, sugar marks
and other high sugarcontent food from the
surface in order to avoid
damaging the hob.
Subsequently clean the
surface with some paper
towel and SIDOL or
STANFIX, rinse with
water and dry by means
of a clean cloth.
Under no circumstance
should sponges or
abrasive cloths be used;
also avoid using
aggressive chemical
detergents such as oven
sprays and spot
removers.
Entretien
(Fig. 4)
Enlevez aussitôt du
plan de cuisson tout
fragment de papier en
aluminium, tout résidu
de nourriture, toute
éclaboussures de
graisse, de sucre ou
dÊautres aliments
fortement riches en
saccharine à lÊaide
dÊune raclette à fin
dÊéviter dÊendommager
la surface du plan.
Ensuite nettoyez avec
papier absorbant de
cuisine du SIDOL ou
du STANFIX, rincez et
essuyez au moyen dÊun
chiffon propre.
NÊutilisez jamais
dÊéponges ni de
chiffons abrasifs;
éviter en outre
dÊemployer des
détergents aggressifs
tels que les sprays à
four ou les détachants.
DO NOT USE STEAM
CLEANERS
NE PAS UTILISER DE
NETTOYEURS À
VAPEUR
NON UTILIZZARE
PULITORI A VAPORE
FR
&IG!BB!FB
no
NO
non
NEIN
no
NEEN
não
40
no
NO
non
NEIN
no
NEEN
não
sì
YES
oui
JA
sì
JA
sìm
DE
ES
NL
PT
)NSTANDHALTUNG
(Abb. 4)
Spuren von Aluminiumfolie, Essensresten,
Fettspritzern, Zucker oder
stark zuckerhaltigen
Speisen müssen sofort mit
einem Schaber von der
Kochfläche entfernt
werden um mögliche
Schäden an der Fläche zu
vermeiden.
Danach mit SIDOL oder
ählichem und Küchenpapier saubermachen, mit
Wasser abspülen und mit
einem sauberen Lappen
trockenwischen.
Auf keinen Fall kratzende
Schwämme oder Lappen
verwenden; ebenso den
Gebrauch von chemisch
aggressiven Reinigungsmitteln wie Ofenspray
oder Fleckenentferner
vermeiden.
Mantenimiento
(Fig. 4)
Restos de hojas de
aluminio, residuos de
alimentos,
salpicaduras de grasa,
azúcar o alimentos
fuertemente sacaríficos
deben ser
inmediatamente
removidos del plano de
cocción con un
raspador para evitar
daños posibles a la
superficie del plano.
Sucesivamente limpiar
con SIDOL o STANFIX
y papel de cocina,
luego enjuagar con
agua y secar con un
paño limpio.
De ninguna manera
usar esponjas o
estropajos abrasivos;
evitar también el uso
de detergentes
químicos agresivos
como Fornospray o
quitamanchas.
/NDERHOUD
(Afb. 4)
Stukken van bladaluminium, overblijfsels van
levensmiddelen, scheuten
van vet, suiker, of sterk
suikerhoudende spijzen
moeten met een schraper
van de kookvlakte
onmiddellijk verwijderd
worden om mogelijke
beschadiging van de
bladoppervlakte te
voorkomen. Vervolgens
met SIDOL of dergelijke
en keukenpapier
schoonmaken, met water
afspoelen en met een
schone vaatdoek
droogmaken. In geen
geval schurende sponzen o
lappen gebruiken; evenzo
het gebruik van agressieve
chemische reinigingsmiddelen zoals ovensprays
of vlekkenmiddelen
vermijden.
Manutenção
(Fig. 4)
Marcas de papeis de
alumínio, resíduos de
alimentação salpicadelas
de gordura, açúcar ou
alimentos fortemente
sacaríferos devem ser
tirados imediatamente do
plano de cozedura com um
raspador para evitar
possíveis danos à
superfície do plano.
Sucessivamente limpar
com SIDOL ou STANFIX e
papel de cozinha, portanto
enxaguar com água e
enxugar com um pano
limpo.
Em nenhum caso usar
esponjas ou esfregões
abrasivos; evitar também
o uso de detergentes
químicos agressivos como
FORNOSPRAY ou TIRANŁDAS.
KEINE
HOCHDRUCKREINIGER VERWENDEN
NO UTILIZAR
LIMPIADORES A
VAPOR
GEEN STOOMREINIGERS GEBRUIKEN
NÃO UTILIZAR
LIMPADORES A
VAPOR
&IG!BB!FB
41
42
)*(+,"&%"' (
#X"%)*##*&(
6;<)44-:V;
6;<:=+<176;
%)*(+*"&%)'&+(
#X"%)*##* +(
%)*##,"&%
$&'"('(&)-#"'#"#
&*# ( :"'( (#&
%) (#%) )
:"'( -#"
&# -#"!")
("-#"'#"# "#&!(*"*#&
@ "(&*"(*#"#
'!$&''&(()(
$$&()&
'"'&( ((&!"(
6;<)44)<176
%"0"+01/2 1&,+0/"#,/1%"
.2)&#&"!1" %+& &+0
$2&!"1,&+01))1&,+
!'201*"+1+!*&+1"++ "
,/!&+$1,1%")40+!
01+!/!0&+#,/ "%"0"
,-"/1&,+0*201)460"
//&"!,214%"+1%"
--)&+ "%0""+
!&0 ,++" 1"!#/,*1%"")" 1/&
0601"*
%)*##*"&%
'"'(&)(#"''#"(
('$#)& (""
'$3 '3#!!)0
:"'( (#")&3 0 :"(&("')*"( '
#'( '"#&!'"
*))&
'"(&*"(#"'#*"(
(#)#)&'5(&()3'
%)" :$$& '(
3&"3
&)","&%$ %*&
:$$$&*'(#
$&''&"''(#")"
$"##! )'(&(#
" :$$#'()&
&'$#&&')()((#
$&!(&# $"#
' "(#&&#
:'#"' :"'( -#"'#$&)"
#&"##"(&&!"(
&(&'
#&"#'!)"(#)"
''(!
&&!"(#
"#"**""
"'')"'#$''#
& #&"#*&'#
$"#
$&*&$''
:&#!"(#"
)&
7;1<17616/&${
%"#&512/"&0"0-" &))6
!"0&$+"!#,/#&11&+$&+1,
4,/(1,-00%,4+&+1%"
,//"0-,+!&+$#&$2/"
) "1%"02--)&"!0")&+$
$"+1),+$1%"%,
-"/&*"1"/
,+,1&+01))1%"%,,3"/+
,3"+&+ 0"6,2!,*("
02/",#1%"#,)),4&+$x
1%",3"+&0".2&--"!4&1%+
--,-/&1" ,,)&+$0601"*
1%"/"&0+,4/*&/)"($"
#/,*1%",3"+1,4/!01%"
%,
02&1)"&/&+)"10/"
-/,3&!"!00%,4+&+1%"
#&$2/"
&)"*"&%% $ %*
:$$& '($&3*)$#)&
5(&""'(&3"')"
$ "(&* #!!
)'(&3"' )&
#&&'$#""(
C((& &)"3'
*&3* :$$& )
#")$#)&(#)&)$ "
#)'3#"' #"'
:"'(&!"()'')'
:)"#)&)'
#"(&&*3&-%)
')(
#)&'(!)":)"
','(4!
&&#''!"(
":,))"$''
:&))#)&)
$ ")''#"
,'#)*&()&'
$#)& *"( (#"#!!
"%)3"' )&
&## J$ %*& # **("&
&!(()&
: !"(# ((&#
&(&'
&((&'(
:!$"(#'"#( '#'&%)"(#
"(#') (&
!(&# $$ (')
#"# $"#
:!$"(#'!)"(#
Electrical connection
//6&+$,211%"")" 1/& )
,++" 1&,+-)"0""+02/"
1%1x
1%"-)+1 %/ 1"/&01& 0/"
02 %01,#,)),44%1&0
&+!& 1"!,+1%"*1/&5-)1"
-) "!11%",11,*,#1%"
4,/(&+$/"
1%11%"-)+1&0#&11"!4&1%
+"##& &"+1"/1% ,++" 1&,+
(%K $ %*# *("N+
*"(:()&
&"!"(
3 (&%)':'')&&%)
'&(&'(%)'
:"'( (#"'#"(
"()&0'('&(#)('
'"(#"'$#&(3'')&
$ %)'" 3(%)
'()3'#)' :$$&
%) :"'( (#"
'$#':)"
IT
44
GB
FR
Fig. 5 - Abb. 5 - Afb. 5
INDUZIONEINDUCTIONINDUCTION)NDUKTION
INDUCCIØNINDUCTIEINDUÎÍO
G4
50 MIN.
aria - air - air - Luft - aire - lucht - ar
induzione - induction - induction - Induktion
- inducción - inductie - indução
100 cm2 MIN.
20 MIN.
(2 x 500)
ZONA FORNO O ARMADIETTO
OVEN ZONE OR CUPBOARD
ZONE FOUR OU PLACARD
OFENBEREICH ODER SCHRANK
ZONA HORNO O ARMARIO
OVENRUIMTE OF KASTJE
ZONA DO FORNO OU ARMÁRIO
LATOSIDECÙTÏLADOZIJKANTSEITE
aria - air - air - Luft - aire - lucht - ar
100 cm2 MIN.
50 MIN.
BASIC
30 mm.
40 mm.
46
dEC2G2IN...
G4
Fig. 6 - Abb. 6 - Afb. 6
~ 230V
N
L
H05 RR–F 3x2.5
H05 VV–F 3x2.5
C2IN41
MONOFASE ~ 230V (cavo incorporato)
SINGLE-PHASE ~ 230V (cable incorporated)
MONOPHASE ~ 230V (câble incorporé)
EINPHASIG ~ 230V (integriertes Kabel)
MONOFÁSICA ~ 230V (cable incorporado)
EENFASIG ~ 230V (geïntegreerde kabel)
MONOFÁSICO ~ 230 V (cabo incorporado)
G4
Fig. 7 - Abb. 7 - Afb. 7
C2INB1
BASIC
Fig. 8 - Abb. 8 - Afb. 8
~ 230V
N
L
H05 V2V2–F 3x2.5
47
La Casa costruttrice declina ogni responsabilità per le possibili inesattezze contenute nel presente
opuscolo, imputabili ad errori di stampa o di trascrizione. Si riserva il diritto di apportare ai propri
prodotti quelle modifiche che ritiene necessarie o utili, senza pregiudicare le caratteristiche essenziali.
The manufacturer declines all responsibility for possible inaccuracies contained in this pamphlet, due
to printing or copying errors. We reserve the right to make on our own products those changes to be
considered necessary or useful, without jeopardizing the essential characteristics.
Dans un souci constant dÊamélioration qualitative, le constructeur se réserve la possibilité dÊapporter
à ses produits les modifications utiles, sans compromettre ses caractéristiques essentielles.
Le constructeur décline toutes responsabilité pour dÊeventuelles inexactitudes contenues dans cette
notice, imputables à des erreurs dÊimpression ou de transcription.
Die Herstellerfirma übernimmt keinerlei Verantwortung für eventuell in dieser Broschüre enthaltene
Ungenauigkeiten, die auf Druckfehler zurückzuführen sind und behält sich das Recht vor an ihren
Produkten alle für notwendig erachteten Änderungen anzubringen, ohne die wesentlichen Eigenschaften
zu beeinflussen.
El constructor declina toda responsabilidad por las posibles inexactitudes contenidas en el presente
documento, imputables a errores de impresión o relacionadas. El constructor se reserva el derecho de
aportar a sus propios productos aquellas modificaciones que se considere necesarias o útiles, sin
perjudicar las características esenciales.
De Fabrikant wijst iedere verantwoordelijkheid af voor enige onjuistheden in deze brochure welke
geweten kunnen worden aan copie - of drukfouten. Hij behoudt zich het recht voor aan zijn eigen
produkten wijzigingen aan te brengen die hij voor noodzakelijk of nuttig houdt zonder dat de wezenlijke
kenmerken erdoor benadeeld worden.
O Fabricante não assume nenhuma responsabilidade acerca de eventuais inexactidões contidas na
presente publicação, devidas a erros de impressão ou de transcrição. Reserva-se o direito de efectuar
nos próprios produtos as eventuais modificações que considerar necessárias ou úteis, sem prejudicar
as características essenciais.
COD. 1.005.10.0 4'ed.
Scaricare