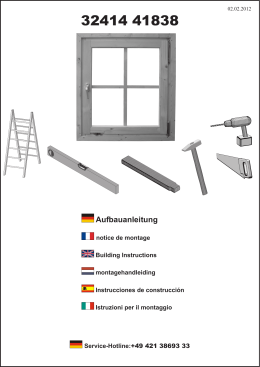
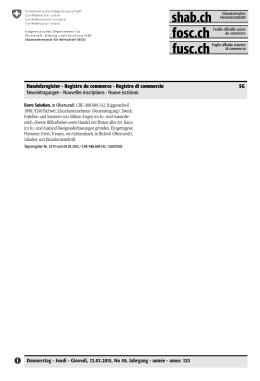
119404
Top staplers
Engrapadora neumática para carton
Deckelhefter
Graffatrici per cartone
561/561PN
Operating and Service instructions
Instr. de uso y mantenimiento
Betriebs- und Wartungsanleitung
Istruzioni d’uso e di servizio
Josef Kihlberg AB
Box 126, S-544 22 Hjo, Sweden
119404
Feb -2010
Telephone: +46 (0)503 328 00 Telefax: +46 (0)503 328 01
www.kihlberg.se e-mail:
[email protected]
E
ES
D
I
The employer is responsible for:
El jefe de personal debe tener en
cuenta:
> enforcement of compliance with safety warnings
and all other directions presented in these Operating
Instructions and its appended documents;
> ensuring that the instructions and its appendixes are
distributed to the personnel concerned;
> familiarizing himself with these instructions in the
interest of personnel safety and proper use of this
tool;
> enforcement of all rules and regulations issued by
local Safety Authorities for the use of this tool.
Der Arbeitgeber verantwortet dadaß:
> Este Manúal de instrucciones – para su estudio a
seguir y siempre al alcance de su personal de trabajo;
> El perssonal debe tener mucho conocimiento y
entrenamiento de ésta herramienta- neumática, asi
mismo conocer todos los riesgos de accidentes. Y un
adecuado método para el uso y cuidados de la misma.
> Reglas de seguridad acompañan , en especial para
jovenes menores de edad que trabajan con éste tipo de
herramienta.
> El personal debe tener las instrucciones y el equipo
necesario para su diario control de la herramienta.
L’operatore deve assicurarsi che:
für
> allen Personen, die mit dem Gerät zu tun haben,
diese Betriebsanleitung und die dazu hörende Beilagen jederzeit zugänglich sind;
> queste istruzioni d’uso e le indicazioni annesse vengano
messe a disposizione di tutte le persone che utilizzano
l’utensile;
> alle betroffene Beschäftigten die Sicherheitshinweise und alle Anleitungen in diesem Heft und
seinen Beilagen kennen und befolgen;
> tutti gli addetti all’utilizzo siano al corrente di queste
istruzioni e delle appendici nell’interesse della sicurezza
personale e dell’utilizzo corretto di questo attrezzo;
> die einschlägigen Sicherheitsvorschriften der Behörden und Berufsgenossenschaften eingehalten
werden.
> vengano rispettate le norme dettate dai Regolamenti di
Sicurezza locali per l’uso dell’attrezzo.
When studying these Instructions, consult also the tool’s spare parts list and technical data sheet
Al estudiar este manúal debe tambien ver la lista de piezas de reserva y construccion de la engrapadora
Beim Studieren dieser Anleitung sind auch die Ersatzteil- und Technische Daten-Listen zu benutzen
Studiando queste istruzioni d’uso, consultate anche la lista delle parti di ricambio e il foglio dei dati tecnici
Table of Contents
Safety Warnings and Tool Installation
Tool use
Loading staples
Adjustment of penetration depth
Lubrication
Contiene notas de
1
3
3
5
5
1
3
3
5
5
Tavola dei contenuti
Inhaltsverzeichnis
Sicherheitshinweise und Inbetriebnahme
Bedienungsanleitung
Klammern laden
Tiefeneinstellung
Schmierung
Precauciones, seguridad e instalación
Manúal de uso
Magasin-cargador de grapas
Regulador de clavado
Engrase y lubricación
1
3
3
5
5
Disposizioni di sicurezza e messa in opera
Impiego
Caricamento dei punti
Regolazione della profondità dei punti
Lubrificazione
1
3
3
5
5
1
Safety Warnings and Tool Installation
Sicherheitshinweise und Inbetriebnahme
E Read these warnings to prevent injuries to yourself and to bystanders.
Refer to other sections for additional information.
Instrucciones de seguridad e instalacion
Istruzioni di sicurezza e di messa in servizio
D Bitte diese Sicherheitswarnungen lesen um Unfälle für Sie und Zuschauer zu vermeiden.
Weitere Information finden Sie in den nachstehenden Abschnitten.
ES Lea éstas precauciones de seguridad, para evitar
daños personales yá sea a tí, ó los de tu alrededor.
Para mas información lea los sgtes. Capitulos a
continuación.
I
Leggere queste istruzioni per prevenire incidenti
a se stessi e ad altri.
Per ulteriori informazioni fare riferimento alle
altre sezioni .
E To prevent eye injuries eye protection must
always be worn by the operator and others in the
work area.
Always use other personal protection equipment
as required, such as ear protection, hard hats, etc.
ES Para evitar daños de la vista, debe tanto el
operador como otras personas den el lugar del
trabajo usar lentes de protección, en caso
necesario usar audifonos ó tapones de oidos ó
eventualmente otro tipo de protección corporal.
D Achten Sie darauf, daß Sie und die anderen
Personen in der Nähe Ihres Arbeitsplatzes
während der Benutzung des Gerätes Sicherheitsbrillen tragen und anderen Sicherheitseinrichtungen benutzen.
I
Specific instructions for pneumatic version
Sonderanweisungen für das pneumatische Modell
E Never use oxygen, combustible gases, CO2,
steam or high pressure gas tanks as power sources
for the PN-version of this tool; the tool may
explode and cause serious injury.
Use only dry, clean, pressure regulated compressed air to drive the tool.
CO2
Per prevenire incidenti agli occhi, devono sempre
essere utilizzati gli occhiali di protezione
dall’operatore e dai presenti. Utilizzare sempre
altre
protezioni
richieste
come
cuffie
otoprotettive, caschi ecc.
Instrucciones especificas para el uso aire comprimido
Istruzioni specifiche per modelli pneumatici
Oxy
ES Nunca uses gases como, gas de fuego, CO2
vapor o tuvos de gas de alta presión para poner
en marcha ésta PN-versión de ésta engrapadora;
puede explotar y causar graves daños.
Use solamente aire seco y limpio como aire
comprimido para el uso de ésta herramienta.
D Niemals Sauerstoff, Brenngase, CO2 oder
Hochdruckgase als Energiequelle für die PNVersion dieses Gerätes benutzen; dies kann zu
Explosionsverletzungen führen.
Benutzen Sie ausschließlich trockene, reine,
geregelte Druckluft
I
E Never use a defective tool. Make sure that the
trigger operates properly and that all screws and
nuts are securely tightened at all times.
Do not modify the tool.
ES Nunca use ésta Máquina en estado de defécto.
Controle a diario qué las funciones como el
gatillo funcionen correctamente, así mismo los
tornillos y de mas seguros estén bien ajustados.
Está prohíbido modificar ésta herramientaneumática.
D Benutzen Sie niemals ein defektes Gerät. Achten
Sie darauf, daß der Auslösehebel richtig
funktioniert und daß alle Schrauben und Muttern
fest angezogen sind.
Nehmen Sie niemals Änderungen am Gerät vor.
I
Non utilizzare mai ossigeno, gas combustibile,
CO2, vapore o gas ad alta pressione come fonti di
energia per la versione PN. L’utensile potrebbe
esplodere e causare gravi incidenti.
Utilizzare esclusivamente aria compressa pura,
secca, con pressione regolata.
Non utilizzare mai un utensile difettoso. Prestare
attenzione che il grilletto operi regolrmente e che
tutte le viti e i dadi siano ben serrati.
Non apportare alcuna modifica all’utensile.
E Always disconnect the tool from the air supply
and empty the magazine when making a break or
ending work, when servicing the tool or eliminating malfunctions.
Never leave a loaded tool unattended.
ES Desconécta siempre la manguera del aire
comprimido cada vez qué tengas paúsas y al
terminar cada trabajo, así mísmo vacia el magasín
-cargador al hacer reparación y mantenimiento.
D Kuppeln Sie immer die Druckluftzufuhr ab und
entleeren Sie das Magazin bei Arbeitspausen,
Arbeitsende, beim Beheben von Störungen und
bei Wartung und Reparaturen.
Niemals ein geladenes Gerät unbeaufsichtigt
lassen.
I
Nunca déjes ésta pistola cargada fuera de control.
Disinnestare
sempre
l’utensile
dall’aria
compressa, svuotare il caricatore quando si fa una
pausa o si termina il lavoro, quando si revisiona
l’utensile o lo si ripara.
Non lasciare mai un utensile caricato incustodito.
2
Safety Warnings and Tool Installation
Sicherheitshinweise und Inbetriebnahme
Instrucciones de seguridad e instalación
Disposizioni di sicurezza e messa in opera
Specific instructions for pneumatic version
Sonderanweisungen für das pneumatische Modell
Instrucciones específicas para el sistema de aire-comp
Istruzioni specifiche per modelli pneumatici
E Always assume that the tool is loaded. No
horseplay! Respect the tool as a working implement. Never point the tool at yourself or
anyone else, whether it contains staples or not.
Always remove finger from trigger when not
driving staples.
ES Considera siempre ésta herramienta cargada.
Recuerda, qué es un instrumento de trabajo y no
un juguete. Nunca apuntes contra tí , ó otras
personas, así esté cargada ó no. Retira de
inmediato el dedo del gatillo si no seguiras
clavando.
D Gehen Sie immer davon aus, daß das Gerät geladen ist. Spielen Sie deshalb niemals damit herum und richten Sie das Gerät niemals auf sich
oder andere Personen. Wenn keine Klammern ein
zu treiben sind, den Abzugshebel nicht berühren
um unbeabsichtigtes Auslösen zu vermeiden.
I
E Connect the tool to the compressed air line
before loading staples. The max. allowable air
pressure is 7 bar.
Ensure that the air hose has the right dimension to
avoid pressure drops which might cause
malfunctioning – min. K".
The tool and the hose must have a coupling which
automatically bleeds all air pressure from the tool
when it is disconnected.
3
4
bar
6
max
1
0
D Schließen Sie immer das Gerät an die Luftleitung
an bevor das Magazin zu laden. Gestattete
Höchstdruck: 7 bar.
Achten Sie darauf, daß der Schlauch richtig dimensioniert ist um Betriebsfehler durch zu großen
Druckabfall zu vermeiden – min. 10 mm.
ES Conecta el sistema de aire a la engrapadora antes
de cargar con grapas (grampas) .La máxima
presión permitida es de 7 bar
5
2
Presupporre sempre che l’utensile sia carico. Non
usarlo come fosse un giocattolo. L’utensile è uno
strumento di lavoro. Non dirigere mai l’utensile
verso se stessi o verso altri, sia che contenga
graffe o meno. Togliere sempre le dita dal
grilletto anche quando non state utilizzando punti.
Controla qué la manguera esté correctamente
dimensionada para evitar perdida de aire ó otros
errores de funcionamiento No es - 10 mm.
7
8
Tanto la herramienta como la manguera debe
estar previstas de válvula de conexión qué
automáticamente cierra el aire cuando éste se
desconécta.
I
∅ 10 mm (3/8")
Collegare l’utensile all’aria compressa prima di
caricarlo di punti. La massima pressione d’aria
ammissibile è 7 bar.
Assicurarsi che il tubo flessibile abbia la giusta
dimensione per evitare cali di pressione che
potrebbero causare problemi – min. 10 mm. Altre
istruzioni per l’installazione potranno essere
fornite dal fabbricante.
Das Gerät und der Schlauch sollen mit einer
Kupplung versehen sein, die das Gerät bei Entkupplung automatisch entlüftet.
L’utensile e il tubo dovranno essere raccordati e
automaticamente spurgati del tutto dall’aria
compressa quando l’utensile viene disinnestato.
E Avoid personal injury. Never hold your hand or
another part of your body under the tool.
ES Evita daños personales. Nunca pongas la mano ó
otra parte de tu cuerpo bajo ésta herramienta.
D Um Unfälle zu vermeiden, niemals die Hand oder
einen anderen Teil des Körpers unter dem Gerät
halten.
I
E Always place yourself in a firmly balanced position when using or handling the tool.
ES Al usar éste tipo de herramienta-neumática debes
tener una posición corporal estable y balanceada.
D Stellen Sie sich immer in eine stabile, wohl
ausgeglichene Position bei dem Gebrauch des
Gerätes.
I
Evitare gli incidenti corporali. Non tenere mai le
mani o altre parti del corpo sotto l’utensile.
Tenete sempre una posizione ferma e bilanciata
quando utilizzate o maneggiate l’utensile.
3
Instrucciones de uso
Impiego
Tool use
Bedienungsanleitung
Specific instructions for pneumatic version
Sonderanweisungen für das pneumatische Modell
Instrucciones específicas para el sistema de aire
Istruzioni specifiche per modelli pneumatici
E Be sure that the tool is not pointed at yourself or
any one else when connecting it to the compressed air line.
ES No apuntes la herramienta contra tí ó contra otras
personas, cuando estés apretando el gatillo.
D Beim anschließen des Gerätes an die Druckluftleitung darauf achten, daß die Austrittsöffnung
nie auf Sie oder andere Personen zielt.
I
E Adjust the air pressure to the lowest one that will
fold the staples correctly. Start at approx. 5.5 bar
and raise this by 0.5 bar increments until the
correct pressure for the job in hand is found.
Never exceed 7 bar.
A low air pressure will give low maintenance
costs!
D Stellen sie keinen höheren Luftdruck ein als für
das richtige Umbiegen der Klammern nötig ist.
Beginnen Sie dabei mit ca. 5.5 bar und erhöhen
Sie den Druck in 0,5 bar Stufen bis der richtige
Arbeitsdruck gefunden ist.
Gehen Sie aber niemals über 7 bar hinaus.
Ein niedriger Luftdruck führt auch zu niedrigen
Wartungskosten
3
4
bar
ES Gradua el medidor de aire lo mínimo posible, qué
todavia en ésta posición puede clavar el fondo
deseado. Comienza apte. de 5.5 bar después
aumenta la presión de aire un paso mas 0,5 bar
hasta conseguir el resultado deseado.
Nunca sobrepases de 7 bar.
Con aire de comprimido relativamente baja
puede bajar los costos de mantenimiento.
5
2
6
max
1
0
Assicuretevi che l’utensile non sia diretto verso di
voi o nessun altro mentre lo collegate all’aria
compressa.
7
8
I
Regolate l’aria compressa al minimo necessario
per portare i punti alla giusta piegatura. Iniziare a
circa 5.5 bar e incrementare di 0.5 bar fino a un
risultato soddisfacente. Non superare mai i 7
bar.
Una pressione moderata vi darà bassi costi di
manutenzione !
Loading staples
Klammern laden
E Grasp the pusher with one finger
(Fig. 1) and pull it back to the magazine breech to release the breech
catch (Fig. 2).
D Greifen Sie mit dem Finger hinter
den Bügel des Klammerschiebers
(Fig. 1) und ziehen Sie ihn zurück bis
zum Anschlag des Magazin-Verchlußstückes um die Sperre zu lösen
(Fig. 2).
El cargado de grapas
Caricamento dei punti
ES Tira con un dedo la pestaña de
avance (Fig. 1) toda hacia atras hasta
el tope de cierre, hasta qué la pieza
de cierre del extremo quede libre
(fig. 2).
Fig 1
2)
1)
Fig 2
I
Afferrare lo spingipunto con un dito
(Fig. 1) e tirarlo verso la parte
posterire del caricatore fino a farlo
sganciare (Fig.2).
4
Loading staples (Cont.)
Klammern laden (Vorts.)
(Cont.) El cargado de grapas
(Cont.) Caricamento dei punti
E Lift the magazine breech and the
pusher upward (Fig. 3) and fill the
magazine with staples (Fig. 4).
Fig 3
D Kippen Sie das Verschlußstück mit
dem Klammerschieber nach oben
(Fig. 3) und beladen Sie das Magazin
mit Klammern (Fig. 4).
ES Levanta la pieza del extremo hacia
arriba con la pestaña-gancho. Luego
coloca una espiga de grapas
(grampas) atraves de de la pieza
trasera en el canal cargador (ver fig.
3 y 4).
I
Alzare la parte posteriore del
caricatore (Fig. 3) e caricarlo con i
punti (Fig. 4).
Fig 4
ES Agarra la pestaña-gancho con un
dedo y junto con la pieza de cierre
del extremo volviendo a su posición
anterior, asegurando con cuidado qué
éste cierre con un clic! (ver fig. 5 y
6).
E Grasp the pusher and let the magazine breech down to close the
breech catch again (Fig. 5). Slide the
pusher gently forwards, until it
touches the staples (Fig. 6).
Fig 5
I
D Greifen Sie den Bügel des
Klammerschiebers und kippen Sie
das Magazinverschlußstück nach
unten bis es einrastet (Fig. 5). Führen
Sie den Schieber vorsichtig nach
vorn, bis er hinten an den Klammern
anliegt (Fig. 6).
Fig 6
Afferrare nuovamente lo spingipunto
e riagganciarlo (Fig. 5). Far avanzare
lo spingipunto con precauzione fino a
toccare i punti (Fig. 6).
5
Adjustment of penetration depth
Tiefeneinstellung
E The penetration control knob permits
instant adjustment of the stapling
depth. Pull it out (A) and turn it (B)
to any of five numbered positions;
the higher the number, the deeper the
penetration.
A
Regulador de profundidad de clavado
Regolazione della profondità del punto
ES La profundidad de clavado de las
grampas se obtiene rápido graduando
un botón del 1 - 5. Tira hacia fuera
(A) y gira (B) el grado de No.
Deseado, mientras mas alto elijas
mas profundo el clavado.
B
D Der Knopf für die Tiefeneinstellung
gestattet eine rasche Justierung der
Einstichtiefe der Klammern. Ausziehen (A) und auf eine der bezifferten Positionen drehen (B); je höher
die Zahl, um so größer die Tiefe.
I
Lubrication
Schmierung
La manopola di regolazione permette
un immediata regolazione della
profondità del punto. Tirare (A) e
ruotare (B) in una delle cinque
posizioni. Più alto è il numero,
maggiore è la penetrazione.
Engrase y lubricación
Lubrificazione
E The linkage mechanism and other movable parts of the tool are ES Los mécanismos de rotación y movimientos qué requiere de
engrase son déspachados por el fabricador yá engrasados. Pero
greased during assembly. Occasionally, they should be regreased.
necesita de un tratado de engrase de vez en cuando, en especial
It is especially important that the return spring 37 on the manual
las piezas del mango de mano interno. Mod. Manúal 37 debe
model is well greased to prolong its life.
éstar bien engrasado para alargar el mantenimiento y duración.
Pneumatic models will perform best by using a dry, clean air-oil
Para el buén funcionamiento de los modelos neumáticos , usar
mist. This can be achieved easily by installing a filter-regulator
aire limpio y seco, asi mismo engrasar las partes de rotación y
and lubricator unit in the air line as close to the stapler as
moviminto. Esto se obtiene rápido atravez de una instalación de
possible. Such an installation ensures the proper quality and
filtro regulador con un conductor aplicador de aceite a gotas
pressure of the air and assures that a light film of oil is distributed
apte. 40 det. que va acoplado al systema de aire. Nunca use aceite
over vital moving parts, e.g. the piston valve assembly. Adjust
que pueda dañar los O-aros tóricos, solo use aceite
the lubricator to one drop per approx. 40 strokes. Do not use oils
recomendado de Josef Kihlberg No. 184313.
which may damage the O-rings; use Josef Kihlberg oil, Nr
184313.
Controle el preparador de aire cada semana para mantener la
A weekly check of the filter-regulator-lubricator unit leads to
minimal wear and top performance of the tool. Water in the air
filter should be drained daily.
herramienta en buenas condiciones de funcionamiento. Filtra y
limpia soplando eventuala gotas de agua, ésto para alargar la
duracion de la máquina-engrapadora.
D Der Gelenkmechanismus und andere bewegliche Teile des Gerä- I
tes werden bei der Montage eingefettet. Die Schmierung dieser
Teile sollte in regelmäßigen Abständen wiederholt werden. Es ist
besonders wichtig, daß die Spreizfeder Nr 37 der Handmodelle
gut gefettet ist um ihre Lebensdauer zu verlängern.
Il meccanismo d’articolazione e le altre parti mobili devono
essere lubrificate durante l’assemblaggio dell'utensile. Ripetete la
lubrificazione a intervalli regolari. E’ molto importante
lubrificare la molla di ritorno N°37 dei modelli manuali per
prolungarne la durata.
Druckluftmodelle funktionieren am Besten, wenn die Luft gereinigt, trocken und ausreichend mit Öl vermischt ist. Dies kann
sehr leicht erreicht werden durch die Installation – so dicht wie
möglich am Gerät heran – eines Filterreglers mit Öler in der
Druckluftleitung. Eine so durchgeführte Installation reinigt nicht
nur die Luft und gewährleistet einen konstanten Druck, sie ergibt
auch einen zuverlässigen, leichten Ölfilm auf allen wichtigen
beweglichen Teilen, wie z.B. der Ventilkolben. Der Öler ist auf
einen Tropf pro ca. 40 Arbeitshübe einzustellen. Verwenden Sie
keine beliebige Schmieröle, die die O-ringe zersetzen können;
benutzen Sie Josef Kihlberg-Öl, Nr 184313.
I modelli pneumatici funzioneranno meglio utilizzando aria
compressa pura secca mista ad olio. Questo può essere facilmente
ottenuto utilizzando un filtro regolatore unito a un lubrificatore
nell’impianto di alimentazione aria posizionandolo il più vicino
possibile all’utensile. Una tale installazione assicura non solo
una adeguata qualità e pressione dell'aria ma assicura anche che
una pellicola d’olio si depositi sulle parti mobili, come ad
esempio il pistone. Regolate il lubrificatore a una goccia ogni 40
colpi. Non utilizzare mai un olio che possa danneggiare gli Orings; usare sempre olio originale Josef Kihlberg, N° 184313.
Eine wöchentliche Überprüfung der Filterregler/Öler-Anlage
gewährt eine lange Lebensdauer bei höchster Leistung. Das
Wasser im Filter soll täglich abgelassen werden.
O-ring- and Repair kits
O-ring- und Reparatursätze
561-15PN
561-18 PN
Il sistema filtro–regolatore e lubrificatore deve essere pulito
settimanalmente. L’acqua nel filtro deve essere scaricata
giornalmente.
O-ring
Rep.
43017
143017
143018
143019
Aros tóricos y piezas de repuestos
O-ring e kit Riparazione
Printed August 1996
PNEUMATIC CARTON CLOSING TOOL
ENGRAPADORA NEUMÁTICA PARA CARTON
DRUCKLUFT-KARTONVERSCHLUSSGERÄTE
GRAFFATRICI PNEUMATICHE PER CARTONE
T561PN
TECHNICAL DATA, ESECIAL
REQUIREMENTS AND SERVICE
INSTRUCTIONS
DATOS TÉCNICOS ESPECIALES,
RESQUISITOS PARTICULARES E
INSTRUCCIONES DE USO Y SERVICIO
This sheet is a supplement to the booklet TOOL USE
AND SAFETY INSTRUCTIONS. Read the SAFETY
WARNINGS AND TOOL INSTALLATION carefully
before connecting the tool to the compressed air supply,
and before carring out repairs and maintenance.
Este es un suplemento de guía para las
INSTRUCCIONES DE USO. Lea atentamente las
normas de SEGURIDAD E INSTALACION antes de
conectar la red de aire comprimido a la clavadoraneumática y antes de realizar trabajos de
mantenimiemto y reparación de la misma.
TECHNISCHE DATEN, SONDERANFORDERUNGEN UND WARTUNGSANWEISUNGEN.
CARATTERISTICHE TECNICHE,
PRESCRIZIONI PARTICOLARI E
INSTRUCTIONI PER L’USO
Das vorliegende Blatt ist eine Ergänzung zu der
Broschüre BETRIEBSANLEITUNG. Vor dem
Anschlissen des Werkzeuges an die Druckluftversorgung und bei der Durchfürung von Reparatur und Wartungsarbeiten den Teil SICHERHEITSHINWEISE UND INBETRIEBNAHME
sorgfältig durchlesen.
Questo foglio è supplementare all’opuscolo
NOTIZIE D’USO. Leggere attentamente
la parte DISPOSIZIONI DI SICUREZZA
E INSTALLAZIONE prima di raccordare
l´utensile all’alimentazione d’aria compressa,
prima di apportare riparazioni e di effettuare
manutenzioni.
Technical data
Datos técnicos
Technische daten
Caratt. tecniche
Height
Altura
Höhe
Altezza
Length
Largo
Länge
Lungh.
Width
Ancho
Breite
Largh.
T561-15PN
T561-18PN
225 mm
225
390 mm
390
100 mm
100
*Weight
*Peso
*Gewicht
*Peso
2,5 kg
2,5
Staples
Grapa
Klammern
Punti
Length
Largo
Länge
Lungh.
Magazine capacity
Capasidad del cargador
Magazinkapazität
Capacità magazzino
561
561
15 mm
18
150
150
* without fasteners
* sin grapas
* ohne klammern
* senza punti
Air pressure:
Aire de presión:
Luftdruck:
Pressione aria:
Working pressure approx 4-5 bar Max air pressure 7,0 bar.
Trabajo de presión apte. 4-5 bar Max presión 7,0 bar.
Arbeitsdruck ca. 4-5 bar. Max Luftdruck 7,0 bar.
Pressione di lavoro, circa 4-6 bar. Pressione massima 7,0 bar.
The tool is designed for use with original Josef Kihlberg staples only.
Esta herramienta está diseñada y fabricada para el uso exclusivo de grapas (grampas) originales. JK:S.
Das Werkzeug darf nur mit Josef Kihlberg-Orginalklammern benutzt werden.
L`utensile è destinato esclusivamente all’utilizzo di punti Josef Kihlberg.
Magazine loading:
El Magasin cargador:
Magazinbeladung:
Caricamento del magazzino:
The tool is loaded from behind.
De ésta herramienta se hace por la parte trasera.
Das werkzeug wird von hinten beladen.
L’utensile si carica da dietro.
Firing of the tool:
Disparos:
Betätigung des Werkzeugs:
Avviamento dell’utensile:
The tool has single shot firing without safety-yoke.
La engrampadora tiene disparos simples sin seguro automático
Das Werkzeug hat Einzelschussbetätigung ohne Auslösesicherung.
L’avviamento dell’utensile a colpo singolo avviene senza sicura.
Air consumption per shot:
Consumo de aire por disparos:
Druckluftverbrauch pro Schuss:
Consumo d’aria per colpo
:1,0 l at 6 bar operating pressure
:1,0 l ca. 6 bar trabajo de presión
:1,0 l bei 6 bar Betriebsdruck
:1,0 l alla pressione di 6 bar
Noise characteristic levels according to:
El nivel de ruído caracteristico es:
Diese Werte sind ermittelt und angegeben nach:
Livello di rumorosità conforme a:
:prEN792-13L(CEN/TC255/WG1/N 45,3)
A-weighted single-event emission sound pressure level at work station:
Nivel de presión acustica a disparos simples en el puesto de trabajo:
Maximaler A-Messflächen-Impulsschalldruckpegel:
Livello di pressione acustica a colpo singolo sul posto di lavoro:
:LPAd,1s=88dB
A-weighted single-event sound power level:
Nivel de potencia acustica a disparos simples:
Maximaler A-Impulsschalleistungspegel:
Livello di potenza acustica a colpo singolo:
:LWAd,1s=92dB
C-weighted peak emission sound pressure level at work station
Máxima emisión acustica en el lugar de trabajo:
Emissionsschalldruckpegel am Arbeitsplatz
Livello di picco acustico sul posto di lavoro
:LpCpeakd=117dB
Vibrationrate below the limit of declaration according to EN 292-2 measured according to ISO 8662/1
and supplementary document ISO TC118/SC 3/WG 3 N 139 D.
Nivel de vibración bajo la declaración segun EN292-2 y segun medidor. ISO 8662/1
y documento complementario ISO TC 118/SC 3/WG 3 N 139 D.
Vibrationswert unter der Deklarationsgrenze nach EN 292-2 gemessen nach ISO 8662/1
und Ergänzung Dokument ISO TC 118/SC 3/WG 3 N 139D.
I valori delle vibrazioni emesse sono nei limiti di norma EN 292-2 misurati in accordo con ISO 8662/1
e completati per decreto ISO TC118/SC 3/WG 3 N 139D.
Spare parts drawing 118023
Dibujos constr. y piezas de recambio
Ersatzteilzeichnung
Esploso delle parti di ricambio
561-15, 561-18
REPAIR KIT
Part no. 143033 = 561-15
Part no. 143034 = 561-18
JOSEF KIHLBERG AB, S-544 22 HJO, SWEDEN
Spare parts list JK 561/15 och 561/18
Drawing 118023
Pos Detalj
Nombre-descripción
Ref Part
Zng Teil
No. No.
1
139044
Cabo ext. de cierre
3
133161
Empujador de avance
133039
"
”
4
174021
Resorte plano de avance
5
150071
Distanciador de avance
6
951035
Anillo de seguro p/eje
7
946591
Tornillo
8
132713
Canal cargador
132538
"
”
132718
Canal cargador largo
132546
”
”
”
Antal
Qty
Stück
Bezeichnung
Descrizione
Magazine breech
Pusher
"
Feed spring
Roller
Retainer
Screw
Rail
"
Extended rail
Magazin-Verschluss-Stuck
Klammerschieber
"
Zugband
Führungsrollen am Zugband
Seegerring
Schraube
Magazinführungsblech
"
Verlängtes Mag.führungsblech
Culatta caricamento
Spingipunto
"
Molla spingipunto
Disco
Coppiglia
Vite
Carrello
"
Carrello lungo
1
1
1
1
2
2
4
1
1
1
-”-
-”-
-”-
1
Tension pin
Back plate
Tenion pin
Penetration eccentric
Pivot block for anvil
holder
Screw
Washer
Lower body
Tension pin
"
Penetration control knob
Spring
Screw
Anvil hook, left
-"Anvil hook, left for
shallow penetration
Anvil hook, right
-"Anvil hook, right for
shallow penetration
Anvil holder
Pin
Driver blade
"
Anvil link
Tension pin
Connecting yoke
Upper link
Pin
Screw
Spacer
Upper body
Lock nut
Return spring
Handle
Plastic grip
Handle, complete
Magazine
Spannstift
Hintere Gehäuseplatte
Spannstift
Exzenter
Führungsblock für Umbieger
Spina tensione
Piastra posteriore
Spina tensione
Perno eccentrico
Perno blocco ganascia
1
1
2
1
1
Schraube
Unterlegscheibe
Unteres Gehäuse
Spannstift
"
Knopf für Tiefeneinstellung
Feder
Schraube
Umbieger, links
-"Umbieger, links für seichtes
Eindringen
Umbieger, rechts
-"Umbieger, rechts für seichtes
Eindringen
Umbiegerhalterung
Stift
Treiber
"
Umbiegerhebel
Spannstift
Verbindungsblock
Oberes Verbindungsglied
Achse
Schraube
Abstandhülse
Oberes Gehäuse
Mutter
Spreizfeder
Auslösehebel
Plastik-Griff
Auslösehebel kompl.
Klammermagazin
Vite
Rondella
Corpo inferiore
Spina tensione
"
Manopola regol. prof.
Molla
Vite
Ganascia sinistra
-"Ganascia sinistra corta
per bassa penetrazione
Ganascia destra
-"Ganascia destra corta
per bassa penetrazione
Supporto ganascia
Spina
Martelletto
"
Bielletta ganascia
Spina tensione
Staffa connessione
Bielletta superiore
Spina
Vite
Distanziale
Corpo superiore
Controdado
Molla ritorno
Impugnatura
Impugnatura plastica
Impugnatura completa
Caricatore compl.
2
2
1
1
1
1
1
2
1
1
1
561/15
561/18
561/15
1
1
1
561/15
561/18
561/15
"
Extended magazine
"
Verlängertes Klammermagazin
"
Caricatore lungo
1
1
561/18 standard
561/15 300 staple
load on above
561/18 300 staple
load on above
9
10
11
12
13
945022
161027
945016
163211
134055
Pasador de tensión
Corredera, deslizadera
Pasador
Eje excéntrico
Soporte de garras
14
15
16
17
18
20
21
22
23
946515
947013
155100
945009
945036
165054
173063
946518
158038
158114
158123
24
158037
158113
158122
25
26
27
156119
945006
164023
164036
163133
945016
161055
163097
181084
146062
150163
139045
946009
173036
165090
949000
134038
132716
132537
132717
Tornillo
Arandela
Casa, caja protectora
Pasador de tensión
"
”
Regulador de ajustes
Resorte
Tornillo
Garra izquierda
-"”
Garra izq. de báse
agarre
Garra derecha
-"-”Garra der. de báse
agarre
Soporte de garras
Pasador cilindrico
Lengueta motriz
"
”
Biela inferior
Pasador de tensión
Eje de satélite
Biela superior
Eje
Tornillo de apoyo
Buje distanciador
Pieza y mango superior
Tuerca
Resorte de retorno
Mango de mano
Agarrador de goma
Mango compl.
Cargador de grampas
compl.
"
Cargador larg
132547
Cargador largo compl.
-”-
-”-
-”-
1
156119
945018
951020
Soporte de garra
Pasador
Anillo de seguro
Anvil holder
Tension pin
Retainer
Umbiegerhalterung
Spannstift
Sicherung
Supporto ganascia
Spina tensione
Coppiglia
1
1
2
28
29
30
31
32
33
34
35
36
37
38
39
40
41
42
43
44
Printed Sept. 1998
Anm.
Notes
Anmerkungen
Discription
1
2
1
1
2
3
1
2
1
1
2
1
1
1
1
1
1
1
561/15
561/18
561/15
561/18
561/15 300 staple
load on above
561/18 300 staple
load on above
561/15 561/18
561/15
561/18
561/15 561/18
561/15 standard
Spare parts drawing 118024
Dibujos y constr. y piezas de recambio
Ersatzteilzeichnung
Esploso delle parti di ricambio
561-15PN, 561-18PN
A
Oring Kit
143017
JOSEF KIHLBERG AB, S-544 22 HJO, SWEDEN
B
Repair Kit
143018 = 15PN
143019 = 18PN
Spare parts list JK 561/15PN och 561/18PN
Drawing 118024 1998
Pos Detalj
Nombre - descripción
Discription
Ref Part
Zng Teil
No. No.
1
3
4
5
6
7
8
139044
133161
133039
174021
150071
951035
946591
132713
132538
132718
132546
Cabo ext. de cierre
Empujador de avance
"
”
Resorte plano de avance
Distanciador de avance
Anillo de seguro
Tornillo
Canal cargador
"
”
Canal cargador largo
”
”
”
9
11
12
13
945022
945016
163211
134055
Pasador de tensión
Pasador de tensión
Eje excéntrico
Soporte de garras
14
15
16
17
18
20
946516
947013
155100
945009
945036
165054
Tornillo
Arandela
Casa, caja protectora
Pasador de tensión
"
”
Regulador de ajustes
21
22
23
173063
946518
158038
158114
158123
Resorte
Tornillo
Garra izquierda
”
”
Garra izq. de báse agarre
24
158037
158113
158122
Garra derecha
”
”
Garra der. de báse agarre
25
26
27
156119
945006
164023
164036
163133
945016
161055
132716
132537
132717
Soporte de garra
Pasador cilindrico
Lengueta motriz
"
”
Biela inferior
Pasador de tensión
Eje de satélite
Magasín cargador compl.
"
”
”
Cargador largo compl.
132547
Cargador largo compl.
156119
987023
136112
972002
946004
191013
972017
947015
191113
163109
972142
139455
946533
145049
161054
945018
149057
173055
972009
191115
147079
946608
150338
163298
173149
145165
947032
173049
163152
165028
945011
146061
170515
161039
945022
945015
947001
971004
178021
972020
951020
Agarrador de garras
Racor, válvula de acopl.
Caja cilindrica y mango
Aro tórico
Tuerca
Pistón
Aro tórico
Arandela
Vástago del émbolio
Desembrague
Aro tórico
Sujetador cilindrico
Tornillo
Presare
Eje de satélites
Pasador de tensión
Cilenciador de pistón
Resorte de válvula
Aro tórico
Husillo, árbol
Arandela de husillo
Tornillo
Buje
Palanca de bloqueo
Resorte
Pasador
Arandela de cierre
Resorte de retorno
Palanca basculadora
Gatillo
Pasador
Tornillo
Argollón
Corredera deslizadora
Pasador
”
Arandela resortada
Cilenciador
Buje
Aro tórico
Anillo de seguro
28
29
30
41
42
45
46
47
48
49
50
51
52
53
54
55
56
57
58
59
60
61
62
63
64
65
66
67
68
69
70
71
72
73
74
75
76
77
78
79
80
81
82
83
84
Magazine breech
Pusher
"
Feed spring
Roller
Retainer
Screw
Rail
"
Extended rail
-"Tension pin
"
Penetration eccentric
Pivot block for anvil
holder
Screw
Washer
Lower body
Tension pin
"
Penetration control
knob
Spring
Screw
Anvil hook, left
-"Anvil hook, left for
shallow penetration
Anvil hook, right
-"Anvil hook, right for
shallow penetration
Anvil holder
Pin
Driver blade
"
Anvil link
Tension pin
Connecting yoke
Magazine
"
Extended magazine
-"Anvil holder
Quick release nipple
Cylinder body
O-ring
Nut
Piston
O-ring
Washer
Piston rod
Release latch
O-ring
Cylinder chassis
Screw
Pin
Connecting yoke
Tensioning pin
Piston stop
Valve spring
O-ring
Piston valve
Washer
Screw
Bushing
Toggle latch
Spring
Pin
Lock washer
Return spring
Valve stem toggle
Trigger
Tensioning pin
Screw
Hook
Back plate
Tensioning pin
”
Lock washer
Sound absorber
Bushing
O-ring
Retainer
Printed November
Anm.
Notes
Anmerkungen
Bezeichnung
Descrizione
Magazin-Verschluss-Stuck
Klammerschieber
"
Zugband
Führungsrollen am Zugband
Seegerring
Schraube
Magazinführungsblech
"
Verlängertes Magazinführungsblech
Culatta caricamento
Spingipunto
"
Molla spingipunto
Disco
Coppiglia
Vite
Carrello
"
Carrello lungo
1
1
1
1
2
2
4
1
1
1
”
1
Spannstift
"
Exzenter
Führungsblock für Umbieger
Spina tensione
"
Perno eccentrico
Perno blocco ganascia
1
2
1
1
Schraube
Unterlegscheibe
Unteres Gehäuse
Spannstift
"
Knopf für Tiefeneinstellung
Vite
Rondella
Corpo inferiore
Spina tensione
"
Manopola regolaz. profon.
2
2
1
1
1
1
Feder
Schraube
Umbieger, links
-"Umbieger, links für seichtes
Eindringen
Umbieger, rechts
-"Umbieger, rechts für seichtes
Eindringen
Umbiegerhalterung
Stift
Treiber
"
Umbiegerhebel
Spannstift
Verbindungsblock
Klammermagazin
"
Verlängertes Klammermagazin
Molla
Vite
Ganascia sinistra
-"Ganascia sinistra corta per
bassa penetrazione
Ganascia destra
-"Ganascia destra corta per
bassa penetrazione
Supporto ganascia
Spina
Martelletto
"
Bielletta ganascia
Spina tensione
Staffa connessione
Caricatore completo
"
Caricatore lungo
1
2
1
1
1
561/15pn
561/18pn
561/15pn
1
1
1
561/15pn
561/18pn
561/15pn
Caricatore lungo
1
Supporto ganascia
Nipple
Corpo cilindro
O-ring
Dado
Pistone
O-ring
Rondella
Biella pistone
Leva rilascio
O-ring
Corpo cilindro
Vite
Spina
Staffa connessione
Spina tensione
Paracolpo
Molla valvola
O-ring
Valvola pistone
Rondella
Vite
Boccola
Leva a bascula
Molla
Spina
Rondella bloccaggio
Molla ritorno
Leva stelo valvola
Grilletto
Spina tensione
Vite
Gancio
Piastra posteriore
Spina tensione
”
Rondella bloccaggio
Silenziatore
Boccola
O-ring
Coppiglia
1
1
1
1
1
1
1
1
1
1
1
1
4
1
1
1
1
1
2
1
1
2
1
1
1
1
5
1
1
1
1
2
1
1
1
1
2
1
1
1
2
-"-
-"Umbiegerhalterung
Schnellkupplungsnippel
Zylinderhäuse
O-ring
Mutter
Kolben
O-Ring
Unterlegscheibe
Kolbenstange
Auslösehebel
O-Ring
Zylinder-Unterteil
Schraube
Stift
Verbindungsblock
Spannstift
Kolbendämpfer
Ventil-Druckfeder
O-Ring
Ventilkolben
Scheibe
Schraube
Buchse
Auslösehebel
Feder
Stift
Zahnscheibe
Ruckzugfeder
Platte für Auslösehebel
Auslösehebel
Spannstift
Schraube
Aufhänger
Hintere Gehäuseplatte1
Spannstift
”
Federring
Schalldämpfer
Buchse
O-Ring
Seegerring
Antal
Qty
Stück
1
2
1
1
2
2
1
1
1
1
561/15 561/15pn
561/18 561/18pn
561/15pn
561/18pn
561/15pn 300 staple load
on above
561/18pn 300 staple load
on above
561/18pn
561/15pn
561/18pn
561/15pn 561/18pn
561/15pn
561/18pn
561/15pn 300 staple load
on above
561/18pn 300 staple load
on above
110392
DEKLARATION OM ÖVERENSSTÄMMELSE
Firma Josef Kihlberg
Box 126
544 22 Hjo
Sverige
försäkrar härmed att alla varianter av följande, bottenhäftare, planhäftare, lockhäftare och
tänger
B53PN, B560PN, B561PN, F53PN, F560PN, F561PN, 561PN, a.560PN, c.561PN,
R555PN, R556PN, R557PN, JK20T, JK20V and JK35T
är tillverkade enligt följande harmoniserande standarder:
EN ISO 12100 del 1 + 2
Samt följer bestämmelserna enligt rådets direktiv.
2006/42/EG
Hjo den 29.12.2009
Anders Pettersson
Produktionsansvarig och behörig att ställa samman den tekniska dokumentation
Telefon +46 503 32800
Konformitätserklärung
Declaration of Conformity
Déclaration de conformité
_______________________________________________________________________
Die Firma/
The Company/
La societé:
Josef Kihlberg AB
Box 126
S-544 22 Hjo
erklärt hiermit in alleiniger
Verantwortung, dass alle
Varianten der Baureihen:
declare under our sole
responsibility that all
versions of the toollines:
déclarons sous notre seule
responsabilité que toutes
les variantes du series:
B53PN, B560PN, B561PN, F53PN, F560PN, F561PN, 561PN, a.560PN, c.561PN, JK20T,
R555PN, R556PN, R557PN, JK20V and JK35T
auf die sich diese Erklärung
bezieht, übereinstimmt mit
der Norm:
to which this declaration
relates on is in conformity
with the following
standard:
auquel se réfère cette déclaration est conforme à
la norme:
EN ISO 12100 Teile/parts/parties 1+2
gemäss den Bestimmungen der Richtlinie:
following the provisions
of directive:
conformément aux
dispositions de Directive:
2006/42/EG
Hjo 29.12.2009
Anders Pettersson
Produktionsleiter und berechtigt die technischen Unterlagen zusammenzustellen. +46 503 32800
Production Manager and authorized to compile the technical documentation. +46 503 32800
Chef de Production et autorisé à constituer le dossier technique. +46 503 32800
Scaricare