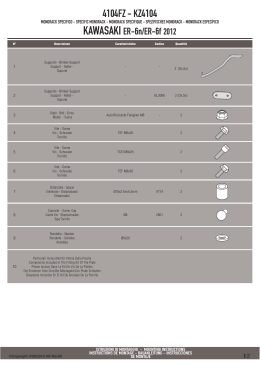
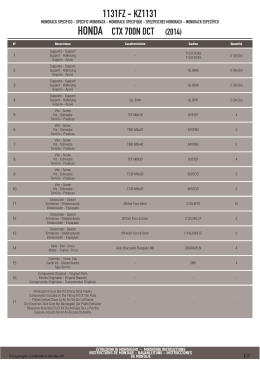
Istruzioni di montaggio del comando esterno con Push-Bar
Assembling instructions of the external handle with Push-Bar
Instructions de montage de la bequille exterieure avec Push-Bar
Montageanleitungen der äusseren klinke mit Push-Bar
Instrucciones de montaje del tirador exterior con Push-Bar
KW12631
Posizionare le viti (V1) in
Sx
A
Posizionare le viti (V1)
in Dx
SX
Place the screw (V1)
into the left hole (Sx)
Place the screw (V1)
into the right hole (Dx)
Positioner la vis (V1)
dans le trou gauche (Sx)
Positioner la vis (V1)
dans le trou droit (Dx)
DX
DX
L=E+18
±0.5
A
L=E+16.5
E
±0.5
DX
DX
Situar el tornillo (V1) en
el hojo izquierdo (Sx)
Die Schraube (V1) in
die linke Bohrung
einsetzen (Dx)
SX
SX
B
Ø16
MANO DESTRA
RIGHT HAND
MAIN DROITE
RECHTE HAND
MANO DERECHA
Ø10
2
SX
Die Schraube (V1) in die
linke Bohrung einsetzen
(Sx)
FORARE LA PORTA - ADATTARE QUADRO MANIGLIA
PERFORATE THE DOOR - ADJUST THE SPINDLE
PERCER LA PORTE - ADAPTER LE CADRE DE LA POIGNEE
TUR DURCHBOHREN - KLINKEEINHEIT ANPASSEN
TALADRAR LA PUERTA - ADAPTAR EL CUADRO DEL TIRADOR
Ø10
1
SCEGLIERE LA MANO
SELECT THE HAND
CHOISIR LA MAIN
ÖFFNUNGSHAND WAHLEN
DECIDIR LA MANO
MANO SINISTRA
LEFT HAND
MAIN GAUCHE
LINKE HAND
MANO IZQUIERDA
Ø22
Trim
V1
V1
Situar el tornillo (V1)
en el hojo derecho
(Dx)
C
L
L=E+15
3
FISSARE LA MANIGLIA
FIX THE HANDLE
FIXER LA POIGNEE
KLINKE BEFESTIGEN
FIJAR EL TIRADOR
4
±0.5
FISSARE IL COMANDO SULLA PORTA
FIX THE ANDLE ONTO THE DOOR
FIXER LA POIGNEE SUR LA PORTE
DIE KLINKE AN DIE TUR BEFESTIGEN
FIJAR EL TIRADOR SOBRE LA PUERTA
Allineare perfettamente
To perfectly line up
Aligner parfaitement
Tadellos übereinstimmen
Alinear perfectamente
I
M
P
O
R
T
A
N
T
C
Sinistra
Left
Gauche
Links
Izquierdas
Bloccare con forza la vite
Tighten the screw throughly
Serrer la vis à fond
Die Schraube kräftig anziehen
Apretar a fondo el tornillo
Destra
Right
Droite
Rechts
Derechas
ATTENTION
Il frizionamento sulla vite è normale. Ha funzione antisvitamento
The screw friction is normal. It has an unscrewing function.
La friction de la vis est normale. Sa fonction est anti-dévissage.
Die Reibung der Schraube ist normal. Sie hat eine Abschraubungschutzfunktion.
La fricción del tornillo es normal. Con función anti-desatornillamiento.
5
I
M
P
O
R
T
A
N
T
SOSTITUZIONE DEL CILINDRO
CYLINDER REPLACEMENT
REPLACEMENT DU CYLINDRE
ZYLINDERERSETZUNG
SUSTITUCION DEL CILINDRO
SX
Togliere la vite (V2)
Remove the screw (V2)
Enlever la vis (V2)
Die Schraube (V2)
herausziehen
Quitar el tornillo (V2)
SX
Sfilare il cilindro e sostituirlo con quello nuovo
Draw the cylinder out and replace with the new one
Enlever le cylindre et le replacer avec le nouveau
Den Zylinder herausnehmen und ihn mit dem neuen ersetzten
Extraer el cilindro y sustituirlo por el nuevo
DX
DX
Avvitare e bloccare la vite (V2)
Tighten and block the screw (V2)
Visser et bloquer la vis (V2)
Die Schraube (V2) spannen und
befestigen
Atornillar el tornillo (V2) y fijarlo
SX
SX
DX
V2
DX
V2
E
B
A
54
Iseo Serrature s.p.a.
via S. Girolamo,13
25055 Pisogne (BS) Italy
Tel.0364 8821 - Fax.0364 882263
e-mail: [email protected]
www.iseo.eu
Istruzioni di montaggio del comando esterno con Base, Push, Pad
Assembling instructions of the external handle with Base, Push, Pad
Instructions de montage de la bequille exterieure avec Base, Push, Pad
Montageanleitungen der äusseren klinke mit Base, Push, Pad
Instrucciones de montaje del tirador exterior con Base, Push, Pad
KW12631
Posizionare le viti (V1) in
Sx
A
Posizionare le viti (V1)
in Dx
SX
Place the screw (V1)
into the left hole (Sx)
Place the screw (V1)
into the right hole (Dx)
Positioner la vis (V1)
dans le trou gauche (Sx)
Positioner la vis (V1)
dans le trou droit (Dx)
DX
DX
L=E+18
I
M
P
O
R
T
A
N
T
±0.5
A
E
L=E+16.5
±0.5
DX
DX
Situar el tornillo (V1) en
el hojo izquierdo (Sx)
Die Schraube (V1) in
die linke Bohrung
einsetzen (Dx)
SX
SX
Sez. A-A
C
Ø16
MANO DESTRA
RIGHT HAND
MAIN DROITE
RECHTE HAND
MANO DERECHA
Ø10
2
SX
Die Schraube (V1) in die
linke Bohrung einsetzen
(Sx)
FORARE LA PORTA - ADATTARE QUADRO MANIGLIA
PERFORATE THE DOOR - ADJUST THE SPINDLE
PERCER LA PORTE - ADAPTER LE CADRE DE LA POIGNEE
TUR DURCHBOHREN - KLINKEEINHEIT ANPASSEN
TALADRAR LA PUERTA - ADAPTAR EL CUADRO DEL TIRADOR
Ø22
1
SCEGLIERE LA MANO
SELECT THE HAND
CHOISIR LA MAIN
ÖFFNUNGSHAND WAHLEN
DECIDIR LA MANO
MANO SINISTRA
LEFT HAND
MAIN GAUCHE
LINKE HAND
MANO IZQUIERDA
Ø10
Trim
V1
V1
Situar el tornillo (V1)
en el hojo derecho
(Dx)
C
L
L=E+15
3
FISSARE LA MANIGLIA
FIX THE HANDLE
FIXER LA POIGNEE
KLINKE BEFESTIGEN
FIJAR EL TIRADOR
4
±0.5
FISSARE IL COMANDO SULLA PORTA
FIX THE ANDLE ONTO THE DOOR
FIXER LA POIGNEE SUR LA PORTE
DIE KLINKE AN DIE TUR BEFESTIGEN
FIJAR EL TIRADOR SOBRE LA PUERTA
A
A
Sinistra
Left
Gauche
Links
Izquierdas
Allineare perfettamente
To perfectly line up
Aligner parfaitement
Tadellos übereinstimmen
Alinear perfectamente
Bloccare con forza la vite
Tighten the screw throughly
Serrer la vis à fond
Die Schraube kräftig anziehen
Apretar a fondo el tornillo
Destra
Right
Droite
Rechts
Derechas
ATTENTION
Il frizionamento sulla vite è normale. Ha funzione antisvitamento
The screw friction is normal. It has an unscrewing function.
La friction de la vis est normale. Sa fonction est anti-dévissage.
Die Reibung der Schraube ist normal. Sie hat eine Abschraubungschutzfunktion.
La fricción del tornillo es normal. Con función anti-desatornillamiento.
5
I
M
P
O
R
T
A
N
T
SOSTITUZIONE DEL CILINDRO
CYLINDER REPLACEMENT
REPLACEMENT DU CYLINDRE
ZYLINDERERSETZUNG
SUSTITUCION DEL CILINDRO
SX
Togliere la vite (V2)
Remove the screw (V2)
Enlever la vis (V2)
Die Schraube (V2)
herausziehen
Quitar el tornillo (V2)
SX
Sfilare il cilindro e sostituirlo con quello nuovo
Draw the cylinder out and replace with the new one
Enlever le cylindre et le replacer avec le nouveau
Den Zylinder herausnehmen und ihn mit dem neuen ersetzten
Extraer el cilindro y sustituirlo por el nuevo
DX
DX
Avvitare e bloccare la vite (V2)
Tighten and block the screw (V2)
Visser et bloquer la vis (V2)
Die Schraube (V2) spannen und
befestigen
Atornillar el tornillo (V2) y fijarlo
SX
SX
DX
V2
DX
V2
E
C
A
54
Iseo Serrature s.p.a.
via S. Girolamo,13
25055 Pisogne (BS) Italy
Tel.0364 8821 - Fax.0364 882263
e-mail: [email protected]
www.iseo.eu
Scaricare