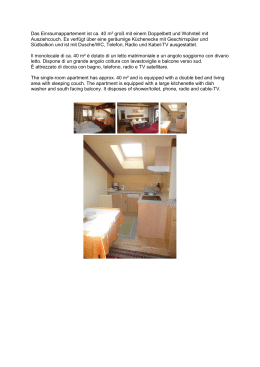
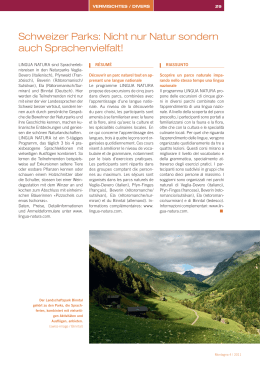
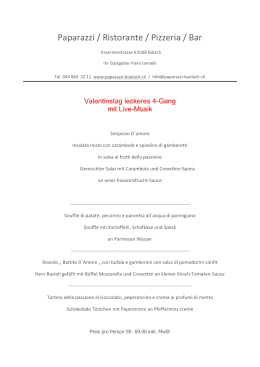
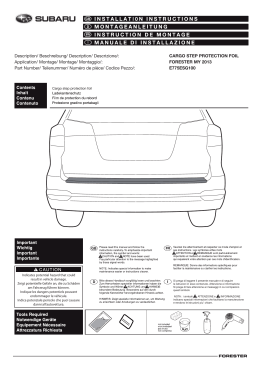
Verarbeitungsanleitung Triflex ProDetail® DE INSTRUCTIONS FOR USE 6 EN INSTRUCTIONS D‘APPLICATION 10 FR ISTRUZIONI DI LAVORAZIONE 14 IT INSTRUKCJA OBRÓBKI 18 PL INFORMATIONEN FÜR VERARBEITER VERARBEITUNGSANLEITUNG2 Verarbeitungsanleitung Triflex ProDetail® Allgemeine Informationen DE Arbeitssicherheit: Bei der Verarbeitung von bauchemischen Produkten sollten folgende Schutzmaßnahmen grundsätzlich eingehalten werden: Bei der Arbeit nicht rauchen, essen oder trinken. Berührung mit den Augen und der Haut vermeiden. Von Nahrungsmitteln und Getränken fern halten. Persönliche Schutzkleidung verwenden. Sicherheitsdatenblätter beachten. Wichtiger Hinweis: Die Sicherheitsdatenblätter und technischen Merkblätter, die Kennzeichnung der Gebinde, die Gefahrenhinweise und die Sicherheitsratschläge auf den Gebinden sind bei Transport, Lagerung und Verarbeitung zu beachten. Bei Rückfragen: Abt. Umwelt & Sicherheit, Telefon +49 571 9339-176 Lagerung: Behälter dicht geschlossen halten. Gebinde trocken und frostfrei an einem kühlen, gut gelüfteten Ort aufbewahren. Vor Hitze und direkter Sonneneinstrahlung schützen. Lagerstabilität mindestens 6 Monate. Gebinde im Winter vor der Verarbeitung möglichst bei Raumtemperatur lagern. Untergrundanforderungen: Die Eignung des Untergrundes muss immer objektbezogen geprüft werden. Der Untergrund muss sauber, trocken und frei von Zementschleier, Staub, Öl sowie Fett und anderen haftungsmindernden Verunreinigungen sein. Untergrundvorbehandlung Untergrund Acrylglas Aluminium Anstriche Asphalt Beton Edelstahl Estriche GFK / Lichtkuppelaufsatzkranz Glas Heißbitumenabstrich Holz Kaltbitumenanstrich Kunststoffbahnen Kupfer Leichtbeton Putz/Mauerwerk Mörtel, kunststoffmodifiziert Polymerbitumenbahnen (PY-E) mod. (SBS) Polymerbitumenbahnen (PY-P) mod. (APP) PVC-Formteile, hart Stahl, verzinkt Wärmedämmverbundsysteme Zink (1) 2 Verarbeitungsbedingungen: Triflex Produkte können in Temperaturbereichen verarbeitet werden, die auf dem Etikett des Gebindes und der Produktinformation angegeben sind. Bei der Verarbeitung von lösemittel- oder monomerhaltigen Triflex Produkten in Innenbereichen und bei Überschreitung der Luftgrenzwerte ist das Tragen von Atemschutzmasken erforderlich (siehe Punkt 8 Sicherheitsdatenblatt). Weiterhin ist eine Zwangsentlüftung mit mind. 7-fachem Luftaustausch pro Stunde vorzusehen. Maßnahmen bei Arbeitsunterbrechungen: Bei Arbeitsunterbrechungen über 12 Std. sowie einer Verschmutzung durch Regen usw. muss der Übergang mit Triflex Reiniger aktiviert werden. Ablüftzeit mind. 20 Min. Übergänge zu anschließenden Abdichtungen müssen inkl. Triflex Spezialvlies mind. 10 cm überlappen. Dies gilt auch für An- und Abschlüsse und Detaillösungen mit Triflex ProDetail. Verarbeitung und Verbräuche: Grundierung: Der Auftrag der Grundierung erfolgt filmbildend mit der Heizkörperrolle. Verbrauch ca. 0,40 kg/m². Zunächst sind die aufgehenden und anschließend die waagerechten Bereiche zu grundieren. Erforderliche Grundierungen, die nicht in den Sets enthalten sind, müssen separat bestellt werden. Abdichtung: Die verarbeitungsfähige Mischung Triflex ProDetail mit einer Heizkörperrolle satt auftragen (ca. 2,00 kg/m²) und gleichmäßig verteilen. In die frische Fläche das zugeschnittene Triflex Spezialvlies blasenfrei einlegen. Anschließend wird das Vlies mit einer weiteren Lage Triflex ProDetail abgedeckt (ca. 1,00 kg/m²). Wichtiger Hinweis: Die Haftung zum Untergrund ist immer objektbezogen zu prüfen! Vorbehandlung Abreiben mit Triflex Reiniger, Anrauen mit Schleifscheibe Abreiben mit Triflex Reiniger, Anrauen mit Schleifscheibe Schleifen, komplett entfernen Schleifen, Fräsen oder staubarmes Kugelstrahlen Schleifen, Fräsen oder staubarmes Kugelstrahlen Abreiben mit Triflex Reiniger, Anrauen mit Schleifscheibe Schleifen, Fräsen oder staubarmes Kugelstrahlen Abreiben mit Triflex Reiniger, Anrauen mit Schleifscheibe Abreiben mit Triflex Glas Reiniger, Haftzugversuch Haftzugversuch Anstriche entfernen Haftzugversuch auf Anfrage Abreiben mit Triflex Reiniger, Anrauen mit Schleifscheibe Schleifen, Fräsen oder staubarmes Kugelstrahlen Haftzugversuch Abreiben mit Triflex Reiniger, Oberfläche anrauen Abreiben mit Triflex Reiniger, Anrauen mit Schleifscheibe Abreiben mit Triflex Reiniger, Anrauen mit Schleifscheibe as Triflex ProDetail Starterset enthält die Grundierung Triflex Cryl Primer 276. Das Triflex ProDetail Mini-Starterset enthält keine Grundierung. D Sollte eine Grundierung laut Tabelle erforderlich sein, die nicht in den Sets enthalten ist, so muss diese separat bestellt werden. zum Anrauen: Abreiben mit Triflex Reiniger, grundieren mit Triflex Metal Primer. (Loser Rost und Rostkrusten sind vorher zu entfernen.) (3) Auf Anfrage erhalten Sie Informationen zu weiteren Untergründen. ([email protected]) (2) Alternativ Verarbeitungsanleitung Triflex ProDetail 09/2015 Grundierung (1) (3) Keine Grundierung Keine Grundierung (2) Siehe Untergrund Triflex Cryl Primer 222 Triflex Cryl Primer 276 Keine Grundierung (2) Triflex Cryl Primer 276 Keine Grundierung Triflex Glas Primer Triflex Cryl Primer 222 Triflex Cryl Primer 276 Triflex Cryl Primer 222 auf Anfrage (3) Keine Grundierung (2) Triflex Cryl Primer 276 Triflex Cryl Primer 276 Triflex Pox R 100 Keine Grundierung Triflex Cryl Primer 222 Keine Grundierung Keine Grundierung (2) Triflex Pox R 100 Keine Grundierung (2) Verarbeitungsanleitung Triflex ProDetail® Verpackungseinheiten Triflex ProDetail DE Triflex ProDetail Triflex ProDetail Starterset Material 15 kg Triflex ProDetail 3 x 0,10 kg Triflex Katalysator (Sommer) 6 x 0,10 kg Triflex Katalysator (Winter) Material 3 x 3,75 kg Triflex ProDetail 1 x 2,00 kg Triflex Cryl Primer 276 4 x 0,10 kg Triflex Katalysator 1 l Triflex Reiniger 15 m Triflex Spezialvlies, 26 cm breit Werkzeug 1 Kunststoffeimer mit Deckel 5 Rührhölzer 5 Heizkörperrollen + Bügel 1 Heizkörperpinsel 1 Schere aus Gussstahl 1 Rolle Krepp-Klebeband 1 Paar Gummihandschuhe 2 Putztücher Verarbeitungsanleitung Untergrundvorbehandlung 1. Saugende Untergründe (z. B. Beton, Asphalt) müssen mit einem Beton-DiamantSchleifer geschliffen werden, um einen haftund tragfähigen Untergrund zu erhalten. 2. Metalle oder PVC werden vor dem Beschichten der Oberfläche mit Triflex Reiniger entfettet und anschließend angeraut (siehe weitere Fotos). 3. Bei größeren Flächen geschieht dies mit einer Schleifscheibe. 4. Bei kleineren Flächen mit Schleifpapier. 2. Basisharz gründlich aufrühren. 3. Gegebenenfalls Teilmenge entnehmen. Der Teilmenge entsprechenden Anteil an Triflex Katalysator klumpenfrei einrühren. Rührzeit mindestens 2 Min. 4. Anschlüsse und Details vor dem Anmischen abkleben. Grundierung filmbildend auftragen. Grundierung 1. Triflex Cryl Primer 276 anmischen. Beachten Sie die Mischanleitung auf dem Gebinde. Verarbeitungsanleitung Triflex ProDetail 09/2015 3 Verarbeitungsanleitung Triflex ProDetail® Verarbeitungsanleitung Anmischen der Abdichtung Wichtiger Hinweis: Beachten Sie die Mischanleitung auf dem Gebinde. Werden Teilmengen entnommen, müssen diese entsprechend der Mischanleitung errechnet werden. DE 1. Triflex ProDetail anmischen. Beachten Sie die Mischanleitung auf dem Gebinde. 2. Basisharz gründlich aufrühren. 3. Gegebenenfalls Teilmenge entnehmen. Der Teilmenge entsprechenden Anteil an Triflex Katalysator klumpenfrei einrühren. Rührzeit mindestens 2 Min. Abdichtung Wandanschluss Tipp: siehe Seite 5 Vliesformteile 4 1. Wandanschluss in Abdichtungshöhe abkleben. 2. Triflex Spezialvlies-Zuschnitte für Innen- und Außenecken erstellen: Kreisförmiger Zuschnitt (ca. Ø 10 cm) mit einem Einschnitt bis zur Mitte. Tipp: Verwenden Sie alternativ Vliesformteile 3. Außenecke: Abdichtungsharz satt mit einem Pinsel oder einer Heizkörperrolle vorlegen und die zugeschnittene Außenecke blasenfrei einlegen. 4. Anschließend die eingelegte Außenecke nochmals mit einer Lage Abdichtungsharz satt abdecken. 5. Innenecke: Abdichtungsharz satt mit einem Pinsel oder einer Heizkörperrolle vorlegen und die zugeschnittene Innenecke blasenfrei einlegen. 6. Anschließend die eingelegte Innenecke nochmals mit einer Lage Abdichtungsharz satt abdecken. 7. Abdichtungsharz satt (ca. 2,00 kg/m²) mit einer Heizkörperrolle im Wandanschlussbereich vorlegen. 8. Anschließend das Triflex Spezialvlies im Zuschnitt oder von der Rolle blasenfrei in das frische Harz einlegen und dabei auf eine ausreichende Vliesdurchtränkung achten. 9. Bei Innenecken wird das Vlies 5 cm um die Ecke geführt und die Falte im Bodenbereich schräg bis zur Ecke eingeschnitten. Anschließend wird der Einschnitt überlappt, wobei darauf zu achten ist, dass sich keine trockenen Vliesstücke überlappen. 10. Bei Außenecken wird das Vlies 5 cm bis über die Ecke geführt und im Bodenbereich bis zur Ecke eingeschnitten. Anschließend wird der Einschnitt um die Ecke gelegt und der freie Bodenbereich wird mit einem zusätzlichen Vlieszuschnitt abgedeckt. 11. Danach das eingelegte Vlies mit einer Schicht Abdichtungsharz (ca. 1,00 kg/m²) satt abdecken. 12. Das Klebeband im noch frischen Zustand entfernen. Fertig! Verarbeitungsanleitung Triflex ProDetail 09/2015 Verarbeitungsanleitung Triflex ProDetail® Verarbeitungsanleitung Abdichtung Gully DE 1. Fläche in Abdichtungsbreite abkleben und Gully mit einem Putztuch verstopfen. Den Gully mit Triflex Reiniger säubern und mit einem Handschleifpapier anrauen. 2. Triflex Spezialvlies-Zuschnitte erstellen. Gully: Breite: 15 cm, Länge: Gullyumfang + 5 cm. Das Vlies wird über die ganze Länge 5 cm tief und 1 cm breit sternenförmig eingeschnitten. 3. Fläche: 1 Vliesstück, das in der Mitte auf Gullydurchmesser sternenförmig eingeschnitten wird. 4. Abdichtungsharz in und um den Gully satt vorlegen (ca. 2,00 kg/m²) und den Zuschnitt für den Gully blasenfrei einlegen. Anschließend die sternenförmigen Einschnitte auf die Fläche umlegen und das Vlies nochmals satt von oben (ca. 1,00 kg/m²) abdecken. 5. Abdichtungsharz auf der Fläche und im Gully satt (ca. 2,00 kg/m²) vorlegen. 6. Das Vlies für die Fläche blasenfrei einlegen und die sternenförmigen Einschnitte mit dem Pinsel in den Gully umlegen. 7. Anschließend das Vlies satt von oben mit Harz (ca. 1,00 kg/m²) abdecken. 8. Das Putztuch aus dem Gully entfernen und das Klebeband im noch frischen Zustand abziehen. Fertig! 2. Fläche: 2 Vliesstücke die jeweils auf einer Seite U-förmig auf Rohrdurchmesser ausgeschnitten werden. Die beiden Vliesstücke müssen sich im Bereich des Rohres mind. 5 cm überlappen! 3. Abdichtungsharz satt (ca. 2,00 kg/m²) mit Heizkörperrolle oder Pinsel am Rohr und in der Fläche vorlegen. Anschließend den Vlieszuschnitt für das Rohr blasenfrei in das frische Harz einlegen und dabei auf eine aus reichende Vliesdurchtränkung achten. 4. Abdichtungsharz in der Fläche vorlegen (ca. 2,00 kg/m²) und den ersten Zuschnitt für die Fläche blasenfrei einlegen und von oben (ca. 1,00 kg/m²) satt abdecken. Wichtiger Hinweis: Vor dem Anmischen des Gebindes müssen alle notwendigen Vlies zuschnitte vorbereitet werden! Vliesformtei Tipp: Verwenden Sie alternativ Vliesformteile (Kein Set-Bestandteil) Abdichtung Lüfter 1. Lüfter in Abdichtungshöhe und Fläche in Abdichtungsbreite (min. 10 cm) abkleben. Triflex Spezialvlies-Zuschnitte erstellen. Rohr: Breite: 20 cm, Länge: Rohrumfang + 5 cm. Das Vlies wird über die ganze Länge 5 cm tief und 1 cm breit streifenförmig eingeschnitten. 5. Abdichtungsharz in der Fläche vorlegen und den zweiten Zuschnitt für die Fläche blasenfrei einlegen und von oben satt abdecken. 6. Das Klebeband im noch frischen Zustand entfernen. Fertig! le Formteil Ecke 5 Weitere Informationen erhalten Sie unter der auf der Rückseite genannten Adresse oder schauen Sie im Internet unter www.triflex.com. Verarbeitungsanleitung Triflex ProDetail 09/2015 Formteil Rohr Instructions for use Triflex ProDetail® General information EN Health and safety: When working with products containing construction chemicals, always ensure adherence to the following protective measures: Do not smoke, eat or drink while working. Avoid contact with eyes and skin. Keep away from food and beverages. Always wear personal protective clothing. Always ensure adherence to safety data sheets. Important note: When transporting, storing and working with these products, always ensure adherence to all pertinent safety data sheets and technical codes of practice, the identification on the containers, as well as to the hazard information and safety tips on the containers. If you have any queries, please contact: Environment and Safety Department, Tel. +49 571 9339-176 Storage: Keep containers firmly sealed. Containers must be stored in a dry, cool (but frost-free) and well ventilated place. Protect against heat and direct sunlight. Storage stability at least 6 months. In winter, store containers at room temperature prior to use where possible. Substrate requirements: Substrate suitability should always be checked on a case by case basis. The substrate must be clean, dry and free of cement bloom, dust, oil, grease and other adhesion-reducing dirt. Substrate pre-treatment Substrate Aluminium Asphalt Cold bitumen coating Composite thermal insulation systems Concrete Copper FRP / Skylight frame Hot bitumen coating Glass Lightweight concrete Mortar, resin-modified Paints Plaster/masonry Plastic sheeting Plexiglas Polymer bitumen sheeting (PY-E) mod. (SBS) Polymer bitumen sheeting (PY-P) mod. (APP) PVC moulded components, hard Screeds Stainless steel Steel, galvanised Wood Zinc (1) The Triflex 6 Conditions for use: Triflex products can be used within the temperature ranges stipulated on the container label and in the product information. Always wear a face mask when using Triflex products containing solvents or monomers in enclosed spaces, or when air limit values are exceeded (see point 8 of safety data sheet). Furthermore, always ensure forced ventilation with a minimum 7-fold air exchange per hour. What to do if work is interrupted: If work is interrupted for more than 12 hrs, or if soiled by rain etc., the intersection must be activated with Triflex Cleaner. Airing time at least 20 min. Transitions to subsequent waterproofing must overlap (including Triflex Special Fleece) by a minimum of 10 cm. This also applies to junctions, transitions and detail solutions with Triflex ProDetail. Processing and volumes: Primer: The primer is applied as a thin film using a radiator roller. Volume approx. 0.40 kg/m². Prime vertical surfaces prior to horizontal surfaces. Primers that are not contained in the sets must be ordered separately. Waterproofing: Once the Triflex ProDetail mixture is ready for use, apply a thick coat with a radiator roller (approx. 2.00 kg/m²) and spread evenly. Lay the cut to length Triflex Special Fleece on the freshly applied area, making sure there are no air bubbles. Then cover the fleece with another layer of Triflex ProDetail (approx. 1.00 kg/m²). Important note: Adhesion to the substrate must be checked on a case-by-case basis! Pre-treatment Abrade with Triflex Cleaner, roughen with grinding disc Grinding, milling or dust-free shot-blasting Adhesive strength test Grinding, milling or dust-free shot-blasting Abrade with Triflex Cleaner, roughen with grinding disc Abrade with Triflex Cleaner, roughen with grinding disc Adhesive strength test Abrade with Triflex Glass Cleaner, adhesive strength test Grinding, milling or dust-free shot-blasting Completely grind off On request Abrade with Triflex Cleaner, roughen with grinding disc Adhesive strength test Abrade with Triflex Cleaner, roughen surface Grinding, milling or dust-free shot-blasting Abrade with Triflex Cleaner, roughen with grinding disc Abrade with Triflex Cleaner, roughen with grinding disc Remove paints Abrade with Triflex Cleaner, roughen with grinding disc ProDetail Starter Set includes the primer Triflex Cryl Primer 276. The Triflex ProDetail Mini Starter Set does not include primer. If the table stipulates that a primer is required, which is not included in the set, this must be ordered separately. Alternative to roughening: Abrade with Triflex Cleaner, prime with Triflex Metal Primer. (Loose rust and blistering rust must first be removed.) (3) Information on other substrates is available on request. ([email protected]) (2) Verarbeitungsanleitung Triflex ProDetail 09/2015 Primer (1) (3) No primer (2) Triflex Cryl Primer 222 Triflex Cryl Primer 222 Triflex Pox R 100 Triflex Cryl Primer 276 No primer (2) No primer Triflex Cryl Primer 222 Triflex Glas Primer Triflex Cryl Primer 276 Triflex Pox R 100 See substrate Triflex Cryl Primer 276 On request (3) No primer No primer Triflex Cryl Primer 222 No primer Triflex Cryl Primer 276 No primer (2) No primer (2) Triflex Cryl Primer 276 No primer (2) Instructions for use Triflex ProDetail® Packaging contents Triflex ProDetail EN Triflex ProDetail Triflex ProDetail Starter Set Materials 15 kg Triflex ProDetail 3 x 0,10 kg Triflex Catalyst (summer) 6 x 0,10 kg Triflex Catalyst (winter) Materials 3 x 3.75 kg Triflex ProDetail 1 x 2.00 kg Triflex Cryl Primer 276 4 x 0.10 kg Triflex Catalyst 1 l Triflex Cleaner 15 m Triflex Special Fleece, 26 cm wide Tools 1 plastic bucket with lid 5 wooden stirring sticks 5 radiator rollers + holder 1 radiator brush 1 pair of scissors made of cast steel 1 roll of adhesive masking tape 1 pair of rubber gloves 2 cleaning cloths Instructions for use Substrate pre-treatment 1. Absorbent substrates (e.g., concrete, asphalt) must be ground with a concrete diamond grinder, in order to ensure the adhesive property and soundness of substrate. 2. Prior to coating the surface, metals or PVC are degreased with Triflex Cleaner and then roughened (see other photos). 3. If working on a larger area, use a grinding disc. 4. Smaller areas can be roughened using sandpaper. 2. Stir base resin thoroughly. 3. Take partial quantity as appropriate. If required, decant a measured weight of resin and add the respective amount of Triflex Catalyst. Stir for at least 2 minutes or until there are no lump. 4. Apply adhesive tape to the joints and details prior to mixing. Apply the primer as a thin film. Primer 1. Mix Triflex Cryl Primer 276. Always follow the mixing instructions on the container. Verarbeitungsanleitung Triflex ProDetail 09/2015 7 Instructions for use Triflex ProDetail® Instructions for use Mixing the waterproofing resin Important note: Always follow the mixing instructions on the container. When using a measured weight of resin, ensure the amount of Triflex Catalyst required is correctly calculated on a prorata basis. EN 1. Mix Triflex ProDetail. Always follow the mixing instruction on the container. 2. Stir base resin thoroughly. 3. Take partial quantity as appropriate. If required, decant a measured weight of resin and add the respective amount of Triflex Catalyst. Stir for at least 2 minutes or until there are no lumps. Wall junction waterproofing ed Tip: see mould ge 9 components pa 8 1. Apply adhesive tape to the wall junction at waterproofing height. 2. Prepare Triflex Special Fleece cut-outs for inner and outer corners: Make a circular cut-out (approx. dia 10 cm) with one incision through to the centre. Tip: Alternatively use fleece moulded components 3. Outer corner: Apply waterproofing resin generously with a brush or radiator roller and embed the pre-cut outer corner ensuring there are no air bubbles. 4. Then apply another thick layer of waterproofing resin to the outer corner fleece. 5. Inner corner: Apply waterproofing resin generously with a brush or radiator roller and embed the pre-cut inner corner ensuring there are no air bubbles. 6. Then apply another thick layer of waterproofing resin to the inner corner fleece. 7. Apply a generous layer of waterproofing resin (approx. 2.00 kg/m²) with a radiator roller to the wall junction area. 8. Either pre-cut the Triflex Special Fleece or apply straight from the roll onto the fresh resin ensuring there are no air bubbles. Make sure the fleece is fully saturated. 9. In the case of inner corners, lay the fleece approx. 5 cm around the corner and cut diagonally into the creased fleece on the floor right up to the corner. Overlap the cut fleece, making sure that there are no dry patches. 10. In the case of outer corners, lay the fleece around the corner approx. 5 cm and then cut into the fleece on the floor up to the corner. Then lay the incision around the corner and cover the free floor space with an additional fleece cut-out. 11. Then cover the laid fleece with a generous layer of waterproofing resin (approx. 1.00 kg/m²). 12. Remove the adhesive tape while the resin is still wet. Done! Verarbeitungsanleitung Triflex ProDetail 09/2015 Instructions for use Triflex ProDetail® Instructions for use Gully waterproofing EN 1. Apply adhesive tape to create a waterproofing border around the gully and plug it up with a cleaning cloth. Clean the gully with Triflex Cleaner and roughen the surface with sandpaper. 2. Prepare Triflex Special Fleece cut-outs. Gully: width: 15 cm, length: gully circumference +5 cm. Make incisions along the entire length of the fleece. These incisions should be 5 cm deep, 1 cm wide and starshaped. 3. Area: 1 piece of fleece with star-shaped incisions in the centre to match the diameter of the gully. 4. Apply a generous layer of waterproofing resin in and around the gully (approx. 2.00 kg/m²) and embed the fleece cut-out for the gully, making sure there are no air bubbles. Then place the star-shaped incisions on the surrounding area and apply another generous coating of resin (approx. 1.00 kg/m²). 5. Apply a generous layer of waterproofing resin to the area in and around the gully (approx. 2.00 kg/m²). 6. Lay fleece for the surrounding area, making sure there are no air bubbles, and use a brush to place the star-shaped incisions in the gully. 7. Apply a further generous layer of resin (approx. 1.00 kg/m²). 8. Remove the cleaning cloth from the gully and remove the adhesive tape while the resin is still wet. Done! 3. Apply a generous layer of waterproofing resin (approx. 2.00 kg/m²) to the pipe and surrounding area using a radiator roller or brush. Then apply the fleece cut-out to the pipe to the fresh resin, making sure that there are no air bubbles and that the fleece is sufficiently saturated. 4. Apply waterproofing resin to the surrounding surface area (approx. 2.00 kg/ m²), embed the first surface fleece cut-out, making sure that there are no air bubbles, and apply another generous coat of resin (approx. 1.00 kg/m²). Important note: Always prepare all fleece cut-outs prior to mixing the materials in the container! Tip: components Alternatively use fleece moulded components (Not included in set) Ventilation duct waterproofing 1. Apply adhesive tape at waterproofing height and on the area surrounding the ventilation duct (min. 10 cm). Prepare Triflex Special Fleece cut-outs. Pipe: width: 20 cm, length: pipe circumference + 5 cm. Make incisions along the entire length of the fleece. These incisions should be 5 cm deep, 1 cm wide and strip-shaped. 5. Apply waterproofing resin to the surrounding area and embed the second surface fleece cut-out, making sure that there are no air bubbles. Apply another generous coat of resin. 2. Area: 2 pieces of fleece, each cut in a U shape on one side to fit the pipe circumference. The fleece pieces must overlap by at least 5 cm around the pipe! 6. Remove the adhesive tape while the resin is still wet. Done! Fleece moulded Corner moulded component 9 For further details, please contact us at the address overleaf, or visit us at www.triflex.com. Verarbeitungsanleitung Triflex ProDetail 09/2015 Pipe moulded component Instructions d‘application Triflex ProDetail® Généralités Sécurité au travail : Lors de l’application de produits de construction chimiques, respecter impérativement les mesures de prévention suivantes : Ne pas fumer, manger ni boire lors des travaux. Éviter tout contact avec les yeux et la peau. Tenir les produits à l’écart des aliments et boissons. Porter des vêtements de protection individuelle. Respecter les fiches techniques de sécurité. FR Remarque importante : Lors du transport, du stockage et de l’application, toujours observer les fiches données de sécurité et fiches techniques ainsi que les inscriptions, indications de danger et conseils de sécurité figurant sur les emballages. Pour toute question : le service Environnement et sécurité, téléphone : +49 571 9339-176 Stockage : Les récipients doivent être hermétiquement fermés. Conserver les récipients au sec, à l’abri du gel et dans un endroit frais et bien ventilé. Protéger de la chaleur et des rayons directs du soleil. Stabilité au stockage : minimum 6 mois. En hiver, conserver si possible les récipients à température ambiante avant utilisation. Exigences relatives aux supports : Vérifier toujours l’aptitude du support au cas par cas. Le support doit être propre, sec et exempt de laitance, de poussière, d’huile, de graisse ou d’autres impuretés susceptibles de nuire à l’adhérence. Préparation du support Support Acier galvanisé Acier inoxydable Aluminium Apprêt de bitume à froid Asphalte Béton Béton allégé Bois Chapes Couches de peinture/vernis Cuivre Enduit/Maçonnerie Feutres bitumineux polymère (PY-E) mod. (SBS) Feutres bitumineux polymère (PY-P) mod. (APP) Feutres synthétiques Mortier, modifié aux polymères Pièces moulées en PVC, dures Plastique renforcé de fibres de verre / Couronne pour dôme d’éclairage Revêtement de bitume à chaud Systèmes composites d'isolation thermique Verre Verre acrylique/Plexiglas Zinc comprise dans la plage indiquée sur l’étiquette du récipient et dans les instructions relatives au produit. Lors de l’application en intérieur de produits Triflex contenant des solvants ou des monomères, et si les valeurs limites d’aération sont dépassées, le port de masques de protection respiratoire est impératif (voir le point 8 Fiche données de sécurité). En outre, il convient de prévoir un système de ventilation forcée avec un renouvellement de l’air au moins 7 fois par heure. Mesures à prendre en cas d’interruption des travaux : En cas d’interruption des travaux de plus de 12 heures ou en cas d’encrassement dû à la pluie ou à d’autres facteurs, la jonction doit être activée au moyen du produit Triflex Nettoyant. Temps d’évaporation : min. 20 mn. Les jonctions d’étanchéité contiguës doivent, non-tissé spécial Triflex Voile de renfort compris, présenter un recouvrement min. de 10 cm. Ceci vaut aussi pour les raccords, terminaisons et détails de finition traités avec Triflex ProDetail. Application et consommations : Couche de primaire : Appliquer le primaire de manière à former un film en utilisant un rouleau pour radiateurs. Consommation : env. 0,40 kg/m². Il convient de traiter en premier lieu les parties verticales puis les parties horizontales. Les primaires nécessaires non compris dans les kits doivent être commandés séparément. Étanchéité : Une fois prêt à l’emploi, appliquer généreusement (env. 2,00 kg/m²) le mélange Triflex ProDetail à l’aide d’un rouleau pour radiateurs et le répartir uniformément. Dans la surface fraîchement traitée, poser le non-tissé spécial Triflex Voile de renfort prédécoupé, en veillant à éliminer toutes les bulles. Puis recouvrir le voile d’une autre couche de Triflex ProDetail (env. 1,00 kg/m²). Remarque importante : Toujours vérifier l’adhérence au support au cas par cas. Préparation Frotter avec le Triflex Nettoyant, rendre rugueux à l’aide d’un disque abrasif Frotter avec le Triflex Nettoyant, rendre rugueux à l’aide d’un disque abrasif Frotter avec le Triflex Nettoyant, rendre rugueux à l'aide d'un disque abrasif Adhérence par essais de traction Ponçage au disque diamant, fraisage ou grenaillage avec faible production de poussière Ponçage au disque diamant, fraisage ou grenaillage avec faible production de poussière Primaire (1) (3) Pas de primaire (2) Pas de primaire (2) Pas de primaire (2) Triflex Cryl Primaire 222 Triflex Cryl Primaire 222 Triflex Cryl Primaire 276 Triflex Cryl Primaire 276 Élimination des couches de peinture/vernis Triflex Cryl Primaire 276 Ponçage au disque diamant, fraisage ou grenaillage avec faible production de poussière Triflex Cryl Primaire 276 Ponçage au disque diamant, élimination complète Voir Support Frotter avec le Triflex Nettoyant, rendre rugueux à l'aide d'un disque abrasif Pas de primaire (2) Triflex Cryl Primaire 276 Pas de primaire Adhérence par essais de traction Triflex Cryl Primaire 222 Sur demande Sur demande (3) Ponçage au disque diamant, fraisage ou grenaillage avec faible production de poussière Triflex Pox R 100 Frotter avec le Triflex Nettoyant, rendre la surface rugueuse Pas de primaire Frotter avec le Triflex Nettoyant, rendre rugueux à l’aide d’un disque abrasif Pas de primaire Adhérence par essais de traction Triflex Cryl Primaire 222 Triflex Pox R 100 Triflex Primaire verre Pas de primaire Pas de primaire (2) Frotter avec le Triflex Nettoyant, adhérence par essais de traction Frotter avec le Triflex Nettoyant, rendre rugueux à l’aide d’un disque abrasif Frotter avec le Triflex Nettoyant, rendre rugueux à l'aide d'un disque abrasif (1) Triflex 10 Conditions de mise en œuvre : Les produits Triflex peuvent être appliqués lorsque la température est ProDetail – Kit d‘essai contient le primaire Triflex Cryl Primaire 276. Triflex ProDetail – Mini-kit d‘essai, quant à lui, n'inclue aucun primaire. Si, conformément au tableau, l'utilisation d'un primaire non compris dans les kits est requise, commander ce dernier séparément. solution que de rendre la surface rugueuse : frotter avec le Triflex Nettoyant, appliquer une couche de primaire avec Triflex Metal Primaire (éliminer au préalable les traces de rouille et les croûtes de rouille qui se détachent). (3) Sur demande, il est possible d’obtenir des informations sur d’autres types de supports ([email protected]). (2) Autre Verarbeitungsanleitung Triflex ProDetail 09/2015 Instructions d‘application Triflex ProDetail® Contenu du kit Triflex ProDetail FR Triflex ProDetail Triflex ProDetail – Kit d‘essai Matériaux 15 kg de Triflex ProDetail 3 x 0,10 kg de Triflex Catalyseur (Été) 6 x 0,10 kg de Triflex Catalyseur (Hiver) Matériaux 3 x 3,75 kg de Triflex ProDetail 1 x 2,00 kg de Triflex Cryl Primaire 276 4 x 0,10 kg de Triflex Catalyseur 1 l de Triflex Nettoyant 15 m de Triflex Voile de renfort de 26 cm de large Outils 1 seau plastique avec couvercle 5 spatules en bois 5 rouleaux à radiateurs + montures 1 pinceau pour radiateurs 1 paire de ciseaux en acier moulé 1 rouleau de ruban adhésif en papier crêpé 1 paire de gants en caoutchouc 2 chiffons Instructions d’application Préparation du support 1. Les supports absorbants (tels que le béton, l’asphalte) doivent être poncés l’aide d’une meuleuse diamantée pour béton afin d’obtenir une bonne adhérence et une bonne résistance. 2. Pour les métaux ou le PVC, avant de recouvrir la surface, la dégraisser avec Triflex Nettoyant et la poncer pour obtenir un résultat rugueux (voir les autres photos). 3. Pour les surfaces relativement importantes, utiliser un disque abrasif. 4. Pour les petites surfaces, utiliser du papier émeri. 2. Mélanger soigneusement la résine de base. 3. Prélever la quantité nécessaire. Ajouter la dose correspondante de Triflex Catalyseur, en veillant à éliminer les granules. Temps de mélange min. 2 mn. 4. Coller une bande adhésive sur les raccords et les détails avant de procéder au mélange. Appliquer le primaire en formant un film. Couche de primaire 1. Mélanger le Triflex Cryl Primaire 276. Pour le mélange, respecter les instructions figurant sur le récipient. Verarbeitungsanleitung Triflex ProDetail 09/2015 11 Instructions d‘application Triflex ProDetail® Instructions d‘application Mélange du produit d‘étanchéité FR 1. Mélanger le produit Triflex ProDetail. Pour le mélange, respecter les instructions figurant sur le récipient. 2. Mélanger soigneusement la résine de base. 3. Prélever la quantité nécessaire. Ajoutez la dose correspondante de Triflex Catalyseur, en veillant à éliminer les granules. Temps de mélange min. 2 mn. Remarque importante : Pour le mélange, respecter les instructions figurant sur le récipient. S‘il ne s‘agit que du prélèvement d‘une certaine quantité, faire correctement les calculs en se référant aux instructions de mélange. Étanchéité pour raccord mural pièces Conseil : voir ge 13 préformées pa 12 1. Coller de la bande adhésive sur le raccord mural pour délimiter la hauteur d’étanchéité. 2. Créer des découpes de Triflex Voile de renfort pour les coins intérieurs et extérieurs : découpe circulaire (env. 10 cm de Ø) avec une incision jusqu’au centre. Conseil : On peut également utiliser des pièces préformées de non-tissé. 3. Coins extérieurs : Appliquer la résine d’étanchéité généreusement à l’aide d’un pinceau ou d’un rouleau pour radiateurs et poser le coin intérieur découpé en veillant à éliminer toutes les bulles. 4. Puis recouvrir de nouveau le coin extérieur d’une couche généreuse de résine d’étanchéité. 5. Angles intérieurs : Appliquer la résine d’étanchéité généreusement à l’aide d’un pinceau ou d’un rouleau pour radiateurs et poser le coin intérieur découpé en veillant à éliminer toutes les bulles. 6. Puis recouvrir de nouveau l’angle intérieur d’une couche généreuse de résine d’étanchéité. 7. Appliquer la résine d’étanchéité généreusement (env. 2,00 kg/m²) à l’aide d’un rouleau pour radiateurs dans la zone du raccord mural. 8. Puis, poser des découpes de Triflex Voile de renfort (ou travailler directement à partir du rouleau) dans la résine fraîche en veillant à éliminer toutes les bulles. S’assurer que le non-tissé est suffisamment imbibé. 9. Pour les angles intérieurs, faire dépasser le non-tissé de 5 cm du coin et inciser le pli de manière oblique jusqu’à l’angle au niveau du sol. Les parties découpées doivent se chevaucher. Veiller à ce qu’aucun morceau de non-tissé sec ne se chevauche. 10. Pour les coins extérieurs, faire dépasser le non-tissé de 5 cm du coin et l’inciser jusqu’au coin au niveau du sol. Rabattre les parties découpées de chaque côté du coin et rajouter une découpe de non-tissé sur la partie du sol restée vierge. 11. Puis recouvrir le non-tissé posé d’une couche généreuse de résine d’étanchéité (env. 1,00 kg/m²). 12. Retirer la bande adhésive lorsque le produit est encore frais. Terminé ! Verarbeitungsanleitung Triflex ProDetail 09/2015 Instructions d‘application Triflex ProDetail® Instructions d‘application Étanchéité de la naissance FR 1. Coller la bande sur la surface pour délimiter la largeur d’étanchéité puis boucher la naissance avec un chiffon. Nettoyer la naissance avec le produit Triflex Nettoyant et la rendre rugueuse manuellement avec du papier émeri. 2. Préparer des découpes de non-tissé spécial Triflex Voile de renfort. Naissance : largeur : 15 cm, longueur : circonférence de la naissance + 5 cm. Découper une frise de pointes de 5 cm de long et 1 cm de large sur toute la longueur. 3. Surface : 1 morceau de non-tissé, entaillé au centre en forme d’étoile correspondant au diamètre de la naissance. 4. Appliquer la résine d’étanchéité généreusement (env. 2,00 kg/m²) dans et autour de la naissance et poser les découpes pour naissance en veillant à éliminer toutes les bulles. Rabattre les découpes en forme d’étoile sur la surface, puis recouvrir de nouveau généreusement (env. 1,00 kg/m²) la face supérieure du non-tissé. 5. Appliquer généreusement (env. 2,00 kg/m²) la résine d’étanchéité sur la surface et dans la naissance. 6. Poser le non-tissé pour la surface en veillant à éliminer toutes les bulles et rabattre les pointes dans la naissance à l’aide d’un pinceau. 7. Puis recouvrir généreusement (env. 1,00 kg/m²) la face supérieure du non-tissé de résine. 8. Retirer le chiffon de la naissance et décoller la bande adhésive lorsque le produit est encore frais. Terminé ! 2. Surface : 2 morceaux de non-tissé, découpés d’un côté en forme de U correspondant au diamètre du tube. Les deux morceaux de non-tissé doivent se chevaucher de 5 cm minimum au niveau du tube ! 3. Appliquer la résine d’étanchéité généreusement (env. 2,00 kg/m²) sur la surface et au niveau du tube à l’aide d’un rouleau pour radiateurs ou d’un pinceau. Puis poser la découpe de voile pour le tube dans la résine fraîche en veillant à éliminer toutes les bulles et en s’assurant que le non-tissé est suffisamment imbibé. 4. Appliquer la résine d’étanchéité sur la surface (env. 2,00 kg/m²) et placer la première découpe pour la surface en veillant à éliminer toutes les bulles. Recouvrir généreusement (env. 1,00 kg/m²) sa face supérieure de résine. Remarque importante : Avant de mélanger le contenu du récipient, préparer toutes les découpes de non-tissé nécessaires ! Conseil : On peut également utiliser des pièces préformées de non-tissé (non comprises dans le kit) Étanchéité des ventilations 1. Coller de la bande sur les ventilations pour délimiter la hauteur d’étanchéité et sur la surface pour délimiter sa largeur (min. 10 cm). Préparer des découpes de non-tissé spécial Triflex Voile de renfort. Tube : largeur : 20 cm, longueur : circonf. du tube + 5 cm. Découper des franges de 5 cm de long et 1 cm de large sur toute la longueur. 5. Appliquer la résine d’étanchéité sur la surface et placer la deuxième découpe pour la surface en veillant à éliminer toutes les bulles. Recouvrir généreusement sa face supérieure de résine. 6. Retirer la bande adhésive lorsque le produit est encore frais. Terminé ! ées Pièces préform issé de voile non-t Pièce préformée Angle 13 Pour plus d‘informations, se reporter à l‘adresse figurant au verso ou se rendre sur notre site Internet www.triflex.com. Verarbeitungsanleitung Triflex ProDetail 09/2015 Pièce préformée Tube Istruzioni di lavorazione Triflex ProDetail® Informazioni generali Sicurezza sul lavoro: Durante la lavorazione di prodotti chimici per l’edilizia dovrebbero essere sempre rispettate le seguenti misure di protezione: Non fumare, mangiare o bere durante il lavoro. Evitare il contatto con gli occhi e la pelle. Tenere lontano da cibi e bevande. Utilizzare abbigliamento di protezione personale. Rispettare le schede di sicurezza. IT Avvertenza importante: Durante il trasporto, lo stoccaggio e la lavorazione osservare le schede tecniche e di sicurezza, l’identificazione delle confezioni, le avvertenze di pericolo e i consigli relativi alla sicurezza presenti sulle confezioni. In caso di ulteriori domande: Rep. Ambiente e sicurezza, telefono +49 571 9339-176 Stoccaggio: Conservare i contenitori chiusi ermeticamente. Mantenere le confezioni asciutte e senza possibilità di congelamento in un luogo fresco e ben aerato. Proteggere dal caldo e dalla radiazione solare diretta. Stabilità di stoccaggio almeno 6 mesi. In inverno stoccare le confezioni per quanto possibile a temperatura ambiente prima della lavorazione. Requisiti del sottofondo: L’adeguatezza del sottofondo deve sempre essere verificata a seconda dell’edificio. Il sottofondo deve essere pulito, asciutto e privo di velature di cemento, polvere, olio e grasso e altre impurità che riducono l’aderenza. Pretrattamento del sottofondo Sottofondo Acciaio inox Acciaio zincato Alluminio Asfalto Calcestruzzo Calcestruzzo leggero Intonaco/muratura Legno Malta, modificata con resina Membrane bitume polimero (PY-E) e modificate (SBS) Membrane bitume polimero (PY-P) e modificate (APP) Membrane sintetiche Rame Resina bituminosa a caldo Resina bituminosa a freddo Sagome in PVC duro Sistemi termoisolanti a cappotto Solette Verniciature Vetro Vetro acrilico Vetroresina / corona per il montaggio di lucernario a cupola Zinco (1) Triflex 14 Condizioni di lavorazione: I prodotti Triflex possono essere lavorati all’interno del campo di temperature indicato sull’etichetta della confezione e nelle informazioni sul prodotto. Durante la lavorazione in interni di prodotti Triflex contenenti solventi o monomeri e in caso di superamento dei valori limite per l’aria è necessario indossare maschere antigas (vedere il punto 8 della scheda di sicurezza). Inoltre deve essere prevista una ventilazione obbligatoria con almeno 7 ricambi d’aria all’ora. Misure in caso di interruzione dei lavori: In caso di interruzioni superiori alle 12 ore o di formazione di sporco per pioggia, ecc., la giunzione deve essere attivata con il detergente Triflex. Tempo di ventilazione almeno 20 min. Le giunzioni degli impermeabilizzanti devono sovrapporsi incl. tessuto non tessuto speciale Triflex per almeno 10 cm. Questo vale anche per i collegamenti alle estremità e i dettagli con Triflex ProDetail. Lavorazione e consumi Primer: Applicare il primer formando uno strato sottile con un rullo per radiatori. Consumo ca. 0,40 kg/m². Applicare il primer innanzitutto sugli elementi sporgenti, quindi su quelli orizzontali. I primer necessari non contenuti nei set devono essere ordinati a parte. Impermeabilizzazione: Applicare abbondante miscela lavorabile Triflex ProDetail con un rullo per radiatori (circa 2,00 kg/m²) e distribuire uniformemente. Inserire nella superficie fresca il tessuto non tessuto Triflex tagliato, evitando la formazione di bolle. Coprire infine il tessuto non tessuto con un ulteriore strato di Triflex ProDetail (circa 1,00 kg/m²). Avvertenza importante: L’aderenza al sottofondo va sempre verificata in base all’edificio! Pretrattamento Strofinare con il detergente Triflex, irruvidire con una mola Strofinare con il detergente Triflex, irruvidire con una mola Strofinare con il detergente Triflex, irruvidire con una mola Levigare, fresare o pallinare senza polvere Levigare, fresare o pallinare senza polvere Rimuovere la verniciatura Levigare, fresare o pallinare senza polvere Verifica adesione su richiesta Strofinare con il detergente Triflex, irruvidire con una mola Verifica adesione Verifica adesione Strofinare con il detergente Triflex, irruvidire la superficie Levigare, fresare o pallinare senza polvere Levigare, rimuovere completamente Strofinare con Triflex Detergente Vetro, verifica adesione Strofinare con il detergente Triflex, irruvidire con una mola Strofinare con il detergente Triflex, irruvidire con una mola Strofinare con il detergente Triflex, irruvidire con una mola Primer (1) (3) Nessuna applicazione di primer (2) Nessuna applicazione di primer (2) Nessuna applicazione di primer (2) Triflex Cryl Primer 222 Triflex Cryl Primer 276 Triflex Cryl Primer 276 Triflex Cryl Primer 276 Triflex Cryl Primer 276 Triflex Pox R 100 Nessuna applicazione di primer Triflex Cryl Primer 222 su richiesta (3) Nessuna applicazione di primer (2) Triflex Cryl Primer 222 Triflex Cryl Primer 222 Nessuna applicazione di primer Triflex Pox R 100 Triflex Cryl Primer 276 Vedere Sottofondo Triflex Primer Vetro Nessuna applicazione di primer Nessuna applicazione di primer Nessuna applicazione di primer (2) ProDetail Starterset contiene il primer Triflex Cryl Primer 276. Triflex ProDetail Mini Starterset non contiene alcun primer. Qualora, in base alla tabella, fosse necessario un primer non contenente nel set, esso dovrà essere ordinato a parte. all’irruvidire: strofinare con il detergente Triflex, applicare Triflex Metal Primer (la ruggine distaccata e le incrostazioni di ruggine devono essere preventivamente rimosse). (3) Su richiesta forniamo informazioni su altri sottofondi. ([email protected]) (2) Alternativa Verarbeitungsanleitung Triflex ProDetail 09/2015 Istruzioni di lavorazione Triflex ProDetail® Contenuto della confezione Triflex ProDetail IT Triflex ProDetail Triflex ProDetail Starterset Materiale 15 kg Triflex ProDetail 3 x 0,10 kg Catalizzatore Triflex (estiva) 6 x 0,10 kg Catalizzatore Triflex (inverno) Materiale 3 x 3,75 kg Triflex ProDetail 1 x 2,00 kg Triflex Cryl Primer 276 4 x 0,10 kg Catalizzatore Triflex 1 l Detergente Triflex 15 m Tessuto non tessuto Triflex, larghezza 26 cm Utensili 1 secchio in plastica con coperchio 5 aste di legno per miscelazione 5 rulli per radiatori + staffa 1 pennello per radiatori 1 paio di forbici di acciaio fuso 1 rotolo di nastro adesivo crespo Triflex 1 paio di guanti di gomma 2 panni Istruzioni di lavorazione Pretrattamento del sottofondo 1. I sottofondi assorbenti (ad es. calcestruzzo, asfalto) devono essere levigati con un disco diamantato per calcestruzzo al fine di ottenere un sottofondo solido e adesivo. 2. Prima di eseguire il rivestimento, sgrassare i metalli o il PVC con il detergente Triflex, quindi irruvidire la superficie (v. foto seguenti). 3. In caso di superfici di dimensioni maggiori si utilizza una mola. 4. In caso di superfici di dimensioni minori, carta abrasiva. 2. Mischiare bene la resina base. 3. Eventualmente prelevare la quantità necessaria. Aggiungere la parte di catalizzatore Triflex corrispondente alla quantità prelevata e mescolare facendo attenzione a non formare grumi. Tempo di miscelazione almeno 2 min. 4. Prima della miscelazione, applicare nastro adesivo su collegamenti e dettagli. Applicare il primer formando uno strato sottile. Strato di primer 1. Miscelare Triflex Cryl Primer 276. Osservare le istruzioni per la miscelazione riportate sulla confezione. Verarbeitungsanleitung Triflex ProDetail 09/2015 15 Istruzioni di lavorazione Triflex ProDetail® Istruzioni di lavorazione Miscelazione dell‘impermeabilizzazione Avvertenza importante: Osservare le istruzioni per la miscelazione riportate sulla confezione. Nel caso di prelievo di parti, queste ultime dovranno essere calcolate in base alle istruzioni di miscelazione. IT 1. Miscelare Triflex ProDetail. Osservare le istruzioni per la miscelazione riportate sulla confezione. 2. Mischiare bene la resina base. 3. Eventualmente prelevare la quantità necessaria. Aggiungere la parte di catalizzatore Triflex corrispondente alla quantità prelevata e mescolare facendo attenzione a non formare grumi. Tempo di miscelazione almeno 2 min. Impermeabilizzazione di collegamenti a parete vedi Suggerimento: a 17 sagome a pagin 16 1. Applicare nastro adesivo sul collegamento alla parete all’altezza dell’impermeabilizzazione. 2. Realizzare ritagli di tessuto non tessuto speciale Triflex per angoli interni ed esterni: ritagli circolari (circa Ø 10 cm) con taglio fino al centro. Suggerimento: in alternativa è possibile utilizzare sagome in tessuto non tessuto. 3. Angolo esterno: Stendere abbondante resina d’impermeabilizzazione con un pennello o un rullo per radiatori e applicare l’angolo esterno ritagliato evitando la formazione di bolle d’aria. 4. Quindi ricoprire abbondantemente l’angolo esterno collocato con un altro strato di resina d’impermeabilizzazione. 5. Angolo interno: Stendere abbondante resina d’impermeabilizzazione con un pennello o un rullo per radiatori e applicare l’angolo interno ritagliato evitando la formazione di bolle d’aria. 6. Quindi ricoprire abbondantemente l’angolo interno collocato con un altro strato di resina d’impermeabilizzazione. 7. Stendere abbondante resina d’impermeabilizzazione (circa 2,00 kg/m²) con un rullo per radiatori nell’area del collegamento alla parete. 8. Quindi collocare il tessuto non tessuto Triflex in ritagli o dal rotolo nella resina fresca evitando la formazione di bolle d’aria e assicurarsi che il tessuto non tessuto sia sufficientemente impregnato. 9. Negli angoli interni, il tessuto non tessuto viene applicato intorno all’angolo per 5 cm e la piega sul fondo viene tagliata trasversalmente fino all’angolo. Quindi si sovrappone la parte tagliata, facendo attenzione a non sovrapporre pezzi asciutti di tessuto non tessuto. 10. Negli angoli esterni, il tessuto non tessuto viene applicato per 5 cm oltre l’angolo e viene tagliato sul fondo fino all’angolo. Quindi la parte tagliata viene fatta girare intorno all’angolo e l’area libera sul fondo viene coperta con un ulteriore ritaglio di tessuto non tessuto. 11. Ricoprire poi il tessuto non tessuto inserito con un abbondante strato di resina d’impermeabilizzazione (circa 1,00 kg/m²). 12. Rimuovere il nastro adesivo quando il materiale è ancora fresco. Fatto! Verarbeitungsanleitung Triflex ProDetail 09/2015 Istruzioni di lavorazione Triflex ProDetail® Istruzioni di lavorazione Impermeabilizzazione di pozzetti 1. Applicare nastro adesivo sulla superficie alla larghezza dell’impermeabilizzazione e chiudere il pozzetto con un panno. Pulire il pozzetto con il detergente Triflex e irruvidire manualmente con carta abrasiva. 2. Realizzare ritagli di tessuto non tessuto Triflex. Pozzetto: largh.: 15 cm, lungh.: circonf. pozzetto + 5 cm Il tessuto non tessuto viene tagliato a forma di stella su tutta la lunghezza per 5 cm di profondità e 1 cm di larghezza. 3. Superficie: 1 pezzo di tessuto non tessuto tagliato al centro a forma di stella in base al diametro del pozzetto. 4. Stendere abbondante resina d’imper meabilizzazione (circa 2,00 kg/m²) all’interno del pozzetto e intorno ad esso e collocare il ritaglio per il pozzetto evitando la formazione di bolle d’aria. Quindi ripiegare le parti tagliate a stella sulla superficie e ricoprire abbondantemente il tessuto non tessuto dall’alto (circa 1,00 kg/m²). 5. Stendere abbondante resina d’impermeabilizzazione (circa 2,00 kg/m²) sulla superficie e nel pozzetto. 6. Collocare il tessuto non tessuto per la superficie evitando la formazione di bolle d’aria e ripiegare i ritagli a forma di stella con il pennello nel pozzetto. 7. Ricoprire quindi il tessuto non tessuto dall’alto con un abbondante strato di resina (circa 1,00 kg/m²). 8. Togliere il panno dal pozzetto e rimuovere il nastro adesivo quando il materiale è ancora fresco. Fatto! 3. Stendere abbondante resina d’imper meabilizzazione (circa 2,00 kg/m²) con un rullo per radiatori sul tubo e sulla superficie. Quindi inserire il ritaglio di tessuto non tessuto per il tubo nella resina fresca evitando la formazione di bolle d’aria e assicurarsi che il tessuto non tessuto sia sufficientemente impregnato. 4. Stendere la resina d’impermeabilizzazione sulla superficie (circa 2,00 kg/m²), collocare il primo ritaglio per la superficie evitando la formazione di bolle d’aria e coprire abbondantemente dall’alto (circa 1,00 kg/m²). Avvertenza importante: Prima di miscelare la confezione, è necessario preparare tutti i ritagli di tessuto non tessuto necessari! Suggerimento: in alternativa è possibile utilizzare sagome in tessuto non tessuto. (non fanno parte del set) IT Impermeabilizzazione di aeratori 1. Applicare nastro adesivo sull’aeratore all’altezza e sulla superficie alla larghezza dell’impermeabilizzazione (min. 10 cm). Realizzare ritagli di tessuto non tessuto Triflex. Tubo: largh.: 20 cm, lungh.: circonf. tubo + 5 cm. Il tessuto non tessuto viene tagliato a strisce su tutta la lunghezza per 5 cm di profondità e 1 cm di larghezza. 5. Stendere la resina d’impermeabilizza-zione sulla superficie, collocare il secondo ritaglio per la superficie evitando la formazione di bolle d’aria e coprire abbondantemente dall’alto. 2. Superficie: 2 pezzi di tessuto non tessuto tagliati su un lato a forma di U in base al diametro del tubo. I due pezzi di tessuto non tessuto devono sovrapporsi nell’area del tubo per almeno 5 cm! 6. Rimuovere il nastro adesivo quando il materiale è ancora fresco. Fatto! suto Sagome in tes non tessuto Sagoma angolo 17 Ulteriori informazioni sono disponibili all‘indirizzo riportato sul retro oppure sul sito www.triflex.com. Verarbeitungsanleitung Triflex ProDetail 09/2015 Sagoma tubo Instrukcja obróbki Triflex ProDetail® Informacje ogólne Bezpieczeństwo pracy: Podczas obróbki chemii budowlanej należy zasadniczo przestrzegać następujących środków bezpieczeństwa: Podczas pracy nie palić tytoniu, nie jeść ani nie pić. Unikać kontaktu produktu z oczami i skórą. Przechowywać produkt z dala od żywności i napojów. Stosować osobistą odzież ochronną. Przestrzegać kart charakterystyki. PL Ważna informacja: Podczas transportu, przechowywania i obróbki należy przestrzegać kart charakterystyki oraz instrukcji technicznych, oznaczeń, jak również wskazówek dotyczących zagrożeń i bezpieczeństwa umieszczonych na opakowaniach produktów. W razie pytań prosimy o kontakt: Dział Środowiska i Bezpieczeństwa, tel. +49 571 9339-176 Przechowywanie: Pojemniki przechowywać szczelnie zamknięte. Opakowanie przechowywać zabezpieczone przed wilgocią i mrozem w chłodnym, dobrze wentylowanym miejscu. Chronić przez gorącem oraz bezpośrednim promieniowaniem słonecznym. Stabilność podczas przechowywania wynosi co najmniej 6 miesięcy. Zimą w miarę możliwości przechowywać opakowanie przed obróbką w temperaturze pokojowej. Wymogi odnośnie podłoża: Przystosowanie podłoża należy zawsze zweryfikować w odniesieniu do konkretnego obiektu. Podłoże powinno być czyste, suche i wolne od resztek cementu, pyłu, oleju lub smaru oraz wszelkich innych zanieczyszczeń osłabiających jego przyczepność. Przygotowanie podłoża Podłoże Aluminium Asfalt Beton Beton lekki Cynk Drewno Elementy kształtowe z PVC, twarde Jastrych Masa bitumiczna na gorąco Masa bitumiczna na zimno Miedź Papa polimerowo-bitumiczna (PY-P) modyf. (APP) Papa polimerowo-bitumiczna (PY-E) modyf. (SBS) Pasma z tworzyw sztucznych Powłoki malarskie Stal, ocynkowana Stal szlachetna Szkło Szkło akrylowe TWS / Wieniec nasadowy świetlika kopułowego Tynk/mur Zaprawa murarska, modyf. tworzywem sztucznym Zespolone systemy termoizolacyjne (1) Zestaw 18 Warunki obróbki: Produkty Triflex mogą być poddawane obróbce w zakresie temperatur podanym na etykiecie opakowania lub w ulotce informacyjnej. Podczas obróbki produktów Triflex zawierających rozpuszczalniki lub monomery we wnętrzach oraz w przypadku przekroczenia ich maksymalnego stężenia w powietrzu wymagane jest stosowanie ochrony dróg oddechowych (patrz punkt 8 Karty charakterystyki). Wymagana jest ponadto wentylacja wymuszona, zapewniająca co najmniej 7-krotną wymianę powietrza w ciągu godziny. Środki wymagane w przypadku przerw w pracy: W przypadku przerw w pracy dłuższych niż 12 godzin oraz zanieczyszczenia wskutek deszczu należy odnowić łączenia środkiem czyszczącym Triflex. Czas odparowywania wynosi co najmniej 20 minut. Łączenia z innymi uszczelnieniami muszą był wykonane z użyciem włókniny Triflex i zachodzić na siebie co najmniej na 10 cm. Dotyczy to również łączeń i krawędzi zewnętrznych oraz uszczelnień detali wykonywanych za pomocą Triflex ProDetail. Obróbka i zużycie Podkład gruntujący: Podkład nałożyć cienką warstwą za pomocą wałka do grzejników. Zużycie ok. 0,40 kg/m². Najpierw zagruntować powierzchnie pionowe, a następnie poziome. Wymagane podkłady gruntujące, które nie są dostarczane w zestawie, należy zamówić oddzielnie. Masa uszczelniająca: Za pomocą wałka do grzejników nałożyć grubą warstwę plastycznej mieszanki Triflex ProDetail (ok. 2,00 kg/m²) i równomiernie ją rozprowadzić. Do świeżo pokrytej powierzchni przyłożyć odpowiednio dociętą włókninę Triflex i usunąć spod niej pęcherzyki powietrza. Następnie pokryć włókninę z wierzchu kolejną warstwą Triflex ProDetail (ok. 1,00 kg/m²). Ważna informacja: Przyczepność do podłoża należy zawsze zweryfikować w odniesieniu do konkretnego obiektu! Sposób przygotowania Oczyścić środkiem czyszczącym Triflex, zmatowić tarczą szlifierską Wyszlifować, wyfrezować lub wyśrutować bezpyłowo Wyszlifować, wyfrezować lub wyśrutować bezpyłowo Oczyścić środkiem czyszczącym Triflex, zmatowić tarczą szlifierską Usunąć powłoki malarskie Przetrzeć środkiem czyszczącym Triflex, zmatowić powierzchnię Wyszlifować, wyfrezować lub wyśrutować bezpyłowo Próba przyczepności Próba przyczepności Oczyścić środkiem czyszczącym Triflex, zmatowić tarczą szlifierską Próba przyczepności na zapytanie Wyszlifować, całkowicie usunąć Oczyścić środkiem czyszczącym Triflex, zmatowić tarczą szlifierską Oczyścić środkiem czyszczącym Triflex, zmatowić tarczą szlifierską Wyczyścić za pomocą środka czyszczącego do szkła Triflex, próba przyczepności Oczyścić środkiem czyszczącym Triflex, zmatowić tarczą szlifierską Oczyścić środkiem czyszczącym Triflex, zmatowić tarczą szlifierską Wyszlifować, wyfrezować lub wyśrutować bezpyłowo Podkład gruntujący (1) (3) Bez podkładu gruntującego (2) Triflex Cryl Primer 222 Triflex Cryl Primer 276 Triflex Cryl Primer 276 Bez podkładu gruntującego (2) Triflex Cryl Primer 276 Bez podkładu gruntującego Triflex Cryl Primer 276 Triflex Cryl Primer 222 Triflex Cryl Primer 222 Bez podkładu gruntującego (2) Triflex Cryl Primer 222 Bez podkładu gruntującego na zapytanie (3) Patrz podłoże Bez podkładu gruntującego (2) Bez podkładu gruntującego (2) Triflex Glas Primer Bez podkładu gruntującego Bez podkładu gruntującego Triflex Cryl Primer 276 Triflex Pox R 100 Triflex Pox R 100 startowy Triflex ProDetail zawiera podkład gruntujący Triflex Cryl Primer 276. Mini zestaw startowy Triflex ProDetail nie zawiera podkładu gruntującego. Jeżeli zgodnie z tabelą potrzebny jest podkład nie dostarczany w zestawie, należy zamówić go oddzielnie. do matowienia: Przetrzeć środkiem czyszczącym Triflex, zagruntować przy użyciu Triflex Metal Primer. (Wcześniej należy usunąć oderwane kawałki i skorupy rdzy). (3) Na życzenie udzielimy informacji o innych rodzajach podłoża. ([email protected]) (2) Alternatywnie Verarbeitungsanleitung Triflex ProDetail 09/2015 Instrukcja obróbki Triflex ProDetail® Zawartość opakowania Triflex ProDetail PL Triflex ProDetail Zestaw startowy Triflex ProDetail Materiały Triflex ProDetail 15 kg Katalizator Triflex 3 x 0,10 kg (lato) Katalizator Triflex 6 x 0,10 kg (zima) Materiały Triflex ProDetail 3 x 3,75 kg Triflex Cryl Primer 276 1 x 2,00 kg Katalizator Triflex 4 x 0,10 kg Środek czyszczący Triflex 1 l Włóknina Triflex o szer. 26 cm, 15 m Narzędzia 1 wiadro z tworzywa sztucznego z pokrywą 5 listewek do mieszania 5 wałków do grzejników + rączka 1 pędzel do grzejników 1 nożyczki ze stali lanej 1 rolka papierowej taśmy samoprzylepnej 1 para rękawic gumowych 2 ścierki Instrukcja obróbki Przygotowanie podłoża 1. Chłonne podłoża (np. beton, asfalt) wyszlifować diamentową szlifierką do betonu, aby uzyskać ich odpowiednią przyczepność i nośność. 2. Metal lub PCW odtłuścić przed powleczeniem powierzchni środkiem czyszczącym Triflex, a następnie zmatowić (patrz kolejne ilustracje). 3. W przypadku większych powierzchni należy użyć tarczy szlifierskiej. 4. Do mniejszych powierzchni użyć papieru ściernego. 2. Dokładnie zamieszać żywicę bazową. 3. W razie potrzeby odjąć potrzebną część. Wmieszać odpowiednią dla odjętej części ilość katalizatora Triflex, uważając, by nie powstały grudki. Mieszać przez co najmniej 2 minuty. 4. Przed sporządzeniem masy uszczelniającej okleić przyłącza i detale taśmą. Nałożyć cienką warstwę podkładu gruntującego. Podkład gruntujący 1. Zamieszać Triflex Cryl Primer 276. Przestrzegać instrukcji mieszania na opakowaniu. Verarbeitungsanleitung Triflex ProDetail 09/2015 19 Instrukcja obróbki Triflex ProDetail® Instrukcja obróbki Sporządzanie masy uszczelniającej Ważna informacja: Przestrzegać instrukcji mieszania na opakowaniu. W przypadku odjęcia potrzebnej ilości należy wyliczyć ją zgodnie z instrukcją mieszania. PL 1. Sporządzić masę Triflex ProDetail. Przestrzegać instrukcji mieszania na opakowaniu. 2. Dokładnie zamieszać żywicę bazową. 3. W razie potrzeby odjąć potrzebną część. Wmieszać odpowiednią dla odjętej części ilość katalizatora Triflex, uważając, by nie powstały grudki. Mieszać przez co najmniej 2 minuty. Uszczelnienie łączenia ze ścianą trz Wskazówka: pa a 21 kształtki stron 20 1. Okleić łączenie ze ścianą taśmą do uszczelnianej wysokości. 2. Przygotować z włókniny Triflex wykroje do zabezpieczenia naroży wewnętrznych i zewnętrznych: Okrągły wykrój (Ø ok. 10 cm) z nacięciem do środka. Wskazówka: Alternatywnie należy użyć kształtek z włókniny 3. Naroże zewnętrzne: Położyć grubą warstwę żywicy uszczelniającej za pomocą pędzla lub wałka i umieścić przygotowany wykrój w narożu zewnętrznym, usuwając spod niego pęcherzyki powietrza. 4. Następnie pokryć zabezpieczone naroże zewnętrzne kolejną grubą warstwą żywicy uszczelniającej. 5. Naroże wewnętrzne: Położyć grubą warstwę żywicy uszczelniającej za pomocą pędzla lub wałka i umieścić przygotowany wykrój w narożu wewnętrznym, usuwając spod niego pęcherzyki powietrza. 6. Następnie pokryć zabezpieczone naroże wewnętrzne kolejną grubą warstwą żywicy uszczelniającej. 7. Za pomocą wałka do grzejników nałożyć grubą warstwę żywicy uszczelniającej (ok. 2,00 kg/m²) na obszar łączenia ze ścianą. 8. Następnie przyłożyć do żywicy włókninę Triflex w postaci wykroju lub bezpośrednio z rolki, usuwając spod niej pęcherzyki powietrza i zwracając uwagę, aby była ona dostatecznie nasączona żywicą. 9. W narożach wewnętrznych należy ułożyć 5 cm wokół naroża, a fałdę powstałą przy podłodze naciąć aż do samego rogu. Następnie nałożyć na siebie oba pasma w miejscu nacięcia, uważając, by żaden z łączonych fragmentów włókniny nie był suchy. 10. W narożach zewnętrznych należy ułożyć 5 cm włókniny aż do naroża, a fałdę powstałą przy podłodze naciąć aż do samego rogu. Następnie wykonać nacięcie przy rogu i przykryć wolny fragment podłogi dodatkowym wykrojem z włókniny. 11. Następnie pokryć nałożoną włókninę grubą warstwą żywicy uszczelniającej (ok. 1,00 kg/m²). 12. Usunąć taśmę jeszcze przed zastygnięciem żywicy. Gotowe! Verarbeitungsanleitung Triflex ProDetail 09/2015 Instrukcja obróbki Triflex ProDetail® Instrukcja obróbki Uszczelnienie wpustu ściekowego 1. Okleić powierzchnię przeznaczoną do uszczelnienia i zatkać wpust ściekowy ścierką. Oczyścić wpust ściekowy środkiem czyszczącym Triflex, a następnie zmatowić ręcznie papierem ściernym. 2. Przygotować wykroje z włókniny Triflex. Wpust ściekowy: Szerokość: 15 cm, długość: obwód wpustu ściekowego + 5 cm. Włókninę naciąć gwieździście na całej długości na głębokość 5 cm i szerokość 1 cm. 3. Powierzchnia wokół: 1 kawałek włókniny, pośrodku którego wykonano gwieździste nacięcia pokrywające średnicę wpustu ściekowego. 4. Nałożyć grubą warstwę żywicy uszczelniającej we wnętrzu oraz wokół wpustu ściekowego (ok. 2,00 kg/m²), po czym przyłożyć wykrój usuwając spod niego pęcherzyki powietrza. Następnie założyć gwieździste wycięcia na powierzchnię wokół studzienki i ponownie pokryć wierzch włókniny grubą warstwą żywicy (ok. 1,00 kg/m²). 5. Na oklejoną powierzchnię wokół oraz wewnątrz wpustu ściekowego położyć grubą warstwę żywicy uszczelniającej (ok. 2,00 kg/m² 6. Przyłożyć przygotowany fragment włókniny do zaznaczonej powierzchni i za pomocą pędzla założyć gwieździste wycięcia do wnętrza wpustu ściekowego. 7. Następnie pokryć wierzch włókniny grubą warstwą żywicy (ok. 1,00 kg/m²). 8. Wyjąć ścierkę ze wpustu ściekowego i usunąć taśmę jeszcze przed zastygnięciem żywicy. Gotowe! 2. Powierzchnia wokół: 2 kawałki włókniny z jednostronnym wycięciem w kształcie litery U o szerokości odpowiadającej średnicy rury. Oba kawałki powinny zachodzić na siebie wokół rury na co najmniej 5 cm! 3. Za pomocą wałka do grzejników lub pędzla nałożyć grubą warstwę żywicy uszczelniającej (ok. 2,00 kg/m²) na rurę i powierzchnię wokół niej. Następnie przyłożyć wykrój do pokrytej świeżą żywicą rury, usuwając pęcherzyki powietrza i zwracając uwagę na dostateczne nasączenie włókniny. 4. Nałożyć żywicę uszczelniającą na powierzchnię wokół wywietrznika (ok. 2,00 kg/m²), przyłożyć pierwszy wykrój usuwając pęcherzyki powietrza, po czym pokryć włókninę z wierzchu grubą warstwą żywicy (ok. 1,00 kg/m²). Ważna informacja: Przez sporządzeniem masy uszczelniającej należy przygotować wszystkie potrzebne wykroje z włókniny! Wskazówka: Kształtki z wł Alternatywnie należy użyć kształtek z włókniny (Nie wchodzą w skład zestawu) PL Uszczelnienie wywietrznika 1. Okleić wywietrznik na wysokość, a powierzchnię wokół niego na szerokość (min. 10 cm), wyznaczając powierzchnię przeznaczoną do uszczelnienia. Przygotować wykroje z włókniny Triflex. Rura: Szerokość: 20 cm, długość: obwód rury + 5 cm. We włókninie na całej długości naciąć paski o głębokości 5 cm i szerokości 1 cm. 5. Nałożyć żywicę uszczelniającą na powierzchnię wokół wywietrznika, przyłożyć drugi wykrój i ponownie pokryć wierzch włókniny grubą warstwą żywicy. 6. Usunąć taśmę jeszcze przed zastygnięciem żywicy. Gotowe! ókniny Kształtka do naroży 21 Dalsze informacje uzyskają Państwo pod adresem wskazanym na odwrocie lub na stronie internetowej www.triflex.com. Verarbeitungsanleitung Triflex ProDetail 09/2015 Kształtka do rur Verarbeitungsanleitung Triflex ProDetail® Anwendungsbeispiele Flachdach – Lichtkuppel Flachdach – Metalldach Flachdach – Doppel-T-Träger Flachdach – Lüftungsrohr Flachdach – Stege Flachdach – Wandanschluss Balkon – Gully und Rinne Balkon – Wandanschluss Balkon – Treppenstufen Parkdeck – Stützen Parkdeck – Schrammbord Parkdeck – Fuge 22 Verarbeitungsanleitung Triflex ProDetail 09/2015 Verarbeitungsanleitung Triflex ProDetail® Triflex International Triflex National Triflex International Triflex International (Global) International Triflex GmbH & Co. KG Karlstraße 59 32423 Minden Fon +49 571 38780-0 [email protected] www.triflex.com Deutschland Triflex GmbH & Co. KG Karlstraße 59 32423 Minden Fon +49 571 38780-0 [email protected] www.triflex.de Schweiz Triflex GmbH Hauptstrasse 36 6260 Reiden Fon +41 62 842 98 22 [email protected] www.triflex.com/ch Österreich Triflex GesmbH Operngasse 17–21 1040 Wien Fon +43 1 23060 8090 [email protected] www.triflex.at Frankreich Triflex France 22, Rue Maurice Labrousse 92160 Antony Fon +33 1 56 45 10 34 [email protected] www.triflex.fr Italien Triflex Italia Via Senigallia 18/2 Torre A 20161 Milano Fon +39 02 64672663 [email protected] www.triflex.com/it Großbritannien Triflex (UK) Limited Whitebridge Way Stone Staffordshire ST15 8JS Fon +44 1785 819119 [email protected] www.triflex.co.uk Niederlande Triflex BV Boerendanserdijk 35 8024 AE Zwolle Fon +31 38 4602050 [email protected] www.triflex.nl Belgien Triflex BVBA / SPRL Diamantstraat 6c 2200 Herentals Fon: +32 14 75 25 50 [email protected] www.triflex.be Polen Triflex Polska ul. Rzymowskiego 53 02-697 Warszawa Fon +48 22 548 01 56 [email protected] www.triflex.pl Verarbeitungsanleitung Triflex ProDetail 09/2015 23 091 Verarbeitungsanleitung ProDetail DE-EN-FR-IT-PL A4 09/2015 International Triflex GmbH & Co. KG Karlstrasse 59 | Germany 32423 Minden Fon +49 571 38780-0 [email protected] www.triflex.com
Scaricare