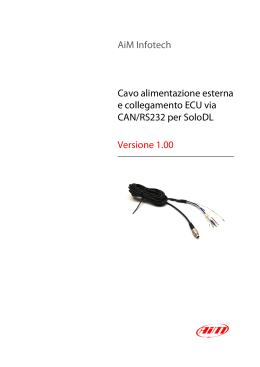
Manuale di montaggio
Centralina programmabile ECU Polini 2 e 4 cilindri
Questo documento supporta la versione attuale della centralina programmabile ECU e tutte le
versioni successive fino a quando il documento non sarà sostituito da una nuova edizione.
YAMAHA TMAX530 2012 - cod. CJP1063
Schema di montaggio della centralina
Dettaglio figura A
Collegamento sensore IAT (sensore aria)
1- Smontare lo sportellino del tunnel centrale.
2- Individuare il sensore IAT situato a destra sotto la cassa filtro guardando la moto da sopra.
3- Collegare il cablaggio ECU facendo un ponte come illustrato nella figura A.
Dettaglio figura B
Collegamento 12 V sotto chiave
1- Collegare il cavo ROSSO ECU al cavo NERO della luce di posizione dello scooter come
illustrato nella figura B.
2- Collegare il cavo NERO ECU (massa) a una delle viti in ferro per il fissaggio degli
specchietti.
Dettaglio figura C
Sequenza iniettori
1- Individuare correttamente il cilindro N1: è il primo da sinistra guardando lo scooter da
sopra.
2- Connettere ECU al cilindro N1 collegando prima i cavi di colore BIANCO e MARRONE e in
seguito tutti gli altri (figura C).
Si consiglia di far passare i cavi anteriormente e poi montare la centralina ECU.
N.B.: per la redazione del presente manuale è stato impiegato un modello di scooter senza
ABS, pertanto è stato utilizzato il vano destinato a tale componente.
Manuale di montaggio versione 12053 Assembly manual
Polini ECU Programmable control unit – 2 and 4 cylinders
This document refers to the outstanding version of the ECU programmable control unit and
all the further versions till this will be replaced by a new edition.
YAMAHA TMAX530 2012 - cod. CJP1063
Control unit assembly diagram
Injectors (2 or 4 according to the bike model)
Injectors cables – USB cable – IAT wiring – Positive-Key- Negative-Conductor
Picture A-Picture B –Battery – IAT sensor
–
Detail of Picture A
IAT sensor connection (air sensor)
1-remove the door of the central tunnel
2-Find the IAT sensor placed on the right side under the filter box looking the bike from
above.
3-Connect the ECU wiring making a bridge as shown in picture A
Detail picture B
12 V connection under key
1- Connect the ECU RED wire to the BLACK one of the scooter sidelights as shown in picture
B.
2- Connect the ECU BLACK cable (earth) to one of the iron screw to fix the wing mirror
Detail picture C
Injector series
1-Find cylinder N.1: it’s the first from the left looking the scooter from above.
2-Connect the ECU to the cylinder N.1 by connecting first the WHITE and BROWN cables and
then the other ones (picture C).
We suggest making the cable pass on the rear side and the install the ECU control unit
Important: to draw up this manual a scooter without ABS has been used, so the
comportment dedicated to it has been used.
Assembly manual - version 120531
Manuel de montage
Unité de control programmable ECU Polini 2 et 4 cylindres
Ce document soutien la version actuelle de l’unité de control programmable ECU et toutes
les versions suivantes jusqu’au remplacement du document-même par une nouvelle édition.
YAMAHA TMAX530 2012 - Réf. CJP1063
Schéma de montage de l’unité de control
Détail figure A
Connexion capteur IAT (capteur de l’air)
1- Démonter la petite porte du tunnel central
2- Identifier le capteur IAT, placé à droite sous la boite du filtre, si on regarde la moto du
haut
3- connecter le câblages Jetprime en créant un pont comme montré en figure A
Détail figure B
Connexion 12V sous clé
1- Connecter le câble ROUJE ECU au câble NOIR du feu de position du scooter comme
montré en figure B.
2- Connecter le câble NOIR ECU (masse) à une des vis en fer pour le blocage des
rétroviseurs.
Détail figure C
Séquence injecteurs
1- Identifier correctement le cylindre N!: c’est le premier à gauche, si on regarde le scooter
du haut.
2- Connecter la ECU au cylindre N1 en connectant avant les câbles BLANC et MARRON et
après tous les autres (figure C)
On souhaite faire passer les câbles de la partie antérieure et après monter l’unité de control
ECU.
NOTA BENE: pour la rédaction de ce manuel on a utilisé un modèle de scooter sans ABS;
pour cette raison on a utilisé la cage destiné au dit composant
Manuale di montaggio versione 12053
Scaricare