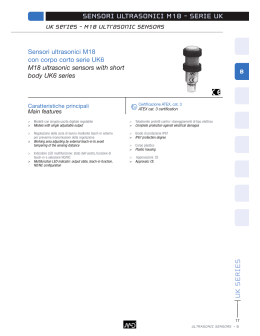
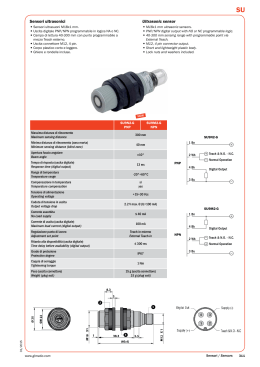
INTERRUTTORI DI PROSSIMITA’
AD ULTRASUONI
ULTRASONIC PROXIMITY
SWITCHES
109
INTERRUTTORI DI PROSSIMITA’ AD ULTRASUONI
ULTRASONIC PROXIMITY SWITCHES
UKS18-380
M18 cilindrici con portata regolabile fino a 380 mm con pulsante teach-in
M18 cylindrical sensors 380 mm adjustable distance with teach-in button ........pag. 111-112
UKS18-880
M18 cilindrici con portata regolabile fino a 880 mm con pulsante teach-in
M18 cylindrical sensors 880 mm adjustable distance with teach-in button ........pag. 111-112
UKS18-1500
M18 cilindrici con portata regolabile fino a 1500 mm con pulsante teach-in
M18 cylindrical sensors 1500 mm adjustable distance with teach-in button ..... pag. 111-112
UKS18-2100
M18 cilindrici con portata regolabile fino a 2100 mm con pulsante teach-in
M18 cylindrical sensors 2100 mm adjustable distance with teach-in button ......pag. 111-112
110
UKS18
Interruttori di prossimità ad ultrasuoni - Ultrasonic sensors proximity Switches
Sensori cilindrici M18 ad ultrasioni
M18 cylindrical ultrasonic sensors
• Diametro 18 mm
18 mm diameter
• Custodia plastica
Plastic housing
• Ridotte distanze della zona di non rilevamento
Very small blind zone
• Portate: UKS18-380 = 380 mm, UKS18-880 = 880 mm, UKS18-1500 = 1500 mm,
UKS18-380 = 2100 mm
Sensing distance: KS18-380 = 380 mm, UKS18-880 = 880 mm, UKS18-1500 = 1500 mm,
UKS18-380 = 2100 mm
• Programmazione distanze e uscite tramite tasto teach-in
Teach-in easy programming, single point or windows
• Versioni con uscita connettore M12 a 4 poli
M12 4-pole connector output version
• Versioni con uscite digitali PNP NO / NC programmabili
Digital output: PNP programmable NO / NC versions
• Versioni con uscite digitali + analogiche 0 ÷ 10V o 4 ÷ 20mA
Digital output + analog output 0 ÷ 10v or 4 ÷ 20mA versions
Caratteristiche - Features
Tensione di alimentazione / Power supply
Assorbimento / Power consumption
Carico minimo / Minumum load
Carico massimo uscita digitale / Maximum load digital output
Carico massimo uscita analogica / Maximum load analog output
Caduta di tensione / Voltage drop
Risoluzione / Resolution
Temperatura di funzionamento / Working temperature
Grado di protezione / IP rating
Custodia plastica / Plastic housing
15 ÷ 30 Vcc / Vdc
≤ 5 mA
3 kW
300 mA
200 mA
< 2,2 V @ 100 mA
1 mm
-20°C ÷ +70°C
IP67
ABS
Riferimenti con collegamento con connettore M12 / References with M12 connector
Dimensioni
Dimensions
A
B
80 mm
80 mm
80 mm
80 mm
57,5 mm
57,5 mm
57,5 mm
57,5 mm
Distanza minima Distanza massima Distanza regolabile
Minimum distance Maximum distance Adjustable distance
55 mm
100 mm
150 mm
200 mm
380 mm
880 mm
1500 mm
2100 mm
55 ÷ 380 mm
100 ÷ 880 mm
150 ÷ 1500 mm
200 ÷ 2100 mm
PNP NO / NC
UKS18-380PSCC5
UKS18-880PSCC5
UKS18-1500PSCC5
UKS18-2100PSCC5
PNP NO / NC
PNP NO / NC
+
+
USCITA ANALOGICA 0 ÷ 10 V USCITA ANALOGICA 4 ÷ 20 mA
0 ÷ 10 V ANALOG OUTPUT
4 ÷ 20 mA ANALOG OUTPUT
UKS18-380P10SCC5
UKS18-880P10SCC5
UKS18-1500P10SCC5
UKS18-2100P10SCC5
UKS18-380P20SCC5
UKS18-880P20SCC5
UKS18-1500P20SCC5
UKS18-2100P20SCC5
Per maggiori informazioni consultare il datasheet “uks18.pdf” presente sul sito web: www.selet.it / For more information see datasheet “uks18.pdf” on
this web site: www.selet.it
DIMENSIONI
DIMENSIONS
A
B
Programmazione uscita NO / NC - Programming output NO / NC
Per cambiare lo stato dell’ uscita premere il pulsante di teach-in per un tempo di 10 secondi.
Il led inizierà a lampeggiare velocemente. Rilasciare il pulsante. Quando il led terminerà di
lampeggiare la memorizzazione della funzione NO o NC sarà terminata.
Dalla fabbrica il sensore è impostato con la funzione NO.
To change the status of ‘exit press the teach-in for a period of 10 seconds.
The LED will flash quickly. Release the button. When the LED stops blinking the memeorizzazione
function NO or NC will be terminated.
From the factory the sensor is set with the NO.
Collegamenti - Connections
(1) MARRONE / BROWN +
PNP
NO / NC
(4) NERO / BLACK OUT
(3) BLU / BLUE -
(1) MARRONE / BROWN +
PNP
(2) BIANCO / WHITE OUT
NO / NC
+
ANALOGICA (3) BLU / BLUE ANALOG
(4) NERO / BLACK ANALOG
111
UKS18
Interruttori di prossimità - Proximity Switches
Modalità di programmazione - Calibration mode
IMPOSTAZIONE DI RILEVAMENTO DELL’ OGGETTO - IMPOSTAZIONE DI UNA DISTANZA P1
Presentare l’oggetto da rilevare alla distanza di lavoro.
Premere il pulsante di teach-in per 1 secondo.
Il led di segnalazione si illuminerà, dopo 2 secondi max ed il sensore memorizzerà la distanza di rilevamento impostata.
Spostare l’oggetto o mettere altro target nella zona morta di non rilevamento, premere il tasto di teach-in
per almeno 1 secondo.
Il led si spegnerà e lampeggerà per 5 volte. A questo punto il sensore ha memorizzato la posizione P2.
Dopo queste operazioni il sensore è pronto a funzionare. Il rilevamento sarà effettuato tra la distanza minima di rilevamento
propria del sensore e la distanza impostata P1.
SETTING THE DETECTION OF ‘OBJECT - SET OF DISTANCE P1
Present the object to be detected at a distance of work. Press the teach-in for 1 second. The LED will light up after 2 seconds max
and the sensor will store the sensing distance set. Move the object or put another target in the dead zone of non-detection,
press the teach-in for at least 1 second. The LED will turn off and blink 5 times. At this point, the sensor has stored the position P2.
After these operations, the sensor is ready for operation. The detection will be performed between the minimum distance of its
detection of the sensor and the set distance P1.
IMPOSTAZIONE DI RILEVAMENTO DELL’ OGGETTO - IMPOSTAZIONE DI UNA FINESTRA DI RILEVAMENTO
Presentare l’oggetto alla distanza massima di rilevamento desiderata.
Premere il pulsante di teach-in per 1 secondo.
Il led di segnalazione si illuminerà dopo 2 secondi max e il sensore memorizzerà la massima distanza di rilevamento impostata.
Spostare l’ oggetto alla distanza minima desiderata, che deve sempre essere superiore a quella della zona morta, e premere
il tasto teach-in per 1 secondo. Dopo che il led ha lampeggiato per 5 volte il sensore avrà memorizzato la distanza minima
di lavoro e sarà pronto a funzionare. Il rilevamento sarà effettuato nella finestra compresa tra il P1 e il P2.
Attenzione: Per entrambi i tipi di rilevamento (una sola distanza o una sola finestra) devono essere sempre impostati e
memorizzati i punti P1 e P2. Se in fase di programmazione della distanza l’ oggetto da rilevare è posto ad una distanza
superiore alla massima portata del sensore, i valori di programmazione risulteranno non ripetitivi ed inaffidabili.
Present the object to the desired maximum distance of detection.
Press the teach-in for 1 second.
The LED will light up after 2 seconds and the sensor will store the maximum sensing distance set.
Move the ‘subject to the minimum distance required, which must always be greater than that of the dead zone, and press
the teach-in button for 1 second. After the LED has flashed 5 times the transmitter will be stored on the minimum distance
work and is ready for use. The detection will be performed in the window between the P1 and the P2.
Please note: For both types of detection (only one distance or a single window) must always be set and
stored points P1 and P2 if during programming of the distance l ‘object to be detected is placed at a distance
greater than the maximum range of the sensor, the values of programming become no repetitive and unreliable.
Rilevamento oggetto con impostazione distanza - Object detection with remote setting
MASSIMA DISTANZA DI RILEVAMENTO / MAXIMUM SITANCE DETECTION
P2
ZONA MORTA / DEAD ZONE
ZONA DI RILEVAMENTO FINO A P1 / DETECTION ZONE TO P1
ZONA DI RILEVAMENTO
DETECTION ZONE
P1
Rilevamento oggetto con impostazione finestra - Detection with window set
MASSIMA DISTANZA DI RILEVAMENTO / MAXIMUM SITANCE DETECTION
P2
ZONA MORTA / DEAD ZONE
ZONA DI RILEVAMENTO TRA P2 E P1 / DETECTION ZONE BETWEEN P2 AND P1
P2
112
ZONA DI RILEVAMENTO
DETECTION ZONE
P1
Scaricare