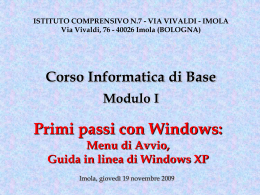
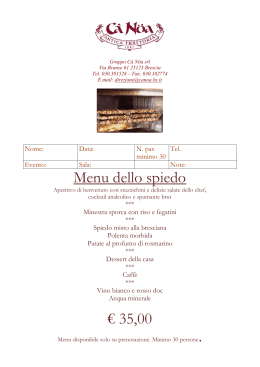
Start EVO ST100E - Fast user's manual 06/09/2013
Guida rapida all'uso dello strumento, si consiglia di scaricare il manuale completo dal sito www.pzracing.it
INTRODUZIONE
Start EVO è un cronometro digitale GPS con acquisizione e scarico dati bluetooth, Start EVO inoltre memorizza giri motore, temperatura motore, apertura gas oppure
temperatura gas di scarico.
Start EVO utilizza una tecnologia GPS a 10Hz che lo rende un prodotto unico nel suo genere, tale tecnologia a 10Hz permette di calcolare i tempi sul giro con estrema
precisione su qualsiasi tipo di veicolo.
N.B: Tutti i prodotti PZRacing sono resistenti all'acqua ma non impermeabili, non lavare il prodotto con lancia ad acqua in pressione, il prodotto potrebbe
danneggiarsi irreparabilmente.
INSTALLAZIONE
N.B: E' MOLTO IMPORTANTE POSIZIONARE IL CRONOMETRO GPS CORRETTAMENTE PER ESSERE SICURI DI AVERE UNA BUONA
RICEZIONE.
Grazie al ricevitore gps integrato sarà sufficiente posizionare il cronometro in un punto ben visibile al pilota, con la faccia superiore rivolta verso l'alto, non
posizionarlo in un punto coperto, il dispositivo deve avere piena visibilità del cielo per una migliore ricezione del segnale dai satelliti.
Una volta trovato il posto ideale si potrà fissare l’indicatore tramite l’apposito materiale adesivo che troverete nella confezione oppure utilizzare le due viti in
dotazione da avvitare nei due fori posteriori dello strumento. Sono inoltre disponibili dei supporti opzionali per l'installazione su auto ST101/C, manubrio ST101/M e
volante ST101/K.
Per il collegamenti dei cavi di Start EVO seguire le istruzioni riportate di seguito:
Alimentazione
Start EVO può essere alimentato sia con batterie interne che tramite batteria esterna 12V, all'acquisto il dispositivo viene fornito già con batterie installate.
Batterie interne: quando la spia della batteria di Start EVO si accende significa che il livello delle batterie è basso ed è necessario sostituirle. Rimuovere le quattro
viti nella parte posteriore del cronometro, estrarre le due batterie scariche tipo “AA” alloggiate sotto il display, inserire le nuove batterie, richiudere il cronometro, non
serrare troppo le viti per evitare di danneggiare la scocca.
Batteria esterna 12V: il filo nero dello spinotto a 6 poli dovrà essere collegato a “massa”, ovvero al telaio o direttamente sul morsetto negativo della batteria,
mentre il filo rosso dello spinotto a 6 poli dovrà essere collegato direttamente al “positivo” della batteria o in un punto in cui arrivi l’alimentazione 12V. Quando Start
EVO è collegato ad una batteria esterna sul display comparirà il simbolo della batteria fisso ad indicare che si utilizza una batteria esterna.
N.B: Non utilizzare entrambe le modalità contemporaneamente, il dispositivo verrebbe danneggiato.
Giri motore
Start EVO permette di rilevare i giri motore in due diverse modalità:
1- Rilevazione da segnale ECU, collegare il cavo Blu dello spinotto a 6 poli al segnale giri motore presente nel fascio di cavi presente dietro al cruscotto originale
oppure, ove non presente, al segnale di gestione degli iniettori, in questo caso collegarsi ad uno dei cavi NON in comune tra tutti gli iniettori rintracciabile anche in
centralina.
N.B: Per il rilevamento dei giri motore da ECU è necessario collegare il filo nero di alimentazione a “massa” anche se si utilizzano le batterie interne.
2- Rilevazione induttiva, collegare il cavetto con lo spinotto “RPM” sul relativo spinotto dello Start ed identificare che tipo di accensione è presente sul proprio
veicolo:
Bobina separata (cavo candela grosso dell'alta tensione): appoggiare per circa due centimentri il capo del cavo RPM al cavo della candela, fissare il cavo con delle
fascette.
Bobina integrata (bobina a “sigaro” sulla candela): effettuare delle spire intorno ai cavi di alimentazione della bobina, effettuare almeno 8/9 spire e fissare il cavo
con delle fascette.
In entrambi i casi assicurarsi che il cavo non riceva disturbi delle altre bobine, questo causerebbe valori dei giri motore errati, assicurarsi quindi che il cavo non passi
vicino ad altri cavi e cercare di fissare il cavo per tutta la sua lunghezza al telaio. In caso di valori errati dei giri motori controllare le impostazioni di settaggio nel
dispositivo.Si consiglia, ove possibile, di utilizzare la ricezione del segnale da ECU.
N.B: Non collegare il cavo con lo spinotto “RPM” elettricamente, il dispositivo verrebbe danneggiato.
N.B: Non utilizzare entrambe le modalità contemporaneamente
Temperatura motore
Avvitare il sensore di temperatura con filetto M6 sulla parte metallica dove si vuole conoscere la temperatura, ricordiamo che sono disponibili anche i raccordi
opzionali da applicare sul manicotto del radiatore del veicolo con i diametri da 10mm (Cod. SS201/10), 17mm (Cod. SS201/17) e 25mm (Cod. SS201/25).
Per quanto riguarda il collegamento del sensore basterà collegare lo spinotto del dispositivo con la sigla “TEMP” allo spinotto del sensore di temperatura.
Apertura gas (TPS)
Collegare il cavo Giallo dello spinotto a 6 poli direttamente al segnale del sensore di posizione della valvola a farfalla direttamente in centralina.
N.B: Per il TPS è necessario collegare il filo nero di alimentazione a “massa” anche se si utilizzano le batterie interne.
Temperatura gas di scarico (opzionale)
Seguire le istruzioni presenti nel manuale del prodotto ST103.
FUNZIONAMENTO
N.B.: Durante il conteggio è necessario spegnere lo strumento prima di togliere l'alimentazione al prodotto, nel caso in cui l'alimentazione venga a mancare
è possibile che la memorizzazione dei dati non avvenga correttamente e che non sia possibile scaricarli sul pc, se ciò avvenisse sarà necessario cancellare la
memoria con conseguente perdita dei dati. Per questo motivo sconsigliamo di collegare lo Start ad un positivo “sotto chiave” ma ad un'alimentazione fissa
in modo tale da evitare che l'alimentazione venga a mancare spegnendo il quadro del veicolo durante il conteggio.
Per accendere Start EVO si dovrà tener premuto per circa due secondi il tasto (↑ ON), durante il quale verrà visualizzato il nome del prodotto e la versione del
firmware, dopodiché entrerà in modalità "conteggio" in attesa di agganciarsi ai satelliti. Lo stato della ricezione satellitare è identificato dalla “S” (satellites) nella
parte destra del display:
S lampeggiante: i satelliti non sono ancora stati agganciati, attendere anche qualche minuto nel caso in cui sia la prima accensione quotidiana.
S fissa: i satelliti sono stati agganciati ma non è stato rilevato alcun traguardo. Se è la prima volta che siete in quel circuito è necessario eseguire la procedura di
memorizzazione del traguardo, se è già stata eseguita avete caricato la pista errata (vedere sezione “Track” del menu).
S fissa in negativo: il cronometro è pronto all'uso, i satelliti sono agganciati ed è stato rilevato il traguardo nelle vicinanze. Non vi resta che partire.
Start EVO è in grado di memorizzare 150 giri, 50 sessioni e 130minuti di dati, nel caso in cui lo spazio in memoria di uno dei valori venisse completato il dispositivo
visualizzerà la scritta “FULL MEMORY” e disinibirà il "conteggio" fino alla cancellazione di una parte o di tutta la memoria. Il tempo massimo per ogni giro è di 10
minuti dopodiché Start EVO si spegnerà automaticamente andando in time-out.
PZRacing – Via A. De Gasperi, 5 61032 Fano (PU) Italy – Tel: +39 0721 820434 Fax: +39 0721 837322 [email protected] – www.pzracing.it 1
Start EVO ST100E - Fast user's manual 06/09/2013
Start EVO è dotato di quattro schermate di visualizzazione, è possibile scorrere le schermate premendo il tasto (↑ ON) per un solo istante in modalità "conteggio".
SCREEN 1: Cronometro, sessione, giro, circuito, guadagno/ritardo, best.
SCREEN 2: Cronometro, sessione, giro, velocità, giri motore, temperatura motore, apertura farfalla/temp gas di scarico.
SCREEN 3: Cronometro, sessione, giro, velocità, giri motore, temperatura motore.
SCREEN 4: Cronometro, sessione, giro, velocità, giri motore, orario, contaore.
Per entrare nel "menù" è necessario premere il tasto centrale (OK/MENU), qui si trovano le varie voci e si potranno scorrere tramite i tasti laterali ( ↑ e ↓) o
selezionare tramite il tasto centrale (OK/MENU). Per lo spegnimento del dispositivo tenere premuto il tasto (↑ ΟΝ) per qualche secondo nella modalità "conteggio".
- LAPS: Laps, in questa voce del menù è possibile scorrere tutti i tempi memorizzati nelle varie sessioni tramite i tasti di direzione (↑ e ↓). Una volta entrati
selezionare la sessione desiderata, per confermarla premere il tasto centrale (OK/MENU), ad ogni giro è associata la sessione, il tempo, la velocità massima raggiunta
ed il nome del circuito.
- BEST: Best Laps, in questa voce del menù è possibile scorrere tutti i migliori tempi memorizzati e tutti i tempi ideali calcolati dallo strumento. Se non sono stati
inseriti gli intermedi il tempo ideale coinciderà con il best lap, se sono stati impostati gli intermedi il tempo ideale sarà calcolato sommando tutti i migliori intertempi
della sessione. Premere il tasto centrale (OK/MENU) per uscire e tornare al menu.
- MEMORY: Memory, in questa sezione è possibile visualizzare la percentuale di memoria utilizzata, i valori massimi ed il contaore. I valori massimi raggiunti non
verranno memorizzati e si cancelleranno automaticamente allo spegnimento del prodotto. Tramite i tasti di direzione (↑ e ↓) è possibile selezionare se cancellare
l’ultima sessione (LAST), tutta la memoria (ALL LAPS) oppure solo il contaore (COUNTER), confermando in seguito con il tasto centrale (OK/MENU).
- SAVE POS: Save position, in questa voce del menù sarà possibile memorizzare le coordinate degli intermedi e/o del traguardo nel caso in cui vi troviate in una pista
in cui non abbiate mai salvato tali coordinate, Start EVO è in grado di memorizzare le coordinate di 6 circuiti e nel caso in cui vi troviate in uno di questi basterà
selezionare il circuito salvato nella sezione del menù “TRACK”.
Per memorizzare le coordinate entrare nella voce “SAVE POS” premendo il tasto (OK/MENU), verrà visualizzata la scritta “INTERMED. 1” procedere con il veicolo
fino al punto in cui si vuole vengano memorizzate le coordinate del “primo” intermedio e premere nuovamente il pulsante (OK/MENU), verrà visualizzata la scritta
“INTERMED. 2” procedere con il veicolo fino al punto in cui si vuole vengano memorizzate le coordinate del “secondo” intermedio e premere nuovamente il
pulsante (OK/MENU), verrà visualizzata la scritta “FINISH LINE” procedere con il veicolo fino al punto in cui si vuole vengano memorizzate le coordinate della
linea del traguardo e premere nuovamente il pulsante (OK/MENU), se si vuole saltare la memorizzazione di uno o più intermedi premere il tasto (↑ o ↓) durante la
memorizzazione dell'intermedio che si vuole saltare.
Per non salvare nessuna coordinata premere i tasti (↑ o ↓) durante la memorizzazione della linea del traguardo, in questo caso il dispositivo non memorizzerà niente e
verrà visualizzata la scritta “COORDINATES NOT MEMORIZED”. L'operazione di salvataggio delle coordinate del cronometro dovrà essere effettuata ad una
velocità superiore ai 20Km/h - 13MPH, al di sotto di tale velocità il cronometro non sarà in grado di rilevare le linee dei traguardi/intermedi e comparirà la scritta
“SPEED TOO MUCH LOW”.
- TRACK: Track, in questo sottomenù si può selezionare o modificare il circuito a cui associare le sessioni. Selezionando il circuito tramite il tasto centrale
(OK/MENU) verrà richiesto se il circuito deve essere selezionato o modificato; nel secondo caso si potrà modificare ogni lettera del nome del circuito scorrendole
tramite i tasti laterali (↑ e ↓) e selezionandole tramite il tasto centrale (OK/MENU).
- SETUP: Set up, in questo sottomenù si potranno cambiare le impostazioni del cronometro.
Best lap – Last lap : “Best Lap” indica che verrà visualizzato il ritardo tra il miglior giro e quello appena effettuato, altrimenti la scritta “BEST LAP” se si è
realizzato il miglior giro. “Last Lap” indica che verrà visualizzata la differenza tra il giro appena effettuato e quello precedente, questa differenza avrà segno positivo
se il tempo effettuato è maggiore del giro precedente, segno negativo se il contrario
Time to: la durata dell'informazione al passaggio sul traguardo in secondi
Width: indica la larghezza della linea del traguardo, SMALL per piste di piccole dimensioni (es. piste kart, motard, minimoto), MEDIUM per piste di medie
dimensioni (es. piste per moto da velocità o auto), LARGE per circuiti di grandi dimensioni(es. tracciati nautici).
Backlight: per selezionare se la retroilluminazione del display deve essere accesa o spenta (ricordiamo che la retroilluminazione incide molto sul consumo della
batteria, si consiglia di tenerla spenta nei modelli a batteria interna)
Hours: verrà visualizzato l'orario di Greenwich rilevato dal GPS, modificare tale orario premendo i pulsanti ↑ e ↓ in modo tale da adeguarlo al proprio fuso orario.
Led mode: selezionare come si preferisce utilizzare il led, “Best” il led si accenderà ogni volta che verrà effettuato il miglior giro/intertempo della sessione, “Flash” il
led si accenderà al raggiungimento della soglia dei giri motore impostata dopo aver premuto il tasto di conferma, “Allarm” il led si accenderà al raggiungimento della
temperatura impostata dopo aver premuto il tasto di conferma.
- GPS INFO: GPS Information, in questo sottomenù si potranno visualizzare tutte le informazioni rilevate dal ricevitore GPS (coordinate, velocità, data e ora al
meridiano di Greenwich).
- EXIT: Exit menù, esce dalla modalità menù e ritorna nella modalità "conteggio" premendo il tasto centrale (OK/MENU).
N.B: E' possibile cambiare le unità di misura di velocità e temperatura solo attraverso il software DataView, leggere il manuale del software per conoscere come
cambiare l'impostazione di default.
BLUETOOTH
Per poter scaricare i dati sul proprio pc è necessario attivare la modalità “bluetooth” nel dispositivo, in modalità “conteggio” premere il tasto (↓ ΜΟDE) comparirà sul
display la scritta “BLUETOOTH ACTIVATED”, ora è possibile scaricare i dati sul proprio pc (seguire le istruzioni del software DataView). E' possibile cambiare le
impostazioni bluetooth di default del proprio Start, per accedere al menu è necessario innanzitutto attivare la modalità “bluetooth” ed in seguito premere il tasto
centrale (OK/MENU). Come prima cosa verrà mostrata la password (default “1234”) è possibile modificare la password selezionando “MODIFY” oppure lasciarla
invariata selezionando “EXIT”, di seguito verrà mostrato il nome del dispositivo (default “USER_A”) è possibile modificare il nome selezionando “MODIFY” oppure
lasciarlo invariato selezionando “EXIT”.
PZRacing – Via A. De Gasperi, 5 61032 Fano (PU) Italy – Tel: +39 0721 820434 Fax: +39 0721 837322 [email protected] – www.pzracing.it 2
Start EVO ST100E - Fast user's manual 06/09/2013
Device quick guide, it's recommended to download the full manual from www.pzracing.it
INTRODUCTION
The Start EVO is a GPS digital chronometer with data acquisition and bluetooth download, Start Evo record also engine revs, water temperature, throttle position
sensor or exhaust gas temperature.
Start EVO uses GPS technology at 10Hz which makes it a unique product; and allows you to measure your time per lap with extreme precision.
This device can be used on every kind of vehicle.
IMPORTANT: All PZRacing products are water resistant but not waterproof, do not wash the product under water jet pressure, the product could be
irreparably damaged.
INSTALLATION
N.B. IT IS VERY IMPORTANT TO POSITION THE GPS RECEIVER CORRECTLY IN ORDER TO RECEIVE GOOD RECEPTION.
Installation is very easy, thanks to integrated gps receiver you just need to place it in a good field of vision and accessibility, with the upper face facing upwards, do
not place in a hidden point, the device must have an unobstructed view to the sky to get better satellite signal.
When you have found the ideal position, you can secure the indicator by using the supplied adhesive material which can be found in the box or by using the two
supplied screws to the two holes at the back of the device. Different kind of accessory for installation are available, ST101/C for installation on car windscreen,
ST101/M for installation on handlebar, ST101/K for installation on steering wheel.
Power supply
Start EVO can be supplied with internal batteries or with an external battery 12V, you will find batteries on board after purchase.
Internal batteries: when the battery symbol will appear on the display, it is necessary to change the batteries. Remove the four screws on the back of the module,
take out the two AA batteries positioned under the display and insert the new batteries, close the module display paying attention not to over-tighten the screws when
closing.
External 12V battery: the black wire needs to be attached to the "earth", that is to say to the frame or directly to the negative clip of the battery, while the red wire
must be attached directly to the "positive" on the battery or to a point where there is a good 12V supply. When Start EVO is connected to an external battery the
battery symbol will appear in the display.
Engine revs
Start EVO allows you to reveal engine revs in two different way:
1- Directly from ECU signal, connect the Blue wire of the 6 poles connector to the engine revs signal, present in the bundle of cables behind the original dashboard,
or if not present to the injectors management signal. In this case, connect to one of the wires NOT shared amongst all the other injectors that can be found, also in the
control unit.
N.B: For RPM from ECU signal the black wire for power supply must be connected to "ground" even if you use the internal batteries.
2- Inductive from spark plug cable, connect the “RPM” plug to the relative connector of the Start and identify which kind of ignition uses your vehicle:
Separate coil (big spark plug cable): just put the “RPM” wire in contact for 2cm with the high-voltage coil cable, fix it by means of two clamps.
Integrated coil (coil over the spark plug): wrap the “RPM” wire to both wires of one of the coil with at least 8 turns and fix it by means of two clamps.
In both cases make sure that the wire does not receive any disturbance from the wires of the other coils as this would cause incorrect engine rev value readings, make
sure then that the wire does not pass close to the other wires and try to fix the whole wire length along the frame. We advise, where possible, to utilize the ECU signal.
N.B. Do not under any circumstances connect the RPM cable directly to the electrics of the motorbike.
N.B. Do not use both methods at the same time.
Water temperature
Screw the M6 thread temperature sensor onto the metal part, where you want to know the temperature, remember that optional connections are available to attach to
the heating muff of the vehicle with diameters of 10mm (code. SS201/10), 17mm (code. SS201/17 and 25mm (code. SS201/25).
With regard to the sensor connection it is enough to connect the jack plug of the device marked “TEMP” to the jack plug of the temperature sensor.
Throttle position sensor (TPS)
Connect the Yellow wire of the 6 poles connector directly to the TPS signal which is in the ECU of the vehicle.
N.B: For TPS the black wire for power supply must be connected to "ground" even if you use the internal batteries.
Exhaust gas temperature (optional)
Follow the instruction in the ST103 box.
USAGE
NB: During counting is necessary to turn off the Start before removing power to the product, if the power is lacking is possible that data storage is not done
correctly and that you can not download data to your PC, in this case it's necessary to clear the memory with consequent loss of data. For this reason, we do
not recommend connecting the Start to a ignition switched supply but directly to battery in such a way as to avoid that the power supply is lacking turning
off the instrument pannel of the vehicle.
To switch on Start EVO you must press the (↑ ON) key for about two seconds, during switching on the display will show the name of the product and the firmware
version, later the device will go into “counting” mode waiting to receive satellite signals. The satellites reception status is identify from the “S” (satellite) in the right
side of the display:
S blinking: satellites are not acquired, wait till few minutes if it's the first time the device is switched on, after a long time or at a considerable distance from the
previous place of operation
S fixed: satellites are acquired but the finish line is not detected. If it's the first time you are in this track it's necessary to set the coordinates of the finish line, if you
are already been in this track you have set the wrong track (see “Track” section).
Negative S fixed: the chronometer is ready to use, the satellites are acquired and the finish line is detected.
Start EVO is able to store up to 150 laps, 99 sessions and 130 minutes, if tone of the memory space is full, the device will display the message “FULL MEMORY”
and it will stop counting until a part of the memory or all of it in deleted. The maximum time for each lap is 10 minutes after which Start EVO will automatically
switch itself off.
Start EVO has four different layout to display the information, to change them use the (↑ ON) key in “counting” mode:
SCREEN 1: Chronometer, session, lap, track, difference from best lap or last lap, best lap.
SCREEN 2: Chronometer, session, lap, speed, engine revs, water temperature, tps/exhaust gas temperature.
SCREEN 3: Chronometer, session, lap, speed, engine revs, water temperature.
SCREEN 4: Chronometer, session, lap, speed, engine revs, hour, engine counter.
PZRacing – Via A. De Gasperi, 5 61032 Fano (PU) Italy – Tel: +39 0721 820434 Fax: +39 0721 837322 [email protected] – www.pzracing.it 3
Start EVO ST100E - Fast user's manual 06/09/2013
To enter the “menu” you have to press the central (OK/MENU) key; here you will find various headings which you can scroll down by using the lateral ( ↑ and ↓)
keys. To enter and exit the headings of the menu, just press the central (OK/MENU) key. To turn off the device, press the (↑ ON) key for a few seconds in the
counting mode.
- LAPS: Laps, under this heading of the menu you can scroll through all the recorded times of the various sessions by using the ( ↑ and ↓) direction keys. Once you
have entered and selected the session you want, confirm by pressing the central (OK/MENU) key, the session, the time, maximum speed and the name of the circuit
are associated to each lap.
- BEST: Best Laps, under this menu heading you can scroll through all the best times recorded and the ideal times of the various sessions. If you haven't set the
coordinated of the intermediates the ideal time will coincide with the best lap, if the coordinates are set the ideal time will be calculated adding all best split times.
Press the central (OK/MENU) key to exit.
- MEMORY: Memory, in this section you can see the percentage of memory you have used, maximum values and end engine counter. The maximum values
achieved will not be stored and will delete automatically turns off the product. By using the (↑ and ↓) direction keys you can decide whether to delete the previous
session (LAST), all the memory (ALL) or only the engine counter (COUNTER); you must then confirm by pressing the central (OK/MENU) key.
- SAVE POS: Save position, under this menu heading you can store the coordinates of your partial lap and finishing line times, in the event that you are on a track
where you have never saved the coordinates remember that the Start EVO is able to store the coordinates of 6 circuits and if you are on one of these, just select the
circuit you have saved under the menu heading “TRACK”.
To store the coordinates, access the heading “SAVE POS” by pressing the (OK/MENU) key, the message “INTERMED. 1” will appear, proceed with your vehicle up
to the point where you want to store the coordinates of the “first” intermediate stage and press the (OK/MENU) key again, the words “INTERMED. 2” will appear,
proceed with your vehicle up to the point where you want to store the coordinates of the “second” intermediate stage and press the (OK/MENU) again, the words
“FINISH LINE” will appear; proceed with your vehicle up to the point where you want to store the coordinates of the finishing line and press the (OK/MENU) key
again, if you want to skip the memorization of one or more of the intermediate stages press the (↑ and ↓) direction keys during the memorization of the intermediate
stage that you want to skip.
If you do not want to save any coordinates press the (↑ and ↓) during the memorization of the Finishing line, in this case the device will not store anything and the
words “COORDINATES NOT MEMORIZED” will appear. Any save of the coordinates must be performed at a higher speed of 20Km / h - 13MPH, below this speed
the chronometer will not be able to detect the finish line and sector lines and will be displayed the word “SPEED TOO MUCH LOW”
- TRACK: track, under this heading you can choose or change the circuit you want to attach sessions to. When choosing the circuit with the central (OK/MENU) key,
you will be asked if the circuit is to be selected or modified; in the second case, you can change the name of the circuit, letter by letter, by scrolling the letter, using the
(↑ and ↓) direction keys and selecting letters with the central (OK/MENU) key.
- SETUP: Set-up, in this section you can change the setting of the chronometer:
Best lap – Last lap: “Best lap” indicates the time difference between the best lap and the one you have just completed, otherwise “BEST LAP” will appear if your
last lap was your best. “Last lap” means that you will see the difference between the lap you have just finished and the previous one, this difference will have a plus
sign if the time is higher than the previous one or a minus sign if the opposite occurs.
Time to: choose how long the previous information is displayed after having reached the finishing line.
Width: to define the length of the virtual finish line and split lines, three different options: SMALL for small tracks (ex tracks for kart, motard, pocket bike),
MEDIUM for medium tracks (ex. tracks for cars or motorbike), LARGE for large circuits (ex. nautical circuits).
Backlight: to select whether the backlight should be turned on or off (remember that the backlight affects on battery power, you should keep off the internal battery
models)
Hours: the time-zone installed is GMT. If you wish to change this, press the ↓↑ to adapt to your own time-zone.
Led mode: choose your preferred modality, "Best" led will light up every time you made the best lap or split session, "Flash" the led will light up as a shift light; you
can set the over revving intervention threshold after pressing the enter key, "Alarm" LED will light to reach the set temperature after pressing the enter key.
- GPS INFO: GPS information; under this heading you will be able to see all the information recorded by the GPS receiver (coordinates, speed, GMT and date).
- EXIT: Exit menu, exit the menu mode and return to the “counting” mode by pressing the central (OK/MENU) key.
N.B: The speed and temperature units can be set only through the DataView software, read the software manual to learn how to change the default setting.
BLUETOOTH
To download the data on your pc you must activate the “bluetooth” mode on the device, in "counting" press (MODE ↓) appears on the display "BLUETOOTH
ACTIVATED", now you can download data on your PC (follow DataView software instructions). You can change the settings of your bluetooth, to enter the menu
first activate the “bluetooth” mode then press the center button (OK / MENU). First you will see the password (default "1234") the password can be changed by
selecting "MODIFY" or leave it unchanged selecting "EXIT", then the device name (default "USER_A) you can change the name by selecting" MODIFY "or leave it
unchanged selecting" EXIT. "
PZRacing – Via A. De Gasperi, 5 61032 Fano (PU) Italy – Tel: +39 0721 820434 Fax: +39 0721 837322 [email protected] – www.pzracing.it 4
Scaricare