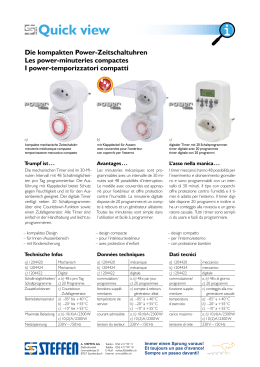
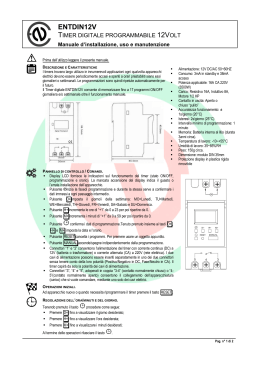
TIMER DIGITALE - 7 GIORNI
IT
manuale d’istruzioni
SI PREGA DI LEGGERE ATTENTAMENTE LE SEGUENTI ISTRUZIONI PRIMA DI COLLEGARE IL TIMER ALLE APPARECCHIATURE ELETTRICHE.
INDICAZIONI DI SICUREZZA
ATTENZIONE! NON INSERIRE DUE O PIU’ TIMER INSIEME!
IMPORTANTE - Non collegare nessun apparecchio il cui carico sia superiore ai 16 Ampere. Assicurarsi sempre che la spina degli apparecchi sia completamente inserita nella presa del
timer. Se fosse necessario pulire il timer, scollegarlo dalla rete elettrica prima di procedere alle operazioni di manutenzione che devono essere effettuate utilizzando un panno asciutto.
•
•
•
•
•
•
•
•
•
•
Utilizza il timer solo con apparecchi con tensione di 230V AC.
La potenza totale delle periferiche collegate non deve superare i 3500W.
Il prodotto non è un giocattolo e non è destinato ai bambini poiché piccole parti potrebbero essere ingerite o inalate.
Rimuovere e smaltire i materiali di imballaggio perchè potrebbero essere pericolosi se maneggiati da bambini, causando soffocamento o altri danni pericolosi.
Non immergere il prodotto in acqua o esporlo a condizioni climatiche estreme o alla luce diretta del sole.
Evitare inoltre vibrazioni e influenze meccaniche, magnetiche ed elettromagnetiche, come anche liquidi e polveri che potrebbero interferire negativamente con il corretto funzionamento.
Se il prodotto dovesse presentare un funzionamento anomalo o dovesse risultare danneggiato nelle sue parti, scollegarlo immediatamente e rivolgersi ad un centro di assistenza.
Il prodotto non deve essere sottoposto o modifiche o cambiato in modo da alterarne il funzionamento. Non può essere aperto e non possono essere sostiutite delle parti. Collegare il prodotto in luoghi facilmente accessibili in modo da essere in grado di disconnetterlo velocemente in caso di emergenza!
Caloriferi o apparecchi simili non dovrebbero mai essera lasciati incustoditi durante il funzionamento. Si raccomanda di non collegare simili apparecchi al timer.
NON IMMERGERE IL TIMER IN ACQUA O IN QUALSIASI ALTRO LIQUIDO
DEFINIZIONE TASTI
MASTERCLEAR
WEEK
CLOCK
HOUR
TIMER
MINUTE
RES/RCL
ON/AUTO/OFF RANDOM
1. MASTER CLEAR: Cancella tutti i dati in memoria
compreso l’ora corrente e tutti i programmi.
2. RANDOM: Imposta o disabilita la funzione casuale.
3. CLOCK: Imposta l’ora corrente con i tasti WEEK,
HOUR, MIN (settimana, ora, minuto). Selezionare la
modalità 12 o 24 ore in combinazione con il tasto
TIMER. Attivare la funzione ora legale in combinazione
con il tasto ON/AUTO/OFF.
4. TIMER: Imposta i programmi in combinazione con i
tasti WEEK, HOUR, MIN. Selezionare la modalità 12 o
24 ore in combinazione con il tasto CLOCK.
5. ON/AUTO/OFF: Seleziona le modalità di funzionamento
del timer.
6. WEEK: Imposta la settimana in combinazione con il
tasto CLOCK o TIMER.
7. HOUR: Imposta l’ora in combinazione con il tasto
CLOCK o TIMER.
8. MIN: Imposta il minuto in combinazione con il tasto
CLOCK o TIMER.
9. RST/RCL: Disabilita i programmi o richiama i programmi
che sono stati disabilitati.
CARATTERISTICHE GENERALI
1.10 programmi di accensione/spegnimento con intervalli di un minuto.
2.Accensione manuale / Automatica / Spegnimento manuale selezionabili
3.Modalità 12/24 ore selezionabile.
4.Ampio display LCD con visualizzazione del secondo.
5.Disponibile funzione ora legale.
6.Funzione casuale con modalità casuale su 10-31minuti tra 6:00 PM e 6:00 AM.
7.16 combinazioni di giorni o blocchi di giorni disponibile come di seguito:
Lu
Me
Ve
Ma
Gi
Sa
Do
Lu, Ma, Me, Gi, Ve, Sa, Do
Lu, Ma, Me, Gi, Ve
Lu, Ma, Me, Gi, Ve, Sa
Ma, Gi, Sa
Gi, Ve, Sa
Sa, Do
Lu, Me, Ve
Lu, Ma, Me
Lu, Me, Ve, Do
MESSA IN FUNZIONE
1.Inserire il timer in una normale presa di corrente 230 Volts e accenderlo tramite l’interruttore. Lasciarlo collegato per circa 14 ore per ricaricare la memoria della batteria di back-up.
2.Dopo aver effettuato la ricarica, cancellare tutte le informazioni premendo il tasto MASTER CLEAR con un oggetto appuntito come una penna o una matita.
3.Il timer è ora pronto per essere impostato per l’uso.
IMPOSTAZIONE DELL’ORA
1.Premere il tasto CLOCK e contemporaneamente premere il tasto WEEK fino a quando viene visualizzata la data del giorno. Continuare premendo il tasto HOUR o MIN fino a quando
viene visualizzata l’ora e il minuto corrente. Quando si effettuano le impostazioni, se i tasti WEEK, HOUR o MIN vengono mantenuti premuti il conteggio in avanti avviene in maniera più
rapida.
2.Rilasciare i tasti. La settimana e l’ora verranno impostate.
3.Per re-impostare un orario non corretto, ripetere i passaggi sopra indicati.
IMPOSTAZIONE PROGRAMMI
SUGGERIMENTO: Quando si effettua la verifica dei programmi assicurarsi che le impostazioni non si sovrappongano, specialmente quando si usa l’opzione blocco. Se ci sono delle
impostazioni di programma che si sovrappongono, la funzione accensione o spegnimento del timer verrà eseguita in accordo con l’ora del prgramma e non con il numero del programma.
Il programma spegnimento ha la priorità sul programma accensione.
1. Premere il tasto TIMER e rilasciarlo. Sullo schermo compare ON_1. La prima impostazione di accensione (ON) può essere inserita ora.
2.Premere il tasto WEEK per impostare il giorno o il blocco dei giorni. Impostare l’ora premento i tasti HOUR e MIN.
3.Premere il tasto TIMER di nuovo per terminare la prima impostazione di accensione ed entrare nella prima impostazione di spegnimento (OFF). Lo schermo mostra OFF_1. Ripetere il
passo 2 per effettuare la prima impostazione di spegnimento (OFF).
4.Premere il tasto TIMER di nuovo per terminare la prima impostazione di spegnimento ed entrare nella seconda impostazione di accensione. Ripetere il passo 2 e 3 per programmare le
impostazioni rimanenti. Premere il tasto TIMER e attendere per 2 secondi per entrare nell’avanzamento veloce.
5.Dopo aver completato le impostazioni, premere il tasto CLOCK. Il timer è pronto per essere messo in funzionamento.
IMPOSTAZIONE ACCENSIONE MANUALE / AUTOMATICA / SPEGNIMENTO MANUALE
1.Le modalità di funzionamento non possono essere modificate durante la programmazione delle impostazioni. 2.Premere il tasto ON/AUTO/OFF per ripristinare a turno le tre modalità.
3.I programmi possono essere eseguiti solo in modalità AUTO. Quando la modalità AUTO è selezionata, il timer funziona come da programmazioni. In modalità MANUAL ON o MANUAL
OFF tutti i programmi sono ignorati e il timer non funzione. Quando la modalità MANUAL ON viene selezionata, la corrente in uscita è sempre accesa. Quando la modalità MANUAL
OFF viene selezionata, la corrente in uscita è permanentemente spenta.
4.Quando la modalità è attivata da MANUAL ON a AUTO, il timer manterrà l’impostazione di MANUAL ON fino alla successive impostazione del timer.
FUNZIONE CASUALE
1.Premere il tasto RANDOM. Sullo schermo compare R(RANDOM). La funzione RANDOM è attivata.
2.Quando la funzione RANDOM è attivata, il timer sarà nella posizione On casualmente per 10-31 minuti durante l’intervallo di tempo --- dalle 6:00PM alle 6:00AM.
3.Premere il tasto RANDOM di nuovo per cancellare questa funzione. La funzione Random non può essere impostata durante le impostazioni programmate.
4.La funzione RANDOM può essere eseguita solo in modalità AUTO tra le 6:00PM e le 6:00AM.
MODALITA’ 12/24 ORE
Premere CLOCK e TIMER simultaneamente per attivare la visualizzazione del tempo tra la modalità 12 e 24 ore.
FUNZIONE ORA LEGALE
1.Premere CLOCK e ON/AUTO/OFF simultaneamente. Sullo schermo compare S(Summer time). L’orologio avanza di un’ora.
2.Per ripristinare le impostazioni con l’ora solare, premere i due tasti di nuovo. L’orologio muove indietro di un’ora. S scompare dallo schermo.
SPECIFICHE
Tensione 230VAC, 50Hz
Impostazione minima tempo 1 Minuto
Precisione +/- 1 minuto per mese
Carico massimo 16(2)A, 3600W
Temperatura d’esercizio da -10° C a +40° C
Batteria di backup NiMH 1.2V >100ore
SMALTIMENTO
In conformità alla direttiva europea WEEE, i prodotti che riportano il presente simbolo non possono essere smaltiti con i rifiuti domestici. Trattandosi infatti di apparecchiature elettriche
ed elettroniche devono essere conferiti separatamente per provvedere al recupero e allo smaltimento differenziato delle parti che li compongono. Si prega di contattare il servizio di
smaltimento rifiuti locale o nazionale per ottenere le informazioni necessarie allo smaltimento corretto di questa apparecchiatura per il rispetto e la salvaguardia dell’ambiente.
Dichiarazione CE - Il presente prodotto è conforme alla direttiva EU 2006/95/EC. DIGITAL TIMER - 7 DAYS
EN
instructions manual
PLEASE READ THE FOLLOWING INSTRUCTIONS CAREFULLY BEFORE CONNECTING THIS TIMER TO ELECTRICAL APPLIANCES.
NOTES ON SAFETY
DO NOT PLUG TWO OR MORE TIMERS TOGETHER!
IMPORTANT - Don’t plug in an appliance where the load exceeds 16 Amp. Always ensure the plug of any appliance is fully inserted into the timer outlet. If cleaning of the timer is required,
remove from mains power and wipe timer with a dry cloth.
•
•
•
•
•
•
•
Use the device only with 230V AC ~ voltage.
The total power of the connected devices must not exceed 3500 watts.
Your product and its accessories are no toys and children must not use it anyway, because it contains fragile, small and swallowable parts which can injure people by incorrect use!
Remove and dispose packaging materials, because playing children could cut on it. Furthermorethere is a danger of swallowing and inhaling incidentals and insulating materials.
Do not interrupt the product to water, extreme heat, coldness or direct sun insulation.
Furthermore avoid vibrations, mechanical, magnetic and electro-magnetic influences, as well as liquid or dust effects.
If defects, mechanical damages, disturbances or other problems should happen, which are not solvable with this manual, take the device out of work immediately and consult your
dealer for questions, repairing or change
• The product must not be changed, reconstructed or modified in other ways. It isnot allowed to open the housing. For any maintenance contact a qualified service.
• Only plug the product to easily accessible mains sockets, to be able to disconnect them quickly in case of emergency!
• Heaters and similar appliances should never be left unattended during operation. The manufacturer recommends such appliances not be connected to timers.
DO NOT IMMERSE TIMER IN WATER OR ANY OTHER LIQUID
KEYBOARD DEFINITION
MASTERCLEAR
WEEK
CLOCK
HOUR
TIMER
MINUTE
RES/RCL
ON/AUTO/OFF RANDOM
1.MASTER CLEAR: Clear all data in memory including
current time and all programs.
2.RANDOM: Set or cancel random function.
3.CLOCK: Set current time combined with buttons WEEK,
HOUR, MIN. Select 12 or 24 hour mode combined with
button TIMER. Activate summertime function combined
with button ON/AUTO/OFF.
4.TIMER: Set programs combined with buttons WEEK,
HOUR, MIN. Select 12 or 24 hour mode combined with
button CLOCK.
5.ON/AUTO/OFF: Select operating modes of timer.
6.WEEK: Set week combined with button CLOCK or
TIMER.
7.HOUR: Set hour combined with button CLOCK or
TIMER.
8.MIN: Set minute combined with button CLOCK or
TIMER.
9.RST/RCL: Override programs or recall the overridden
programs.
GENERAL FEATURES
1.10 ON/OFF programs with 1 minute step.
2.MANUAL ON/AUTO/MANUAL OFF selectable.
3.12/24 hour mode selectable.
4.Large LCD display with second.
5.Summer time function available.
6.Random function with a randomly on 10-31minutes between 6:00 PM and 6:00
AM.
7.16 combinations of day or blocks of days available as follows:
Mo
We
Fr
Su
Tu
Th
Sa
Mo, Tu, We, Th, Fr, Sa, Su
Mo, Tu, We, Th, Fr
Mo, Tu, We, Th, Fr, Sa
Tu, Th, Sa
Th, Fr, Sa
Sa, Su
Mo, We, Fr
Mo, Tu, We
Mo, We, Fr, Su
INITIAL OPERATION
1.Plug the timer into a regular 220-240 Volts power outlet and turn the power on. Leave for approximately 14 hours to charge the Memory Back-up battery.
2.Clear all current information by pressing MASTER CLEAR button with a sharp object such as a pen or pencil after charging.
3.The timer is now ready to be set up for use.
SETTING CURRENT TIME
1.Press CLOCK button and hold, simultaneously press WEEK button until the actual day is displayed. Continue by pressing HOUR or MIN button until the current hour or minute is
displayed. When setting, the buttons WEEK, HOUR or MIN can be held down for rapid forward counting.
2.Release both buttons. The week and time will be set.
3.To reset incorrect time, repeat above steps.
SETTING PROGRAMS
TIP: When verifying your programs ensure that the settings do not overlap, especially when using the block option. If there are program settings overlapping, the timer ON or OFF will be
executed according to program time, not by program number. Program OFF has the priority over program ON.
1.Press TIMER button and release. LCD shows ON_1. The first ON setting can be made now.
2.Press WEEK button to set the day or block of days. Set the time by pressing HOUR and MIN button.
3.Press TIMER button again to finish the first ON setting and enter into the first OFF setting. LCD shows OFF_1. By repeating 2 to make the first OFF setting.
4.Press TIMER button again to finish the first OFF setting and enter into the 2nd ON setting. Repeat 2 and 3 to program remaining settings. Press TIMER button and hold for 2 seconds
to enter fast advance.
5.After completing settings, press CLOCK button. The timer is ready to operate.
Operating modes can’t be changed during program settings.
1.Press ON/AUTO/OFF button to revert the three modes in turn.
2.The programs can only be executed in AUTO mode. When AUTO is selected, the timer operates as the programs. In MANUAL ON or MANUAL OFF mode all programs are ignored and
the timer doesn’t operate. When MANUAL ON mode is selected, power output is always ON. When MANUAL OFF mode is selected, power output is permanently off.
3.When the mode is turned from MANUAL ON to AUTO, the timer will keep the setting of MANUAL ON until to the next timer setting.
RANDOM FUNCTION
1.Press RANDOM button. LCD displays R(RANDOM). RANDOM function is activated.
2.When RANDOM is activated,the timer will be in On position randomly for 10-31 minutes during the time gap----from 6:00PM to 6:00AM.
3.Press the RANDOM button again to cancel this function. Random function can’t be set during program settings.
4.The RANDOM function can only be executed in AUTO mode between 6:00PM and 6:00AM.
12/24 HOUR MODE
Press CLOCK and TIMER simultaneously to turn the time display between 12 and 24 hour mode.
SUMMERTIME FUNCTION
1.Press CLOCK and ON/AUTO/OFF simultaneously. LCD shows S(Summer time). Clock advances 1 hour.
2.To revert to winter setting, press the two buttons again. Clock moves backward 1 hour. S disappears in LCD.
SPECIFICATIONS
Voltage 220-240VAC, 50Hz
Min Setting Time 1 Minute
Accuracy +/- 1 minute per month
Max Load 16(2)A, 3600W
Operating temperature -10° C to +40° C
Battery backup NiMH 1.2V >100hours WASTE DISPOSAL
In according to the European WEEE directive, electrical and electronic equipment and batteries must not be disposed with consumers waste. The consumer is committed by law to
reposit electrical and electronic devices to public collecting points or to the dealer at the end of the devices lifetime for free. Particulars are regulated in national right. The symbol
on the product, in the manual or at the packaging alludes to these terms. With this kind of application of used devices you achieve an important share to environmental protection.
CE Declaration - This device corresponds to EU directives 2006/95/EC.
Scaricare