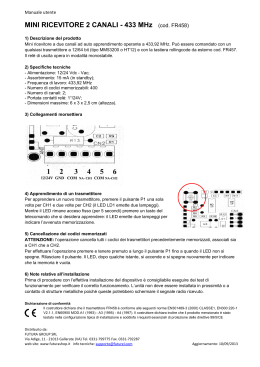
PROCEDURA PER MEMORIZZAZIONE TX
Dopo aver installato la ricevente in posizione libera da eventuali disturbi per facilitare la ricezione del segnale, dare
alimentazione al sistema.
A QUESTO PUNTO È CONSIGLIABILE EFFETTUARE UNA PROCEDURA DI RESET. Per fare ciò basta tenere premuto il
pulsante SW1 e tutti i leds si accenderanno. Tenerlo premuto fino a quando i leds non si spengono (circa 10 secondi), a questo
punto si può procedere all' auto-apprendimento dei radiocomandi.
Premendo il pulsante SW1 il led LD1 si accende ed il sistema è pronto ad apprendere un telecomando, (indifferentemente
codice Dip-Switch o Rolling-Code con riconoscimento automatico del tipo).
Si può ora premere uno dei tasti del trasmettitore che verrà memorizzato nel primo canale (CH1) del ricevitore, indicato dall’
accensione del relativo led LD1. Finchè il led del ricevitore è acceso è possibile apprendere ulteriori telecomandi della stessa
famiglia uno di seguito all’ altro.
Premendo un’ altro tasto del telecomando avremmo il secondo canale (CH2) del ricevitore operativo, indicato dall’ accensione
del relativo led LD2. La procedura di autoapprendimento Tx degli altri tasti verrà indicata dall’ accensione dei relativi led,
LD3,LD4. Dopo l’ apprendimento dell’ ultimo telecomando bisogna attendere lo spegnimento del Led (circa 5 secondi) ad
indicare che il sistema è uscito dall’ apprendimento ed è pronto per il normale funzionamento.
ATTENZIONE: dopo aver appreso il primo codice il sistema accetterà soltanto quella famiglia di codici (ES: se il primo è RollingCode tutti gli altri dovranno essere Rolling-Code).
Se la memorizzazione riguarda codici a Dip-Switch, basta apprendere un solo telecomando.
APPRENDIMENTO TELECOMANDI SENZA ACCEDERE AL RICEVITORE: (solo rolling-code) Dopo aver fatto apprendere al
sistema un telecomando in modo manuale è possibile abilitare l’ apprendimento di altri telecomandi della stessa famiglia,
premendo contemporaneamente (davanti all’ impianto) i tasti 1 e 2 del trasmettitore, già operativo nel sistema per 8 secondi
circa, dopo di che premendo il tasto di un telecomando nuovo lo si autoapprende. La verifica è data dal fatto che l’
apprendimento dà un comando al ricevitore e l’ automazione entrerà in funzione.
ATTENZIONE: L’apparecchio è previsto esclusivamente per collegamenti a bassissima tensione di sicurezza. Il collegamento
con circuiti a tensione diversa può provocare pericolo. Il costruttore non può essere considerato responsabile per eventuali danni
causati da uso improprio e/o irragionevole.
APPRENDIMENTO TELECOMANDI CON CODICE IMPIANTO SENZA ACCEDERE AL RICEVITORE: (solo rolling-code):
Programmare un codice su un telecomando e memorizzarlo manualmente nel ricevitore tramite il pulsante SW1. Nel caso il
cliente abbia la necessità di un altro radiocomando, inserire il codice impianto in un nuovo radiocomando e, davanti al propio
impianto tenere premuto il pulsante del tx fino alla partenza dell’ automazione.
-------------------------------------------------------------------------------------------------------------------------------------------------------------------------INSTRUCTIONS FOR INSTALLATION AND USE
The receivers are set up for a 12/24V AC or DC power supply selectable with the dip switch SW1.
J1 Closed = 12V
J1 Open = 24V
With DC power supply respect the polarity.
SELF-LEARNING PROCEDURES
After positioning the external receiver, in the most suitable position for best reception of the radio signal, connect the power
supply terminal, when powering for the first time, check that the red led is on to indicate that the receiver is ready. When first
powering the device it is advisable to run a RESET procedure. To do this, hold the button P1 pressed down until the LED goes
off (about 10 seconds), indicating that the memory has been completely reset.
At this point, the radio controls can be self-learned.
Press SW1, the LEDS comes on to indicate that the receiver is ready to learn a remote control (whether DIP SWITCH or
ROLLING-CODE whith automatic recognition of the type). One of the keys of a transmitter can now be pressed , the relay can
be heard tripping CH1. Without pressing the P1 key again, further remote controls of the same family can be learned, one after
the other. Press another key to put CH2 channel of the receiver in active mode. Apply to the CH2 second channel the same Tx
self-configuration procedure used for the first channel of the receiver.
After learning the last remote control, whait for the led to go off (about 5 seconds) indicating that the system has exited tx
learning and is ready to operate normally.
WARNING: After learning the first code, the system will accept only that family of codes (if the first is Rolling all the other must
be Rolling). If learning is for Dip Switch transmitters, only one remote control needs to be learned.
REMOTE CONTROL LEARNING WITHOUT ACCESSING THE RECEIVER: After letting the system learn a remote control in
manual mode (by pressing the key SW1), self-learning of other remote controls of the same family can be enabled by
simultaneously pressing for 5 seconds the keys 1 and 2 of the transmitter already learned. Subsequently, when pressing the key
of a new remote control is self-learned. Learning has been successful when it moves the gate.
WARNING: The control unit is intended exclusively for very low-voltage safety connections. Connection to high-voltage circuits
may create a danger. The manufacturer cannot be held responsible for damage caused by improper and/or irrational use.
-------------------------------------------------------------------------------------------------------------------------------------------------------------------------SMALTIMENTO: conservare il prodotto fuori dalla portata dei bambini. Non gettare l’ apparato insieme ai comuni rifiuti urbani come da simbolo
contrassegnato sul prodotto. (Direttiva Europea 2002/96/EC)
ISTRUZIONI
RICEVITORE
12 13
JP1
LD4
LD3
COM
ANT.
LD2
JP2
J1
RL2
JP3
CH4
CH3
INGRESSI MORSETTIERA
CARATTERISTICHE TECNICHE
M1
M2
M3
M4
M5
M6
M7
M8
M9
M10
M11
M12
M13
ALIMENTAZIONE
ASSORBIMENTO
FREQUENZA
CODICI MEM.
N° CANALI
PORTATA CONTATTI
VISUALIZZAZIONE
TEMP. DI ESERCIZIO
CODICI TX MEM.
- 12 / 24 V
+ 12 / 24 V
COM CH4
NA CH4
COM CH3
NA CH3
COM CH2
NA CH2
NA CH1
COM CH1
NC CH1
SIG. ANTENNA
COM. ANTENNA
CH2
CH1
12/24V (AC-DC)
15mA IN STAND-BY
433.92MHZ
MAX 200
4
0,5A 24V
LED
-20 +70 °C
DIP-SWITCH e/o ROLLING-CODE
ISTRUZIONI PER INSTALLAZIONE ED UTILIZZO
JUMPER : J1
I ricevitori sono predisposti per l' alimentazione a 12V / 24V in CA o CC selezionabile tramite jumper.
J1 CHIUSO = 12V
J1 APERTO = 24V
In caso di alimentazione in CC fare attenzione alla polarità.
JUMPER : JP1
I ricevitori di default sono abilitati al controllo del codice Rolling-Code selezionabile tramite jumper.
JP1 = CHIUSO = ROLLING-CODE DISABILITATO
JP1 = APERTO = ROLLING-CODE ABILITATO
CODICE IMPIANTO:
Memorizza e gestische anche i telecomandi rolling-code avente un codice impianto programmato in
precedenza con il palmare s.o.l.2 ( o programmatori prg4r)
CONFIGURAZIONI USCITE RELE’:
JP2 = CHIUSO = CH1 e CH2 BISTABILI
JP2 = APERTO = CH1 e CH2 MONOSTABILI
JP3 = CHIUSO = CH3 e CH4 TEMPORIZZATI 20 SEC.
JP3 = APERTO = CH3 e CH4 MONOSTABILI
E’ responsabilità del propietario smaltire il prodotto elettrico nei centri di raccolta seguendo le specifiche degli enti pubblici.
DICHIARAZIONE CE DI CONFORMITA’:
IL PRODOTTO E’ CONFORME A QUANTO PREVISTO DALLA DIRETTIVA COMUNITARIA:
Soddisfa tutti i requisiti applicabili alla tipologia del prodotto e richiesti dalla regolamentazione delle telecomunicazioni secondo direttiva R&TTE5/99
allegato II tramite l’utilizzo delle norme pubblicate nella gazzetta ufficiale della comunità Europea:
Sicurezza elettrica:
Radio e parametri di trasmissione:
Compatibilità elettromagnetica EMC:
Il prodotto può essere immesso nei seguenti Stati Europei: TUTTI GLI STATI COMUNITARI
En 60950
En 300220-3
EN 301489-1-3
Scaricare