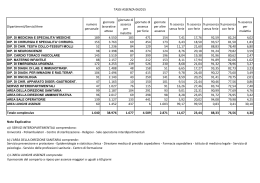
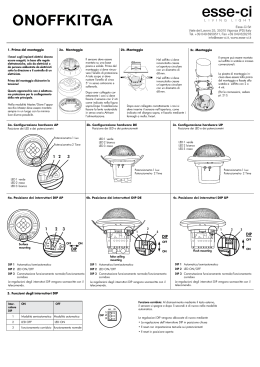
SC24 SC24 - (AS05700) Apparecchiatura elettronica ISTRUZIONI PER L’INSTALLAZIONE Electronic control unit INSTRUCTIONS FOR INSTALLATIONS I UK SC24 2 I 1 - CARATTERISTICHE TECNICHE Apparecchiatura Tipo SC24 / AS05700 Apparecchiatura elettronica per l’automazione di un cancello scorrevole con motore a 24Vac Alimentazione N° motori Alimentazione motore Lampeggiante Lampada spia 230 Vac monofase 50/60 Hz 1 24 Vdc 24 Vdc 10W max 24 Vdc 3W max Alimentazione accessori e dispositivi di sicurezza 24 Vdc 8W max totali Ricevitore radio Temperatura di utilizzo Tempo di lavoro Tempo di pausa Tipo di batteria consigliata Soft start Ad innesto -20°C +60°C 240 secondi fisso Regolabile da 2 a 250 s Batteria ricaricabile al piombo 24V 2 Ah (2 x 12V 2Ah) 1s 2 - CARATTERISTICHE TECNICHE / FUNZIONI Led rossi di segnalazione dei contatti N.C. (photo, dev, fcc, fca) e 8K2 (safety, stop). Led verdi di segnalazione dei contatti N.O. (start e ped). Pulsanti START e PED a bordo scheda. Test sicurezze effettuato prima del movimento di apertura e chiusura. Rallentamento in apertura e chiusura comandato da 2 magneti supplementari . Arresto ed inversione del moto per 1 s dopo l'intervento dei dispositivi di sicurezza. Al successivo impulso di Start il moto riparte nel senso di liberazione dell'ostacolo. Lettura amperometrica dell'assorbimento del motore per la funzione antischiacciamento, sia in funzionamento normale che in modalità rallentata (regolabile con opportuni trimmer AMP. FORCE e AMP. SLOW). L'intervento amperometrico determina l'arresto e l'inversione del moto per 1 s. Al successivo impulso di Start il moto riparte nel senso di liberazione dell'ostacolo. Programmazione della richiusura automatica e del tempo di pausa. Funzionamento pedonale con apertura fissa di 10 s. Il pedonale funziona con logica condominiale. Predisposizione per uso con batterie a tampone (scheda accessoria caricabatteria cod. AJ00601) . Verifica dello stato di carica delle batterie. Durante il funzionamento con le batterie verrà attivato un segnale acustico sincronizzato con il lampeggiatore. Quando le batterie saranno prossime all'esaurimento, dopo un comando di apertura il cancello si aprirà e quindi resterà aperto. Qualora le batterie non avessero una carica sufficiente la porta non si aprirà. Fotocellula attiva in chiusura o in apertura e chiusura selezionabile con dip switch. Regolazione della FORZA e del RALLENTAMENTO del motore con trimmer ( FORCE, SLOW). Logiche di funzionamento: Condominiale - Passo Passo - Passo Passo con Stop - Uomo presente. Energy saving. Soft-Start e Soft-Stop per limitare gli shock meccanici. 1 ingresso per dispositivo di sicurezza 8K2. 1 ingresso selezionabile come dispositivo di sicurezza 8K2 o STOP 8K2. SC24 3 I 3 - AVVERTENZE PER L’INSTALLAZIONE Prima di procedere con l’installazione bisogna predisporre a monte dell’impianto un interruttore magneto termico e differenziale con portata massima 10A. L’interruttore deve garantire una separazione omnipolare dei contatti, con distanza di apertura di almeno 3 mm. Per evitare possibili interferenze, differenziare e tenere sempre separati i cavi di potenza (sezione minima 1,5mm²) dai cavi di segnale (sezione minima 0,5mm²). Eseguire i collegamenti facendo riferimento alle tabelle seguenti e alla serigrafia sulla scheda. Fare molta attenzione a collegare in serie tutti i dispositivi che vanno collegati allo stesso ingresso N.C. (normalmente chiuso) e in parallelo tutti i dispositivi che condividono lo stesso ingresso N.O. (normalmente aperto). Una errata installazione o un uso errato del prodotto può compromettere la sicurezza dell’impianto. Tutti i materiali presenti nell’imballo non devono essere lasciati alla portata dei bambini in quanto potenziali fonti di pericolo. Il costruttore declina ogni responsabilità ai fini del corretto funzionamento dell'automazione nel caso non vengano utilizzati i componenti e gli accessori di propria produzione e idonei per l'applicazione prevista. Al termine dell’istallazione verificare sempre con attenzione il corretto funzionamento dell’impianto e dei dispositivi utilizzati. Questo manuale d’istruzioni si rivolge a persone abilitate all’installazione di “apparecchi sotto tensione” pertanto si richiede una buona conoscenza della tecnica, esercitata come professione e nel rispetto delle norme vigenti. La manutenzione deve essere eseguita da personale qualificato. Prima di eseguire qualsiasi operazione di pulizia o di manutenzione, scollegare l’apparecchiatura dalle rete di alimentazione elettrica. L’apparecchiatura qui descritta deve essere utilizzata solo all’uso per il quale è stata concepita. Verificare lo scopo dell'utilizzo finale e assicurarsi di prendere tutte le sicurezze necessarie. L’utilizzo dei prodotti e la loro destinazione ad usi diversi da quelli previsti, non è stata sperimentata dal costruttore, pertanto i lavori eseguiti sono sotto la completa responsabilità dell’installatore. Segnalare l’automazione con targhe di avvertenza che devono essere visibili. Avvisare l’utente che bambini o animali non devono giocare o sostare nei pressi del cancello. Proteggere adeguatamente i punti di pericolo (per esempio mediante l’uso di una costa sensibile). 4 - AVVERTENZE PER L’UTENTE In caso di guasto o anomalie di funzionamento staccare l’alimentazione a monte dell’apparecchiatura e chiamare l’assistenza tecnica. Verificare periodicamente il funzionamento delle sicurezze. Le eventuali riparazioni devono essere eseguite da personale specializzato usando materiali originali e certificati. Il prodotto non deve essere usato da bambini o persone con ridotte capacità fisiche, sensoriali o mentali, oppure mancanti di esperienza e conoscenza, a meno che non siano stati correttamente istruiti. Non accedere alla scheda per regolazioni e/o manutenzioni. ATTENZIONE: IMPORTANTI ISTRUZIONI DI SICUREZZA. E' importante per la sicurezza delle persone seguire queste istruzioni. Conservare il presente libretto di istruzioni. SC24 4 I 5 - COLLEGAMENTI ELETTRICI: MORSETTIERE Morsetto Posizione 1 2 3 4 M1 Segnale 0 Vac 24 Vac +SK BAT -SK BAT Descrizione Uscita 0 Vac alla SCHEDA CARICABATTERIA. Uscita 24 Vac alla SCHEDA CARICABATTERIA. Collegamento positivo alla SCHEDA CARICABATTERIA. Collegamento negativo alla SCHEDA CARICABATTERIA. 5 LAMP Uscita lampeggiatore 24V 10W max (lampeggio lento in apertura, spento con cancello aperto, lampeggio veloce in chiusura); può essere collegato anche alla SCHEDA CARICABATTERIA. 6 SPIA Uscita lampada spia 24V 3W max (lampeggio lento in apertura, accesa fissa con cancello aperto, lampeggio veloce in chiusura). 7 COM Comune INGRESSI - USCITE. 8 COM Comune INGRESSI - USCITE. 9 SAFETY / STOP 10 START Ingresso DISPOSITIVI DI SICUREZZA / STOP (8K2) selezionabile col DIP SW1_10. Vedi descrizione DIP SW1_10, Cap.8. Se non utilizzato ponticellare con morsetto n°9 usando una resistenza 8K2 Ω Ingresso START (N.A.). Vedi DIP SW1_1 e SW1_2, Cap.8 Ingresso PEDONALE (N.A.) La manovra pedonale viene eseguita in seguito alla chiusura di questo contatto o tramite il relè 2 delle riceventi bicanale ad innesto. M2 M3 Funzionamento in risposta al comando di PEDONALE: Cancello chiuso → APRE per 10 secondi (non regolabile). Durante l’apertura → ININFLUENTE Cancello aperto → ININFLUENTE se la richiusura automatica è attiva altrimenti CHIUDE. Durante la chiusura → APRE completamente. 11 PED 12 PHOTO Ingresso FOTOCELLULA (N.C.). Se non utilizzato ponticellare con morsetto n°14. 13 SAFETY Ingresso DISPOSITIVI DI SICUREZZA (8K2). In seguito all’intervento del dispositivo di sicurezza, la centrale blocca il moto, lo inverte per 1 secondo e resta in attesa di comandi. Se non utilizzato ponticellare con morsetto n°14 usando una resistenza 8K2 Ω 14 COM Comune INGRESSI - USCITE. 15 16 17 MOTOR MOTOR + ACCES Uscita motore 24V, vedi fig. 4. Uscita motore 24V, vedi fig. 4. 18 TEST / ENERGY SAVING Alimentazione +24Vdc per dispositivi di sicurezza esterni sottoposti a test, 8W Max. Alimentazione +24Vdc per dispositivi esterni sottoposti a ENERGY SAVING. Vedi funzionamento DIP SW1_4, Cap.8. 19 COM Alimentazione +24Vdc accessori esterni (fotocellule, radio, etc.). Comune INGRESSI - USCITE. 5 SC24 I 6 - COLLEGAMENTI ELETTRICI: FASTON Segnale 0 Vac 18 Vac 24 Vac Descrizione Collegamento 0 Vac trasformatore (cavo nero). Collegamento 18 Vac trasformatore (cavo arancione). Collegamento 24 Vac trasformatore (cavo rosso). 7 - FUSIBILI DI PROTEZIONE Posizione Valore Tipo F1 315 mA RAPIDO F2 5A RAPIDO Protegge le uscite di alimentazione ACCESSORI e DISPOSITIVI di SICUREZZA. Protegge l’apparecchiatura all’ingresso alimentazione 24 Vac. Descrizione F3 500 mA RAPIDO Protegge l’uscita del lampeggiatore. 8 - DIP SWITCH SW1 Le impostazioni vengono memorizzate durante la fase di riposo (cancello chiuso). Le impostazioni di DEFAULT sono evidenziate con lo sfondo della casella in grigio DIP Funzione OFF OFF Funzionamento in risposta al comando di START : Cancello chiuso → APRE Durante l’apertura → STOP Cancello aperto → CHIUDE Durante la chiusura → STOP Dopo uno STOP → inverte il moto ON OFF Funzionamento in risposta al comando di START : Cancello chiuso → APRE Durante l’apertura → CHIUDE Cancello aperto → CHIUDE Durante la chiusura → APRE CONDOMINIALE OFF ON Funzionamento in risposta al comando di START : Cancello chiuso → APRE Durante l’apertura → ININFLUENTE Cancello aperto → Ricarica il tempo di chiusura automatica se la richiusura automatica è abilitata altrimenti chiude. Durante la chiusura → APRE UOMO PRESENTE ON ON Se mantenuto premuto pulsante Start: APRE Se mantenuto premuto pulsante Pedonale: CHIUDE Gli ingressi SAFETY 8K2, PHOTO e i rallentamenti saranno inattivi. STOP 8K2 sarà attivo. Non gestibile col radiocomando. ON Abilita il prelampeggio di 3 secondi prima dell’attivazione del motore in apertura e chiusura. OFF Disabilita il prelampeggio. PASSO – PASSO CON STOP PASSO – PASSO DIP 1 DIP 2 DIP 3 Descrizione Stato PRELAMPEGGIO SC24 6 I 9 - DIP SWITCH SW1 DIP Funzione Descrizione Stato Abilita il TEST dei dispositivi collegati ai morsetti (9)-(12)-(13): Se i dispositivi saranno perfettamente funzionanti il ciclo potrà iniziare, in caso contrario alcuni lampeggi prolungati indicheranno l’anomalia. DIP 4 TEST SICUREZZE ENERGY SAVING ON Morsetto (12 - “PHOTO”): alimentare i trasmettitori delle fotocellule tramite il morsetto (18) ed i ricevitori tramite il morsetto (17). Ad inizio manovra verrà tolta corrente ai trasmettitori per 1 secondo e poi ridata per verificarne il corretto funzionamento. Morsetto (13 - “SAFETY”) e (9 se DIP10=ON ) : Viene verificato il valore resistivo 8K2Ω. Abilita ENERGY SAVING: Sarà presente tensione sul morsetto (18) solo durante la manovra. A riposo i led saranno spenti. DIP 5 DIP 6 DIP 7 DIP 10 Disabilita il test dei dispositivi di sicurezza. Disabilita ENERGY SAVING ON Quando viene intercettata la fotocellula, sia in apertura che in chiusura, viene bloccato il moto del cancello fintanto che la fotocellula stessa non viene liberata. Successivamente si ha sempre una fase di apertura. OFF Fotocellula attiva solo durante la chiusura, quando viene intercettata il cancello apre. ON Disabilita la chiusura automatica. OFF Abilita la chiusura automatica dopo il tempo di pausa regolabile tramite il trimmer TR1 PAUSE da 2 a 250 secondi. ON Abilita il rallentamento sia in apertura che in chiusura quando viene intercettato il rispettivo fine corsa. La velocità di rallentamento è regolata dal trimmer TR3 SLOW. Questa funzione prevede l’impiego di 4 magneti. Vedi immagini 22 e 23. OFF Disabilita la funzione rallentamento. E’ necessaria la presenza di 2 soli magneti. ON Riduce il tempo di pausa a 3 secondi dopo l’intervento delle fotocellule. OFF Disabilita la funzione di richiusura rapida FOTOCELLULA IN APERTURA RICHIUSURA AUTOMATICA RALLENTAMENTO DIP 8 RICHIUSURA RAPIDA DIP 9 OFF -- -- -- ON Morsetto 9 (SAFETY-STOP) funziona come morsetto 13 (SAFETY 8K2). Vedi Cap.5 . OFF Morsetto 9 funziona come STOP 8K2. L’attivazione del dispositivo STOP 8K2 comporta uno STOP immediato dell’automazione. FUNZIONE MORSETTO 9 7 SC24 I 10 - DIP SWITCH SW4 Le impostazioni vengono memorizzate durante la fase di riposo (cancello chiuso). Le impostazioni di DEFAULT sono evidenziate con lo sfondo della casella in grigio DIP Funzione Descrizione Stato ON Disabilita la funzione. Abilita la funzione tentativi in seguito all’intervento delle sicurezze. Dopo l'intervento del dispositivo di sicurezza SAFETY o SAFETY-STOP (DIP 10 = ON) o del ANTISCHIACCIAMENTO e trascorsi 10 secondi, l'automazione tenterà, per un massimo di 3 volte, di riprende il moto nella direzione che era stata interrotta. In seguito a un ulteriore intervento del dispositivo di sicurezza l'automazione si blocca in attesa di comandi. DIP 1 DIP 2 TENTATIVI DOPO INTERVENTO SICUREZZE -- ATTENZIONE! OFF Una diversa programmazione della funzione rispetto alla configurazione preimpostata dal costruttore, pur consentendo, se effettuata in modo corretto, la riduzione dei casi di arresto dell'impianto in posizione intermedia (a titolo esemplificativo e non esaustivo, per la presenza di attriti, vento e/o ostacoli sulla corsa dell'elemento mobile), determina, in ogni caso, un abbassamento del livello di sicurezza dell'impianto stesso e un conseguente pericolo per l'incolumità delle persone. ON - OFF - 11 - REGOLAZIONE TRIMMER Trimmer Default Descrizione PAUSE Regola il TEMPO di PAUSA da 2 a 250 secondi. Il valore aumenta ruotando in senso orario il trimmer. AMP. SLOW Regola la sensibilità d’intervento dell’antischiacciamento durante il periodo di movimento rallentato. Ruotando il trimmer in senso orario diminuisce la sensibilità. SLOW Regola il livello della VELOCITA’ motore durante il periodo di movimento rallentato. AMP. FORCE Regola la sensibilità d’intervento dell’antischiacciamento durante il periodo di movimento non rallentato. Ruotando il trimmer in senso orario diminuisce la sensibilità. FORCE Regola il livello della VELOCITA’ motore durante il periodo di movimento non rallentato. SC24 8 I DESRCIZIONE 12 - MANOVRAMENU MANUALE (A) Se il cancello viene sbloccato e mosso manualmente, con la scheda elettronica alimentata, la centrale si resetta e il successivo movimento sarà un’apertura. Posizionare il cancello all’interno della corsa definita dai finecorsa prima di ribloccare l’operatore. DESRCIZIONE 13 - VERIFICHEMENU FINALI( A ) Verificare i collegamenti elettrici: un collegamento errato può risultare dannoso sia per l'apparecchiatura che per l'operatore. Verificare la corretta posizione dei finecorsa. Prevedere sempre i fermi meccanici in apertura e chiusura. Verificare il corretto funzionamento delle fotocellule e dei dispositivi di sicurezza. Verificare che i motori siano bloccati e pronti per il funzionamento in posizione di CANCELLO A META’ CORSA. Rimuovere eventuali ostacoli nel raggio d'azione del cancello. Verificare che la direzione del moto del cancello sia corretta: § togliere alimentazione alla centrale. § alimentare la centrale. § dare un comando di START. § verificare che il cancello stia aprendo, in caso contrario togliere alimentazione alla centrale e invertire i fili del morsetto M3. Verificare il corretto funzionamento dell'automazione. DESRCIZIONE 14 - RIEPILOGOMENU SEGNALAZIONI (A) DA LAMPEGGIATORE Dispositivo Segnalazione Effetto Foto intercettata a riposo in presenza di comando di START ( DIP5 = ON ) 5 lampeggi veloci Al rilascio apre Test foto fallito 4 lampeggi lenti Porta bloccata Costa intercettata prima del moto 3 lampeggi lenti Porta bloccata Test costa 8K2 Fallito ( morsetto 13) 2 lampeggi lenti Porta bloccata Test costa 8K2 Fallito (morsetto 9) 1 lampeggio lento Porta bloccata Grazie per avere scelto GIBIDI. LEGGERE ATTENTAMENTE QUESTO MANUALE PRIMA DI PROCEDERE ALL’INSTALLAZIONE. AVVERTENZE: Questo prodotto è stato collaudato in GI.BI.DI. verificando la perfetta corrispondenza delle caratteristiche alle direttive vigenti. GI.BI.DI. S.r.l. si riserva la facoltà di modificare i dati tecnici senza avviso, in funzione dell’evoluzione del prodotto. SMALTIMENTO: GI.BI.DI. consiglia di riciclare i componenti in plastica e di smaltire in appositi centri abilitati i componenti elettronici evitando di contaminare l'ambiente con sostanze inquinanti. 9 SC24 I Dichiarazione di conformità CE Il fabbricante: GI.BI.DI. S.r.l. Via Abetone Brennero, 177/B, 46025 Poggio Rusco (MN) ITALY Dichiara che i prodotti: APPARECCHIATURA ELETTRONICA SC24 Sono conformi alle seguenti Direttive CEE: • Direttiva LVD 2006/95/CE e successive modifiche; • Direttiva EMC 2004/108/CE e successive modifiche; e che sono state applicate le seguenti norme armonizzate: • EN60335-1, • EN61000-6-2, EN61000-6-3 Data16/04/14 Il Rappresentante Legale Michele Prandi SC24 10 UK 1 - TECHNICAL CHARACTERISTICS Control unit Type Power supply No. of motors Motor power supply Flashlight Warning light Accessory and safety device power supply Radio-receiver Operating temperature Run time Pause time Recommended battery type Soft start SC24 / AS05700 Electronic control unit for automation of a sliding gate with 24 Vdc motor 230 Vdc single-phase 50/60 Hz 1 24 Vdc 24 Vdc 10W max 24 Vdc 3W max 24 Vdc 8W max total Pluggable radio receiver -20°C +60°C 240 sec. fixed Adjustable between 2 and 250 sec Rechargeable lead battery 24V 2Ah (2 x 12V 2Ah) 1s 2 - TECHNICAL CHARACTERISTICS / FUNCTIONS Red warning leds of N.C. (photocell, closing limit switch,opening limit switch) and 8K2 contacts (safety device, stop). Green warning leds of N.O. contacts (start and ped). START and PED buttons on board. Safety test run before the opening and closing movement. Deceleration during opening and closing controlled by 2 additional magnets. Stop and motion inversion for 1s after the intervention of safety devices. At next Start pulse the motion restarts in the obstacle freeing direction. Amperometric reading of motor absorption for the anti-crushing function both during normal operation and in slow motion. (adjustable with AMP.FORCE and AMP.SLOW trimmers). The amperometric intervention determines stopping and motion inversion for 1 second. At the next Start pulse the motion restarts in the obstacle freeing direction. Automatic closing and Pause time programming. Pedestrian operation with fixed opening of 10 s. Pedestrian operation works with automatic logic. Provision for use with buffer batteries (accessory battery charger board). Test of battery charge status. During battery operation, an acoustic signal synchronised with the flashlight will be activated. When the batteries are nearly flat and an opening command is given, the gate will open and remain thus. Should the batteries not be sufficiently charged, the gate will not open. Photocells active during closing or during closing and opening selectable by dip switch. Force and Slow down adjustable by trimmers (FORCE, SLOW). Operating logics: Automatic - Step by Step, Step by Step with Stop, Dead Man. Energy saving function. Soft Start and soft-Stop to avoid mechanical shocks. 1 input for 8K2 safety device. 1 input selectable as 8K2 safety device or STOP 8K2. 11 SC24 UK 3 - INSTALLATION WARNINGS Before proceeding with the installation, it is necessary to fit a magnetothermal and differential switch of 10A max. upstream of the system. The switch must guarantee an omnipolar separation of the contacts, with an opening distance of at least 3 mm. To prevent possibile interferences, differentiate and always keep the power cables (min. cross-section 1,5mm²) separate from the signal cables (min. cross-section 0,5mm²). Make the connections referring to the following tables and to the attached screen-print. Be extremely careful to connect in series all the devices that are connected to the same N.C. (normally closed) input and in parallel all the devices that share the same N.O. (normally open) input. An incorrect installation or an improper use of the product may compromise the safety of the system. Keep all the materials contained in the packaging away from children, since they pose a potential risk. The manufacturer declines all responsibility for improper functioning of the automated device if the original components and accessories suitable for the specific application are not used. After the installation, always carefully check the proper functioning of the system and the devices used. This instruction manual addresses persons qualified for installation of “live equipment”. Therefore good technical knowledge and professional practice in compliance with the regulations in force are required. Maintenance must be carried out by qualified personnel. Before carrying out any cleaning or maintenance operation, disconnect the control unit from the mains. This control unit may only be used for the purpose for which it was designed. Check the aim of the final use and make sure that all safety measures are taken. The use of the products for purposes different from the intended use has not been tested by the manufacturer, therefore any work is carried out on full responsibility of the installer. Mark the automated device with visible warning plates. Warn the user that children or animals must not play or stand around near the gate. Appropriately protect the danger points (for example using a sensitive frame). 4 - WARNINGS FOR THE USER In the event of an operating fault or failure, cut the power upstream of the control unit and call the technical service. Periodically check the functioning of the safety devices. Any repairs must be carried out by specialised personnel using original and certified materials. The product is not to be used by children or people with physical, sensory or mental capabilities, or lack of experience and knowledge, unless they have been given instruction. Do not touch the card for adjustments and/or maintenance. WARNING: IMPORTANT SAFETY INSTRUCTIONS. It is important to follow the present instructions for your own safety. Please keep this instruction manual. SC24 12 UK 5 - ELECTRICAL CONNECTIONS: TERMINAL BOARDS Terminal Position 1 2 3 4 M1 M2 Signal 0 Vac 24 Vac +SK BAT -SK BAT Description 0 Vac output to the BATTERY CHARGER BOARD. 24 Vac output to the BATTERY CHARGER BOARD. Positive connection to the BATTERY CHARGER BOARD. Negative connection to the BATTERY CHARGER BOARD. 5 LAMP Flashlight output 24V 10W max (slow flashing during opening, off with gate open, fast flashing during closing); it can also be connected to the battery charger board. 6 SPIA Warning light output 24V 3W max (slow flashing during opening, on fixed with gate open, fast flashing during closing). 7 COM Common INPUTS - OUTPUTS. 8 COM Common INPUTS - OUTPUTS. 9 SAFETY / STOP SAFETY DEVICES / STOP (8K2) input, selectable by DIP SW1_10. See description DIP SW1_10 , Chap.8. If not used, make a bridge with terminal n°9, using a 8K2 Ω resistance 10 START START (N.A.) input. See DIP SW1_1 and SW1_2, Chap.8 PEDESTRIAN (N.A.) input The pedestrian manoeuvre is made after the closing of this contact or by the relay 2 of the plug-in two-channels receivers. Operation in reply to a PEDESTRIAN command: Gate closed → OPENS for 10 seconds (not adjustable). During the opening → IRRELEVANT Gate open → IRRELEVANT if the automatic reclosing is enabled, otherwise CLOSES. During the closing OPENS completely. → 11 PED 12 PHOTO PHOTOCELL input (N.C.). If not used, jumper with terminal 14. 13 SAFETY SAFETY DEVICES (8K2) input. After the intervention of the safety device, the control unit stops the motion, inverts it for 1 second and waits for a command. If not used, make a bridge with terminal n°14, using a 8K2 Ω resistance 14 COM 15 16 17 MOTOR MOTOR + ACCES SAFETY / STOP M3 18 19 COM Common INPUTS - OUTPUTS. 24V motor output, see fig.4. 24V motor output, see fig.4. +24 Vdc external accessory power supply (photocells, radio, etc.). Power supply +24Vdc for external safety devices tested, 8W Max. Power supply +24Vdc for external devices submitted to ENERGY SAVING. See operation DIP SW1_4, Chap.8. Common INPUTS - OUTPUTS. 13 SC24 UK 6 - ELECTRICAL CONNECTIONS: FASTON Faston 0 Vac 18 Vac 24 Vac Description Transformer 0 Vac connection (black cable). Transformer 18 Vac connection (orange cable). Transformer 24 Vac connection (red cable). 7 - PROTECTION FUSES Position Value F1 315 mA F2 5A F3 500 mA Description Type FAST-BLOW Protects the ACCESSORY and SAFETY DEVICE power supply. FAST-BLOW Protects the control unit at the 24 VAC power supply input. FAST-BLOW Protects the flashlight output. 8 - DIP SWITCH SW1 The settings are stored during the rest phase (gate closed). The DEFAULT settings are coloured in grey DIP Function OFF OFF Operation in reply to a START command: Gate closed → OPENS During opening → STOPS Gate open → CLOSES During closing → STOPS After a STOP → inverts the motion ON OFF Operation in reply to a START command: Gate closed → OPENS During opening → CLOSES Gate open → CLOSES During closing → OPENS CONDOMINIUM OFF ON Operation in reply to a START command: Gate closed → OPENS During opening → IRRELEVANT Gate open → Recharges the automatic closing time if the automatic reclosing is enabled, otherwise closes. During closing → OPENS DEAD MAN ON ON If Start button is held down: OPENS If Pedestrian button is held down: CLOSES The SAFETY 8K2, PHOTO inputs and the decelerations will not be active. STOP 8K2 will be enabled. Not manageable with radio control. ON Enables the pre-flashing of 3 seconds before the activation of the motor in opening and closing. OFF Disables the pre-flashing. STEP–BY-STEP WITH STOP STEP–BY-STEP DIP 1 DIP 2 DIP 3 Description Status PRE-FLASHING SC24 14 UK 9 - DIP SWITCH SW1 DIP Function Description Status Enables the TEST of the devices connected to the terminals (9)-(12)-(13): if the devices are working perfectly, the cycle can start, otherwise some prolonged flashings will indicate the anomaly. DIP 4 ENERGY SAVING SAFETY DEVICES TEST ON Terminal (12 - “PHOTO”): power the photocells’ transmitters by the terminal (18) and the receivers by the terminal (17). At the beginning of the manoeuvre, the current will be cut to the transmitters for 1 second and then restored to check its right operation. Terminal (13 - “SAFETY”) and (9 if DIP10=ON ): the resistive value 8K2Ω is checked Enables ENERGY SAVING: There will be some tension on terminal (18) only during the manoeuvre. At rest the leds will be off. DIP 5 DIP 6 DIP 7 Disables the safety devices test. Disables ENERGY SAVING ON When the photocell is intercepted, during both opening and closing, the gate motion is locked until the photocell is freed. Subsequently there is always an opening phase. OFF Photocell enabled only during closing,when it is intercepted the gate opens. ON Disables automatic closing. OFF Enables automatic closing after the pause time adjustable by the trimmer TR1 PAUSE from 2 to 250 seconds. ON Enables the deceleration during both opening and closing, when the respective limit switch is intercepted. The deceleration speed is adjusted by trimmer TR3 SLOW. This function provides for use of 4 magnets. See fig. 22 and 23. OFF Disables the deceleration function. Only 2 magnets are required. ON Reduces the pause time to 3 seconds after the intervention of the photocells. OFF Disables the fast closing function PHOTOCELL IN OPENING AUTOMATIC RECLOSING DECELERATION DIP 8 FAST RECLOSING DIP 9 -- DIP 10 OFF -- -- ON Terminal 9 (SAFETY-STOP) works as terminal 13 (SAFETY 8K2). See Chap.5 . OFF Terminal 9 works as STOP 8K2. The activation of STOP 8K2 device causes an immediate STOP of the automatic device. TERMINAL 9 FUNCTION 15 SC24 UK 10 - DIP SWITCH SW4 The settings are stored during the rest phase (gate closed). The DEFAULT settings are coloured in grey DIP Function Description Status ON Disables the function. Enables the function attempts after the intervention of the safety devices. After the intervention of the safety device SAFETY or SAFETY-STOP (DIP 10 = ON) or of the ANTI CRUSHING and, after 10 seconds, the automation will try, for 3 times max., to restart the motion in the direction that has been interrupted. After another intervention of the safety device, the automation stops waiting for some commands. DIP 1 DIP 2 ATTEMPTS AFTER SAFETY DEVICES INTERVENTION -- WARNING! OFF A programming of the function different from the configuration pre-set by the manufacturer, although it allows, if correctly done, the reduction of the cases of stop of the system in intermediate position (as a simply example, for the presence of frictions, wind and/or obstacles on the way of the movable element), causes, in any case, a reduction of the safety level of the same system and a consequent danger for people safety. ON - OFF - 11 - TRIMMER ADJUSTMENT Trimmer Default Descrizione PAUSE Adjusts the PAUSE TIME from 2 to 250 seconds. The value is increased by turning the trimmer clockwise. AMP. SLOW Adjusts the intervention sensitivity of the anti crushing during the decelerated movement period. Turning the trimmer clockwise, the sensitivity decreases. SLOW Adjusts the motor FORCE/SPEED during the decelerated movement period. AMP. FORCE Adjusts the intervention sensitivity of the anti crushing during the not decelerated movement period. Turning the trimmer clockwise, the sensitivity decreases. FORCE Adjusts the motor FORCE/SPEED during the decelerated movement period. SC24 16 UK DESRCIZIONE 12 - MANUAL MANOEUVRE MENU ( A ) If the gate is unlocked and moved manually, with the electronic card powered, the control unit is reset and the following movement will be an opening. Position the gate into the stroke defined by the limit switches before locking the operator again. DESRCIZIONE 13 - FINAL CHECKS MENU ( A ) Check the electrical connections: an improper connection may be harmful to both the control unit and the operator. Check the correct position of the limit switches. Always preset the mechanical stops in opening and closing. Check the correct operation of photocells and safety devices. Check that the motors are blocked and ready to work with GATE HALFWAY POSITION. Remove possible obstacles in the operating area of the gate. Check that the direction of gate motion is correct: § take off the power supply from the control unit. § power the control unit. § give a START command. § check that the gate is opening, otherwise take off the power supply from the control unit and invert the wires of terminal M3. Check the correct operation of the automation. DESRCIZIONE 14 - FLASHINGMENU LIGHT(SIGNALLING A) SUMMARY Device Signalling Photo intercepted at rest in presence of START command 5 fast flashings ( DIP5 = ON ) Effect When released, it opens Test photo failed 4 slow flashings Door blocked Frame intercepted before the motion 3 slow flashings Door blocked Test frame 8K2 Failed (terminal 13) 2 slow flashings Door blocked Test frame 8K2 Failed (terminal 9) 1 slow flashing Door blocked Thank you for choosing GIBIDI. READ CAREFULLY THIS MANUAL BEFORE PROCEEDING WITH THE INSTALLATION. WARNING: This product has been tested by GI.BI.DI. checking the perfect correspondance of its characteristics to the current directive. GI.BI.DI. S.r.l. reserves the right to modify the technical data without prior notice, depending on the product development. DISPOSAL: GI.BI.DI. advises recycling the plastic components and disposing of them at special authorized centres, for electronic components, protecting the environment from polluting substances. 17 SC24 UK Declaration of conformity CE The manufacturer: GI.BI.DI. S.r.l. Via Abetone Brennero, 177/B, 46025 Poggio Rusco (MN) ITALY Declares that the products: ELECTRONIC CONTROL UNIT SC24 are in conformity to the following CEE Directives: • Directive LVD 2006/95/CE and subsequent amendments; • Directive EMC 2004/108/CE and subsequent amendments; and that the following harmonised standards have been applied: • EN60335-1, • EN61000-6-2, EN61000-6-3 Date 16/04/14 The legal Representative Michele Prandi SC24 18 NOTE SC24 NOTE 19 Cod. AIC8745 - 04/2014 - Rev. 00 GI.BI.DI. S.r.l. Via Abetone Brennero, 177/B 46025 Poggio Rusco (MN) - ITALY Tel. +39.0386.52.20.11 Fax +39.0386.52.20.31 E-mail: [email protected] Numero Verde: 800.290156 w w w . g i b i d i . c o m
Scarica