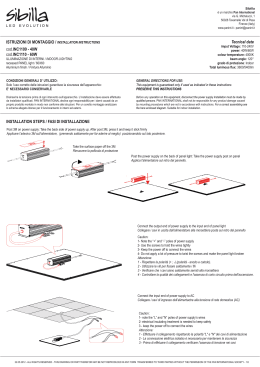
KIT FREE LVC KIT FREE LC VAS/101 VAS/101 LVC/01 LC/01 A A 70 43,5 70 7,5 B 57 45 106 45 a 7,5 1 a 3 c c 43,5 KIT FREE LC-LVC A 57 B 2 b D 145 C 135 64,5 M1 a a b M2 – + 6.5 135 3.5 6.5 3.5 99 b 243 30 99 243 64,5 207 70 207 70 E 24809590 B 30 c IT Italiano EN English www.bpt.it 24809590/26-03-2014 94° G 1080 mm B 43,5 mm 800 mm F 77° 500 mm 163,5 mm 94° A 43,5 Imm H c a a b 77° 163,5 mm 800 mm 500 mm L d a b 500 mm M N P a c 1 2 O M1 RESET – + B M/S CL.RES VAS/101 + – M2 M1 M2 A a LITHOS M1 BOUT + BOUT - b M2 Italiano Avvertenze generali All’apertura dell’imballo •Leggere attentamente le istruzioni, prima di iniziare l’installazione ed eseguire gli interventi come specificato dal costruttore; Prescrizioni generali per l’installazione •L’installazione, la programmazione, la messa in servizio e la manutenzione del prodotto deve essere effettuata soltanto da personale tecnico qualificato ed opportunamente addestrato nel rispetto delle normative vigenti ivi comprese le osservanze sulla prevenzione infortuni; •L’installatore deve assicurarsi che le informazioni per l’utente, dove previste, siano presenti e vengano consegnate. Manutenzione •Prima di effettuare qualunque operazione di pulizia o di manutenzione, togliere l’alimentazione ai dispositivi. •Gli apparecchi dovranno essere destinati unicamente all’uso per il quali sono stati espressamente concepiti. •Il costruttore non può comunque essere considerato responsabile per eventuali danni derivanti da usi impropri, erronei ed irragionevoli. VAS/101 Installazione B L’alimentatore deve essere installato SEMPRE in orizzontale. L’apparecchio è installabile su guida DIN (EN 50022) a, su apposito quadro elettrico oppure a parete utilizzando i coprimorsetti b. Per lo smontaggio procedere come indicato in figura . NOTA. Provvedere ad una corretta areazione nel caso l’alimentatore venga installato in un contenitore metallico. Dati tecnici Tipo Alimentazione VAS/101 230 VAC 50÷60 Hz Corrente assorbita =200 mAAC I max AC Potenza dissipata (W max) 10 Alimentazione nominale 18 VDC 1 A-0,5 A 1’/3’ Dimensioni (DIN) 4 Temperatura di stoccaggio (°C) -25 ÷ + 70 Temperatura di funzionamento (°C) 0 ÷ +35 Grado IP 30 Funzioni C Morsettiere a ~ Rete ~ + Alimentazione 18 VDC (*) – (*) L’apparecchio è protetto elettronicamente contro sovraccarichi e cortocircuiti. Far passare la tubazione con i conduttori d’impianto attraverso uno dei punti a rottura (F punto A). Nella messa in opera della scatola d’incasso si potranno evitare possibili deformazioni utilizzando l’apposito distanziale in dotazione (F punto B). Tramite la chiave a brugola togliere la placca Ea. Posizionare la cornice nella scatola d’incasso Ha, far passare i cavi di collegamento nell’apposito foro Eb e fissare il posto esterno Hb. Estrarre il coprimorsetto Ec ed effettuare i collegamenti. Terminati i collegamenti, reinserire il ccprimorsetto e montare la placca frontale. SMALTIMENTO Assicurarsi che il materiale d’imballaggio non venga disperso nell’ambiente, ma smaltito seguendo le norme vigenti nel paese di utilizzo del prodotto. Alla fine del ciclo di vita dell’apparecchio evitare che lo stesso venga disperso nell’ambiente. Lo smaltimento dell’apparecchiatura deve essere effettuato rispettando le norme vigenti e privilegiando il riciclaggio delle sue parti costituenti. Sui componenti, per cui è previsto lo smaltimento con riciclaggio, sono riportati il simbolo e la sigla del materiale. Accessori I Pulsante singola altezza DPS; Tettuccio da parete LTP; Scatola d’incasso LSI; Cornice da incasso LCI; Montaggio e rimozione moduli pulsanti L M N Inserire il modulo pulsante L facendo attenzione all’orientamento dall’alto verso il basso L . Rimuovere il vetrino e scrivere i nominativi M facendo attenzione al verso d’inserimento del vetrino N . Esempio di collegamento O Dati tecnici Tipo Alimentazione (VDC) Assorbimento (mA) Assorbimento in stand-by (mA) Temperatura di stoccaggio (°C) Temperatura di funzionamento (°C) Grado IP Dimensioni cartellini portanome (mm) Telecamera Standard video Risoluzione (pixel) Illuminazione minima (LUX) LC/01-LVC/01 16-18 320 130 -25 ÷ + 70 °C 0 ÷ +35 54 5 3 x 1 3 x 0 , 3 o p p u re 53x33x0,3 LVC/01 PAL/NTSC 680x512 1 Funzioni P Morsettiere a BOUT Montante – Alimentazione + 16-18 VDC – Massa Pulsante apriporta (NA) – Elettroserratura 12V - 1A max Regolazioni c LC-01 LVC-01 Audio altoparlante Audio microfono Installazione da parete Tramite la chiave a brugola togliere la placca Ea. Con i tasselli in dotazione fissare il posto esterno all’altezza desiderata Eb tenendo conto del posizionamento dell’obiettivo della telecamera G. Far passare la tubazione Eb, estrarre il coprimorsetto Ec ed effettuare i collegamenti. Reinserire i coprimorsetti e montare la placca frontale. elettroserratura 1÷10 sec (default 1 sec) Programmazione Il posto esterno viene fornito già configurato per una chiamata abbinata ad un qualsiasi derivato interno MAI programmato. È comunque possibile aggiungere pulsanti o derivati come spiegato nel manuale di programmazione del posto esterno. Installazione da incasso Murare la scatola d’incasso F all’altezza desiderata tenendo conto del posizionamento dell’obiettivo della telecamera G. 3 English General Precautions Opening the packaging •Read the instructions carefully before starting installation and proceed as specified by the manufacturer; General prescriptions for installation •Installation, programming, commissioning and maintenance of the product must only be performed by qualified technicians who have been properly trained in compliance with current standards, including health and safety regulations; •The installer must make sure that the information for the user, where applicable, is present and is delivered; Maintenance •Before performing any cleaning or maintenance operation, disconnect the power supply to the device; if the equipment is powered by mains voltage disconnect the power supply, opening the switch located upstream of it; •The equipment must be used only for the purpose for which it was explicitly designed. •The manufacturer declines all liability for any damage as a result of improper, incorrect or unreasonable use. VAS/101 Installation B The power supply unit must ALWAYS be installed horizontally. The device can be installed on DIN rails (EN 50022) a, on a suitable switchboard, or on the wall using the terminal board covers b. To dismantle it, proceed as shown in figure c. NOTE. Ensure there is correct ventilation if the power supply unit is installed in a metal case. Technical data Type Power supply Input current Dissipated power (W max) Nominal power supply Dimensions (DIN) Storage temperature (°C) Operating temperature (°C) IP Degree VAS/101 230 VAC 50÷60 Hz =200 mAAC I max AC 10 18 VDC 1 A-0,5 A 1’/3’ 4 -25 ÷ + 70 0 ÷ +35 30 Functions C Terminal boards a ~ Mains ~ + Power supply 18 VDC (*) – (*) The appliance is electronically protected against overloads and short circuits. LC-01 LVC-01 Wall mounting Using the Allen screwdriver remove the cover Ea. With the wall plugs provided fix the entry panel at the desired height Eb respecting the positioning of the lens of the surveillance camera G. Push through pipe Eb, take off the terminal board cover Ec and make the connections. Put back on the terminal board covers and assemble the front cover. 4 Recessed installation Wall in the recessed box F at the desired height, respecting the positioning of the lens of the surveillance camera G. Push the pipe with the system conductors through one of the breaking points (F point A). When using the recessed box any possible deformations can be avoided by using the spacer provided (F point B). Using the Allen screwdriver remove the cover Ea. Position the frame surround in the recessed box Ha, push the connection cables through hole Eb and secure the entry panel Hb. Take off the terminal board cover Ec and make the connections. Once the connections have been made, put back on the terminal board cover and assemble the front cover. Accessories I DPS single button; LTP Wall roof; Recessed box LSI; Recessed frame LCI; Assembly and removal of buttons modules L M N Insert the button module L paying attention to the up to down orientation La. Remove the small piece of glass and write the names M paying attention to the direction of insertion of the glass panel N a. Connection examples O Technical data Type Power supply (VDC) Absorption (mA) Consumption in stand-by mode (mA) Storage temperature (°C) Operating temperature (°C) IP Degree Size of name cards (mm) Camera Standard video Resolution (pixel) Minimum lighting (LUX) LC/01-LVC/01 16-18 320 130 -25 ÷ + 70 °C 0 ÷ +35 54 53x13x0,3 or 53x33x0,3 LVC/01 PAL/NTSC 680x512 1 Functions P Termina block a BOUT Riser – Power supply + 16-18 VDC – Ground Door lock release button (NA) – Solenoid lock 12 V 1 A max Adjustments c loudspeaker audio microphone audio solenoid lock 1-10 s. (default 1 s) Programming The entry panel is supplied already configured through a call put through to any receiver that has NEVER been programmed. It is possible, however, to add buttons or receivers as explained in the entry panel’s programming manual. DISPOSAL Do not litter the environment with packing material: make sure it is disposed of according to the regulations in force in the country where the product is used. When the equipment reaches the end of its life cycle, take measures to ensure it is not discarded in the environment. The equipment must be disposed of in compliance with the regulations in force, recycling its component parts wherever possible. Components that qualify as recyclable waste feature the relevant symbol and the material’s abbreviation.
Scaricare