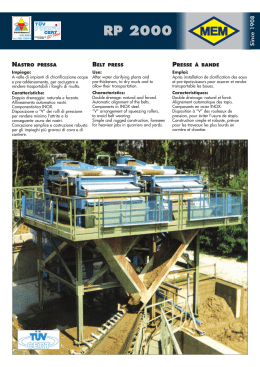
J-6
QUADRO ELETTRONICO PER IL COMANDO DI 6 MOTORI PER TAPPARELLE E TENDE DA SOLE
COFFRET ÉLECTRONIQUE POUR LA COMMANDE DE 6 MOTEURS POUR VOLETS ET RIDEAUX PARE-SOLEIL
ELECTRONIC PANEL FOR THE AUTOMATION OF 6 MOTORS FOR ROLLING WINDOW SHUTTERS AND SUN BLINDS
CUADRO ELECTRÓNICO PARA EL COMANDO DE 6 MOTORES DE PERSIANAS Y TOLDOS
cod. ABJ0004
ITALIANO pag. 04 / FRANÇAIS pag. 07 / ENGLISH page 10 / ESPAÑOL pag. 13
I
F
ISTRUZIONI DI SICUREZZA IMPORTANTI
PER L’INSTALLAZIONE
INSTRUCTIONS DE SECURITE
IMPORTANTES POUR L’INSTALLATION
- ATTENZIONE PER LA SICUREZZA DELLE PERSONE É IMPORTANTE
CHE VENGANO SEGUITE TUTTE LE ISTRUZIONI
- ATTENTION POUR LA SECURITE DES PERSONNES IL EST IMPORTANT
QUE TOUTES LES INSTRUCTIONS SOIENT SUIVIES
SEGUIRE TUTTE LE ISTRUZIONI DI INSTALLAZIONE
SUIVRE TOUTES LES INSTRUCTIONS D’INSTALLATION
1° - Q
uesto libretto d’istruzioni è rivolto esclusivamente a
del personale specializzato che sia a conoscenza dei criteri
costruttivi e dei dispositivi di protezione contro gli infortuni per
i cancelli, le porte e i portoni motorizzati (attenersi alle norme e
alle leggi vigenti).
2° - L’installatore dovrà rilasciare all’utente finale un libretto di
istruzioni in accordo alla EN 12635.
3° - L’installatore prima di procedere con l’installazione deve prevedere
l’analisi dei rischi della chiusura automatizzata finale e la messa
in sicurezza dei punti pericolosi identificati (seguendo le norme
EN 12453/EN 12445).
4° - Il cablaggio dei vari componenti elettrici esterni all’operatore (ad
esempio fotocellule, lampeggianti, ecc.) deve essere effettuato
secondo la EN 60204-1 e le modifiche a questa apportate dal
punto 5.2.2 della EN 12453.
5° - L’eventuale montaggio di una pulsantiera per il comando manuale
del movimento deve essere fatto posizionando la pulsantiera in
modo che chi la aziona non si trovi in posizione pericolosa; inoltre
si dovrà fare in modo che sia ridotto il rischio di azionamento
accidentale dei pulsanti.
6° - Tenete i comandi dell’automatismo (pulsantiera, telecomando
etc.) fuori dalla portata dei bambini. I comandi devono essere
posti ad un’altezza minima di 1,5m dal suolo e fuori dal raggio
d’azione delle parti mobili.
7° - Prima di eseguire qualsiasi operazione di installazione,
regolazione, manutenzione dell’impianto, togliere la tensione
agendo sull’apposito interruttore magnetotermico collegato a
monte dello stesso.
1° - C
e livret d’instructions est adressé exclusivement à un
personnel spécialisé qui connaît les critères de construction et
les dispositifs de protection contre les accidents concernant les
portails, les portes et les grandes portes motorisés (s’en tenir aux
normes et aux lois en vigueur).
2° - L’installateur devra délivrer à l’utilisateur final un livret d’instruction
en accord à la EN 12635.
3° - L’installateur avant de procéder à l’installation, doit prévoir
l’analyse des risques de la fermeture automatisée finale et la
mise en sécurité des points identifiés dangereux (en suivant les
normes EN 12453/EN 12445).
4° - Le câblage des divers composants électriques externes à
l’opérateur (par exemple photocellules, clignotants, etc) doit être
effectué selon la EN 60204-1 et les modifications apportées à
celle-ci dans le point 5.2.2 de la EN 12453.
5° - Le montage éventuel d’un tableau pour la commande manuelle
du mouvement doit être fait en positionnant le tableau de
façon à ce que la personne qui l’actionne ne se trouve pas en
position de danger ; de plus, il faudra faire en sorte que le risque
d’actionnement accidentel des boutons soit réduit.
6° - Tenir les commandes de l’automatisme (tableau, télécommande,
etc) hors de portée des enfants. Les commandes doivent être
placées à une hauteur minimum de 1,5 m du sol et hors du rayon
d’action des parties mobiles.
7° - Avant l’exécution de toute opération d’installation, de réglage,
d’entretien de l’installation, couper le courant en agissant sur
l’interrupteur magnétothermique à cet effet, branché en amont
de l’installation.
LA DITTA RIB NON ACCETTA NESSUNA RESPONSABILITÀ per
eventuali danni provocati dalla mancata osservanza nell’installazione
delle norme di sicurezza e delle leggi attualmente in vigore.
LA SOCIETE RIB N’ACCEPTE AUCUNE RESPONSABILITE pour
d’éventuels dommages provoqués par la non-observation dans
l’installation, des normes de sécurité et des lois actuellement en
vigueur.
CONSERVARE CON CURA QUESTE ISTRUZIONI
CONSERVER SOIGNEUSEMENT CES INSTRUCTIONS
1° - S
e non é previsto nel quadro elettronico, installare a monte della
medesima un’interruttore di tipo magnetotermico (onnipolare con
apertura minima dei contatti pari a 3mm) che riporti un marchio
di conformità alle normative internazionali. Tale dispositivo deve
essere protetto contro la richiusura accidentale (ad esempio
installandolo dentro quadro chiuso a chiave).
2° - Per la sezione ed il tipo dei cavi la RIB consiglia di utilizzare un
cavo di tipo H05RN-F con sezione minima di 1,5mm2 e comunque
di attenersi alla norma IEC 364 e alle norme di installazione
vigenti nel proprio Paese.
3° - Posizionamento di un’eventuale coppia di fotocellule: Il raggio
delle fotocellule deve essere ad un’altezza non superiore a 70
cm dal suolo e ad una distanza dal piano di movimento dell’anta
non superiore a 20 cm. Il loro corretto funzionamento deve essere
verificato a fine installazione in accordo al punto 7.2.1 della EN
12445.
4° - Per il soddisfacimento dei limiti imposti dalla EN 12453, se la
forza di picco supera il limite normativo di 400 N è necessario
ricorrere alla rilevazione di presenza attiva sull’intera altezza del
cancello (fino a 2,5m max) - Le fotocellule in questo caso sono
da applicare all’esterno tra le colonne ed all’interno per tutta la
corsa della parte mobile ogni 60÷70cm per tutta l’altezza delle
colonne del cancello fino ad un massimo di 2,5m (EN 12445
punto 7.3.2.1) - es. colonne alte 2,2m => 6 coppie di fotocellule - 3
interne e 3 esterne (meglio se dotate di sincronismo - 6 FIT SLYM
con 2 TX SLIM).
1° - S
i la centrale électrique ne dispose d’aucun interrupteur, il faut
en installer un de type magnétothermique en amont de cette
dernière (omnipolaire avec ouverture minimale des contacts
correspondant à 3mm); la marque de cet interrupteur devra être
en conformité avec les normes internationales. Ce dispositif doit
être protégé contre toute remise en fonction accidentelle (ex. en
l’installant dans un coffre fermant à clé).
2° - En ce qui concerne la section et le type des câbles, le conseil de
la RIB est celui d’utiliser un câble de type H05RN-F présentant
une section minimale de 1,5mm2 et, quoi qu’il en soit, de se
conformer à la norme IEC 364, ainsi qu’aux normes d’installation
en vigueur dans le pays de destination.
3° - Positionnement d’un éventuel jeu de photocellules : le faisceau
des photocellules ne doit pas être à une hauteur supérieure à
70 cm du sol et 20 cm du bord du vantail. Leur correct effectivité
fonctionnement doit être vérifié terminant l’installation, selon le
point de la 7.2.1 de la EN 12445.
4° - Afin de satisfaire aux limites imposées par la norme EN 12453, si
la force d’impact dépasse la limite de 400N, il sera nécessaire de
détecter une présence sur la hauteur totale du portail (jusqu’à un
maximum de 2,5m) - Les cellules photo-électriques dans ce casci doivent être s’appliquent extérieurement entre les colums et
intérieurement pour toute la course de la pièce de mobil chaque
60÷70cm pour toute la taille de la colonne de la porte jusqu’à
un maximum de 2,5m (EN 12445 point 7.3.2.1) - exemple: taille
2,2m de colonne = > 6 copies des cellules photo-électriques
- 3 internes et 3 externes (meilleur si complet du dispositif de
syncronism - FIT SLYM avec TX SLYM).
N.B.:É obbligatoria la messa a terra dell’impianto
I dati descritti nel presente manuale sono puramente indicativi.
La RIB si riserva di modificarli in qualsiasi momento.
Realizzare l’impianto in ottemperanza alle norme ed alle leggi vigenti.
N.B.:La mise à terre de l’installation est obligatoire.
Les données figurant dans le présent manuel sont fournies à titre
purement indicatif. La RIB se réserve le droit de les modifier à tout
moment, sans aucun préavis. Effectuer l’installation en conformité
avec les normes et les lois en vigueur.
2
G
B
E
S
IMPORTANT SAFETY INSTRUCTIONS FOR
THE INSTALLATION
- ATTENTION FOR THE SAFETY OF THE PEOPLE IT IS IMPORTANT
TO FOLLOW ALL THE INSTRUCTIONS.
IMPORTANTES INSTRUCCIONES DE
SEGURIDAD PARA LA INSTALACIÓN
- CUIDADO UNA INCORRECTA INSTALACIÓN PUEDE CAUSAR
GRAVES DAÑOS
SEGUIR TODAS LAS INSTRUCCIONES DE INSTALACIÓN
FOLLOW ALL INSTALLATION INSTRUCTIONS
1° - E
ste manual de instrucciones está exclusivamente dirigido a
personal especializado que conozca los criterios de construcción
y de los dispositivos de protección contra accidentes con
cancelas, puertas y portales motorizados (atenerse a las normas
y a las leyes vigentes).
2° - El instalador tendrá que dar al utilizador final un manual de
instrucciones de acuerdo con la EN 12635.
3° - El instalador antes de proceder con la instalación tiene que hacer
una analisis de los riesgos del cierre automatizado final y la
puesta en seguridad de los puntos identificados como peligrosos
(siguiendo las normas EN 12453 / EN 12445).
4° - El cablaje de los varios componentes eléctricos externos al
operador (por ejemplo fotocélulas, los intermitentes, etc) tiene que
ser efectuado según la EN 60204-1 y a las modificas sucesivas
aportadas por el punto 5.2.2 della EN 12453.
5° - El eventual montaje de un panel de mandos para la gestión del
movimiento manual tiene que ser efectuado posicionando el
panel en modo que quién lo accione no se encuentre en una
posición peligrosa; además se tiene que hacer en modo que
el riesgo de accionamiento accidental de los pulsadores sea
mínimo.
6° -Tener los mandos del automatismo (panel de mandos, mando a
distancia, etc.) lejos del alcance de los niños. Los mandos tienen
que ser puestoa una altura mínima de 1,5m del suelo y fuera del
radio de acción de las partes móviles.
7° - Antes de ejecutar cualquier operación de instalación, ajuste
o mantenimiento del sistema, quitar la corriente accionando
el respectivo interruptor magnetotérmico conectado antes del
mismo.
1° - T
his handbook is exclusively addressed to the specialized
personnel who knows the constructive criteria and the protection
devices against the accidents for motorized gates, doors and
main doors (follow the standards and the laws in force).
2° - The installer will have to issue to the final user a handbook in
accordance with the EN 12635.
3° - Before proceeding with the installation, the installer must forecast
the risks analysis of the final automatized closing and the safety
of the identified dangerous points (following the standards EN
12453/EN 12445).
4° - The wiring harness of the different electric components external to
the operator (for example photoelectric cells, flashlights etc.) must
be carried out according to the EN 60204-1 and the modifications
to it done in the point 5.2.2 of the EN 12453.
5° - The possible assembly of a keyboard for the manual control of the
movement must be done by positioning the keyboard so that the
person operating it does not find himself in a dangerous position;
moreover, the risk of accidental activation of the buttons must be
reduced.
6° - Keep the automatism controls (push-button panel, remote control
etc.) out of the children way. The controls must be placed at a
minimum height of 1,5m from the ground and outside the range
of the mobile parts.
7° - Before carrying out any installation, regulation or maintenance
operation of the system, take off the voltage by operating on the
special magnetothermic switch connected upstream it.
THE RIB COMPANY DOES NOT ACCEPT ANY RESPONSIBILITY
for possible damages caused by the non observance during the
installation of the safety standards and of the laws in force at present.
LA EMPRESA RIB NO ES RESPONSABLE por eventuales daños
provocados por la falta de respeto de las normas de seguridad,
durante la instalación y de las leyes actualmente vigentes.
KEEP THESE INSTRUCTIONS WITH CARE
CONSERVAR CUIDADOSAMENTE ESTAS INSTRUCCIONES
1° - Install a thermal magnetic switch (omnipolar, with a minimum
contact opening of 3 mm) before the control board, in case this is
not provided with it. The switch shall be guaranteed by a mark of
compliance with international standards. Such a device must be
protected against accidental closing (e.g. Installing it inside the
control panel key locked container).
2° - As far as the cable section and the cable kind are concerned,
RIB suggests to use an H05RN-F cable, with a minimum section
of 1,5mm2, and to follow, In any case, the IEC 364 standard and
Installation regulations In force In your Country.
3° - Positioning of an eventual pair of photocells: The beam of the
photocells must be at an height not above the 70 cm from the
ground, and, should not be more than 20 cm away from the axis
of operation of the gate (Sliding track for sliding gate or door, and
the hinges for the swing gate). In accordance with the point 7.2.1
of EN 12445 their correct functioning must be checked once the
whole installation has been completed.
4° - In order to comply with the limits defined by the EN 12453 norm,
if the peak force is higher than the limit of 400N set by the norm,
it is necessary to use an active obstacle detection system on
the whole height of the gate (up to a maximum of 2,5m) - The
photocells in this case must be apply externally between the
colums and internally for all the race of the mobil part every
60÷70cm for all the height of the column of the gate up to a
maximum of 2,5m (EN 12445 point 7.3.2.1). example: column
height 2,2m => 6 copies of photocells - 3 internal and 3 external
(better if complete of syncronism feature - FIT SLYM with TX
SLYM).
1° - E
n el caso de que no sea previsto en la central eléctrica, instalar
antes de la misma, un interruptor de tipo magnetotérmico
(omnipolar con una abertura mínima de los contactos de 3mm) que
dé un sello de conformidad con las normas internacionales. Este
dispositivo tiene que estar protegido contra cierres accidentales
(por ejemplo instalándolo dentro de un panel cerrado a llave).
2° - Para la sección y el tipo de los cables, la RIB aconseja utilizar
cables de tipo H05RN-F con sección mínima de 1,5mm2 e
igualmente atenerse a la norma IEC 364 y a las normas de
instalación del propio País.
3° - Posicionamiento eventual de un par de fotocélulas. El rayo de
las fotocélulas no debe estar a más de 70 cm de altura desde
el suelo y a una distancia de la superficie de movimiento de la
puerta, no superior a 20 cm. El correcto funcionamiento tiene que
ser controlado al final de la instalación de acuerdo con el punto
7.2.1 de la EN 12445.
4° - Para satisfascer los límites impuestos por la EN 12453, si la
fuerza de punta supera el límite normativo de 400 N, es necesario
recurrir al control de presencia activa en toda la altura de la
puerta (hasta a 2,5m max). Las fotocélulas en este caso se tienen
que colocar en el exterior entre las columnas y en el interior por
todo el recorrido de la parte móvil cada 60÷70cm en toda la altura
de las columnas de la cancela hasta un máximo de 2,5m (EN
12445 punto 7.3.2.1) - es. columnas altas de 2,2m => 6 par de
fotocélulas - 3 internas y 3 externas (mejor si están provistas de
sincronismo - 6 FIT SLYM con 2 TX SLYM).
PS.:Es obligatorio la puesta a tierra del sistema.
Los datos descritos en el presente manual son sólamente indicativos.
La RIB se reserva de modificarlos en cualquier momento.
Realizar el sistema respetando las normas y las leyes vigentes.
N.B.: The system must be grounded
Data described by this manual are only Indicative and RIB reserves
to modify them at any time. Install the system complying with current
standards and regulations.
3
I
J-6 cod. AC00183
Buzzer
F
E
D
C
B
A
Dip-switch per la selezione delle funzioni
Dip
ON
OFF
1
2 3
4
1 2 3 4 5 6 7
8 9 10
1 4 15 1 6
1 1 12 1 3
COLLEGAMENTI ELETTRICI
Stop
Com
Close
Open/Go
24Vdc
Com
Open
Close
Com
Open
Close
23 24 25
Com
Open
Close
20 21 22
Com
Open
Close
14 15 16 17 18 19
Com
Open
Close
11 12 13
M1
M2
M3
M4
M5
M6
SCHEMA DI COLLEGAMENTI PER CONTROLLO INDIVIDUALE
ATTENZIONE: NEL CONTROLLO INDIVIDUALE, ATTIVARE UN MOTORE ALLA VOLTA
1
8 9 10
M1
11 12 13
M2
2
14 15 16
M3
17 18 19
M4
FUNZIONAMENTO DEL CONTROLLO INDIVIDUALE
Il controllo individuale permette di movimentare l’automazione escludendo la centralina.
Il controllo individuale viene escluso quando la centralina comanda un movimento.
4
23 24 25
Qualunque contatto
Normalmente Chiuso (N.C.)
deve essere ponticellato
se non utilizzato.
Com
Open
Close
8 9 10
LIGHT
L
N
230Vac/1ph/N/E
Mains Supply
20 2 1 2 2
A B C D E F
1 2 3 4 5 6 7
L
N
17 1 8 1 9
3
20 21 22
M5
23 24 25
M6
I
ALIMENTAZIONE AUSILIARIA
ATTENZIONE: Prima di qualsiasi attivazione e/o messa in opera,
leggere attentamente i seguenti paragrafi che descrivono le
programmazioni e le impostazioni principali dell’automazione. Nella
programmazione, seguire scrupolosamente l’ordine e le istruzioni
riportate. Non entrare nel raggio d’azione dell’automazione mentre
è in movimento o durante le programmazioni. Prima di ogni
modifica attendere il completo arresto del sistema. Non permettere
a persone estranee e/o non qualificate interventi e/o la presenza nel
raggio d’azione del sistema.
Tramite i morsetti E e F, è possibile usufruire di una tensione da 24Vdc
(200 mA) per eventuali accessori.
COLLEGAMENTO FOTOCELLULE
F
E
D
C
B
A
Il collegamento del contatto delle fotocellule deve essere eseguito in
serie all’ingresso del pulsante di STOP (morsetto A).
ACCENSIONE
CARATTERISTICHE TECNICHE
All’accensione del quadro di comando vengono emessi 2 toni di buzzer,
CONTEMPORANEAMENTE SI ACCENDE IL LED VERDE “POWER” A
SEGNALARE LA PRESENZA DI RETE.
Tensione di Alimentazione
Frequenza
Potenza massima singolo motore
Assorbimento massimo scheda
Grado di protezione
Fusibili
Dimensioni
Peso apparecchiatura
FUNZIONI SELEZIONABILI TRAMITE DIP SWITCH
Dip
ON
OFF
1
2 3
4
DIP1:
- Se è OFF: La funzione attiva nel PULSANTE DI
APERTURA è quella “a uomo presente”.
L’apertura dell’automazione dura fino alla
permanenza della pressione sul pulsante.
Quando il pulsante viene rilasciato l’automazione si
arresta.
-Se è ON: Una pressione momentanea del
PULSANTE DI APERTURA determina l’apertura
completa dell’automazione.
L’apertura può essere bloccata in qualsiasi
momento dal pulsante di STOP o dal comando di
CHIUDI.
230V~ ±10%
50/60Hz
500W
20 mA
IP55
6.3A ritardato
250x196x100 mm
1,2 kg
DIP2:
- Se è OFF: La funzione attiva nel PULSANTE DI CHIUSURA è quella
“a uomo presente”.
La chiusura dell’automazione dura fino alla permanenza della pressione
sul pulsante.
Quando il pulsante viene rilasciato l’automazione si arresta.
-Se è ON: Una pressione momentanea del PULSANTE DI CHIUSURA
determina la chiusura completa dell’automazione.
La chiusura può essere bloccata in qualsiasi momento dal pulsante di
STOP o dal comando di APRI.
DIP3: TEMPO DI LAVORO
- Se è OFF: l’automazione ha un tempo di lavoro massimo di tre minuti.
-Se è ON: l’automazione ha un tempo di lavoro infinito.
4 5 6 7
8 9 10
1 1 12 1 3
DIP4: FUNZIONAMENTO INGRESSI (come si può vedere nello schema
a pagina precedente).
- Se è OFF: si ha la possibilità di collegare alla morsettiera dei comandi
tre pulsanti “STOP, CHIUDI, APRI”.
In questo caso il DIP 1 e il DIP 2, come descritto sopra, determinano la
modalità di funzionamento degli ingressi.
-Se è ON: si ha la possibilità di collegare alla morsettiera dei comandi
due pulsanti “STOP e PASSO/PASSO”.
In questo caso il funzionamento è dato dalla sequenza APRI - STOP CHIUDI …
Per abilitare questo funzionamento impostare DIP1 e DIP2 su ON.
LAMPADA DI CORTESIA
È possibile collegare ai morsetti 6 e 7 una lampada di cortesia a 230Vac
40W max. La lampada si accende ad un comando da pulsante APRE o
CHIUDE e rimane accesa per 3 minuti.
5
1 4 15 1 6
1
I
OPTIONAL - Per i collegamenti ed i dati tecnici degli accessori attenersi ai relativi libretti di istruzione.
TELECOMANDO SUN
SUN 2CH
SUN CLONE 2CH
NOVA - NOVA WIRELESS
cod. ACG6052
cod. ACG6056
FOTOCELLULE NOVA - portata 25 m
cod. ACG8046
FOTOCELLULE NOVA WIRELESS - portata 25 m - durata batterie 3
anni
cod. ACG8047
COPPIA DI COLONNINE per NOVA
cod. ACG8039
RADIO RICEVITORE AD AUTOAPPRENDIMENTO
SELETTORI A CHIAVE
RX433/A 2CHsupereterodina bicanale con morsettiera
cod. ACG5052
Comando per ogni tipo di automazione.
Dotato di due microswitches con contatti N.O. da 15A 250V (apre/chiude)
e da un interruttore con contatto N.C. da 4A 250V (Stop).
Il selettore può essere aperto solo dal possessore della chiave di
azionamento. IP54.
- DA INCASSO SENZA STOP dim.: 100x100x109
cod. ACG1010
- DA PARETE SENZA STOP dim.: 100x100x42
cod. ACG1030
ANTENNA 433
con cavo. Per applicazione a muro.
PULSANTIERA DA PARETE FLAT
cod. ACG5450
FIT SLIM
APRE/CHIUDE
Comando per ogni tipo di automazione.
Con comando diretto al motore.
FOTOCELLULE DA PARETE
cod. ACG8032
COPPIA DI COLONNINE PER FIT SLIM
cod. ACG8065
Le fotocellule FIT SLIM hanno la funzione di sincronismo in corrente
alternata e portata di 20 m.
Sono applicabili più coppie di fotocellule ravvicinate grazie al circuito
sincronizzatore.
Aggiungere il TRASMETTITORE TX SLIM SYNCRO cod. ACG8029 per
sincronizzare fino a 4 coppie di fotocellule.
cod. ACG2012
PULSANTIERA DA PARETE
APRE/CHIUDE
Comando per ogni tipo di automazione.
Con comando diretto al motore.
6
cod. ACG2010
J-6 code AC00183
Buzzer
F
E
D
C
B
A
Dip-switch pour la Sélection des fonctions
Dip
ON
OFF
1
2 3
4
1 2 3 4 5 6 7
8 9 10
1 4 15 1 6
1 1 12 1 3
CONNEXIONS ÉLECTRIQUES
Stop
Com
Close
Open/Go
24Vdc
Com
Open
Close
Com
Open
Close
23 24 25
Com
Open
Close
20 21 22
Com
Open
Close
14 15 16 17 18 19
Com
Open
Close
11 12 13
23 24 25
Tout contacte normalement
fermé (N.C) doit être shunté
commun si non utilisé
Com
Open
Close
8 9 10
LIGHT
L
N
230Vac/1ph/N/E
Mains Supply
20 2 1 2 2
A B C D E F
1 2 3 4 5 6 7
L
N
17 1 8 1 9
M1
M2
M3
M4
M5
M6
SCHÉMA DE CONNEXION POUR LE CONTRÔLE INDIVIDUEL
ATTENTION: DANS LE CONTRÔLE INDIVIDUELLE, ACTIVER UN SEUL MOTEUR A LA FOI FONCTINNEMENT
1
8 9 10
M1
11 12 13
M2
2
14 15 16
M3
17 18 19
M4
FONCTINNEMENT DU CONTROLE INDIVIDUEL
Le contrôle individuel permet de manoeuvrer l’automatisme en excluant la centrale.
Le contrôle individuel est exclu quand la centrale commande un mouvement.
7
3
20 21 22
M5
23 24 25
M6
F
F
ALIMENTATION SUPPLÉMENTAIRE
ATTENTION: Avant tout actionnement et/ou mise en marche, lire
attentivement les paragraphes suivants reportant les programmations
et les réglages principaux de l’automatisme. Dans la programmation,
suivre scrupuleusement les instructions reportées dans la notice. Ne
pas entrer dans le rayon d’action du portail pendant le mouvement ou
pendant les programmations. Avant toute modification, attendre l’arrêt
complet du système. Interdire à toutes personnes non autorisées ou
non qualifiées d’effectuer des opérations et/ou la présence dans le
rayon d’action du système.
Grâce à bornes E et F, il est possible l’utilisation de une tension de 24
Vdc (200 mA) pour les accessoires.
F
E
D
C
B
A
CONNEXION PHOTOCELLULES
La connexion de contact des photocellules doivent être exécutés en
série sur le entrée de bouton STOP (borne A).
ALLUMAGE
CARACTÉRISTIQUES TECHNIQUES
A la mise sous tension du la centrale de commande sont émis 2 sons
du buzzer, SIMULTANEMENT VENEZ SUR LE LED VERT “POWER”
POUR SIGNALER LA PRÉSENCE DU RÉSEAU.
FONCTIONS SÉLECTIONNABLES À TRAVERS LES DIPS
Dip
ON
OFF
230V~ ±10%
50/60Hz
500W
20 mA
IP55
6.3A à retardement
250x196x100 mm
1,2 kg
1
2 3
4
DIP1:
- S’il est à OFF: La fonction active du BOUTON
D’OUVERTURE est celle “a homme présent”.
L’ouverture de l’automation dure tant que la
pression du bouton même est maintenue. Quand le
bouton est relâché, l’automation s’arrête.
-S’il est à ON: Une pression temporaire du
BOUTON D’OUVERTURE détermine l’ouverture
complète de l’automation.
L’ouverture peut être bloquée à tout moment avec
le bouton stop ou avec la commande de fermeture.
Tension d’alimentation
Fréquence
Puissance maximale un seul moteur
Absorption maximale carte
Indice de protection
Fusibles
Encombrement
Poids de l’appareillage
DIP2:
- S’il est à OFF: La fonction active du BOUTON DE FERMETURE est
celle “a homme présent”.
La fermeture de l’automation dure tant que la pression du bouton même
est maintenue. Quand le bouton est relâché, l’automation s’arrête.
-S’il est à ON: Une pression temporaire du BOUTON DE FERMETURE
détermine la fermeture complète de l’automation.
La fermeture peut être bloquée à tout moment avec le bouton stop ou
avec la commande d’ouverture.
DIP3: TEMPS DE TRAVAIL
- S’il est à OFF: l’automation a un temps de travail de 3 minutes
maximum.
-S’il est à ON: l’automation à un temps de travail infini.
DIP4: FONCTIONNEMENT ENTRÉE (comme décrit à la page
précédente).
- S’il est à OFF: il y a la possibilité de brancher aux bornes de la centrale
des commandes à trois boutons “STOP, FERME, OUVRE”. Dans ce
cas les DIP 1 e 2, comme décrit ci-dessus, détermine la modalité de
fonctionnement des entrée.
-S’il est à ON: il y a la possibilité de brancher aux bornes de la centrale
des commandes à deux boutons “STOP e PAS à PAS”. Dans ce cas le
fonctionnement est donné par la séquence OUVRE - STOP - FERME...
Pour habilité ce fonctionnement, positionner les DIPS 1 et 2 sur
ON.
4 5 6 7
8 9 10
1 1 12 1 3
LUMIÈRE DE COURTOISIE
Il est possible de brancher aux bornes 6 et 7, une lumière de courtoisie
230Vac 40W max.
La lumière est allumée à un commande de bouton OUVERTURE ou
FERMETURE et reste allumé pendant 3 minutes.
8
1 4 15 1 6
1
OPTIONS -
our les branchements et les données techniques des accessoires, se conformer aux livrets
P
d’instruction correspondants.
EMETTEUR RADIO SUN
SUN 2CH
SUN CLONE 2CH
NOVA - NOVA WIRELESS
code ACG6052
code ACG6056
PHOTOCELLULES NOVA - portée 25 m
code ACG8046
PHOTOCELLULES NOVA WIRELESS - portée 25 m - durée batteries
3 années
code ACG8047
PAIRE DE POTEAUX pour NOVA
code ACG8039
RADIORÉCEPTEURS AUTO-APPRENDISSAGE
SELECTEURS A CLE
RX433/A 2CH superhétérodyne à deux canaux avec bornes à visser
code ACG5052
Commande pour tout type d’automatisation. Équipé de deux microinterrupteurs avec contact N.O. de 15A 250V (Ouverture / Fermeture) et
d’un interrupteur avec contact N.F. de 4A 250V (Stop).
Le sélecteur peut être ouvert que par la personne en possession de la clé
de manoeuvre. IP54.
- A ENCASTRER SANS STOP dim.: 100x100x109 code ACG1010
- MURAL SANS STOP dim.: 100x100x42 code ACG1030
ANTENNE 433
avec câble. Pour l’application de mur.
BOUTON POUSSOIR MURAL FLAT
code ACG5450
FIT SLIM
OUVERTURE/FERMETURE
Commande pour tout type d’automatisation.
Pour commande directe du moteur.
PHOTOCELLULES MURALES
code ACG8032
PAIRE DE POTEAUX POUR PHOTOCELLULES FIT SLIM
code ACG8065
Les photocellules FIT SLIM ont la fonction de synchronisme dans le
courant à C.A. et les gammes de 20 m.
Plusieurs paires sont appliqués, rapprochés les uns des autres grâce au
circuit synchronisé.
Ajouter le TRANSMETTEUR TX SLIM SYNCRO
code ACG8029
s’il existe plus de deux paires de photocellules (jusqu’à 4).
code ACG2012
BOUTON POUSSOIR MURAL
OUVERTURE/FERMETURE
Commande pour tout type d’automatisation.
Pour commande directe du moteur.
9
code ACG2010
F
G
B
J-6 code AC00183
Buzzer
F
E
D
C
B
A
DIP SWITCH for the selectable functions
Dip
ON
OFF
1
2 3
4
1 2 3 4 5 6 7
8 9 10
1 4 15 1 6
1 1 12 1 3
ELECTRICAL CONNECTIONS
Stop
Com
Close
Open/Go
24Vdc
Com
Open
Close
Com
Open
Close
23 24 25
Com
Open
Close
20 21 22
Com
Open
Close
14 15 16 17 18 19
Com
Open
Close
11 12 13
M1
M2
M3
M4
M5
M6
INDIVIDUAL CONTROL CONNECTIONS
WARNING: ACTIVATE ONLY ONE MOTOR AT A TIME
1
8 9 10
M1
11 12 13
M2
2
14 15 16
M3
17 18 19
M4
WORKING OF THE INDIVIDUAL CONTROL
The individual control allows to move the automation by excluding the control unit.
The individual control will be excluded when the control unit operates a movement.
10
23 24 25
All normally closed (N.C.)
contacts need to be
jumpered in case these
won’t be used.
Com
Open
Close
8 9 10
LIGHT
L
N
230Vac/1ph/N/E
Mains Supply
20 2 1 2 2
A B C D E F
1 2 3 4 5 6 7
L
N
17 1 8 1 9
3
20 21 22
M5
23 24 25
M6
G
B
ADDITIONAL POWER SUPPLY
ATTENTION: Before starting up, please read carefully the following
paragraphs which describe the programming and main settings of
the automation. While programming, follow strictly the order and
the indicated instructions. Do not enter in the action range of the
automatism while it’s in movement or while programming. Before
carrying out any modifies please wait that there is a completely
standstill of the automatism. Do not allowed external and or not
qualified personal to carry out any operations and/or presences in
the action range of the system.
Through E and F terminals, you can use a voltage 24Vdc (200 mA) for
accessories.
PHOTOCELLS CONNECTION
F
E
D
C
B
A
The contact connection of the photocells must be executed in series to
the STOP button input (terminal A).
POWER SUPPLY
TECHNICAL DATA
When the control panel is powered will hear 2 buzzer sounds.
SIMULTANEOUSLY COME ON THE “POWER” GREEN LED TO
INDICATE THE POWER PRESENCE.
Power supply voltage
Frequency
Max. single motor power
Max. card power absorption
Protection degree
Fuse
Dimensions
Weight of the equipment
SELECTABLE FUNCTIONS THROUGH THE DIP SWITCH
Dip
ON
OFF
1
2 3
4
DIP1:
- If positioned on OFF: the active function in the
OPENING BUTTON is the one called “DEAD MAN
OPERATION”. The opening of the automation
continues until the button itself is pressed. When
the button is released the automation stops.
- If positioned on ON: A momentarily pressing of
the OPENING BUTTON determines the complete
opening of the automation. The opening can be
stopped with the stop button or by a close operation
in any moment.
230V~ ±10%
50/60Hz
500W
20 mA
IP55
6.3A ritardato
250x196x100 mm
1,2 kg
DIP2:
- If positioned on OFF: The active function in the CLOSING BUTTON
is the one called “DEAD MAN OPERATION”. The closing of the
automation goes on until the button itself is pressed. When the button
is released the automation stops.
- If positioned on ON: A momentarily pressing of the CLOSING BUTTON
determines the complete closing of the automation. The closing can be
stopped with the stop button or by an open operation in any moment.
DIP3: WORKING TIME
- If positioned on OFF: the automation has a maximum working time
of 3 minutes.
- If positioned on ON: the automation has an infinitive working time.
DIP4: INPUT WORKING (as you can see in the scheme on the previous
page).
- If positioned on OFF: you have the possibility to connect three buttons
“STOP, OPEN, CLOSE” on the control board. In this case the DIP 1 and
the DIP2, as mentioned above, will determine the working modality of
the inputs.
- If positioned on ON: you have the possibility to connect the operations
of two buttons “STOP, STEP by STEP” on the control board. In this
case the working will be determined by the sequence OPEN-STOPCLOSE….
The DIP1 and DIP2 needs to be set on ON for enabling this function.
4 5 6 7
8 9 10
1 1 12 1 3
COURTESY LAMP
You can connect a courtesy light 230Vac 40W max. to the 6 and 7
terminals. The lamp lights up with a OPEN or CLOSE button command
and stays on for 3 minutes.
11
1 4 15 1 6
1
G
B
OPTIONALS - For the connections and the technical data of the fixtures follow the relevant handbooks.
NOVA - NOVA WIRELESS
RADIO TRANSMITTER SUN
SUN 2CH
SUN CLONE 2CH
code ACG6052
code ACG6056
PHOTOCELLS NOVA - range 25 m
code ACG8046
PHOTOCELLS NOVA WIRELESS - range 25 m - 3 years batteries
life
code ACG8047
PAIR OF COLUMNS for NOVA
code ACG8039
CODE LEARNIG SYSTEM RADIORECEIVERS
KEY SELECTORS
RX433/A 2CHsuper eterodyne, 2 channel and terminal board
code ACG5052
Control for any type of automation.
Equipped with two microswitches with N.O. contacts of 15A 250V (Open/
Close) and one switch with N.C. contact of 4A 250V (Stop).
The selector can be opened only with the operating key.
IP54
- EMBEDDED WITHOUT STOP dim.: 100x100x109
code ACG1010
- TO WALL WITHOUT STOP dim.: 100x100x42
code ACG1030
ANTENNA 433
with cable. For wall application.
FLAT SURFACE MOUNTED PUSH BUTTON
code ACG5450
FIT SLIM
OPEN/CLOSE
Control for any type of automation.
With direct control to the motor.
PHOTOCELLS for the wall-installation
code ACG8032
PAIR OF COLUMNS FOR FIT SLIM
code ACG8065
FIT SLIM photocells have synchronism function in AC current and
ranges of 20 m.
You can fit many photocell couples close together thanks to the optional
synchronizing circuit SYNCRO TRANSMITTER TX SLIM SYNCRO
code ACG8029 for more than 2 photocells couples (up to 4).
code ACG2012
SURFACE MOUNTED PUSH BUTTON
OPEN/CLOSE
Control for any type of automation.
With direct control to the motor.
12
code ACG2010
J-6 còd. AC00183
Buzzer
F
E
D
C
B
A
Dip-switch para la selección de las funciones
Dip
ON
OFF
1
2 3
4
1 2 3 4 5 6 7
8 9 10
1 4 15 1 6
1 1 12 1 3
CONEXIONES ELÉCTRICAS
Stop
Com
Close
Open/Go
24Vdc
Com
Open
Close
Com
Open
Close
23 24 25
Com
Open
Close
20 21 22
Com
Open
Close
14 15 16 17 18 19
Com
Open
Close
11 12 13
M1
M2
M3
M4
M5
M6
ESQUEMA DE CONEXIONES PARA CONTROL INDIVIDUAL
ATENCION: EN EL CONTROL INDIVIDUAL, ACTIVAR UN MOTOR A LA VEZ
1
8 9 10
M1
11 12 13
M2
2
14 15 16
M3
17 18 19
M4
FUNCIONAMIENTO DEL CONTROL INDIVIDUAL
El control individual permite poner en movimiento el automatismo excluyendo el cuadro.
El control individual es excluído cuando el cuadro acciona un movimiento.
13
23 24 25
Cualquier Contacto
Normalmente Cerrado (N.C.)
debe ser puenteado
si no es utilizado.
Com
Open
Close
8 9 10
LIGHT
L
N
230Vac/1ph/N/E
Mains Supply
20 2 1 2 2
A B C D E F
1 2 3 4 5 6 7
L
N
17 1 8 1 9
3
20 21 22
M5
23 24 25
M6
E
S
E
S
ALIMENTACIÓN ADICIONALES
ATENCION: Antes de cualquier activación y/o puesta en
funcionamiento, leer atentamente los siguientes párrafos que
describen las programaciones y las regulaciones del automatismo.
En la programación, seguir detalladamente el orden y las
instrucciones. No entrar en el radio de acción del automatismo
mientras en movimiento o durante las programaciones. Antes de
cada modificación esperar el paro total del sistema. No permitir a
personas eXtranea y/o no calificadas intervenir y/o presencia en el
radio de acción del sistema.
A través de terminales E y F, se puede utilizar una tensión de 24Vdc (200
mA) para los accesorios.
CONEXIÓN FOTOCÉLULAS
F
E
D
C
B
A
La conexión de contacto de las fotocélulas se debe ejecutar en serie
entrada del botón STOP (terminal A).
ALIMENTACIÓN
CARACTERÍSTICAS TÉCNICAS
Cuando el panel de mando se alimenta, 2 tonos de buzzer suenan.
AMBOS SE ENCIENDE LA LUZ VERDE “POWER” PARA INDICAR LA
PRESENCIA DE LA ELECTRICIDAD.
Tensión de alimentación
Frecuencia
Potencia máxima del motor único
Absorción máxima tarjeta
Grado de protección
Fusibles
Medidas
Peso del equipo
FUNCIONES SELECCIONABLES POR MEDIO DIP SWITCH
Dip
ON
OFF
1
2 3
4
DIP1:
- Si está en OFF: La función activa en el PULSADOR
DE APERTURA es aquella “a hombre presente”.
La apertura del automatismo dura hasta cuando
se presiona el pulsador. Cuando el pulsador es
liberado el automatismo se detiene.
- Si está en ON: Una presión momentánea del
PULSADOR DE APERTURA determina la apertura
completa del automatismo.
La apertura puede ser bloqueda en cualquier
momento por el pulsador stop o por el mando de
cierre.
230V~ ±10%
50/60Hz
500W
20 mA
IP55
6.3A retraso
250x196x100 mm
1,2 kg
DIP2:
- Si está en OFF: La función activa en el PULSADOR DE CIERRE y
aquella “a hombre presente”.
El cierre del automatismo dura hasta cuando se presiona el pulsador.
Cuando el pulsador es liberado el automatismo se detiene.
- Si está en ON: Una presión momentánea del PULSADOR DE CIERRE
determina el cierre completo del automatismo.
El cierre puede ser bloqueado en cualquier momento por el pulsador
stop o por el mando de abre.
DIP3: TIEMPO DE TRABAJO
- Si está en OFF: el automatismo tiene un tiempo de trabajo máximo
de tres minutos
- Si está en ON: el automatismo tiene un tiempo de trabajo infinito
DIP4: FUNCIONAMIENTO ENTRADAS (como se puede ver en el
esquema de la página precedente).
- Si está en OFF: se tiene la posibilidad de conectar a la bornera de
los mandos tres pulsadores “STOP, CIERRA, ABRE”. En este caso el
DIP 1 y el DIP 2, como explicado arriba, determinan la modalidad de
funcionamiento de las entradas.
- Si está en ON: se tiene la posibilidad de conectar a la bornera de
los mandos dos pulsadores “STOP y PASO/PASO”. En este caso el
funcionamiento es dado por la secuencia ABRE - STOP - CIERRA …
Para habilitar este funcionamiento regular los DIP1 y DIP2 en ON.
4 5 6 7
8 9 10
1 1 12 1 3
LUZ DE CORTESÍA
Puede conectarse a los terminales 6 y 7 una luz de cortesía 230Vac 40W
max. La luz se enciende a un comando de botón APERTURA o CIERRE
y permanece encendida para 3 minutos.
14
1 4 15 1 6
1
OPCIONALES -
Para las conexiones y datos técnicos de los accesorios, consultar los manuales respectivos.
TELEMANDO SUN
SUN 2CH
SUN CLONE 2CH
NOVA - NOVA WIRELESS
cód. ACG6052
cód. ACG6056
FOTOCÉLULAS NOVA - alcanze 25 m
cód. ACG8046
FOTOCÉLULAS NOVA WIRELESS - alcanze 25 m - duración baterías
3 años
cód. ACG8047
PAR DE COLUMNAS para NOVA
cód. ACG8039
RADIO RECEPTOR CON AUTO APRENDIZAJE
SELECTORES CON LLAVE
RX433/A 2CH superheterodina bi canal con regleta
cód. ACG5052
Mando para todo tipo de automatismo.
Dotado de dos microinterruptores con contactos N.A. de 15 A 250 V (abrir/
cerrar) e interruptor con contacto N.C. de 4 A 250 V (parar).
Para accionar el selector es imprescindible disponer de la llave de
seguridad. IP54.
- DE EMPOTRAR SIN PARADA dim.: 100x100x109
cód. ACG1010
- DE PARED SIN PARADA dim.: 100x100x42
cód. ACG1030
ANTENA 433
BOTONERA DE PARED FLAT
con cable. Para la aplicación de pared.
cód. ACG5450
FIT SLIM
ABRIR/CERRAR
Mando para todo tipo de automatismo.
Con el control directo del motor.
FOTOCÉLULAS PARA PARED
cód. ACG8032
PAR DE COLUMNAS PARA FIT SLIM
cód. ACG8065
Las fotocélulas FIT SLIM tienen una funciòn de sincronizaciòn en
corriente alterna y portada de 20 metros.
Pueden ser aplicadas màs parejas de fotocélulas cercanas gracias al
circùito de sincronizaciòn.
Añadir el TRANSMISOR TX SLIM SYNCRO
cód. ACG8029
para sincronizar hasta 4 parejas de fotocélulas.
cód. ACG2012
BOTONERA DE PARED
ABRIR/CERRAR
Mando para todo tipo de automatismo.
Con el control directo del motor.
15
cód. ACG2010
E
S
J-6
R.I.B. S.r.l.
25014 Castenedolo - Brescia - Italy
Via Matteotti, 162
Tel. ++39.030.2135811
Fax ++39.030.21358279 - 21358278
www.ribind.it - [email protected]
AZIENDA CON SISTEMA
DI QUALITÀ CERTIFICATO
DA DNV
COMPANY WITH QUALITY
SYSTEM CERTIFIED
BY DNV
DICHIARAZIONE DI CONFORMITÁ - DÉCLARATION DE CONFORMITÉ
DECLARATION OF COMPLIANCE - DECLARACIÓN DE CONFORMIDAD
Dichiariamo sotto la nostra responsabilità che il quadro elettronico J-6 è conforme alle seguenti norme e Direttive:
Le fabricant certifie en engageant sa seule responsabilité que les produit J-6 est conforme aux Normes et Directives ci-dessous:
We declare, on our own responsibility, that operating devices of the series J-6 comply with the following standards and Directives:
Declaramos bajo nuestra responsabilidad que el panel J-6 es conforme a la siguientes normas y disposiciones:
EN 301 489-1
EN 301 489-3
EN 300 220-1
EN 300 220-3
EN 55014-1
2011
2012
2012
2000
2012
EN 55014-2
EN 60335-1
EN 61000-3-2
EN 61000-3-3
EN 61000-6-1
2009
2013
2011
2009
2007
EN 61000-6-2
EN 61000-6-3
EN 61000-6-4
2006
2012
2012
Inoltre permette un’installazione a Norme - Permit, en plus, une installation selon les normes suivants
You can also install according to the following rules - Además, permite una instalación según las normas:
EN 12453 2002 - EN 12445 2002 - EN 13241-1 2011
Come richiesto dalle seguenti Direttive - Comme demandé par les suivantes Directives
As requested by the following Directives - Según lo requerido por las siguientes Directrices:
2006/95/CE
2004/108/CE
1999/5/CE
Il presente prodotto non può funzionare in modo indipendente ed è destinato ad essere incorporato in un impianto costituito da ulteriori elementi.
Rientra perciò nell’Art. 6 paragrafo 2 della Direttiva 2006/42/CE (Macchine) e successive modifiche, per cui segnaliamo il divieto di messa in
servizio prima che l’impianto sia stato dichiarato conforme alle disposizioni della Direttiva
Le présent dispositif ne peut fonctionner de manière indépendante, étant prévu pour être intégré à une installation constituée d’autres éléments. Aussi
rentre-t-il dans le champ d’application de l’art. 6, paragraphe 2 de la Directive machines 2006/42/CEE et de ses modifications successives. Sa mise
en service est interdite avant que l’installation ait été déclarée conforme aux dispositions prévues par la Directive
This product can not work alone and was designed to be fitted into a system made up of various other elements. Hence, it falls within Article 6,
Paragraph 2 of the EC-Directive 2006/42 (Machines) and following modifications, to which respect we point out the ban on its putting into service
before being found compliant with what is provided by the Directive
El presente producto no puede funcionar de manera independiente y está destinado a ser incorporado en un equipo constituido por ulteriores
elementos. Entra por lo tanto en el Art. 6 párrafo 2 de la Directiva 2006/42/CEE (Máquinas) y sucesivas modificaciones, por lo que señalamos la
prohibición de puesta en servicio antes de que el equipo haya sido declarado conforme con las disposiciones de la Directiva.
Legal Representative
25014 CASTENEDOLO (BS) - ITALY
Via Matteotti, 162
Tel. +39.030.2135811
Fax +39.030.21358279
www.ribind.it - [email protected]
Cod. CVA2263 - 13062013 - Rev. 01
(Rasconi Antonio)
Scarica