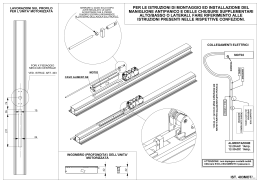
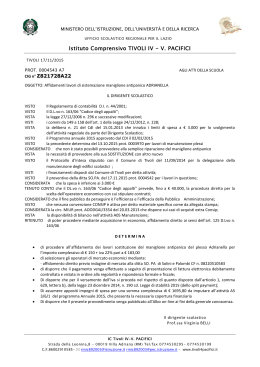
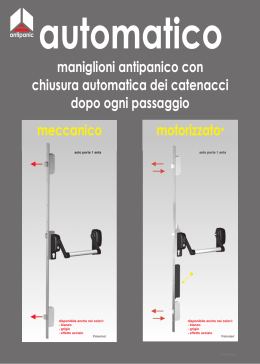
FIST.9903/2
ARTIGLIO
MANIGLIONE ANTIPANICO
PANIC EXIT DEVICE
POIGNÉE ANTIPANIQUE
PANIKGRIFF
BARRA ANTIPANICO
0425-0593
04
EN1125:1997+A1:2001
3 7 6 1 1 3 2 1 A
3
ASSA ABLOY Italia S.p.A. - Via Modena 68 - 40017 San Giovanni in Persiceto (BO) Italy
Tel.: +39 051 6812411 - Fax +39 051 827486 - E-mail: [email protected] - www.assaabloy.it
04
7
25
6
1
-E
N
1
3
11
2
1
25
A
ARTIGLIO
Le caratteristiche di sicurezza di questo prodotto sono di importanza fondamentale ai fini
della sua conformità alla EN 1125. Non sono permesse modifiche di nessun tipo, fatta
eccezione per quelle che vengono descritte in queste istruzioni.
The safety features of this product are of fundamental importance to ensure its conformity
with standard EN 1125. It is strictly forbidden to introduce any type of modifications apart
from those described in the instructions below.
Les caractéristiques de sécurité de ce produit sont d'une extrême importance pour sa
conformité à la norme EN 1125. Il ne doit faire l'objet d'aucune modification, exception faite
de celles décrites dans les présentes instructions.
Die Sicherheitsmerkmale dieses Produkts sind von grundlegender Bedeutung im Hinblick
auf die Konformität mit der Norm EN 1125. Es sind keinerlei Änderungen zulässig, mit
Ausnahme der in dieser Anleitung beschriebenen.
Las caracteristícas de este producto relativas a la seguridad son de importancia
fundamental para los fines de su conformidad con la Norma EN1125. No está permitido
efectuar modificaciones de ningún tipo, con excepcíon de aquéllas que se indican en estas
instrucciones.
Il maniglione antipanico ARTIGLIO è utilizzabile su porte tagliafuoco.
The ARTIGLIO panic exit device may be installed on fire doors.
La poignée antipanique ARTIGLIO est utilisable sur les portes coupe-feu.
Der panikgriff ARTIGLIO ist anwendbar bei Brandschutztüren.
La barra antipanico COMPOSIT - ARTIGLIO puede utilizarse en puertas cortafuego.
ATTENZIONE - La ASSA ABLOY Italia rifiuterà ogni responsabilità o contestazione in caso
di mancato funzionamento causato da incontri non adatti o da mancata osservanza delle
istruzioni di montaggio.
ARTIGLIO
Raccomandazioni per l'installazione ed il fissaggio
- Per il corretto funzionamento del maniglione antipanico seguire scrupolosamente le
istruzioni di montaggio , a montaggio eseguito consegnare le istruzioni di montaggio
e di manutenzione periodica all'utilizzatore.
- I maniglioni antipanico forniscono un elevato grado di sicurezza a condizione che
vengano montati su porte e telai in buone condizioni; e correttamente montati; verificare
inoltre che la porta non incontri ostacoli nel movimento. Fare attenzione che le
guarnizioni non impediscano il corretto funzionamento del maniglione antipanico.
- Salvo specifica indicazione del produttore i maniglioni antipanico non sono adatti per
essere montati su porte va e vieni.
- Non si consiglia il montaggio di maniglioni antipanico su porte con interno alveolare.
- In caso di porta a vetri, il vetro deve essere temprato o stratificato.
- Si possono usare sistemi di fissaggio diversi in funzione delle tipologie della porta. Per
ottenere un fissaggio più solido si possono utilizzare bulloni passanti o altri sistemi
simili.
- Tutti gli incontri o altri accessori devono essere montati in modo tale che il maniglione
antipanico assicuri la più totale conformità a quanto previsto dalla Norma.
- Nel caso in cui al maniglione antipanico sia collegato un dispositivo di accesso dall'
esterno (cilindro, maniglia ecc...) questo deve essere conforme a quanto previsto dal
fabbricante, in ogni caso la presenza di un dispositivo di accesso dall'esterno non deve
in alcun modo impedire l'azionamento del dispositivo antipanico dall'interno, sia che il
dispositivo di accesso dall'esterno sia bloccato o no.
- Non si può impedire il funzionamento del dispositivo antipanico utilizzando qualsiasi
mezzo estraneo.
ATTENTION - ASSA ABLOY Italia will not be held responsible or will accept any complaint
for misfunctioning caused by the use of unproper striking plate or the installation not
conforming to the mounting instructions.
- La barra orizzontale deve essere montata ad una altezza compresa tra 900mm e
1100mm dal filo del pavimento finito. In caso di applicazioni in locali dove sono presenti
in maggioranza bambini è possibile ridurre l'altezza della barra.
ATTENTION - ASSA ABLOY Italia décline d'ores et déjà toute responsabilité et
n'acceptera de plaintes concernant le non fonctionnement du à l'utilisation de gâches
non conformes ou au non-respect des instructions de montage.
- La barra orizzontale deve essere installata in modo da fornire la massima lunghezza
utile, mai meno del 60% della larghezza della porta.
ACHTUNG - ASSA ABLOY Italia lehnt jegliche Haftung oder Beanstandung ab, wenn die
Vorrichtung wegen der Anwendung ungeeignetert türöffner oder Nichteinhalten der
Montageanweisungen nicht funktioniert.
ATENCIÓN - La ASSA ABLOY Italia rechazará toda responsabilidad u objeción en caso
de falta de funcionamiento causado por cerraderos no idóneos o por inobservancia de
las instrucciones de montaje.
2
- Sul lato interno della porta, immediatamente sopra la barra o sulla barra stessa deve
comparire la scritta "per aprire spingere la barra" in caratteri e dimensioni chiaramente
leggibili.
- Dopo il montaggio assicurarsi del corretto funzionamento dell'insieme porta/maniglione
antipanico.
3
ARTIGLIO
ARTIGLIO
La piastra P deve essere utilizzata come piastra di appoggio per il
meccanismo M e ha anche la funzione di dima per le lavorazioni.
Plate P should be used as support plate for mechanism M and can
also be used as a jig for cutting the slot.
La plaque P doit être comme plaque de support pour le mecanisme M
et sert également comme gabarit pour le mortaisage.
Die Platte P muss als Lagerplatte für den Mechanismus M verwendet
werden und dient auch als Schablone für die Bearbeitungen.
La placa P debe utilizarse como placa de apoyo para el mecanismo M
y también sirve para los trabajos.
ATTENZIONE: usare solo le viti
più corte (Ø3.9x9)
WARNING: use shorter screws
only (Ø3.9x9)
ATTENTION: n'utiliser que le vis
les plus courtes (Ø3.9x9)
ACHTUNG: Nur die kürzeren
Schrauben verwenden (Ø3.9x9)
ATENCIÓN: usar sólo los
tornillos más cortos (Ø3.9x9)
V4
V3
M
V3
V2
P
V5
V2
M
V3
V3
V6/V7
G1
V2
P
V5
V2
V3
V4
V5
V6
V7
G1
8
Ø3.9x13
Ø3.9x9
Ø4.2x19
M3x5
M5x35
M5x45
M6x8
G1
V4
ATTENZIONE: usare solo le viti
più lunghe (Ø3.9x13)
WARNING: use longer screws
only (Ø3.9x13)
ATTENTION: n'utiliser que le vis
les plus longues (Ø3.9x13)
ACHTUNG: Nur die längeren
Schrauben verwenden (Ø3.9x13)
ATENCIÓN: usar sólo los tornillos
más largos (Ø3.9x13)
V2
FARE ATTENZIONE anche alla lunghezza delle viti della maniglia esterna. Non usare viti di misure diverse
da quelle fornite in confezione.
PLEASE NOTE the length of the screws on the external handle. Always use screws of the same size of those
provided in the pack.
FAITES EGALEMENT ATTENTION à la longueur des vis de la poignée externe. N'utilisez pas de vis ayant
une mesure différente des vis qui vous sont fournies par le fabricant.
BEACHTEN SIE auch die Schraubenlänge des Griffs an der Au Benseite. Verwenden Sie nur die gleichen
Schrauben wie die mitgelieferten.
TENER CUIDADO también con la longitud de los tornillos de la manilla externa. No utilizar tornillos de
medidas diferentes de las suministrada en el paquete.
9
ARTIGLIO
ARTIGLIO
ATTENZIONE: qualora vengano utilizzati cilindri a camma disassata è necessario che questa sia orientata
verso il lato opposto al catenaccio (vedere figura)
IMPORTANT: whenever cylinders with a projecting plug are used, the plug must be directed toward the side
opposite the bolt (see figure)
ATTENTION: en cas d'utilisation de cylindres à panneton en saillie, il est nécessaire que ce dernier soit
orienté vers côté opposé au pêne (voir figure)
ACHTUNG: Falls Zylinder mit überstehendem Hebel benutzt werden, muss dieser zu der dem Riegel
gegenüberliegenden Seite zeigen (siehe Abbildung)
ATENCIÓN: en caso de utilizarse cilindros de palanca sobresaliente será necesario orientar la misma hacia
el lado opuesto del cerrojo (véase figura)
)
170
Per estrarre il coperchio C abbassare la leva E.
To take out the cover C lower lever E.
Pour enlever le couvercle C faire descendre le levier E.
Zum Herausnehmen des Deckels C den Hebel E nach
unten schieben.
Para quitar la tapa C bajar la palanca E.
527
490
46.6
)
V5
244
284.5
109.6
25
4.25
6
46.6
R10
20
20
170
20
18.35
135
A-68
44
416
1.75
)
74.5
109.6
20.35
453
(4x
R6.5
A=945 ÷ 1120
15
3.5
M4x7
M3x5
V1
4x
135
5(
3.
20
V1
V5
15
17.5
10
B
C
74.5
(6x
Left-right reversibility: remove the slider B that is not used. Remove the screws V1.
Réversibilité droite-gauche: enlever le coulisseau B qui n'est pas utilisé. Eliminer les vis V1.
Umkehrbarkeit rechts-links: den Schieber B der nicht verwendet wird, entfernen und die entsprechenden
Schrauben V1 nicht mehr einsetzen.
Reversibilidad derecha-izquierda: quitar el cursor B que no se utiliza y elimine los relativos tornillos V1.
18.15
3.5
Reversibilità destra-sinistra: togliere il cursore B che non viene utilizzato ed eliminare le relative viti V1.
E
V5
Terminale per il frontale. Centratore per profili aste esterne.
End piece for forend. Centering piece for joint flush systems.
Embout pour têtière. Centreur pour
profils tringles extérieures.
Endverschluss für die Frontplatte.
Zentrier vorrichtung für die
Profile mit äusseren Stangen.
Terminal para el frente.
Centrador de perfiles varillas
exteriores.
14
.7
18
.6
19
.7
15
.7
11
11
ARTIGLIO
ARTIGLIO
ATTENZIONE: assicurare una sufficiente presa del
cursore sulla serratura. Eventualmente utilizzare il
cursore più lungo.
IMPORTANT: make sure that the slider has sufficient
hold on the lock. If necessary, use the longer slider.
ATTENTION: s'assurer que la prise du curseur dans
la serrure est suffisante. Au besoin, utiliser le curseur
le plus long.
ACHTUNG: Für einen ausreichenden Halt der
Gleithülse am Schloss sorgen. Eventuell eine
längere Gleithülse verwenden.
ATENCIÓN: Garantizar una adecuada toma del
cursor en la cerradura. De ser necesario,
utilizar el cursor más largo.
D=2-5
S
ATTENZIONE: installare gli incontri
laterali in posizione esattamente
centrata rispetto al catenaccio
(vedi figura).
=
=
40
45
50
E
L
ATTENTION: side strikers must be
fixed in a perfectly centered position
with respect to the deadbolt
(see figure).
ATTENTION: les gâches latérales
doivent être installées en position
parfaitement centrée par rapport au
pêne (voir figure).
ACHTUNG: Die seitlichen Türöffner
genau in der Mitte zum Riegel
installieren (siehe Abbildung)
ATENCIÓN: Instalar los cerraderos
laterales de forma que queden
exactamente centrados respecto del
cerrojo (véase figura).
12
25
30
35
L
113
E
L > S + 10
ATTENZIONE: verificare che la distanza tra frontale ed incontro (quota D in figura)
sia compresa tra 2 e 5 mm.
IMPORTANT: make sure that the distance between the plate and striker (distance D
in the figure) is between 2 and 5 mm.
ATTENTION: s'assurer que la distance entre têtière et gâche (voir cote D sur la
figure) est comprise entre 2 et 5 mm.
ACHTUNG: Überprüfen, ob der Abstand zwischen Schließblech und Halter (Wert D
in der Abbildung) zwischen 2 und 5 mm beträgt.
ATENCIÓN: Verificar que la distancia entre el frontal y el cerradero (cota D en figura)
esté comprendida entre 2 y 5 mm.
13
ARTIGLIO
ARTIGLIO
ATTENZIONE: non è ammesso l'impiego di accessori per ottenere
punti di chiusura addizionali.
Utilizzare esclusivamente ARTIGLIO 3.
WARNING: it is forbidden to use accessories to obtain additional
locking points.
Use only ARTIGLIO 3.
TABELLA INCONTRI
STRIKERS TABLE
NUOVA
ATTENTION: en aucun cas n'est admise l'utilisation d'accessoires
pour obtenir des points de fermeture supplémentaires.
Utiliser exclusivement le dispositif ARTIGLIO 3.
Articolo Serve per Profilo della porta
Article Use for Door profile
ACHTUNG: Die Verwendung von Zubehör zum Anbringen
zusätzlicher Schließpunkte ist nicht erlaubt.
Ausschließlich den ARTIGLIO 3 benutzen.
ATENCIÓN: No está permitido emplear accesorios para obtener
puntos de cierre adicionales.
Utilizar únicamente el ARTIGLIO 3.
ATTENZIONE: utilizzare esclusivamente incontri originali
"NUOVA FEB" marcati 1125 - INOX.
IMPORTANT: use only original "NUOVA FEB" strikers marked
1125 - INOX.
ATTENTION: utiliser exclusivament des gâches "NUOVA FEB"
d'origine marquées 1125 - INOX.
9932/19
9937/19
Artiglio 1
Artiglio 3
Giunti aperti vari per finestre
Open couplings profiles for windows
9932/56
9937/56
Artiglio 1
Artiglio 3
R40 - R50
9932/59
9937/59
Artiglio 1
Artiglio 3
Giunti aperti con camera larga + profili porta (larghezza
incontro 22mm)
Open couplings and profile doors (width strike 22mm)
9932/61
9937/61
Artiglio 1
Artiglio 3
Profili porta (larghezza incontro 30mm)
Profile doors (width strike 30mm)
9932/64
9937/64
Artiglio 1
Artiglio 3
Profili in ferro + blindati
Steel and armoured profiles
9932/69
9937/69
Artiglio 1
Artiglio 3
Camera europea unificata
Euro-groove profiles
ACHTUNG: Ausschließlich Originalhalter von "NUOVA FEB"
mit der Markierung 1125 - INOX verwenden.
ATENCIÓN: Utilizar únicamente cerraderos originales
"NUOVA FEB" con marca 1125 - INOX.
1125 - INOX
MADE IN ITALY
14
15
ARTIGLIO
ARTIGLIO
Raccomandazioni per la manutenzione
Wartungsempfehlungen
Ad intervalli non superiori ad un mese l'occupante di un edificio in cui sono
installati i maniglioni antipanico, o un suo rappresentante autorizzato, devono
effettuare i seguenti controlli:
a) Ispezionare ed azionare il dispositivo antipanico per verificare che tutti i componenti
siano in condizioni operative soddisfacenti. Azionare la barra e verificare che sia
sufficiente una modesta pressione per sganciare lo scrocco laterale e/o gli scrocchi
superiore e inferiore.
b) Verificare che le bocchette non siano ostruite.
In Abständen von höchstens einem Monat muss der Bewohner eines Gebäudes,
in dem die Panikgriffe installiert sind, oder sein Bevollmächtigter folgende
Kontrollen durchführen:
a) Die Antipanikvorrichtung inspizieren und betätigen, um zu kontrollieren, ob alle
Komponenten in funktionsfähigem Zustand sind. Die Stange drücken und überprüfen,
ob ein leichter Druck ausreicht, um die seitliche Falle und/oder die obere und untere
Falle auszuklinken.
b) Kontrollieren, ob die Schließbleche eventuell verstopft sind.
Directions for maintenance
Recomendaciones relativas al mantenimiento
At least once a month the occupant of the building where the panic exit device are
installed - or an authorised representative - must carry out the following checks:
a) Inspect and activate the panic exit device to ensure that all the components are in
satisfactory working conditions. Push the bar and check that a slight pressure is
enough to release the side and/or upper and lower latches.
b) Make sure that the keepers are not obstructed.
Como máximo con frecuencia mensual, el resposable de un edificio en el que
están instaladas las cerraduras antipánico, o un representante por él autorizado,
debe efectuar los siguientes controles:
a) Inspeccionar y accionar el dispositivo antipánico para verificar que todos sus
componentes se encuentren en condiciones operativas satisfactorias. Accionar la
barra y verificar que sea suficiente una modesta presión para desenganchar el
pestillo lateral y/o los pestillos superior e inferior.
b) Verificar que las boquillas no estén obstruidas.
Recommandations pour l'entretien
Au moins une fois par mois, l'occupant d'un édifice dans lequel sont installées
des barres anti-panique ou un représentant autorisé à cet effet, doit:
a) Contrôler et actionner le dispositif anti-panique pour s'assurer que tous le composants
sont en bon état. Actionner la barre et s'assurer qu'une faible pression suffit pour
debloquer le pêne latéral et/ou supérieur et inférieur.
b) S'assurer que les gâches ne sont pas obstruées.
16
17
ARTIGLIO
ARTIGLIO
INSTALLAZIONE - INSTALLATION - INSTALLATION
INSTALLATION - INSTALLACIÓN
Data / Date / Date
Datum / Fecha
Timbro / Stamp / Tampon
Stempel / Sello
Registro dei controlli programmati / scheduled inspection log
Registre des contrôles programmés / Kontrollinspektion vorgesehen
Registro de los controles programados
Data / Date / Date
Firma / Signature / Signature
Datum / Fecha
Unterschrift / Firma
INIZIO MANUTENZIONE - MAINTENANCE START - DÉBUT ENTRETIEN
WARTUNGSBEGINN - INICIO MANTENIMIENTO
Data / Date / Date
Datum / Fecha
Timbro / Stamp / Tampon
Stempel / Sello
Ubicazione / Position / Position / Standort / Ubicación
N° (Porta / Door / Porte / Tuer / Puerta)
Codice art. / Item code / Code art. / Artikelcode / Código art.
18
19
Scaricare