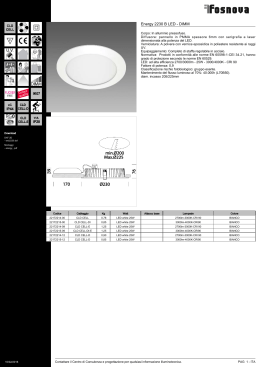
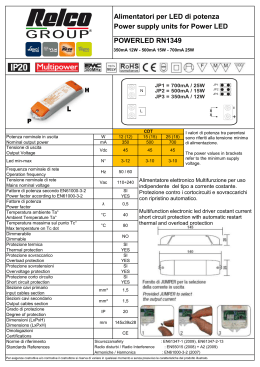
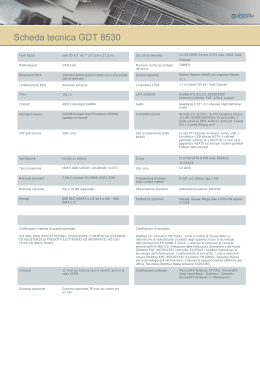
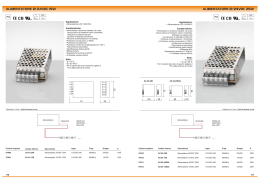
HE2050-A2
99 740 68
A
C
350mA
1
2
I
II
III
IV
V
VI
VII
VIII
3
mA
250
350
400
450
500
550
600
700
L
500mA
B
0.9
tc(℃)
ta (℃)
1-10V +
C H1
1 2 3
700mA
600mA
550mA
500mA
450mA
400mA
350mA
250mA
C H2
4 5 6
LED1 LED2
C H2
Io(mA ) Uo(V )
2 5 0 1 0 -6 0
3 5 0 1 0 -6 0
4 0 0 1 0 -6 0
4 5 0 1 0 -5 5
5 0 0 1 0 -5 0
5 5 0 1 0 -4 5
6 0 0 1 0 -4 2
7 0 0 1 0 -3 6
LE D
LE D
PRI
U o(M a x)
8 0 M a x.
-2 0 ~4 5
75V
Po(W )
2 X1 5
2 X2 1
2 X2 4
2 X2 5
2 X2 5
2 X2 5
2 X2 5
2 X2 5
1-10V -
LED current
selection
C H1
58
U N (V ) 220...240
SEC
P N (W )
I N (mA ) 260...242
f N (H z ) 5 0 / 6 0
0 .7 5 -1 .5
M odel: H E 2 0 5 0 -A 2 (2 X2 5 W )
wire preparation
Dimma ble C onsta nt C urrent LE D D river(0 -1 0 0 %)
LE D C urrent S election
LED, 2x25W
L
N
Switch
Dim
N
L
D
79
67
4.5
DE
111
EN
123
FI
BC/AF-JA/JZ-150817
Gebrauchsanweisung / Instruction
Manual / Käyttöohje / Manuel
d’utilisation / Manuale d’istruzioni /
Gebruiksaanwijzing / Bruksanvisning
30
FR
(mm)
I
NL
SE
DE
EN
Dimmbarer Treiber LED, 2x25W
Dimmable LED driver, 2x25W
Note! Must be connected to earth to obtain the correct function.
Note: Short push should be a time period between 120ms to 1s, and the
time interval between two short pushes should be longer than 120ms.
Wichtig! Erdanschluss ist für korrekte Funktion erforderlich.
Hinweis. Drucken Sie kurz sollte zwischen 120ms und 1s und der zeit
abstand zwischen zwei kurzen Druck sollte länger als 120ms sein.
ANSCHLUSS
Connection
1.Einstellung von Ausgangsstrom zuerst machen. Der Ausgangsstrom wird mit
den Hebelschaler eingestellt (siehe Tabelle, Bild A).
2. Die Armaturen an den Treiber gemäß Anschlusschema anschließen (siehe Bild B).
1.Start with setting the output current. The current can be easily configured by
choosing the correct combination of the DIP switches (see table, fig. A).
2. Connect the luminaires to the driver according to the wiring diagram (see fig. B).
Taster für Lichtregulierung (Nr. 3 Bild B und C)
Push button Switch for dimming (no. 3 fig. B and C)
Ein/aus: Kurzer Druck auf den Schalter.
Dimmung: Der Schalter drucken und einhalten.
Feinabstimmung des Lichtniveaus: Bei jedem zweite lange Druck geht das
Lichtniveau in entgegengesetzter Richtung.
Memoryfunktion: Das Licht geht bei Ausschaltung und Wiedereinschaltung zu
vorigem Dimmungsniveau zurück, auch bei Stromunterbrechung.
On/Off: Short push on the switch.
Stepless dimming: Long push on the switch.
For fine tuning of light level: With every other long push, the light level goes the
opposite direction.
Built-in with permanent memory: Light returns to the previous dimming level
when switched off and on again, even at power failure.
SYNCHRONISATION (siehe Anschlusschema Bild C)
Synchronization (see wiring diagram, fig. C)
Dank dem MCU-Programm gibt von Anzahl Treiber, wann sie zu demselben
Schalter angeschlossen sind, keine Begrenzung. Dies bedeutet, dass kein weitere
Synchronisierkabel in großen Installationen, wo viele Treiber von demselben Schalter kontrolliert wird, benötigt ist.
Um korrekte Funktion der Synchronisation, wann mehrere Treiber an denselben
Druckschalter angeschaltet sind, zu erreichen, muss, nachdem die Treiber eingeschaltet sind, folgendes gemacht wird:
Der Druckschalter für mehr als eine Sekunde einschalten, erzeuge dann eine
kurze Einschaltung.
Danach muss die Treiber ausgeschaltet werden, mache danach eine lange Einschaltung mit dem Druckschalter. Das System ist nun auf Null gestellt.
No limitation on the number of drivers when connected to the same switch,
thanks to the MCU programme. This means there is no need for any additional
synchrony wire in larger installations, where many drivers should be controlled by
one switch.
For the resynchronization to work correctly when more than one driver is connected to the same push button, please follow the steps below after the drivers
are connected:
Press the push button for more than one second (long push), followed by a
short push (<1s).
Now that the devices are switched off, do a long push, the system will now be
resynchronized.
Achtung: Versichern Sie sich, dass korrekter Strom eingestellt ist ehe der
Treiber gestartet ist!
Warning: Please make sure the correct current is set before starting the
driver!
SPEZIFIKATIONEN
Specifications
Modell
HE2050-A2, 2x25W
Model
HE2050-A2, 2x25W
Reihenspannung
220-240V AC, 50/60Hz
Rated voltage
220-240V AC, 50/60Hz
Nennstrom
0,26A (max)
Rated current
0.26A (max)
Ausgangsspannung
10-60V DC (max)
Output voltage
10-60V DC (max)
Arbeitstemperatur
Ta: -20ºC-45ºC Tc: 80ºC
Ausgangsstrom
und Belastung
Kanal: 1
250mA 10-60V 15W
400mA 10-60V 24W
500mA 10-50V 25W
600mA 10-42V 25W
350mA 10-60V 21W
450mA 10-55V 25W
550mA 10-45V 25W
700mA 10-36V 25W
Ausgangsstrom
und Belastung
Kanal: 2
250mA 10-60V 15W
400mA 10-60V 24W
500mA 10-50V 25W
600mA 10-42V 25W
350mA 10-60V 21W
450mA 10-55V 25W
550mA 10-45V 25W
700mA 10-36V 25W
PO Box 144, SE-692 23
Kumla, SWEDEN
Sicherung
Ausgang mit automatischer Rückstellung
Abnormal protection Output short-circuit protection with auto reset
Phone:+46 (0)19 58 77 00
Fax: +46 (0)19 57 11 77
Temperaturschalter
Temperaturschalter mit automatischer Rückstellung
EN55015, EN61547
Overheating
protection
Overheating protection with auto-reset
EMC Standard
Sicherheitsstandard
EN61347-1, EN61347-2-13
EMC standard
EN55015, EN61547
Safety standard
EN61347-1, EN61347-2-13
Zertifikat
SEMKO, CE, EMC
Certification
SEMKO, CE, EMC
Masse
Siehe Bild D
Dims
See fig. D.
Schutzklasse
IP20, Unterputz
Protection class
IP20, built-in type
Malmbergs Elektriska AB (publ)
[email protected]
www.malmbergs.com
Operating
temperature
Output current
& load
CH: 1
Output current
& load
CH: 2
Ta: -20ºC-45ºC Tc: 80ºC
250mA 10-60V 15W
400mA 10-60V 24W
500mA 10-50V 25W
600mA 10-42V 25W
350mA 10-60V 21W
450mA 10-55V 25W
550mA 10-45V 25W
700mA 10-36V 25W
250mA 10-60V 15W
400mA 10-60V 24W
500mA 10-50V 25W
600mA 10-42V 25W
350mA 10-60V 21W
450mA 10-55V 25W
550mA 10-45V 25W
700mA 10-36V 25W
FR
FI
Säädettävä LED-liitäntälaite, 2x25W
Pilote LED à intensité réglable, 2x25W
Remarque ! Doit être raccordé à la terre pour bien fonctionner.
Remarque : Une courte pression doit être comprise entre 120 ms et 1s, et
l’intervalle entre deux courtes pressions doit dépasser 120 ms.
HUOM! Liitetään maadoitukseen toimiakseen oikein.
Huom: Lyhyt painallus on 120ms – 1s. Väli kahden lyhyen painalluksen
välillä tulee olla yli 120ms.
LIITÄNTÄ
1.Aloita kytkemällä tuleva virtajohdin. Lähtevä virta säädetään yksinkertaisesti
vipukytkimillä (katso Taulukko, kuva. A).
2.Yhdistä valaisimet liitäntälaitteeseen kytkentäkaavion mukaisesti (katso kuva. B).
PAINOKYTKIN VALON SÄÄTÄMISEKSI (no. 3 kuva. B ja C)
Päälle/Pois: Lyhyt painallus kytkimeen.
Portaaton säätö: Paina kytkintä ja pidä alas painettuna.
Valotason hienosäätö: Joka toisella pitkällä painalluksella valotaso muuttaa
suuntaa.
Muistitoiminto: Valo palautuu edelliseen tasoonsa kun se sammutetaan ja
uudelleen sytytetään, myös virtakatkoissa.
SYKRONOINTI (katso kytkentäkaavio, kuva. C)
MCU-ohjelmoinnin ansiosta liitäntälaitteiden lukumäärä on rajoittamaton niiden
ollessa liitettynä samaan kytkimeen. Siksi ei tarvita muita synkronointikaapeleita
suuremmissakaan asennuksissa, kun useita liitäntälaitteita ohjataan samalla
kytkimellä.
Synkronisoinnin toimimiseksi oikein silloin kun useampia liitäntälaitteita on kytketty
samaan painonappikytkimeen tulee liitäntälaitteen kytkemisen jälkeen suorittaa
seuraavat toimenpiteet:
Pidä painonappikytkintä alaspainettuna kauemmin kuin sekunnin ajan, ja paina
sen jälkeen painiketta lyhyesti (<1s).
Nyt kun liitäntälaitteet ovat poiskytkettyinä paina pidempään painonappia,
liitännät ovat nyt uudelleen synkronoidut.
Varoitus: Varmista että oikea virta on valittuna ennen kuin käynnistät
liitäntälaitteen!
I
Collegamento
1.Commencer d’abord par régler le courant de sortie. Le courant se configure
facilement en choisissant la bonne combinaison de commutateurs DIP
(voir le tableau Fig. A).
2.Raccorder les luminaires au pilote comme indiqué sur le schéma de câblage
(voir la Fig. B).
1. Iniziare impostando la corrente d’uscita. Si può configurare facilmente la corrente scegliendo la giusta combinazione di interruttori DIP (vedere tabella, fig. A)
2. Collegare le lampade al driver come mostrato nello schema dei collegamenti
(vedere fig. B).
Bouton poussoir pour variation (n° 3 Fig. B et C)
On/Off: premuta breve sull’interruttore.
Dimmeraggio continuo: premuta lunga sull’interruttore.
•Per regolare bene il livello della luce: con ogni ulteriore premuta lunga, il livello
della luce va in direzione contraria.
•Integrato con memoria permanente: quando si accende o si spegne o nel caso di
interruzione di corrente, le luci ritornano al livello di dimmeraggio precedente.
Marche / Arrêt : une courte pression sur l’interrupteur.
• Gradation en continu : une longue pression sur l’interrupteur.
• Pour un réglage précis du niveau d’éclairage : une longue pression sur deux
provoque un niveau d’éclairage inverse.
• Avec une mémoire permanente intégrée : l’éclairage revient au niveau de variation précédent après chaque coupure, même après une panne secteur.
Synchronisation (voir le schéma de câblage, Fig. C)
Il n’existe aucune limite concernant le nombre de pilotes lors d’un branchement
sur un même interrupteur, grâce au programme MCU. Ainsi, il n’est pas nécessaire
d’utiliser des fils de synchronisation supplémentaires dans les installations de
grande taille, qui exigent le contrôle de plusieurs pilotes par un seul interrupteur.
Pour que la re-synchronisation se déroule correctement lorsque plusieurs pilotes
sont connectés au même bouton poussoir, veuillez respecter les étapes suivantes
après le branchement des pilotes :
Faire suivre une pression longue sur l’interrupteur (plus d’une seconde), d’une
pression plus brève (<1s).
• A présent que les appareils sont coupés, appuyer longuement pour re-synchroniser le système.
Avertissement : S’assurer que le courant approprié a été configuré avant de
démarrer le pilote.
Spécifications
Malli
HE2050-A2, 2x25W
Nimellisjännite
220-240V AC, 50/60Hz
Nimellisvirta
0,26A (max)
Lähtevä jännite
10-60V DC (max)
Käyttölämpötila
Ta: -20ºC-45ºC Tc: 80ºC
250mA 10-60V 15W
400mA 10-60V 24W
500mA 10-50V 25W
600mA 10-42V 25W
250mA 10-60V 15W
400mA 10-60V 24W
500mA 10-50V 25W
600mA 10-42V 25W
Modèle
Tension nominale
Courant nominal
Tension de sortie
Température de
fonctionnement
Charge et courant
de sortie
CH : 1
Lähtöjännite ja
kuormitus
Kanava: 2
350mA
450mA
550mA
700mA
350mA
450mA
550mA
700mA
10-60V 21W
10-55V 25W
10-45V 25W
10-36V 25W
10-60V 21W
10-55V 25W
10-45V 25W
10-36V 25W
Suojaus
Lähtö suojattu automaattisella palautuksella
Ylikuumenemissuojaus
Ylikuumenemis-suoja automaattisella palautuksella
EMC standardi
EN55015, EN61547
Turvallisuus
standardi
EN61347-1, EN61347-2-13
Certifiointi
SEMKO, CE, EMC
Mitat
Katso kuva. D.
Kotelointiluokka
IP20, sisäänrakennettuna
NL
Charge et courant
de sortie
CH : 2
Protection en cas
d’anomalie
Protection contre la
surchauffe
Norme CEM
Norme de sécurité
Certification
Dimensions
Type de protection
HE2050-A2, 2x25W
220-240V AC, 50/60Hz
0,26A (max)
10-60V DC (max)
Ta: -20ºC-45ºC Tc: 80ºC
250mA
400mA
500mA
600mA
250mA
400mA
500mA
600mA
10-60V 15W
10-60V 24W
10-50V 25W
10-42V 25W
10-60V 15W
10-60V 24W
10-50V 25W
10-42V 25W
350mA
450mA
550mA
700mA
350mA
450mA
550mA
700mA
10-60V 21W
10-55V 25W
10-45V 25W
10-36V 25W
10-60V 21W
10-55V 25W
10-45V 25W
10-36V 25W
Protection contre les courts-circuits de sortie avec la
réinitialisation automatique
Protection contre la surchauffe avec réinitialisation
automatique
EN55015, EN61547
EN61347-1, EN61347-2-13
SEMKO, CE, EMC
Voir Fig. D.
IP20, type intégré
SE
Dimbare LED-driver, 2x25W
Dimbart drivdon LED, 2x25W
Let wel! Voor een goede werking moet de aarde zijn aangesloten.
Let op: Een korte indruk zou tussen 120 mSec tot 1 Sec moeten zijn, en tijdsinterval tussen 2 korte indrukken zou langer moeten zijn dan 120 mSec.
OBS! Måste anslutas till jord för att erhålla rätt funktion.
OBS: Kort tryckning bör vara mellan 120 ms till 1 s, och tidsintervallet
mellan två korta tryck bör vara längre än 120 ms.
Verbinding
Anslutning
1.Begin met het instellen van de uitgangsstroom. De stroom kan makkelijk
worden geconfigureerd door de juiste combinatie van de DIP-schakelaars te
kiezen (zie tabel, afb. A).
2. Verbind de lampen aan de driver zoals getoond in het verbindingsschema
(zie afb. B).
1.Börja med inställning av utström. Utströmmen ställs enkelt in med hjälp av
vippbrytarna (se tabell, bild A).
2.Anslut armaturerna till drivdonet enligt kopplingsshemat (se bild B).
Drukschakelaar voor dimmen (nr. 3 afb. B en C)
Aan/uit: Kort de schakelaar indrukken.
• Traploos dimmen: Lang de schakelaar indrukken.
• Voor nadere afstemming van het lichtniveau: Telkens wanneer de knop lang
wordt ingedrukt, gaat het lichtniveau de andere kant op.
• Permanent geheugen ingebouwd: Licht begint bij het inschakelen op het vorige
lichtniveau, zelfs als de stroom is uitgevallen.
Synchronisatie (zie verbindingsschema, afb. C)
Dankzij het MCU-programma kan er een onbeperkt aantal drivers op dezelfde
schakelaar worden aangesloten. Dit betekent dat er bij grotere installaties geen
extra synchronisatiekabel nodig is, omdat een groot aantal drivers via dezelfde
schakelaar kunnen worden geregeld.
Om voor een goede synchronisatie te zorgen als er meerdere drivers op dezelfde
schakelaar worden aangesloten, moeten de onderstaande stappen worden gevolgd nadat de drivers zijn aangesloten:
• Druk de drukknop meer dan één seconde in (lang indrukken), en druk hem dan
kort in (<1 sec).
• Nu de lampen zijn uitgeschakeld, moet de knop lang worden ingedrukt om het
systeem opnieuw te synchroniseren.
Tryckströmbrytare för ljusreglering (nr 3 bild B och C)
På/Av: Kort tryck på strömbrytaren.
Steglös dimning: Tryck och håll in strömbrytaren.
För finjustering av ljusnivå: Vid varannan lång tryckning går ljusnivån i motsatt
riktning.
Minnesfunktion: Ljuset återgår till föregående dimningsnivå när den stängs av
och på igen, även vid strömavbrott.
Synkronisering (se kopplingsschema, bild C)
Tack vare MCU-programmet så finns det ingen begränsning av antalet drivdon när
de är anslutna till samma strömbrytare. Detta innebär att det inte behövs någon
ytterligare synkroniseringskabel i större installationer, där många drivdon kontrolleras av samma strömbrytare.
För att synkroniseringen skall fungera riktigt när flera drivdon är kopplade till
samma tryckströmställare skall, efter att drivdonen har inkopplats, följande operation utföras:
Håll tryckströmställaren i tillslaget läge i mer än en sekund följt av ett kort
tillslag.
Därefter skall drivdonen vara frånslagna, vilket skall följas av ett långt tillslag
med tryckströmställaren. Systemet skall nu vara nollställt.
Varning: Försäkra dig om att korrekt ström är inställd innan du startar
drivdonet!
Waarschuwing: Zorg ervoor dat de juiste stroom is ingesteld voordat de
driver wordt gestart!
Specificaties
Model
Nominale spanning
Nominale stroom
Uitgangsspanning
Bedrijfstemperatuur
Uitgangsstroom en
lading
Kanaal: 1
Uitgangsstroom en
lading
Kanaal: 2
Abnormaliteitsbeveiliging
Oververhittingsbeveiliging
Specifikationer
HE2050-A2, 2x25W
220-240V AC, 50/60Hz
0,26A (max)
10-60V DC (max)
Ta: -20ºC-45ºC Tc: 80ºC
250 mA 10-60V 15W
400 mA 10-60V 24W
500 mA 10-50V 25W
600 mA 10-42V 25W
250 mA 10-60V 15W
400 mA 10-60V 24W
500 mA 10-50V 25W
600 mA 10-42V 25W
350 mA 10-60V 21W
450 mA 10-55V 25W
550 mA 10-45V 25W
700 mA 10-36V 25W
350 mA 10-60V 21W
450 mA 10-55V 25W
550 mA 10-45V 25W
700 mA 10-36V 25W
Kortsluitbeveiliging op uitgangen met automatische reset
Oververhittingsbeveiliging met automatische reset
EMC-norm
EN55015, EN61547
Veiligheidsnorm
EN61347-1, EN61347-2-13
Certificering
SEMKO, CE, EMC
Afmetingen
Zie afb. D.
Beschermingsklasse IP20, ingebouwd type
NOTA! Per funzionare correttamente deve essere collegato a terra.
Nota: una premuta breve deve avere una durata compresa tra 120 ms e 1 s,
e l’intervallo di tempo tra due premute brevi deve superare i 120 ms.
Raccordement
TEKNISET TIEDOT
Lähtöjännite ja
kuormitus
Kanava: 1
LED driver dimmerabile, 2x25 W
Modell
HE2050-A2, 2x25W
Märkspänning
220-240V AC, 50/60Hz
Märkström
0,26A (max)
Utspänning
10-60V DC (max)
Arbetstemperatur
Utström och
belastning
Kanal: 1
Ta: -20ºC-45ºC Tc: 80ºC
250mA 10-60V 15W
400mA 10-60V 24W
500mA 10-50V 25W
600mA 10-42V 25W
250mA 10-60V 15W
400mA 10-60V 24W
500mA 10-50V 25W
600mA 10-42V 25W
Utström och
belastning
Kanal: 2
Säkring
350mA
450mA
550mA
700mA
350mA
450mA
550mA
700mA
10-60V 21W
10-55V 25W
10-45V 25W
10-36V 25W
10-60V 21W
10-55V 25W
10-45V 25W
10-36V 25W
Avsäkrad utgång med automatisk återställning
Överhettningsskydd Överhettningsskydd med automatisk återställning
EMC standard
EN55015, EN61547
Säkerhetsstandard
EN61347-1, EN61347-2-13
Certifiering
SEMKO, CE, EMC
Mått
Se bild D.
Kapslingsklass
IP20, infälld typ
Interruttore a pulsante per il dimmeraggio (n.3 fig.B e C)
Sincronizzazione (vedere lo schema dei collegamenti, fig. C)
Grazie al programma MCU, non ci sono limiti al numero di driver che si possono
collegare allo stesso interruttore. Questo significa che nelle installazioni più grandi
non c’è bisogno di un ulteriore cavo di sincronizzazione, tutti i driver dovrebbero
essere regolati da un solo interruttore.
Per la risincronizzazione, per lavorare correttamente quando più di un driver è
collegato allo stesso pulsante, dopo che i driver sono stati collegati è necessario
seguire gli accorgimenti di seguito:
Premere il pulsante per più di un secondo (premuta lunga), seguito da una
premuta breve (<1s).
• Ora che gli apparecchi sono spenti, tener premuto a lungo: il sistema ora si
risincronizzerà.
Attenzione: prima di far partire i driver assicurarsi che sia impostata la
corrente giusta!
Specifiche
Modello
Tensione nominale
Corrente nominale
Tensione d’uscita
Temperatura
d’esercizio
Corrente e carico
d’uscita
CH: 1
Corrente e carico
d’uscita
CH: 2
Protezione anomala
Protezione per
surriscaldamento
Normativa EMC
Normativa di
sicurezza
Certificazioni
HE2050-A2, 2x25W
220-240V AC, 50/60Hz
0.26A (max)
10-60V DC (max)
Ta: -20ºC-45ºC Tc: 80ºC
250mA 10-60V 15W
350mA 10-60V 21W
400mA 10-60V 24W
450mA 10-55V 25W
500mA 10-50V 25W
550mA 10-45V 25W
600mA 10-42V 25W
700mA 10-36V 25W
250mA 10-60V 15W
350mA 10-60V 21W
400mA 10-60V 24W
450mA 10-55V 25W
500mA 10-50V 25W
550mA 10-45V 25W
600mA 10-42V 25W
700mA 10-36V 25W
Protezione da corto circuito in uscita con resettaggio
automatico
Protezione per surriscaldamento con resettaggio
automatico
EN55015, EN61547
EN61347-1, EN61347-2-13
SEMKO, CE, EMC
Dimensioni
Vedere fig. D.
Classe di protezione
IP20, Incorporato
Scaricare