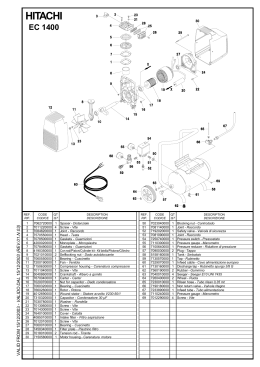
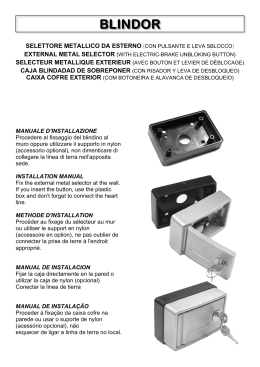
CAVO DI SBLOCCO - RELEASE CABLE PER CASSAFORTE ESTERNA STONE (code ACJ9078)
FOR STONE STRONG BOX (code ACJ9078)
PROCEDURA D’ASSEMBLAGGIO
- Avvitare la vite forata di regolazione nel foro filettato libero presente sull’elettroblocco.
- Inserire il cavo di acciaio (A) nel foro previsto nell’elettroblocco e successivamente nella
vite forata.
- Infilate la bussola di guida (B) del cavetto d’acciaio (A) lungo lo stesso, come raffigurato.
- Infilate la guaina di protezione (C) del cavetto d’acciaio lungo lo stesso.
- Infilate la bussola (D) di guida del cavetto d’acciaio lungo lo stesso, come raffigurato.
- Infilate la bussola con vite di fermo (E) in battuta contro la rondella (F) ed in seguito
stringete la sua vite esagonale con una chiave n° 7.
code ACG9462
ASSEMBLY PROCEDURE
- Tighten adjusting screw into the threaded hole free of the electric lock.
- Insert the steel cable (A) into the hole of the electric lock and then into the hole screw.
- Insert the steering compass (B) into the cable (A), as shown in the drawing.
- Insert the sheated cable (C) along the cable.
- Insert the compass (D) onto the cable as shown.
- Insert the compass with the blocking screw (E) against part (F) and tighten the hexagonal
screw with a key n° 7.
E
A
F
D
COLLEGAMENTO ELETTRICO
Collegare ai morsetti 16 e 22 del quadro di comando, entrambi i contatti N.O. della pulsantiera (CEL1551) presente nella
cassaforte.
Premendo il pulsante e’ possibile aprire la porta automatica SLIDER come impostato tramite selettore rotativo (se installato).
ELECTRICAL CONNECTION
Connect to 16 and 22 terminals of the control panel the N.O. contacts of the push-button (CEL1551) present in the strong
box.
Pressing the button can open the SLIDER automatic door as set on the rotary switch (if installed).
CAVO DI SBLOCCO - RELEASE CABLE PER CASSAFORTE ESTERNA FLAT (code ACJ9071)
FOR FLAT STRONG BOX (code ACJ9071)
PROCEDURA D’ASSEMBLAGGIO
- Avvitare la vite forata di regolazione nel foro filettato libero presente sull’elettroblocco.
- Inserire il cavo di acciaio (A) nel foro previsto nell’elettroblocco e successivamente nella vite
forata.
- Infilate la bussola di guida (B) del cavetto d’acciaio (A) lungo lo stesso, come raffigurato.
- Infilate la guaina di protezione (C) del cavetto d’acciaio lungo lo stesso.
- Infilate la bussola (D) di guida del cavetto d’acciaio lungo lo stesso, come raffigurato.
- Infilate la bussola con vite di fermo (E) in battuta contro la rondella (F) ed in seguito stringete la
sua vite esagonale con una chiave n° 7.
code ACG9462
ASSEMBLY PROCEDURE
- Tighten adjusting screw into the threaded hole free of the electric lock.
- Insert the steel cable (A) into the hole of the electric lock and then into the hole screw.
- Insert the steering compass (B) into the cable (A), as shown in the drawing.
- Insert the sheated cable (C) along the cable.
- Insert the compass (D) onto the cable as shown.
- Insert the compass with the blocking screw (E) against part (F) and tighten the hexagonal screw
with a key n° 7.
A
E
F
D
G
Sede dove inserire il cavo e la guaina di sblocco
Seat where insert steel cable and release sheating
COLLEGAMENTO ELETTRICO
Collegare il morsetto 16 del quadro di comando al morsetto 5 della pulsantiera.
Collegare il morsetto 22 del quadro di comando ai morsetti 1 e 2 della pulsantiera.
Premendo il pulsante e’ possibile aprire la porta automatica SLIDER come impostato tramite selettore rotativo (se installato).
ELECTRICAL CONNECTION
Connect terminal 16 of the control panel to terminal 5 of the push-button.
Connect terminal 22 of the control panel to terminals 1 and 2 of the push-button.
®
automatismi per cancelli
automatic entry systems
25014 CASTENEDOLO (BS) - ITALY
Via Matteotti, 162
Tel. +39.030.2135811
Fax +39.030.21358279
www.ribind.it - [email protected]
Cod. CVA2085 - 08052015 - Rev. 01
Pressing the button can open the SLIDER automatic door as set on the rotary switch (if installed).
Scaricare