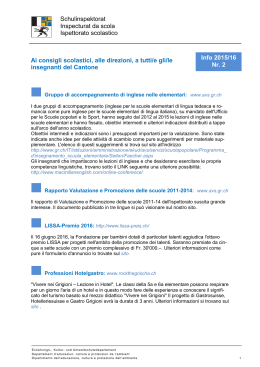
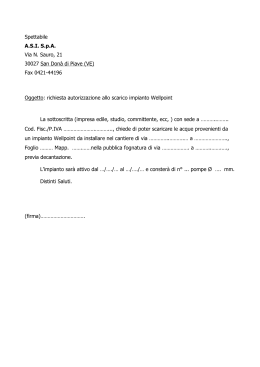
User Manual...............................2
Anwendung.................................6
L’utilisation de specification..........11
istruzione...............................16
Usando las instrucciones ................21
1
Manual for Mobile Receiver(APE6600)
●Number Registering
If you can’t register numbers, it means that the watch is locked. You can see the last page to
unlock it.
1) Standby mode, press the key [FUN] for 2 seconds till F1 appears on the LED screen.
2) Keep pressing the key FUN till 001 appears.
3) Press the key FUN to move the place of the flashing number and press the key ENT to change
the number.
4) Press the call button to be registered. When the mobile host beeps with flashing number, the
registration is finished.
5) To register all the call buttons needed, please repeat step (3) ~ (4) after the first one finished.
6) After registration, keep pressing the key FUN till F1 appears.
7) Keep pressing the key ENT till back to standby mode.
※Special notes
1) Ten sets of scroll numbers can be reserved on the host. For example, when “1 002” appears on
the screen, it means that there was a number called before 002 and 002 is the second number
calls.
2) For the multi-button pagers, the mantissa on the screen means different call functions, 6
means service, 8 means bill. For example, “001-6” means that 001 is paging for service. “001-8”
means that 001 is paging for bill. When the key CANCEL of the pager is pressed, the calling
number on the LED screen disappears and it means the service is done.
●Prompt mode setting
1) Standby mode, press the key FUN for 2 seconds till F1 appears.
2) Press the key ENT repeatedly till F2 appears.
3) Keep pressing the key FUN till a number between 001~005 appears. Press the key ENT to
choose the number wanted (number 000 means beep prompt, while number 001~005 means
vibration prompt. The vibration time can be changed from 1 second to 5 seconds as required.)
4) Keep pressing the key FUN till F2 appears.
5) Keep pressing the key ENT till back to standby mode. The setting is done.
●Time display setting
1) Standby mode, press the key FUN 2 seconds till F1 appears.
2) Press the key ENT repeatedly till F3 appears.
3) Keep pressing the key FUN, a number between 001~099 appears. Press the key ENT to choose
the displaying time you wanted. The number 001 to 099 is the time of display, from 1 second to
99 seconds accordingly. The number 000 means unlimited time.
4) Keep pressing key FUN till F3 appears.
5) Keep pressing key ENT till back to standby mode, the display time setting is done.
●Delete registered numbers
1) Standby mode, press the key FUN for 2 seconds till F1 appears.
2) Press the key ENT repeatedly till F4 appears on the LED screen.
2
3) Keep pressing the key FUN, the minimum registered number appears.
4) Press the key ENT repeatedly to choose the number to be deleted. Then,
keep pressing the key ENT to delete the number. And the next registered number appears on the
screen after the deleting.
5) Keep pressing the key FUN till F4 appears.
6) Keep pressing the key ENT till back to standby mode.
●Initialization
1) Press the key [FUN] for 2 seconds and F1 appears on the screen.
2) Press the key [ENT] repeatedly till F5 appears.
3) Keep pressing [FUN] till [000] appears, and press the key [ENT] for 3 seconds to start the
initialization. Then numbers keep changing on the LED screen. When [000] appears again, the
initialization is done.
4) Keep pressing the key [FUN] till F5 appears
5) Keep pressing the key [FUN], and back to standby mode (time mode).
●Time setting
1) Standby mode, press the key FUN for 2 seconds till F1 appears.
2) Press the key ENT repeatedly till F6 appears on the LED screen.
3) Keep pressing the key FUN, the current time, such as 08:10, appears.
4) Press key ENT to regulate the time. Press the key FUN to move the cursor.
5) After time setting, keep pressing the key FUN till F6 appears.
6) Keep pressing the key ENT, and back to standby mode. Time setting is done.
※ Time returns to zero every time after the battery is taken out and needs to reset.
●Number display mode setting (all-digital display or digits beginning with an English letter)
1) Standby mode, press the key FUN for 2 seconds till F1 appears on the LED screen.
2) Press the key ENT repeatedly till F7 appears.
3) Keep pressing the key FUN till a number appears. (If the number is between 00 and 17, it’s
all-digital display (default setting); if the number is between 18 and 89, it’s digits
beginning with an English letter display, the English letters includes A,B,C,D,E,F,H,P,L and J). Press
the key ENT repeatedly to choose the number you wanted. Keep pressing the key ENT can help to
expedite the number changing.
4) Keep pressing the key FUN till F7 appears.
5) Keep pressing the key ENT, and back to standby mode. The setting is done.
●Sleep mode setting
Keep pressing the key ENT for 5 seconds on standby mode to activate the sleep mode
(Number 1 appears on the left of the LED screen.). The sleep mode is the equal of power off
mode. Press the key ENT for 5 seconds again to make the mobile host to return to work. (Number
1 on the left of the screen disappears accordingly).
●Lock the watch
1. Press the key FUN for 2 seconds till F1 appears on the LED screen.
3
2. Press the key ENT repeatedly till F9 appears.
3. Then press the key FUN for 2 seconds till a three-digit XXX appears on the LED screen
4. Press the key ENT to change the number. When the XXX is 181, it’s unlocked.
Notice: Function F2,F3,F6,F8,F9 can still be used after being locked, but F1,F4,F5,F7 can’t .All
functions can be used after unlocking it.
Instructions for Replacing Battery (Pager APE560)
Schematic diagram:
4
Instructions for Replacing Battery (Pager APE700)
Schematic diagram:
5
Anwendungsanleitung APE6600
1
Nummer Registrierung
1) Bei Stand-By Modell FUN (Funktionstasten) für ca. 2 Sekunden drücken, und bis F1 auf
LCD Bildschirm gezeigt F1 ist.
2) Drücken Sie FUN Taste lange drücken bis zun das001 auf LCD Bildschirm 001 zeigt
gezeigt ist.
3) Druck ENT Taste drückenso dass dieum die glimmernde Ziffern zu ändern verändert
werden können.. Druck FUN Taste drücken so dassum die Stelle von glimmernder Ziffen
verändert werden könnenzu ändern.
4) Nachdem die der Registrierte Registriertung, das entsprechendes Nummer aufgestellt
wurde,druck das Rufgerät drücken., das für die Registrierung gebraucht ist. Wenn Ddas
Gerät klingt wie DiDi piept und die aufgestellte Nummer glimmert, ist die Registierung
erfolgreich. auf das Bildschirm.Das bedeutet,dass Anmeldung fertig ist.
5) Für Registierung mehrerer Wenn mehrere Rufgeräte, die Schritte 3 und 4 folgen.
registriert werden,können Sie nach dem Registrierung der ersten Nummer infole der
Schritt 3 und 4 weiter registrieren.
6) Nachdem alle Nummern registriert wardenNach aller Registierung , druck FUN Taste so
lange drücken bis F1 auf das LCD Bildschirm F1 zeigt ist.
7) Druck ENT Taste lange drücken bis zum Breitschaft Stand-By-Modell, und die
Nummerregistrierung ist fertig.
※ Besonderer Hinweis Anmerkungen:
1) Das Gerät kann insgesamt zehn Gruppen Nummern speichern und nach einander
laufende Zeigenanzeigen. Zz.B Das Bildschirm zeigt“ 1 002“ bedeutet ︰ 002
bedeutet die zeigendenist die aktuelle Rufnummer,1 bedeutet, dass es bevor 002
es schon eine Rufnummer lafuend gezeigt wurdegibt.Die jetztDie Nummer 002 ist
nun die zweite Rufnummer.
2) Wenn das Gerät auf mehr als zwei Tasten bestehthat, hat die EndeziffernEndziffer
auf die im Bildschirm gezeigt sind zeigen die unterschiedlische Ruffunktionen. Die
EndzifferEndenummer 6 bedeutet Service und 8 bedeutet Bezahlung. zZ.B 001
001-6 zeigtbedeutet, dass die der Kunde im bei Kasse 1 ruft für die Bezahlung
anService braucht. 001-8 bedeutet, dass der Kunde bei Kasse 1 bezahlen will. Druck
Abbrechen Taste vom Rufgrät drücken, im Rufgerät und verschwindet die Nummer
im Bildschirm verschwinden.Das bedeutet dass das Service fertig ist., ist die
Funktion erledigt.
2 HinweiswegEinstellung Klingelton / Vibrationssignal
1)Unter Stand-By Modell, Im Bretischaft druck FUN Funktionstaste für ungefähr ca. 2
Sekunden drücken bis und das Bildschirm zeigt F1 auf Bildschirm gezeigt.
2)Druck ENT kontinuierlich drücken bis das Bildschirm F2 gezeigt.
3)Drck FUN Taste drücken bis das Bildschirm die Ziffern 001—005 zeigenauf Bildschirm
gezeigt.ENT ist für Auswählen. Druck ENT so dass die Ziffern verändert werden
können(000 bedeutet dass die Hinweisweg Klingen ist klingelton,001 001-005 bedeutet
dass die Hinweiseweg Erschütterung ist Vibration mit jeweils 1 – 5 Sekunden, .Die Zeit
6
für Erschütterung verändert von 1 Sekunden bis 5 Sekunden.(Die was der Kunde kann
nach eigene Nachfrage selbst wählenfreilich auswählen kann.)
4) Nachdem die Hinweisweg gewählt wurde,Danach druck FUN lange drücken zurück zu
treten.Das Bildschirmbis zeigt F2 auf Bildschirm gezeigt.
5)Druck Zum Schluss ENT Taste lange drücken bis zum Bretschaft um die Schaltung von
Hinweisweg zu schaffen.Stand-By-Modell.
3 Anzeige der Zeit anzeigen
1)Unter Stand-By Modell, FUN Funktionstaste für ca. 2 Sekunden drücken bis F1 auf
Bildschirm gezeigt.
Im Breitschaft druck FUN(Funktionstaste) für ungefähr 2 Sekunden.Das Bildschirm zeigt F1
2)ENT kontinuierlich drücken bis F3 gezeigt.Druck ENT Taste kontinuierlich bis das Bildschirm
F3 zeigt.
3)Druck FUN lange drücken bis das Bildsc 日 hirm dieeine Nummer zwischen 001—009
gezeigt .Danachist. Danach drcuk ENT Taste drücken umund die gebrauchte Zeit zu
wählen.Das Auswählen. Die Nr. 001~-009 bedeutet 1 Sekund bis - 99 Sekunden.000 zeigt
die unendliche Zeitbedeutet keine Zeitbegrenzung.
4)Nachdem die Zeit gewaählt wurde,drücken Sie FUN lange bis das Bildschirm F3 zeigt.
Danach FUN lange drücken bis F3 auf Bildschirm gezeigt.
5)Zum Schluss ENT Taste lange drücken bis zum Stand-By-Modell.
Druck ENT Taste bis zurück zum Breitschaft.Das zeigt dass die Zeit umgestllt ist.
4
Die registierte Nummer löschen
1)Unter Stand-By Modell, FUN Funktionstaste für ca. 2 Sekunden drücken bis F1 auf
Bildschirm gezeigt.
Im Breitschaft drücken Sie FUN(Funktionstaste) für 2 Sekunden.Das Bildschirm zeigt F1.
2)ENT kontinuierlich drücken bis F4 gezeigt.Drücken ENT Taste kontinuierlich bis das
Bilschirm F4 zeigt.
3)Drücken Sie FUN lange drücken. lange bis das Bildschirm dieDie kleinste registierte
Nummer die schon angemeldet wurdewird dann auf Bildschirm angezeigt.
4)Drücken Sie ENT Taste drücken um die zu löschende Nummer auszuwählen. kontinuierlich
so dass die registriert Nummer die gelöscht werden gewählt werden kann.Nach die
Auswahl der Nummer drücken SieDanach ENT Taste lange drücken um die zu löschen.
Nach diesem Vorgang wird die nächste existierte Nummer angezeigt.so dass die
Nummer gelöscht werden.
5)FUN lange drücken bis F4 auf Bildschirm gezeigt.Drücken Sie FUN bis das Bildschirm F4
zeigt.
6)Zum Schluss ENT Taste lange drücken bis zum Stand-By-Modell.
zurück zum Breitschaft und die Nummer erfolgereisch gelöscht wurde.
5
Drücken ENT Taste
Initialisierung
1) Unter Stand-By Modell, FUN Funktionstaste für ca. 2 Sekunden drücken bis F1 auf
7
Bildschirm gezeigt.
2)ENT kontinuierlich drücken bis F5 gezeigt.
3)FUN Taste so lange drücken bis 000 auf Bildschirm gezeigt. ENT für ca. 3 Sekunden
drücken bisdie Initialisierung startet. Während dem Vorgang wird die Nummer mehrmals
geändert bis die 000 noch mal auftritt. Die Initialisierung ist dann erledigt.
4)FUN lange drücken bis F5 auf Bildschirm gezeigt.
5)Zum Schluss ENT Taste lange drücken bis zum Stand-By-Modell.
6
Uhrzeiteinstellung
1)Unter Stand-By Modell, FUN Funktionstaste für ca. 2 Sekunden drücken bis F1 auf
Bildschirm gezeigt.
2)ENT kontinuierlich drücken bis F6 gezeigt.
3)FUN Taste lange drücken bis die Uhrzeit gezeigt.
4)ENT Taste drücken um die Zeit einzustellen. FUN ist Umschaltung zwischen um die
Stunden und Minuten.
※
5)Danach FUN lange drücken bis F6 auf Bildschirm gezeigt.
6)Zum Schluss ENT Taste lange drücken bis zum Stand-By-Modell.
Nach jedem Batteriewechsel muss die Uhrzeit neu eingestellt werden.
7 Darstellungsart der Nummer auswählen (Nur Nummer oder Nummer
mit Buchstabenkopf)
1)Unter Stand-By Modell, FUN Funktionstaste für ca. 2 Sekunden drücken bis F1 auf
Bildschirm gezeigt.
2)ENT kontinuierlich drücken bis F7 gezeigt.
3)FUN Taste langedrücken irgendeine Nummer zwischen 00 und 89 gezeigt. Eine Nummer
zwischen 00 und 17 auswählen: Darstellungsart nur Nummer. Eine Nummer zwischen 18
und 89 auswählen: Darstellungsart Nummer mit Buchstabenkopf. (Rheinfolge der
Buchstaben ABCDEFHPLJ). ENT Taste drücken um die Nummer zu ändern. Bei langem
Drucken wird die Nummer schneller geändert.
4)Danach FUN lange drücken bis F7 auf Bildschirm gezeigt.
5)Zum Schluss ENT Taste lange drücken bis zum Stand-By-Modell.
8
Ruhezustand
Unter Stand-By Modell, ENT Taste für ca. 5 Sekunden drücken bis zum Ruhestand. (Die
Nummer „1“ an der Anfangsstelle des Bildschirms zeigt den Ruhestand des Gerätes.
Hauptgerät ist nun ausgeschaltet.) Die ENT Taste noch mal für 5 Sekunden drücken, kehrt
das Gerät zum normalen Betrieb zurück. (Die Nummer „1“ verschwindet dann)
8
VerschlüsselungAPE6600
1、 FUN Funktionstaste für ca. 2 Sekunden drücken bis F1 auf Bildschirm gezeigt
2、 ENT Taste drücken bis zum F9 (Programm Normal) oder F7 (Programm 8200)
3、 Als F9 oder F7 gezeigt ist, FUN Taste für ca. 2 Sekunden drücken bis eine dreistellige
Nummer XXX auf Bildschirm gezeigt.
4、 ENT drücken um die XXX zu irgendeinem Wert zu definieren. XXX =181 zeigt den
Zustand von Entschlüsselung. Wenn XXX anders als 181 ist, bleibt das Gerät verschlüsselt.
Hinweis: Nach Verschlüsselung funktionieren nur F2, F3, F6, F8 und F9.
Die F1, F4, F5 und F7
funktionieren dann nicht mehr. Nach Entschlüsselung funktionieren allerdings alle.
Ersetzen Sie die Batterie Beschreibung (APE560)
9
Bedienungsanleitung zur Basisstation der Rufanlage APE700
Schematische Darstellung:
10
Mode d’emploi de APE 6600
1. Numéro d’enregistrement
1) En état de guetter l’occasion, appuyer FUN (bouton de fonction ) environ 2 secondes, F1
apparaît sur l’écran LED.
2) Appuyer bouton FUN à long terme jusqu’à l’apparition de 001 sur l’écran LED.
3) Appuyer bouton ENT pour changer le chiffre de position de clignotement, appuyer bouton
FUN pour bouger la position de chiffre de clignotement.
4) Après avoir bien installé le numéro d’enregistrement, appuyer l’appeleur qui doit être
enregistré, le local donne un tic-tac, le numéro bien installé clignote sur l’écran LED, cela
explique la reussite d’enregistrement.
5) Si l’on enregistre plusieurs appeleurs, on peut continuer à enregistrer en suivant l’étape 3
et 4 après avoir fini le premier numéro d’enregistrement.
6) Après la réalisation d;enregistrement de tous les numéros, appuyer à long terme bouton
FUN jusqu’à l’apparition de F1 sur l’écran.
7) Appuyer à long terme bouton ENT jusqu’ à la situation de guetter l’occasion,
l’enregistrement de numéro est fini.
* Explication spéciale
1) Local peut stocker 10 groupes de numéro et montrer en roulant. Si l’écran LED montre 1 002 :
“002” explique le numéro d’appel en cours d’indication, “1” explique que l’avant d’appeler, il y a d
éjà un numéro d’appel qui est montré en roulant, 002 de ce moment est le deuxième numéro
d’appel.
2) Si c’est l’appeleur de plus de deux boutons, la mantisse montrée sur l’écran LED explique diffé
rentes fonctions d’appel. Le mantisse 6 explique le service, 8 explique l’addition. Par exemple :
001-6 exprime que le client de table 1 appelle le service, 001-8 exprime que le client de table 1
appelle l’addition. Appuyer le bouton d’annulation d’appeleur, le numéro disparaît sur l’écran LED,
cela exprime que le service est fini.
2. Façon de rappel
1) En état de guetter l’occasion, appuyer FUN (bouton de fonction ) environ 2 secondes, F1
apparaît sur l’écran LED.
2) Appuyer bouton ENT sans cesse jusqu’à l’apparition de F2 sur l’écran LED
3) Appuyer bouton FUN jusqu’à lapparition de chiffre entre 000-005 sur l’écran LED, appuyer
bouton ENT pour ajuster le chiffre (000 exprime que la façon de rappel est sonnerie, 001-005
exprime que le façon de rappel est tremblement, la durée de tremblement est de 1 seconde à 5
secondes en dépendant les demandes de clients)
4) Après avoir bien choisi la façon de rappel, appuyer bouton FUN pour quitter, F2 apparaît sur
l’écran.
5) Appuyer à long terme ENT jusqu’à revenir en état de guetter l’occasion, accomplir lq
commutation de façon de rappel.
3. Durée d’indication
11
1)
En état de guetter l’occasion, appuyer FUN (bouton de fonction ) environ 2 secondes, F1
apparaît sur l’écran LED.
2) Appuyer bouton ENT sans cesse jusqu’à l’apparition de F3 sur l’écran LED
3) Appuyer bouton FUN à long terme jusqu’à l’apparition de chiffre entre 001-009 sur l’écran
LED, appuyer bouton ENT pour choisir la durée d’indication dont on a besoin, 001-009 sur l’écran
explique 1 seconde - 99 secondes, 000 explique infini.
4) Après avoir bien choisi la durée, appuyer à long terme FUN jusqu’à l’apparition de F3 sur l’
écran.
5) Appuyer à long terme bouton ENT jusqu’à revenir en état de guetter l’occasion, montre la
réalisation de ajustement de durée.
4. Cancellation de numéro
1) En état de guetter l’occasion, appuyer FUN (bouton de fonction ) environ 2 secondes, F1
apparaît sur l’écran LED.
2) Appuyer bouton ENT sans cesse jusqu’à l’apparition de F4 sur l’écran LED
3) Appuyer à long terme bouton FUN, l’écran LED montre le minimum numéro enregistré en
ce moment.
4) Appuyer sans cesse bouton ENT, choisir le numéro d’enregistrement qui doit être supprimé,
appuyer à long terme bouton ENT peut supprimer après avoir bien choisi le numéro, après la ré
alisation de cancellation , l’écran LED montre le numéro suivant qui n’est pas supprimé.
5) Appuyer à long terme bouton FUN jusqu’à l’apparition de F4 sur l’écran LED.
6) Appuyer à long terme bouton ENT jusqu’à revenir en état de guetter l’occasion, la
cancellation de numéro est réussi.
5. Initialisation
1) Appuyer FUN (bouton de fonction ) environ 2 secondes, F1 apparaît sur l’écran LED.
2) Appuyer bouton ENT sans cesse jusqu’à l’apparition de F5 sur l’écran LED.
3) Appuyer à long terme bouton FUN jusqu’à l’apparition de 000 sur l’écran LED, appuyer
bouton ENT environ 3 secondes pour entrer dans l’initialisation, en ce moment le changement de
chiffre commence sur l’écran LED, quand 000 apparaît de nouveau, l’initialisation est finie.
4) Apr è s la r é alisation de l’initialisation, appuyer à long terme bouton FUN jusqu’à
l’apparition de F5 sur l’écran LED.
5) Appuyer à long terme bouton ENT jusqu’à revenir en état de guetter l’occasion(soit l’état
d’indication de durée), l’initialisation est finie.
6. Installation de temps de l’horloge
1) En état de guetter l’occasion, appuyer FUN (bouton de fonction ) environ 2 secondes, F1
apparaît sur l’écran LED.
2) Appuyer bouton ENT sans cesse jusqu’à l’apparition de F6 sur l’écran LED.
3) Appuyer à long terme bouton FUN, l’écran LED montre le temps du moment, par exemple :
08 : 10.
4) Appuyer bouton ENT pour régler le temps, appuyer bouton FUN pour choisir l’heure et la
minute.
5) Après la réalisation d’ajustement de temps, appuyer à long terme bouton FUN pour quitter,
12
l’écran montre F6
6) Appuyer à long terme bouton ENT jusqu’à revenir en état de guettter l’occasion,
l’installation de temps est réussi.
* A chaque fois que l’on tire la pile, le temps revient à zéro, il faut le rajuster à la précision.
7. Choix de type d’indication de numéro (type de tout chiffre ou de lettres anglais comme
commencement)
1) En état de guetter l’occasion, appuyer FUN (bouton de fonction ) environ 2 secondes, F1
apparaît sur l’écran LED.
2) Appuyer bouton ENT sans cesse jusqu’à l’apparition de F7 sur l’écran LED.
3) Appuyer à long terme bouton FUN, l’écran LED montre chiffre libre entré 00-89, choisir
n’importe quel chiffre entre 00-17 exprime le type de tout chiffre (acceptation tacite est le type
de tout chiffre au moment de sortie de l’hôte), choisir n’importe quel chiffre entre 18-89 exprime
le type de lettres anglais comme commencement (s é quence croissante de lettres est
ABCDEFHPLJ), appuyer bouton ENT pour changer le chiffre, appuyer à long terme bouton ENT
pour croîte à vitesse.
4) Après avoir bien choisi le type d’enregistrement, appuyer à long terme bouton FUN jusqu’à
l’apparition de F7 sur l’écran LED.
5) Appuyer bouton ENT jusqu’à revenir en état de guetter l’occasion, le choix de type
d’indication de numéro est fini.
8. Commutation de fonction de dormance
En état de guetter l’occasion, appuyer à long terme bouton ENT environ 5 secondes pour
changer directement en état de dormance (le plus avant de l’écran LED montre 1, soit entrer en
état de dormance, ce moment l’hôte est considéré comme arrêt), réappuyer bouton ENT
environ 5 secondes pour revenir en état de travail (le chiffre 1 au plus avant de l’écran LED va
disparaître en suivant)
Notice de l’utilisation de densification de APE6600
1. Appuyer bouton FUN environ 2 secondes, l’écran montre F1.
2. Appuyer bouton ENT pour ajuster à F9 (processus normal) ou F7 (processus 8200)
3. Lorsque l’écran montre F9 ou F7, appuyer bouton FUN environ 2 secondes pour entrer, l’écran
montre trois chiffres “XXX”.
4. En appuyant bouton ENT pour changer “XXX” à une valeur libre, quand “XXX” = 181, c’est en
état de décryptage, quand “XXX” n’est pas égale à 181, c’est en état de densification.
Attention : après la densification, les fonctions que l’on peut utiliser sont F2, F3, F6,
F8, F9, le reste F1, F4, F5, F6 n’est pas utilisable, bien sûr que l’après le décryptage,
toutes les fonctions sont normalement utilisables.
13
Notice d’opération de changement de pile de APE560
14
Étape d’opération de charger et décharger le socle de
l’appeleur APE700 de soucoupe volant ultramicro
Le schéma :
15
Manuale APE6600
Ⅰ. Registrazione del numero
1) F1 Premere FUN(il tasto di funzione)per circa 2 secondi nello stato di standby, si mostra
F1 sullo schermo.
2) Premere il tasto di FUN fino a mostrare 001 sullo schermo
3) Premere il tasto ENT per cambiare la cifra lampeggiante, premere il tasto FUN per
muovere la posizione della cifra lampeggiante.
4) Premere il cercapersone da registrare dopo impostare il numero da registrare, la
macchina si invia il suono “Di Di”, si significa la registrazione con successo quando il
numero impostato è lampeggiante sullo schermo LCD.
5) Si prega di ripetere passo 3, 4 per registrare molto cercapersone dopo la registrazione
prima.
6) F1 Premere il tasto FUN fino a mostrare F1 sullo schermo LCD dopo la registrazione per
tutto il cercapersone.
7) Premere il tasto ENT fino a ritornare allo stato di standby, la registrazione del numero è
completata.
※ Nota speciale:
1) La macchina può memorizzare dieci gruppi di numeri con la visualizzazione di
scorrimento. Ad esempio, 1 002 : “002”sullo schermo, si indica il numero
chiamando, “1”indica che c’è 1 numero chiamato con la visualizzazione di
scorrimento prima la chiama di 002, la visualizzazione attuale è il secondo numero
del 002.
2) Per il cercapersone con i tasti più di due, la fine della cifra sullo schermo LCD indica
la diversa funzione di chiamare. La fine 6 indica il servizio, 8 indica il pagamento.
Come ad esempio: 001—6 rappresenta il servizio del cliente dalla scrivania 1,
001—8 rappresenta il pagamento di chiamare del cliente dalla scrivania 1. il
numero è scomparso sullo schermo LCD quando premere il tasto di annullare del
cercapersone, si significa che il servizio è completato.
Ⅱ. Modalità di suggerimento
1)Premere FUN(il tasto di funzione)per circa 2 secondi nello stato di standby, si mostra F1
sullo schermo.
2)F2 Premere il tasto di ENT fino a mostrare F2 sullo schermo
3)Premere il tasto FUN fino a mostrare la cifra tra 000~005 sullo schermo, si può regolare la
cifra via il tasto ENT (000 rappresenta la modalità di suggerimento di suonerie,001~005
rappresenta la modalità di suggerimento di vibrazione,il cliente si può selezionare il
tempo desiderio dal 1 secondo al -5 secondi)
4)Premere il tasto FUN fino a mostrare F2 sullo schermo LCD dopo la selezione della
modalità di suggerimento.
5)Premere il tasto ENT fino a ritornare allo stato di standby, il cambiamento della modalità
di suggerimento è completata.
16
Ⅲ. Visualizzazione del tempo
1)Premere FUN(il tasto di funzione)per circa 2 secondi nello stato di standby, si mostra F1
sullo schermo.
2)Premere il tasto di ENT fino a mostrare F3 sullo schermo
3)Premere il tasto FUN fino a mostrare la cifra tra 001~099, selezionare il tempo da
mostrare via il tasto ENT, 001~099 sullo schermo rappresentano 1 secondo~99 secondi,
e 000 rappresenta il tempo lungo senza la limitazione.
4)Premere il tasto FUN fino a mostrare F3 sullo schermo LCD dopo la selezione del tempo.
5)Premere il tasto ENT fino a ritornare allo stato di standby, la visualizzazione del tempo è
completata.
Ⅳ. Cancellazione del numero
1)Premere FUN(il tasto di funzione)per circa 2 secondi nello stato di standby, si mostra F1
sullo schermo.
2)Premere il tasto di ENT fino a mostrare F4 sullo schermo
3)Premere il tasto FUN fino a mostrare il numero minimo registrato attualmente sullo
schermo.
4)Si può selezionare il numero registrato per cancellare quando premere il tasto ENT
continuamente, premere il tasto ENT fino a cancellare il numero selezionato, si mostra il
prossimo numero non cancellato dopo la cancellazione.
5)Premere il tasto FUN fino a mostrare F4 sullo schermo LCD.
6)Premere il tasto ENT fino a ritornare allo stato di standby, la cancellazione del numero è
completata.
Ⅴ. Inizializzazione
1) Premere FUN(il tasto di funzione)per circa 2 secondi, si mostra F1 sullo schermo.
2)Premere il tasto di ENT fino a mostrare F5 sullo schermo
3)Premere il tasto FUN fino a mostrare 000 sullo schermo, premere il tasto ENT per circa 3
secondi ad entrare l’inizializzazione, c’è il cambiamento delle cifre sullo scherma al
momento, l’inizializzazione è completata quando si mostra 000 una altra volta.
4)Premere il tasto FUN fino a mostrare F5 sullo schermo LCD dopo la inizializzazione.
5)Premere il tasto ENT fino a ritornare allo stato di standby (cioè lo stato di mostrare il
tempo), la inizializzazione è completata.
Ⅵ. Tempo impostato di orologio
1)Premere FUN(il tasto di funzione)per circa 2 secondi nello stato di standby, si mostra F1
sullo schermo.
2)Premere il tasto di ENT fino a mostrare F6 sullo schermo
3)Premere il tasto FUN fino a mostrare il tempo attuale sullo schermo, as esempio: 08︰10
4)Premere il tasto ENT a regolare il tempo, premere il tasto FUN a selezionare le ore ei
minuti.
5)Premere il tasto FUN fino a mostrare F6 sullo schermo LCD dopo la regolazione del tempo.
6)Premere il tasto ENT fino a ritornare allo stato di standby, il tempo impostato di orologio è
17
completata.
※È necessario ri-regolazione accurata perchè il tempo ha ritornato a zero ogni volta dopo la
batteria rimossa.
Ⅶ. Selezione del tipo di mostrare il numero (tipo di cifra complessa od inizia con lettura
inglese)
1)Premere FUN(il tasto di funzione)per circa 2 secondi nello stato di standby, si mostra F1
sullo schermo.
2)Premere il tasto di ENT fino a mostrare F7 sullo schermo
3)Premere il tasto FUN fino a mostrare la cifra arbitraria tra 00~89 sullo schermo,
selezionare la cifra arbitraria tra 00~17 per il tipo della cifra complessa (la cifra
complessa impostata per il mainframe alla fabbrica), selezionare la cifra arbitraria tra
18~89 per il tipo della cifra con l’inizio della lettera inglese (ordine alfabetico crescente
ABCDEFHPLJ), si può cambiare le cifre via il tasto ENT, e premere il tasto ENT per un
lungo tempo per il rapido aumento.
4)Premere il tasto FUN fino a mostrare F7 sullo schermo LCD dopo la selezione del tipo della
registrazione.
5)Premere il tasto ENT fino a ritornare allo stato di standby, la selezione del tipo di mostrare
il numero è completata.
Ⅷ. Attivazione di funzione di sonno
Premere il tasto ENT per circa 5 secondi per cambiare allo stato di sonno direttamente nello
stato di standby (1 è apparso alla più avanti sullo schermo LCD, si rappresenta lo stato di
sonno, il mainframe è stato arrestato equivalente al momento). Premere il tasto ENT per
circa 5 secondi una altra volta per ritornare lo stato del lavoro (1 è scomparso dalla più
avanti sullo schermo LCD).
Utilizzo della crittografia APE6600
1、 Premere “FUN” per circa 2 secondi fino a mostrare “ F1” sullo schermo.
2、 Premere il tasto “ENT” a “F9”(programma comune) or “F7”(8200 programma)
3、 Premere il tasto “FUN” per circa 2 secondi quando si mostra “F9”o“F7”, e poi appare "XXX"
a tre cifre.
4、 Si può cambiare “xxx”a valore arbitrario attraverso il tasto “ENT”, si è in stato decriptato nel
caso di “XXX”=181, si è in stato crittografato nel caso di “XXX”≠181.
Nota: le funzioni di F2,F3,F6,F8,F9 sono disponibili, e le funzioni di F1,F4,F5,F7 non sono
disponibili. Naturalmente, tutte le funzioni possono essere normale da usare dopo di decifrare.
18
Istruzioni di Cambiare la batteria APE560
19
Procedura di Montare & Smontare Base di Ultra-sottile UFO
Cercapersone APE700
Illustrazione:
20
Manual de Usos de APE6600
I.Registro del número
1) En el modo de espera,pulse la tecla seleccionada (FUN) durado 2 segundos. En la
pantalla se aparece [F1].
2) Pulse la tecla FUN durado un largo tiempo hasta en la pantalla se parezca 001.
3) Pulse la tecla ENT puede cambiar la posición del número parpadeado. Pulse la tecla FUN
puede trasladar la posición del número parpadeado.
4) Después de configurar los números de registro,pulse el localizador que se necesita
registrar. La máquina propia tiene el sonido pitidos,los números configurados está
parpadeado en la pantalla. Todos significan que ya ha terminado el registro.
5) Si necesita registrar más localizadores. Después del registro del primer número, puede
repetir los procesos 3)-4) para continuar registrando.
6) Después de registrar todos los números, pulse la tecla FUN durado un largo tiempo
hasta en la pantalla se parezca F1.
7) pulse la tecla ENT durado un largo tiempo a estar en el modo de espera.Ya ha terminado
el registro de números.
※ Explicación especiales.
1) Este máquina puede guardar 10 grupos números. Por ejemplo,la pantalla se
muestra 1 002,¨002¨significa el número que está llamando,¨1¨significa antes de
la llamada 002,un número de llamada ya ha sido llamado y desplácido. En la
actualidad,002 es el segundo número de llamada.
2) Si es un localizador con varias teclas,los números en la pantalla significa diferentes
funciones de llamadas. El número 6 significa el servicio,8 significa la cuenta. Por
ejemplo:001-6 significa el cliente en la mesa con No. 1 está pediendo el servicio.
001-6 significa el cliente en la mesa con No. 1 quiere pagar la cuenta. Pulse la tecla
de cancelación,el número se desparece,significa ya he terminado el servicio.
Ⅱ、maneras apuntadas
1)En el modo de espera,pulse la tecla seleccionada (FUN) durado 2 segundos. En la pantalla
se aparece [F1].
2) Pulse continuamente la tecla FUN hasta en la pantalla se parezca F2.
3) Pulse la tecla FUN hasta que se aparezca 000-005 en la pantalla. Pulse la tecla ENT para
ajustar las cifras(000 significa la manera apuntada es el tintineo,001-005 significa la
manera apuntada es las vibraciones. El tiempo de vibración desde un segundo hasta 5
segundos. Los clientes pueden elegir según sus propias necesidades.)
4) Después de selección de maneras apuntadas,pulse FUN durado un largo tiempo para
salir hasta que se aparezca F2 en la pantalla.
5) Pulse la tecla ENT durado un largo tiempo a estar en el modo de espera para
el cambio de maneras apuntadas
terminar
Ⅲ、muestra del tiempo
1)En el modo de espera,pulse la tecla seleccionada (FUN) durado 2 segundos. En la pantalla
21
se aparece [F1].
2)Pulse continuamente la tecla FUN hasta en la pantalla se parezca F3.
3)Pulse la tecla FUN hasta que se aparezca 001-009 en la pantalla. Pulse ENT para elegir el
tiempo necesario para mostrar. El 001-009 significa 1 segundo hasta 99 segundos. El 000
significa el timpo sin limitaciones.
4)Después de selección del tiempo,pulse FUN durado un largo tiempo para salir hasta que se
aparezca F3 en la pantalla.
5)Pulse la tecla ENT durado un largo tiempo a estar en el modo de espera. Si ya ha mostrado
el tiempo,ya ha terminado el ajuste del tiempo.
Ⅳ、Eliminar números
1)En el modo de espera,pulse la tecla seleccionada (FUN) durado 2 segundos. En la pantalla
se aparece [F1].
2)Pulse continuamente la tecla FUN hasta en la pantalla se parezca F4.
3)Pulse la tecla FUN durado un largo tiempo hasta en la pantalla se parezca la cifra minima
de registro.
4)Pulse continuamente la tecla ENT,puede seleccionar los números de registra que son
necesarios eliminar. Después de elegir,pulse la tecla ENT durado un largo tiempo para
eliminarlo. Después de eliminar,va a mostrar el número siguiente no eliminado en la
pantalla.
5) Pulse FUN durado un largo tiempo para salir hasta que se aparezca F4 en la pantalla.
6) Pulse la tecla ENT durado un largo tiempo a estar en el modo de espera. Ya ha eliminado
el número.
Ⅴ、Inicialización
1) Pulse la tecla seleccionada (FUN) durado 2 segundos. En la pantalla se aparece [F1].
2) Pulse continuamente la tecla FUN hasta en la pantalla se parezca F5.
3) Pulse la tecla FUN durado un largo tiempo hasta que en la pantalla se parezca 000,pulse
la tecla ENT durado 3 segundos para entrar la inicialización. En ese momento,las cifras
en la pantalla va cambiando. Cuando se aparezca 000 otra vez,ya ha terminado la
inicialización.
4) Después de inicialización,pulse la tecla FUN durado un largo tiempo hasta que se
aprezca F5 en la pantalla.
5) Pulse la tecla ENT durado un largo tiempo a estar en el modo de espera(es un estado
mostrado el tiempo),ya ha terminado la inicialización.
Ⅵ、Ajuste del tiempo del reloj
1)En el modo de espera,pulse la tecla seleccionada (FUN) durado 2 segundos. En la pantalla
se aparece [F1].
2)Pulse continuamente la tecla FUN hasta en la pantalla se parezca F6.
3)Pulse la tecla FUN durado un largo tiempo hasta que en la pantalla se parezca el tiempo
actual. Por ejemplo:08:10.
4)Pulse la tecla ENT para ajustar el tiempo. Pulse FUN para elegir las horas y los minutos.
5) Después de ajustar el tiempo, pulse la tecla FUN durado un largo tiempo hasta que se
22
aparezca F6 en la pantalla.
6) Pulse la tecla ENT durado un largo tiempo a estar en el modo de espera,ya ha terminado
el ajuste del tiempo.
※ El tiempo va a ser 0 cuando saque la batería. Necesita volver a ajustar el tiempo.
Ⅶ、Seleccionar el tipo mostrado de los números (con todos números o con la primera
letra del alfabeto)
1) En el modo de espera,pulse la tecla seleccionada (FUN) durado 2 segundos. En la
pantalla se aparece [F1].
2) Pulse continuamente la tecla FUN hasta en la pantalla se parezca F7.
3) Pulse la tecla FUN durado un largo tiempo hasta que en la pantalla se parezca cualquier
número dentro 00-89. Seleccione cualquier número dentro 00-17 significa con el tipo de
todos números(configura el tipo de todos números del equipo principal en la fábrica).
Seleccione cualquier número dentro 18-89 significa con el tipo de la primera letra del
alfabeto(el orden de las letras es ABCDEFHPLJ). Pulse la tecla ENT para cambiar los
numeros. Pulse ENT durado un largo tiempo puede aumentar rápidamente.
4) Después de seleccionar el tipo de registro,pulse la tecla FUN hasta que se aparezca F7
en la pantalla.
5) Pulse la tecla ENT durado un largo tiempo a estar en el modo de espera,ya ha
seleccionado el tipo mostrado.
Ⅷ. Cambio del estado de sueño
En el modo de espera, pulse la tecla ENT durado 5 segundos,puede estar en el estado de sueño
directamente(Se aparece 1 en la pantalla,significa ya ha llegado en el estado de sueño. En ese
momento,como ya ha pagado el equipo principal). Si quiere volver al estado de trabajo,pulse ENT
durado 5 segundos(El número 1 va a desparecer en la pantalla).
Instrucción de Usos de codificación de APE6600
1、 Pulse la tecla FUN durado un largo tiempo hasta en la pantalla se parezca 001.
2、 Pulse la tecla¨ENT¨para ajustar ¨F9¨(proyecto normal) o ¨F7 ¨(proyecto 8200)
3、 Cuando en la pantalla muestre ¨F9¨o ¨F7,̈pulse la tecla FUN durado 2 segundos más o menos
hasta se parezca XXX en la pantalla.
4、 Pulse la tecla ENT,puede cambiar XXX a cualquier números. Cuando XXX es 181 y estáen
el estado codificado. Cuando XXX no es 181 y estáen el estado secreto.
Nota:Despúes ponerse el pin,puede utilizar normalmente las funcionses F2,F3,F6,F8,F9,pero no
puedes utilizar F1,F4,F5,F7. Claro,después de codificar,puede utilizar normalmente todas
funciones.
23
Instrucciónes de funcionamiento de cambio de baterías de APE560
24
Pasos de operación de carga y descarga de la base de APE700
localizador delgado con forma UFO
Diagrama Esquemático
25
Scaricare