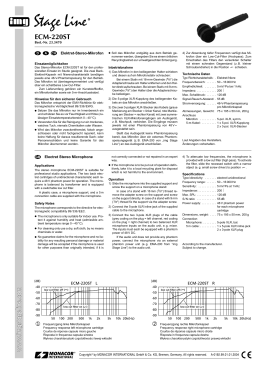
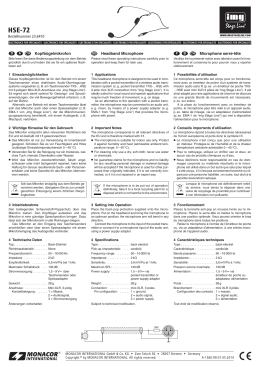
ECM-130
Best.-Nr. 23.3580
D
1
A
CH
3
GroßmembranElektret-Mikrofon
Einsatzmöglichkeiten
Das Mikrofon ECM-130 mit extrem dünner, goldbeschichteter Membran ist für professionelle Studiound Live-Einsätze konzipiert und eignet sich sowohl
für die Schallabnahme von Instrumenten als auch
für Gesangs- und Sprachanwendungen. Die Richtcharakteristik kann zwischen Niere, Acht und Kugel
umgeschaltet werden. Das Mikrofon wird mit einer
Phantomspeisung von 48 V betrieben und verfügt
über ein schaltbares Low-Cut-Filter und einen
10-dB-Abschwächschalter.
Zum Lieferumfang gehören ein abschließbarer
Koffer (inkl. 2 Schlüsseln), ein vibrationsdämpfender Mikrofonhalter (Spinne), ein Ersatzband für die
Spinne, ein Windschutz und ein Schlüssel zum Aufschrauben des Mikrofons.
2
Wichtige Hinweise für den Gebrauch
Das Mikrofon entspricht der EMV-Richtlinie für elektromagnetische Verträglichkeit 89/336/EWG.
● Setzen Sie das Mikrofon nur im Innenbereich ein
und schützen Sie es vor Feuchtigkeit und Hitze
(zulässiger Einsatztemperaturbereich 0 – 40 °C).
● Verwenden Sie zum Reinigen nur ein trockenes,
weiches Tuch, niemals Chemikalien oder Wasser.
● Wird das Mikrofon zweckentfremdet, falsch angeschlossen oder nicht fachgerecht repariert, kann
keine Haftung für daraus resultierende Sachoder Personenschäden und keine Garantie für
das Mikrofon übernommen werden.
Soll das Mikrofon endgültig aus dem Betrieb genommen werden, übergeben Sie
es zur umweltfreundlichen Entsorgung
einem örtlichen Recyclingbetrieb.
(dB)
low cut filter off (
)
low cut filter on (
)
Inbetriebnahme
1) Die Spinne auf ein Stativ mit 16-mm-Gewinde
(5/8") oder 9-mm-Gewinde (3/8") schrauben. Das
Mikrofon in die Korbhalterung der Spinne setzen
und über sein Gewinde mit der Halterung verschrauben.
2) Zum Ausrichten des Mikrofons die Feststellschraube an der Spinne lösen, die Spinne mit
dem eingesetzten Mikrofon wie gewünscht positionieren und die Schraube wieder anziehen.
3) Das Mikrofon über ein Kabel mit XLR-Stecker
(z. B. ein Kabel der MEC-Serie von „img Stage
Line“) an einen Mikrofoneingang des verwendeten Audiogeräts (z. B. Mischpult) anschließen.
Der Eingang muss eine 48-V-Phantomspeisung
aufweisen. Stellt das Audiogerät keine Phantomspeisung bereit, das Mikrofon über ein externes
Phantomspeisungsgerät (z. B. EMA-3 von „img
Stage Line“) an das Audiogerät anschließen.
4) Die drei versenkten Kippschalter am Mikrofon
(Abb. 2) mit einem schmalen Gegenstand (z. B.
Schraubendreher) wie gewünscht einstellen:
a Die Richtcharakteristik mit dem 3-Positionen-Schalter (1) auswählen:
linke Position : Acht („bidirectional“)
Mikrofon reagiert am empfindlichsten auf
direkt von vorn und von hinten auftreffende
Schallwellen und gar nicht bzw. nur sehr
schwach auf Schall von der Seite
mittlere Position : Niere („unidirectional“)
Mikrofon reagiert am empfindlichsten auf
direkt von vorn auftreffende Schallwellen
und weniger empfindlich auf seitlich und von
hinten einfallenden Schall.
rechte Position : Kugel („omnidirectional“)
keine Richtwirkung; Mikrofon reagiert auf
Schall aus allen Richtungen gleich empfindlich
330°
-20
0°
-30
Technische Daten
System: . . . . . . . . . . Druckgradientenempfänger,
umschaltbare Richtcharakteristik (Acht/Niere/Kugel)
Frequenzbereich: . . . 20 – 20 000 Hz
Empfindlichkeit
Niere: . . . . . . . . . . 28 mV/Pa bei 1 kHz
Acht: . . . . . . . . . . . 22 mV/Pa bei 1 kHz
Kugel: . . . . . . . . . . 20 mV/Pa bei 1 kHz
Impedanz: . . . . . . . . . 250 Ω
Signal-Rausch-Abstand
Niere: . . . . . . . . . . 80 dB
Acht: . . . . . . . . . . . 79 dB
Kugel: . . . . . . . . . . 78 dB
Max. Schalldruck: . . . 135 dB (145 dB bei eingeschalteter 10-dB-Abschwächung)
Stromversorgung: . . . Phantomspeisung 48 V
Anschluss: . . . . . . . . XLR, symmetrisch
Abmessungen: . . . . . Ø 55 mm x 200 mm
Gewicht: . . . . . . . . . . 650 g
Änderungen vorbehalten.
60°
90°
270°
-50
4
30°
300°
-40
b Soll bei Abnahme von Schallquellen mit hohem Schallpegel, wie z. B. Schlagzeug, tiefe
Blasinstrumente, die 10-dB-Abschwächung
eingeschaltet werden, den Abschwächschalter (2) in die rechte Position -10dB stellen.
c Um das Low-Cut-Filter (Hochpass) einzuschalten (Bassabsenkung zur Kompensation
des Nahbesprechungseffekts), den Low-CutSchalter (3) in die linke Position
stellen.
5) Bei Bedarf den Windschutz aufstecken.
240°
120°
-60
20
50
200
500
2k
5k
210°
20k(Hz)
(dB)
330°
-20
180°
0°
150°
300°
-30
-40
1
ECM-130
3
90°
240°
–10
2
60°
270°
-50
o
30°
120°
-60
20
50
200
500
2k
5k
210°
20k(Hz)
(dB)
330°
w w w.imgstageline.com
-20
180°
0°
150°
30°
300°
-30
-40
60°
90°
270°
-50
240°
120°
-60
20
50
200
500
2k
5k
20k(Hz)
210°
180°
150°
➀
➁
Frequenzgang und Polardiagramm (bei 1 kHz) bei Achter-/Nieren-/Kugelcharakteristik
Frequency response and polar pattern (at 1 kHz) for bidirectional, unidirectional, and omnidirectional characteristics
Réponse en fréquences, diagramme polaire (à 1 kHz) pour les directivités directionnel/unidirectionnel/omnidirectionnel
Schalter
®
(1) für die Richtcharakteristik
(2) für die 10-dB-Abschwächung ein/aus
(3) für das Low-Cut-Filter ein/aus
Switch
(1) for the directivity
(2) for the 10 dB attenuation on/off
(3) for the low cut filter on/off
Interrupteur (1) pour la directivité
(2) pour marche/arrêt atténuation 10 dB
(3) pour marche/arrêt filtre Low Cut
Copyright © by MONACOR INTERNATIONAL GmbH & Co. KG, Bremen, Germany. All rights reserved.
A-0430.99.01.06.2005
ECM-130
Best.-Nr. 23.3580
GB
1
Large Diaphragm Electret
Microphone
Applications
The microphone ECM-130 with extra thin, goldcoated diaphragm is designed for professional studio and live applications and is both suitable for the
sound pick-up of musical instruments and for vocal
sound and speech applications. The directivity can
be switched between unidirectional, bidirectional,
and omnidirectional. The microphone is operated
with a phantom power of 48 V and has a switchable low cut filter and a 10 dB attenuator switch.
The microphone is supplied with a lockable case
(including 2 keys), a vibration-dampening microphone support (spider), a replacement ribbon for the
spider, a windshield, and a key for opening the
microphone.
2
Important Notes
The microphone corresponds to the directive for
electromagnetic compatibility 89/336/EEC.
● The microphone is only suitable for indoor use.
Protect it against humidity and heat (admissible
ambient temperature range 0 – 40 °C).
● For cleaning only use a dry, soft cloth, by no
means chemicals or water.
● No guarantee claims for the microphone and no
liability for any resulting personal damage or
material damage will be accepted if the microphone is used for other purposes than originally
intended, if it is not correctly connected or not
repaired in an expert way.
If the microphone is to be put out of operation definitively, take it to a local recycling plant for a disposal which is not
harmful to the environment.
F
1
B
CH
w w w.imgstageline.com
2) To align the microphone, release the setscrew at
the spider, position the spider with the microphone inserted as desired and retighten the
screw.
3) Connect the microphone via a cable with XLR
plug (e. g. a cable of the MEC series from “img
Stage Line”) to the microphone input of the audio
unit used (e. g. mixer). The input must have a
48 V phantom power. If the audio unit does not
provide any phantom power, connect the microphone via an external phantom power supply unit
(e. g. EMA-3 from “img Stage Line”) to the audio
unit.
4) Adjust the three recessed toggle switches on the
microphone (fig. 2) with a narrow object (e. g.
screwdriver) as desired:
a Adjust the directivity with the 3-position
switch (1):
left position : bidirectional
The microphone reacts the most sensitively
on sound waves coming directly from the
front or from the back and not at all or only
very poorly on sound from the side
central position : unidirectional
The microphone reacts the most sensitively
on sound waves coming directly from the
front and less sensitively on sound waves
coming from the sides or from the back
right position : omnidirectional
no directivity; the microphone reacts on
sound from all directions with the same sensitivity
Lorsque le microphone est définitivement
retiré du service, vous devez le déposer
dans une usine de recyclage adaptée pour
contribuer à son élimination non polluante.
Possibilités d’utilisation
Notes importantes
Le microphone répond à la norme européenne
89/336/CEE, relative à la compatibilité électromagnétique.
● Le microphone n’est conçu que pour une utilisation en intérieur. Protégez-le de l’humidité et de la
chaleur (plage de température de fonctionnement
autorisée : 0 – 40 °C).
● Pour le nettoyer, utilisez uniquement un chiffon
sec et doux, en aucun cas de produits chimiques
ou d’eau.
● Nous déclinons toute responsabilité en cas de
dommages matériels ou corporels résultants si le
microphone est utilisé dans un but autre que celui
pour lequel il a été conçu, s’il n’est pas correctement branché ou s’il n’est pas réparé par une personne habilitée ; en outre, la garantie deviendrait
caduque.
®
Setting into Operation
1) Screw the spider onto a stand with 16 mm (5/8")
thread or 9 mm (3/8") thread. Place the microphone into the basket support of the spider and
screw it to the support via its thread.
Microphone électret à
grande membrane
Le microphone ECM-130 avec une membrane extrêmement fine et un revêtement en or, est conçu
pour des utilisations professionnelles en studio et
sur scène et s’adapte aussi bien pour la prise de son
d’instruments que pour des applications de chant et
de discours. On peut commuter la directivité entre
unidirectionnel, bi-directionnel, omnidirectionnel. Le
microphone nécessite, pour son fonctionnement,
une alimentation fantôme 48 V et dispose d’un filtre Low Cut commutable et d’un atténuateur 10 dB.
Sont livrés un coffret verrouillable (avec 2 clés),
un support micro amortissant les vibrations (araignée), une bande de rechange pour l’araignée, une
bonnette de protection et une clé pour ouvrir le
microphone.
2
3
3
Fonctionnement
1) Vissez l’araignée sur un pied avec un filetage
16 mm (5/8") ou un filetage 9 mm (3/8"). Placez le
microphone sur le support de l’araignée et vissez-le sur le support via son filetage.
2) Pour orienter le microphone, desserrez la vis de
réglage sur l’araignée, positionnez l’araignée
avec le microphone placé comme souhaité puis
revissez la vis.
3) Reliez le microphone via un cordon avec fiche
XLR (p. ex. un cordon de la série MEC de “img
Stage line”) à l’entrée micro de l’appareil audio
utilisé (p. ex. table de mixage). L’entrée micro doit
posséder une alimentation fantôme 48 V. Si l’appareil audio n’a pas d’alimentation fantôme, connectez le microphone à l’appareil audio via une
alimentation fantôme externe (p. ex. EMA-3 de
“img Stage Line”).
4) Réglez avec un objet fin (par exemple tournevis)
les trois interrupteurs à bascule encastrés sur le
microphone (schéma 2) comme voulu :
a) Sélectionnez la directivité avec l’interrupteur
3 positions (1) :
position
gauche : bidirectionnel
Le microphone réagit avec le plus de sensibilité possible à des ondes sonores venant
directement de l’avant ou de l’arrière et pas
ou très faiblement à des ondes sonores
venant des côtés.
position
médiane : unidirectionnel
Le microphone réagit avec le plus de sensibilité possible à des ondes sonores venant
directement de l’avant, moins sensiblement
à des ondes sonores venant des côtés ou de
l’arrière.
b For switching on the 10 dB attenuation for
picking-up sound sources with high sound
level, e. g. drums, low wind instruments, set
the attenuator switch (2) to the right position
-10dB.
c To switch on the low cut filter (high pass)
[bass attenuation for compensating the close
talking effect], set the low cut switch (3) to the
left position
.
5) If required, place the windshield.
4
Specifications
System: . . . . . . . . . . pressure gradient microphone, switchable directivity
(bidirectional, unidirectional,
omnidirectional)
Frequency range: . . . 20 – 20 000 Hz
Sensitivity
unidirectional: . . . . 28 mV/Pa at 1 kHz
bidirectional: . . . . . 22 mV/Pa at 1 kHz
omnidirectional: . . 20 mV/Pa at 1 kHz
Impedance: . . . . . . . . 250 Ω
S/N ratio
unidirectional: . . . . 80 dB
bidirectional: . . . . . 79 dB
omnidirectional: . . 78 dB
Max. SPL: . . . . . . . . . 135 dB (145 dB with 10 dB
attenuation switched on)
Power supply: . . . . . . phantom power 48 V
Connection: . . . . . . . XLR, balanced
Dimensions: . . . . . . . Ø 55 mm x 200 mm
Weight: . . . . . . . . . . . 650 g
Subject to technical modification.
position
droite : omnidirectionnel
aucune directivité : le microphone réagit au
son venant de toutes les directions avec la
même sensibilité.
b) Pour la prise de son de sources avec un niveau sonore élevé, p. ex. batterie, instruments
à vent graves, il faut commuter l’atténuation
10 dB, mettez alors l’atténuateur (2) sur la
position de droite –10dB.
c) Pour allumer le filtre Low Cut (passe-haut)
[diminution des graves pour compenser l’effet
généré par le fait de parler près du micro],
mettez l’interrupteur Low Cut (3) sur la position gauche
.
5) Si besoin, mettez la bonnette de protection en
place.
4
Caractéristiques techniques
Système : . . . . . . . . . récepteur à gradient de
pression/directivité commutable (bidirectionnel/unidirectionnel/omnidirectionnel)
Bande passante : . . . 20 – 20 000 Hz
Sensibilité
unidirectionnel : . . 28 mV/Pa à 1 kHz
bidirectionnel : . . . 22 mV/Pa à 1 kHz
omnidirectionnel : . 20 mV/Pa à 1 kHz
Impédance : . . . . . . . 250 Ω
Rapport signal/bruit
unidirectionnel : . . 80 dB
bidirectionnel : . . . 79 dB
omnidirectionnel : . 78 dB
Pression sonore max. : 135 dB (145 dB si atténuation 10 dB allumé)
Alimentation : . . . . . . alimentation fantôme 48 V
Branchement : . . . . . XLR, symétrique
Dimensions : . . . . . . . Ø 55 mm x 200 mm
Poids : . . . . . . . . . . . 650 g
Tout droit de modification réservé.
Copyright © by MONACOR INTERNATIONAL GmbH & Co. KG, Bremen, Germany. All rights reserved.
A-0430.99.01.06.2005
ECM-130
Best.-Nr. 23.3580
Microfono a elettrete a grande
membrana
I
1
Possibilità d’impiego
Il microfono ECM-130 con la sua membrana estremamente sottile, placata d’oro, è stato realizzato per
impieghi professionali negli studi di registrazione e
dal vivo; è adatto sia per prelevare il suono da strumenti musicali che per applicazioni di canto e di lingua parlata. La caratteristica direzionale può essere
commutata fra cardioide, bidirezionale e onnidirezionale. Il microfono funziona con un’alimentazione
phantom di 48 V e dispone di un filtro low-cut commutabile e di un interruttore di attenuazione di 10 dB.
Il kit comprende una valigetta con chiusura (con
2 chiavi), un supporto del microfono che riduce le
vibrazioni (spider), un gommino di ricambio per lo
spider, una spugna antivento e una chiave per svitare il microfono.
2
Consigli importanti
Il microfono è conforme alla direttiva CE 89/336/
CEE sulla compatibilità elettromagnetica.
● Usare il microfono solo all’interno di locali. Proteggerlo dall’ umidità e dal calore (temperatura
d’impiego ammessa fra 0 e 40 °C).
● Per la pulizia usare solo un panno morbido,
asciutto; non impiegare in nessun caso prodotti
chimici o acqua.
● Nel caso d’uso improprio, di collegamenti sbagliati o di riparazione scorretta del microfono, non
si assume nessuna responsabilità per eventuali
danni consequenziali a persone o a cose e non si
assume nessuna garanzia per il microfono.
Se si desidera eliminare il microfono definitivamente, consegnarlo per lo smaltimento ad un’istituzione locale per il riciclaggio.
(dB)
low cut filter off (
)
low cut filter on (
)
3
Messa in funzione
1) Avvitare lo spider su uno stativo con filettatura di
16 mm (5/8") o 9 mm (3/8"). Inserire il microfono
nel suo supporto nello spider ed avvitarlo al supporto stesso per mezzo della sua filettatura.
2) Per orientare il microfono allentare la vite di bloccaggio dello spider, posizionare lo spider con il
microfono inserito e stringere di nuovo la vite.
3) Collegare il microfono con un ingresso microfono
dell’apparecchio audio utilizzato (p. es. di un
mixer), servendosi di un cavo con connettori XLR
(p. es. un cavo della serie MEC di “img Stage
Line”). L’ingresso deve essere equipaggiato con
un alimentazione phantom di 48 V. Se l’apparecchio audio non dispone di alimentazione phantom,
occorre collegare il microfono con l’apparecchio
audio per mezzo di un alimentatore phantom
esterno (p. es. EMA-3 di “img Stage Line”).
4) Impostare i tre interruttori a levetta, incassati sul
microfono (fig. 2), secondo necessità, servendosi
di un oggetto sottile (p. es. cacciavite):
a Scegliere la caratteristica direzionale con
l’interruttore a 3 posizioni (1):
posizione a sinistra :
bidirezionale (“bidirectional”)
Il microfono reagisce con la massima sensibilità alle onde sonore che arrivano direttamente dal davanti o dal didietro, mentre reagisce in modo debole o anche per niente al
suono che arriva da un lato
posizione centrale :
cardioide (“unidirectional”)
Il microfono reagisce con la massima sensibilità alle onde sonore che arrivano direttamente dal davanti, mentre reagisce meno al
suono che arriva dai lati o dal didietro.
posizione a destra :
onnidirezionale (“omnidirectional”)
nessuna preferenza per la direzione; il mi-
330°
-20
0°
-30
Dati tecnici
Sistema: . . . . . . . . . . ricevitore a gradiente di
pressione, caratteristica
direzionale commutabile
(bidirezionale/cardioide/
onnidirezionale)
Banda passante: . . . 20 – 20 000 Hz
Sensibilità
cardioide: . . . . . . . 28 mV/Pa con 1 kHz
bidirezionale: . . . . 22 mV/Pa con 1 kHz
onnidirezionale: . . 20 mV/Pa con 1 kHz
Impedenza: . . . . . . . . 250 Ω
Rapporto S/R
cardioide: . . . . . . . 80 dB
bidirezionale: . . . . 79 dB
onnidirezionale: . . 78 dB
Pressione
sonora max.: . . . . . . . 135 dB (145 dB con
attenuazione 10 dB attivata)
Alimentazione: . . . . . alimentazione phantom
48 V
Collegamento: . . . . . XLR, simmetrico
Dimensioni: . . . . . . . . Ø 55 mm x 200 mm
Peso: . . . . . . . . . . . . 650 g
Con riserva di modifiche tecniche.
60°
90°
270°
-50
4
30°
300°
-40
crofono reagisce con la medesima sensibilità al suono che arriva da tutte le direzioni
b Se nel caso di onde sonore con alto volume,
come p. es. batteria, strumenti bassi a fiato, si
desidera attivare l’attenuazione di 10 dB,
portare l’interruttore di attenuazione (2) in
posizione a destra di -10dB.
c Per attivare il filtro low-cut (passaalto) [riduzione dei bassi per compensare l’effetto del
parlare vicino al microfono], portare l’interruttore low-cut (3) in posizione di sinistra
.
5) Se necessario montare la spugna antivento.
240°
120°
-60
20
50
200
500
2k
5k
210°
20k(Hz)
(dB)
330°
-20
180°
0°
150°
300°
-30
-40
1
ECM-130
3
90°
240°
–10
2
60°
270°
-50
o
30°
120°
-60
20
50
200
500
2k
5k
210°
20k(Hz)
(dB)
330°
w w w.imgstageline.com
-20
180°
0°
150°
30°
300°
-30
-40
60°
90°
270°
-50
240°
120°
-60
20
50
200
500
2k
5k
20k(Hz)
210°
180°
150°
➀
➁
Risposta in frequenza e diagramma direttivo (con 1 kHz) con caratteristica bidirezionale/a cardioide/onnidirezionale
Respuesta de frecuencia y diagrama polar (a 1 kHz) para directividad bidireccional, unidireccional y omnidireccional
Charakterystyka częstotliwościowa i wykres biegunowy (przy 1 kHz) dla mikrofonu dwukierunkowego, jednokierunkowego i wielokierunkowego
Interruttore (1) per la caratteristica direzionale
(2) per l’attenuazione 10 dB on/off
(3) per il filtro low-cut on/off
Interruptor (1) para la directividad
(2) para atenuación 10 dB on/off
(3) para el filtro low cut on/off
Przełącznik (1) kierunkowości
(2) tłumienia (10 dB) wł/wył
(3) filtra górnoprzepustowego wł/wył
®
Copyright © by MONACOR INTERNATIONAL GmbH & Co. KG, Bremen, Germany. All rights reserved.
A-0430.99.01.06.2005
ECM-130
Best.-Nr. 23.3580
E
1
Micrófono electret de gran
membrana
Aplicaciones
El micrófono ECM-130 con una membrana extremadamente fina, recubierta de oro ha sido diseñado
para aplicaciones profesionales en el estudio y en
directo y es adecuado para captar el sonido de
instrumentos musicales así como para aplicaciones
de voz y canto. La directividad puede ajustarse a
unidireccional, bidireccional y omnidireccional. El
micro funciona con una potencia phantom de
48 V DC y tiene un filtro low cut conmutable y un
interruptor atenuador de 10 dB.
El micro está entregado con una caja con cierre
(incluye 2 llaves), un soporte de micro atenuando
las vibraciones (spider), una cinta de reemplazo
para el spider, espuma anti viento, y una llave para
abrir el micro.
2
Notas importantes
El micro cumple con la normativa para compatibilidad electromagnética 89/336/EEC.
● El micro ha sido fabricado únicamente para utilización en el interior. Protéjalo contra la humedad y el calor (temperatura de ambiente admisible 0 – 40 °C).
● Para limpiarlo utilice únicamente un trapo seco y
suave, nunca productos químicos o agua.
● El micro carecería de todo tipo de garantía en
caso de daños personales o materiales derivados
de una utilización del micro con otro fin del que le
es propio, si no está conectado correctamente o
reparado por un experto.
Si el micro está definitivamente retirado
de servicio, llévelo a una planta de reciclaje próxima para contribuir a su eliminación no contaminante.
PL
1
Mikrofon elektretowy z dużą
membraną
Zastosowania
Mikrofon ECM-130 wyposażony w wyjątkowo cienką, powlekaną złotem membranę jest przeznaczony do profesjonalnych zastosowań studyjnych
oraz scenicznych i zarówno dobrze zbiera dźwięk
instrumentów muzycznych, jak i głos ludzki. Charakterystykę zbiorczą mikrofonu można wybrać z
pośród trzech: jednokierunkowej, dwukierunkowej
i wielokierunkowej. Mikrofon jest zasilany napięciem fantomowym 48 V, posiada filtr górnoprzepustowy i załączany tłumik 10 dB.
W zestawie znajduje się zamykany futerał (plus
2 klucze), uchwyt studyjny amortyzujący wstrząsy
(pająk), taśma eksploatacyjna do uchwytu, wiatrochron oraz klucz do otwierania mikrofonu.
w w w.imgstageline.com
2
Ważne Informacje
To urządzenie podlega wytycznym i normom dla
urządzeń zgodnych z 89/336/EEC.
● Mikrofon jest przeznaczony tylko do użytku
wewnątrz pomieszczeń. Urządzenie należy
chronić przed wilgocią i wysoką temperaturą
(dopuszczalny zakres temperatury to 0 – 40 °C).
● Do czyszczenia obudowy używać suchej, miękkiej ściereczki. Nie stosować wody ani środków
czyszczących.
● Producent ani dostawca nie ponosi odpowiedzialności za wynikłe szkody materialne, jeśli
urządzenie było używane niezgodnie z przeznaczeniem, zostało zainstalowane lub obsługiwane niepoprawnie lub poddawane nieautoryzowanym naprawom.
Jeśli urządzenie nie będzie już nigdy
więcej używane, wskazane jest przekazanie go do miejsca utylizacji odpadów,
aby zostało utylizowane bez szkody dla
środowiska.
®
3
Puesta en funcionamiento
1) Atornille el spider en un pie con una rosca de
16 mm (5/8") o una de 9 mm (3/8"). Coloque el
micro en el soporte del spider y enrósquelo vía
su rosca con el soporte.
2) Para alinear el micro, suelte el tornillo de fijación
del spider, posicione el spider con el micro dentro como lo desee y apriete el tornillo.
3) Conecte el micro con un cable con conector XLR
(p. ej. un cable de la serie MEC de “img Stage
Line”) a una entrada micro de la unidad audio
utilizada (p. ej. un mezclador). La entrada micro
debe tener una potencia phantom de 48 V. Si la
unidad audio no proporciona ninguna potencia
phantom, conecte el micro a través de una unidad externa de potencia phantom (p. ej. EMA-3
de “img Stage Line”) a la unidad audio.
4) Ajuste los tres interruptores empotrados basculantes en el micro (esquema 2) con un objeto
pequeño (p. ej. un destornillador) como prefiera:
a Ajuste la directividad con las 3 posiciones del
interruptor (1):
posición izquierda : bidireccional
El micro reacciona lo más sensiblemente a
las ondas de sonido que provienen directamente de la parte delantera o trasera y no
reacciona de ninguna manera o solamente
reacciona muy débil si el sonido proviene
del lado.
posición central : unidireccional
El micro reacciona lo más sensiblemente a
las ondas de sonido que provienen directamente de la parte delantera y menos sensiblemente a las ondas de sonido que provienen del lado y de la parte trasera.
posición derecha : omnidireccional
sin directividad; el micro reacciona con el
sonido que proviene de todas las direcciones con la misma intensidad
3
Przygotowanie do pracy
1) Przykręć uchwyt mikrofonu do statywu za
pomocą śrub 16 mm (5/8") lub 9 mm (3/8") i
umieść mikrofon w uchwycie. Włóż mikrofon w
uchwyt i przykręć do statywu.
2) Aby ustawić mikrofon, należy poluzować śrubę
dociskową przy uchwycie, zmienić położenie
bez wyjmowania mikrofonu i ponownie dokręcić
śrubę.
3) Podłączyć mikrofon za pomocą kabla XLR (np.
kabel z serii MEC z oferty “img Stage Line”) do
wejścia mikrofonowego używanego urządzenia
audio (np. miksera). Na wejściu musi się znajdować zasilane fantomowe o wartości 48 V.
Jeżeli urządzenie audio nie dostarcza zasilania
fantomowego, podłącz mikrofon do urządzenia
przez zewnętrzny zasilacz fantomowy (np.
EMA-3 z oferty “img Stage Line”).
4) Trzy przełączniki na mikrofonie (rys. 2) można
ustawiać za pomocą np. śrubokrętu w odpowiedniej pozycji:
a Ustaw kierunkowość mikrofonu za pomocą
trzystopniowego przełącznika (1):
pozycja lewa :
charakterystyka dwukierunkowa
Mikrofon ma najwiąkszą czułość dla fal
dźwiękowych dochodzących bezpośrednio
z przodu lub bezpośrednio z tyłu, nie rejestruje lub rejestruje bardzo słabo dźwięki
dochodzące z boków.
pozycja środkowa :
charakterystyka jednokierunkowa
Mikrofon ma najwiąkszą czułość dla fal
dźwiękowych dochodzących bezpośrednio
z przodu, rejestruje słabo dźwięki dochodzące z boków lub tyłu.
pozycja prawa :
charakterystyka wielokierunkowa
brak kierunkowości, mikrofon reaguje z tą
samą czułością na dźwięk z każdego kierunku
b Para activar la atenuación 10 dB para captar
fuentes de sonido con una alto nivel de
sonido, por ejemplo tambores, instrumentos
de viento bajos, ponga el interruptor de
atenuación (2) en posición derecha -10dB.
c Para activar el filtro low cut (pasa alto)
[atenuación de graves para compensar el
efecto de cerca], ponga el interruptor low cut
(3) en su posición izquierda
.
5) Si lo requiere, coloque el anti viento.
4
Especificaciones
Sistema: . . . . . . . . . . micro de gradiente de presión, directividad cambiable
(bidireccional, unidireccional, ommidireccional)
Índice de frecuencia: . 20 – 20 000 Hz
Sensibilidad
unidireccional: . . . 28 mV/Pa a 1 kHz
bidireccional: . . . . 22 mV/Pa a 1 kHz
omnidireccional: . . 20 mV/Pa a 1 kHz
Impedancia: . . . . . . . 250 Ω
Relación senal/ruido
unidireccional: . . . 80 dB
bidireccional: . . . . 79 dB
omnidireccional: . . 78 dB
Presión sonora
máxima: . . . . . . . . . . 135 dB (145 dB con atenuación activada 10 dB)
Fuente de energía: . . potencia phantom 48 V
Conexión: . . . . . . . . . XLR, balanceado
Dimensiones: . . . . . . Ø 55 mm x 200 mm
Peso: . . . . . . . . . . . . 650 g
Sujeto a modificaciones técnicas.
b Aby włączyć tłumienie 10 dB w celu lepszego zbierania źródeł o wysokim poziomie
dźwięku np. perkusji lub instrumentów dętych, ustaw przełącznik tłumika (2) w pozycji
prawej -10dB.
c Aby włączyć filtr górnoprzepustowy [tłumienie tonów niskich w celu skompensowania hałasów powodowanych zbyt bliskim
mówieniem do mikrofonu], ustaw dolny
przełącznik (3) w pozycji lewej
.
5) W razie potrzeby na mikrofon załóż wiatrochron.
4
Dane techniczne
System: . . . . . . . . . . . mikrofon gradientowy ze
zmienną kierunkowością
(dwukierunkowy, jednokierunkowy, wielokierunkowy)
Pasmo przenoszenia: 20 – 20 000 Hz
Czułość przy charakterystyce
jednokierunkowej: 28 mV/Pa przy 1 kHz
dwukierunkowej: . 22 mV/Pa przy 1 kHz
wielokierunkowej: 20 mV/Pa przy 1 kHz
Impedancja: . . . . . . . 250 Ω
Stosunek S/N przy charakterystyce:
jednokierunkowej: 80 dB
dwukierunkowej: . 79 dB
wielokierunkowej: 78 dB
Max. SPL: . . . . . . . . . 135 dB (145 dB przy włączonym tłumieniu 10 dB)
Zasilanie: . . . . . . . . . zasilanie fantomowe
48 V
Łącza: . . . . . . . . . . . . XLR, symetryczne
Wymiary: . . . . . . . . . . Ø 55 mm x 200 mm
Ciężar: . . . . . . . . . . . 650 g
Może ulec zmianie.
Copyright © by MONACOR INTERNATIONAL GmbH & Co. KG, Bremen, Germany. All rights reserved.
A-0430.99.01.06.2005
Scaricare