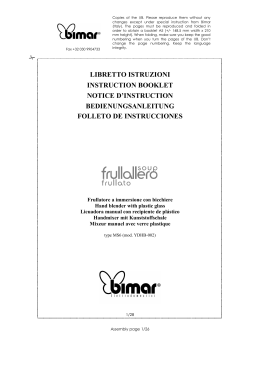
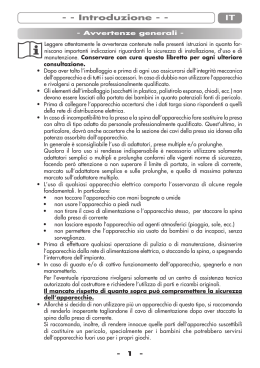
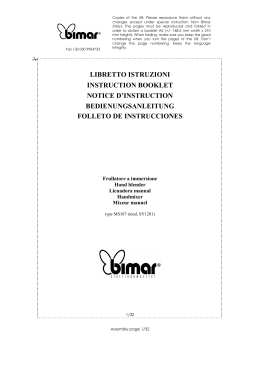
Model: Moviestar Large
DE
IT
FR
UK
08/52252/0
Issue 1
The product complies with the European Safety Standards EN60065 and the European Standard Electromagnetic Compatibility (EMC)
EN55014-1, EN55014-2, EN61000-3-2 and EN61000-3-3 These cover the essential requirements of EEC Directives 2006/95/EC and 2004/108/EC
- Patents pending International Application No . : PCT/EP2013/051263 & PCT/EP058211 GB Application : GB1210108.5
1
2a
2b
3
5
4
75
DE........................................1
IT..........................................2
FR..........................................3
UK..........................................4
Moviestar Large
DE
WICHTIG: DIESE ANLEITUNG IST SORGFÄLTIG ZU STUDIEREN UND ZUR SPÄTEREN VERWENDUNG AUFZUBEWAHREN
Handbedienung: Die Bedientasten befinden sich unten links hinter dem
Gerät. Abb. 3).
Der Ein/Aus-Schalter. (‘O/I’) zum 100%igen Ausschalten
des Gerätes.
Allgemein
Im Karton befinden sich folgende
Teile:
- Moviestar Modell: L
- Fernbedienung mit Batterien
(Typ AAA)
Sicherheitsanweisungen
, Schalter befindet sich direkt unter dem
Der “Standby”
Hauptschalter.
Ist das Gerät in der Standby-Stellung, ist dies an der
leuchtenden roten LED (Abb. 4) erkennbar.
Das Gerät darf nur im Innenbereich und in einem nicht
feuchten Raum aufgestellt werden.
Das Gerät erst anschließen, nachdem es vollständig
installiert ist.
Das Gerät ist an eine geerdete Steckdose anzuschließen.
Halten Sie sich an die angegebenen Einbaumaße und
sorgen Sie für Lüftung an der Einbauöffnung.
Keine Gegenstände gleich welcher Art im Gerät
platzieren.
Darauf achten, dass das Gerät nicht von anderen
Wärmequellen angestrahlt wird.
Fernbedienung : Die Fernbedienung funktioniert nur, wenn der
Hauptschalter auf ‘I’ (Abb.3) steht.
Die Fernbedienung auf einen Punkt links von der Mitte
richten (Siehe Abb. 4.)
Einschalten/Standby: Standby-Taste drücken. (Rote LED
brennt in Standby-Stellung)
Die Lautstärke kann mit der + und _Taste höher oder
niedriger eingestellt werden
Zum Auswechseln oder Einlegen der Batterien siehe
Abb.5
Installation
Instandhaltung
Das Glas kann regelmäßig mit einem weichen Tuch
gereinigt werden.
Auf keinen Fall aggressive Glasreiniger verwenden.
Das Gerät ist zum Einbau in einer Schrank- oder
Wandöffnung vorgesehen.
Das Gerät ist mit Schrauben in den dazu vorgesehenen
Löchern auf einer
Basis zu verschrauben. Siehe Abb. 2a und Abb 2b für die
empfohlenen Einbaumaße.
Achten Sie auf die gewählte Höhe: Empfohlen wird 65
cm, wenn das Gerät im Sitzen
gesehen wird, bis max. 110 cm, wenn das Gerät im
Stehen gesehen wird. Die Bemaßung wird vom
Fußboden bis zur Unterseite der Kaminöffnung
gerechnet.
Das Blechmaterial auf der Frontseite darf die
Kaminöffnung auf keinen Fall teilweise abdecken. Der
Einbaustreifen um die Kaminöffnung ist maßgebend.
Dies ist erforderlich, um Servicearbeiten zu ermöglichen,
ohne das Gerät ausbauen zu müssen.
Darauf achten, dass der Anschluss an die Steckdose
jederzeit erreichbar bleibt.
Für Servicearbeiten ist es erforderlich, das Gerät
spannungsfrei zu schalten.
Alle Bauteile können durch die Kaminöffnung auf der
Vorderseite des Gerätes erreicht werden.
Anschlusswert
230V 50Hz 80VA
Leistungsaufnahme
Standby-Aufnahme
0,04 KW
1W
Recycling
Für alle in der EU verkauften Elektrogeräte gilt, dass sie
am Ende der Lebensdauer wiederzuverwerten
sind.
Das Gerät bei einer lokalen Sammelstelle
entsorgen.
Funktionsweise: Den Hauptschalter auf ‘I’ (Abb.3 oben links hinter dem
Gerät) einstellen.
Das ‘THE FLAME’ Logo ist während der Startphase 3
Sekunden lang sichtbar.
In einem Zeitraum von ca. 30 Minuten wird der
Bildschirm ca. 5 Sekunden schwarz. (Film zurücksetzen)
Wird das Gerät für eine längere Zeit nicht benutzt,
empfehlen wir zur Energieeinsparung, den
Hauptschalter auszuschalten.
1
Moviestar Large
IT
IMPORTANTE: LEGGERE ATTENTAMENTE LE PRESENTI ISTRUZIONI E CONSERVARLE PER POTERLE CONSULTARE IN FUTURO
Funzionamento: Per accendere l'apparecchio, bisogna per prima cosa portare
l'interruttore di alimentazione ‘ON’ (‘O/I’vedere Fig.3) in
posizione ‘I’.
Contenuto della confezione
•
•
Moviestar Modello L
Telecomando e batterie (tipo AAA)
Istruzioni importanti per la sicurezza
Prima di avere l'effetto fiamma, comparirà per circa 3 secondi
il logo ‘THE FLAME’.
Durante l’uso del prodotto adottare le misure di sicurezza
valide per qualsiasi apparecchio elettrico, onde evitare
incendi, scosse elettriche e infortuni ai presenti. Prestare
particolare attenzione alle seguenti raccomandazioni:
Nota: Si può notare una schermata vuota per circa 5 secondi
ogni 30 minuti. Si tratta di un fenomeno del tutto normale che
non deve suscitare preoccupazione.
Se l’apparecchio risulta danneggiato, rivolgersi al fornitore
prima di installarlo e utilizzarlo.
Funzionamento a controllo manuale: -
Non utilizzare l’apparecchio nelle immediate vicinanze di
bagni, docce o piscine.
I comandi manuali dello schermo sono collocati in alto nella
parte sinistra interna dell'apparecchio sopra il vetro. (Vedere
Fig.3).
Nel cablaggio fisso occorre inserire un sistema di
scollegamento conforme alle norme per i cablaggi elettrici.
Se si pensa di non usare il caminetto, per esempio, di notte
o per lunghi periodi, per evitare sprechi di energia, spegnere
l'apparecchio, mettendone l'interruttore di alimentazione (‘O/I’
vedere Fig.3) in posizione (‘O’).
Il pulsante di standby ( ) si trova appena sotto l'interruttore
principale.
Non utilizzare l’apparecchio all’aperto.
In caso di guasti, scollegare l’apparecchio dalla presa di
corrente.
Se si prevede di non utilizzare l’apparecchio per un lungo
periodo, scollegarlo dalla presa di corrente.
Avvertenza - L’apparecchio non deve essere esposto a
gocciolamenti o spruzzi e non devono esservi collocati sopra
recipienti pieni di liquidi, per esempio vasi.
Funzionamento del telecomando: Il telecomando è utilizzabile solo dopo aver acceso
l'apparecchio, mettendo l'interruttore su ‘I’ (‘I’ vedere Fig.3).
Una spia rossa indica che l’apparecchio è in modalità standby.
(Vedere Fig.4) Puntare il telecomando allo schermo (il sensore
I.R. è indicato in Fig. 4). Il volume dell'audio può essere alzato
od abbassato premendo i pulsanti di regolazione del volume
(+ e -). Per installare o sostituire le batterie AAA nel
telecomando - vedere Fig. 5.
Avvertenza - Questo apparecchio è di Classe I e deve
essere collegato a una presa di rete con collegamento a
terra protettivo.
Dati tecnici:
Se il cavo di alimentazione è danneggiato, dovrà essere
sostituito da un cavo apposito disponibile presso il
costruttore o il tecnico dell'assistenza.
Avvertenza - Non collocare fiamme libere, per esempio
candele, sopra questo apparecchio.
230V 50Hz
Caratteristiche elettriche
AVVERTENZA – IL PRODOTTO DEVE ESSERE COLLEGATO
A TERRA
Consumo di corrente
0,04KW
Modalità stand-by
1W
Non accendere l’apparecchio finché non è stato correttamente
installato. Leggere con attenzione le raccomandazioni sulla
sicurezza e le istruzioni per il funzionamento.
Pulizia
Per la pulizia usare un panno morbido per la polvere; non
utilizzare in nessun caso detergenti abrasivi. Per pulire il vetro,
usare un panno particolarmente morbido. NON usare prodotti
per la pulizia dei vetri.
Installazione
Avvertenza.
Non collegare l’apparecchio se non è stato fissato
adeguatamente ad una base sicura e se non ne sono state
lette attentamente tutte le istruzioni.
Riciclaggio
Durante l’installazione dell’apparecchio, assicurarsi di non
danneggiare eventuali cavi che passino all’interno della parete.
Quando i prodotti elettrici non sono più utilizzabili, non possono
essere smaltiti assieme ai normali rifiuti domestici. Smaltirli
nelle apposite strutture, ove disponibili. Per informazioni sui
servizi di riciclaggio locali, rivolgersi all'amministrazione locale
o al proprio rivenditore di fiducia.
Prodotti elettrici venduti all'interno della Comunità Europea.
Prestare attenzione durante la foratura col trapano.
Questi modelli sono stati progettati per essere fissati in modo
tale da avere una visuale ottimale del display, vedere Fig.2a
e 2b.
Le dimensioni contrassegnate con * sono quelle di montaggio
consigliate tra il pavimento ed il lato inferiore dell'apertura parete
- 65 cm da una visuale in posizione seduta e 110 cm da una
visuale da posizione eretta. Il profilo del telaio e la posizione
della presa elettrica sono illustrati con linee punteggiate in Fig.4.
Per tutto ciò che riguarda i cablaggi, rivolgersi ad un elettricista
qualificato.
2
Moviestar Large
FR
IMPORTANT : CES INSTRUCTIONS DOIVENT ÊTRE LUES ATTENTIVEMENT ET CONSERVÉES AFIN DE POUVOIR ÊTRE
CONSULTÉES ULTÉRIEUREMENT
Informations générales
Commande manuelle
Components dans la boîte :
Moviestar Modèle: L
Télécommande, pile (type AAA)
incl.
Consignes de sécurité importantes
Les boutons de commandes se trouvent au fond de
l’appareil, gauche en haut (voir Fig. 3).
L’interrupteur marche/arrêt (« O/I ») : 100%
débranchement de l’appareil.
L’interrupteur « stand-by »
, se trouve immédiatement
dessous l’interrupteur principale.
Le led rouge indique que le foyer se trouve dans le mode
stand-by (fig.4).
Ne pas utiliser l’appareil à l’extérieur ou dans un endroit
humide.
Ne branchez pas l’appareil avant que l’installation soit
faite complètement.
L’appareil doit être relié à la terre.
Tenez compte avec les dimensions indiquées et n’oubliez
pas de prévoir de la ventilation.
Ne déposez pas d’autres components dans l’appareil.
Pas d’autres sources de chaleur à l’environ de l’appareil.
Télécommande
Fonctionnement de la télécommande : mettez
l’interrupteur principale sur position « I » (Fig. 3).
Dirigez la télécommande vers le centre à gauche
(voir Fig. 4).
Fonctionnement/stand-by : appuyez sur le bouton standby (led rouge s’allume dans le mode
Stand-by).
Le volume peut être réglé avec le bouton + et -.
Placement/remplacement des pilles : voir fig. 5.
Installation
Cet appareil est un modèle à encastrer.
A l’aide des vis adaptées, fixez solidement l’appareil. Voir
Fig. 2a et Fig. 2b pour les mesures recommandées.
Faites attention à la hauteur : hauteur recommandée 65
cm, vue d’une position assise,
hauteur recommandée vue d’une position debout : 110
cm. Tenant compte avec des
mesures à partir du sol jusque le bas du foyer.
Les panneaux de front ne peuvent jamais couvrir
partiellement l’ouverture du foyer.
La bande à encastrer autour de l’ouverture du foyer est
décisive. Ceci est nécessaire dans le
cas où un technicien aura besoin d’accéder aux
components intérieurs. Si non, il sera
nécessaire de retirer l’appareil de la cheminée.
La prise doit rester toujours accessible.
Toujours débrancher l’appareil du secteur avant de
réaliser toute opération d’entretien.
Tous les components peuvent être remplacer à la face de
l’appareil.
Entretien
Pour nettoyage de la vitre : utilisez un chiffon à poussière.
Ne jamais utiliser des produits nettoyants abrasifs ou
des produits spécifiquement conçus pour le nettoyage
des vitres.
Spécifications techniques
230V 50Hz
Puissance
Puissance Stand-by
0,04 KW
1W
Recyclage
Pour tous les appareils électriques vendus dans l’Union
Européenne : les appareils ne peuvent pas être remis au
rebut avec les déchets ménagers, lorsqu’ils
arrivent en fin de vie.
Vous pouvez remettre l’appareil à des services
locales compétentes.
Fonctionnement
Mettez l’indicateur principale sur « I » (Fig. 3, à gauche,
en haut au fond de l’appareil).
Le logo « THE FLAME » devient visible pendant 3
secondes, pendant la phase d’amorcement.
Tous les ± 30 minutes, l’écran devient noir pendant ± 5
secondes (reset film).
Nous vous conseillons de mettre l’interrupteur
principale sur « O » au moment que l’appareil ne
sera pas utilisé pendant une période prolongée, point
de vue d’énergie.
3
Moviestar Large
UK
IMPORTANT: THESE INSTRUCTIONS SHOULD BE READ CAREFULLY AND RETAINED FOR FUTURE REFERENCE
Contents of Carton
flame picture starts .
•
•
Note: The user may notice a blank screen for approximately
5 seconds, every 30 minutes. This is normal and should not
be a cause for concern.
Moviestar Model: L
Remote control and batteries (AAA type)
Important Safety Advice
Manual Control Operation: -
When using electrical appliances, basic precautions
should be followed to reduce the risk of fire, electric shock,
and injury to persons, including the following:
The manual controls for the screen are located at the inner
top left hand side of the appliance above the glass.(see Fig.3).
The appliance Power switch (‘O/I’ see Fig.3) may be used to
switch the appliance off (‘O’) when it is not required, for
example, overnight or for long periods, to avoid energy
wastage.
The standby button (
) is located just below the mains
switch.
If the appliance is damaged, check immediately with the
supplier before installation and operation.
Do not use this appliance in the immediate surroundings
of a bath, shower or swimming pool.
Means for disconnection must be incorporated in the fixed
wiring in accordance with the wiring regulations.
Do not use outdoors.
Remote Control Operation: The remote control may be operated once the appliance is
switched ‘I’ (‘I’ see Fig.3). A red light will indicate when the
appliance is in standby mode. (See Fig.4) Aim the remote
control at the screen (I.R. sensor is indicated in Fig. 4). The
audio volume may be adjusted up or down by pressing the
volume control buttons ( + and -). For installing or replacing
the AAA batteries into the remote control - see Fig. 5.
In the event of a fault switch off the appliance.
Switch off the appliance when not required for long periods.
If the supply cord is damaged, it must be replaced by a
special cord or assembly available from the manufacturer
or its service agent.
Warning - No naked flame sources, such as candles,
should be placed on this apparatus.
Warning - The appliance shall not be exposed to dripping
or splashing and that no objects filled with liquid, such as
vases, shall be placed on the apparatus.
Techical Information:
Warning - this appliance is of Class I construction and
must be connected to a mains outlet with protective
earthing connection.
Power consumption
0,04KW
Stand-by Power
1W
230V 50Hz
Electrical
WARNING – THIS APPLIANCE MUST BE EARTHED
Cleaning
For general cleaning use a soft clean duster – never use
abrasive cleaners. The glass screen should be cleaned
carefully with a soft cloth. DO NOT use proprietary glass
cleaners.
Do not switch the appliance on until properly installed. Please
read all the safety warnings and operating instructions.
Installation
Warning.
Warranty and Service
Do not connect the appliance until properly fixed to a secure
base and the instruction leaflet is read fully.
Recycling
At installation of the appliance, care must be taken not to
damage any cables that may be concealed in the wall.
For electrical products sold within the European Community.
Please be careful while drilling the holes.
At the end of the electrical products useful life it should
not be disposed of with household waste. Please
recycle where facilities exist. Check with your Local
Authority or retailer for recycling advice in your country.
These models are designed to be permanently fixed
for optimum viewing of the display screen see Fig.2a and 2b.
Dimensions indicated * are recommended fixing
dimensions from floor to underside of the wall aperture 65cm for viewing in a seated position and 110cm for viewing
in a standing position. The outline of the chassis and the
position of the electrical socket are shown as dotted outlines
in Fig.4. Please consult with a qualified electrician for
appropriate wiring requirements.
Operation: The power ‘ON’ switch (‘O/I’see Fig.3) must first be switched
‘I’ to operate the appliance.
The ‘THE FLAME’ logo will appear for about 3 seconds before the
4
Scarica