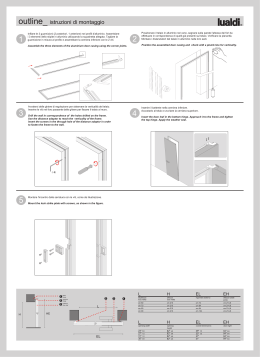
PLANUS quattro
1
Prevedere un vano nella muratura
delle dimensioni come indicato
nella pagina precedente.
Set a wall unit in the same sizes
specified in the previous page.
2
Posizionare i montanti del falso
telaio su un piano con il verso del
lato interno come indicato in figura,
rimuovere le quattro viti per
montante poste al lato superiore
dello stesso. Posizionare il traverso
del falso telaio nello stesso verso
dei montanti ed inserire i profili
del traverso facendoli scorrere
nelle apposite sedi presenti nei
montanti. Ottenuta così la perfetta
complanarità dei profili costituenti il gruppo montanti/traverso
bloccare il sistema riposizionando
le viti rimosse in precedenza.
Inserire e fissare con viti i distanziatori in dotazione nelle posizioni
già predisposte. Il falso telaio
così predisposto è pronto per
essere posizionato nel vano
muratura.
Position the frame jambs on the
floor turned to the internal side,
as specified on the picture.
Remove the four jamb screws on
its upper side. Position the head
turned to the jamb direction and
fit the hear profiles sliding in the
special seat on the jambs themselves. Once the jamb/head profiles are perfectly co-planar, clamp
the system by simply positioning
and tightening the screws which
were previously removed. Fit the
screws once the supplied separators are already fitted in their
correct position.
Istruzioni di montaggio falso telaio - Door post operating instructions
Per un corretto montaggio del falso telaio Planus quattro è consigliabile seguire alcune semplici istruzioni di seguito illustrate. Il falso telaio per la porta
Planus quattro è stato progettato al fine di ottimizzare maggiormente le prestazioni tecniche e viene ora fornito imballato scomposto in parti per
un trasporto più sicuro. Il corretto posizionamento del falso telaio nel vano muro è di fondamentale importanza per una corretta posa in opera della porta;
vengono di seguito riportate alcune norme da seguire:
- Non annegare il falso telaio nel pavimento ma rispettare sempre la quota minima del metro riportata sul montante del falso telaio.
- Non rimuovere i distanziatori dal falso telaio prima del completo indurimento del conglomerato murario.
- Verificare che i profili non subiscano effetti di svergolamento o di imbarcamento.
For a correct assembly of the Planus four false frame, follow the hereby specified simple assembling instructions. The Planus four false frame was
designed as to better improve its technical features and it is supplied packed in different parts as to make transportation easier and safer. The
correct frame positioning on the wall is extremely important as to correctly assemble the entire door; hereby a series of technical specifications
to comply with:
- Never fit the frame directly on the floor but comply with the minimum required size specified on the frame jamb.
- Never remove the frame separators before complete wall hardening.
- Check the profiles do not undergo any warping or bending effects.
Larghezza vano
luce netta nominale
luce netta nominale
luce netta nominale
60 cm
70 cm
80 cm
L 74 cm
L 84 cm
L 94 cm
Altezza vano
luce netta nominale
210 cm
H 217 cm
3
1
Posizionare il falso telaio metallico
nel vano. Fare attenzione ai lati
interno ed esterno della porta.
Position the metal door jamb inside
the unit. Pay attention to the door
internal and external sides.
2
3
4
5
Sul falso telaio una apposita
tacca indica il livello di 100 cm.
Dopo avere posizionato il falso
telaio perfettamente in bolla procedere alla muratura delle zanche.
On the door jamb the special
notch refers to 100 cm. After
perfectly positioning the door
jamb, totally levelled, fix the
joints.
Solo dopo la completa presa del
cemento rimuovere le traverse e
completare il rasamento del muro.
Once concrete setting, remove
the crossbars and completely glaze
the wall.
4
5
PLANUS quattro
Istruzioni di montaggio stipite - Door post assembly instructions
Planus quattro è stata progettata per essere inserita in un falso telaio metallico dedicato di produzione TRE-Più che va inserito e murato in sostituzione al falso telaio in legno tradizionale. Sul falso telaio metallico dedicato lo stipite è montato come segue:
Planus quattro was designed to be fitted to a dedicated unique metal door jamb by TRE-Più to be fitted to the wall replacing the traditional wood door jamb.
1
Assemblare in orizzontale montanti e traversi dello stipite utilizzando le squadrette già inserite sui montanti e le apposite viti in dotazione.
Horizontally assemble the vertical rods and crosspieces of the door post using the small squares which were already fitted to the vertical rods by means of the
special supplied screws.
2
Inserire lo stipite nel vano del
falso telaio metallico (precedentemente murato).
Fit the door post in the metal door
jamb wall unit (which was previously fitted to the wall).
3
Porre le piastrine di regolazione
tra stipite e falsotelaio.
Put the little metal plate between
frame and false frame.
2
Fissare lo stipite al falsotelaio
con le apposite viti.
Istall the main frame using the
appropriate screws.
4
4
1
5
Procedere al montaggio dell’anta
inserendo il perno della cerniera
inferiore nella apposita sede.
Fit the door fitting the lower hinge
stud in the special seat.
6
Fare corrispondere gli interassi
della cerniera superiore e avvitare
il perno senza bloccarlo.
Perfectly fit the upper hinge distance between centres and
screw the stud without clamping.
7
Regolare l’altezza da terra agendo
sul perno della cerniera inferiore.
Bilanciare lo spostamento verticale agendo anche sul perno
della cerniera superiore.
Adjust the door height by means
of the lower hinge stud. Balance
the vertical opening through the
upper hinge stud.
8
Inserire i controdadi di bloccaggio
e serrarli a fondo.
Fit the clamping counter nuts and
perfectly clamp.
9
5
6
7
8
9
10
11
12
Procedere all’eventuale regolazione della complanarità dell’anta
rispetto allo stipite agendo sulle
viti laterali della cerniera. Dopo la
regolazione bloccare a fondo.
Possibly adjust the door co-planarity with reference to the door
post by means of the hinge side
screws. After adjusting, strongly
clamp.
10 Come al punto precedente per la
cerniera inferiore.
Follow the above mentioned
instructions at the lower hinge level.
IMPORTANTE - IMPORTANT
11 Avvitare la vite di sicurezza sopra
la cerniera superiore.
Perfectly screw the safety screw
on the upper hinge level.
12 Si consiglia di bloccare a terra la
cerniera inferiore con una vite da
inserire nella apposita sede.
Perfectly ground block the lower
hinge by means of a screw to be
fix to the special seat.
Scaricare